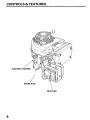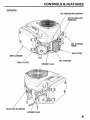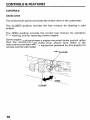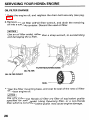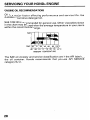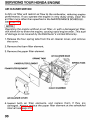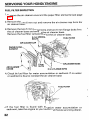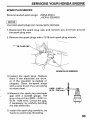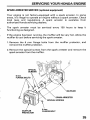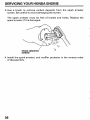
1
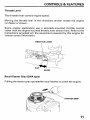
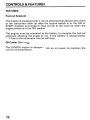
Click SAVE to save this manual to your computer. Thank you for choosing Honda.
ENGINES
Owner’s Manual
GXV610 GXV620 GXV67O
The engine exhaust from this product
contains chemicalsknown tothe State
of California to cause cancer, birth
defects or other reproductive harm.
Keep this owner's manual handy, so you can refer to it at any time.
This owner's manual is considered
a permanent part of the engine and
should remain with the engine if resold.
The information and specifications included in this publication were in
effect at the time of approval for printing. Illustrations
are based on the
GXV61O-OAF type. Honda Motor Co., Ltd. reserves the right, however,
to discontinue or change specifications or design a t any time without
notice and without incurring any obligation whatever. No part of this
publication may be reproduced without written permission.
Congratulations on your selection of a Honda engine. We are certain
you will be pleasedwith your purchase of one of the finest engines on
the market.
We want to help you get the best results from new
your engine and to
operate it safely. This manual contains the information on how to do
that; please readit carefully.
As ou read this manual, you will find information preceded by a
symbol.Thatinformationisintended
to helpyouavoid
damage to yourengine, other property, or the environment.
Wesuggest you read thewarrantypolicy
tofullyunderstandits
coverage and your responsibilities of ownership. The warranty policy
is a separate document that should have been given to you by your
dealer.
When your engine needs scheduled maintenance, keep in mind that
your Honda servicing dealer is specially trained in servicing Honda
engines. Your Honda servicingdealer is dedicated to yoursatisfaction
and will be pleasedto answer your questionsand concerns.
Best Wishes,
Honda Motor Co., Ltd.
1
INTRODUCTION
A FEW WORDS ABOUTSAFETY
Your safety and the safety of others
are very important. And using this
engine safely is an important responsibility.
To help you make informed decisions aboutsafety, we have provided
operatingproceduresandotherinformationonlabelsandinthis
manual. This information alerts you to potential
hazards that could
hurt you or others.
Of course, it is not practical or possible to warn you about
all the
hazards associated with operating or maintaining
an engine. You must
use your own good judgment.
You willfindimportant
including:
safetyinformationin
a varietyofforms,
A and one
Safety Messages - preceded by a safety alert symbol
of three signal words,
DANGER, WARNING, or CAUTION.
These signal words mean:
You WILL be KILLED or SERIOUSLYHURT if
you don’t follow instructions.
You CANbeKILLED
or SERIOUSLYHURT
you don‘t follow instructions.
if
You CAN be HURT if
you
don’t
follow
instructions.
Safety Headings - such as IMPORTANTSAFEWINFORMATION.
Safety Section - such as ENGINE SAFETY.
Instructions - how touse this engine correctly and safely.
This entire book is filled with important safety information - please
read it carefully.
2
ENGINE SAFETY ........................................................................................
IMPORTANT SAFETY INFORMATION .................................................
5
5
CONTROLS & FEATURES .........................................................................
COMPONENT & CONTROL LOCATIONS .............................................
CONTROLS ...........................................................................................
Choke Lever ......................................................................................
Throttle Lever ...................................................................................
Recoil Starter Grip............................................................................
FEATURES ............................................................................................
Fuel-cut Solenoid .............................................................................
Oil Cooler (GXV670).........................................................................
7
7
10
10
11
11
12
12
12
BEFORE OPERATION ..............................................................................
IS YOUR ENGINE READY TOGO? ......................................................
Check the General Condition of the Engine ...................................
Check the Engine ..............................................................................
Check the Equipment Poweredby This Engine .............................
13
13
13
14
14
OPERATION .............................................................................................
SAFE OPERATING PRECAUTIONS ....................................................
STARTING THE ENGINE .....................................................................
STOPPING THE ENGINE .....................................................................
SETTING ENGINE SPEED ....................................................................
15
15
15
18
19
SERVICING YOUR HONDA ENGINE ......................................................
20
THE IMPORTANCE OF MAINTENANCE .............................................
20
MAINTENANCE SAFETY .....................................................................
21
MAINTENANCE SCHEDULE ...............................................................
22
FUEL RECOMMENDATIONS ..............................................................
23
ENGINE OIL LEVEL CHECK .................................................................
24
ENGINE OIL CHANGE .......................................................................... 25
OIL FILTER CHANGE ............................................................................
26
ENGINE OIL RECOMMENDATIONS ................................................... 28
AIR FILTER INSPECTION .....................................................................
29
AIR CLEANER SERVICE .......................................................................
30
FUEL FILTER INSPECTION ..................................................................
32
SPARK PLUG SERVICE ........................................................................ 33
SPARK ARRESTER MAINTENANCE (optional equipment)..............35
3
CONTENTS
HELPFUL TIPS& SUGGESTIONS ..........................................................
STORING YOUR ENGINE ....................................................................
Storage Preparation .........................................................................
Storage Precautions .........................................................................
Removal From Storage ....................................................................
TRANSPORTING ..................................................................................
37
37
37
40
41
42
TAKING CARE OF UNEXPECTED PROBLEMS ......................................
ENGINE WILL NOT START ..................................................................
ENGINE LACKS POWER ......................................................................
43
43
43
TECHNICAL & CONSUMER INFORMATION .........................................
44
TECHNICAL INFORMATION ................................................................
44
Serial Number Location ...................................................................
44
Battery Connectionsfor Electric Starter .........................................
45
46
Remote Control Linkage ..................................................................
Carburetor Modification for High Altitude Operation
...................47
48
Oxygenated Fuels ............................................................................
Emission Control System Information...........................................
49
Air Index ............................................................................................ 51
52
Specifications ...................................................................................
Wiring Diagrams ..............................................................................
54
CONSUMER INFORMATION ...............................................................
57
57
Honda Publications ..........................................................................
Warranty Service Information ......................................................... 58
QUICK REFERENCE INFORMATION .............................
4
Inside back cover
IMPORTANT SAFETY INFORMATION
Most accidents with enginescanbeprevented
if youfollow
instructionsinthismanualandontheengine.Someofthemost
common hazards are discussed below, along
with the best way
protect yourself and others.
all
to
Owner Responsibilities
Honda engines are designed to give safe and dependable service if
operated according to instructions. Read and understand this
owner’s manual before operating the engine. Failureto do so could
result in personal injury or equipment damage.
Know how to stop the engine quickly, and understand the operation
of all controls. Never permit anyone to operate the engine without
proper instructions.
Do not allow children to operate the engine.
Keep children and pets
away from thearea of operation.
Refuel With Care
Gasoline is extremely flammable, and gasoline vapor can explode.
Refuel outdoors, in a well-ventilated area, with the engine stopped.
Never smoke near gasoline, and keep other flames and sparks away.
Always store gasoline in an approved container. Ifany fuel is spilled,
make sure thearea is dry before starting the engine.
Hot Exhaust
The muffler becomes very hot during operation and remains hot for
a while after stopping the engine.
Be careful not to touch the muffler
while it is hot. Let the engine cool before storing
it indoors.
Topreventfire
hazards andtoprovideadequateventilationfor
stationary equipment applications, keep the engine a t least 3 feet (1
meter)awayfrombuildingwallsandotherequipmentduring
operation. Do not place flammable objects closeto theengine.
5
ENGINE SAFETY
Carbon Monoxide Hazard
Exhaust gas contains poisonous carbon monoxide. Avoid inhalation of
exhaust gas. Never run the engine in
a closed garage or confinedarea.
Other Equipment
Review the instructions provided with the equipment powered by this
engine for any additional safety precautions that should be observed
inconjunctionwithenginestartup,shutdown,oroperation,or
protective apparel that maybe needed to operate the equipment.
COMPONENT & CONTROL LOCATIONS
( GXV61O/GXV620 )
FAN COVER
PROTECTOR TYPE
PROTECTOR TYPE
RECOIL
EQUIPPED TYPE
GRID
(STANDARD TYPE)
I
I
STARTER GRIP
(QWA type only)
OIL PRESSURE SWITCH
AIR
FILTER FUEL
SPARK PLUG
7
CONTROLS & FEATURES
ELECTRIC S
SPARK PLUG
\
MUFFLER
8
CONTROLS & FEATURES
( GXV670 )
OIL PRESSURE SWITCH
AIR
/
FUEL FILTER
I
SPARK PLUG
OIL COOLER
SPARK PLUG
9
CONTROLS & FEATURES
CONTROLS
Choke Lever
The choke lever opens and closes the choke valve
in the carburetor.
The CLOSED positionenrichesthefuelmixtureforstartingacold
engine.
The OPEN position provides the correct fuel mixture for operation
after starting, andfor restarting a warm engine.
Some engine applications use a engine-mounted choke control rather
thantheremote-mountedchokelevershown
here. Refer to the
instructions provided with the equipment powered by this engine for
remote control information.
CHOKE LEVER
CLOSED
10
-
Throttle Lever
The throttle lever controls engine
speed.
Moving the throttle lever in
run faster or slower.
the directions shown makes the engine
Someengineapplicationsusearemotely-mountedthrottlecontrol
rather than the engine-mounted throttle lever shown
here. Refer to the
instructions provided with the equipment powered by this engine for
remote control information.
THROTTLE LEVER
.
SLOW
Recoil Starter Grip (QWA type)
Pulling the starter grip operates the recoil starter
to crank the engine.
STARTER GRIP
11
CONTROLS & FEATURES
FEATURES
Fuel-cut Solenoid
The engine is equipped with
a fuel-cut solenoid that allows fuel to flow
to the carburetor main jet when the engine switch is in the
ON or
START position and stops the flow of fuel to the main jet when the
engine switch is in the
OFF position.
The engine must be connected to the battery to energize the fuel-cut
solenoid, allowing the engine to run. If the battery is disconnected,
fuel flow to the carburetor main
willjet
stop.
Oil Cooler (GXV670)
The GXV670 engine is equipped with an oil cooler to maintain the
correct oil temperature.
12
IS YOUR ENGINE READY TO GO?
For your safety, and to maximize the service life of your equipment,it
is very important to
takea fewmomentsbeforeyouoperatethe
engine to check its condition. Be sure to take care of any problem you
find, or have your servicing dealer correct it, before you operate the
engine.
Improperly maintaining thisengine,
or failingto correct a problem
before operation, could causea
malfunction in which you could be
seriously injured.
Always perform a preoperation
inspection beforeeach operation,
and correct any problem.
Before beginning your preoperationchecks, be sure the engine is level
and the engine switch in
isthe OFF position.
Check the General Conditionof the Engine
Look around and underneath the engine for signs oil
of or gasoline
leaks.
Remove any excessive dirt or debris, especially around the muffler
and recoil starter.
Look for signs of damage.
Check that all shields and covers
are in place, and allnuts, bolts, and
screws are tightened.
13
BEFORE OPERATION
Check the Engine
Check the engine oil level (see page 24). Running the engine with a
low oil level cancause engine damage.
Check the air filter(see page29). A dirty air filterwill restrict airflow
to thecarburetor, reducing engine performance.
Check the fuel level. Starting witha full tank will help to eliminate or
reduce operating interruptions for refueling.
Check the Equipment Poweredby This Engine
Review the instructions providedwith the equipment powered by this
engine for any precautions and proceddres that should be followed
before engine startup.
14
SAFE OPERATING PRECAUTIONS
Before operating the engine for the first time, please review the
IMPORTANT SAFETY INFORMATION on page 5 and the chapter titled
BEFORE OPERA TION.
Carbon monoxidegas is toxic.
Breathing it can cause
unconsciousness and even kill you.
Avoid anyareas or actions that
expose you tocarbon monoxide.
Review the instructions provided with the equipment poweredby this
engineforanysafetyprecautionsthatshouldbeobserved
in
conjunction with enginestartup, shutdown, or operation.
STARTING THE ENGINE
1. If the fuel tank is equipped with a valve, be sure the fuel valve is in
the OPEN or ON position before attempting to start the engine.
15
OPERATION
2. To start a coldengine, pull thechoke lever to theCLOSED position.
To restart awarm engine, leave the choke lever in the
OPEN position.
Someengineapplications
usean engine-mountedchokecontrol
rather than the remote-mounted choke lever shown here.
Refer to
theinstructionsprovidedwiththeequipmentpoweredbythis
engine for remote control information.
.
CHOKE LEVER
.
CLOSED
3. Move the throttle lever away from theSLOW position, about 1/3 of
the way toward the
FAST position.
Some engine applications use an engine-mounted throttle control
rather than the remote-mounted throttle lever shown here. Refer to
theinstructionsprovidedwiththeequipmentpoweredbythis
engine for remote control information.
SLOW
16
OPERATION
4. Turn the engine switch to ON
the position.
5. Operate the starter.
RECOIL STARTER(applicable enginetypes):
Pull the starter grip lightlyuntil you feel resistance, then pull briskly.
Return the starter grip gently.
STARTER GRIP
ELECTRIC STARTER (all engine types):
Turn thekey to theSTART position, and holdit there until the engine
starts.
If the engine fails to start within
5 seconds, release the key, and wait
at least 10 seconds before operating the starter again.
m
Using the electric starter for more than 5 seconds at a time will
overheat thestarter motor andcan damageit.
When the engine starts, release the key, allowing it to return to the
ON position.
6. If the choke lever has been moved to the CLOSED position to start
the engine, gradually move it to the OPEN position as the engine
warms up.
CHOKE LEVER
CLOSED
17
OPERATION
STOPPING THE ENGINE
To stop the engine in an emergency, simply turn the engine switch to
the OFF position.
Under
normal
conditions,
use the
following
procedure.
1. Move the throttle lever to the
SLOW position.
Some engine applications use an engine-mounted throttle control
rather than the remote-mounted throttle lever shown here. Refer to
theinstructionsprovidedwiththeequipmentpowered
by this
engine for remote control information.
THROTTLE LEVER
\
p - rw
SLOW
2. Turn the engine switch to the
OFF position.
3. If the fuel tank is equipped with a valve, turn the fuel valve to the
CLOSED or OFF position.
18
OPERATION
SElTlNG ENGINE SPEED
Position the throttle lever for the desired engine
speed.
Someengineapplications
use an engine-mountedthrottlecontrol
rather than the remote-mounted throttle lever shown
here.
For engine speed recommendations, referto the instructions provided
with the equipment powered by this engine.
THROlTLE LEVER
,
SLOW
Do not disconnect the battery from the engine while the engine is
running. Disconnecting the battery
causes the fuel-cut solenoidto shut
off the flow of fuel to the carburetor jet,
main
and the engine
will stop.
19
SERVICING YOUR HONDA ENGINE
THE IMPORTANCE OF MAINTENANCE
Good maintenance is essential for safe, economical, and trouble-free
operation. It will also help reduce air pollution.
Improperly maintaining :his engine,
or failure to correct
a problem
before operation,can c a x e a
malfunction in which youcan be
seriously hurt or killed.
Always follow the inspection and
maintenance recommendations and
schedules in thisowner‘s manual.
To help you properlycare for your engine, the following pages include
a maintenance schedule, routine inspection procedures, and simple
maintenance procedures using basic hand tools. Other service tasks
that are more difficult, or require special tools,
are best handled by
professionals and are normally performed by a Honda technician or
other qualified mechanic.
The maintenance schedule applies to normal operating conditions. If
you operate your engine under unusual conditions,such as sustained
high-load or high-temperature operation, or use in unusually wet or
dusty conditions, consult your servicing dealer for recommendations
applicable to your individual
needs and use.
Maintenance, replacement or repair of emission control devices and
systems maybe
done by any engine
repair
establishment
or
individual, using parts that are “certified”’t0 EPA standards.
20
SERVICING YOUR HONDA ENGINE
MAINTENANCE SAFETY
Some of the most important safety precautions follow. However, we
cannotwarnyouofeveryconceivable
hazard that canarise
in
performing maintenance. Only you can decide whether or not you
should perform a given
task.
Failure to properly follow
maintenance instructions and
precautions cancause you to be
seriously hurt orkilled.
Always follow the procedures and
precautions in the owner’s manual.
Safety Precautions
Make sure the engine is off before you begin any maintenance or
repairs. This will eliminate several potential hazards:
-Carbon monoxide poisoning from engine exhaust.
Be sure there is adequate ventilation whenever you operate the
engine.
-Burns from hot parts.
Let the engine and exhaust system cool before touching.
-Injury from moving parts.
Do not run the engine unless instructed toso.do
Read the instructions before youbegin, and make sureyou have the
tools and skills required.
To reducethepossibilityoffireorexplosion,becarefulwhen
workingaroundgasoline.
Use only a nonflammable solvent, not
gasoline, to clean parts. Keep cigarettes, sparks and flames away
from all fuel-related parts.
Remember that your servicing dealer knows your engine best and is
fully equipped to maintain and repair
it.
To ensurethebestqualityandreliability,useonly
new, genuine
Honda partsor their equivalents for repair and replacement.
21
MAINTENANCE SCHEDULE
Refer
0 1
l o !
I
33
l o
~
I
I
Fuel tank
Fuel tube
Clean
Check
I
25
After
Every year (2)
Even/ 2 years (Replace if necessary) (2)
-
1
-
Emission-related items.
* Replace the
paper air filter element only.
(1) Service more frequently when usedin dusty areas.
(2) These items should be serviced by your servicing dealer, unless
you have the proper tools and are mechanically proficient. Refer
to theHonda shop manual for service procedures.
(3) For commercial use, log hours of operation to determine proper
maintenance intervals.
22
SERVICING YOUR HONDA ENGINE
FUEL RECOMMENDATIONS
Use unleaded gasoline with a pump octane rating of 86 or higher.
These engines are certifiedt o operate on unleaded gasoline. Unleaded
gasoline produces fewer engine and spark plug deposits and extends
exhaust system life.
Never use stale or contaminated gasoline or an oil/gasoline mixture.
Avoid getting dirt or water
in the fueltank.
Occasionally youmay
hear a light "sparkknock"
or"pinging"
(metallic rapping noise) while operating under heavy loads. This n
iso
cause for concern.
Ifsparkknock
orpingingoccursat
a steadyengine
normal load, change brands of gasoline. If spark knock or
persists, see an authorized Honda servicing dealer.
speed, under
pinging
m
Running the engine with persistent spark knock or pinging can cause
engine damage.
Running the engine with persistent spark knock or pinging is misuse,
and the Distributor's Limited Warrantydoes not cover parts damaged
by misuse.
23
SERVICING YOURHONDA ENGINE
ENGINE OIL LEVEL CHECK
Check theengineoillevel
position.
with theenginestoppedandin
a level
1. Place the engine on a level
surface.
2.GXV670 ONLY: Start the engine and let it idle for 1 or 2 minutes.
Stop the engine and
wait for 2 or 3 minutes.
3. Remove the oil filler cap/dipstick and wipe
it clean.
4. Insert and remove the dipstick without screwing it into the oil filler
neck. Check the oil level shown on the dipstick.
5. If the oil level is near or below the lowerlimit mark on the dipstick,
fill with the recommended
oil to the upperlimit mark (see page 28).
6. Reinstall the oil filler cap/dipstick.
OIL FILLER CAP/ DIPSTICK
/
OIL FILLER CAP/
/
- UPPER LIMIT
-LOWER LIMIT
piZq
Running the enginewith a low oil
level can causeengine damage.
24
SERVICING YOUR HONDA ENGINE
ENGINE OIL CHANGE
Drain the used oil while the engine is warm. Warm oil drains quickly
and completely.
1. Place a suitable container below the en ine to catch the used oil,
then remove the oil filler cap/dipstickCYthe
an drain bolt.
2. Allow the used oil to drain completely, then reinstall the drain
bolt,
and tightenit securely.
Please dispose of used motor oil in a manner that is compatible
with the environment. We suggest you take used oil in a sealed
container toyourlocalrecyclingcenterorservicestationfor
reclamation. Do not throwit in the trash, pour it on the ground, or
down a drain.
3. With the engine in a level position, fill to the upper limit mark on
the dipstick with the recommended (see
oil page 28).
ENGINE OIL REFILL CAPACITIES:
Without oil filter replacement: GXV61OIGXV620
GXV670
With oilfilter replacement:
GXV61O/GXV620
GXV670
1.8 US qt (1.7 Q , 1.5 Imp qt)
2.1 US qt (2.0 Q , 1.8 Imp qt)
2.3 US qt (2.2 0, 1.9 Imp qt)
2.6 US qt (2.5 Q ,2.2 Imp qt)
p
q
i
Running the engine
with a low oillevel can causeengine damage.
4. Reinstall the oil filler cap/dipstick
securely.
UPPER
LIMIT
LOWER
LIMIT
OIL DRAIN BOLT
OIL FILLER CAPIDIPSTICK
25
SERVICING YOUR HONDA ENGINE
OIL FILTER CHANGE
1. Drain the engine oil, and retighten the drain bolt securely(see page
25).
2. Remove the oil filter with oil filter wrench, and drain the remaining
oil into a suitable container.Discard the used oil filter.
[NOTlCE]
Use an oil filter socket, rather than a strap wrench, to avoid striking
and damaging the filter.
oil
OIL FILTER
/
OIL FILTER SOCKET
SEAL
3. Clean the filter mountingbase, and coat theseal of the new oil filter
with clean engineoil.
p E i K \
Use only a genuine Honda oil filter or a filter of equivalent quality
specified for your model. Using the
wrong filter, or a non-Honda
filter whichis not ofequivalent quality, may
cause engine damage.
26
4.Screw on the new oil filter by hand until the seal contacts the filter
mounting base, then use an oil filter wrench to tighten the filter an
additional 7/8 turn.
Oil filter tightening torque: 16 Ibf-ft (22 N - m , 2.2 kgf-m).
5. Refill the crankcase with the specified amount of the recommended
oil (see page28). Reinstall the oil filler cap/dipstick.
6. Start theengine, and check for leaks.
7. Stop the engine, and check the oil level as described on page 24. If
necessary, add oil to bring the oil level to the upper limit mark on t
dipstick.
27
SERVICING YOUR HONDA ENGINE
ENGINE OIL RECOMMENDATIONS
Oil is a major factor affecting performance and service life. Use
4-stroke automotive detergent oil.
SAE IOW-30 is recommended for generaluse. Other viscosities shown
in the chart may be used whenaverage
the
temperature in your area is
within the recommended range.
SAE
TEMP -20
0
20
40
60
80 100°F
-30 -20 -10 0 10 20 30 40'C
AMBIENT TEMPERATURE
The SAE oil viscosity and service classification are in the API label on
theoilcontainer.Hondarecommendsthatyouuse
API SERVICE
category SJ oil.
28
SERVICING YOUR HONDA ENGINE
AIR FILTER INSPECTION
Remove the air cleaner cover and inspect the filter elements.
Clean or
replace dirty filter elements. Always
replace damaged filter elements.
Refer to page30for instructions that apply to the air
cleaner and filter
service.
AIR CLEANER BASE
SPRING TABS
I
I
PAPER FILTER
ELEMENT
'
SPRING TABS
FOAM FILTER
ELEMENT
CLEAN CHAMBER
AIR CLEANER
COVER
29
SERVICING YOUR HONDA ENGINE
_
_
~
AIR CLEANER SERVICE
A dirty air filterwill restrict air flow to the carburetor, reducing engine
performance. If you operate the engine in very dusty areas, clean the
air filter more often than specified inMAINTENANCE
the
SCHEDULE.
(see page22).
p E - 1
Operating the enginewithout an air filter, or with adamaged air filter,
will allow dirt
to enter the engine, causing rapid enginewear. This type
of damage is not covered by the
Distributor’s Limited Warranty.
1. Release the four spring tabs from the air cleaner
cover, and remove
the cover.
2. Remove the foam filter element.
3. Remove the paper filter element.
AIR CLEANER BASE
SPRING TABS
G TABS
PAPER FILTER ELEMENT
FOAM
CLEAN CHAMBER
/
AIR CLEANER COVER
4. InsDect bothairfilter
eleme!nts, andreplacethemifthey
are
damaged. Always replace the paper filter element at the scheduled
interval (see page 22).
30
5. Clean the air filter elements if they
are to bereused.
Paper filter element: Tap the filter element several times on a hard
surface to remove dirt, or blow compressed air [not exceeding
30 psi
(207 kPa, 2.1 kgf/cm2)] through the filter element from the
clean side
that faces the engine. Never try to brush
off dirt; brushing will force
dirt into the fibers.
Replace the paper filter element ifit is excessively
dirty.
i
Foam filter element:Clean in warmsoapy water, rinse, and allow to
drythoroughly. Orclean innonflammablesolventandallowtodry.
Do not apply oil to the foam element.
6. Wipe dirt from the inside of the air
cleaner base and cover, using a
moist rag. Be careful toprevent
dirt fromenteringthe
clean
chamber thatleads on the carburetor.
7. Place thefoamairfilterelement
in the aircleaner cover, then
and cover to the aircleaner base.
reinstall the paper air filter element
Hook four spring tabs
securely.
31
SERVICING YOURHONDA ENGINE
FUEL FILTERINSPECTION
1. Remove the air
cleaner cover and the paper filter elements
(see page
30).
2. Remove thetwo 6 mm nuts and remove the air
cleaner cap from the
air cleaner base.
3. Remove the two5 mm special bolts andtwo 6 mm flange bolts from
the aircleaner base and remove the air cleaner
base.
Remove
the
fuel
filter
clamped
behind
the
air
cleaner ba’se.
PAPER FILTER
ELEMENT
AIR CLEANER BASE
AIR CLEANER
COVER
4. Check the fuel filter for water accumulation or sediment.
If no water
or sediment is found, reinstall thecleaner
air
base.
L FILTER
5. If thefuelfilterisfoundwith
excessive wateraccumulation or
sediment, take the engine to yourauthorized Honda servicingdealer.
32
a
t
SERVICING YOUR HONDA ENGINE
SPARK PLUG SERVICE
Recommended spark plugs: ZGR5A (NGK)
J 16CR-U (DENSO)
m
Incorrect spark plugs can cause engine damage.
L
1. Disconnect the spark plug caps, and remove any dirt from around
the spark plug area.
2. Remove the spark plugs witha 13/16-inch spark plug wrench.
SPARK PLUG CAP
SPARK PLUG WRENCH
*’
3. Inspect the spark plugs. Replace
them if the electrodes are worn,
oriftheinsulator
is cracked or
chipped. Clean the spark plugs
with a wire brush if youare going
to reuse them.
4. Measure the spark plug electrode
gap with a suitablegauge. The
g a p s h o u l d b e 0.028-0.031 i n
(0.70-0.80 mm). Correct the gap,
if necessary, by carefully bending
the sideelectrode.
5. Install the spark plug carefully, by
hand, to avoid cross-threading.
33
SERVICING YOUR HONDA ENGINE
6.Afterthesparkplug
seats, tightenwitha
wrench to compress the washer.
If reinstalling the used spark
spark plug seats.
13/16-inchspark
plug
plugs, tighten 1/8-1/4 turn after the
If installing a new spark plugs, tighten 1/2 turn after the spark plug
seats.
A loose spark plug can overheat anddamage the engine.
Overtighteningthe
spark plug can damage thethreads
cylinder head.
7. Attach the spark plug
caps.
34
t
*
in the
SPARK ARRESTER SERVICE(optional equipment)
Your engine is not factory-equipped with a spark arrester. In some
areas, it is illegal to operate an engine without a spark
arrester. Check
local
laws
and
regulations.
A
spark
arrester
is
available
from
authorized Honda servicingdealers.
r'
,
The
spark
arrester
mustbeservicedevery
functioning as designed.
100 hoursto
keep it
If the engine has been running, the muffler will be very hot. Allow the
muffler to cool before servicing the spark
arrester.
1. Removethe
6 m m flange bolts from the muffler protector, and
remove the muffler protector.
2. Remove the special screws from the spark arrester and remove the
spark arresterfrom the muffler.
SPARK ARRESTER
SPECIAL SCREWS
\
MUFFLER
PROTECTOR
6 mm
FLANGE BOLT
35
SERVICING YOUR HONDA ENGINE
3. Usea brush to remove carbon deposits from the spark arrester
screen. Be careful to avoid damaging the
screen.
The spark arrester must be free of
spark arrester ifit is damaged.
breaks and holes. Replace the
.
/
SPARK ARRESTER
SCREEN
4. Install the spark arrester, and muffler protector in the reverse order
of disassembly.
36
HELPFUL TIPS & SUGGESTIONS
STORING YOUR ENGINE
Storage Preparation
Properstoragepreparationisessential
for keeping yourengine
troublefree and looking good. The following steps will help to
keep
rust
and
corrosion
from
impairing
your
engine's
function
and
appearance, and will make the engine t o start easier when you use it
again.
Cleaning
If the engine has been running, allowit to cool for atleast half an hour
before cleaning. Clean all exterior surfaces, touch up any damaged
paint, and coat other areas that may rustwith a light film of oil.
Using a garden hose or pressure washing equipment can force
water into the aircleaner or muffleropening. Water in the aircleaner
will soak the air filter, andwater that passes through the air filteror
muffler can enterthe cylinder,causing damage.
Water contacting a hot engine can cause damage. If the engine has
been running, allow it to cool for at least half an hour before
washing.
Fuel
Gasoline will oxidizeanddeteriorate
in storage.Oldgasoline
will
cause hard starting, and it leaves gum deposits that clog the fuel
system. If the gasolinein your engine deteriorates duringstorage, you
may need to have the carburetor and other fuel system components
serviced or replaced.
The length of time that gasoline can be left in your fuel tank and
carburetor without causing functional problems
will vary with such
factors as gasoline blend, your storage temperatures, and whether the
fuel tank is partially or completely filled. The airin a partially filled fuel
tankpromotesfueldeterioration.Verywarmstoragehemperatures
accelerate fuel deterioration. Fuel deterioration problems may occur
within a few months, or even less if the gasoline was not fresh when
you filled the fuel
tank.
37
HELPFUL TIPS & SUGGESTIONS
The Distributor’sLimitedWarranty
does notcoverfuelsystem
damageorengineperformanceproblemsresultingfromneglected
storage preparation.
You can extendfuelstoragelife
by adcfng a fuelstabilizerthat
formulatedforthatpurpose,oryou
can avoidfueldeterioration
problems by draining the fuel tank and carburetor.
is
e
ADDING A FUEL STABILIZERTO EXTEND FUEL STORAGE LIFE
Whenadding a fuel stabilizer, fillthefueltankwithfreshgasoline.
If
onlypartiallyfilled,airinthe
tank willpromotefueldeterioration
during storage. If you keep a container of gasoline for refueling,
be
sure that it contains only fresh gasoline.
1. Add fuel stabilizer following the manufacturer’s instructions.
2. After adding a fuel stabilizer, run the engine outdoors for
10 minutes
to be sure that treated gasoline has replaced the untreated gasoline
in the carburetor.
3.Stop the engine, and if the fuel tank is equipped with a fuel valve,
move the fuel valve to CLOSED
the
or OFF position.
38
,
DRAINING THE FUEL TANK AND CARBURETOR
1. Disconnect the fuel line
to theengine, and drain the fuel tank into
an
approved gasoline container. If the fuel tank is equipped with a valve
turn the fuel valve to the OPEN or ON position to enable draining.
After draining is completed, reconnect the fuel line.
2. Loosen the carburetor drainscrew, and drain the carburetor into an
approved gasoline container. After draining is completed, tighten
the carburetor drain screw.
Gasoline is highly flammable and
explosive.
You can be burned or seriously
injured when handling fuel.
Keep heat, sparks and flameaway.
Handle fuel only outdoors.
Wipe up spills immediately.
CARBURETOR
39
HELPFUL TIPS& SUGGESTIONS
Engine Oil
1. Change the engineoil (see page 25).
Engine Cylinder
1. Remove the spark plugs
(see page33).
,
2. Pour a tablespoon(5- 10 cc) ofclean engine oil into the cylinders.
3. Pullthestarterropeseveraltimestodistributetheoilinthe
cylinders.
4. Reinstall the spark plugs.
Storage Preparation
If yourengine will bestored with gasoline in thefueltankand
carburetor, it is important to
reducethe hazard ofgasolinevapor
ignition. Select awell-ventilated storage area away from any appliance
that operates with a flame, such as a furnace, water heater, or clothes
dryer. Also avoid any area with a spark-producing electric motor, or
where power toolsare operated.
If possible, avoidstorage areas withhighhumidity,
promotes rust and corrosion.
because that
Unless all fuel has been drained from thetank,
fuel leave the fuel valve
in the CLOSED or OFF position toreduce the possibility of fuelleakage.
40
HELPFUL TIPS& SUGGESTIONS
Position the equipmentso the engine is level. Tilting can cause fuel or
oil leakage.
With the engine and exhaust system
cool, cover the engineto keep out
ormeltsome
dust. A hotengine and exhaustsystemcanignite
materials. Do not use sheet plasticas a dust cover. A nonporous cover
will trap moisture around the
engine, promoting rust and corrosion.
X
Ifinstalled,removethebatteryandstore
it in a cool, dry place.
Recharge the battery oncea month while the engine is in storage. This
will help to extend the service life of the battery.
Removal From Storage
Check your engine as described in theBEFORE OPERATlONchapter of
this manual.
If the fuel was drained during storage preparation, fill the tank with
fresh gasoline. If you keep a container of gasoline for refueling, be
surethat
it containsonlyfreshgasoline.Gasolineoxidizesand
deteriorates over time, causing hard starting.
If the cylinders were coated with oil during storage preparation, the
engine may smoke brieflyat startup. This is normal.
41
HELPFUL TIPS& SUGGESTIONS
TRANSPORTING
If the engine has been running, allow it to cool for at least 15 minutes
beforeloadingtheengine-poweredequipmentonthetransport
vehicle. A hot engine and exhaust system can burn you and can ignite
some materials.
Keep the engine level when transporting to reduce the possibility of
fuel leakage. If the fuel tank is equipped with a fuel valve, move the
fuel valve leverto OFF.
42
ENGINE WILL NOT
START
1. Check battery and
fuse.
2. Check control
positions.
3. Check fuel.
4. Remove and inspect
spark plug.
5. Take engine to an
authorized Honda
servicing dealer, or
refer to shop manual.
ENGINE LACKS
POWER
1. Check air filter.
2. Check fuel.
3. Take engine to an
authorized Honda
servicing dealer, or
refer to shop manual.
Possible Cause
Correction
Battery discharged.
Fuse burnt out.
(if equipped)
Fuel valve OFF.
(if equipped)
Choke OPEN.
Recharge battery.
Replace fuse.
Engine switchOFF.
(if equipped)
Out offuel.
Bad fuel; engine stored
without treating or
draining gasoline, or
refueled with bad
gasoline.
Spark plugs faulty,
fouled, or improperly
gapped.
Spark plugs wet with
fuel (flooded engine).
Fuel filter clogged,
carburetor malfunction,
ignition malfunction,
valves stuck, etc.
ON.
Move lever to
Move lever to
CLOSED
unless engine is warm.
Turn engine switch to
ON.
Refuel.
Drain fuel tank and
carburetor (p. 39).
Refuel with fresh
gasoline.
Clean, gap, or replace
spark plugs (p. 33).
Dry and reinstallspark
plugs. Start engine
with throttle lever in
FAST position.
Replace or repair faulty
components as
necessary.
Possible Cause
Correction
Filter element(s)
clogged.
Bad
fuel;
engine
stored
without treating or
draining gasoline, or
refueled with bad gasoline.
Fuel filter clogged,
carburetor malfunction,
ignition malfunction,
valves stuck, etc.
Clean or replace filter
element(s) (p. 30).
Drain fuel tank and
carburetor (p. 39).
Refuel with fresh
gasoline.
Replace or repair faulty
components as
necessary.
43
TECHNICAL & CONSUMER INFORMATION
TECHNICAL INFORMATION
Serial Number Location
ENGINE SERIAL NUMBER
\
ELECTRIC STARTER
(QAF type)
Record the engine serial number in the
space below. You will need this
serial number when ordering
parts, and when making technical or
warranty inquires(see page57 1.
Engine serial number:
44
TECHNICAL & CONSUMER INFORMATION
Battery Connections for Electric Starter
Use a 12-volt batterywith an ampere-hour rating at
of least 45 Ah.
Be careful not to connect the battery in reverse polarity, as this will
short circuit the battery chargingsystem. Always connect the positive
(+) battery cable tothebatteryterminalbeforeconnectingthe
negative ( - ) battery cable, so your tools cannotcause ashort circuit if
they touch a grounded part while tightening the positive ( + ) battery
cable end.
A battery can explode if you do
not
follow thecorrect procedure,
seriously injuring anyone nearby.
Keep all sparks, open flames, and
smoking materials away from the
battery.
1.Connect thebatterypositive
terminal as shown.
(+)
cable tothe
startersolenoid
2.Connect the battery negative (--) cable to an engine mounting bolt,
frame bolt, or other good engine ground connection.
3.Connect the battery positive
terminal as shown.
( + ) cable to the battery positive (+)
4.Connect the battery negative ( - ) cable to the battery negative (-1
terminal as shown.
5.Coat the terminals and cable
ends with dielectric grease.
POSITIVE (+)
BAlTERY CABLE
STARTER SOLENOID
45
TECHNICAL & CONSUMER INFORMATION
Remote Control Linkage
are provided with holesfor
Thethrottleandchokecontrollevers
optional cable attachment.
The following illustrations show installation examples for a solid wire
cable. Do not usea braided wirecable.
REMOTE THROlTLE AND REMOTE CHOKE
x l6mm (2) CABLEHOLDER (2)
CHOKE
CABLE
5 X 16 mm (2)
CABLE HOLDER(2)
CHOKE CABLE
NTROL LEVER
OL
THR
CABLE
LEFT SIDE CONTROL
SIDE
RIGHT
CONTROL
CHOKE LEVER
CHOKE CABLE
\
LEVER
y
\
CABLE
HOLDER
5 mm SCREWS
THROlTLE CABLE
46
TECHNICAL & CONSUMER INFORMATION
Carburetor Modification for High Altitude Operation
At high altitude, the standard carburetor air-fuel mixture will be too
rich. Performance will decrease, and fuel consumptionwill increase. A
very rich mixturewill also foul thespark plugs andcause hard starting.
High altitude performance can be improved by specific modifications
to thecarburetor. If you always operate your engineat altitudes above
5,000 feet (1,500 meters),have yourservicingdealerperformthis
carburetor modification.
Even with carburetor modification, engine horsepower will decrease
about 3.5% for each1,000-foot (300-meter) increase in altitude. The
effectofaltitudeonhorsepower
will begreaterthanthisifno
carburetor modification is made.
1When the carburetor has been modified for high altitude operation,
the air-fuel mixture will be too lean for low altitude use. Operation at
altitudes below 5,000 feet (1,500 meters) with a modified carburetor
may cause the engineto overheat and result in serious engine damage.
Foruse
at low altitudes, haveyour
servicing dealer returnthe
carburetor to originalfactory specifications.
47
TECHNICAL & CONSUMER INFORMATION
Oxygenated Fuels
Some conventional gasolines are being Slended with alcohol or an
ethercompound.
These gasolines are collectivelyreferredto
as
oxygenated fuels.
To meet clean air standards, some
areas of the United Statesand
Canada use oxygenated fuels to help reduce emissions.
If you use an oxygenated fuel, be sure it is unleaded and meets the
minimum octane rating requirement.
Before using an oxygenated fuel, try to confirm the fuel's contents,
Some states/provinces require this information to
be posted on the
pump.
The following are the EPA approved percentages of oxygenates:
ETHANOL
(ethyl
or
grain
alcohol)
10% by
volume
Youmay
use gasolinecontainingupto
10%
ethanolbyvolume.Gasolinecontainingethanol
may be marketed under the name "Gasohol".
MTBE
(methyl
tertiary
butyl
ether)
15% volume
by
You may use gasoline containing up to 15% MTBE
by volume.
METHANOL (methyl or wood alcohol)
5% by volume
You
may
use gasoline
containing
up
to
5%
methanol by volume, as long as it also contains
cosolvents and corrosjon inhibitors to protect the
fuelsystem.Gasolinecontainingmorethan
5%
methanolbyvolumemay
cause startingand/or
performanceproblems.Itmayalsodamagemetal,
rubber, and plastic parts of your fuel system.
If you notice any undesirable operating symptoms, try another service
station, or switch to another brand of gasoline.
Fuel system damage or performance problems resulting from the use
of an oxygenatedfuelcontainingmorethanthepercentagesof
oxygenates mentioned aboveare not covered under warranty.
48
L
Emission Control System Information
Source of Emissions
The
combustion
process
produces
carbon
monoxide,
oxides
of
nitrogen, and hydrocarbons. Control of hydrocarbons and oxides of
nitrogenisveryimportant
because, undercertainconditions,they
react to form photochemical smog when subjected to sunlight. Carbon
monoxide does notreact in thesame way, but it is toxic.
Honda utilizes lean carburetor settings and other systems
the
emissions
of
carbon
monoxide,
oxides
of
nitrogen
and
hydrocarbons.
to reduce
The U.S. and California Clean Air Acts
EPA andCaliforniaregulationsrequire
all manufacturers to furnish
writteninstructionsdescribingtheoperationandmaintenanceof
emission control systems.
The following instructions and procedures must be followed in order
to keep the emissions from your Honda engine within the emission
standards.
Tampering and Altering
Tampering with or altering the emission control system mayincrease
emissions beyond the legal
limit. Among those acts that constitute
tampering are:
Removal or alteration of any part of the
systems.
intake, fuel or exhaust
Alteringordefeatingthegovernorlinkageorspeed-adjusting
mechanism to cause theenginetooperateoutsideitsdesign
parameters.
49
Problems That Maybl
ffect Emissions
If you are aware of any of the following symptoms, have your engine
inspected and repairedby your servicing dealer.
Hard starting or stalling after starting.
Rough idle.
Misfiring or backfiring under load.
Afterburning (backfiring).
Black exhaust smoke or high fuel consumption.
Replacement Parts
The emission control systems on your Honda engine were designed,
built,andcertifiedtoconformwith
EPA andCaliforniaemission
regulations. We recommend
the
use of
genuine
Honda
parts
whenever
you
have
maintenance
done.
These
original-design
replacement parts are manufactured to the same standards
as the
original parts, so you can be confident of their performance. The use
of replacement parts that are not of the original design and quality
may impair the effectiveness of your emission control system.
A manufacturer of an aftermarket part assumes the responsibility that
the
part
will
not
adversely
affect
emission
performance.
The
manufacturer or rebuilder of the part must certify that use of the part
will not result in
a failureoftheenginetocomplywithemission
regulations.
Maintenance
Follow the maintenance schedule on
page 22. Remember that this
schedule is based on the assumption that your machine will be used
foritsdesignedpurpose.Sustainedhigh-loadorhigh-temperature
operation, or use in unusually wet or dusty conditions, will require
more frequent service.
50
AIR INDEX
An Air Index Information hang tag/label was applied to this engine in
accordance withtherequirements
of theCaliforniaAir
Resources
Board.
The bar graph is intendedto provide you, our customer, the ability to
compare the emissions performance of available engines. The lower
the Air Index, the less pollution.
The durability description is intendedto provide you with information
relating to the engine'semissiondurabilityperiod.Thedescriptive
term indicates the useful-life period for the engine's emission control
Control
Warranty
foradditional
system. See your Emission
information.
Descriptive Term
Applicable to Emissions Durability Period
Moderate
50 hours (0-65 cc)
125 hours (greater than65 cc)
Intermediate
125 hours (0-65 cc)
250 hours (greater than65 cc)
Extended
300 hours (0-65 cc)
500 hours (greater than65 cc)
The Air Index Information hang tag must remain on the engine untilit
is sold. Remove the hang tag before operating the engine.
51
TECHNICAL & CONSUMER INFORMATION
Specifications
GXV610-QAF Type
Length X Width X Height
Dry weight
Engine type
Displacement
[Bore X Stroke]
Max. output
Max. torque
Fuel consumption
Cooling system
Ignition system
PTO shaft rotation
18.1 X 18.0 X 17.0 in (459 X 457 X 431 mm)
95 Ibs (43 kg)
4-stroke, overhead valve, 2 cylinders (90' V-Twin)
37.5 cu-in (614 cm3)
[3.03 X 2.60 in (77 X 66 m m ) ]
18 bhp(13.4 kW, 18.3 PS) at 3,600 rpm
31.8 Ibf.ft (43.05 N.m, 4.39 kgf.m) at2,500 rpm
0.51 Ib/hph (313 g/kWh, 230 g/PSh)
Forced air
Transistorized magneto
Counterclockwise
GXV620-QAF Type
Length X Width X Height
Dry weight
Engine type
Displacement
[Bore X Stroke]
Max. output
Max. torque
Fuel consumption
Cooling system
Ignition system
PTO shaft rotation
18.1 X 18.0 X 17.0 in (459 X 457 X 431 m m )
95 Ibs (43 kg)
4-stroke, overhead valve, 2 cylinders (90'V-Twin)
37.5 cu-in (614 cm3)
[3.03 X 2.60 in (77 X 66 m m ) ]
20 bhp (14.9 kW, 20.3 PS) at 3,600 rpm
32.5 Ibf.ft (44.13 N.m, 4.50 kgf.m) at2,500 rpm
0.51 Ib/hph (313 g/kWh, 230 g/PSh)
Forced air
Transistorized magneto
Counterclockwise
GXV61O/GXV620 Tuneup
ITEM
MAINTENANCE SPECIFICATION
0.028-0.031 in
Refer to page 33
(0.70-0.80 mm)
IN: 0.15+0.02 m m
Valve clearance (cold)
See your authorized
EX: 0.20k0.02 m m
Honda dealer
No other adjustments needed.
Other specifications
Spark plug gap
52
TECHNICAL & CONSUMER INFORMATION
Specifications
GXV670-TAF Type
Length X Width X Height
Dry weight
Engine type
Displacement
[Bore X Stroke]
Max. output
Max. torque
Fuel consumption
Cooling system
Ignition system
PTO shaft rotation
18.3 X 18.6 X 17.7 in (464 X 473 X 449 m m )
99 Ibs (45 kg)
4-stroke, overhead valve, 2 cylinders (90' V-Twin)
40.9 cu-in (670 cm3)
[3.03 X 2.83 in (77 X 72 m m ) ]
24 bhp (15.6 kW, 21.2 PS) at 3,600 rpm
37 Ibf.ft (50.8 N.m, 5.18 kgf.m) at 2,500 rpm
0.59 Ib/hph (360 g/kWh, 265 g/PSh)
Forced air
Transistorized magneto
Counterclockwise
GXV670 Tuneup
ITEM
Spark plug gap
Valve clearance (cold)
Other specifications
MAINTENANCE
SPECIFICATION
0.028-0.031 in (0.70-0.80 m m )
Refer to page33
IN: 0.15k0.02 m m
See your authorized
EX: 0.20k0.02
mm
Honda
dealer
No other adjustments needed.
I
53
UI
b
P
b
i
RECTIFIER
I
-
RIGHT
SPARKPLUG
RIGHT
IGNITION COIL
i
I
&
I
&
ENGINE
SWITCH
3ACHARGE
COIL
LEFT
LEFT
SPARK
PLUG
IGNITION COIL
ENGINE SWITCH
BATTERY
STARTER
MOTOR
FUEL CUT
SOLENOID
VALVE
ENGINE GROUND
TECHNICAL & CONSUMER INFORMATION
55
TECHNICAL & CONSUMER INFORMATION
CONSUMER INFORMATION
Honda Publications
These
publications
will
give
you
additional
information
for
maintainingandrepairingyourengine.
You may order them from
your Honda engine dealer.
Shop Manual
This manual covers complete maintenance and overhaul procedures.
It is intended tobe used bya skilled technician.
Parts Catalog
This manual provides complete, illustrated parts
lists.
56
TECHNICAL & CONSUMER INFORMATION
Warranty Service Information
Servicing dealership personnel are trained professionals. They should
be able to answer any question you may
have. If you encounter a
problem that your dealer does not solve to your satisfaction, please
discuss it with the dealership’s management. The Service Manageror
General Manager can help. Almost all problems
are solved in this way.
If you aredissatisfied with thedecisionmadebythe
management,
contact
the
Honda
Power
Equipment
Customer
Relations Office. You can write to:
dealership’s
American Honda MotorCo., Inc.
Power Equipment Division
Customer Relations Office
4900 Marconi Drive
Alpharetta, Georgia 30005-8847
Or telephone: (770)497-6400
When you write or
call, please give us this information:
Model and serial number(see page 44)
Name of dealer who sold the engine to you
Name and address of dealer who services your engine
Date of purchase
Your name, address and telephone number
A detailed description of the problem
57
MEMO
58
MEMO
59
MEMO
60
QUICK REFERENCE INFORMATION
Fuel
TY Pe
Engine Oil
TY Pe
Capacity
t
Spark Plug
T ,.
we
Gap
Carburetor
Maintenance
Idle speed
each use
First 20
hours
Subsequent
Unleaded gasoline witha pump
octane rating of86 or higher
(page 23)
SAE IOW-30, API SJ, for general
use (page 28)
Without oil filter replacement:
GXV61O/GXV620
1.8 US qt (1.7 €4 , 1.5 Imp qt)
GXV670
2.1 US qt (2.0 €41.8
, Imp qt)
With oil filter replacement:
GXV61O/GXV620
, Imp qt)
2.3 US qt (2.2 €41.9
GXV670
I 2.6 US qt (2.5 €4,2.2 imp qt)
I ZGR5A
NGK:
DENSO: J 16CR-U
0.028-0.031 in (0.70-0.80 mm)
(page 33)
1,400 f 150 rpm
Check engine oillevel. Before
Check air filter.
Change engine oil.
Refer to themaintenance
schedule on page 22.