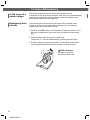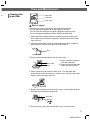
1
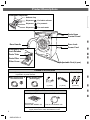
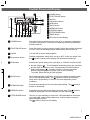
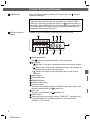
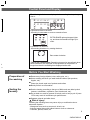
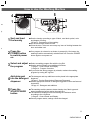
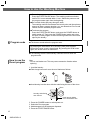
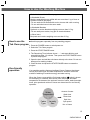
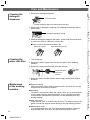
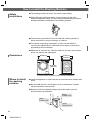
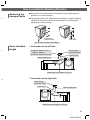
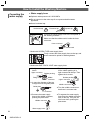
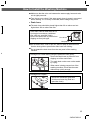
EN Operating & Installation Instructions Front Loading Washing Machine Model BD-W80PAE Contents Environmentally Friendly Waste Disposal 3 Hints and Tips for Eco-Friendly Washing 3 Safety Instructions 4 Product Descriptions 6 Control Panel and Display 7 Before You Start Washing 9 How to Use the Washing Machine 11 Program Overview 14 In Case of Emergency 16 Care and Maintenance 17 Troubleshooting 19 Error Codes 21 How to Install the Washing Machine 22 Customer Service 28 Consumption Values 29 Specifications 29 Thank you for purchasing a Hitachi front loading washing machine. ■ Please read these operating & installation instructions carefully for proper operation of the machine. ■ Please keep these operating & installation instructions for future reference. 3WPL079591-2 Memo 2 3WPL079591-2 Environmentally Friendly Waste Disposal Disposing of the packaging The shipping package has protected your new washing machine on its way to your home. All materials are ecologically harmless and recyclable. Please contribute to a better environment by disposing of packaging materials in an environmentally conscious manner. Please ask your dealer or inquire at your local authorities about current means of disposal. Risk of choking! Do not let children play with packaging and associated parts. Risk of choking on plastic film and collapsible boxes. Disposing of your old appliance Old appliances are not worthless rubbish. Environment-conscious recycling can reclaim valuable new materials. Danger of death! Unplug mains plug on redundant appliances. Cut off mains cable and discard with mains plug. Destroy the lock on the door. To prevent playing children from becoming trapped and endangered, ensure that the door locking mechanism is disabled. If you wish to discard this product, please contact your local authorities or dealer and ask for the correct method of disposal. Hints and Tips for Eco-Friendly Washing ■ Keep to the load limit of each program. ■ Your washing machine automatically adjusts the operating time and amount of water of each program depending on the load. ■ You only need to use the PREWASH or INTENSIVE options if your laundry is heavily soiled. ■ Add detergent according to the degree of soiling, laundry size and water hardness, and follow the detergent manufacturer’s instructions. ■ Using the Cotton program with water temperature at 60ºC setting instead of the Cotton program with water temperature at 90ºC will save energy, and will remove ordinary stains. Better still, in areas where the temperature is high, you can remove ordinary stains without using hot water by setting ‘Cold’ programs for more ecologically friendly operation. 3 3WPL079591-2 Safety Instructions Before operating the washing machine, please read these safety instructions carefully. Warning Issues which could cause death or serious injury General safety ■ Do not dismantle, repair or modify the appliance. Installation ■ The installation of the appliance should be done by the manufacturer’s Power source and cable ■ Do not insert the plug with a wet hand. 4 3WPL079591-2 This could cause malfunction, fire, electric shock or injury. For repair, please contact your local service center. ■ Do not put fire sources or anything inflammable in or near the washing machine (gas, diesel, petrol, thinner, alcohol or clothes stained with these substances). This could cause an explosion or fire. ■ Do not pour water on the machine when it is running. This could cause an electric shock. ■ Do not climb on the washing machine. This may cause injury. ■ Do not put heavy objects on the washing machine. This may damage the surface of the worktop. ■ It is a malfunction if the drum is still rotating when the door is open. In this case never touch the drum nor laundry inside and stop using the washing machine immediately, and contact your local service center for repair. ■ This appliance is not intended for use by persons (including children) with reduced physical, sensory or mental capabilities, or lack of experience and knowledge, unless they have been given supervision or instruction on how to use the appliance safely. dealer or service agent. If the installation, test run and inspection of the appliance are not carried out following the installation method outlined in these instructions, the manufacturer is not liable for any accident or damage caused. ■ Do not install in a damp place such as a bathroom or a place exposed to rain. Risk of fire, electric shock, current leakage or product damage. ■ Do not install on a board with castors or an unstable surface. This may cause injury or malfunction due to abnormal vibration. ■ Do not use a plug adapter to convert 3 pins to 2 pins. (The washing machine must be grounded) This could cause an electric shock. ■ The opening must not be obstructed by carpeting when the washing machine is installed on a carpet floor. ■ If the washing machine is to be connected to the water mains, please use new water supply hose. This could cause an electric shock. ■ Use the rated mains voltage and do not connect another plug at the same socket. Using the washing machine plug together with other electrical systems may cause overheating in the plug and result in fire. ■ When removing the worktop to install the washing machine under a counter, use a separately sold upper plate. (Part No. BD-W80MV 150) ■ Clean off all the dust on the plug. A dirty or dusty plug may cause a fire. ■ Do not use an electric socket or connection which is damaged or loose. This could cause an electric shock or a short circuit which may start fire. ■ Do not mark, cut, modify, bend or fold the power cable. A damaged power cable could cause fire or an electric shock. ■ Do not use a mains plug adaptor or an extension cable. This could cause overheating which may cause a fire. ■ If the power supply plug is damaged, it must only be replaced by the authorized service agent or repairing shops appointed by the manufacturer in order to avoid a hazard. Safety Instructions Child safety ■ Keep packaging out of reach of children and babies. Danger of suffocation. ■ Do not let children climb onto the washing machine or open the drum lid, and do not leave a box or chair near the washing machine which could enable children to climb onto it. This may cause injury. ■ Children should be supervised to ensure that they do not play with the appliance. Caution General safety Issues which could cause injury or damage your belongings ■ If there is a water outage or you remove the water supply hose and reattach it, turn off the tap and press the START/PAUSE button, then turn on the tap slowly after 40 seconds. Air pressure could damage the washing machine if there is a lot of air in the water pipe. ■ Regularly check to confirm that the union nut of the water supply hose is tightened. A loose nut may cause a water leak. ■ Remove the plug from the socket and turn off the water tap if you don’t use the machine for a long time. Use ■ All transport bolts must be removed before using the washing machine. They may cause abnormal vibration or failure. ■ Check inside the drum before washing. Make sure that small pets do not climb into the drum. n. ■ Do not wash waterproof items such as raincoats, wet suits, ski suits, sleeping bags, cushions, pillows, shoes, etc. The washing machine may not work properly, or the items may cause injury or damage the machine. ■ Do not operate without the detergent dispenser. ■ Do not use tap water hotter than 50ºC. ■ Do not wash items together with coins, pins or stones. This may damage clothes and the washing machine, and cause a water leak. Check inside pockets before washing. ■ Do not press the buttons with sharp or pointed objects. ■ Be careful when draining hot water. ■ Do not lean on or put weight on the opened door of the washing machine. This may cause damage to the washing machine. ■ Do not attempt to open the door while it is operating. ■ Do not put heavy objects, liquid-filled containers or equipment which produces heat (e.g. oven, rice cooker, etc.) on the washing machine. This may damage the washing machine or the surface of the worktop. er, Care and maintenance ■ If detergent, fabric softener or bleach spills on the surface of the machine, clean it up with a damp cloth immediately. The plastic or steel parts of the washing machine may get damaged. ■ Do not place heat sources near the washing machine This may cause deformation of the machine. r 5 3WPL079591-2 Product Descriptions Detergent Dispenser Softener Cap Dispenser : For fabric softener Dispenser : For prewash Dispenser : For main wash Drain Hose Control Panel Door Handle Door Lock Power Cord Emergency Door Lock Release Drain Tube Drain Filter Filter Cover Adjustable Feet (4 pcs.) Packed-In Accessories Either type of water supply hose is packed in by area demand. Water Supply Hose & One-touch Joint Hose Guide Spanner Cover Caps (1 piece) (1 piece) (4 pieces) Water Supply Hose (Screw Type) Optional Accessories Upper Plate See page 27 Part No. BD-W80MV 150 Water Leak Detection Hose Part No. BD-W80MV 162 Please contact your local dealer when installing the upper plate and the water leak detection hose. 6 3WPL079591-2 Control Panel and Display POWER button START/PAUSE button Jog Dial Temperature button SPIN button QUICK button INTENSIVE button PREWASH button EXTRA RINSE button TIMER button LED multi function display ) POWER button Press this button to switch power on and off. If no program is selected or no button is pressed for 10 minutes, the washing machine automatically switches itself off. START/PAUSE button Press this button to start or pause a program. When the machine is paused for over 1 hour, the washing machine automatically switches itself off. Jog Dial Turn this dial to select wash programs. Temperature button Enables temperature setting from cold up to 90ºC. When you select cold, the symbol is shown on the display and the heater switches off. SPIN button Enables spin speed setting from 0 (No Spin) to 1200r/min and Rinse Hold. ● No Spin (display ) – The intermediate and final spinning are cancelled, and the water is drained out only. Recommended for delicate fabrics. ● Rinse Hold (display ) – Laundry remains in the last rinse water without progressing to the final spin cycle to avoid creasing. To unload, select the Spin or Drain program. QUICK button When washing lightly soiled items, this lets you slightly shorten the wash time of the selected program. The symbol is shown on the display. Wash time is shortened by 5-10 mins, but varies depending on the conditions. INTENSIVE button Extends the washing time for more thorough washing. The shown on the display. PREWASH button Prewashes heavily soiled items before the main wash. The symbol is shown on the display. Pour the detergent into the dispenser . EXTRA RINSE button This lets you give washing an extra rinse. Recommended for areas with very hard water, when washing baby linen, and for people concerned about detergent residue. symbol is shown on the display. The symbol is 7 3WPL079591-2 Control Panel and Display TIMER button Lets you program a wash to finish up to 24 hours later. The shown on the display. symbol is Child lock: To prevent accidental operation by children, this disables the operation buttons and dial, and also locks the door. Press the TIMER button for 3 seconds to activate this option. The symbol is shown on the display. Press TIMER button for 3 seconds again to cancel the child lock. (Remaining time of timer operation is shown instantaneously but disappears after the child lock is set.) LED multi function display Displays all cycle information, remaining time and error codes. Water temperature The symbol is on when the heater is off (Cold setting). Spin speed ● (No Spin) : Final spin is cancelled and last rinse water is drained only. ● (Rinse Hold) : Final spin is cancelled and water is not drained, so the laundry remains in the last rinse water. ● Symbol is on when the spin speed from 400 to 1200 r/min is selected. QUICK option INTENSIVE option PREWASH option EXTRA RINSE option Child lock option All buttons are disabled except the POWER button and Jog Dial, and the door is locked when the symbol is on. Door lock The door is locked when the symbol is on. TIMER option Remaining time of the program (shows ‘TIME LEFT’), remaining time until timer operation is completed (shows ‘h’), and error codes. Page 21 : Error Codes 8 3WPL079591-2 Control Panel and Display The following indications are displayed when washing time is prolonged due to : ● Excessive foam in the drum. Pouring in extra water to remove excessive foam. EXTRA RINSE option pictogram lights up, and three horizontal bars light up in order. ● Imbalance in the drum. Correcting imbalance by rotating the drum. Bars rotate clockwise. *This is not a malfunction. Remaining time may be turned back when these indications are displayed so that operation is completed in a longer time than the remaining time displayed at the start. d o Before You Start Washing Preparation of the washing ■ Remove any foreign objects (coins, safety pins, etc.). ■ Use a washing net when you wash delicate clothes (knit products, lingerie, etc.). ■ Close zips, brush sand out of pockets and collars. ■ Brush pet hair out of laundries. Sorting the laundry ■ Sort the laundry according to the type of fabric and care label symbol (cottons, mixed fibers, synthetics, wool, hand wash, etc.). ■ Do not wash too small an amount of laundry such as only a pair of jeans. This may result in insufficient spin performance. ■ Separate colored and white items. Risk of injury! Washing the following items may cause injury or malfunction due to abnormal vibration : - Waterproof items such as a wet suit, ski suit, etc. - Anti-slip treated items with rubber bottoms such as a doormat. - Cushions, pillows, shoes, etc. 9 3WPL079591-2 Before You Start Washing Detergent and additives Washing with different degrees of soiling ■ Use the amount of detergent recommended on the detergent package. The type and amount of detergent depends on the type of fabric, load size, degree of soiling and hardness of the water used. Use less detergent if : - you wash a small load. - the laundry is slightly soiled. ■ Too much detergent can result in excess foam formation which reduces rinse efficiency or may cause a water leak. ■ Depending on the detergent brand, detergent may remain undissolved when the water pressure is low, or when the water temperature is low. Page 18 : Care and Maintenance (Cleaning the detergent dispenser). ■ Do not use liquid detergent when using the PREWASH option. ■ The detergent and any additives must be poured into the appropriate dispenser. Page 6 : Product Descriptions (Detergent Dispenser). ■ Pour in the detergent before you press the START/PAUSE button. If you add the PREWASH option, pour detergent into both dispensers ( ) before starting. ■ For dyeing and bleaching, use dyes and bleaches that are suitable for washing machines. ■ For water softener and limescale removal agents, follow the instructions on the package. ■ Lightly to normally : No washing options (PREWASH / INTENSIVE) are necessary for more eco-friendly operation. ■ Normally to heavily : Select INTENSIVE as an option for better washing results. ■ Heavily soiled : Select PREWASH as an option for better washing results. soiled soiled 1 2 3 4 5 10 3WPL079591-2 How to Use the Washing Machine . 4 5 2 3 1 es r). Sort and load 1 the laundry s 2 Press the POWER button to switch power on Select and adjust 3 the program Add detergent ■ Sort the laundry according to type of fabric, care label symbol, color and degree of soiling. Page 9 : Preparation of the washing. ■ Do not exceed the maximum load. ■ Close the door. Take care not to trap any items of clothing between the door and rubber seal. ■ If no program is selected or no button is pressed for 10 minutes, the washing machine automatically switches itself off. Press the POWER button again to turn power on. ■ Select a washing program first with the Jog Dial. ■ Use the option buttons to set additional functions. Page 7 : Control Panel and Display. Page 14 : Program Overview. ■ If you select the wrong program by mistake, reselect the washing program by turning the Jog Dial. 4 into the detergent ■ The detergent and any additives must be placed in the appropriate Press the 5 START/PAUSE ■ The washing machine starts to detect laundry size, fabric type and dispenser button dispenser. Page 6 : Product Descriptions (Detergent Dispenser). ■ Add the appropriate amount of detergent suggested in the manufacturers’ instructions. Page 10 : Detergent and additives. water temperature before setting the wash time. ■ The wash time displayed on the remaining time indicator varies according to the conditions. Page 8 : Control Panel and Display. ■ Once a program starts, settings cannot be changed. 11 3WPL079591-2 How to Use the Washing Machine ■ Pause the program. Press the START/PAUSE button. The washing machine switches itself off if it is not restarted within 1 hour. Switch the power on and the program starts again from the beginning. ■ Do not add clothes part way through a wash. The washing machine first detects the laundry size and the optimum amount of water, program duration, etc. are determined. Do not add clothes after the selected program starts. ■ Terminate the program. Press the START/PAUSE button, and press the POWER button to switch power off. Then press the POWER button again and select the Spin or Drain program to drain remaining water in the drum and spin-dry the laundry. 6 Program ends ■ The buzzer sounds when the program ends. By pressing the SPIN button for 3 seconds, (After press POWER button) the buzzer sound is deactivated. By pressing the SPIN button again, the buzzer sound is reactivated. ■ The washing machine automatically switches itself off when the program ends. How to use the Duvet program Note - Do not use blanket net. This may cause excessive vibration when spinning. 1. Load the laundry : ■ Fold a large items such as a duvet or blanket as follows. ■ Load laundry into the drum with the ends facing the rear of the drum. Drum Laundry ends facing rear of drum Push laundry inside not to exceed this line 2. Press the POWER button to switch power on. 3. Select the Duvet program. 4. Add detergent into the detergent dispenser 5. Press the START/PAUSE button. 12 3WPL079591-2 How to Use the Washing Machine Washable Items with the Duvet program : ● Washable Duvets Machine washable duvets stuffed with not more than 1 kg of down or synthetic material (polyester). - Do not wash duvets stuffed with wool or duvets with a silk covering. - Do not add other items in the same wash. ● Washable Blankets Synthetic or woolen blankets weighing not more than 2.5 kg. - Do not wash pure woolen, long pile or electric blankets. ● Other Items Bed pads and curtains weighing not more than 2.5 kg. ■ Use this program separately from any washing program. How to use the Tub Clean program 1. Press the POWER button to switch power on. 2. Select the Tub Clean program. 3. Press the START/PAUSE button. 4. The Remaining Time indicator shows ‘- - -’ and starts blinking, and stops blinking after 1-2 minutes. Then press the START/PAUSE button to pause the program. 5. Open the door and add the tub cleaner directly to the drum. Do not use detergent for washing clothes. 6. Close the door and press the START/PAUSE button to restart the program. Eco-friendly operation Your washing machine features Intelligent Sensor Systems that detect laundry size, fabric type and water temperature, and then control the method of washing to maximize energy and water saving. When the Cotton course with the Cold water setting ( symbol is shown on the display) is selected, after laundry size, fabric type and water temperature are detected, the optimum amount of water, wash/rinse/spin times, spin speed and number of rinses are determined for eco-friendly operation. Water Temperature Amount of water Wash time Rinse time Fabric Type Laundry Size Spin time Spin speed No. of rinses 13 3WPL079591-2 Program Overview Temperature Setting Program Max Load Cotton 8 kg /30-90ºC 400-1200r/min, No Spin Rinse Hold For daily washing of cotton and linen items s towels, bed linen and table linen. Cotton Eco 8 kg 30-60ºC 400-1200r/min, No Spin Rinse Hold For cotton and linen items. Eco operation tha provides the same washing performance as Rapid 15 2 kg /30ºC 400-800r/min, No Spin Rinse Hold This lets you wash small loads of lightly soile such as underwear in 15 minutes. It’s also id clothes. Synthetic 4 kg /30-60ºC 400-1000r/min, No Spin Rinse Hold For washing normally soiled blouses, shirts, or blends with cotton. Colors 4 kg /30ºC/40ºC 400-1200r/min, No Spin Rinse Hold Separate wash for colored or cotton blend ite Washes in low temperature or cold water to Delicate 4 kg /30ºC/40ºC 400-800r/min, No Spin Rinse Hold Gentle wash program for delicate items such curtains. Outdoor 4 kg 40-90ºC 400-1200r/min, No Spin Rinse Hold For washing heavily soiled durable clothes (j Duvet 2.5 kg /30ºC/40ºC 400-800r/min, No Spin Rinse Hold For washable large items such as duvets, bl Wool 2 kg /30ºC 400r/min, No Spin Rinse Hold Gentle washing for machine washable woole label. This program is tested and approved by Woo Allergy Care 4 kg 90ºC 400-1200r/min, No Spin Rinse Hold Removes allergens such as house dust mite This program is tested and approved by Alle Night Cycle 8 kg Rinse Hold Provides quiet washing with less noise and v ideal for overnight operation. Rinse & Spin 8 kg - 400-1200r/min, No Spin Rinse Hold For rinsing and spin-drying only, recommend Spin 8 kg - 400-1200r/min Use to spin-dry hand washed items, or after Drain - - - For emptying out water remaining after the la Cycle or a program with the Rinse Hold optio Tub Clean - 40ºC 800r/min A special cycle that cleans the inside of the w cycle regularly keeps the tub clean and prev /30-60ºC Spin Setting Type of Laundry / The Wool program is Woolmark certified – you can safely wash woolen items bearing the Woolmark label indicating that they are machine washable. The Wool program was tested and approved under the following settings : Washing temperature of 30ºC / Spin speed of 400r/min / No options added 14 3WPL079591-2 Selectable Options Laundry / Notes QUICK INTENSIVE PREWASH EXTRA RINSE TIMER nen items such as shirts, underwear, ○ ○ ○ ○ ○ peration that saves energy and water that rmance as the Cotton program. ○ ○ ○ ○ ○ lightly soiled clothes and small items . It’s also ideal for freshening up just-worn - - - - - ses, shirts, etc. made of polyester, acrylic ○ ○ ○ ○ ○ on blend items. d water to prevent colors from running. ○ ○ ○ ○ ○ items such as lingerie and thin lace ○ - - ○ ○ e clothes (jeans, sportswear, etc.) - ○ ○ ○ ○ s duvets, blankets, bedspreads, etc. ○ - - ○ ○ - - - ○ ○ - ○ ○ ○ ○ - ○ ○ ○ ○ recommended for hand washed items. - - - ○ - ms, or after using Rinse Hold. - - - - - g after the last rinse when using the Night e Hold option. - - - - - side of the washing machine. Using this n and prevents the growth of mold. - - - - - hable woolens bearing the Woolmark ved by Woolmark. e dust mites, mold and bacteria. ved by Allergy UK. noise and vibration and no final spin. It’s The Allergy Care program was awarded the Seal of Approval by Allergy UK. By reducing mold, house dust mites and bacteria, this program provides worry-free washing for people with delicate skin and families with a baby. The Allergy Care program was tested and approved under the following settings : Washing temperature of 90ºC / No options added 15 3WPL079591-2 In Case of Emergency In the event of a power outage The washing machine features a Fully Auto Restart function. If the power is shut off part way through a wash, the cycle (wash/rinse/spin) at the time is memorized, and when power is restored, the same cycle automatically restarts from the beginning. Emergency door release If the laundry has to be removed in the event of an extended power outage, or in the event of malfunction of the door lock, the washing machine door can be opened as follows : 1. Press the POWER button to switch power off (when the power is on in the event of malfunction of the door lock), and disconnect the mains plug. 2. Drain the water in the drum from the drain tube. See page 17 : Care and Maintenance (Cleaning the drain filter). 3. Pull the emergency release downwards. The washing machine door can be opened and the laundry can be taken out from the drum. Risk of injury! Hot water may come out from the drain tube. 16 3WPL079591-2 Care and Maintenance n) Cleaning the drain filter Drain tube Drain filter Filter cover Risk of injury! Hot water may come out from the drain tube and drain filter. - Do not open the drain filter when a program is running. - Do not clean the drain filter just after a program using hot water. - Do not operate the washing machine without the drain filter. 1. Select the Drain program and start to drain remaining water in the drum. Make sure to drain the water first, otherwise a lot of hot water may come out. 2. Insert a thin/slim object such as a flat-blade screwdriver, handle of spoon/fork into the slot of the filter cover and open it. Slot 3. Drain out the remaining water from the drain tube : Drain tube Cap (1) Place a shallow container near the drain tube. (2) Remove the cap and drain water into the container. 4. Place a piece of cloth under the filter cover. Turn the drain filter anticlockwise slowly and remove it. Make sure to open the drain filter slowly as hot water may come out. 5. Remove foreign objects such as coins or pins. Clean inside the drain filter and the drain pump with a brush. Drain filter Remove 6. Return the cap, drain filter and the filter cover in reverse order. 17 3WPL079591-2 Care and Maintenance Cleaning the detergent dispenser 1. Remove the detergent dispenser. 1 Push the dent D o 2 Pull the detergent dispenser while pushing the dent. 2. Remove dirt or detergent remaining in the detergent dispenser casing with a brush. Detergent dispenser casing 3. Wash the detergent dispenser with water. Use a brush for narrow parts or parts from which it is difficult to remove dirt. B w W s ■ How to remove and set the softener cap. Pull up to remove Push down firmly to set D r c Cleaning the water inlet filter 1. Turn off the tap. 2. Remove the water supply hose from the rear panel of the washing machine. 3. Remove the water inlet filter and clean with a brush. T h Water inlet filter Pull out to remove 4. Return the water inlet filter and the water supply hose to their original positions. Maintenance of the washing machine ■ External cleaning Clean the surface of the washing machine with a soft cloth. Do not use solvents such as alcohol or benzine. ■ Descaling The water in some areas is hard and contains lime, so it is recommended to use a water softening agent periodically, or use a descaler according to the descaler manufacturer' instructions. Do this separately from any laundry washing. R b fi T r d ■ Maintenance wash S r a It is recommended to run the Tub Clean program regularly. Using this program keeps the drum clean and prevents the growth of mold. 3WPL079591-2 D d w ■ After each wash Leave the door open for a while to dry the drum. This helps to prevent the growth of mold and stagnant smells forming inside the washing machine. 18 T f Troubleshooting Problem Door cannot be opened. Possible Cause Solution ● There is still some water in the washing machine. ● Child lock may be activated. ● Push the POWER button to Buttons do not work. ● Child lock may be activated. ● Settings cannot be changed while a ● Deactivate the child lock. Water is not supplied. ● The water tap may not be turned on. ● The water supply hose may be frozen. ● Turn on the water tap. ● Make sure that the water ● The water supply hose may be kinked or ● Straighten the water inlet ● The water supply filter may be clogged. ● Clean the water inlet filter. ● Washing time may be prolonged if the load ● This is not a malfunction. Displayed remaining time changes. d e . (See page 8) ● Washing machine may be switched off program is in progress. pinched. e drain water. ● Deactivate the child lock. before the door lock is released. s ● Run the Drain program to is unbalanced, as the washing machine tries to correct the imbalance. ● Washing time may be prolonged when there is too much foam, as the additional action of eliminating it is necessary. ● The remaining time is continually corrected and may change during the program. switch power on. The door lock will be released if there is no water in the drum. (See page 8) supply hose is not frozen. hose. (See page 18) ● Use the appropriate amount of detergent. ● This is not a malfunction. There’s no foam or hardly any foam. ● The amount of foam varies depending on ● Use the appropriate amount There’s a lot of foam. ● You may have used too much detergent. ● The amount of foam varies depending on ● Use the appropriate amount Detergent in the dispenser is not washed away. ● You may not have selected the PREWASH ● If you are using prewash, Rinsing begins before spinning finishes. ● If there is imbalance in the drum, rinsing ● This is not a malfunction. The drum stops and rotates repeatedly during spin. ● If there is imbalance in the drum, the washing ● This is not a malfunction. Spin cycle repeatedly starts and stops. ● Intermittent spinning of the tub helps the ● Add one or two bath towels the temperature, level of soiling and water hardness. ● Detergent may remain undissolved if it is poured directly into the drum. the temperature, level of soiling and water hardness. option. ● The detergent in the dispenser prewash only. is for restarts automatically to correct it for safety reasons. machine tries to correct the imbalance by repeatedly rotating and stopping. spin process to operate quietly. ● The laundry may be too light. of detergent. of detergent. push the PREWASH button. to the drum. 19 3WPL079591-2 Troubleshooting Problem Possible Cause Solution Foam remains on the door or the door seal. ● You may have used too much detergent. ● Laundry is new or not that soiled. ● Use the appropriate amount of Fabric softener overflows. ● You may have exceeded the max. level of ● Do not pour in more than the Fabric softener remains. ● The softener cover may have come out. ● Firmly set the softener cover There’s detergent powder residue in the detergent dispenser. ● You may have used too much detergent. ● Use the appropriate amount of ● You may have poured detergent in the ● Wipe the water away before The washing machine switches off during operation. ● There may be noise from other electrical ● Unplug the power cord and softener in the detergent dispenser . detergent dispenser when it was wet. Wipe the water away before adding detergent. appliances nearby such as a TV, a radio, etc. ● The motor may be locked due to overload, the clothes being trapped in the rubber seal, etc. Odor in the washing machine ● Rubber parts may give off a smell when you Unsatisfactory washing results ● You may have used too little detergent. first start using the washing machine. ● There may be mold, dirt or detergent residue on the drum. max. level of softener. on the detergent dispenser. detergent. adding detergent. plug in again. Then select a program and start. Do not place electrical appliances close to the washing machine. ● This is not a malfunction. Wait for about one hour and restart the program. ● The smell goes away over time. ● Run the Tub Clean program. ● Use the appropriate amount of detergent. ● You may have poured detergent directly into ● Pour detergent in the the drum. Unusual noise or vibration detergent. ● The transport bolts may not have been removed. ● The washing machine may be installed on a sloping or unstable surface. ● There may be foreign objects inside the drum. appropriate dispenser. ● Remove the transport bolts before using. ● Install the washing machine on a horizontal, stable surface. ● Remove foreign objects such as coins, pins, etc. from the drum. Noise during drain cycle ● This is normal. There may be noise when ● This is not a malfunction. There’s the sound of water when the drum is rotated manually. ● This is normal. Liquid is inside the 4-Ply ● This is not a malfunction. Tapping noise comes out at spin start. ● This is normal. Tapping sound is generated ● This is not a malfunction. Detergent dispenser is wet. ● In some environmental or usage conditions, ● This is not a malfunction. 20 3WPL079591-2 the drain pump is on. Liquid Load Balancer fixed onto the drum to make it balanced. when laundry touches to the laundry protection bulge on the laundry inlet. Detergent dispenser may get wet due to condensation. Error Codes Code f Description Possible Cause Solution C01 Water is not supplied. ● ● ● ● Water tap may not be turned on. Water inlet filter may be clogged. Water line or water hose may be frozen. Water supply may be cut off. Check water tap, water inlet filter, water line and water hose. C02 Water is not drained. ● ● ● ● Drain hose or drain pump may be clogged. Drain hose may be kinked or frozen. Drain hose may not be set correctly. Height of the drain outlet may be too high. Check drain hose, drain pump and drain outlet. If C02 still appears after removing the possible cause, please contact your local service center for repair. C04 Spin cycle does not function. ● Clothes may be imbalanced in the drum. ● You may be washing only one heavy item f such as a cotton blanket or jeans, or small items in a laundry net. ● You may be washing too many large items such as bed sheets. ● The washing machine may be installed on a slanting floor or may not be level. ● You may be washing waterproof or antislip treated items. Page 9 : Before You Start Washing (Sorting the laundry) f n s Add a few clothes to the drum. (Spinning only one item may result in imbalance.) C08 Door lock does not function. ● The door may be open. ● The door may not be closed completely. Check the door and close firmly. C09 Door unlock does not function. ● Laundry may be exceeded 8 kg and door Switch power off and press the door to close tightly. Hold that position and switch power on, and wait until the door lock is released. C14 Malfunction of vibration sensor ● There may be other appliances that C18 Spin cycle does not function. ● The drain hose may not be set correctly. ● There may be too much foam in the drum. Same as in C02. C19 Over loaded ● Laundry may exceed rated capacity. See page 14 for max. load of each program. C30 Water flows out from drain hose while washing. ● Drain hose end is set lower than 60 cm. See page 23 for proper height on drain hose setting. is pushed from inside. generate electrical noise near the washing machine. Move the appliances away from the washing machine. 21 3WPL079591-2 How to Install the Washing Machine Safety Instructions ■ The washing machine is heavy. Use caution when lifting it. ■ When lifting the washing machine, do not hold the jog dial or the detergent dispenser casing. Lift the washing machine with two persons holding the bottom and the back of the washing machine. ■ Frozen hoses may tear/burst. Do not install the washing machine in areas where there is a risk of freezing, or outdoors. ■ If the power supply plug is damaged, in order to avoid hazard, it must only be replaced by an authorized service agent or repair shop appointed by the manufacturer. ■ Make sure to earth the unit. Failure to earth the unit may cause electric shock if an electric leak takes place. Dimensions W:600 mm D:624 mm D:600 mm H:850 mm (*820 mm) (*Height without worktop for under-counter installation) Where to install the washing machine ■ Install the appliance on a flat hard floor to avoid excessive vibration and noise. ■ Do not install the unit in humid places such as a bathroom or places that are exposed to wind and rain. ■ Keep the minimum installation distance from the walls to prevent abnormal sound and vibration. (Back) At least 3 mm (Side) At least 3 mm (Side) At least 3 mm 22 3WPL079591-2 How to Install the Washing Machine Removing the transport bolts ■ Remove the four transport bolts and insert the cover caps using the packed-in 13 mm box spanner. ■ The transport bolts must always be removed before using the washing s machine for the first time and must be retained for any subsequent transport (e.g. when moving). Remove the transport bolts Insert the cover caps Do not remove these hose holders. c Hose and cable length ● Connection on the left side Power Supply (220-240V 50Hz) ● Optimum Water Pressure : (30kpa ~ 800kpa) ● Use cold water from the tap Power Cord min 60 cm max 100 cm Water Supply Hose Water Drain Hose (Approx. 105 cm) ● Connection on the right side Power Supply (220-240V 50Hz) Water Supply Hose max 100 cm Power Cord min 60 cm d Water Drain Hose (Approx. 160 cm) 23 3WPL079591-2 How to Install the Washing Machine Conecting the water supply ● Water supply hose ■ Optimum water pressure is 0.03-0.8MPa. ■ Do not connect to the mixer tap of an unpressurised hot-water apparatus. ■ Use a horizontal tap. Horizontal tap Extension tap Square tap Connect the water supply hose to the rear panel of the washing machine. Make sure that the rubber seal is inside the hose connector. Hose connector Rubber seal * Model with SCREW TYPE water supply hose. Firmly connect the water supply hose to the tap, and check connection points for water-tightness. * Model with ONE TOUCH JOINT water supply hose. 1. Untighten the upper connector screw. Upper connector Rubber packing Middle connector Fixing screw 2. Push the upper connector up till the rubber packing is in tight contact with the tap. Then tighten the 4 screws. Rubber packing Upper connector ● In case the diameter of the tap is large remove the guide plate. Guide plate Middle connector ● Turn the middle connector so that there is no water leak. Connector 3. Connect the water supply hose to the middle connector, pushing the plate down. Middle connector Water supply hose 24 3WPL079591-2 ● To separate the water supply hose from the middle connector shut off the tap. Then pull the inlet hose down, pushing the plate down. How to Install the Washing Machine ■ Make sure that the union nut between the water supply hose and main unit is tightly screwed. ■ Turn the tap on to check if the water supply hose is properly connected before starting. If it is loosely connected, water leakage may occur. ● Drain hose ■ The drain hose should be placed higher than 60 cm above and not higher than 100 cm above the floor. If the drain outlet is lower than 60 cm, a joint pipe is necessary (additional part, sold at a specialist outlet). Secure the drain hose to prevent from slipping out from joint pipe. 60~100 cm Joint pipe ■ Do not bend, twist, crush or pull out, bend or step on the drain hose. Use the hose guide to prevent the drain hose from kinking. ■ Do not detach the drain hose from the rear panel of the washing machine. d Drainage into a wash basin (Using the packed-in hose guide) : - Secure the drain hose to prevent it from slipping out of the wash basin. - The wash basin outlet must not be sealed by a plug. - When water is being pumped out of the washing machine, check that the water drains away quickly enough. Drainage into a siphon : - Secure the connection point with 24-40 mm φ hose clip (Sold at a specialist outlet). 25 3WPL079591-2 How to Install the Washing Machine Connecting the power ■ Connect the washing machine to an alternating current via a correctly installed earthed socket only. ■ The mains voltage must correspond to the voltage specification on the washing machine. ■ Connection specifications as well as the required fuses are stipulated on the washing machine nameplate. ■ Do not plug the washing machine into an extension lead or power strip with multiple sockets. Level Adjustment ■ All four adjustable feet must be firmly on the ground. The washing machine must not wobble. ■ Check the alignment of the washing machine with a spirit level, and adjust the feet if it’s not aligned. Loosening 1 Elevating Lock nut Lock nut Adjustable leg Tightening 2 Loosen the lock nut by unscrewing in the arrow direction 1 then stabilize the unit with the adjustable feet. After adjustment, tighten the lock nut by screwing it in the arrow direction 2. Plastic base plate Tighten the lock nut until it reaches the plastic base plate. Adjustable leg is not over 25 mm. 26 3WPL079591-2 How to Install the Washing Machine Under-counter installation ■ You need a space of 600 mm (W) x 600 mm (D) x 850 mm (H) with at least 3 mm of clearance on the sides, above and back. ■ If the height of the space ranges from 823 mm to 852 mm, use upper plate (sold separately). Upper Plate : Part No. BD-W80MV 150 Please contact your local dealer when installing the upper plate. p Necessary clearance : (Above) At least 3 mm (Back) At least 3 mm (Sides) At least 3 mm ■ For neater installation under the counter, check the height of internal measurement before fitting and adjust to the appropriate height with the adjustable feet. Page 26 : How to Install the Washing Machine (Level Adjustment). 27 3WPL079591-2 How to Install the Washing Machine Checking after installation 1. Turn on the water tap and close the washing machine door. 2. Press the POWER button to switch power on. 3. Select the Cotton program and press the START/PAUSE button. 4. After 5 minutes, check if there is no water leakage from anywhere. 5. Press the POWER button to switch power off. 6. Press the POWER button again to switch power on. 7. Select the Spin program and press the START/PAUSE button. 8. Check if there is no abnormal vibration or sound, and that water is drained out properly. If any of the following conditions or other abnormalities occur, immediately pull out the power plug to prevent an accident and contact your local service center. ■ The washing machine does not operate when you switch power on. ■ The power cord has cracks. ■ There are abnormal vibrations and sounds during operation. N ■ There is a smell of burning. Before the first wash Select the Cotton program with water temperature at 60ºC setting and allow the unit to wash without clothing. This will remove residues and water from the drum that may have been left during manufacturing. Customer Service In case of malfunction of the washing machine, please check these Operating & Installation instructions carefully before you call for repair services. If you are unable to identify or solve the problem, please contact your local service center. Before calling, make a note of the model name, serial no. and purchase date of your washing machine. You can find the model name and serial no. on the label attached to the filter cover. Model Name : BD-W80PAE Serial No : XXXXXXXX 28 3WPL079591-2 * ** Consumption Values Consumption value** Program y Load Temperature Option Spin speed Cotton 8 kg 40ºC - Cotton Eco 8 kg 40ºC - Water 1000 r/min 0.76kwh 85L 1:33h 1000 r/min 0.75kwh 49L 2:53h INTENSIVE 1200 r/min 1.20kwh 49L 3:28h Rapid 15 2 kg 30ºC - 800 r/min 0.15kwh 30L 0:15h Synthetic 4 kg 40ºC - 800 r/min 0.43kwh 42L 1:04h Colors 4 kg 40ºC - 1200 r/min 0.58kwh 64L 1:27h Delicate 4 kg 40ºC - 800 r/min 0.53kwh 55L 1:32h Outdoor 4 kg 60ºC - 1000 r/min 1.14kwh 75L 2:02h 2.5 kg 30ºC - 800 r/min 0.40kwh 79L 1:30h Night Cycle 8 kg 40ºC - - 0.66kwh 80L 1:38h Allergy Care 4 kg 90ºC - 1000 r/min 2.16kwh 112L 2:47h Wool 2 kg 30ºC - 400 r/min 0.32kwh 63L 0:56h Duvet er 60ºC Time Power * * Program, temperature, option and spin speed used to measure the data entered in energy label in compliance with EN60456 IEC60456 standards. ** Consumption values may differ from the indicated values depending on the water pressure, water hardness, water inlet temperature, ambient temperature, type and amount of laundry and degree of soiling, detergent brand, and selected options. Specifications Model BD-W80PAE Power supply See the rating plate attached to the rear of the washer Standard water level 23L (Highest water level) Standard amount of water used 49L (Cotton Eco course) Water pressure 0.03-0.8 MPa (0.3-8 Kgf/cm2) Dimension W 600 mm. x D 624 mm. x H 850 mm. Weight 67 kg. 29 3WPL079591-2 Memo 30 3WPL079591-2 Memo 31 3WPL079591-2 3WPL079591-2 3WPL079591-2