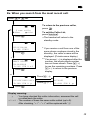
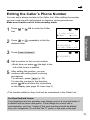
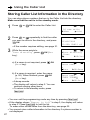
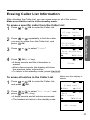
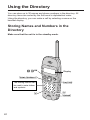
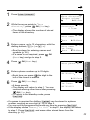
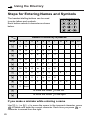
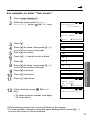
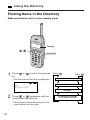
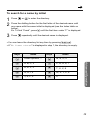
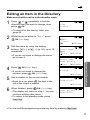
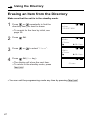
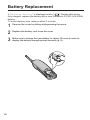
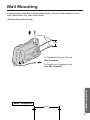
1
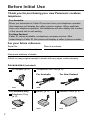
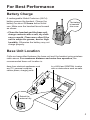
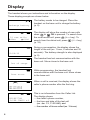
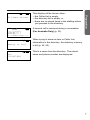
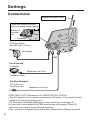
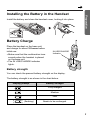
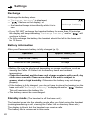
Model No. KX-TC1105ALB KX-TC1105ALN Preparation Cordless Phone Operating Instructions Basic Operation Advanced Operation PLEASE READ BEFORE USE AND SAVE. Caller ID Compatible Charge the battery for about 10 hours before initial use. Useful Information KX-TC1105ALB Before Initial Use Thank you for purchasing your new Panasonic cordless telephone. For Australia When you subscribe to Caller ID services from your telephone operator this telephone will display the caller’s phone number. When available from your telephone operator, this telephone will also display the number of the second call or call waiting. For New Zealand Caller ID, where available, is telephone company service. After subscribing to Caller ID, this phone will display a caller’s phone number. For your future reference Serial No. Date of purchase (found on the bottom of the unit) Name and address of dealer Attach or keep original receipt to assist with any repair under warranty. Accessories (included) AC Adaptor (p. 8) Telephone Line Cord (p. 8) For Australia one For Australia only Telephone Plug (p. 8) one 2 For New Zealand one Battery (p. 9) Handset Cover (p. 9) one one For Best Performance Battery Charge A rechargeable Nickel Cadmium (Ni-Cd) battery powers the handset. Charge the battery for about 10 hours before initial use. Make sure the handset faces forward as shown. The battery is beneath this cover. • Clean the handset and the base unit charge contacts with a soft, dry cloth once a month. Clean more often if the unit is subject to grease, dust or high humidity. Otherwise the battery may not charge properly. Base Unit Location Calls are transmitted between the base unit and the handset using wireless radio waves. For maximum distance and noise-free operation, the recommended base unit location is: Away from electrical appliances such as a TV, personal computer, cellular phone, charging units. In a HIGH and CENTRAL location with no obstructions such as walls. Extend the antenna fully. 3 Contents Preparation Advanced Operation Location of Controls ................5 Using the Directory.................24 Display.......................................6 Storing Names and Numbers in the Directory .......................24 Settings .....................................8 Connections..............................8 Steps for Entering Names and Symbols..................................26 Installing the Battery in the Handset ....................................9 Finding Items in the Directory ..28 Battery Charge .........................9 Programmable Functions ......11 Selecting the Ringer Volume ...................................12 Setting the Auto Talk Feature ...13 Basic Operation Making Calls............................14 Answering Calls......................16 Caller ID Service .....................16 Dialling from the Directory ......30 Editing an Item in the Directory .................................31 Erasing an Item from the Directory .................................32 Special Features .....................33 How to Use the PAUSE Button (For Analog PBX Line/Long Distance Service Users) .........33 Call Waiting and Caller ID compatible (For Australia only) .................33 RECALL Button ......................34 Using the Caller List...............18 Viewing the Caller List ............18 Calling Back from the Caller List ..........................................20 Editing the Caller’s Phone Number ..................................21 Storing Caller List Information in the Directory .......................22 Erasing Caller List Information..............................23 4 Useful Information Battery Replacement..............36 Wall Mounting .........................37 Adding Another Phone ..........38 Before Requesting Help.........39 Safety Instructions .................42 Important Information ............44 Location of Controls Handset Preparation Antenna (p. 14) Display (p. 6) (TALK) Button (REDIAL) Button (p. 14, 20) (p. 14, 15) (FUNCTION/EDIT) Navigator Key ( , , , OK) (p. 11, 15, 18, 24) Button (p. 11, 24) (EXIT/CH) (Channel) Button (p. 11, 14) (RECALL) Button (p. 33, 34) (PAUSE) Button (p. 25, 33) Charge Contacts (p. 10) Base unit Antenna (p. 3, 8) IN USE/CHARGE Indicator (p. 9) Charge Contacts (p. 10) IN US CHAR E/ CALLE GE R ID CALLER ID Indicator (p. 17) 5 Display The handset shows you instructions and information on the display. These display prompts are shown below. Recharge battery 12 new calls F=Old G=New 01-06-35 The battery needs to be charged. Place the handset on the base unit to charge the battery (p. 9). The display will show the number of new calls when or OK is pressed. To search from the most recent call, press (New key). To search from the oldest call, press (Old key) (p. 18). During a conversation, the display shows the length of the call (ex. 1 hour, 6 minutes and 35 seconds). The battery strength is also displayed (p. 9). The handset has lost communication with the base unit. Move closer to the base unit. Out of range Save error While programming, the handset lost communication with the base unit. Move closer to the base unit. When a call is received, the display shows the caller’s phone number after the first ring. 0211115555 0355667788 11:20A JAN12 × 3 6 This is an information from the Caller List. The display shows: the caller’s phone number, the time and date of the last call (ex. Jan. 12, 11:20 AM), and the number of times called (ex. 3 times). 0266667777 A second call is received during a coversation (For Australia Only) (p. 33). Preparation No items stored This display will be shown when: —the Caller List is empty, —the directory list is empty, or —there are no stored items in the dialling button you pressed in the directory. ----Waiting---- Memory is full Ann 1234567890 When trying to store an item or Caller List information in the directory, the directory memory is full (p. 22, 25). This is a name from the directory. The stored name and phone number are displayed. 7 Settings Connections Extend the antenna fully. Fasten the cords to prevent them from being disconnected. Bottom of the base unit Hooks To Power Outlet (AC 230–240 V, 50 Hz) AC Adaptor OR For Australia To Socket Telephone Line Cord Telephone Plug For New Zealand To Single-Line Telephone Jack Telephone Line Cord • USE ONLY WITH Panasonic AC ADAPTOR KX-TCA1AL. • The AC adaptor must remain connected at all times. (It is normal for the adaptor to feel warm during use.) • To connect a standard telephone on the same line, see page 38. • If your unit is connected to a PBX which does not support Caller ID services, you cannot access those services. • The unit is not designed to be used with rotary (pulse dialling) services. 8 Install the battery and close the handset cover, locking it into place. Preparation Installing the Battery in the Handset Battery Charge Place the handset on the base unit and charge for about 10 hours before initial use. • Make sure that the confirmation tone sounds when the handset is placed on the base unit. • The IN USE/CHARGE indicator lights. IN USE/CHARGE Indicator Battery strength You can check the present battery strength on the display. The battery strength is as shown in the chart below. Display prompt Battery strength Fully charged Medium Low (flashing) Needs to be recharged. 9 Settings Recharge Recharge the battery when: — “Recharge battery” is displayed, —“ ” flashes on the display, or — the handset beeps intermittently while it is in use. Recharge battery • If you DO NOT recharge the handset battery for more than 30 minutes, the display will keep indicating “Recharge battery” and/or “ ” will continue to flash. • To fully recharge the battery the handset should be left in the base unit for 10 hours. Battery information After your Panasonic battery is fully charged (p. 9): Operation Approx. battery life While in use (TALK) 8 hours While not in use (Standby) 20 days • Battery life may be shortened depending on usage conditions, such as viewing the Caller ID Caller List or directory items and ambient temperature. • Clean the handset and the base unit charge contacts with a soft, dry cloth once a month. Clean more often if the unit is subject to grease, dust or high humidity. Otherwise the battery may not charge properly. • If the battery is fully charged, you do not have to place the handset on the base unit until “Recharge battery” is displayed and/or “ ” flashes. This will maximize the battery life. • The battery cannot be overcharged. Standby mode (The handset is off the base unit.) The handset goes into the standby mode after you finish using the handset (making/answering a call, viewing the Caller List or directory items etc.). The display is blank, but the handset can receive calls. The battery life is conserved in this mode. 10 Programmable Functions Press (FUNCTION/EDIT). Preparation You can program the following function items using the handset near the base unit. The display shows the programming instructions. See the corresponding pages for function details. Make sure that the unit is in the standby mode. <Function menu>* HSave directory Ringer volume Program To use the directory (p. 25). To select the ringer volume (p. 12). Press OK. <Function menu>* HSet recall time Talk switching To select the recall time (p. 34). To set the auto talk feature (p. 13). During programming *To select a desired function item, press or repeatedly until the arrow points to the item. Then press OK to go to the next step. • You can exit the programming mode any time by pressing (EXIT/CH). • If you do not press any buttons for 60 seconds, the unit will return to the standby mode. 11 Programmable Functions Selecting the Ringer Volume You can program the ringer volume to HIGH, LOW or OFF. If set to OFF, the unit will not ring. Your phone comes from the factory set to HIGH. Make sure that the unit is in the standby mode. 1 Press (FUNCTION/EDIT). HSave directory Ringer volume HOK=Yes GF 2 Press or repeatedly to select “Ringer volume”. Then press OK (Yes key). 3 Press volume. or to select the desired Save directory HRinger volume GF HOK=Yes HIGH Ringer Low ❚ ❚ ❚ ❚ ❚ ❚ • The selected volume is displayed and rings. • To turn the ringer OFF, press and hold until 2 beeps sound. • The handset will return to the standby mode. High GF LOW Ringer Low ❚ ❚ High GF To turn the ringer ON, press or in or step 3. until 2 beeps • The ringer will sound at the LOW level. OFF Ringer off GF 12 The Auto Talk feature allows you to answer a call by lifting the handset off the base unit without pressing (TALK). To view caller’s information on the display after lifting the handset, turn this feature OFF. Your phone comes from the factory set to ON. Make sure that the unit is in the standby mode. 1 Press (FUNCTION/EDIT). 2 Press or repeatedly until the arrow points to “Program”. HProgram GF 3 Press 4 Press or repeatedly until the arrow points to “Talk switching”. Press HOK=Yes OK (Yes key). HTalk switching GF 5 Preparation Setting the Auto Talk Feature HOK=Yes OK (Yes key). Auto talk :Off GF 6 Press Press or HOK=Save to select “On” or “Off”. OK (Save key). • A beep sounds. • To return to the standby mode, press (EXIT/CH). Auto talk :On • You can exit the programming mode any time by pressing (EXIT/CH). • To answer a call when the Auto Talk feature is OFF, lift the handset off the base unit, and press (TALK). 13 Making Calls Extend the antenna fully. Display , , (TALK) (REDIAL) (EXIT/CH) 1 Press (TALK). 2 Dial a phone number. • The dialled number is displayed. • After a few seconds, the display will show the length of the call. 1112222 00-00-00 3 To hang up, press (TALK) or place the handset on the base unit. • If “Out of range” is displayed and an alarm tone sounds in step 1, move closer to the base unit or place the handset on the base unit, and try again. To redial the last number dialled Press (TALK) ➡ (REDIAL). If noise interferes with the conversation Press (EXIT/CH) to select a clearer channel or move closer to the base unit. 14 To dial after confirming the entered number 1. Enter a phone number. • If you misdial, press . Digits are erased from the right. • To cancel, press (EXIT/CH). 1112222 2. Press (TALK). • After a few seconds, the display will show the length of the call. 3. To hang up, press (TALK) or place the handset on the base unit. Basic Operation To redial after confirming the last number dialled Press (REDIAL) ➡ (TALK). To select the receiver volume Press or while talking. • Each time you press or , the volume level will change. • The display will return to the length of the call. HIGH Loud Low ❚ ❚ ❚ ❚ ❚ ❚ High GF LOW Loud Low ❚ ❚ High GF Backlit handset keypad The handset dialling buttons will light when you press a button or lift the handset off the base unit, and flash when a call is received. The lights will go out about 10 seconds after pressing a button, lifting the handset or answering a call. Backlit LCD display The backlit handset display will stay on for about 10 seconds after pressing a handset button or lifting the handset off the base unit. 15 Answering Calls When a call is received, the unit rings and the CALLER ID indicator on the base unit flashes quickly. If you subscribe to a Caller ID service, the calling party information will be displayed after the first ring (see below). In order to view the CALLER ID information, please wait until the second ring to answer a call. If the handset is off the base unit, press (TALK). (TALK) • You can also answer a call by pressing any dialling button (0) to (9), (*) or (#) (— Any Key Talk). OR If on the base unit, just lift up. (This is not possible when the Auto Talk feature is set to OFF. See page 13.) CALLER ID Indicator Caller ID Service This unit is compatible with a Caller ID service offered by your telephone company. After subscribing to a Caller ID service, the calling party’s information will be displayed on the handset after the first ring. The unit can record information of up to 50 different callers, including the time and date the call was received and the number of times called, in the Caller List. The Caller List information is sorted from the most recent to the oldest call. When the 51st call is received, the oldest call is deleted. Using the list, you can automatically call back a caller. You can store the callers’ names and numbers from the Caller List in the directory. When a second call is received while talking, the new caller’s phone number will be displayed (For Australia only) (p. 33). 16 How caller information is displayed when a call is received The display shows the caller’s phone number after the first ring.* 021111555 After you answer the call, the display will show the length of the call. 00-00-00 Basic Operation The CALLER ID indicator light will flash quickly when a call is being received. *Private name display If you receive a call from one of the same phone numbers stored in the directory, the caller’s name will be displayed. • To use this function, names and phone numbers 021111555 must be stored in the directory (p. 24). • Caller information cannot be displayed in the following cases: — If the caller dialled from an area which does not provide a Caller ID service, the display will show “Out of area”. — If the caller has requested not to display his/her information, the display will show “Private caller”. • If your unit is connected to a PBX which does not support Caller ID services, you cannot access those services. • If the name display service is available in your area, the display will show callers’ names. For further information, please contact your telephone company. TINA ROBINSON For New Zealand Users: Your telephone company may not support the second caller display feature. 17 Using the Caller List Viewing the Caller List Caller list information includes the caller’s phone number, the time and date the call was received, and the number of times that caller called. When new calls have been received, the CALLER ID indicator flashes slowly on the base unit. Make sure that the unit is in the standby mode. 1 Press or Caller List. OK to enter the • The number of new calls is displayed. 2 new calls F=Old G=New 2 To search from the most recent call, press (New key). To search from the oldest call, press (Old key). Display , , , OK (EXIT/CH) • To scroll between callers, press or . 3 To exit the list, press (EXIT/CH). • The handset will return to the standby mode. • Once new calls have been checked, “√” will be added. • If “No items stored” is displayed in step 1, the Caller List is empty. • If more than one call is received from the same caller, the date and time of the most recent call will be recorded. If the same caller calls again, the call entry with “√” will be deleted. 18 Ex. When you search from the most recent call: Press or OK. To return to the previous caller, press . 2 new calls F=Old G=New Press . Press . * • The handset will return to the standby mode. * If you receive a call from one of the same phone numbers stored in the directory, the caller’s name will be displayed. (Private name display). Basic Operation 02223334444 3:10P JUN10 To exit the Caller List, press (EXIT/CH). ** If an arrow (→) is displayed after the NANCY BROWN 0244448888 1:54P JUN 9 × 2 Press . ** number, the whole phone number has not been shown. Press (#) (→) to see the remaining numbers. Press (*) (←) to return to the previous display. Press (#) (→). 0 123456789012345→ 10:38A JUN 9 √ Press Press (*) (←). ←678901 10:38A JUN 9 √ . Display meaning: √ : You have checked this caller information, answered the call or called back the caller. × 2-× 9 : The number of times the same caller called (up to 9). After checking, “× 2” – “× 9” will be replaced with “√”. 19 Using the Caller List Calling Back from the Caller List , , , OK (TALK) (FUNCTION/EDIT) 1 Press or OK to enter the Caller List. 3 new calls F=Old G=New 2 Press or desired caller. 3 Press (TALK). repeatedly to find the • The displayed phone number is dialled automatically. 0234567890 11:20A JAN12 × 3 0234567890 00-00-00 • If you need to edit a phone number, see page 21. • If a phone number is not displayed in the caller information, you cannot call back that caller. For New Zealand Users: Your telephone service provider may charge you for a local call when it is dialled with an area code prefix. If the charge for a local call is unacceptable, only the 7-digits of the local number should be dialled from your telephone. Do not dial the “0” prefix or the area code digit. 20 Editing the Caller’s Phone Number You can edit a phone number in the Caller List. After editing the number, you can continue with calling back or directory storing procedures. Make sure that the unit is in the standby mode. 1 Press List. or OK to enter the Caller 5 new calls F=Old G=New Press or desired caller. repeatedly to find the 0276543210 11:20A JAN12 × 3 3 Press (FUNCTION/EDIT). 0276543210 4 Add a number to the current number. 5 After editing the number, you can continue with calling back or storing procedures. To call back, press (TALK) (p. 20). To store the number in the directory, press OK and follow the instructions on the display (see page 22, from step 3). Basic Operation 2 • Each time you press the digit to the left of the cursor is erased. • The number edited in step 4 will not be maintained in the Caller List. For New Zealand Users: Your telephone service provider may charge you for a local call when it is dialled with an area code prefix. If the charge for a local call is unacceptable, only the 7-digits of the local number should be dialled from your telephone. Do not dial the “0” prefix or the area code digit. 21 Using the Caller List Storing Caller List Information in the Directory You can store phone numbers that are in the Caller List into the directory. Make sure that the unit is in the standby mode. 1 Press or OK to enter the Caller List. 10 new calls F=Old G=New 2 Press or repeatedly to find the caller you want to store in the directory, and press OK. • If the number requires editing, see page 21. 3 While the arrow points to “Save directory”, press key). OK (Yes a) If a name is not required, press (Save key). 0234567890 11:20A JAN12 × 3 HSave directory Clear GF HOK=Yes OK Enter name #=←→ b) If a name is required, enter the name OK (p. 26). When finished, press (Save key). • A beep sounds. • The display will return to step 2. You can continue storing other items. • To return to the standby mode, press (EXIT/CH). HOK=Save Enter name CINDY TURNER #=←→ HOK=Save • You can exit the programming mode any time by pressing (EXIT/CH). • If the display shows “Memory is full” in step 3, the display will return to step 2. Press (EXIT/CH) to exit the list. To erase other stored items from the directory, see page 32. • You cannot store caller information in the directory if a phone number is not displayed. 22 Erasing Caller List Information After checking the Caller List, you can erase some or all of the entries. Make sure that the unit is in the standby mode. To erase a specific caller from the Caller List 1 Press or OK to enter the Caller List. 10 new calls F=Old G=New 3 Press or repeatedly to find the caller you want to erase from the Caller List, and press OK. Press or 0355556666 12:20A JAN12 √ to select “Clear”. Save directory HClear GF 4 Press OK (Yes key). • A beep sounds and the information is erased. • After a few seconds, the display will show the previous caller information. • To return to the standby mode, press (EXIT/CH). To erase all entries in the Caller List 1 HOK=Yes Basic Operation 2 Clear Make sure this display is shown. Press or OK to enter the Caller List, and press OK. 0 new call F=Old G=New 2 Press press or to select “All clear”, and OK (Yes key). • A beep sounds and all entries are erased. • The handset will return to the standby mode. Exit HAll clear GF HOK=Yes All clear 23 Using the Directory You can store up to 30 names and phone numbers in the directory. All directory items are sorted by the first word in alphabetical order. Using the directory, you can make a call by selecting a name on the handset display. Storing Names and Numbers in the Directory Make sure that the unit is in the standby mode. OK Display (FUNCTION/EDIT) The dialling buttons can be used to enter letters and symbols. (*) (EXIT/CH) (#) (PAUSE) 24 1 Press (FUNCTION/EDIT). HSave directory Ringer volume HOK=Yes GF 2 While the arrow points to “Save directory”, press OK (Yes key). • The display shows the number of stored items in the directory. Directory= 0 item Enter name #=←→ 3 Enter a name, up to 15 characters, with the dialling buttons, (*) (←) or (#) (→). • See the steps for entering names and symbols (p. 26). OK • If a name is not required, press (Next key) and go to step 5. Press 5 Enter a phone number up to 22 digits. 6 Enter name Tom Jones #=←→ HOK=Next OK (Next key). Enter phone no. • Each time you press the digit to the left of the cursor is erased. Press 0987654321 HOK=Save OK (Save key). • A beep sounds. • The display will return to step 1. You can continue storing other items after pressing OK (Yes key). • To return to the standby mode, press (EXIT/CH). Tom Jones 0987654321 Advanced Operation 4 HOK=Next • If a pause is required for dialling, (PAUSE) can be stored in a phone number counting as one digit (p. 33) in step 5. • You can exit the programming mode any time by pressing (EXIT/CH). • If the display shows “Memory is full” in step 2, the display will return to step 1. Press (EXIT/CH), and erase other stored items from the directory (p. 32). 25 Using the Directory Steps for Entering Names and Symbols The handset dialling buttons can be used to enter letters and symbols. Each button selects a character as shown below. ABC DEF GH I JKL MNO PQRS TUV WXYZ Number of times key is pressed Keys 1 2 3 4 5 (1) # & ’ ( ) (2) A B C a b c 2 (3) D E F d e f 3 (4) G H I g h i 4 (5) J K L j k l 5 (6) M N O m n o 6 (7) P Q R S p q r (8) T U V t u v 8 (9) W X Y Z w x y (0) 0 Blank 6 7 8 9 10 11 , – . / 1 s 7 z 9 (*) To move the cursor to the left. (#) To move the cursor to the right. If you make a mistake while entering a name Use (*) (←) or (#) (→) to move the cursor to the incorrect character, press to delete and enter the correct character. Each time you press ,a character is erased from the right. 26 For example, to enter “Tom Jones”: 1 2 Press (FUNCTION/EDIT). While the arrow points to “Save directory”, press OK (Yes key). Directory= 20 items Enter name #=←→ (8) (6) (#) T To (6) Tom (#) Tom (5) Tom J (6) (#) Tom Jo (6) Tom Jon (3) Tom Jone (7) finished, press 12 When key). Enter name Tom Jones #=←→ HOK=Next Advanced Operation 3 Press . six times, then press (→) 4 Press to move the cursor to the right. Press four times. 5 6 Press (→) twice to enter a blank. 7 Press . six times, then press (→) 8 Press to move the cursor to the right. 9 Press five times. 10 Press five times. 11 Press eight times. HOK=Next OK (Next Enter phone no. • To enter a phone number, see page 25, from step 5. • While entering names, the cursor will flash on the display. • To enter another character using the same dialling button, press (#) (→) to move the cursor to the next space. 27 Using the Directory Finding Items in the Directory Make sure that the unit is in the standby mode. Display , (EXIT/CH) 1 Press list. or to enter the directory • The first item or last item is displayed. Ann 1234567890 Press . Press Alphabet letter Symbol Number 2 Press or repeatedly until the desired item is displayed. • All directory items are stored in the order shown on the right. 28 Telephone number (If no name is stored) . To search for a name by initial 1 2 Press 3 Press or to enter the directory. Press the dialling button for the first letter of the desired name until any name with the same initial is displayed (see the Index table on below). Ex. To find “Frank”, press (3) until the first item under “F” is displayed. repeatedly until the desired name is displayed. • You can leave the directory list any time by pressing (EXIT/CH). • If “No items stored” is displayed in step 1, the directory is empty. Index Keys Index (1) Other symbols, 1 (6) M, N, O, 6 (2) A, B, C, 2 (7) P, Q, R, S, 7 (3) D, E, F, 3 (8) T, U, V, 8 (4) G, H, I, 4 (9) W, X, Y, Z, 9 (5) J, K, L, 5 (0) 0 Advanced Operation Keys 29 Using the Directory Dialling from the Directory Display , , OK (TALK) (EXIT/CH) 1 Press or repeatedly to find the directory item that you want to dial. • To search for the item by initial, see page 29. • To exit the directory, press (EXIT/CH). 2 3 Frank 4567890 Press (TALK). • The number is dialled automatically. 4567890 To hang up, press (TALK) or place the handset on the base unit. • You can leave the directory list any time by pressing (EXIT/CH). 30 Editing an Item in the Directory Make sure that the unit is in the standby mode. 1 Press or repeatedly to find the directory item you want to change, then press OK. Jane 1234567 • To search for the item by initial, see page 29. 2 While the arrow points to “Edit”, press OK (Yes key). HEdit Clear GF 3 Edit the name by using the dialling buttons, (*) (←) or (#) (→) (p. 26), up to 15 characters. • If you do not need to change the name, go to step 4. HOK=Yes Enter name Jane #=←→ HOK=Next 4 5 6 Press OK (Next key). • If you do not need to change the OK (Save key). number, press 1234567 HOK=Save Add a number to the current number. • Each time you press the digit to the left of the cursor is erased. When finished, press 0981234567 HOK=Save Advanced Operation Enter name Jane Walker #=←→ HOK=Next OK (Save key). • The display will return to step 1. You can continue editing other items. • To return to the standby mode, press (EXIT/CH). Jane Walker 0981234567 • You can exit the programming mode any time by pressing (EXIT/CH). 31 Using the Directory Erasing an Item from the Directory Make sure that the unit is in the standby mode. 1 Press or repeatedly to find the directory item you want to erase. • To search for the item by initial, see page 29. 2 Press Helen 1234567890 OK. HEdit Clear HOK=Yes GF 3 Press or to select “Clear”. Edit HClear GF 4 Press HOK=Yes OK (Yes key). • The display will show the next item. • To return to the standby mode, press (EXIT/CH). Clear • You can exit the programming mode any time by pressing (EXIT/CH). 32 Special Features How to Use the PAUSE Button (For Analog PBX Line/Long Distance Service Users) We recommend you press (PAUSE) if a pause is required for dialling with a PBX or to access a long distance service. Ex. Line access number (9) (PBX) (9) ➡ (PAUSE) ➡ Phone number • Pressing (PAUSE) once creates a 3.5 second pause. This prevents misdialling when you redial or dial a stored number. • Pressing (PAUSE) more than once increases the length of the pause between numbers. Call Waiting and Caller ID Compatible (For Australia only) If you subscribe to Caller ID services, your handset displays a second caller’s information while talking. After you hear a call-waiting tone, the caller’s phone number and “----Waiting----” will be displayed. 0266667777 ----Waiting---- • If the phone number is stored in the directory, the caller’s name will be displayed (p. 17). • The second caller’s information will not be displayed when a parallel connected telephone is in use. For Call Waiting Service Users in New Zealand Adjust the recall time to 600 msec for use with Telecom’s Call Waiting Service. Press (RECALL) if you hear a call-waiting tone while talking. • The first call is put on hold and you can answer the second call. • To return to the first caller, press (RECALL) again. • Your telephone company may not support the second caller display feature. Advanced Operation You can answer the second call, keeping the first call on hold. Follow Telstra’s instructions using (RECALL). 33 Special Features RECALL Button Pressing (RECALL) allows you to use special features of your host PBX such as transferring an extension call or accessing special telephone services (optional) such as call waiting. Selecting the recall time The recall time depends on your telephone exchange or host PBX. You can select from recall times: “700, 600, 400, 300, 250, 110, 100 or 90 ms (milliseconds)” using the handset near the base unit. Your phone comes from the factory set to “100 ms”. Make sure that the unit is in the standby mode. 1 2 3 4 Press (FUNCTION/EDIT). Press or repeatedly until the arrow points to “Program”. Press OK (Yes key). Press or repeatedly until the arrow points to “Set recall time”. HProgram GF HOK=Yes HSet recall time Set dial mode HOK=Yes GF 5 Press 6 Press or repeatedly until the desired time is displayed. 7 Press OK (Yes key). Recall time :100ms GF HOK=Save OK (Save key). • A beep sounds. • To return to the standby mode, press (EXIT/CH). • You can exit the programming mode any time by pressing (EXIT/CH). • If 3 beeps sound and the display shows “Save error”, move closer to the base unit and try again. If “Save error” is still displayed, place the handset on the base unit. Start again from step 1. 34 For Australia Users: • You can access Telstra’s “EASY CALL” service by having the recall time set at 100 msec, and then follow Telstra’s “EASY CALL” instructions to operate this service. • If you are connected via a PBX, a longer recall time may be necessary to use PBX functions (transferring a call etc.). Consult your PBX installer for the correct setting. For New Zealand Users: • The recall setting of this telephone is not to be adjusted below 300ms for use on the Telecom Network. • The recall facility of this product may not always operate correctly on some parts of the Telecom network or on some PABX’s available on the market. If this is the case then “recall” can be activated by “flashing” the swich-hook or repeat use of the recall button. RECALL PROBLEMS WITH THIS PRODUCT ARE NOT TO BE REPORTED TO TELECOM FAULTS SERVISE. Advanced Operation 35 Battery Replacement If “Recharge battery” is displayed and/or “ ” flashes after being fully charged, replace the battery with a new Panasonic P-P301 (KX-A36A) battery. To avoid memory loss, replace within 3 minutes. 1 2 3 36 Remove the cover by sliding while pressing the arrow. Replace the battery, and close the cover. Make sure to charge the new battery for about 10 hours in order to display the battery strength prompt correctly (p. 9). Wall Mounting Install screws using the wall template below. Connect the telephone line cord. Mount the unit, then slide down. • Extend the antenna fully. Screws 4 cm To Telephone Plug and Socket (For Australia) To Single-Line Telephone Jack (For New Zealand) 4 cm Useful Information Wall Template 37 Adding Another Phone This unit will not function during a power failure. To connect a standard telephone on the same line, use a telephone double adaptor (for Australia) or a T-adaptor (for New Zealand). For Australia Standard Telephone (Optional) To socket Telephone Doulble Adaptor Telephone Line Cord For New Zealand To Single-Line Telephone Jack T-Adaptor Telephone Line Cord Standard Telephone 38 Before Requesting Help Remedy “Out of range” is displayed and an alarm tone sounds. • You are too far from the base unit. Move closer and try again. • Place the handset on the base unit and try again. • Plug in the AC adaptor. • Extend the antennas fully. The unit does not work. • Check the settings (p. 8–10). • Charge the battery fully (p. 9). • Clean the charge contacts and charge again (p. 10). • Install the battery properly (p. 9). • Place the handset on the base unit and unplug the AC adaptor to reset. Plug in, and try again. • Re-install the handset battery within 3 minutes to avoid memory loss and place the handset on the base unit. Then try again. • This unit is not designed to be used with rotary (pulse dialling) services. Static, sound cuts in/out, fades. Interference from other electrical units. • Locate the handset and the base unit away from other electrical appliances (p. 3). • Move closer to the base unit. • Extend the antennas fully. • Press (EXIT/CH) to select a clearer channel. The handset does not ring. • The ringer volume is set to OFF. Set to HIGH or LOW (p. 12). The handset display is blank even after pressing , , • Charge the battery fully (p. 9). or OK. Useful Information Problem 39 Before Requesting Help Problem Remedy You cannot program items, such as the ringer volume. • Programming is not possible while the unit is in the talk mode or when viewing the Caller List/directory list. • Do not pause for over 60 seconds while programming. • Move closer to the base unit. Previously programmed information is erased. • If a power failure occurs, programmed information may be erased. Reprogram if necessary. You cannot store a name and • You cannot store an item in the phone number in the directory. directory while the unit is in the talk mode. • Do not pause for over 60 seconds while storing. 40 While programming or searching, the unit starts to ring and stops the program/search. • To answer the call, press (TALK). Start again from the beginning after hanging up. The unit does not display the caller’s phone number. • Other telephone equipment may be interfering with your phone. Disconnect it and try again. • Other electrical appliances connected to the same outlet may be interfering with the Caller ID information. • Telephone line noise may be affecting the Caller ID information. • Some PABX do not support Caller Display. The display goes to the standby mode while viewing the Caller List/directory list. • Do not pause for over 60 seconds while searching. You cannot redial the last number dialled. • If the last number dialled was more than 32 digits long, the number will not be redialled. Problem Remedy “Recharge battery” is displayed, “ ” flashes or the unit beeps intermittently. • Charge the battery fully (p. 9). You charged the battery fully, but “Recharge battery” is still displayed and/or “ ” continues to flash. • Clean the charge contacts and charge again (p. 9, 10). • Install a new battery (p. 36). The IN USE/CHARGE indicator light does not go out while charging. • This is normal. For New Zealand Customers: Panasonic New Zealand operates a toll free Customer Support Centre. Please phone 0800 Panasonic (0800 726276) for assistance. Useful Information 41 Safety Instructions Take special care to follow the safety suggestions listed below. Safety 1) The unit should be connected to a power supply only of the type described in the operating instructions or as marked on the unit. 2) When left unused for a long period of time, the base unit should be unplugged from the household AC outlet. 3) To minimize possibility of lightning damage when you know that a thunderstorm is coming, we recommend that you: a) Unplug the telephone line cord from the phone jack. b) Unplug the power supply cord from the AC power outlet. Installations Environment 1) Do not use this unit near water— for example, near a bathtub, washbowl, sink, etc. Damp basements should also be avoided. 2) The unit should be kept away from heat sources such as radiators, kitchen range, etc. It also should not be placed in rooms where the temperature is less than 5°C or greater than 40°C. 3) The AC adaptor is used as the main disconnect device, ensure that the AC outlet is located/installed near the unit and is easily accessible. Placement 1) Do not place heavy objects on top of this unit. 2) Care should be taken so that objects do not fall onto, and liquids are not spilled into, the unit. Do not subject this unit to excessive smoke, dust, mechanical vibration or shock. 3) Place the unit on a flat surface. For best performance 1) If noise prevents the conversation from being understood at the handset, approach the base unit to lessen the noise. 2) The handset should be used at the HIGH volume setting when the reception tone is difficult to hear. 3) The handset should be fully recharged on the base unit when “Recharge battery” is displayed and/or “ ” flashes. 4) The handset antenna should not be touched during use because of its high sensitivity. 5) The maximum calling distance may be shortened when the unit is used in the following places: Near obstacles such as hills, tunnels, undergrounds, near metal objects such as wire fences, etc. 42 WARNING: TO PREVENT FIRE OR SHOCK HAZARD, DO NOT EXPOSE THE PRODUCT TO RAIN OR ANY TYPE OF MOISTURE. When a failure occurs which result in the internal parts becoming accessible, disconnect AC adaptor immediately and return this unit to the place of purchase or service centre. If there is any trouble, disconnect the unit from the telephone line and connect a known working phone. If the known working phone operates properly, do not reconnect the unit to the telephone line until the trouble has been repaired. If the known working phone does not operate properly, consult your telephone company. This equipment has been tested and found to comply with AS/NZS 3548: 1995 limits for electromagnetic interference. Any modefications to any part of the system or to any peripherals may void the EMC compliance of the system or the peripherals. This equipment will be inoperable if mains power fails. The earcap on the handset is magnestised and may retain metallic objects. Useful Information 43 Important Information Instructions to customer (For Australia only) Installation Attached to this apparatus is an approval label. This label is evidence that it is a “Permitted Attachment” which has been authorised to be connected to your telephone service. Conditions relating to connection and operation of this Permitted Attachment are contained in Telecommunications General By-Law 220 (5). You are authorised to install this Permitted Attachment yourself by plugging it into the line socket of any regular telephone. You may connect it in place of your existing telephone or to any spare telephone socket installed in your premises. To disconnect your existing telephone you must first remove its plug from the line socket. You can then insert the plug of your Permitted Attachment into the socket and use your equipment. If the plug of your existing telephone cannot be readily removed, you will have to remove the screw securing it. To do this proceed as follows: 1. Loosen screw “A” sufficiently to remove the socket cover. (See Fig. 1.) 2. Remove screw “B” and withdraw the plug. (See Fig. 2.) 3. Replace screw “B”. (See Fig. 3.) Ensure that it screws completely into the socket recess. (If the screw is too long, increase the hole depth or replace the screw with one 5 mm shorter.) 4. Replace socket cover and tighten screw “A”. (See Fig. 4.) SOCKET PLUG SCREW “B” SCREW “A” Fig. 2 Fig. 1 TELEPHONE CORD Connect to the PLUG as shown in Fig. 1. ( ) SCREW “A” SCREW “B” Fig. 3 44 SOCKET Fig. 4 If you are satisfied with the operation of your telephone service after plugging in your Permitted Attachment, your installation is completed. You will be unable to connect this Permitted Attachment if your telephone service consists only of a wall phone or an old style telephone which is not connected by means of a modern plug and socket. In such cases a new socket will need to be installed. Should the Permitted Attachment not operate when plugged into a socket, it is either faulty or unsuitable for operation with your telephone service. It should be returned to the store where purchased. Service difficulties If at any time a fault occurs on your telephone service carry out the following checks before you call for service: • Disconnect the Permitted Attachment and try using the service with the normal telephone. • If the telephone service then operates satisfactorily, the fault is in your Permitted Attachment. Leave the Permitted Attachment disconnected and report the fault to its supplier or agent to arrange for repair. • If when using the telephone the service is still faulty, report the fault to “Service Difficulties and Faults” for attention. You are required to keep this Permitted Attachment in good working order while it is connected to your telephone service. Its construction or internal circuit must not be modified in any way without permission. WARNING This cordless telephone system does not incorporate provision for secrecy of conversations. Appropriately tuned radio equipment and other cordless telephone systems in close proximity may be used by a third party to monitor and possibly interrupt conversations in progress when this system is on radio operation. Useful Information 45 Important Information For New Zealand Users Only The grant of a Telepernit for any item of terminal equipment indicates only that Telecom has accepted that the item complies with minimum conditions for connection to its network. It indicates no endorsement of the product by Telecom, nor does it provide any sort of warranty. Above all, it provides no assurance that any item will work correctly in all respects with another item of Telepermitted equipment of a different make or model, nor does it imply that any product is compatible with all of Telecom’s network services. This equipment shall not be set to make automatic call to the Telecom “111” Emergency Service. WARNING NOTICE: No “111” or other calls can be made from this device during a mains power failure. • We recommend that a standard phone which can be used in the case of a power failure be connected to the telephone line at all times. • This cordless telephone system does not incorporate provision for secrecy of conversations. Appropriately tuned radio equipment and other cordless telephone systems in close proximity may be used by a third party to monitor and possibly interrupt conversations in progress when this system is on radio operation. 46 47 Kyushu Matsushita Electric Co., Ltd. 1-62, 4-chome, Minoshima, Hakata-ku, Fukuoka 812-8531, Japan Printed in Malaysia PQQX12819ZA-BM WM0800ST0