1
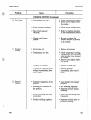
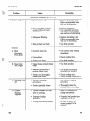
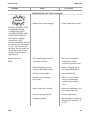
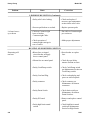
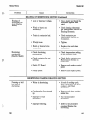
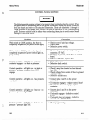
This section provides troubleshooting information in the form
of an easy to read table.
If a problem occurs during the first operation of a new fryer,
recheck the installation per the Installation Section of this
manual.
Before troubleshooting, always recheck the operation procedures per Section 3 of this manual.
To isolate a malfunction, proceed as follows:
1. Clearly define the problem (or symptom) and when it
occurs.
2. Locate the problem in the Troubleshooting table.
3. Review all possible causes. Then, one-at-a-time work
through the list of corrections until the problem is solved.
4. Refer to the maintenance procedures in the Maintenance
Section to safely and properly make the checkout and
repair needed.
If maintenance procedures are not followed correctly,
injuries and/or property damage could result.
Product Color Not
Correct:
A. Too Dark
B. Too Light
C. Product
Greasy
Temperature too high.
Check temperature setting
in the program mode. See
section on programming.
Remove and replace defective probe.
Shortening too old.
Change shortening.
Shortening too dark.
Filter shortening.
Change shortening.
Breading product too far
in advance.
Bread product closer to
actual frying period.
Wrong cook button
pushed.
Be sure to select the
correct product to be
cooked.
Temperature too low.
e Check temperature setting.
a Remove and replace defective probe.
Fryer incorrect preheat.
Allow proper preheat time.
Slow fryer heat-up/
recovery.
Refer to heating elements
in the maintenance section.
Wrong cook button
pushed.
Be sure to select the
correct product to be
cooked.
Shortening old.
Replace shortening.
Temperature too low.
Check temperature setting.
Temperature not recovered
when product was dropped
in cookpot.
Remove and replace defective probe.
Wrong cook button
pushed.
Be sure to select the
correct product to be
cooked.
Cookpot overloaded.
Reduce cooking load.
Product not removed from
cookpot immediately after
depressurization.
Remove product
immediately after
depressurization of the
eookpot.
B. Too Light
C. Product
Greasy
Temperature too low.
Fryer incorrect preheat.
0 Allow proper preheat time.
Slow fryer heat-up/
recovery.
* Refer to heating elements
in the maintenance section.
Wrong cook button
pushed.
@ Be sure to select the
correct amount of product
to be cooked.
0 Shortening old.
Temperature too low.
0 Cookpot overloaded.
Product not removed from
cookpot immediately after
end of cycle.
D. Spotted
Product
Check temperature setting.
Remove and replace defective probe.
e Replace shortening.
@ Check temperature setting.
e Temperature not recovered
when product was dropped
in cookpot.
e Remove and replace defective probe.
0 Reduce cooking load.
0 Remove product
immediately after end of
cycle.
Improper separation of the
product.
Load product into basket
properly.
Breading not uniform on
the product.
Sift breading regularly.
Separate product during
breading.
Burned breading particles
on product.
Filter the shortening more
frequently.
Product sticking together.
Separate product prior to
pressure cooking.
E. Dryness of
Product
Moisture loss prior to
cooking.
Overcooking the product.
Reduce cooking time.
Reduce cooking
temperature.
Low operating pressure.
Cheek pressure gauge
reading, check for pressure
leaks.
Wrong cook button pushed.
Be sure to select the
correct product to be
cooked.
Breading mixture is too
salty.
Sift breading after each
use.
Incorrect breading mixture.
Discard old breading.
Incorrect choice of
breading.
Use breading designed for
the desired product.
Burned shortening flavor.
Replace shortening.
Cookpot not properly
cleaned.
Drain and clean cookpot.
Product Flavor
(Taste):
A. Salty Taste
urned Taste
6. Bland Taste
aw product not fresh.
Use fresh raw products.
Breading mixture incorrect
for product (spice content
too low).
Use breading designed for
desired product.
Cooking temperature too
high (spice flavors lost).
Check temperature.
D. Rancid Taste
Shortening too old.
Replace shortening, and
follow recommended care
and use of shortening.
Non compatible products
cooked within the same
shortening.
Replace shortening.
Use compatible products,
and follow recommended
care and use of shortening.
Infrequent filtering.
Replace shortening, and
follow recommended care
and use of shortening.
Raw product not fresh.
Use fresh product.
Incorrect meat cut.
Use correct meat cutting
procedures.
Overcooking.
Check cooking time.
Product not fresh.
Use fresh product.
Using frozen product (black
bone).
Use fresh product.
Improper processing of
product (black bone).
Use proper processing
procedure for product.
Product not thoroughly
cooked (red bone).
Check cooking time.
Check cooking temperature.
Incorrect breading
procedures.
Use correct breading
procedure.
Product partially frozen.
Thoroughly thaw the
product, before breading.
Product breaded too long
prior to cooking.
Refer to breading and
frying instructions.
Improper loading
procedure.
Properly load product per
loading procedures.
Wrong cook button pushed.
Be sure to select the
correct product to be
cooked.
General:
A. Meat
Separation
From Bone
B. Bone Color
Not Proper
6. Breading Falh
Off
D. Product
Sticking
Together
With switch in
POWER position,
the fryer is completely inoperative
(NO POWER)
Open circuit.
Check to see that unit is
plugged in.
Check the breaker or fuse
at supply box.
Check control panel fuses
(electric model only).
Check voltage at wall
receptacle.
Check MAIN POWER
switch. Replace if defective.
Check cord and plug.
Pressure will not
exhaust at end of
cooking cycle.
Exhaust line from solenoid
valve to condensation tank
clogged.
Turn unit off and allow
fryer to cool to release
pressure from cookpot;
clean all pressure lines,
exhaust stacks, and condensation tank.
Solenoid valve clogged.
Check and clean solenoid
valve per Maintenance
Section on Solenoid Valve.
Dead weight clogged.
Turn unit off and allow
fryer to cool to release
pressure from cookpot;
remove dead weight and
clean.
Operating
pressure too high
Henny Penny
Problem
Model 581
Cause
Correction
LID/PRESSURE SECTION (Continued)
• Exhaust line to stack clogged
• Clean exhaust line to stack.
• Not enough product in fryer
or product not fresh.
• Place proper quantity of
fresh product within
cookpot to generate steam.
• Metal shipping spacer not
removed from dead weight.
• Remove shipping spacer.
See Unpacking Section.
• Lid open or not latched.
• Close and latch lid.
• Solenoid valve leaking or
not closing.
• Check or clean solenoid
valve per maintenance
section on the solenoid
valve.
• Dead weight valve leaking.
• Repair per maintenance section on operating valve.
• Pressure not programmed.
• Check programming.
• Lid gasket leaking.
• Reverse gasket or lid needs
adjusted. See Sections 5-10
& 5-13.
DO NOT OPERATE UNIT
IF HIGH PRESSURE
CONDITIONS EXIST,
SEVERE INJURIES AND
BURNS WILL RESULT.
Place the Power/Pump
switch in the “OFF”
position immediately. Release
the pressure by allowing unit
to cool. The pressure will
then drop. Do not resume use
of unit until cause of high
pressure has been found
and corrected.
Pressure does not
build
1201
4-7
Henny Penny
Problem
Model 581
Cause
Correction
LID/PRESSURE SECTION (Continued)
Lid won’t move
up or down
• Safety relief valve leaking.
• Check and replace if
necessary per maintenance
section on the relief valve.
• Pressure pad broken or crushed.
• Replace pressure pads.
• Cable on Counterweight
loose or broken
Counterweight Cable.
• Put cable on Counterweight
per section on
• Check operation of
counterweight carriage in
rear of cooker.
• Make proper adjustments.
HEATING OF SHORTENING SECTION
Shortening will
not heat
4-8
• Blown fuse or tripped
circuit breaker at supply
box or control panel.
• Reset breaker or replace
fuse.
• Blown fuse at control panel.
• Check fuse per Maintenance Section on fuses
• Faulty Cook/Pump switch.
• Check Cook/Pump switch
per Maintenance Section on
Cook/Pump switch.
• Faulty Cord and Plug.
• Check cord and plug and
power at wall receptacle.
• Faulty contactor.
• Check contactor per
Maintenance Section on
contactors.
• Faulty Drain Switch.
• Check drain switch per
Maintenance Section on
Drain Switches.
• Faulty PC board.
• Remove and replace control
panel.
• Faulty high limit control
switch.
• Check high limit control
switch per Maintenance
Section on High Limits.
1201
Heating of
shortening too
slow (Electric
Model)
Shortening
overheating
(Electric Model)
Foaming or boiling o,ver of
shortening
Low or improper voltage.
Use a meter and check the
receptacle against data
plate.
Weak or burnt out
element(s).
Check heating element(s)
per Maintenance Section on
Heating Elements.
Points in contactor bad.
Check contactor per
Maintenance Section on
Contactors.
Wire(s) loose.
Tighten.
Burnt or charred wire
connection.
Replace wire and clean
connectors.
Check shortening
temperature.
Check temperature setting
in the program mode.
Check contactor for not
opening.
Check faulty contactor per
Maintenance Section on
Contactors.
Faulty PC Board.
Remove and replace control
panel.
Faulty probe.
Remove and replace probe.
Water in shortening.
At end of cooking cycle,
drain shortening and clean
cookpot. Add fresh
shortening.
Condensation line stopped
up.
Remove and clean condensation line.
Improper or bad
shortening.
Use recommended
shortening.
Improper filtering.
Refer to the procedure
covering filtering the
shortening.
Shortening will
not drain from
cookpot
Shortening leaking
through drain
valve.
Cold zone full of cracklings.
Filter shortening.
Improper rinsing after
cleaning the fryer.
Clean and neutralize the
cookpot. Rinse with vinegar
to remove the alkaline, then
rinse with hot water and
dry cookpot.
Too much stirring.
Only stir on initial heat-up.
Drain valve clogged with
crumbs.
Open valve - push cleaning
brush through drain opening from inside of cookpot.
Drain valve will not open by
pulling the knob.
Replace cotter pins in valve
coupling.
Obstruction in drain.
Remove obstruction.
Faulty drain valve.
Replace drain valve.
The following guide requires voltage to be present when troubleshooting the control. When
the guide refers to connecting pins on the power connection, unplug the power connector
from the board and refer to the attached illustration. These are numbered 1 through 9.
Using a strand of #16 gauge wire, connect the pins as numbered in the troubleshooting
guide. Extreme caution must be taken when connecting these pins to avoid control board
damage or electrical shock.
With switch in COOK position, the fryer is
completely inoperative (no power switch light).
With switch in COOK position, the fryer is
completely inoperative (power switch light on,
pump works).
Check to see if unit has voltage.
Check fuses.
Defective power switch.
+SCheck voltage on pins 1 and ‘7 on the power
connector, 10 VAC.
If voltage is present, check fuse on control
board.
@ If fuse is defective, replace fuse.
Control operative - all lights on - primary
contactor engages - no heat or pressure.
Control operative - all lights on - no heat or
pressure - primary contactor does NOT
engage.
Check 5 amp fuse located on heat shroud fuse OK.
Check voltage from center of fuse to ground
- 208/240 VAC.
Defective transformer.
Control operative - all lights on - has pressure
- no heat.
Connect pins 4 and 6 on the power
connector.
If contactor engages - replace control boarcJ
If contactor does not engage, replace
contactor.
Control operative - all lights on - heat on - no
pressure - pressure light OFF.
Connect pins 3 and 6 on the power
connector.
If solenoid engages - defective control
board.
If solenoid does not engage - defective
solenoid coil - 2081240 VAC.
Control operative - all lights on - heat on - no
pressure - pressure light ON.
Check programming
Error message E-5 display reads HI.
Read display temperature - if display
temperature reads HI, unplug power
connector from control board. If secondary
contactor stays engaged, change contactor if secondary contactor disengages, change
control board. If shortening temperature
reads normal - defective thermal sensor replace.
Error message E-6.
Defective thermal sensor.
Replace thermal sensor.
Error message E-10.
Reset manual high limit thermostat.
Error message E-41.
Depress timer switch.
Control must be completely reprogrammed.
If the power connector is making poor contact onto the board, an error message could be
read, or it might disable other components. When removing connector, look down into power
connector to see if the ramp connectors, inside the power connector, are not flat. If so,
they can be removed from the power connector, and bent back into proper position.