1
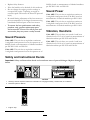
R53S and R53A Recycling Mower
with Auto-drive, ES, and VS
Code 448E, 449E
Serial No. 290000101 and Up
Manual Part No. 111-2842 Rev B
mowing conditions. Correct operation and maintenance
will ensure a long and satisfactory service life. Prior to
despatch from our factory every effort is made to ensure
that your mower is delivered in perfect condition.
Introduction
Thank you for purchasing a Hayter mower. The
following pages are designed to help you gain safe and
efficient service from your machine
Throughout this handbook all references to left and
right are as viewed from behind the handlebar, in the
direction of forward travel.
Important: This Operator’s Manual should
be regarded as part of the mower as it gives
essential information regarding mower safety,
operation, maintenance and specifications. Read
and understand this handbook prior to operating
your mower for the first time. Make sure you are
familiar with all the controls and points of regular
maintenance. If you have any doubts, consult your
local Hayter authorised dealer who will be pleased
to give you assistance
This handbook is based on information available at the
time of publication.
HAYTER LIMITED reserve the right to amend
product specifications without prior notification.
Important: This mower is designed solely for use
in a domestic grass cutting environment. Use in any
other way is considered as contrary to the intended
use. Compliance with and strict adherence to
the conditions of operation, service and repair as
specified in this manual also constitute essential
elements of the intended use.
This mower should be operated, serviced and
repaired only by persons who are familiar with its
particular characteristics and who are acquainted
with the relevant safety procedures.
This manual identifies potential hazards and has
safety messages identified by the safety alert symbol
(Figure 1), which signals a hazard that may cause serious
injury or death if you do not follow the recommended
precautions.
Figure 1
1. Safety alert symbol
This manual uses 2 words to highlight information.
Important calls attention to special mechanical
information and Note emphasizes general information
worthy of special attention.
The safety precautions listed in this handbook and all
other generally recognised regulations on safety must
be observed at all times. Any arbitrary modifications
carried out to this machine may relieve Hayter Limited
of liability for any resulting damage or injury.
Hayter mowers are robustly constructed and designed
for efficient economical performance under normal
© 2008—Hayter Limited
2
Printed in the USA.
All Rights Reserved
Contents
Safety
Introduction................................................................. 2
Safety ........................................................................... 3
General Lawn Mower Safety ................................. 3
Sound Pressure..................................................... 5
Sound Power ........................................................ 5
Vibration, Hand/arm ........................................... 5
Safety and Instructional Decals ............................. 5
Setup............................................................................ 7
Unfolding the Handle........................................... 7
Filling the Engine with Oil .................................... 7
Installing the Fuse ................................................ 7
Charging the Battery............................................. 8
Install the Mulch Plug or Grass Bag....................... 9
Product Overview ...................................................... 10
Operation................................................................... 10
Filling the Fuel Tank........................................... 10
Checking the Engine Oil Level............................ 11
Adjusting the Cutting Height .............................. 11
Adjusting the Upper Handle Height .................... 11
Starting the Engine............................................. 12
Traveling Forward .............................................. 13
Stopping the Engine ........................................... 13
Mulching the Clippings....................................... 13
Collecting Grass ................................................. 14
Side-discharge .................................................... 15
Operating Tips ................................................... 16
Maintenance............................................................... 17
Recommended Maintenance Schedule(s) ................ 17
Premaintenance Procedures.................................... 17
Preparing for Maintenance ................................. 17
Lubrication............................................................. 18
Lubricating the Wheel Gears............................... 18
Lubricating the Upper Handle ............................ 18
Engine Maintenance............................................... 19
Replacing the Air Filter ....................................... 19
Changing the Engine Oil .................................... 19
Electrical System Maintenance................................ 20
Charging the Battery........................................... 20
Replacing the Fuse.............................................. 20
Drive System Maintenance ..................................... 21
Adjusting the Auto-drive .................................... 21
Blade Maintenance ................................................. 22
Replacing the Cutterblade................................... 22
Cleaning ................................................................. 23
Cleaning the Mower............................................ 23
Storage....................................................................... 23
Preparing the Mower for Storage ........................ 23
Folding the Handle............................................. 24
Removing the Mower from Storage..................... 24
Improperly using or maintaining this mower can
result in injury. To reduce the potential for injury,
comply with these safety instructions.
This mower was designed and tested for reasonably safe
service; however, failure to comply with the following
instructions may result in personal injury.
To ensure maximum safety, best performance, and
to gain knowledge of the product, it is essential
that you and any other operator of the mower read
and understand the contents of this manual before
the engine is ever started. Pay particular attention
to the safety alert symbol (Figure 1) which means
Caution, Warning, or Danger—“personal safety
instruction.” Read and understand the instruction
because it has to do with safety. Failure to comply
with the instruction may result in personal injury.
General Lawn Mower Safety
The following instructions have been adapted from the
ISO 5395.
This cutting machine is capable of amputating hands
and feet and throwing objects. Failure to observe the
following safety instructions could result in serious
injury or death.
Training
• Read the instructions carefully. Be familiar with the
controls and the proper use of the equipment.
• Never allow children or people unfamiliar with these
instructions to use the mower. Local regulations can
restrict the age of the operator.
• Keep in mind that the operator or user is responsible
for accidents or hazards occurring to other people or
their property.
• Understand explanations for all pictograms used on
the mower or in the instructions.
Petrol
WARNING-Petrol is highly flammable. Take the
following precautions.
• Store fuel in containers specifically designed for this
purpose.
• Refuel outdoors only and do not smoke while
refueling.
• Add fuel before starting the engine. Never remove
the cap of the fuel tank or add petrol while the
engine is running or when the engine is hot.
3
• If petrol is spilled, do not attempt to start the engine
but move the mower away from the area of spillage
and avoid creating any source of ignition until petrol
vapors have dissipated.
• Replace all fuel tank and container caps securely.
•
Preparation
• While mowing, always wear substantial footwear and
long trousers. Do not operate the equipment when
barefoot or wearing open sandals.
• Thoroughly inspect the area where the equipment is
to be used and remove all stones, sticks, wires, bones
and other foreign objects.
• Before using, always visually inspect to see that
guards, and safety devices, such as deflectors and/or
grass bags, are in place and working correctly.
• Before using, always visually inspect to see that the
cutterblades, cutterblade bolts and cutter assembly
are not worn or damaged. Replace worn or damaged
cutterblades and bolts in sets to preserve balance.
•
•
•
Starting
•
• Disengage all cutterblade and drive clutches and shift
into neutral before starting the engine.
• Do not tilt mower when starting the engine or
switching on the motor, unless the mower has to be
tilted for starting. In this case, do not tilt it more than
absolutely necessary and lift only the part, which is
away from the operator.
• Start the engine or switch on the motor carefully
according to instructions and with feet well away
from the cutterblade(s) and not in front of the
discharge chute.
•
– Exercise extreme caution when on slopes.
– Mow across the face of slopes, never up and
down and exercise extreme caution when
changing direction on slopes.
– Always be sure of your footing on slopes.
Reduce speed on slopes and in sharp turns to prevent
overturning or loss of control.
Stop the cutterblade if the lawn mower has to be
tilted for transportation when crossing surfaces other
than grass and when transporting the lawn mower to
and from the area to be mowed.
Do not operate the engine in a confined space where
dangerous carbon monoxide fumes can collect.
Stop the engine
– whenever you leave the lawn mower.
– before refueling.
– before removing the grass bag.
– before making height adjustment unless
adjustment can be made from the operator’s
position.
Stop the engine and disconnect the spark-plug lead.
– before clearing blockages or unclogging chute.
– before checking, cleaning or working on the lawn
mower.
– after striking a foreign object, inspect the lawn
mower for damage and make repairs before
restarting and operating the lawn mower.
– if lawn mower starts to vibrate abnormally (check
immediately).
Watch out for traffic when crossing or near roadways.
Maintenance and Storage
Operation
• Keep all nuts, bolts and screws tight to be sure the
equipment is in safe working condition.
• Do not use pressure cleaning equipment on machine.
• Never store the equipment with petrol in the tank
and inside a building where fumes can reach an open
flame or spark.
• Allow the engine to cool before storing in any
enclosure.
• To reduce the fire hazard, keep the engine, silencer,
battery compartment and petrol storage area free of
grass, leaves, or excessive grease.
• Check grass bag components and the discharge
guard frequently and replace with manufacturer’s
recommended parts, when necessary.
• Replace worn or damaged parts for safety.
• Never mow while people, especially children, or pets
are nearby.
• Mow only in daylight or in good artificial light.
• Stay alert for holes in the terrain and other hidden
hazards.
• Do not put hands or feet near or under rotating parts.
Keep clear of the discharge opening at all times.
• Never pick up or carry a lawn mower while the
engine is running.
• Use extreme caution when reversing or pulling a
pedestrian controlled lawn mower towards you.
• Walk, never run.
• Slopes:
– Do not mow excessively steep slopes.
4
• Replace faulty silencers.
90 dBA, based on measurements of identical machines
per EN ISO 11201 and EN 836.
• If the fuel tank has to be drained, do this outdoors.
• Do not change the engine governor settings or
overspeed the engine. Operating an engine at
excessive speed can increase the hazard of personal
injury.
Sound Power
Code 448E: This unit has an equivalent continuous
A-weighted sound power level of 98 dBA, based on
measurements of identical machines per ISO 11094.
• Be careful during adjustment of the lawn mower to
prevent entrapment of the fingers between moving
cutterblades and fixed parts of the lawn mower.
Code 449E: This unit has an equivalent continuous
A-weighted sound power level of 98 dBA, based on
measurements of identical machines per ISO 11094.
• To ensure the best performance and safety,
purchase only genuine replacement parts
and accessories. Do not use will fit parts and
accessories; they may cause a safety hazard.
Vibration, Hand/arm
Sound Pressure
Code 448E: This unit does not exceed a hand/arm
vibration level of 5.13 m/s2, based on measurements of
identical machines per EN 1033 and EN 836.
Code 448E: This unit has an equivalent continuous
A-weighted sound pressure level at the operator ear of
88 dBA, based on measurements of identical machines
per EN ISO 11201 and EN 836.
Code 449E: This unit does not exceed a hand/arm
vibration level of 4.10 m/s2, based on measurements of
identical machines per EN 1033 and EN 836.
Code 449E: This unit has an equivalent continuous
A-weighted sound pressure level at the operator ear of
Safety and Instructional Decals
Important: Safety and instruction decals are located near areas of potential danger. Replace damaged
decals.
104-7953
1. Warning—read the Operator’s Manual for information on charging the battery; contains lead; do not discard.
2. Read the Operator’s Manual.
117-4157
1. Engine—stop
5
112-8760
1. Thrown object hazard—keep bystanders a safe distance
from the machine.
2. Cutting/dismemberment of hand or foot—stay away from
moving parts.
108-0992
1. Read the Operator’s
Manual.
2. Remove the fuse box
decal.
3. Remove the fuse box
cover.
4. Install the fuse.
5. Replace the fuse box
cover.
6. Start the engine.
114-2820
1. Warning—read the
Operator’s Manual.
4. Cutting/dismemberment
hazard of hand or foot,
cutterblade—stay away
from moving parts.
2. Thrown object
5. Cutting/dismemberment
hazard—keep bystanders
hazard of hand or foot,
a safe distance from the
cutterblade—disconnect
machine.
the spark plug lead and
read the instructions
before servicing or
performing maintenance.
3. Thrown object hazard—do 6. Cutting/dismemberment
not operate the mower
hazard of hand or foot,
without the rear discharge
cutterblade—do not
plug or bag in place; do
operate up and down
not operate the mower
slopes; operate side to
without the side discharge
side on slopes; stop the
cover or deflector in place.
engine before leaving the
operating position; and
look behind you when
backing up.
108-7450
(Model 448E only)
1. Height of cut
108-7451
(Model 448E only)
1. Height of cut
110-9457
1. Engine switch Off
2. Engine switch On
3. Unlocked
4. Locked
6
Setup
Important: Remove and discard the protective
plastic sheet that covers the engine.
Unfolding the Handle
1. Move the handle rearward and hold the upper handle
in place (Figure 2).
Figure 4
2. Slowly pour oil into the oil fill tube until the oil level
reaches the Full line on the dipstick (Figure 4). Do
not overfill. (Max. fill: 0.6 l, type: SAE 30 detergent
oil)
Figure 2
Note: If you overfill the engine, pour some oil out
of it as directed in Changing the Engine Oil.
3. Install the dipstick securely.
2. Tighten the upper handle knob as tight as you can
(Figure 3).
Important: Change the engine oil after the first
5 operating hours; change it yearly thereafter.
Refer to Changing the Engine Oil.
Installing the Fuse
Your mower comes with a 40-amp fuse that protects the
electric starter.
Important: You cannot start the mower with the
electric starter or charge the battery unless you
install the fuse.
1. Remove the 2 screws that fasten the battery cover to
the rear of the mower (Figure 5).
Figure 3
Filling the Engine with Oil
To prevent engine damage the engine is shipped without
oil. The engine must be filled with the correct grade of
oil before starting the mower.
Figure 5
1. Remove the dipstick (Figure 4).
Note: Save the screws for installing the battery
cover.
7
2. Install the fuse (Figure 6).
Figure 7
Important: Use only the charger supplied with
the mower.
2. Connect the charger plug to the mains electricity
supply and charge it for 24 hours.
Figure 6
3. Disconnect the charger plug from the mains
electricity supply.
Note: Your mower comes with a fuse in your
owner’s packet.
4. Disconnect the charger from the mower wire
harness.
3. Install the battery cover with the 2 screws that you
removed in step 1.
When the battery no longer holds a charge, recycle or
dispose of the lead-acid battery according to local codes.
Note: Remove the temporary decal from the
battery cover.
Important: PREVENT ENVIRONMENTAL
DAMAGE: The battery and charger have a separate
collection mark (Figure 8). This indicates that for
disposal of the battery and battery charger they
must be taken to an authorised disposal site. They
must not be disposed of with general waste.
Charging the Battery
PREVENT ACCIDENTS: ALWAYS charge
the battery in a well ventilated area.
NEVER charge the battery near naked flames
or direct heat.
G009630
Figure 8
ALWAYS switch off the mains electricity supply
before disconnecting the charger from the
battery.
EU Directive 2002/96/EC classifies this product
as an electrical or electronic equipment.
(a) These products should not be disposed of as
unsorted municipal waste. (b) They should be taken
to a designated collection point or recycling centre
and handled according to national laws in the area.
(c) The consumer has a critical role in returning waste
electronic/electrical equipment for recycling and
disposal. (d) Recycling keeps these products out of
the municipal waste stream. (e) The crossed-out
bin symbol is a reminder to follow these points.
(f) Please contact your local authority or local dealer and
ask for further details regarding the correct method of
disposal
ALWAYS use the battery charger supplied with
the mower.
Charge the battery for 24 hours initially, then monthly
(every 25 starts) or as needed. Always use the charger
in a sheltered area and charge the battery at room
temperature (22°C) whenever possible.
1. Connect the charger to the mower wire harness
located below the ignition key (Figure 7).
8
Install the Mulch Plug or Grass
Bag
You must correctly install the mulch plug (for mulching
or side-discharging) or the grass bag (for bagging), or
the engine will not start.
The mower has a safety switch, located at the bottom
of a channel on the top, right rear of the mower, that
prevents the mower from operating without a mulch
plug or grass bag. This prevents the mower from
throwing debris at the operator through the rear chute.
For the switch to detect the presence of the mulch plug,
the top of the mulch plug lever must lie fully in the
bottom of the channel (Figure 9).
Figure 11
3. Release the button on the lever and ensure that the
top of the lever is lies fully in the switch channel
(Figure 12). If the top of the lever is not in the
switch channel, your mower will not start!
Figure 9
1. Top of mulch plug lever in switch channel
1. Insert the mulch plug into the mower, if it isn’t
already installed (Figure 10).
Figure 12
Note: If the lever does not latch properly,
disconnect the wire from the spark plug and check
for and remove any debris buildup in the tunnel.
Figure 10
2. Squeeze the button on the lever with your thumb
and fully insert the mulch plug into the opening
(Figure 11).
9
Product Overview
Operation
Filling the Fuel Tank
Unleaded petrol is extremely flammable and
explosive. A fire or explosion from unleaded
petrol can burn you and others.
• To prevent a static charge from igniting the
unleaded petrol, place the container and/or
mower directly on the ground before filling,
not in a vehicle or on an object.
• Fill the tank outdoors when the engine is
cold. Wipe up spills.
Figure 13
1.
2.
3.
4.
5.
Cutting height lever
Air filter
Fuel tank cap
Oil fill/Dipstick
Foot pedal
6.
7.
8.
9.
10.
• Do not handle unleaded petrol when
smoking or around an open flame or sparks.
Recoil start handle
Engine stop lever
Upper handle knob
Electric starter
Spark plug
• Store unleaded petrol in an approved fuel
container, out of the reach of children.
Fill the fuel tank with fresh unleaded petrol (Figure 16).
Important: To reduce starting problems, add
fuel stabilizer to the fuel all season, mixing it with
unleaded petrol less than 30 days old.
Figure 14
1. Model and serial number plate
Figure 16
1. 10 mm
Figure 15
1. Grass bag
2. Side discharge chute
3. Mulch plug
4. Battery charger
5. Fuse (not illustrated)
10
Checking the Engine Oil Level
Note: To raise the mower, move all 4 cutting height
levers forward; to lower the mower, move them all
rearward.
Service Interval: Before each use or daily
1. Remove the dipstick, wipe it clean, and fully install
the dipstick (Figure 17).
Figure 18
Adjusting the Upper Handle
Height
You may raise or lower the upper handle to a position
comfortable for you.
Figure 17
Note: You cannot raise the upper handle higher than
the angle of the lower handle.
1. Loosen the upper handle knob (Figure 19).
2. Remove the dipstick and check the oil level
(Figure 17). If the oil level is below the Add mark
on the dipstick, slowly pour oil into the oil fill tube
to raise the oil level to the Full mark on the dipstick.
Do not overfill. (Max. fill: 0.6 l, type: SAE 30
detergent oil)
3. Install the dipstick securely.
Adjusting the Cutting Height
Adjusting the cutting height may bring you into
contact with the moving cutterblade, causing
serious injury.
• Stop the engine and wait for all moving parts
to stop.
Figure 19
• Do not put your fingers under the housing
when adjusting the cutting height.
2. Move the upper handle to the desired position
(Figure 20).
If the engine has been running, the exhaust
guard will be hot and can severely burn you.
Keep away from the hot exhaust guard.
Adjust the cutting height as desired. Set all four wheels
to the same height.
11
Figure 20
Figure 22
3. Tighten the upper handle knob as tight as you can
(Figure 21).
Figure 23
2. Hold the engine stop lever against the handle and
immediately start the engine using either the ignition
key or the recoil starter (Figure 24).
Figure 21
Starting the Engine
Important: The mower has a safety switch that
prevents you from starting the mower unless
you first install the mulch plug or the grass bag
securely on the mower.
1. Install the mulch plug (Figure 22) or the grass bag
(Figure 23) on the mower.
Figure 24
Note: If the mower still does not start, contact an
Authorised Service Dealer.
12
Traveling Forward
To operate the auto-drive, simply walk with your hands
on the upper handle and your elbows at your sides,
and the mower will automatically keep pace with you
(Figure 25 and Figure 26).
G009647
Figure 27
Figure 25
Mulching the Clippings
If the grass bag is on the mower, remove it (refer
to Removing the Grass Bag) before mulching the
clippings. If the side discharge chute is on the mower,
remove it and lock the side discharge door (refer to
Removing the Side Discharge Chute) before mulching
the clippings.
Important: The mower has a safety switch that
prevents you from starting the mower unless you
first install the mulch plug securely on the mower
(Figure 28).
Figure 26
Stopping the Engine
Service Interval: Before each use or daily—Ensure
that the engine stops within 3
seconds after releasing the engine
stop lever.
To stop the engine, release the engine stop lever
(Figure 27).
Important: When you release the engine stop
lever, both the engine and cutterblade should stop
within 3 seconds. If they do not stop properly, stop
using your mower immediately and contact an
Authorised Service Dealer. If the engine fails to
stop, disconnect the spark plug lead to stop it.
Figure 28
1. Top of mulch plug lever in switch channel
13
Collecting Grass
Note: The lower rope guide releases the starter
rope when you pull the recoil start handle.
3. Insert the grass bag handle into the grooves at the
top of the mower (Figure 31).
Use the grass bag when you want to collect grass and
leaf clippings from the lawn.
If the side discharge chute is on the mower, remove it
and lock the side discharge door (refer to Removing the
Side Discharge Chute) before bagging the clippings.
Important: The mower has a safety switch that
prevents you from starting the mower unless
you first install the grass bag securely on the
mower.
The cutterblade is sharp; contacting the
cutterblade can result in serious personal injury.
Stop the engine and wait for all moving parts to
stop before leaving the operating position.
Installing the Grass Bag
Figure 31
1. Remove the mulch plug (Figure 29).
Removing the Grass Bag
1. Route the starter rope around the lower rope guide
(Figure 32).
Figure 29
Figure 32
2. Route the starter rope around the lower rope guide
(Figure 30).
2. Lift the grass bag handle out from the grooves at
the top of the mower and remove the bag from the
mower (Figure 33).
Remove grass debris from the grass bag
immediately after use and check it’s condition
for signs of damage. A worn grass bag could
allow debris to be thrown at both operator or
bystander resulting in personal injury or death.
Figure 30
To prevent accidents replace a damaged grass
bag immediately.
14
Installing the Side Discharge Chute
1. Unlock the side discharge door (Figure 35).
Figure 35
Figure 33
2. Lift open the side discharge door (Figure 36).
3. Insert the mulch plug (Figure 34.
Figure 36
3. Install the side discharge chute and close the door
onto the chute (Figure 37).
Figure 34
Side-discharge
Use the side discharge for cutting very tall grass.
If the bag is on the mower, remove it and insert the
mulch plug (refer to Removing the Grass Bag) before
side-discharging the clippings.
Figure 37
Important: The mower has a safety switch that
prevents you from starting the mower unless you
first install the mulch plug securely on the mower
(refer to Mulching the Clippings).
15
Removing the Side Discharge Chute
set the front wheels at 51 mm and the rear
wheels at 64 mm.
To remove the side discharge chute, reverse the steps
above.
Cutting Leaves
Important: Lock the side discharge door after you
close it (Figure 38).
• After cutting the lawn, ensure that half of the lawn
shows through the cut leaf cover. You may need to
make more than one pass over the leaves.
• If there are more than 130 mm of leaves on the
lawn, set the front cutting height one or two notches
higher than the rear cutting height.
• Slow down your mowing speed if the mower does
not cut the leaves finely enough.
Figure 38
Operating Tips
Cutting Grass
• Cut only about a third of the grass cutterblade at a
time.
• When cutting grass over 150 mm tall, mow at the
highest cutting height setting and walk slower; then
mow again at a lower setting for the best lawn
appearance. If the grass is too long, the mower may
block and cause the engine to stall.
• Mow only dry grass or leaves. Wet grass and leaves
tend to clump on the lawn and can cause the mower
to plug or the engine to stall.
Wet grass or leaves can cause serious injury if
you slip and contact the cutterblade. Mow only
in dry conditions.
• Alternate the mowing direction. This helps disperse
the clippings over the lawn for even fertilization.
• If the finished lawn appearance is unsatisfactory, try
one or more of the following:
– Replace the cutterblade or have it sharpened.
– Walk at a slower pace while mowing.
– Raise the cutting height on your mower.
– Cut the grass more frequently.
– Overlap cutting swaths instead of cutting a full
swath with each pass.
– Set the cutting height on the front wheels one
notch lower than the rear wheels. For example,
16
Maintenance
Note: Determine the left and right sides of the machine from the normal operating position.
Recommended Maintenance Schedule(s)
Maintenance Service
Interval
Maintenance Procedure
After the first 5 hours
• Change the engine oil.
Before each use or daily
• Check the engine oil level.
• Ensure that the engine stops within 3 seconds after releasing the engine stop lever.
• Clean grass clippings and dirt from under the mower.
Every 25 hours
• Replace the air filter; replace it more frequently in dusty operating conditions.
Before storage
• Empty the fuel tank before repairs as directed and before annual storage.
•
•
•
•
Lubricate the wheel gears.
Lubricate the upper handle.
Change the engine oil.
Replace the cutterblade or have it sharpened (more frequently if the edge dulls
quickly).
• Refer to your Engine Operator’s Manual for any additional yearly maintenance
procedures.
Yearly
Yearly or before storage
• Charge the battery monthly (or as needed) and before storage.
Important: Refer to your Engine Operator’s Manual for additional maintenance procedures.
Premaintenance
Procedures
Important: Before tipping the mower to change
the oil or replace the cutterblade, allow the fuel
tank to run dry through normal usage. If you
must tip the mower prior to running out of fuel,
use a hand fuel pump to remove the fuel. Always
tip the mower onto its side with the air filter up.
Preparing for Maintenance
1. Stop the engine and wait for all moving parts to stop.
2. Disconnect the spark plug lead from the spark plug
(Figure 39) before performing any maintenance
procedure.
Tipping the mower may cause the fuel to leak.
Petrol is flammable, explosive and can cause
personal injury.
Run the engine dry or remove the Petrol with a
hand pump; never siphon.
Figure 39
3. After performing the maintenance procedure(s),
connect the spark plug lead to the spark plug.
17
Lubrication
Lubricating the Wheel Gears
Service Interval: Yearly
1. Remove the wheel bolt in the center of each rear
wheel and remove the rear wheels.
Figure 42
2. Apply engine oil to the inner and outer sides of the
gear as shown in Figure 40.
Figure 40
3. Install the rear wheels.
Lubricating the Upper Handle
Service Interval: Yearly
Lubricate the left and right sides of the upper handle
with a low-viscosity silicone spray lubricant yearly or
as needed.
1. Spray the outer plastic end of the inner handle
(Figure 41).
Figure 41
Note: Use the straw that comes with the spray can
to direct the spray.
2. Push the upper handle fully down and spray the
inner plastic surface of the outer handle (Figure 42).
18
Engine Maintenance
Replacing the Air Filter
Service Interval: Every 25 hours
Replace the air filter yearly; replace it more frequently
in dusty operating conditions. Refer to Preparing for
Maintenance.
1. Use a screw driver to open the air filter cover
(Figure 43).
Figure 45
3. Tip the mower onto its side, with the air filter up,
to drain the used oil out through the oil fill tube
(Figure 46).
Figure 43
2. Replace the air filter (Figure 44).
Figure 44
Figure 46
3. Install the cover.
4. Slowly pour oil into the oil fill tube until the oil level
reaches the Full line on the dipstick (Figure 47).
Do not overfill. (Max. fill: 0.59 l, type: SAE 30
detergent oil)
Changing the Engine Oil
Service Interval: After the first 5 hours
Yearly
Run the engine a few minutes before changing the oil
to warm it. Warm oil flows better and carries more
contaminants.
1. Perform the pre-maintenance procedures; refer to
Preparing for Maintenance.
2. Remove the dipstick (Figure 45).
19
Electrical System
Maintenance
Charging the Battery
Service Interval: Yearly or before storage
Refer to Charge the Battery in the Setup section.
Replacing the Fuse
If the battery does not charge or the engine does not
turn with the electric starter, the fuse may be blown.
Replace it with a 40-amp plug-in type fuse. Refer to
Install the Fuse in the Setup section.
Figure 47
5. Install the dipstick securely.
6. Dispose of the used oil properly at a local recycling
center.
20
Drive System
Maintenance
Adjusting the Auto-drive
If your mower does not self-propel properly, adjust the
auto-drive cable.
1. Loosen the nut on the cable mount (Figure 48).
Figure 50
1. Cable mount
2. Cable jacket
Note: Moving the cable jacket upward decreases
the ground speed; moving the jacket downward
increases the ground speed.
5. Tighten the nut firmly.
1
6. Start the mower and check the adjustment.
Note: If the self-propel drive is not properly
adjusted, repeat this procedure.
G009696
Figure 48
1. Cable mount
2. Pull the upper handle back fully rearward.
Note: If the handle does not move smoothly, refer
to Lubricating the Upper Handle.
3. Pull the cable jacket downward until you remove the
slack in the exposed cable (Figure 49).
Figure 49
1. Exposed cable
4. Push the cable jacket upward 1/8 inch (3 mm).
Note: You can place a ruler against the upper side
of the black cable mount and measure how far the
upper end of the cable jacket moves (Figure 50).
21
Blade Maintenance
Important: Position the curved ends of the
cutterblade to point toward the mower housing.
6. Use a torque wrench to tighten the cutterblade
bolt to 60 ft-lb (82 N⋅⋅m).
Replacing the Cutterblade
Service Interval: Yearly
Important: A bolt torqued to 60 ft-lb (82 N⋅⋅m)
is very tight. While holding the cutterblade with
a block of wood, put your weight behind the
ratchet or wrench and tighten the bolt securely.
This bolt is very difficult to overtighten.
Important: You will need a torque wrench to install
the cutterblade properly. If you do not have a torque
wrench or are uncomfortable performing this
procedure, contact an Authorised Service Dealer.
Examine the cutterblade whenever you run out of
petrol. If the cutterblade is damaged or cracked, replace
it immediately. If the cutterblade edge is dull or nicked,
have it sharpened or replace it.
The cutterblade is sharp; contacting the
cutterblade can result in serious personal injury.
Wear gloves when servicing the cutterblade.
1. Disconnect the spark plug lead from the spark plug.
Refer to Preparing for Maintenance.
2. Tip the mower onto its side, with the air filter up.
3. Use a block of wood to hold the cutterblade steady
(Figure 51).
Figure 51
4. Remove the cutterblade, keeping all mounting parts.
5. Install the new cutterblade and all mounting parts.
22
Cleaning
Storage
Cleaning the Mower
Store the mower in a cool, clean, dry place.
Service Interval: Before each use or daily
Preparing the Mower for
Storage
The mower may dislodge material from under
the mower housing.
Petrol vapors can explode.
• Wear eye protection.
• Do not store petrol more than 30 days.
• Stay in the operating position (behind the
handle).
• Do not store the mower in an enclosure near
an open flame.
• Do not allow bystanders in the area.
• Allow the engine to cool before storing it.
1. With the engine running on a flat paved surface,
spray a stream of water in front of the right rear
wheel (Figure 52).
1. On the last refueling of the year, add fuel stabilizer
to the fuel as directed by the engine manufacturer.
2. Run the mower until the engine stops from running
out of fuel.
Note: The water will splash into the path of the
cutterblade, cleaning out the clippings.
3. Allow the engine to run until it stops. When you can
no longer start the engine, it is sufficiently dry.
4. Disconnect the lead from the spark plug.
5. Remove the spark plug, add 1 oz. (30 ml) of oil
through the spark plug hole, and pull the starter rope
slowly several times to distribute oil throughout the
cylinder to prevent cylinder corrosion during the
off-season.
Figure 52
2. When no more clippings come out, stop the water
and move the mower to a dry area.
6. Loosely install the spark plug.
7. Tighten all nuts, bolts, and screws.
3. Run the engine for a few minutes to dry the housing
to prevent it from rusting.
8. Charge the battery for 24 hours, then unplug the
battery charger and store the mower in an unheated
area. If you must store the mower in a heated area,
you must charge the battery every 90 days.
23
Folding the Handle
Upright Position
1. Step on the foot pedal and hold it down (Figure 53).
Figure 55
3. To unfold the handle, refer to Unfolding the Handle.
Removing the Mower from
Storage
Figure 53
1. Remove the spark plug and spin the engine rapidly
using the starter to blow the excess oil from the
cylinder.
2. Move the handle to the upright position (Figure 54).
2. Install the spark plug and tighten it with a torque
wrench to 15 ft-lb (20 N-m).
3. Charge the battery.
4. Connect the spark plug lead to the spark plug.
Figure 54
Forward Position
1. With the handle in the upright position, step on the
foot pedal and hold it down.
2. Move the handle all the way forward and loosen the
upper handle knob (Figure 55).
24
1st Year (12 months)
We certify that this service has been
carried out by an Authorised Hayter
Service Dealer
Date:
1st Year (12 months)
Owner’s Name:
Serial Number:
Date:
Note for dealer: Please retain this voucher for your records.
2nd Year (24 months)
We certify that this service has been
carried out by an Authorised Hayter
Service Dealer
Date:
2nd Year (24 months)
Owner’s Name:
Serial Number:
Date:
Note for dealer: Please retain this voucher for your records.
LIMITED WARRANTY
Hayter Limited warrants to the original user/purchaser that this unit shall be free from defects
in material and workmanship under normal use and service for a period of three years from the
date of purchase. The manufacturer of major proprietry components ie. engines, gearbox /
transaxle (where applicable) furnish their own warranty and services are provided through their
authorised network. To qualify for the full benefit of the warranty, the warranty registration card
must be returned within 14 days of purchase. Subject to the conditions and exclusions noted in
this limited warranty, we shall at our option, repair or replace any warranted part during the
applicable period. If you are in doubt or experience any difficulty, please consult a Hayter
Authorised Service Dealer for clarification.
To qualify for the extended warranty (second and third year) of the three year limited warranty
the machine must have annual services carried out by an Authorised Hayter Service Dealer.
These chargeable services should be carried out within 12 and 24 months of the date of purchase.
Excluded from the extended warranty period are those items which are subject to normal wear
and tear e.g. tyres, wheels, cutterblades, belts, cables, grassbags, brush/bristles, batteries and
other consumable wearing parts.
All consumer machines which are fitted with a genuine Hayter friction disc as original
equipment before use, are covered by a Lifetime Warranty against the engine crankshaft
bending. Note: friction washers, blade brake clutch (B.B.C) units and other such devices are not
applicable. Only machines fitted with a genuine Hayter friction disc, which are used in
accordance with the recommended operating and maintenance procedures, are covered.
This warranty does not apply to any unit that has been tampered with, altered, misused, abused or
used for hire, and will become invalid if non genuine Hayter parts are fitted. This warranty does
not cover minor mechanical adjustments unless they are due to defective material or
workmanship. Consult the Owner's Handbook or a Hayter Authorised Service Dealer for
assistance when making these adjustments.
A warranty period of 90 days applies to machines used for commercial purposes.
This limited warranty gives you specific legal rights and is in addition to any statutory rights to
which you may be entitled and your statutory rights are not affected by this warranty. If you need
additional information concerning this written warranty, or assistance in obtaining services,
please write to : HAYTER LIMITED, Service Department, Spellbrook, Bishop's Stortford,
Hertfordshire CM23 4BU
UK ONLY: Details of your local Hayter authorised dealer are contained in Yellow Pages and
the Hayter website www.hayter.co.uk or contact:- Freephone 0800 616298.
Issue: 12.08.03
To make a warranty claim, return the unit to a Hayter authorised dealer along with proof of
purchase stating the machine serial number and date of purchase. The service receipt(s) or this
Owners Handbook with the 1st/2nd year service boxes fully completed, must be produced as
proof of entitlement to the extended warranty period. Subject to the conditions and exclusions in
this limited warranty, the authorised dealer will, at our option, repair or replace any warranted
part within the duration of the warranty period.
Date of Sale:Your Local Dealer:-