1
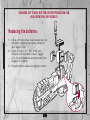
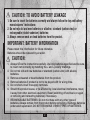
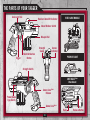
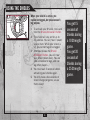
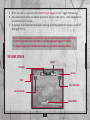
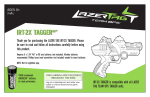
AGES 8+
LT01_distressed
®
LT02_clean
BATTERIES INCLUDED
x12
Replace with 12 x 1.5V “AA” or R6 size alkaline batteries.
Phillips/cross head screwdriver (not included) needed to
replace batteries.
13744
Standard, CRT TV only. Not for use with projection, LCD,
high-definition, or plasma TV.
Replacing the batteries:
1. Using a Phillips/cross head screwdriver (not
included), unscrew the battery covers on
your Tagger units.
2. Insert 6 fresh 1.5 V “AA” or R6 size
batteries (not included) in each Tagger
unit. Alkaline batteries recommended. See
diagram for polarity.
3. Replace battery covers and tighten screws.
1
CAUTION: TO AVOID BATTERY LEAKAGE
1.Be sure to insert the batteries correctly and always follow the toy and battery
manufacturers’ instructions;
2.Do not mix old and new batteries or alkaline, standard (carbon-zinc) or
rechargeable (nickel-cadmium) batteries;
3.Always remove weak or dead batteries from the product.
IMPORTANT: BATTERY INFORMATION
Please retain this information for future reference.
Batteries should be replaced by an adult.
CAUTION:
1. Always follow the instructions carefully. Use only batteries specified and be sure
to insert item correctly by matching the + and – polarity markings.
2. Do not mix old and new batteries or standard (carbon-zinc) with alkaline
batteries.
3. Remove exhausted or dead batteries from the product.
4. Remove batteries if product is not to be played with for a long time.
5. Do not short-circuit the supply terminals.
6. Should this product cause, or be affected by, local electrical interference, move
it away from other electrical equipment. Reset (switching off and back on again
or removing and reinserting batteries) if necessary.
7. RECHARGEABLE BATTERIES: Do not mix these with any other types of
batteries. Always remove from the product before recharging. Recharge batteries
under adult supervision. DO NOT RECHARGE OTHER TYPES OF BATTERIES.
2
1
THE PARTS OF YOUR TAGGER
Accessory Rail
Receiver Dome/Hit Indicator
VIDEO GAME MODULE
Indoor/Outdoor Switch
Weapon Rail
Trigger
Shield Activation
Button
Strength
Gauge
Ammo
Indicator
PINPOINT SIGHT
Strength Switch
SHOT BLAST™*
Attachment
Ammo Core™*
Release
Power/Game
Type Switch
Ammo Core™*
Rack
1
3
Release Button
BEFORE YOU TURN ON YOUR TAGGER
1. All players should agree on Strength scores for the
game, and set the Strength Switch to either 10 or
25. You can’t change your Strength score once the
game begins!
• 10 Strength means you can be tagged 10 times
before you are out of the game.
• 25 Strength means you can be tagged 25 times
before you are out of the game. Your Strength
Gauge will stay filled until you are on your last 10
Strength points.
2. Set the Indoor/Outdoor Switch to the proper
position based on where you are.
3. Decide what game type to play – Solo or Team.
• Solo Game means that all players are on their
own. The last player with any Strength Points left
wins!
• Team Game means that players organize
themselves into two teams that battle against each
other. You can’t tag someone on your own team.
There are many different team games you can play
– make up your own, or check out lazertag.com for
team game rules!
4
1
PLAYING A GAME
1. Switch your Tagger to Solo, Team 1 or Team 2.
2. When all players have set their Taggers to the right
game type, point your Tagger in the air and pull the
Trigger. This will activate a 10-second countdown,
after which the game begins!
3. To tag another Player, point your Tagger at him and
pull the Trigger. This will use one round of Ammo.
4. When all of the lights on the Ammo Indicator are out,
you need to reload. Press the Ammo Core™* Release
to pop out the Ammo Core™*. Now, push the Power
Core back in. You are reloaded and ready to continue
tagging!
Note: You have ten rounds
of Ammo after each
reload. When you fire one
round, one of the lights on
your Ammo Indicator will
blink. When you fire the
second, the blinking light
will go out.
5. When you are tagged, your Tagger will rumble, and
one (or more, depending on the Weapon Accessory
your opponent is using) of your Strength points will
be lost. When all of the lights on your Strength Gauge
go out, you are out of the game (your Tagger will warn
you when your Strength is down to dangerous levels).
6. The last player (or players on the same team in a
team game) with Strength points left wins!
The PHOENIX LTX™* Tagger is compatible with all LAZER TAG
Team Ops gear from TIGER ELECTRONICS™* and HASBRO®*.
See
.com for more details.
1
5
USING THE SHIELDS
When your shield is active, you
cannot be tagged, but you also can’t
tag anyone.
1. To activate your Shields, press and
hold the Shield Activation Button.
2. The shield will stay on for up to
10 seconds. You will hear it power
up and hum. While your shield is
up, you cannot tag or be tagged.
3. After you release the Shield
Activation Button, you will hear
your shield power down. You are
now vulnerable to tags, and can
tag other players.
4. You must wait 2 seconds before
activating your shields again.
5. You only have a few seconds of
shield charge per game, so use
them wisely!
6
1
You get 15
seconds of
Shields during
a 10 Strength
game.
You get 30
seconds of
Shields during
a 25 Strength
game.
USING THE SHOT BLAST™* WEAPON ACCESSORY
1. Slide the SHOT BLAST accessory onto the
front of the Tagger until it snaps into place.
2. To arm the SHOT BLAST, slide the Rack
toward you, and then forward again.
Note: Tags fired by the
SHOT BLAST accessory
have a shorter range than
regular tags, but affect a
wider area. If you catch
several opponents standing
close to one another, you
can actually hit all of them
at once!
3. When you pull the trigger, your Tagger will fire
an extra-powerful blast. Depending on how
accurate your shot is, you could take as many
as three points off your target’s Strength
Gauge.
4. You will need to Rack the SHOT BLAST again
before you can fire it.
5. If you pull the Trigger without using the Rack,
you will fire a single, regular Tagger shot.
6. To remove the SHOT BLAST, slide the
Release Button down and pull it off the Tagger.
USING THE PINPOINT SIGHT
1. Slide the PINPOINT SIGHT onto the accessory rail
on the top of your Tagger until it locks into place.
2. Look into the PINPOINT SIGHT. If it is properly
attached, you will see a green dot reflected on the
crosshairs.
3. Line up the green dot in the center of the
crosshairs with your target for pinpoint accuracy!
1
7
USING THE VIDEO GAME MODULE
Plug it in, and experience intense, single-player Lazer Tag action on your television!
REQUIREMENTS
TV with AV input OR VCR or DVD player with AV input attached to your TV.
• RF Adapter (not included) required if your TV does not have an AV input.
• Standard, CRT TV only. Not for use with projection, LCD, high-definition, or plasma TV.
• You cannot play this game through a cable box or satellite hookup. Game must be
connected directly to the TV, VCR, or DVD player.
• If the game malfunctions or freezes, you can reset it by turning your Tagger off
and then on again.
ASSEMBLY
Slide the Video Game Module onto the
accessory rail on the front of your Tagger,
until it locks into place.
To remove it, slide the Release Button
down and pull the Module off the Tagger.
Note: Do not use the PINPOINT SIGHT with
the Video Game Module.
8
1
SETUP
Insert the cable plugs into the AV inputs on your TV, VCR or DVD player.
Connecting to a TV:
1. Insert the cable’s white plug into the white audio-in jack
on the TV.
2. Insert the cable’s yellow plug into the yellow video-in jack
on the TV.
Note: these jacks are normally found on the front of
the TV near the adjustment controls, or on the back
of the TV near the antenna and cable connections
3. Turn on your TV, and set it to the channel/video input mode
directed by your TV owner’s manual.
Connecting to a VCR or DVD player:
1. Make sure the VCR or DVD player is properly connected to the TV.
2. Insert the cable’s white plug into the white audio-in jack on the VCR or DVD player.
DEMO
TV/VIDEO
- VOLUME +
3. Insert the cable’s yellow plug into the yellow video-in jack on the VCR or DVD player.
4. Turn on your TV and VCR or DVD player.
5. Set your TV, VCR or DVD player to the channel/video input
mode directed by your TV, VCR or DVD player owner’s manual.
1
9
- CHANNEL +
POWER
STEREO
TIMER/
STAND BY
VIDEO 2 INPUT
VIDEO
L
AUDIO
R
VIDEO GAME MODULE BUTTONS & CONTROLS
Left & Right Scroll Buttons – Scroll through menu options. Dodge
incoming tags. Launch Grenades while holding down SHIELD
Button.
Start Button – Start/Pause game
Release Button
TAGGER BUTTONS & CONTROLS
Some of the features of your Tagger will be
disabled during video game play, and are
not listed.
Power/Game Type Switch – Set to “Solo” for
video game play
Shield Activation Button – Activates Shields in game;
switches between menu options.
Trigger – Fire/Select
Ammo Core™* Release – Press forward to pop out the Ammo Core
Ammo Core™* – Pop out and push back in to reload
10
1
HOW TO PLAY
Object of the game: Defeat your opponents and take command of the environment in
which you are battling. Gain points by defeating opponents in order to unlock new
weapons, environments, and game types.
1. Slide the Power/Game Type Switch to Solo.
2. After a brief introduction, either pull the Trigger to begin play as directed on the
screen. The Main Menu will appear. Make menu selections by scrolling through
the options using the L and R Buttons on the Video Game Module. Pull the Trigger
to select the game type of your choice. Press the Shield Button to switch between
menus.
3. The first thing you should do is create a player, so that you can save your game and
unlock weapons and environments. Select this option from the menu and follow the
on-screen directions. You can create up to 5 different players.
4. Once a Player is created, you’re ready to play a game! There are three game types:
Single Game – Play a single round in an environment randomly chosen from the
environments you have unlocked.
Tournament – Play a full Tournament. Battle your way through all five environments.
Environments and new weapons will unlock as you play, and become available to you
in the Single Game type. Tournament is locked when you first play the game.
Target Practice – Hone your skills with Target Practice. Targets will randomly pop up
on screen for you to tag. Difficulty increases as you play.
4. Once you select a game, you will enter the first environment. Target your opponents
and tag them by pulling the Trigger. You can also collect the power-ups scattered
throughout each environment by tagging them.
11
1
5. When you are hit, you will notice the Strength Gauge on your Tagger decreasing.
6. You score points when you defeat opponents. As you score points, more weapons and
environments will unlock.
7. A game or an environment ends when you tag all of the opponents, or you run out of
Strength Points.
Notes: For best performance, stand 3-4 feet away from your television while playing. Always
be sure to keep some slack in the cable, to avoid damaging your Tagger or television.
The Tagger and game will shut down if no buttons are pressed for about four minutes.
THE GAME SCREEN
Ammo
Strength
Score
Timer
Flash Grenades
Laser Grenades
Shield Meter
12
1
BATTLE ACTIONS
Fire your Tagger – To fire your Tagger, aim it at an opponent on-screen (using the
crosshairs to aim), and pull the Trigger.
Dodge – Dodge incoming fire by pressing the R or L buttons.
Launch a Grenade – Aim at a target onscreen using the crosshairs, and press the Shield
Button at the same time as either the R Button (flash grenade, stuns enemies), or the L
Button (EM grenade, damages enemies).
Activate Shields – Shields work exactly as described above in USING THE SHIELDS.
Reload – When your Ammo Indicator is empty, you need to reload. This works exactly
as described above in PLAY A GAME. You can also set the game to Reload your Tagger
automatically from the Pause Menu.
Pause – Press the Start Button to pause your game. From here, you can exit your game,
or switch weapons.
Switch Weapons – Pause the game, and use the R and L Buttons to scroll to the Switch
Weapons option. Pull the Trigger to select. Scroll through your unlocked weapon options
until you get to the one you want. Pull the Trigger again to arm that weapon.
13
1
WEAPON TYPES
Standard Tagger – This weapon is the one you
start with. Every pull of the Trigger fires one
round of ammunition. After 10 shots, you will
need to reload.
SHOTBLAST™* - Can drain up to 3 points of
Strength from your target. Can also hit multiple
targets that are clustered close together. You
must reload every 3 shots.
Auto Assault – Press and hold the Trigger for
continuous fire, for up to ten seconds. Reload
after 10 bursts.
Burner – Press and hold the Trigger for
continuous fire that hits a wider area than the
Auto Assault. Reload after 10 bursts.
14
1
FCC STATEMENT
This device complies with part 15 of the FCC Rules. Operation is subject to the following two
conditions: (1) This device may not cause harmful interference, and (2) this device must accept
any interference received, including interference that may cause undesired operation.
This equipment has been tested and found to comply with the limits for a Class B digital device,
pursuant to part 15 of the FCC Rules. These limits are designed to provide reasonable protection
against harmful interference in a residential installation. This equipment generates, uses and can
radiate radio frequency energy, and, if not installed and used in accordance with the instructions,
may cause harmful interference to radio communications. However, there is no guarantee that
interference will not occur in a particular installation. If this equipment does cause harmful
interference to radio or television reception, which can be determined by turning the equipment
off and on, the user is encouraged to try to correct the interference by one or more of the
following measures:
• Reorient or relocate the receiving antenna.
• Increase the separation between the equipment and receiver.
• Consult the dealer or an experienced radio/TV technician for help.
CAUTION: Changes or modifications not expressly approved by the party responsible for
compliance could void the user’s authority to operate the equipment.
LAZER TAG is a registered trademark of
Shoot the Moon Products and is used with
permission.
®* and/or TM* and © 2008 Hasbro. All Rights Reserved.
TM & ® denote U.S. Trademarks.
U.S. Patent No. 5904621 & patents pending.
PN 6841540000
.com
for game types, detailed instructions, new
products and more!
Questions? Call 1-800-844-3733