1
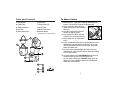
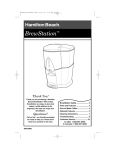
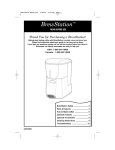
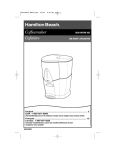
BrewStation™
English .............................. 2
USA: 1-800-851-8900
Canada : 1-800-267-2826
840106400
IMPORTANT SAFEGUARDS
When using electrical appliances, basic safety precautions should
always be followed to reduce the risk of fire, electric shock, and/or
injury to persons, including the following:
1. Read all instructions.
2. Do not touch hot surfaces. Use handles or knobs. Care must be
taken, as burns can occur from touching hot parts or from
spilled, hot liquid.
3. To protect against electric shock, do not place cord, plug or
brew station in water or other liquid.
4. Close supervision is necessary when any appliance is used by
or near children.
5. Unplug from outlet when either the brew station or clock is not
in use and before cleaning. Allow to cool before putting on or
taking off parts and before cleaning the appliance.
6. Brew station must be operated on a flat surface away from the
edge of counter to prevent accidental tipping.
7. Do not operate any appliance with a damaged cord or plug, or
after the appliance malfunctions or is dropped or damaged in
any manner. Call our toll-free customer service number for
information on examination, repair, or adjustment.
8. The use of accessory attachments not recommended by
Hamilton Beach/Proctor-Silex, Inc. may cause injuries.
9. Do not use outdoors.
10. Do not let cord hang over edge of table or counter or touch hot
surfaces, including stove.
11. The coffee tank is designed for use with this brew station. It
must never be used on a range top or in a microwave oven.
12. Do not place brew station on or near a hot gas or electric burner
or in a heated oven.
13. To disconnect brew station, turn controls to OFF, then remove
plug from wall outlet.
14. Scalding may occur if the cover is lifted during the brewing
cycle.
2
15. Warning: To reduce the risk of fire or electric shock, do not
remove the bottom cover. No user serviceable parts are inside.
Repair should be done by authorized service personnel only.
16. Do not use appliance for other than intended use.
SAVE THESE INSTRUCTIONS!
CONSUMER SAFETY INFORMATION
This appliance is intended for household use only.
This appliance is equipped with a polarized plug. This type of plug
has one blade wider than the other. The plug will fit into an electrical
outlet only one way. This is a safety feature intended to help reduce
the risk of electrical shock. If you are unable to insert the plug into
the outlet, try reversing the plug. If the plug should still fail to fit,
contact a qualified electrician to replace the obsolete outlet. Do
not attempt to defeat the safety purpose of the polarized plug by
modifying the plug in any way.
The length of the cord used on this appliance was selected to
reduce the hazards of becoming tangled in, or tripping over a longer
cord. If a longer cord is necessary an approved extension cord may
be used. The electrical rating of the extension cord must be equal to
or greater than the rating of the brew station. Care must be taken to
arrange the extension cord so that it will not drape over the countertop or tabletop where it can be pulled on by children or accidentally
tripped over.
To avoid an electrical circuit overload, do not use another high
wattage appliance on the same circuit with your brew station.
3
To Make Coffee
Parts and Features
1. Filter Basket
2. Coffee Tank
3. Coffee Dispenser
4. Drip Tray
5. Keep Warm Plate
6. Reservoir
7. Water Filter Lid*
8. Water Filter*
9. Water Filter Base*
10. Coffee Scoop
*optional feature on selected models
4
1. Before first use, clean brew station by following steps
listed in “To Clean the Inside of the BrewStation.”
2. Place water filter and water filter
holder into reservoir. (See Optional
Features.)
3. Fill coffee tank with the desired
amount of cold tap water.
4. Pour water from coffee tank into
reservoir. Do not exceed Max Fill.
5. Place coffee tank on Keep Warm
Plate.
6. Place a disposable paper filter in the filter basket. Use a
good quality cupcake (basket) style filter (8 to 12 cup
size). A permanent filter may also be used. Place filter
basket on coffee tank.
7. For each cup of coffee being made, place one level
tablespoon of coffee into filter basket. Close lid making
sure it is fully closed.
8. For clock model, press Auto/ON/OFF button once for
automatic brew or press twice for coffee now.
For non-clock model, press ON/OFF button once for
coffee now. Care should be taken when handling the
coffee tank after brewing.
5
9. To dispense coffee, press the coffee
dispenser with a cup. Remove cup
when the desired amount has been
dispensed. Coffee may be dispensed
during and after brewing.
10. When finished, push ON/OFF
button to turn off, then unplug brew
station. If desired, press ON/OFF
before the two-hour auto off turns the unit off automatically.
Optional Features (on selected models)
Water Filter
1. To replace, pull up on lid of filter
holder while holding filter base, turn
filter base to allow filter to drop out.
2. Before first use, soak water filter in
cold tap water for 15 minutes. Then
rinse under cold running tap water for
15 seconds.
3. Insert filter in base. Snap lid onto base.
4. Place filter and filter holder in reservoir.
5. Replace after 60 brew cycles of coffee. Set your replacement month by aligning the arrow with the month you
expect will represent 60 brew cycles.
Permanent Filter
The Permanent Filter takes the place of disposable paper filters.
Simply place the Permanent Filter in the filter basket. Rinse
the Permanent Filter in hot water before first use. Clean the
Permanent Filter under hot running water and let dry. Permanent Filter can be placed in top rack of automatic dishwasher.
6
Optional Features
(cont.)
Programmable Clock/Timer
To Set Clock:
1. Plug in brew station. Numbers on the clock will flash until
you set time of day or one minute elapses.
2. To set time of day, press H button to set current hour with
AM or PM.
3. Press M button until you reach the current time.
To Program Automatic Brew:
1. Make sure clock is set for correct time
of day.
2. Press Prog button and digits will flash.
3. Press H and M buttons until desired
brewing time is reached.
4. Press Prog button to confirm setting.
Digits will stop flashing and return to
set time of day.
5. Once brewing time has been set, follow this procedure:
• Follow steps 2–10 in “To Make Coffee.”
• Push Auto/ON/OFF button once and “PRO” will be
shown in display indicating the brew cycle will begin at
the set time.
NOTE: If the Auto/ON/OFF button is pushed twice, brewing will begin immediately (see page 5).
7
Cleaning Instructions
Customer Service
To maintain the performance of your brew station, clean once
a month.
If you have a question about your brew station, call our toll-free
customer service number. Before calling, please note the model,
type, and series numbers and fill in that information below. These
numbers can be found on the bottom of your brew station. This
information will help us answer your question much more quickly.
To Clean the Inside of the BrewStation:
1. Remove water filter and water filter holder (optional feature).
2. Plug in brew station and set the clock (on clock model).
3. Place empty coffee tank on Keep Warm Plate. Do not
add coffee into filter basket.
4. Pour one pint of plain white vinegar into the reservoir.
5. To turn ON, press Auto/ON/OFF button twice for clock
model or once for non-clock model. After 20 seconds
turn OFF.
6. Wait 20 minutes to allow the vinegar to clean. Then turn
ON again. When the brew cycle is finished, turn OFF. Wait
for brew station to cool, then empty coffee tank and rinse.
7. Pour one coffee tank of cold tap water into the reservoir.
Place coffee tank on Keep Warm Plate.
8. To turn ON, press Auto/ON/OFF button twice for clock
model or once for non-clock model. When the brew cycle
is finished, empty the coffee tank. Allow brew station to
cool, then repeat this process with one more coffee tank
of cold tap water.
9. Turn OFF when complete.
10. Wash coffee tank and brew basket before making a
beverage.
To Clean Coffee Tank and Filter Basket:
Coffee tank, drip tray, and filter basket should be washed in
hot, soapy water. Filter basket may be washed on the top
rack of the dishwasher.
8
MODEL:_____________ TYPE:_____________ SERIES: _____________
LIMITED WARRANTY
This product is warranted to be free from defects in material and workmanship for a
period of two (2) years for Hamilton Beach Portfolio products or one (1) year for
Hamilton Beach products from the date of original purchase, except as noted below.
During this period, we will repair or replace this product, at our option, at no cost. THE
FOREGOING WARRANTY IS IN LIEU OF ANY OTHER WARRANTY, WHETHER
EXPRESS OR IMPLIED, WRITTEN OR ORAL INCLUDING ANY WARRANTY OF
MERCHANTABILITY OR FITNESS FOR A PARTICULAR PURPOSE. ANY LIABILITY IS
EXPRESSLY LIMITED TO AN AMOUNT EQUAL TO THE PURCHASE PRICE PAID, AND
ALL CLAIMS FOR SPECIAL, INCIDENTAL AND CONSEQUENTIAL DAMAGES ARE
HEREBY EXCLUDED. There is no warranty with respect to the following, which may be
supplied with this product: glass parts, glass containers, cutter/strainer, blades, and/or
agitators. This warranty extends only to the original consumer purchaser and does not
cover a defect resulting from abuse, misuse, neglect, use for commercial purposes, or
any use not in conformity with the printed directions. This warranty gives you specific
legal rights, and you may also have other legal rights which vary from state to state, or
province to province. Some states or provinces do not allow limitations on implied
warranties or special, incidental or consequential damages, so the foregoing limitations
may not apply to you.
If you have a claim under this warranty, DO NOT RETURN THE APPLIANCE TO THE
STORE! Please call our CUSTOMER SERVICE NUMBER. (For faster service please
have model, series, and type numbers ready for operator to assist you.)
CUSTOMER SERVICE NUMBERS
In the U.S. 1-800-851-8900
In Canada 1-800-267-2826
Web site address: www.hamiltonbeach.com
KEEP THESE NUMBERS FOR FUTURE REFERENCE!
9
HAMILTON BEACH PROCTOR-SILEX, INC.
PROCTOR-SILEX CANADA, INC.
263 Yadkin Road
Southern Pines, NC 28387
Picton, Ontario K0K 2T0
840106400
Web site address: www.hamiltonbeach.com
10
12/02