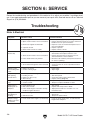
1
MODEL G4179 1⁄2 HP
POWER FEEDER
OWNER'S Manual
Copyright © JUNE, 2008 By Grizzly Industrial, Inc. REVISED JULY, 2008.
Warning: No portion of this manual may be reproduced in any shape
Or form without the written approval of Grizzly Industrial, inc.
#CR10816 printed IN TAIWAN
4HISMANUALPROVIDESCRITICALSAFETYINSTRUCTIONSONTHEPROPERSETUP
OPERATIONMAINTENANCEANDSERVICEOFTHISMACHINEEQUIPMENT
&AILURETOREADUNDERSTANDANDFOLLOWTHEINSTRUCTIONSGIVENINTHIS
MANUALMAYRESULTINSERIOUSPERSONALINJURYINCLUDINGAMPUTATION
ELECTROCUTIONORDEATH
4HEOWNEROFTHISMACHINEEQUIPMENTISSOLELYRESPONSIBLEFORITS
SAFEUSE4HISRESPONSIBILITYINCLUDESBUTISNOTLIMITEDTOPROPER
INSTALLATIONINASAFEENVIRONMENTPERSONNELTRAININGANDUSAGE
AUTHORIZATIONPROPERINSPECTIONANDMAINTENANCEMANUALAVAILABILITY
ANDCOMPREHENSIONAPPLICATIONOFSAFETYDEVICESBLADECUTTERINTEG
RITYANDTHEUSAGEOFPERSONALPROTECTIVEEQUIPMENT
4HEMANUFACTURERWILLNOTBEHELDLIABLEFORINJURYORPROPERTYDAMAGE
FROMNEGLIGENCEIMPROPERTRAININGMACHINEMODIFICATIONSORMISUSE
3OMEDUSTCREATEDBYPOWERSANDINGSAWINGGRINDINGDRILLINGAND
OTHERCONSTRUCTIONACTIVITIESCONTAINSCHEMICALSKNOWNTOTHE3TATE
OF#ALIFORNIATOCAUSECANCERBIRTHDEFECTSOROTHERREPRODUCTIVE
HARM3OMEEXAMPLESOFTHESECHEMICALSARE
s ,EADFROMLEADBASEDPAINTS
s #RYSTALLINESILICAFROMBRICKSCEMENTANDOTHERMASONRYPRODUCTS
s !RSENICANDCHROMIUMFROMCHEMICALLYTREATEDLUMBER
9OURRISKFROMTHESEEXPOSURESVARIESDEPENDINGONHOWOFTENYOU
DOTHISTYPEOFWORK4OREDUCEYOUREXPOSURETOTHESECHEMICALS
7ORKINAWELLVENTILATEDAREAANDWORKWITHAPPROVEDSAFETYEQUIP
MENTSUCHASTHOSEDUSTMASKSTHATARESPECIALLYDESIGNEDTOFILTER
OUTMICROSCOPICPARTICLES
Table of Contents
INTRODUCTION................................................ 2
Foreword......................................................... 2
Contact Info.................................................... 2
Functional Overview....................................... 2
Machine Data Sheet....................................... 3
Identification.................................................... 5
SECTION 1: SAFETY........................................ 6
Safety Instructions for Machinery................... 6
Additional Safety for Power Feeders.............. 8
SECTION 2: CIRCUIT REQUIREMENTS......... 9
220V Single-Phase......................................... 9
SECTION 3: SETUP........................................ 10
Setup Safety................................................. 10
Items Needed for Setup................................ 10
Unpacking..................................................... 10
Inventory....................................................... 11
Hardware Recognition Chart........................ 12
Clean Up....................................................... 13
Assembly...................................................... 13
Base Mounting.............................................. 14
Mounting Options.......................................... 15
Test Run....................................................... 16
Model G4179 1⁄2 HP Power Feeder
SECTION 4: OPERATIONS............................ 17
Operation Safety........................................... 17
Basic Use and Care...................................... 17
SECTION 5: MAINTENANCE.......................... 19
Schedule....................................................... 19
Cleaning........................................................ 19
Lubrication.................................................... 19
SECTION 6: SERVICE.................................... 20
Troubleshooting............................................ 20
Wheel Replacement..................................... 21
SECTION 7: WIRING....................................... 22
Electrical Safety Instructions......................... 22
Wiring Diagram............................................. 23
SECTION 8: PARTS........................................ 24
Power Feed.................................................. 24
Power Feed Parts List.................................. 25
Base.............................................................. 26
Base Parts List.............................................. 26
WARRANTY AND RETURNS......................... 29
-1-
INTRODUCTION
Foreword
Functional Overview
We are proud to offer the Model G4179 1⁄2 HP
Power Feeder. This machine is part of a growing
Grizzly family of fine woodworking machinery.
When used according to the guidelines set forth in
this manual, you can expect years of trouble-free,
enjoyable operation and proof of Grizzly’s commitment to customer satisfaction.
This power feeder greatly simplifies repetitive
operations on table saws, jointers, and shapers by
automating how workpieces are fed into the cut.
The specifications, drawings, and photographs
illustrated in this manual represent the Model
G4179 when the manual was prepared. However,
owing to Grizzly’s policy of continuous improvement, changes may be made at any time with no
obligation on the part of Grizzly.
For your convenience, we always keep current
Grizzly manuals available on our website at www.
grizzly.com. Any updates to your machine will be
reflected in these manuals as soon as they are
complete. Visit our site often to check for the latest updates to this manual!
Contact Info
We stand behind our machines. If you have any
service questions, parts requests or general questions about the machine, please call or write us at
the location listed below.
Grizzly Industrial, Inc.
1203 Lycoming Mall Circle
Muncy, PA 17756
Phone: (570) 546-9663
Fax: (800) 438-5901
E-Mail: [email protected]
Since the power feeder is typically positioned
between the blade and the operator during operations, the operator’s hands do not need to get
near the blade when feeding the workpiece,
so the danger of an accidental cutting injury is
greatly reduced.
Additionally, the power feeder provides more consistent results than hand fed operations, because
it moves the workpiece at an even speed and
maintains consistent workpiece pressure against
the table and fence throughout the cut.
The power feeder works by simply attaching rubber rollers to a motor through a series of gears
designed to control the roller speed.
Since the rubber rollers must be positioned
correctly to maintain even workpiece pressure
against the table and fence, the power feeder is
mounted on a stand that allows it to be moved and
locked at an array of heights an angles within the
range of the stand.
The power feeder stand is typically mounted to the
desired machine by clamping it to the machine’s
table, or mounting it directly into the machine’s
table via drilled and tapped holes.
If you have any comments regarding this manual,
please write to us at the address below:
Grizzly Industrial, Inc.
/O Technical Documentation Manager
P.O. Box 2069
Bellingham, WA 98227-2069
Email: [email protected]
C
-2-
Model G4179 1⁄2 HP Power Feeder
Machine Data
Sheet
MACHINE DATA
SHEET
Customer Service #: (570) 546-9663 · To Order Call: (800) 523-4777 · Fax #: (800) 438-5901
MODEL G4179 1/2 HP POWER FEEDER
EgdYjXi9^bZch^dch/
Weight.............................................................................................................................................................. 104 lbs.
Length/Width/Height....................................................................................................................... 45 x 18 x 28-1/2 in.
Foot Print (Length/Width)............................................................................................................................. N/A x N/A
H]^ee^c\9^bZch^dch/
8Vgidc&
Type................................................................................................................................................... Cardboard
Content.................................................................................................................................................. Machine
Weight...................................................................................................................................................... 59 lbs.
Length/Width/Height................................................................................................................... 20 x 11 x 19 in.
8Vgidc'
Type................................................................................................................................................... Cardboard
Content...................................................................................................................................................... Stand
Weight...................................................................................................................................................... 59 lbs.
Length/Width/Height..................................................................................................................... 30 x 11 x 9 in.
:aZXig^XVa/
Switch..................................................................................................................................... Forward/Reverse Barrel
Switch Voltage...................................................................................................................................................... 220V
Cord Length............................................................................................................................................................ 9 ft.
Cord Gauge....................................................................................................................................................18 gauge
Recommended Breaker Size.............................................................................................................................15 amp
Plug.......................................................................................................................................................................... No
Bdidgh/
BV^c
Type.................................................................................................................. TEFC Capacitor Start Induction
Horsepower..............................................................................................................................................1/2 HP
Voltage........................................................................................................................................................220V
Prewired......................................................................................................................................................220V
Phase........................................................................................................................................................ Single
Amps........................................................................................................................................................... 2.9A
Speed.................................................................................................................................................1700 RPM
Cycle..........................................................................................................................................................60 Hz
Number Of Speeds............................................................................................................................................1
Power Transfer ................................................................................................................................... Gear Box
Bearings................................................................................................................................. Lubricated for Life
BV^cHeZX^[^XVi^dch/
Ldg`e^ZXZ8VeVX^i^Zh
Min. WorkPiece Len..................................................................................................................................... 6 in.
BdYZa<)&,.
I]Z^c[dgbVi^dcXdciV^cZY]ZgZ^c^hYZZbZYVXXjgViZVhd[-$'($'%%-VcYgZegZhZcihdjgbdhigZXZciegdYjXiheZX^[^XVi^dch#
9jZiddjgdc\d^c\^begdkZbZciZ[[dgih!i]^h^c[dgbVi^dcbVncdiVXXjgViZanYZhXg^WZ^iZbhegZk^djhanejgX]VhZY#
Model G4179 1⁄2 HP Power Feeder
E6<:&D;'
-3-
DeZgVi^dc>c[d
No. Of Feed Speeds......................................................................................................................................... 4
Feed Speeds....................................................................................................................... 9.5, 15, 25, 38 FPM
Swing.................................................................................................................................................... 360 deg.
Vertical Movement................................................................................................................................10-1/4 in.
Horizontal Movement............................................................................................................................16-3/8 in.
Rotation.................................................................................................................................. Forward, Reverse
GdaaZg>c[d
No. Of Rollers....................................................................................................................................................3
Roller Width..................................................................................................................................................2 in.
Roller Diameter............................................................................................................................................ 4 in.
Roller Suspension................................................................................................................................. 15/16 in.
Max Height Rollers Parallel Table Surface............................................................................................ 7-7/8 in.
Centers Between Rollers....................................................................................................................... 4-3/4 in.
Di]Zg
Column Diameter......................................................................................................................................... 2 in.
8dchigjXi^dc>c[d
Roller Construction.................................................................................................................. Synthetic Rubber
Housing Construction................................................................................................................. Cast Aluminum
Supports Construction.......................................................................................................................... Cast Iron
Column Construction.................................................................................................................................. Steel
Paint.......................................................................................................................................................... Epoxy
Di]ZgHeZX^[^XVi^dch/
ISO Factory ................................................................................................................................................... ISO 9001
Country Of Origin ..............................................................................................................................................Taiwan
Warranty ............................................................................................................................................................ 1 Year
Serial Number Location ................................ "Checked" Sticker, On In-feed Portion Of Housing's Roller Cover Side
Assembly Time ........................................................................................................................................... 45 minutes
;ZVijgZh/
Rollers are Spring Tensioned
Heavy-Duty Gear Reduction with Hardened Gears
Universal Positioning with Handle Locks
BdYZa<)&,.
-4-
I]Z^c[dgbVi^dcXdciV^cZY]ZgZ^c^hYZZbZYVXXjgViZVhd[-$'($'%%-VcYgZegZhZcihdjgbdhigZXZciegdYjXiheZX^[^XVi^dch#
9jZiddjgdc\d^c\^begdkZbZciZ[[dgih!i]^h^c[dgbVi^dcbVncdiVXXjgViZanYZhXg^WZ^iZbhegZk^djhanejgX]VhZY#
E6<:'D;'
Model G4179 1⁄2 HP Power Feeder
Identification
Refer to Figure 1 and your power feeder to familiarize yourself with the controls, features, and terminology
used in this manual. Doing so will make setup, use, and any future maintenance easier.
Vertical Travel
Handcrank
Horizontal
Travel Lock
Horizontal
Handcrank
Vertical
Travel
Lock
Upper Elbow
Joint Lock
⁄2 HP
Motor
1
Lower Elbow
Joint Lock
Gearbox Oil Plug
Labeled "OIL"
Located on Top
of Case Behind
Motor
Rotary
Movement
Lock
Figure 1. Controls and features.
Model G4179 1⁄2 HP Power Feeder
-5-
3%#4)/.3!&%49
&OR9OUR/WN3AFETY2EAD)NSTRUCTION
-ANUAL"EFORE/PERATINGTHIS-ACHINE
4HEPURPOSEOFSAFETYSYMBOLSISTOATTRACTYOURATTENTIONTOPOSSIBLEHAZARDOUSCONDITIONS4HIS
MANUALUSESASERIESOFSYMBOLSANDSIGNALWORDSINTENDEDTOCONVEYTHELEVELOFIMPORTANCE
OFTHESAFETYMESSAGES4HEPROGRESSIONOFSYMBOLSISDESCRIBEDBELOW2EMEMBERTHATSAFETY
MESSAGESBYTHEMSELVESDONOTELIMINATEDANGERANDARENOTASUBSTITUTEFORPROPERACCIDENT
PREVENTIONMEASURES
)NDICATESANIMMINENTLYHAZARDOUSSITUATIONWHICHIFNOTAVOIDED
7),,RESULTINDEATHORSERIOUSINJURY
)NDICATESAPOTENTIALLYHAZARDOUSSITUATIONWHICHIFNOTAVOIDED
#/5,$RESULTINDEATHORSERIOUSINJURY
)NDICATESAPOTENTIALLYHAZARDOUSSITUATIONWHICHIFNOTAVOIDED
-!9RESULTINMINORORMODERATEINJURY)TMAYALSOBEUSEDTOALERT
AGAINSTUNSAFEPRACTICES
./4)#% 4HISSYMBOLISUSEDTOALERTTHEUSERTOUSEFULINFORMATIONABOUT
PROPEROPERATIONOFTHEMACHINE
Safety Instructions for Machinery
3AFETY)NSTRUCTIONSFOR-ACHINERY
2%!$4(%%.4)2%-!.5!,"%&/2%
34!24).'-!#().%29BVX]^cZgnegZh"
Zcih hZg^djh ^c_jgn ]VoVgYh id jcigV^cZY
jhZgh#
!,7!93 53% (%!2).' 02/4%#4)/.
7(%. /0%2!4).' -!#().%29
BVX]^cZgn cd^hZ XVc XVjhZ eZgbVcZci
]ZVg^c\adhh#
!,7!93 53% !.3) !002/6%$
3!&%49',!33%37(%./0%2!4).'
-!#().%29 :kZgnYVn ZnZ\aVhhZh dcan
]VkZ ^beVXi gZh^hiVci aZchZh·i]Zn VgZ
CDIhV[Zin\aVhhZh#
7%!2 02/0%2 !00!2%, 9D CDI
lZVgaddhZXadi]^c\!\adkZh!cZX`i^Zh!g^c\h!
dg _ZlZagn i]Vi XVc XViX] ^c bdk^c\ eVgih#
LZVg egdiZXi^kZ ]V^g XdkZg^c\ id XdciV^c
adc\]V^gVcYlZVgcdc"ha^e[ddilZVg#
!,7!93 7%!2 ! .)/3( !002/6%$
2%30)2!4/2 7(%. /0%2!4).'
-!#().%29 4(!4 02/$5#%3 $534
BdhiineZhd[YjhilddY!bZiVa!ZiX#XVc
XVjhZhZkZgZgZhe^gVidgn^aacZhhZh#
.%6%2 /0%2!4% -!#().%29 7(%.
4)2%$/25.$%24(%).&,5%.#%/&
$25'3/2!,#/(/,7ZbZciVaanVaZgi
ViVaai^bZhl]Zcgjcc^c\bVX]^cZgn#
-6-
Model G4179 1⁄2 HP Power Feeder
3AFETY)NSTRUCTIONSFOR-ACHINERY
/.,9 !,,/7 42!).%$ !.$ 02/0
%2,9 350%26)3%$ 0%23/..%, 4/
/0%2!4% -!#().%29 BV`Z hjgZ
deZgVi^dc^chigjXi^dchVgZhV[ZVcYXaZVgan
jcYZghiddY#
+%%0#(),$2%.!.$6)3)4/23!7!9
@ZZe Vaa X]^aYgZc VcY k^h^idgh V hV[Z Y^h"
iVcXZ[gdbi]Zldg`VgZV#
-!+% 7/2+3(/0 #(),$02//& JhZ
eVYadX`h! bVhiZg hl^iX]Zh! VcY gZbdkZ
hiVgihl^iX]`Znh#
.%6%2 ,%!6% 7(%. -!#().% )3
25..).'IjgcedlZg/&&VcYVaadlVaa
bdk^c\ eVgih id XdbZ id V XdbeaZiZ hide
WZ[dgZaZVk^c\bVX]^cZjcViiZcYZY#
$/ ./4 53% ). $!.'%2/53
%.6)2/.-%.43 9D CDI jhZ bVX]^c"
Zgn ^c YVbe! lZi adXVi^dch! dg l]ZgZ Vcn
[aVbbVWaZdgcdm^djh[jbZhbVnZm^hi#
+%%07/2+!2%!#,%!.!.$7%,,
,)'(4%$8ajiiZgVcYYVg`h]VYdlhbVn
XVjhZVXX^YZcih#
53% ! '2/5.$%$ %84%.3)/. #/2$
2!4%$&/24(%-!#().%!-0%2!'%
<gdjcYZY XdgYh b^c^b^oZ h]dX` ]VoVgYh#
JcYZgh^oZY XdgYh XgZViZ ZmXZhh^kZ ]ZVi#
6alVnhgZeaVXZYVbV\ZYZmiZch^dcXdgYh#
!,7!93 $)3#/..%#4 &2/- 0/7%2
3/52#%
"%&/2%
3%26)#).'
-!#().%29# BV`Z hjgZ hl^iX] ^h ^c D;;
edh^i^dcWZ[dgZgZXdccZXi^c\#
-!).4!). -!#().%29 7)4( #!2%
@ZZeWaVYZhh]VgeVcYXaZVc[dgWZhiVcY
hV[ZhieZg[dgbVcXZ#;daadl^chigjXi^dch[dg
ajWg^XVi^c\VcYX]Vc\^c\VXXZhhdg^Zh#
-!+% 352% '5!2$3 !2% ). 0,!#%
!.$ 7/2+ #/22%#4,9 "%&/2%
53).'-!#().%29
Model G4179 1⁄2 HP Power Feeder
2%-/6% !$*534).' +%93 !.$
72%.#(%3BV`ZV]VW^id[X]ZX`^c\[dg
`Znh VcY VY_jhi^c\ lgZcX]Zh WZ[dgZ ijgc"
^c\bVX]^cZgn/.#
#(%#+ &/2 $!-!'%$ 0!243
"%&/2%53).'-!#().%298]ZX`[dg
W^cY^c\dgb^hVa^\cZYeVgih!Wgd`ZceVgih!
addhZ Wdaih! VcY Vcn di]Zg XdcY^i^dch i]Vi
bVn ^beV^g bVX]^cZ deZgVi^dc# GZeV^g dg
gZeaVXZYVbV\ZYeVgihWZ[dgZdeZgVi^dc#
53% 2%#/--%.$%$ !##%33/2)%3
GZ[Zgidi]Z^chigjXi^dcbVcjVa[dggZXdb"
bZcYZY VXXZhhdg^Zh# >begdeZg VXXZhhd"
g^Zh^cXgZVhZg^h`d[^c_jgn#
$/ ./4 &/2#% -!#().%29 Ldg` Vi
i]ZheZZY[dgl]^X]i]ZbVX]^cZdgVXXZh"
hdgnlVhYZh^\cZY#
3%#52% 7/2+0)%#% JhZ XaVbeh dg
V k^hZ id ]daY i]Z ldg`e^ZXZ l]Zc egVXi^"
XVa# 6 hZXjgZY ldg`e^ZXZ egdiZXih ndjg
]VcYhVcY[gZZhWdi]]VcYhiddeZgViZi]Z
bVX]^cZ#
$/ ./4 /6%22%!#( BV^ciV^c hiVW^a^in
VcYWVaVcXZViVaai^bZh#
-!.9 -!#().%3 #!. %*%#4
7/2+0)%#%3 4/7!2$ /0%2!4/2
@cdlVcYVkd^YXdcY^i^dchi]ViXVjhZi]Z
ldg`e^ZXZid`^X`WVX`#
!,7!93 ,/#+ -/"),% "!3%3
)& 53%$ "%&/2% /0%2!4).'
-!#().%29#
#%24!). $534 -!9 "% (!:!2$/53
id i]Z gZhe^gVidgn hnhiZbh d[ eZdeaZ VcY
Vc^bVah!ZheZX^Vaan[^cZYjhi#7ZVlVgZd[
i]Z ineZ d[ Yjhi ndj VgZ ZmedhZY id VcY
ValVnhlZVgVgZhe^gVidgYZh^\cZYid[^aiZg
i]ViineZd[Yjhi#
-7-
Additional Safety for Power Feeders
1. SAFETY ACCESSORIES. Always use appropriate machine guards.
2.TOOL SPEED. Make sure all cutting tools
are rotating at the operating speed before
feeding the workpiece.
3. FEEDING SPEED. DO NOT overload the
cutting tool by feeding too quickly. The cutting
tool will perform better and be safer to work
with at the rate for which it was designed.
4. HAND SAFETY. Keep hands away from
rotating parts on the feeder and the cutting
tool. Do not allow hands or clothing to be
pinched beween the rollers and workpiece.
Like all machines there is danger associated
with this machine. Accidents are frequently
caused by lack of familiarity or failure to pay
attention. Use this machine with respect
and caution to lessen the possibility of
operator injury. If normal safety precautions
are overlooked or ignored, serious personal
injury may occur.
-8-
5. WORKPIECE SUPPORT. DO NOT feed long
workpieces without providing adequate support at the outfeed end of the table.
6. STOPPING FEEDER. Always stop the feeder
before stopping the cutting tool.
7.ADJUSTMENTS. Disconnect the feeder from
its power source before cleaning, repairing,
or making adjustments.
8. EXPERIENCING DIFFICULTIES. If at any
time you are experiencing difficulties performing the intended operation, stop using
the machine! Contact Tech Support at (570)
546-9663.
No list of safety guidelines can be complete.
Every shop environment is different. Always
consider safety first, as it applies to your
individual working conditions. Use this and
other machinery with caution and respect.
Failure to do so could result in serious personal injury, damage to equipment, or poor
work results.
Model G4179 1⁄2 HP Power Feeder
SECTION 2: CIRCUIT REQUIREMENTS
220V Single-Phase
Power Connection Device
The type of plug required to connect your machine
to power depends on the type of service you currently have or plan to install. We recommend
using the plug shown in Figure 2.
Serious personal injury could occur if you
connect the machine to power before completing the setup process. DO NOT connect
the machine to the power until instructed
later in this manual.
Electrocution or fire could
result if machine is not
grounded and installed in
compliance with electrical
codes. Compliance MUST
be verified by a qualified
electrician!
Figure 2. NEMA 6-15 plug and receptacle.
Extension Cords
Full Load Amperage Draw
Using extension cords may reduce the life of the
motor. Instead, place the machine near a power
source. If you must use an extension cord:
This machine draws the following amps under
maximum load:
•
Amp Draw.............................................. 2.9 Amps
Power Supply Circuit Requirements
You MUST connect your machine to a grounded
circuit that is rated for the amperage given below.
Never replace a circuit breaker on an existing circuit with one of higher amperage without consulting a qualified electrician to ensure compliance
with wiring codes. If you are unsure about the
wiring codes in your area or you plan to connect your machine to a shared circuit, consult
a qualified electrician.
Use at least a 14 gauge cord that does not
exceed 50 feet in length!
•The extension cord must also have a ground
wire and plug pin.
•A qualified electrician MUST size cords over
50 feet long to prevent motor damage.
Minimum Circuit Size.............................. 15 Amps
Model G4179 1⁄2 HP Power Feeder
-9-
SECTION 3: SETUP
Setup Safety
This machine presents
serious injury hazards
to untrained users. Read
through this entire manual to become familiar with
the controls and operations before starting the
machine!
Wear safety glasses during the entire setup process!
Items Needed for
Setup
The following items are needed to complete the
setup process, but are not included with your
machine:
Description
Qty
•Safety Glasses............................................ 1
•Light Machine Oil ..................... As Required
• Mineral Spirits............................ As Required
• Medium-Grade Thread Locking Liquid........ 1
• Clean Rags................................ As Required
Unpacking
Your machine was carefully packaged for safe
transportation. Remove the packaging materials
from around your machine and inspect it. If you
discover the machine is damaged, please immediately call Customer Service at (570) 546-9663
for advice.
Save the containers and all packing materials for
possible inspection by the carrier or its agent.
Otherwise, filing a freight claim can be difficult.
When you are completely satisfied with the condition of your shipment, inventory the contents.
-10-
Model G4179 1⁄2 HP Power Feeder
Inventory
B
The following is a description of the main components shipped with your machine. Lay the components out to inventory them.
A
Note: If you can't find an item on this list, check
the mounting location on the machine or examine
the packaging materials carefully. Occasionally
we pre-install certain components for shipping
purposes.
Box Inventory (Figures 3 & 4)
Qty
A. Power Feeder Assembly............................. 1
B. Extra 26/34-Tooth Gears (Behind Cover)...... ...............................................................1 Ea
C. Elbow Joint Assembly................................. 1
D. Base and Column Assembly....................... 1
E. Crank and Leadscrew Assembly................. 1
F. Base Bolt Pattern Template......................... 1
G. Pointed Set Screws M8-1.25 x 12............... 3
H. Hex Wrench 4mm........................................ 1
I. Handcrank Handles..................................... 2
J. Flat Washer 13mm...................................... 1
K. T-Handle...................................................... 1
L. Horizontal Column Assembly...................... 1
C
Figure 3. Power feeder inventory.
D
E
F
G
H
J
I
K
L
SUFFOCATION HAZARD!
Immediately discard all plastic bags and packing materials to eliminate choking/suffocation hazards for children
and animals.
Model G4179 1⁄2 HP Power Feeder
Figure 4. Base inventory.
If any nonproprietary parts are missing (e.g. a
nut or a washer), we will gladly replace them; or
for the sake of expediency, replacements can be
obtained at your local hardware store.
-11-
Hardware Recognition Chart
-12-
Model G4179 1⁄2 HP Power Feeder
Clean Up
The unpainted surfaces are coated with a waxy
oil to prevent corrosion during shipment. Remove
this protective coating with a solvent cleaner or
degreaser, such as shown in Figure 5. For thorough cleaning, some parts must be removed.
For optimum performance, clean all moving
parts or sliding contact surfaces. Avoid chlorine-based solvents, such as acetone or brake
parts cleaner that may damage painted surfaces. Always follow the manufacturer’s instructions
when using any type of cleaning product.
Gasoline and petroleum
products have low flash
points and can explode
or cause fire if used to
clean machinery. DO
NOT use these products
to clean the machinery.
Many cleaning solvents
are toxic if inhaled.
Minimize your risk by only
using these products in a
well ventilated area.
Assembly
You MUST assemble all guards, fences, and
holdowns before starting your machine or
power feeder. Failure to heed this warning
could result in serious personal injury.
To correctly position this power feeder on your
table top, completely assemble the power feeder
first in the order of A, B and C as shown in
Figures 6 and 7. Next, refer to Base Mounting
on Page 14. With the power feeder unit completely
assembled, it will be easier to locate where on the
table top you will need to drill your base mounting
holes, so you can take advantage of the full range
of power feeder swing and adjustments.
A
B
G2544—Solvent Cleaner & Degreaser
A great product for removing the waxy shipping
grease from your machine during clean up.
Figure 6. Stand assembly.
C
Figure 5. Cleaner/degreaser available from
Grizzly.
Figure 7. Assembled unit.
Model G4179 1⁄2 HP Power Feeder
-13-
Base Mounting
Whichever way you mount your power feeder,
you must be able to use the handcranks and lock
levers to position the rubber wheels parallel with
the table surface and 1⁄8" lower than the thickness
of your workpiece.
Position the power feeder on the table top to
determine where to drill your base mounting
holes, so you can maximize power feeder swing
and adjustment options.
Also, you must be able to point the power feeder
slightly towards the machine fence (Figure 8). In
other words, the tracking of the power feeder must
be toed-in approximately 1° to 1.5° degrees toward
the machine fence so the rubber wheels slightly
push the workpiece against the fence during cutting operations.
There are two mounting options available:
Through Bolt Mounting and Direct Mounting
(discussed on Page 15). Choose an option that
suits your requirements.
Shaper
Jointer
;ZcXZ
Tablesaw
;ZcXZ
;ZcXZ
7aVYZ
8jiiZg
)i]"GdaaZg
BdYZah
;ZZY
;ZZY
;ZZY
8jiiZg]ZVY
Figure 8. Typical power feed mounting on a shaper, jointer, and tablesaw.
-14-
Model G4179 1⁄2 HP Power Feeder
Mounting Options
To correctly position this power feeder on your
table top, completely assemble the power feeder
first, then refer to this section and mount your
base to the table using one of the two methods
below. The reason for this order is that with the
power feeder unit completely assembled, it will
be easier to locate where on the table top you will
need to drill your base mounting holes, so you can
take advantage of the full range of power feeder
swing and adjustments.
Through-Bolt Mounting
We recommend that you mount your new power
feeder to the machine table with through bolts,
nuts, and washers (Figure 9). This option will
give the most rigidity and clamping strength to
prevent the feeder base from twisting out of alignment during use. However, if under-table support
webs interfere with washer or nut locations under
the table, you must use an optional clamping kit,
or drill and thread holes directly into the table as
described in Direct Mounting.
7dai
;ZZYZg
7VhZ
;aViLVh]Zg
BVX]^cZIVWaZ
;aViLVh]Zg
AdX`LVh]Zg
AdX`^c\=ZmCji
IVWaZ
Hjeedgi
LZWW^c\
Figure 9. Through-bolt mounting.
7dai
;ZZYZg
7VhZ
AdX`LVh]Zg
;aViLVh]Zg
BVX]^cZIVWaZ
Direct Mounting
Use the included mounting template to drill and
tap your table, so the power feeder base can
be directly mounted to the table surface (Figure
10). If the table is thinner than 3⁄8" thick where
the threaded holes would be drilled and tapped,
or if support webbing is in the way, the threads
may strip or loosen as the power feeder is used.
Thread locking compound will not cure this situation. Revert to the Through-Bolt Mounting
option. In any case, make sure to use a mediumgrade liquid thread locking compound on all
threads.
Model G4179 1⁄2 HP Power Feeder
IVWaZ
Hjeedgi
LZWW^c\
6eeanBZY^jb
<gVYZI]gZVY
AdX`^c\8dbedjcY
idi]ZI]gZVYh
Figure 10. Direct mounting.
-15-
Test Run
6. Connect the power feeder to the power supply and use the feed direction switch (Figure
11) to test operation in both directions.
Once power feeder assembly is complete and
mounted on the table, you must test run your
power feeder to make sure it runs properly.
— Listen and watch for abnormal noises or
vibrations. The power feeder should run
smoothly.
If, during the test run, you cannot easily locate
the source of an unusual noise or vibration, stop
using the power feeder immediately, then review
the Troubleshooting table on Page 21.
—Correct for any unusual noises or vibrations before operating the power feeder
any further. Always disconnect the power
feeder from power when investigating or
correcting potential problems.
If you still cannot remedy a problem, contact our
Technical Support at (570) 546-9663 for assistance.
Loose hair, clothing, or
jewelry could get caught
in machinery and cause
serious personal injury.
Keep these items away
from moving parts at all
times to reduce this risk.
To test run the power feed:
1.Read the entire instruction manual first!
Figure 11. Feed direction switch.
2. Make sure all tools and foreign objects have
been removed from the tabletop area.
3. Make sure that the power feeder gearbox oil
level is full, the oil level should be 1" below
the oil fill port. See Figure 1 on Page 5 for oil
fill port location.
4. Ensure that all tools and objects used during
set up are cleared away from the machine.
5.Adjust and lock the power feeder so the
wheels are held approximately one inch
above the table and nothing will interfere with
wheel rotation.
-16-
Model G4179 1⁄2 HP Power Feeder
SECTION 4: OPERATIONS
Operation Safety
To reduce the risk of
serious injury when using
this machine, read and
understand this entire
manual before beginning
any operations.
Damage to your eyes and lungs could result
from using woodworking machinery without
proper protective gear. Always wear safety
glasses and a respirator when operating this
machine.
Loose hair, clothing, or
jewelry could get caught
in machinery and cause
serious personal injury.
Keep these items away
from moving parts at all
times to reduce this risk.
NOTICE
If you have never used this type of machine
or equipment before, We strongly recommend that you read books, trade magazines, or get formal training before beginning any projects. Regardless of the content in this section, Grizzly Industrial will
not be held liable for accidents caused by
lack of training.
Model G4179 1⁄2 HP Power Feeder
Basic Use and Care
You MUST assemble all guards, fences,
and hold-downs before starting your
machine or power feeder. Failure to heed
this warning could result in amputation or
death!
Power feeders reduce kickback hazards and
improve cutting results by feeding in a consistent
and stable manner. Remember, do not to stand in
the path of potential kickback.
When not in use, support the power feeder with
a wooden block so the rubber wheels are raised
above the table and do not compress from the
weight of the power feeder.
The universal joints on this power feeder allow
you to adjust the power feeder tracking and height
to accommodate many workpiece sizes. Before
loosening any lock lever, always support the
power feeder with a block of wood, so the power
feeder does not drop and cause damage.
Adjust the power feeder so it is toed-in approximately 1° to 1.5° degrees towards the machine
fence. This adjustment will ensure that the power
feeder wheels slightly push the workpiece against
the fence during cutting operations (Figure 8).
Next, adjust the power feeder so the rubber
wheels are parallel with the table surface, and are
1
⁄8" lower than the thickness of your workpiece.
This adjustment ensures that the workpiece will
not slip or hang in the middle of a cut. Always
double check that the power feeder wheels are 1⁄8"
lower than the workpiece before you begin feeding operations. Otherwise, the workpiece may slip
and kickback.
-17-
Changing Feed
Speed
Your power feeder has the option to feed a
workpiece at four different feed rates: 9.5, 15, 25,
and 38 feet per minute. These rates are achieved
by changing the combination of change gears in
the power feeder gear box.
Always disconnect power
to the machine before
performing maintenance.
Failure to do this may
result in serious personal injury.
To change the feed rate of your power feeder:
1. Turn the speed dial to the OFF position.
2.DISCONNECT THE
FROM POWER!
POWER
4.Remove the chain cover and the two 14mm
hex nuts securing the position A & B change
gears to the shafts.
5. Swap the required gears in positions A & B
shown in Figure 12.
Included Accessory Change
Gear Set (26-34 Tooth)
Position A
Position B
Figure 12. Change gear locations.
6. Reinstall the hex nuts and the chain cover.
FEEDER
3.Refer to the change gear chart below to find
the gear combination required for your chosen feed rate.
Installed Change Gears:
A, 20 Tooth + B, 40 Tooth = 9.5 Ft (2.9
M)/Per Min
A, 40 Tooth + B, 20 Tooth = 15 Ft (4.6
M)/Per Min
Included Accessory Change Gears:
A, 26 Tooth + B, 34 Tooth = 25 Ft (7.6
M)/Per Min
A, 34 Tooth + B, 26 Tooth = 38 Ft (11.6
M)/Per Min
-18-
Model G4179 1⁄2 HP Power Feeder
SECTION 5: MAINTENANCE
Always disconnect power
to the machine before
performing maintenance.
Failure to do this may
result in serious personal injury.
Schedule
For optimum performance from your machine,
follow this maintenance schedule and refer to any
specific instructions given in this section.
•After the first 200 hours of use, or after the
first month, change the gearbox oil with 4.5
fluid ounces of a good automotive grade
80-90W gear oil. For the remaining life of
the power feeder, change the oil every 1000
hours, or every 6 months. Note: To drain the
unit, remove the fill plug labeled "OIL" and
invert the power feeder.
•
Every 40 hours of use, or once every two
weeks, wipe clean and lubricate the wheel
grease fittings (Figure 13) with one pump
from a grease gun filled with automotive
grade GL-2 grease.
Daily Check:
•Loose mounting bolts.
• Worn switch.
• Worn or damaged cords and plugs.
•Damaged wheel rubber.
•Any other condition that could hamper the
safe operation of this machine.
Grease
Fitting
Cleaning
Frequently blow-off sawdust with compressed
air. This is especially important for the internal
working parts and motor. Dust build-up around
the motor is a sure way to decrease its life span.
If the wheels become loaded up with pitch, oil, or
other residues, wipe them clean using a clean rag
and a mild solvent. Avoid touching the plastic or
paint with mineral spirits or you may damage the
surfaces.
Figure 13. Wheel lubrication.
•As required to prevent rust, binding, and
dry spots, brush the sprockets, chain, and
change gears (Figure 14) with a light film of
an automotive grade GL-2 grease.
Oil Fill
Plug
Lubrication
•To prevent surface rust and binding, periodically clean and oil all lock lever and lead
screw threads with a light machine oil.
Change
Sprocket
Gear
Chain
Figure 14. Sprockets, chain, and gears.
Model G4179 1⁄2 HP Power Feeder
-19-
SECTION 6: SERVICE
Review the troubleshooting and procedures in this section to fix or adjust your machine if a problem develops. If you need replacement parts or you are unsure of your repair skills, then feel free to call our Technical
Support at (570) 546-9663.
Troubleshooting
Motor & Electrical
Symptom
Possible Cause
Motor will not start.
1. Check power supply for proper voltage.
1.Low voltage.
2.Open circuit in motor or loose connections. 2.Inspect all lead connections on motor and circuit
board for loose or open connections.
3.Repair for cause of overload and replace fuse or
3. Blown fuse tripped circuit breaker.
reset circuit breaker.
4.Replace capacitor.
4. Capacitor at fault.
5.Replace switch, or motor.
5. Motor switch or motor is at fault.
Fuses or circuit
breakers trip.
1.Short circuit in line cord or plug.
Motor overheats.
1. Motor overloaded.
1.Reduce power feeder feed rate.
2.Air circulation through the motor restricted. 2. Clean out motor fan cover to provide normal air
circulation.
Workpiece jams
when feeding under
rollers.
1.Rollers set too low.
2. Feeder at wrong angle.
1.Raise feeder.
2.Adjust angle.
Workpiece slips
while passing
beneath rollers.
1.Rollers positioned too high, no traction.
2. Feeding too fast.
3.Rollers are dirty or oily.
4. Worn roller(s).
1.Lower feeder.
2.Slow feed speed.
3. Clean roller surface with a mild solvent.
4.Replace roller(s) (Page 21).
Workpiece cut is
burnt.
1. Wrong feed speed.
2. Cutter is at fault.
1.Adjust feed speed.
2.Sharpen or replace dull blade or cutter.
Rough finish or
chipped grain on
workpiece.
1. Feed speed too fast.
2.Dull cutter or blade.
3.Power feeder angle is not toed in to keep
workpiece against the fence.
1.Slow speed.
2.Replace with sharp cutter or blade.
3.Adjust power feeder so it is toed-in 1° to 1.5°
toward the fence.
Fuzzy grain occurs
when planing or
moulding.
1.Lumber has high moisture content.
1.If moisture content is higher than 20%, sticker and
allow to dry.
2.Sharpen or replace knives.
Workpiece hangs
and does not enter
the machine.
1.Power feeder roller height is set incorrectly. 1.Lower the power feeder roller
height of the workpiece.
-20-
Possible Solution
1.Inspect cord or plug for damaged insulation and
shorted wires and replace extension cord.
2.Short circuit in motor or loose connections. 2.Inspect all connections on motor for loose or
shorted terminals or worn insulation.
3.Disconnect all machinery from power and correct
3.Power feeder rollers are jammed.
for cause of jamming.
2.Dull knives/cutter.
⁄8" lower than the
1
Model G4179 1⁄2 HP Power Feeder
Wheel Replacement
2. Using a 5mm hex wrench, remove the two
wheel retaining cap screws (Figure 15).
Always disconnect power
to the machine before
performing maintenance.
Failure to do this may
result in serious personal injury.
If you damage one or more wheels or they are
worn out, you can easily replace the wheels.
Tools Needed
Qty
Hex Wrench 5mm............................................... 1
To replace a wheel:
1. DISCONNECT THE
FROM POWER!
Cap
Screw
Figure 15. Wheel replacement.
3. Swap the old wheel with the new.
POWER
Model G4179 1⁄2 HP Power Feeder
FEEDER
4. Reinstall the two cap screws, and tighten in
an alternating pattern until the wheel is seccure.
-21-
SECTION 7: WIRING
These pages are current at the time of printing. However, in the spirit of improvement, we may make changes
to the electrical systems of future machines. Study this diagram carefully. If you notice differences between
your machine and these wiring diagrams, call Technical Support at (570) 546-9663 for assistance.
Electrical Safety Instructions
1. CIRCUIT REQUIREMENTS. You MUST follow the CIRCUIT REQUIREMENTS given on
Page 9. If you are unsure about the wiring
codes in your area or you plan to connect
your machine to a shared circuit, consult
a qualified electrician.
2. SHOCK HAZARD. Disconnect the power
from the machine before servicing electrical
components. Touching electrified parts will
result in personal injury including but not limited to severe burns, electrocution, or death.
3. MOTOR WIRING. The motor wiring shown
in these diagrams are current at the time of
printing, but it may not match your machine.
Always use the wiring diagram inside the
motor junction box.
4. EXPERIENCING DIFFICULTIES. If at any
time you are experiencing difficulties understanding the information included in this section, contact our Technical Support at (570)
546-9663.
NOTICE
The photos and diagrams included in this
section are best viewed in color. You can view
these pages in color at www.grizzly.com.
-22-
Model G4179 1⁄2 HP Power Feeder
Wiring Diagram
BdYZa<)&,.EdlZg
;ZZYZgL^g^c\9^V\gVb
BdidgEdlZgVcY
9^gZXi^dcHl^iX]
H^YZ6
H^YZ7
G'
K&
,
M-
+
*
&&
&'
N&%
.
Gjc
8VeVX^idg
&
<gdjcY
-
<gdjcY
HiVgi
8VeVX^idg
<gdjcY
(
'%%B;9
&'*K68
H)
'*B;9
'*%K68
K(
''%K
Bdidg
<
=di
''%
K68
=di
+"&*Eaj\
6hGZXdbbZcYZY
Figure 17. Motor capacitors.
Figure 16. Motor power and direction
switch.
Model G4179 1⁄2 HP Power Feeder
READ ELECTRICAL SAFETY
ON PAGE 22!
-23-
-24-
*&*
*&+
*%)
*'+
*'*"&
*'*
*&(
*'*"'
*&,
*&-
*&)
*&&
*'%
*''
*%)
*%'
*%)
*%+
*'%
*,-
*,,
*)'
*(.
*'&
*&.
*('
*+(
*%*%+
*,)
*,+
*(&
*+'
**+"' *'(
*')
*))
*)(
**+
**%"'
*()
*).
*)+
*,'
*,(
*((
*')
**%
**."'
**."&
**.
**%")
**%"(
**+"&
*,+
*'&
*+)
*&.
*(*
**%"&
*,*
*(*"(
*(*"'
*+-
*+.
*+,
*,%
*(*"&
*)*
*,&
*%,
*'*"(
*'*")
*&)
*+)")
*)& *)%
*&& *+)"&
*&,
*&(
*&'
*&.
*(%
*&-
*'*"&
*'*"'
*%,
*'*"(
*'*")
*&)
*%(
*%&
*'*")
*'*"(
*&'
*'+
*&, *&(
*&-
*%-
*&'
*'*"'
*&&
*'*"&
*'+
*&*
*+)"'
Power
Feed
*&*
*&+
*&+
*+)"(
SECTION 8: PARTS
Model G4179 1⁄2 HP Power Feeder
Power Feed Parts List
REF
PART #
DESCRIPTION
REF
PART #
DESCRIPTION
501
502
503
504
506
507
508
511
512
513
514
515
516
517
518
519
520
521
522
523
524
525
525-1
525-2
525-3
525-4
526
530
531
532
533
534
535
535-1
535-2
535-3
539
576
P4179501
P4179502
P4179503
P4179504
P4179506
P4179507
P4179508
P4179511
P4179512
PLW01M
PSB24M
PLW04M
PSB31M
P4179517
P4179518
PR58M
P4179520
PR47M
P4179522
PW06M
PN09M
P4179525
P4179525-1
P4179525-2
PW06M
PN09M
G4180
P4179530
P4179531
PSS01M
P4179533
P6203
P4179535
P4179535-1
PLW04M
PSB31M
P4179539
P4179576
GREASE NIPPLE
SPROCKET CASE
TORSION SPRING (A) 3.5 x 100
CASE COVER
GREASE NIPPLE
CASE SPROCKET
TORSION SPRING (B) 3.5 X 100
ROLLER BASE
SPROCKET
LOCK WASHER 5MM
CAP SCREW M5-.8 X 16
LOCK WASHER 8MM
CAP SCREW M8-1.25 X 25
CHAIN-(22S)
TUBE
EXT RETAINING RING 24MM
SPROCKET SHAFT
EXT RETAINING RING 13MM
SPROCKET SHAFT
FLAT WASHER 12MM
HEX NUT M12-1.75
SPINDLE ASSEMBLY
GREASE NIPPLE
SPINDLE
FLAT WASHER 12MM
HEX NUT M12-1.75
ROLLER
HOUSING
BUSHING
SET SCREW M6-1 X 10
GEAR COVER
BALL BEARING 6203ZZ
SWIVEL CONE ASSEMBLY
CONE
LOCK WASHER 8MM
CAP SCREW M8-1.25 X 25
SPROCKET
SPROCKET
540
541
542
543
544
545
546
549
550
550-1
550-2
550-3
550-4
556
556-1
556-2
559
559-1
559-2
562
563
564
564-1
564-2
564-3
564-4
567
568
569
570
571
572
573
574
575
576
577
578
P4179540
P4179541
P4179542
P4179543
P4179544
PK81M
PW06M
PSW03-1
P4179550
P4179550-1
P4179550-2
P4179550-3
PSB01M
P4179556
P4179556-1
P4179556-2
P4179559
P4179559-1
P4179559-2
P4179562
PORP016
P4179564
P4179564-1
P4179564-2
P4179564-3
P4179564-4
P4179567
P4179568
P4179569
P4179570
P4179571
P4179572
P4179573
P4179574
PLABEL-14
P4179576
PLW03M
PB29M
SPACING COLLAR
CHAIN (36S)
CHAIN (22S)
WORM GEAR
WORM GEAR SHAFT
KEY 6 X 6 X 12
FLAT WASHER 12MM
KNOB
GEARBOX ASSEMBLY
GASKET
COVER
OIL SEAL
CAP SCREW M6-1 X 16
GEAR SET 20T, 40T
GEAR 20T
GEAR 40T
GEAR SET 26T, 34T
GEAR 34T
GEAR 26T
OIL CAP
O-RING 15.8 X 2.4 P16
MOTOR 1/2HP 110V
FAN
FAN COVER
R. CAPACITOR 25MFD 250VAC
S. CAPACITOR 200MFD 125VAC
COMPLETE SWITCH ASSEMBLY
SPACER W/SEAL
COMPLETE SWITCH BOX ASSEMBLY
QC LABEL
GENERAL WARNING LABEL
COVER WARNING LABEL
GRIZZLY LOGO PLATE
SWITCH DIRECTION LABEL
ELECTRICITY LABEL
SPROCKET
LOCK WASHER 6MM
HEX BOLT M6-1 X 30
Model G4179 1⁄2 HP Power Feeder
-25-
Base
+-)
+-(
+-*
++)
++%
+*+")
+*.
+*+"(
+*+
+*+"'
+-(
++%
+*.
+*+"(
+*+"'
+,+*,
++)
+-*
+*+")
+,-"(
+,-"&
+,-"'
++'"+
+*+"&
++'
++'"*
+*-
+,(")
+,("(
++'"(
++'"&
++'")
+,("'
+,("&
+-'"&
+-'"'
+-'"(
+-'
+,(
++(
++(")
++'"'
++("&
++("(
++("'
Base Parts List
REF
PART #
DESCRIPTION
REF
PART #
DESCRIPTION
656
656-1
656-2
656-3
656-4
657
658
659
660
662
662-1
662-2
662-3
662-4
662-5
662-6
663
663-1
663-2
P4179656
P4179656-1
P4179656-2
PW01
P4179656-4
P4179657
P4179658
P4179659
PSS14M
P4179662
P4179662-1
P4179662-2
P4179662-3
PRP71M
PW01
PSB73M
P4179663
P4179663-1
P4179663-2
ELEVATING BRACKET ASSEMBLY
ELEVATING BRACKET
STUD M12-1.75 X 70
FLAT WASHER 1/2
HANDLE
ELEVATION LEAD SCREW
HORIZONTAL LEAD SCREW
COLUMN CAP
SET SCREW M8-1.25 X 12
OVER ARM CONE ASSEMBLY
OVER ARM CONE
LOCK STUD
T-HANDLE
ROLL PIN 6 X 22
FLAT WASHER 1/2
CAP SCREW M12-1.75 X 50
SWIVEL CONE ASSEMBLY
SWIVEL CONE
LOCK STUD
663-3
663-4
664
673
673-1
673-2
673-3
673-4
678
678-1
678-2
678-3
682
682-1
682-2
682-3
683
684
685
P4179663-3
PRP71M
P4179664
P4179673
P4179673-1
P4179673-2
PW01
P4179673-4
P4179678
P4179678-1
P4179678-2
PSB50M
P4179682
P4179682-1
P4179682-2
PSB03M
PRP31M
PAW04M
P4179685
T-HANDLE
ROLL PIN 6 X 22
HANDLE
BASE ASSEMBLY
COLUMN BASE
STUD M12-1.75 X 70
FLAT WASHER 1/2
LEVER
VERTICAL COLUMN ASSEMBLY
COLUMN
KEY 350MML X 8T
CAP SCREW M5-.8 X 10
OVER ARM ASSEMBLY
OVER ARM
KEY 564MML X 8T
CAP SCREW M5-.8 X 8
ROLL PIN 6 x 36
HEX WRENCH 4MM
CRANK ARM
-26-
Model G4179 1⁄2 HP Power Feeder
7!22!.49#!2$
CVbZTTTTTTTTTTTTTTTTTTTTTTTTTTTTTTTTTTTTTTTTTTTTTTTTTTTTTTTTTTTTTTTTTTTTTTTTTTTTT HigZZiTTTTTTTTTTTTTTTTTTTTTTTTTTTTTTTTTTTTTTTTTTTTTTTTTTTTTTTTTTTTTTTTTTTTTTTTTTTTT
8^in TTTTTTTTTTTTTTTTTTTTTTT HiViZTTTTTTTTTTTTTTTTTTTTTTTTT O^e TTTTTTTTTTTTTTTTTTTTT
E]dcZTTTTTTTTTTTTTTTTTTTT :bV^a TTTTTTTTTTTTTTTTTTTTTTTT >ckd^XZTTTTTTTTTTTTTTTTT
BdYZaTTTTTTTTTTTTTTTTTTTT DgYZgTTTTTTTTTTTTTTTTTTTTTTT HZg^VaTTTTTTTTTTTTTTTTTT
4HEFOLLOWINGINFORMATIONISGIVENONAVOLUNTARYBASIS)TWILLBEUSEDFORMARKETINGPURPOSESTOHELPUSDEVELOP
BETTERPRODUCTSANDSERVICES/FCOURSEALLINFORMATIONISSTRICTLYCONFIDENTIAL
=dlY^YndjaZVgcVWdjijh4
TTTT 6YkZgi^hZbZci
TTTT 8VgY9ZX`
TTTT ;g^ZcY
TTTT LZWh^iZ
TTTT 8ViVad\
TTTT Di]Zg/
8JI6ADC<9DII:9A>C:
L]^X]d[i]Z[daadl^c\bV\Vo^cZhYdndjhjWhXg^WZid4
TTTT
TTTT
TTTT
TTTT
TTTT
TTTT
TTTT
TTTT
TTTT
TTTT
8VW^cZiBV`Zg
;Vb^an=VcYnbVc
=VcYAdVYZg
=VcYn
=dbZH]deBVX]^c^hi
?djgcVad[A^\]i8dci#
A^kZHiZVb
BdYZa6^geaVcZCZlh
BdYZaiZX
DaY=djhZ?djgcVa
TTTT
TTTT
TTTT
TTTT
TTTT
TTTT
TTTT
TTTT
TTTT
TTTT
EdejaVgBZX]Vc^Xh
EdejaVgHX^ZcXZ
EdejaVgLddYldg`^c\
EgVXi^XVa=dbZdlcZg
EgZX^h^dcH]ddiZg
Egd_ZXih^cBZiVa
G8BdYZaZg
G^ÄZ
H]deCdiZh
H]di\jcCZlh
TTTT
TTTT
TTTT
TTTT
TTTT
TTTT
TTTT
TTTT
TTTT
IdYVn»h=dbZdlcZg
LddY
LddYZc7dVi
LddYh]deCZlh
LddYhb^i]
LddYldg`
LddYldg`ZgLZhi
LddYldg`Zg»h?djgcVa
Di]Zg/
L]Vi^hndjgVccjVa]djhZ]daY^cXdbZ4
TTTT '%!%%%"'.!%%%
TTTT (%!%%%"(.!%%%
TTTT *%!%%%"*.!%%%
TTTT +%!%%%"+.!%%%
TTTT )%!%%%").!%%%
TTTT ,%!%%%
L]Vi^hndjgV\Z\gdje4
TTTT '%"'.
TTTT *%"*.
TTTT )%").
TTTT ,%
TTTT (%"(.
TTTT +%"+.
=dladc\]VkZndjWZZcVlddYldg`Zg$bZiValdg`Zg4
TTTT %"'NZVgh
TTTT '"-NZVgh
TTTT -"'%NZVgh
TTTT '% NZVgh
=dlbVcnd[ndjgbVX]^cZhdgiddahVgZ<g^ooan4
TTTT %"'
TTTT ("*
TTTT +".
TTTT &%
9dndji]^c`ndjgbVX]^cZgZegZhZcihV\ddYkVajZ4
TTTTT NZh
TTTTTCd
LdjaYndjgZXdbbZcY<g^ooan>cYjhig^VaidV[g^ZcY4
TTTTT NZh
TTTTTCd
LdjaYndjVaadljhidjhZndjgcVbZVhVgZ[ZgZcXZ[dg<g^ooanXjhidbZgh^cndjgVgZV4
.OTE7ENEVERUSENAMESMORETHANTIMES
TTTTT NZh
TTTTTCd
8dbbZcih/?????????????????????????????????????????????????????????????????????
????????????????????????????????????????????????????????????????????????????????? ????????????????????????????????????????????????????????????????????????????????? ????????????????????????????????????????????????????????????????????????????????? ;DA96ADC<9DII:9A>C:
EaVXZ
HiVbe
=ZgZ
'2)::,9).$5342)!,).#
0/"/8
"%,,).'(!-7!
;DA96ADC<9DII:9A>C:
HZcYV<g^ooan8ViVad\idV[g^ZcY/
CVbZTTTTTTTTTTTTTTTTTTTTTTTTTTTTTTT
HigZZiTTTTTTTTTTTTTTTTTTTTTTTTTTTTTTT
8^inTTTTTTTTTTTTTTHiViZTTTTTTO^eTTTTTT
I6E:6ADC<:9<:H""EA:6H:9DCDIHI6EA:
WARRANTY AND RETURNS
7!22!.49!.$2%452.3
<g^ooan>cYjhig^Va!>cX#lVggVcihZkZgnegdYjXi^ihZaah[dgVeZg^dYd[YEARidi]Zdg^\^cVaejgX]VhZg[gdb
i]ZYViZd[ejgX]VhZ#I]^hlVggVcinYdZhcdiVeeanidYZ[ZXihYjZY^gZXiandg^cY^gZXianidb^hjhZ!VWjhZ!
cZ\a^\ZcXZ!VXX^YZcih!gZeV^ghdgVaiZgVi^dchdgaVX`d[bV^ciZcVcXZ#I]^h^h<g^ooan»hhdaZlg^iiZclVggVcin
VcYVcnVcYVaalVggVci^Zhi]VibVnWZ^bea^ZYWnaVl!^cXajY^c\VcnbZgX]VciVW^a^indg[^icZhh![dgVcneVg"
i^XjaVgejgedhZ!VgZ]ZgZWna^b^iZYidi]ZYjgVi^dcd[i]^hlg^iiZclVggVcin#LZYdcdilVggVcidggZegZhZci
i]Vii]ZbZgX]VcY^hZXdbea^Zhl^i]i]Zegdk^h^dchd[VcnaVldgVXihjcaZhhi]ZbVcj[VXijgZghdlVggVcih#
>ccdZkZcih]Vaa<g^ooan»ha^VW^a^injcYZgi]^hlVggVcinZmXZZYi]ZejgX]VhZeg^XZeV^Y[dgi]ZegdYjXiVcY
VcnaZ\VaVXi^dchWgdj\]iV\V^chi<g^ooanh]VaaWZig^ZY^ci]ZHiViZd[LVh]^c\idc!8djcind[L]ViXdb#
LZh]Vaa^ccdZkZciWZa^VWaZ[dgYZVi]!^c_jg^ZhideZghdchdgegdeZgindg[dg^cX^YZciVa!Xdci^c\Zci!heZX^Va!
dgXdchZfjZci^VaYVbV\ZhVg^h^c\[gdbi]ZjhZd[djgegdYjXih#
IdiV`ZVYkVciV\Zd[i]^hlVggVcin!XdciVXijhWnbV^adge]dcZVcY\^kZjhVaai]ZYZiV^ah#LZl^aai]Zc
^hhjZ ndj V ¸GZijgc CjbWZg!»» l]^X] bjhi WZ XaZVgan edhiZY dc i]Z djih^YZ Vh lZaa Vh i]Z ^ch^YZ d[ i]Z
XVgidc# LZ l^aa cdi VXXZei Vcn ^iZb WVX` l^i]dji i]^h cjbWZg# Egdd[ d[ ejgX]VhZ bjhi VXXdbeVcn i]Z
bZgX]VcY^hZ#
I]ZbVcj[VXijgZghgZhZgkZi]Zg^\]iidX]Vc\ZheZX^[^XVi^dchViVcni^bZWZXVjhZi]ZnXdchiVcianhig^kZid
VX]^ZkZWZiiZgfjVa^inZfj^ebZci#LZbV`ZZkZgnZ[[dgiidZchjgZi]VidjgegdYjXihbZZi]^\]fjVa^inVcY
YjgVW^a^inhiVcYVgYhVcYlZ]deZndjcZkZgcZZYidjhZi]^hlVggVcin#
EaZVhZ[ZZa[gZZidlg^iZdgXVaajh^[ndj]VkZVcnfjZhi^dchVWdjii]ZbVX]^cZdgi]ZbVcjVa#
I]Vc`ndjV\V^c[dgndjgWjh^cZhhVcYXdci^cjZYhjeedgi#LZ]deZidhZgkZndjV\V^chddc#
"UY$IRECTAND3AVEWITH'RIZZLY®n4RUSTED0ROVENANDA'REAT6ALUE
6ISIT/UR7EBSITE4ODAY!ND$ISCOVER
7HY'RIZZLY®)S4HE)NDUSTRY,EADER
s3%#52%/2$%2).'
s/2$%233()00%$7)4().(/523
s%-!),2%30/.3%7)4()./.%(/52
/2
#ALL4ODAY&OR!&2%%
&ULL#OLOR#ATALOG