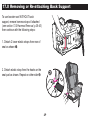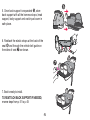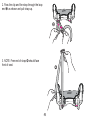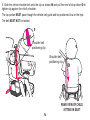
1
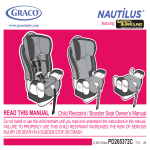
featuring READ THIS MANUAL Child Restraint / Booster Seat Owner’s Manual Do not install or use this child restraint until you read and understand the instructions in this manual. FAILURE TO PROPERLY USE THIS CHILD RESTRAINT INCREASES THE RISK OF SERIOUS INJURY OR DEATH IN A SUDDEN STOP OR CRASH. © 2013 Graco PD246612A 3/13 US Table of Contents 1.0 Warnings to Parents and Other Users . . . . . . . . . . . . . . . . . . . . 4-5 2.0 Registration Information . . . . . . . . . . . . . 6 2.1 Register Your Child Restraint . . . . . 6 2.2 For Recall Information . . . . . . . . . . 6 2.3 If You Need Help . . . . . . . . . . . . . . 7 3.0 Useful Information . . . . . . . . . . . . . . . . . 7 3.1 Certification . . . . . . . . . . . . . . . . . . . 7 3.2 Child Restraint Useful Life. . . . . . . . 7 3.3 Second Hand Child Restraint . . . . . 7 4.0 Features . . . . . . . . . . . . . . . . . . . . . . . 8-9 5.0 Assembling the Head Support . . . . 10-11 6.0 WARNINGS . . . . . . . . . . . . . . . . . . 12-13 7.0 Height and Weight Limitations . . . . . . . 14 7.1 WITH Built-in Harness. . . . . . . . . . 14 7.2 WITHOUT Built-in Harness . . . . . . 15 7.3 WITHOUT Back Support. . . . . . . . 16 8.0 Choosing an Appropriate Vehicle Seat Location . . . . . . . . . . . .17 8.1 Vehicle Seat Location Requirements . . . . . . . . . . . .17 8.2 Vehicle Seat Belt Requirements . . . . . . . . . . .18 8.3 SAFE Vehicle Seat Belt Systems . . . . . . . . . . . . . . . .18 8.4 For Built-in Harness Only . .19 8.5 WITH or WITHOUT Built-in Harness . . . . . . . . . . . . . . . .20 8.6 To Install Locking Clip . . . . . .21 8.7 UNSAFE Vehicle Belt Systems.. . . . . . . . . . . . . 22-23 9.0 LATCH. . . . . . . . . . . . . . . . . . . . . .24 9.1 What is LATCH? . . . . . . . . . .24 9.2 LATCH System . . . . . . . . . . .26 10.0 Using Child Restraint WITH Built-in Harness . . . . . . . . . . . . . . . . . 27-32 2 Table of Contents (cont.) 11.0 Securing the Child Restraint in Your Vehicle . . . . . . . . . . . . . . . . . . . . .33 11.1 Using a Child Restraint WITH a Built-in Harness . . . . . . . . . .33 11.2 With a Vehicle Lap or Lap/shoulder belt . . . . . . 33-34 11.3 With LATCH . . . . . . . . . . 35-36 12.0 Securing Your Child in the Child Restraint . . . . . . . . . . . . 37-38 13.0 Harness Removal or Re-attaching Harness . . . . . . 39-43 14.0 Using Your Child Restraint WITHOUT Built-in Harness . 44-46 15.0 Securing Child & Booster Seat in Vehicle. . . . . . . . . . . . . . . . . . . . .47 16.0 Adjusting Head Support. . . . . . . .48 17.0 Removing or Re-attaching Back Support . . 49-51 18.0 Securing Child in Vehicle Belt with Shoulder Belt Positioning Clip..... 52-55 19.0 Using the Tether . . . . . . . . . . . . . . . . . . . 56 19.1 Storing Lower Anchors and Tether . . . . 57 20.0 Airplane Use . . . . . . . . . . . . . . . . . . . . . . 58 21.0 Accessories . . . . . . . . . . . . . . . . . . . . . . . 59 21.1 Body Support and Harness Covers . . . 59 22.0 Recline Foot . . . . . . . . . . . . . . . . . . . . . . 60 23.0 Care and Maintenance . . . . . . . . . . . . . . 61 23.1 Buckle Cleaning Process . . . . . . . . . . . ..62 24.0 To Remove or Re-attach Seat Cover . . . . 63 25.0 Owners Manual Storage . . . . . . . . . . . . . 64 26.0 Replacement Parts and Warranty . . . . . . 64 3 1.0 Warnings to Parents and Other Users NEVER PLACE THIS CHILD RESTRAINT IN A VEHICLE SEATING LOCATION THAT HAS A FRONT AIR BAG. If an air bag inÀates it can hit the child and child restraint with great force and cause serious injury or death to your child. Refer to your vehicle owner’s manual for information about side air bags and child restraint installation. 4 Failure to properly use this child restraint increases the risk of serious injury or death in a sharp turn sudden stop or crash. Your child’s safety depends on you installing and using this child restraint correctly. Even if using this child restraint seems easy to ¿gure out on your own it is very important to READ THE OWNER’S MANUAL and the vehicle owner’s manual. Your child’s safety depends on: 1. Choosing the correct mode of use for the child restraint depending on your child’s size. 2. Inserting the harness straps (if needed) in the proper slots for your child. 3. Selecting a suitable location for the child restraint in your vehicle. 4. Properly routing the vehicle seat belt or LATCH. 5. Properly securing the child restraint in the vehicle using a seat belt designed to restrain both the child restraint and your child or by using LATCH. Many seat belts are NOT safe to use with this child restraint even though they can easily be threaded through or around the child restraint! 6. Properly securing your child in the child restraint. 5 2.0 Registration Information Model Number: Date of manufacture: Purchase Date: 2.1 Register Your Child Restraint Please ¿ll in the above information. The model number and date of manufacture can be found on a label on the child restraint. Fill out the prepaid registration postcard attached to the harness and mail it today. Child restraints could be recalled for safety reasons. You must register this restraint to be reached in a recall. Send your name address and the restraint’s model number and date of manufacture to: Graco Children’s Products Inc. Attn: Customer Service 3 Glenlake Parkway Atlanta, GA 30328 or call 1-800-345-4109 or register online at: http://www.gracobaby.com/carseatregistration 2.2 For Recall Information Call the U.S. Government’s Vehicle Safety Hotline at: 1-888-327-4236 (TTY:1-800-424-9153), or go to http://www.NHTSA.gov or contact Graco: 1-800-345-4109 or www.gracobaby.com 6 2.3 If You Need Help Please contact our Customer Service Department with any questions you may have concerning parts use or maintenance. When you contact us please have your product’s model and date of manufacture ready so that we may help you ef¿ciently. These numbers can be found on a label on the child restraint. USA: 1-800-345-4109 or www.gracobaby.com www.cpsc.gov www.NHTSA.gov www.seatcheck.org 3.0 Useful Information THIS CHILD RESTRAINT CONFORMS to all applicable Federal Motor Vehicle Safety Standards and is certi¿ed for use in motor vehicles. It is certi¿ed for use in Aircraft only when used with the built-in harness. When used as a booster without the harness this restraint is NOT certi¿ed for use in aircraft. 3.2 Child Restraint Useful Life STOP using this child restraint and throw it away 10 years after the date of manufacture. Look for this sticker on rear of child restraint: MODEL Date of Manufacture NAME year month day GRACO CHILDREN'S PRODUCTS, INC. ATLANTA, GA 30328 1-800-345-4109 Made in China 3.3 Second Hand Child Restraint Graco Children’s Products Inc. advises against loaning or passing along a child restraint. 7 PD206938A 3.1 CertiÀcation 4.0 Features 8 The locking clip is stored on the back of the child restraint. You will need to use it with certain types of vehicle seat belts. United States Federal Motor Vehicle Safety Standards have de¿ned a system for installing child restraints in vehicles. The system is called LATCH (Lower Anchorage and Tether for CHildren). LATCH may ONLY be used IN PLACE of vehicle belt if vehicle is equipped with LATCH anchor points. Please refer to vehicle owners manual for LATCH locations in vehicles. 9 5.0 Assembling the Head Support Adult assembly required. 1. Squeeze height adjust button and push head support into slots on the back support as shown. Head support will click into the back support. You may need to unfasten the hook and loop attachment tape on both sides at the top of the back support to allow for easier access to the slots. Always use child restraint with head support installed and properly adjusted. CLICK! 10 2. The assembly is now complete. 11 6.0 WARNINGS NO CHILD RESTRAINT CAN GUARANTEE PROTECTION FROM INJURY. However proper use of this child restraint reduces the risk of serious injury or death to your child. DO NOT INSTALL OR USE THIS CHILD RESTRAINT UNTIL YOU READ AND UNDERSTAND THE INSTRUCTIONS IN THIS MANUAL AND IN YOUR VEHICLE OWNER’S MANUAL. DO NOT let others install or use the child restraint unless they understand how to use it. DO NOT use locking clip in booster mode. According to accident statistics CHILDREN ARE SAFER WHEN PROPERLY RESTRAINED IN REAR VEHICLE SEATING POSITIONS, RATHER THAN FRONT SEATING POSITIONS. For a vehicle with a front passenger air bag refer to your vehicle owner’s manual as well as these instructions for child restraint installation. NEVER LEAVE YOUR CHILD FAILURE TO PROPERLY USE THIS CHILD UNATTENDED. RESTRAINT INCREASES THE RISK OF SERIOUS INJURY OR DEATH IN A SHARP TURN, SUDDEN STOP OR CRASH. Your child can be injured in a vehicle even if you are not in a crash. Sudden braking and sharp turns can injure your child if the child restraint is not properly installed or if your child is not properly secured in the child restraint. 12 NEVER LEAVE A CHILD RESTRAINT UNSECURED IN YOUR VEHICLE. An unsecured child restraint can be thrown around and may injure occupants in a sharp turn sudden stop or crash. Remove it or make sure that it is securely belted in the vehicle. If not using LATCH and tether, make sure LATCH and tether connectors are properly stored on back of seat. NEVER USE CHILD RESTRAINT IF IT HAS DAMAGED OR MISSING PARTS. Do not use a cut frayed or damaged child restraint harness LATCH belt or vehicle seat belt. THE CHILD RESTRAINT CAN BECOME VERY HOT IF LEFT IN THE SUN. Contact with these parts can burn your child’s skin. Always touch the surface of any metal or plastic parts before putting your child in the child restraint. REPLACE THE CHILD RESTRAINT AFTER AN ACCIDENT OF ANY KIND. An accident can cause damage to the child restraint that you cannot see. NEVER GIVE THIS CHILD RESTRAINT to someone else without also giving them this manual. DO NOT MODIFY YOUR CHILD RESTRAINT or use any accessories or parts supplied by other manufacturers. NEVER USE A SECOND-HAND CHILD RESTRAINT or a child restraint whose history you do not know. DO NOT USE THIS child restraint without properly assembling it. 13 7.0 Height and Weight Limitations FAILURE TO USE CHILD RESTRAINT IN A MANNER APPROPRIATE FOR YOUR CHILD’S SIZE MAY INCREASE THE RISK OF SERIOUS INJURY OR DEATH. Instructions for the use of this child restraint differ greatly depending on the size of your child. Be sure you are using the child restraint in the correct mode and with the correct features for your child. 7.1 WITH Built-In Harness Your child must meet all requirements: Weight: 20 to 65 lbs (mass between 9 and 29.5 kg) Height: 27 to 52 inches (69 and 132 cm) in height At least one year old and can sit upright unassisted Shoulders are BELOW top harness slots. If shoulders are above top harness slots child is too large for built-in harness. 14 7.2 WITHOUT Built-in Harness Your child must meet all requirements: Weight: 30 to 100 lbs (mass between 13.6 and 45 kg) Height: 38 to 57 inches (96 and 145 cm) in height appro[imately 3-10 years of age the shoulder belt MUST lie across child’s shoulder as shown and the lap portion of the belt is positionned low on the child’s hips. Child’s ears are BELOW top of booster seat. If tops of ears are above top of seat child is too large for booster seat. If child is between 30 and 65 lbs and shoulders are below the upper harness slots, we highly recommend use of the built-in harness for as long as possible (up to 65 lbs). 15 7.3 WITHOUT Back Support Your child must meet all requirements: weigh between 40 and 100 lbs. (mass between 18 and 45 kg) and are between 40 and 57 inches (101 and 145 cm) in height appro[imately 4-10 years of age the shoulder belt MUST lie across child’s shoulder as shown and the lap portion of the belt is positionned low on the child’s hips. When sitting on the booster seat your child’s ears should be below the top of the vehicle seat cushion / head rest. Your Graco booster seat can be used with or without the back support as long as all requirements are met. 16 8.0 Choosing an Appropriate Vehicle Seat Location 8.1 Vehicle Seat Location Requirements IMPROPER PLACEMENT OF THE CHILD RESTRAINT INCREASES THE RISK OF SERIOUS INJURY OR DEATH. Some seating positions in your vehicle may not be safe for this child restraint. Some vehicles do not have any seating positions that can be used safely with the child restraint. If you are not sure where to place the child restraint in your vehicle consult your vehicle owner’s manual or call Graco Children’s Products Inc.1-800-345-4109. Children are safer when properly restrained in rear vehicle seating positions. Whenever possible secure the child restraint in the center position of the seat directly behind the front seats. However this position is sometimes equipped with a lap belt only and cannot be used when this child restraint is used without the built-in harness. The vehicle seat must face forward. Do not use child restraints on rear-facing or side-facing vehicle seats. 17 8.2 Vehicle Seat Belt Requirements MANY SEAT BELT SYSTEMS ARE NOT SAFE TO USE WITH THE CHILD RESTRAINT. THE VEHICLE SEAT BELT MUST BE DESIGNED TO HOLD THE CHILD RESTRAINT TIGHTLY AT ALL TIMES. Pay careful attention to these systems; some of the seat belts that are not safe to use look very much like seat belts that are safe to use. If you are unsure consult your vehicle owner’s manual or call Graco Children’s Products Inc. 1-800-345-4109. 8.3 SAFE Vehicle Seat Belt Systems THE FOLLOWING BELT SYSTEMS CAN BE USED WITH YOUR CHILD RESTRAINT, IF the seat location meets all other requirements of these instructions and those in your vehicle owner's manual. LATCH can be used in place of the following vehicle belt systems if your vehicle is equipped with LATCH anchor points. Please refer to vehicle owners manual for LATCH locations. 18 8.4 For Built-in Harness Only Lap Belts - Manually AdMusted When buckled the belt is tightened manually by pulling on the e[cess belt. Lap Belts with Automatic Locking Retractor (ALR) The automatic locking retractor will not permit the lap belt to lengthen once it is buckled. Tighten the belt by feeding the belt back into the retractor while pushing down hard on the child restraint. 19 8.5 With OR Without Built-in Harness Combination LapShoulder Belt with Locking Latch Plate Once it is buckled this type of belt has a latchplate that will not allow the lap portion of the belt to loosen. Belt is tightened by pulling hard on the shoulder portion of the vehicle belt while pushing down hard on the child restraint. Combination LapShoulder Belt with Sliding Latch PlateThis belt has a latchplate that slides freely along the belt. This belt MUST be converted to prevent movement of the lap portion of the belt. You must use the locking clip provided with the child restraint unless your vehicle's seat belt can be converted in another way as described in your vehicle owner's manual. Locking clip When using booster seat WITHOUT the built-in harness locking clip is NOT to be used. 20 8.6 To Install Locking Clip 1. Tighten the buckled belt by pushing down hard on the child restraint and pulling hard on the shoulder belt. 2. While pushing down on seat pinch the two straps together behind the buckle tongue. Unbuckle the belt without allowing it to slip. 3. Attach locking clip to lap and shoulder belts as shown . 4. Rebuckle belt. Check that lap belt does not move by pulling hard. If belt loosens or lengthens repeat procedure. Remove locking clip when not using child restraint. Store under it’s tab on the rear of seat. Test installation to see if child restraint is secure. If not secure additional belt tightening may be required: Unbuckle vehicle seat belt. Hold belts together and remove locking clip. Shorten length of lap belt portion slightly by pulling belt through latch plate. Re-attach locking clip. Buckle vehicle seat belt. Press child restraint further down into vehicle seat cushion to help buckle vehicle seat belt. Test installation to see if child restraint is secure. If not secure repeat above steps until secure. 21 12” (1.25 cm) 8.7 UNSAFE Vehicle Belt Systems DO NOT USE ANY OF THE FOLLOWING SYSTEMS TO SECURE THE CHILD RESTRAINT. LATCH can be used IN PLACE OF the following unsafe belt systems if your vehicle is equipped with LATCH anchor points. Please refer to the vehicle owners manual for LATCH locations. NEVER USE unsafe belt systems. Lap Belts with Emergency Locking Retractor (ELR) This lap belt stays loose and can move until it locks in a crash or sudden stop. Combination LapShoulder Belt with Retractor Each strap has a retractor at one end and is attached to the latch plate at the other end. Passive Restraint - Lap or Shoulder Belt Mounted on Door 22 Passive Restraint Lap Belt with Motorized Shoulder Belt DO NOT use vehicle belts that are attached to the door in any way or that move along a track to automatically surround the passenger when the door is closed. Lap Belts Forward of Seat Crease Vehicle seat belts located forward of seat crease may not securely hold child restraint. Check vehicle owner’s manual or see vehicle dealer for car seat installation requirements. If approved for use with child restraint, install child restraint and check for secure installation by pulling child restraint front to back. If child restraint slides forward, DO NOT use these seat belts. 23 9.0 LATCH 9.1 What is LATCH? United States Federal Motor Vehicle Safety Standards have defined a system for installing child restraints in vehicles. The system is called LATCH. LATCH stands for: Lower Anchors and Tethers for CHildren. LATCH in the vehicle consists of a top tether anchor point and two lower anchor points. Some vehicle owner manuals use the term ISOFIX to identify the new child restraint anchor system. This child restraint with LATCH can also be used in vehicle seating positions equipped with ISOFIX. Newer vehicles have one or more seating positions with LATCH anchor points. If vehicle is equipped with LATCH, the vehicle lower anchor points may be visible at the vehicle seat crease. If not visible, they may be marked with this symbol . CHECK vehicle owner’s manual for vehicle top tether anchor locations. They may be identified using one of the anchor symbols as shown . ONLY use LATCH on a child restraint in a seating position recommended by vehicle manufacturer. 24 NOTE: Some vehicle manufacturers have lower maximum weight ratings for LATCH anchors, so you must consult your vehicle owner’s manual or call the vehicle manufacturer to confirm the limits on your vehicle’s LATCH anchors. Use vehicle belt (not LATCH connectors) for installations with children weighing more than 48 pounds (21.7 kg). See your vehicle owner’s manual for exact locations, anchor identification, and requirements for use with a child restraint. Vehicle Top Tether Anchor Points Vehicle Lower Anchor Points Typical seat in a passenger vehicle. Other vehicle types may have different LATCH locations. Vehicle Seat Crease 25 9.2 LATCH System LATCH consists of a permanently attached lower anchor belt and a top tether strap. ONLY use LATCH in a seating position recommended by vehicle manufacturer. LATCH lower vehicle anchor points are defined as 11 inches from the center of one LATCH anchor to the center of another LATCH anchor. If allowed by your Vehicle Owners Manual, the center seating position maybe used if the anchor spacing is 11” or greater. Child Restraint Top Tether Vehicle Top Tether Anchor Point Vehicle Lower Anchor Points 26 Lower Anchor Belt 10.0 Using Child Restraint WITH Built-in Harness FAILURE TO PROPERLY ADJUST THE HARNESS STRAPS FOR YOUR CHILD INCREASES THE RISK OF SERIOUS INJURY OR DEATH IN THE EVENT OF A SHARP TURN, SUDDEN STOP OR CRASH. Snugly adjust the belts provided with this child restraint around your child. A snug strap should not allow any slack. It lies in a relatively straight line without sagging. It does not press on the child’s flesh or push the child’s body into an unnatural position. 1. Loosen the harness straps by lifting the harness adjuster lever at front of seat near the adjustment strap and pulling the straps toward you . 2. Open harness clip . 27 4a O 3. Unbuckle harness straps . Tilt top of buckle toward infant restraint and press in at the top of the red button and pull 4a . tongues out of buckle O 4. Check the crotch strap: Choose the position that is closest to but not under your child. To change crotch strap position push crotch belt up through the bottom of the child restraint and grab it from the top to pull out . Reinsert crotch strap in the desired position. Make sure crotch strap is not twisted when reinserting into slot. Pull up on it to make sure it is secure. 28 5. The harness straps must go into the slots even with or Must above the shoulders . If straps are in proper slots go to page 33. 6. To adMust harness straps: a) Turn seat around so you will have access to the rear of the seat. b) From the rear of the seat remove straps from metal junction plate . 29 7. Pull strap ends through slots at front of seat ¡and reinsert them in the desired slots ¢. Check that the straps are not twisted. ¡ ¢ MAKE SURE harness straps are inserted into the same slots on each side of the seat. Remove body support when not using harness in the lowest slot position. 30 8. Use plastic strap guides as a guide to feed the harness up over the red rollers. Make sure to feed straps OVER red rollers and plastic strap guides 11 . 11 Harness straps MUST go over red rollers. Make sure that the tether strap does not interfere when changing the harness strap height positions. 9. If the straps are not fed OVER the red rollers the assembly is incorrect and MUST be corrected before using child restraint. 12 10. Reassemble straps onto metal junction plate e[actly as shown 12 . Check that straps are completely within the slots and that they are not twisted. 31 11. Check that the straps are inserted at the same level. Pull on harness to make sure it is secure 13 . 13 REMEMBER to check the shoulder straps and crotch strap position as your child grows and move them to the ne[t position when necessary. The harness straps must go in the slots even with or just above the shoulders. 32 11.0 Securing the Child Restraint in Your Vehicle FAILURE TO PROPERLY SECURE THE CHILD RESTRAINT IN THE VEHICLE INCREASES THE CHILD’S RISK OF SERIOUS INJURY OR DEATH IN THE EVENT OF A SHARP TURN, SUDDEN STOP OR CRASH. Carefully follow these instructions and those in your vehicle owner’s manual to be sure your child restraint is properly positioned and held tightly at all times. 11.1 Using a Child Restraint WITH a Built-in Harness 11.2 With a Vehicle Lap or Lap/shoulder Belt: Lower anchors must be stored when using vehicle belt. See Section 19.1, Storing LATCH, page 57. 1. Place the child restraint firmly against the back of a forward-facing vehicle seat. 2. Thread the seat belt through the belt slot openings: For Lap/Shoulder belt For Lap-only belt 3. Buckle the vehicle belt. The vehicle belt should not be twisted. 33 4. Tighten vehicle seat belt Push down hard with your knee or free hand in the middle of the child restraint . Then pull and tighten the vehicle belt. For more information on how to tighten the belt for your seat belt system see Section 8.0 Choosing an Appropriate Vehicle Seat Location p.17 or your vehicle owner’s manual. 5. If a vehicle top tether anchor is available, secure the tether to hold seat in place. See Section 19.0 Using the Tether page 56. When not using the tether hook it on the tether storage bar on the rear of the seat see page 57. 6. Safety Check for Secure Installation Perform this test every time you drive with your child. Twist and pull child restraint forward and to both sides to make sure the vehicle belt does not lengthen or loosen and the child restraint does not easily move. The child restraint should not move side to side or forward more than 1 inch (2.5 cm). . If child restraint is loose or not secure repeat procedure OR find another location for the child restraint see Section 8.0 Choosing an Appropriate Vehicle Seat Location p. 17. 34 11.3 With LATCH Use vehicle belt (not LATCH connectors) for installations with children weighing more than 48 pounds (21.7 kg). NOTE: Some vehicle manufacturers have lower ma[imum weight ratings for LATCH anchors so you must consult your vehicle owner’s manual or call the vehicle manufacturer to confirm the limits on your vehicle’s LATCH anchors. 1. Unhook LATCH from storage bars on the sides of the seat. For ease of installation e[tend LATCH to its ma[imum length. 2. Place the child restraint firmly against the back of a forward-facing vehicle seat. 3. Hook LATCH Connectors to vehicle lower anchors . Pull firmly on Connectors to be sure they are attached. Belt must lay flat and not be twisted. 4. Tighten LATCH by pushing down hard on child restraint and pulling the adjustment belt . 5. If you need to remove LATCH to readjust push button on LATCH buckle to loosen strap. 35 6. NEVER put two LATCH connectors on one vehicle LATCH anchor unless specifically allowed by the vehicle manufacturer . 7. All LATCH seating positions have tether anchors. Secure the top of the seat using the tether strap. See Section 19.0 Using the Tether page 56. 8. Safety Check for Secure Installation Perform this test every time you drive with your child. Twist and pull child restraint forward and to both sides to make sure the LATCH belt does not lengthen or loosen and the child restraint does not easily move. The child restraint should not move side to side or forward more than 1 inch (2.5 cm). .If child restraint is loose or not secure repeat procedure OR find another location for the child restraint see Section 8.0 Choosing an Appropriate Vehicle Seat Location p. 17. 36 12.0 Securing Your Child in the Child Restraint FAILURE TO PROPERLY SECURE YOUR CHILD IN THE CHILD RESTRAINT INCREASES THE RISK OF SERIOUS INJURY OR DEATH IN THE EVENT OF A SHARP TURN, SUDDEN STOP OR CRASH. In a crash the child restraint provides NO protection for your child unless the harness straps are properly secured. Follow these instructions carefully to properly secure your child. ADJUST THE HARNESS SYSTEM SNUGLY EVERY TIME you place your child in the child restraint. Avoid bulky clothing. 1. Place child in child restraint with child’s back flat against back of car seat. 2. Place harness straps over child’s shoulders and insert tongues into buckle until they click into place . CHECK that straps are not twisted. CHECK that harness is securely latched by pulling up on straps. DO NOT use child restraint if harness does not latch. 37 CLICK! 3. Fasten harness clip . Position harness clip at middle of child’s chest level with armpits. 4. Tighten the harness straps by pulling the adjustment strap on the front of the seat . 5. Make sure straps are flat and snug against child’s shoulders and thighs. You should not be able to pinch the harness straps. A snug strap should not allow any slack. It lies in a relatively straight line without sagging. It does not press on the child’s flesh or push the child’s body into an unnatural position. 38 13.0 Harness Removal or Re-attaching Harness 1. Remove harness straps. Open chest clip and harness buckle . 2. Face the rear of the seat and remove the belt straps from metal junction plate as shown . 3. Remove crotch strap by pushing the strap retainer on bottom of seat up through slot. 39 4. Grab the crotch strap buckle and pull it completely out . 5. Pull on the adjustment strap on the front of the seat to lock the metal junction plate into place. 6. Grab hold of the shoulder straps and pull them out of their respective slots on the seat pad. Remove body support and crotch pad. 40 7. On the rear of the seat detach 2 lower seat pad elastic straps from hooks as shown in . 8. Also detach the elastic straps that are threaded through the vehicle belt guides on the sides of the seat as shown in . Repeat on other side. 9. Pull the seat pad out of the way to reveal the red buttons as shown in the seating area ¡ . Slide the buttons to release the back support from the base and lower it into a flat position. Hold the back support to avoid it from falling back and hitting something. ¡ 41 10. Remove harness straps from arms as shown in ¢. Store the body support harness covers crotch pad cover and harness straps in safe place for future use. ¢ Harness Strap T-slot Arm 11. Move seat pad fabric out of the way then raise seat back so that both arms LOCK into the gutters 11 . You should hear a CLICK when the arms lock into the gutters. MAKE sure to keep the gutters clear of any obstructions. 11 KEEP GUTTERS CLEAR 42 12. Tuck seat pad in between the gap of the back support and seat area of the booster seat to allow 2 elastic straps to show at the rear of the seat. 13. Attach 2 seat pad elastic straps onto the hooks on the rear of the child restraint as shown in 12 . 12 14. Pull elastic strap on the seat pad through the vehicle belt guide on side of seat and attach to hook as shown. Repeat on other side 13 . 13 REVERSE INSTRUCTIONS TO REINSTALL HARNESS. See Section 10.0 page 27-32 for the correct path for the harness. 43 14.0 Using Your Child Restraint WITHOUT Built-in Harness FAILURE TO PROPERLY SECURE YOUR CHILD IN THE CHILD RESTRAINT INCREASES THE RISK OF SERIOUS INJURY OR DEATH IN THE EVENT OF A SHARP TURN, SUDDEN STOP OR CRASH. In a crash the child restraint provides NO protection for your child unless the vehicle lap/ shoulder belt is properly secured. Follow these instructions carefully to properly secure your child. WARNING! Use only the vehicle lap and shoulder belt system when restraining the child in the booster seat. LATCH will not secure your child in the booster seat . Vehicle belts MUST lie flat against child and MUST not be twisted. NEVER use a vehicle lap-only belt across front of child . 44 INCORRECT DO NOT use shoulder belt loose or positioned under arm . DO NOT place shoulder belt behind child’s back . INCORRECT INCORRECT Lap portion of lap/shoulder belt MUST be low and snug on hips just touching thighs. DO NOT allow child to slide down in booster seat . If child will not keep vehicle belt properly positioned DO NOT use this booster seat. Use a different child restraint system. DO NOT position vehicle belt over top of the armrests . INCORRECT 45 INCORRECT Vehicle seat headrest should not create a gap between vehicle seat and booster seat . The front of booster seat MUST NOT hang over front of vehicle seat . INCORRECT 46 INCORRECT 15.0 Securing Child & Booster Seat in Vehicle 1. Place booster seat firmly against the back of a forward-facing vehicle seat. The vehicle seat must be equipped with a lap/shoulder belt. 2. Place child in car seat with child’s back flat against back of car seat. 3. Position lap/shoulder belt through shoulder belt guide not underneath shoulder belt guide . Belt should pass over vehicle belt guide . Fasten buckle and pull up on the shoulder belt to tighten. 4. If belt lies across child’s neck head or face redirect belt over shoulder by adjusting the head support setting See page 48, Adjusting Head Support. 5. Check that shoulder belt is properly positioned over shoulder and snug against child. A snug strap should not allow any slack. It lies in a relatively straight line without sagging. It does not press on the child’s flesh or push the child’s body into an unnatural position. 47 16.0 Adjusting Head Support When using with or without the built-in harness. BEFORE adjusting the head support height have your child lean forward slightly. Squeeze the red adjustment handle on top of seat and pull back support up until it snaps into one of the 5 height positions. To lower squeeze red adjustment handle and push down. CHECK to make sure it is securely snapped into one of the 5 height positions by pulling up on head support. The shoulder belt guides must be even with or just above the shoulders as shown by dotted line . 48 17.0 Removing or Re-attaching Back Support To use booster seat WITHOUT back support remove harness straps if attached (see section 13.0 Harness Removal, p.39-43) then continue with the following steps: 1. Detach 2 lower elastic straps from rear of seat as shown . 2. Detach elastic strap from the hooks on the seat pad as shown. Repeat on other side . 49 3. Pull the seat pad out of the way to reveal red buttons as shown in . Slide the buttons to release the back support from the base and lower it into a flat position. When removing back support you must support the back support when sliding the red buttons that disengage the back support from the base. Make sure all hands fingers and other objects are not behind the back support when removing it. 4. Move seat pad fabric out of the way and squeeze red buttons together to release back support from seat. Pull seat and back support apart . 50 5. Once back support is separated store back support with all the harness straps head support body support and crotch pad cover in safe place. 6. Reattach the elastic straps at the back of the seat and through the vehicle belt guide on the sides of seat as shown. 7. Seat is ready to install. TO REATTACH BACK SUPPORT IF NEEDED, reverse steps from p. 51 to p. 49. 51 18.0 Securing Child in Vehicle with Shoulder Belt Positioning Clip The shoulder belt MUST lie across child’s shoulders in red zone as shown . If shoulder belt lies outside this zone the shoulder belt positioning clip MUST be used. To attach clip to booster seat: 1. Insert the loop end of strap through the slot on rear of seat e[actly where shown . There is a slot on each side of booster seat the shoulder belt positioning clip MUST be attached through the slot closest to where the vehicle shoulder belt lies across the child. 52 2. Pass the clip and the strap through the loop end as shown and pull strap up. 3. NOTE: Free end of strap should face front of seat. 53 4. Slide the vehicle shoulder belt onto the clip as shown and pull free end of strap down to tighten clip against the child’s shoulder. The lap portion MUST pass through the vehicle belt guide and be positionned low on the hips. The belt MUST NOT be twisted. Shoulder belt positioning clip Shoulder belt positioning clip REAR VIEW OF CHILD SITTING IN SEAT 54 5. Lap portion of lap/shoulder belt MUST be low and snug on hips just touching thighs. DO NOT allow child to slide down in booster seat . CORRECT 55 19.0 Using the Tether All LATCH seating positions have tether anchors. Always use tether if a vehicle tether anchor is available check your vehicle owner’s manual for the tether anchor location(s). If your vehicle is not equipped with a tether anchor it may be possible to install one. Contact your vehicle dealership for the proper anchor location and installation. 1. Check that tether is securely attached to child restraint. 2. Fasten tether clip to anchor point . 3. Tighten the tether strap securely . 4. To loosen push button while pulling on the belt as shown . 56 19.1 Storing Lower Anchors and Tether (LATCH) 1. For ease of storing e[tend LATCH to its ma[imum length. 2. Locate the storage bars on back of child restraint . 3. Fasten ends of tether and lower anchors onto their respective storage bars as shown . Tether Storage bars located on each side at the back of the seat Lower anchors 4. Tether and lower anchors storage should look like this when complete . Lower anchors 57 20.0 Airplane Use This restraint is certified for use in Motor Vehicles. It is certified for use in Aircraft ONLY when used with the built-in harness. When used as a booster WITHOUT the harness this restraint is NOT CERTIFIED for aircraft use because aircraft seats do not have a shoulder belt. Important points to remember: 1. Airlines have some restrictions about the use of child restraints. 2. Install your car seat on an airplane in the same way it is installed in an automobile with a lap belt (see Section 11.1 Using Child Restraint WITH Built-in harness pp. 33-34). 3. Check that the airplane seat belt holds the child restraint securely in place at all times. 58 21.0 Accessories (on certain models ONLY) 21.1 Body Support & Harness Covers To prevent ejection in sudden stop or crash: Always make sure shoulder straps are threaded through slots and properly positioned on shoulders. Never allow body support to bunch or fold behind child. Use body support with bottom harness slots only. Make sure that harness covers do not interfere with placement of the chest clip at armpit level. 59 22.0 Recline Foot Your child restraint has 3 recline positions: adjust recline foot before installing child restraint. 1. To recline seat pull recline handle out and tilt seat back to e[tend foot as shown . 2. To set seat to upright position pull recline handle out and tilt seat foward to retract foot . 60 23.0 Care and Maintenance Continuous use of child restraint may cause damage to vehicle seat. Use a child restraint mat towel or thin blanket to protect upholstery. Metal and plastic parts: clean with mild soap and cool water. No bleach or detergents. Harness straps and LATCH straps: spot clean or replace. Do not immerse the straps in water. Doing so may weaken the straps. If buckle or harness adjuster sticks or will not remain tight check for foreign objects such as food dirt etc. Remove objects with tweezers and/or clean with a cotton swab. If you cannot get the harness to remain tight with the buckle securely locked do not use this child restraint. Call Graco at 1-800-345-4109 to purchase a replacement harness or buckle. 61 23.1 Buckle Cleaning Process Prevent serious inMury or death: Buckle must be properly latched. Periodically inspect and clean buckle to remove objects or debris that could prevent latching. 1. Turn restraint over push retainer through crotch strap slot . 2. To clean buckle - place in a cup of warm water and gently agitate the buckle press the red button several times while in the water . DO NOT SUBMERGE THE HARNESS WEBBING. DO NOT USE SOAPS or LUBRICANTS. DO NOT use household detergents. Never lubricate buckle. 3. Shake out e[cess water and allow to air dry harness webbing should be dry before use . 4. Repeat Step 2 and 3 as needed. Buckle should fasten with a “click”. 5. Re-attach buckle into the same slot from Step 1. Re-check harness for correct installation before use. 62 24.0 To Remove or Re-attach Seat Cover Seat Cover: clean with a damp sponge using mild soap and cool water. If necessary cover may be removed for cleaning. 1. Remove harness and crotch straps (see Section 13.0 Harness Removal p.39). 2. Remove elastic loops from seat as indicated in and . Hook and loop attachment tape 3. Machine wash cover in cold water on delicate cycle and drip-dry. DO NOT USE BLEACH. TO PUT THE SEAT COVER BACK ON, REVERSE PRECEDING INSTRUCTIONS. 63 Hook and loop attachment tape 25.0 Owners Manual Storage Your Owner’s Manual can be stored on the bottom of the seat inside the slot in the footrest as shown. 26.0 Replacement Parts and Warranty To purchase parts or accessories or for warranty information in the United States, please contact us at the following: www.gracobaby.com or 1-800-345-4109 64