1
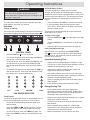
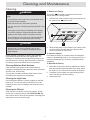
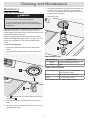
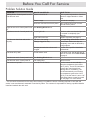
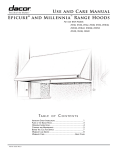
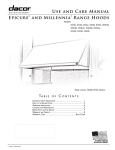
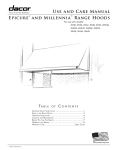
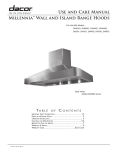
Use and Care Manual Epicure ® and Millennia™ Range Hoods For Use With Models: EH30, EH36, EH42, EH48, EH54, EHR30, EHR36, EHR42, EHR48, EHR54 MH30, MH36, MH48 Model EH48 shown Ta b l e o f C o n t e n t s Important Safety Instructions..................................................... 1 Parts of the Range Hood........................................................... 3 Operating Instructions............................................................... 4 Cleaning and Maintenance........................................................ 5 Before You Call For Service...................................................... 7 Warranty & Service.................................................................... 8 Warranty Card.......................................................... Back Cover Part No. 102138 Rev. C tomer: le and atures, sty tion of fe e combina uniqu ® ucts! Our cor prod a D . in t s our home ery late dition to y e of the v d s a a t h a rc re u g ™ p your and a nce, we lations on Kitchen , tive Applia c e n th ti f is o D e Congratu if w s ur ne s The L struction ntial of yo ce make u Safety In d full pote t n n a a performan , s rt n o o p ti nc e Im controls, fu ing with th lf with the al, beginn e u n rs a u o m y re e nd ca familiariz this use a In order to f our ghly read u ro o mework o th u at yo hin the fra it w g in suggest th rk Call for hile wo efore You d pride, w B n a e . y th n lit k o a c ti u c e . se t ch ith q for service please firs factured w r to calling r product, and manu o u ri d o p y e s n h ie it ig s d w e me lem s are d ons and re ce a prob appliance l suggesti r experien fu e e v All Dacor s e u ct u s o e y id ould e to conta It prov value. Sh se feel fre guidance. a r le fo p l o a company s u , n ices is ma ts and serv ection of th ur produc o Service s e v . ro p sly im ort needs continuou duct supp to ro s p u r s u lp o y e y of put h ce with an ustomer in r assistan Valuable c fo m a e T e mer Servic our Custo lued Cus To Our Va rvice Team stomer Se Dacor Cu rive ge Gate D 1440 Brid 1765 Bar, CA 9 Diamond -0093 (800) 793 : -3130 Telephone (626) 403 Friday y through Fax: a d n ime o M . Pacific T peration: to 5:00 P.M . .M Hours of O A 0 :0 6 dedicated and we are om s c e r. ili o c m a fa .D s for www by familie nce and pany built f performa o m l o Web Site: e c v a le h re ea a hig r home. W ill deliver or for you product w c r a o D c a g D in s w ne u for choo that your Thank yo confident re a e W . yours ome. to serving years to c y n a m r fo t enjoymen Sincerely, we Cheryl Cro atisfaction ustomer S C Director, © 2007 Dacor, all rights reserved Important Safety Instructions Installer: Leave these instructions with the appliance. About Safety Instructions The Important Safety Instructions and warnings in this manual are not meant to cover all possible conditions and situations that can occur. Use common sense and caution when installing, maintaining or operating this or any other appliance. Customer: Read this use and care manual completely before using this appliance. Save it for future reference. It contains important use and care information. Keep your sales receipt or canceled check in a safe place. Proof of original purchase date is required for warranty service. Always contact the Dacor Customer Service Team about appliance problems or situations that you do not understand. If you have any questions, call: Safety Symbols and Labels Dacor Customer Service Team 1-800-793-0093 (U.S.A. and Canada) Monday — Friday 6:00 a.m. to 5:00 p.m. Pacific Time DANGER Immediate hazards that WILL result in severe personal injury or death. Web site: www.Dacor.com Have the model and serial number for your hood available. Remove the filters to access the model and serial number labels. Record these numbers below for easy access. WARNING Model Number ___________________________________ Hazards or unsafe practices that COULD result in severe personal injury or death. CAUTION Serial Number ___________________________________ Hazards or unsafe practices that COULD result in minor personal injury or property damage. Date of Purchase_________________________________ For warranty and service information, see page 8. At Dacor, we continuously improve the quality and performance of all our products. We may need to make changes to this appliance without updating these instructions. DANGER To avoid the possibility of explosion or fire, do not store or use combustible, flammable or explosive vapors and liquids (such as gasoline) inside or in the vicinity of this or any other appliance. Also keep items that could explode, such as aerosol cans away from cooktop burners, ovens and range hoods. Do not store flammable or explosive materials in adjacent cabinets or areas. warning WARNING - TO REDUCE THE RISK OF FIRE, ELECTRIC SHOCK, OR INJURY TO PERSONS, OBSERVE THE FOLLOWING: a. Use this unit only in the manner intended by the manufacturer. If you have questions, contact the manufacturer. b. Before servicing or cleaning unit, switch power off at service panel and lock the service disconnecting means to prevent power from being switched on accidentally. When the service disconnecting means cannot be locked, securely fasten a prominent warning device, such as a tag, to the service panel. READ AND SAVE THESE INSTRUCTIONS 1 Important Safety Instructions General Safety Precautions To reduce the risk of fire, electric shock, serious injury or death when using your range hood, follow basic safety precautions, including the following: WARNING 1. If you receive a damaged product, immediately contact your dealer or builder. Do not install or use a damaged hood. 2. Make sure that the range hood has been properly installed and grounded by a qualified installer according to the accompanying installation instructions. Have the installer show you the location of the fuse or junction box so that you know where and how to turn the power off. 3. Do not install, repair or replace any part of the range hood unless specifically recommended in the literature accompanying it. A qualified service technician should perform all other service. 4. To avoid the risk of electric shock, before servicing the range hood, switch power off at the fuse or junction box and lock the electrical panel door to prevent power from being switched on accidentally. When the electrical panel cannot be locked, securely fasten a prominent warning device, such as a tag, to the service panel. 5. To avoid the risk of electric shock, before cleaning the range hood, turn off the main power switch. 6. Use the range hood only for its intended purpose as outlined in this manual. DO NOT use this range hood to vent hazardous or explosive materials or vapors. If you have questions, contact the manufacturer. 7. Do not tamper with the controls. 8. Never allow the filters to become blocked or clogged. Do not allow foreign objects, such as cigarettes or napkins, to be sucked into the hood. 9. Clean the filter(s) and all grease-laden surfaces often to prevent grease fires and maintain performance. 10. If the cooktop and range hood are near a window, use an appropriate window treatment. Avoid long drapes or other window coverings that could blow over the cooktop and hood, resulting in a fire hazard. 11. Always run the fan(s) whenever the cooktop is operating. 12. Never leave the range or cooktop unattended when a burner (or element) is in use. Boil-overs and greasy spills may smoke and/or ignite. 13. Do not leave children alone or unattended in the area where the cooktop and range hood are in use. Never allow children to sit or stand on an appliance. Do not let children play with a range, cooktop or range hood. Do not store items of interest to children above or around the cooktop, range or range hood. 14. The minimum vertical distance between the cooktop surface and the exterior part of the hood must be no less than 25” (635 mm). The vertical distance may be longer for the range or cooktop being used. Consult the range or cooktop instasllation instructions for the minimum vertical distance from the appliance being used. 15. TO REDUCE THE RISK OF INJURY TO PERSONS IN THE EVENT OF A RANGE TOP GREASE FIRE: a. SMOTHER FLAMES with a close-fitting lid, cookie sheet or metal tray, then turn off the burner. BE CAREFUL TO PREVENT BURNS. If the flames do not go out immediately, EVACUATE AND CALL THE FIRE DEPARTMENT. b. NEVER PICK UP A FLAMING PAN - you may be burned. c. DO NOT USE WATER, including wet dish clothes or towels - a violent steam explosion may result. d. Use a fire extinguisher ONLY if: • You have a Class ABC extinguisher, and you already know how to operate it. • The fire is small and contained in the area where it started. • The fire department is being called. • You can fight the fire with your back to an exit. 2 Parts of the Range Hood b a d d E c Model EH4218 Shown c A HOOD - The hood directs heat and smoke into the fan located inside the unit. The fan forces heat and smoke into the duct system which vents to the outside. The filter and the lights are located on the bottom of the hood. D LIGHTS - 75 W halogen lights. The number of lights and location depends on the model. See the table below. E MAIN POWER SWITCH - The main power switch allows you to turn off power to the hood for safety during maintenance. B CONTROL PANEL - Use the keys on the control panel to control your hood’s various features. On C FILTER - Prevents grease and grime from getting into the fan(s). The number of filters depends on the model. See the table below. Off HOOD FEATURES MODEL HOOD WIDTH HOOD HEIGHT FILTERS LIGHTS EH/EHR3012 & MH3012 30 Inches 12 Inches 2 2 EH/EHR3018 & MH3018 30 Inches 18 Inches 2 2 EH/EHR3612 & MH3612 36 Inches 12 Inches 2 2 EH/EHR3618 & MH3618 36 Inches 18 Inches 2 2 EH/EHR4212 42 Inches 12 Inches 3 2 EH/EHR4218 42 Inches 18 Inches 3 2 EH/EHR4812 & MH4812 48 Inches 12 Inches 4 3 EH/EHR4818 & MH4818 48 Inches 18 Inches 4 3 EH/EHR5418 54 Inches 18 Inches 4 3 3 Operating Instructions AUTO-ON Safety Feature warning Never operate the range hood without the filter(s) in place. Also, do not operate the hood with grimy or grease-laden filters. Personal injury, fire or damage to the range hood could result. Main Power Switch The main power switch must be on to operate any of the hood features. See page 3 for location. Operation To protect the electronic speed control from heat damage, the fan system automatically turns on when the temperature on the control board goes above 140°F (60°C) and the main power switch is on. The fan speed increases with the temperature. To temporarily turn off the auto-on feature: • Touch and release the FAN key until the fan turns off. • If the temperature under the hood remains above 140°F (60°C), the fan will turn on again to protect the electronic speed control. Turning on the Fan The fan has four speed settings. The speed is indicated by the number of lights glowing on the fan speed indicator A . The fan will turn off automatically when the temperature drops below 130°F (54°C). Turning on the Lights A B C D E Touch the LIGHTS key C to turn the lights on the high setting. • Touch the LIGHTS key a second time to set the lights to low. • Touch the light key a third time to turn the lights off. Clean Filter Reminder Light CONTROL PANEL • Touch the FAN key B to turn on the fan. • To increase the speed, touch and release the FAN key until the fan is at the desired setting. • To turn off the fan, touch and release the FAN key until the fan turns off. As you touch and release the FAN key, the fan speed increases, then goes from HIGH to OFF. • • To decrease the speed, touch and release the FAN key until the fan turns off. Then touch and release the FAN key until the fan is at the desired speed. After 50 hours of fan operation, the CLEAN FILTER light E will come on to remind you to clean the filters(s). After coming on, the clean filter timer will reset the next time the fan is turned off. Important Operating Tips • Always use the fan when using the cooktop or range. • Turn the fan on a few minutes before starting to cook to establish an airflow pattern in the room. • Adjust the fan speed according to the volume and weight of the food you are cooking. • Shut nearby windows and doors, turn off ceiling fans and close nearby heating and air conditioning outlets to reduce air currents around the hood. • Place your largest pots and pans on the back burners when possible. • In the interest of safety, heat oils and fats slowly. Energy Saving Tips OFF LOW MEDIUM HIGH • Do not operate the fan at a speed higher than necessary to remove heat and smoke. Running at too high a speed will draw in air from outside the house, increasing heating and cooling costs. • Keep the filter system and hood surfaces free of grease and grime to improve efficiency. • Turn the fan off as soon as all smoke and odors have been cleared. • Select cookware of the proper size, material and construction for the cooking task. Always use lids on cookware to retain heat and moisture. • Minimize the amount of liquid used to cook food. FAN SPEED INDICATOR Timed Feature Your hood is equipped with a timer to automatically turn off the fan and/or lights after ten minutes. To set the timer: • Set the fan to the desired speed and/or lights to the desired setting. • Touch the TIMED key D (the key will light). The fan and/or the lights will turn off after about ten minutes. • To turn off the timer, touch the TIMED key again. The light on the TIMED key will go out to indicate the timer is off. 4 Cleaning and Maintenance Cleaning To Remove the Filter(s): warning The filter(s) A are located on the bottom of the hood, directly above the cooking surface. To avoid the risk of fire, electric shock or personal injury: 1. Hold the filter in place with one hand and push back on the release lever B with the other. • Turn off power to the hood at the circuit breaker panel or fuse box before cleaning. • Clean the hood only in the manner specified. • Use only the types of cleaning solutions specified in this manual. • Thoroughly dry the filter(s) immediately after cleaning. • Turn off the cooktop or range and make sure that the appliance and range hood are cool before cleaning. B • To avoid damage to the fan, do not reinstall damaged filters (see page 6 for replacement part numbers). caution A • Always wipe stainless steel (silver colored) surfaces with the grain. To prevent scratching, do not use abrasive cleaners or scrubbers on stainless steel or glass surfaces. 2. While pushing back on the release lever, lower the filter out of the hood. On hoods with more than one filter, remove and clean all of the filters. To Clean the Filter(s): Proper cleaning is necessary to ensure safe operation and maintain hood performance and appearance. The frequency of cleaning should be adjusted according to the type and amount of cooking. Best results will be achieved by cleaning soiled components as soon as possible. Hand wash the filter(s) in hot water with a mild detergent solution or dishwashing soap. Or you can place them in an automatic dishwasher. Dry the filter(s) completely before reinstalling. To Reinstall the Filter(s): Cleaning Stainless Steel Surfaces 1. Insert tabs on the end of the filter opposite the release lever into the slots toward the back of the hood (above the hood rim). The release lever must be facing down. Clean stainless steel surfaces with a mild solution of detergent or dishwashing soap and warm water. Rinse and dry with a soft, lint-free cloth. 2. Push back on the release lever while sliding the free end of the filter into the filter opening. You may also use Dacor Stainless Steel Cleaner. Use it according to the directions on the package. 3. Release the lever. Cleaning the Light Lens Use a mild glass cleaner to remove smudges on the light fixture lens. You can also clean it with Dacor Cook Top Cleaning Creme. Use it according to the directions on the package. Cleaning the Filter(s) Clean the filter a minimum of every two months. To help remind you to clean the filter(s), the CLEAN FILTER light will come on after 50 hours of fan operation. See page 4 for instructions on how to reset the light. 5 Cleaning and Maintenance Maintenance Light Bulb Replacement warning • To prevent electric shock turn off power at the fuse or junction box before replacing the light bulb. 5. Screw the new bulb into the light fixture clockwise until it is tight. Turn on power at the fuse or junction box. Turn on the main power switch and touch the light key to make sure it is working. 6. Replace the filter. • To avoid personal injury, make sure the cooktop or range, the hood and the light are cool before changing the light bulb. 2 Light bulb replacement is considered to be a homeowner maintenance operation. If all of the lights do not work, before replacing any bulbs, check to make sure power is on at the circuit breaker or fuse box. Replace the light bulbs only with Dacor Part No. 700975. Halogen Bulb Replacement Kit consist of a single bulb and suction cup, available from any authorized Dacor parts dealer. 3 To replace the light bulb: 1. Remove the right filter and turn off the main power switch. 1 2. Gently push the suction cup on the light replacement Replacement Parts DACOR PART # DESCRIPTION 700975 Halogen Bulb Replacement Kit 101617 Filter Product Specifications* B Total Connect Load 120 Vac, 60 Hz, 9 Amps MAX (10 Amp MAX surge) Filters Mesh type, dishwasher safe Lights 120 Vac, 60 Hz, 75 W *Specifications subject to change without notice A tool A (provided with you range hood) onto the lens of the light bulb B . 3. Turn the tool counter-clockwise until the bulb comes loose. 4. Remove the tool from the bulb and put it on the lens of the replacement bulb. 6 Before You Call For Service Problem Solution Guide PROBLEM MAY BE CAUSED BY WHAT TO DO Nothing Works. Control panel is not lit. Fan does not work. Power to hood is off. Turn on power at junction or fuse box. Check for tripped breaker or blown fuse. Power outage. Call electric company. Hood not connected to electric power. Have qualified electrician connect hood to electric power. Lights do not work. Control panel is not lit. See Nothing Works above. Light does not work. Control panel is lit. Loose light bulb. Check to make sure that the light bulb is screwed in completely (see page 6). Light bulb burned out. Replace light bulb (see page 6). Fan set to low setting. See Operating Instructions section. Filter(s) clogged or dirty. Check filters. Make sure they are completely clean and not blocked by foreign objects. Damper jammed shut or duct work clogged. Consult with a qualified installation professional.* Timed feature used. If the timer is set, the fan will turn off after ten minutes. See Timed Feature on page 4. Fan does not draw heat and smoke properly. Fan shuts off by itself. Fan does not work. Control panel not lit. See Nothing Works above. Fan does not work. Control panel lit. Fan malfunction. Call for service. Fan comes on by itself. Hood AUTO-ON feature. The fan comes on automatically when the temperature rises above 140°F (60°C). The AUTO-ON feature protects the control panel from damage due to overheating. The fan will automatically turn off when the temperature goes below 140°F (60°C), if the fan control is set to “off”. This safety feature cannot be turned off. See page 4 for more details. * The duct work connected from the range hood chimney to outside the house or building required to vent heat and smoke is not manufactured, warranted or serviced by Dacor. The customer is responsible for having a qualified installer install and maintain the duct work. 7 Warranty & Service Product Maintenance OUTSIDE THE FIFTY STATES OF THE U.S.A., THE DISTRICT OF COLUMBIA, AND CANADA: Do not perform any maintenance other than that instructed in the Cleaning and Maintenance section of this manual. A qualified service technician should perform all other service. LIMITED FIRST YEAR WARRANTY Getting Help Before you obtain service, please review the Before You Call for Service section of this manual starting on page 7. If you have performed the checks in the Problem Solution Guide and the problem has not yet been remedied, please visit our web site or contact our Customer Service Team for a listing of Dacor authorized service agents. Prior to requesting service, it is helpful to be familiar with the warranty terms and conditions on this page. If your DACOR product fails to function within one year of the original date of purchase, due to a defect in material or workmanship, DACOR will furnish a new part, F.O.B. factory, to replace the defective part. All delivery, installation and labor costs are the responsibility of the purchaser. The owner must provide proof of purchase, upon request, and have the appliance accessible for service. What Is Not Covered • Service calls to educate the customer in the proper use and care of the product. • Failure of the product when used for commercial, business, rental or any application other than for residential consumer use. • Replacement of house fuses or fuse boxes, or resetting of circuit breakers. Dacor Customer Service Team: • Light bulbs and filters. Tel: (800) 793-0093 Fax: (626) 403-3130 Business Hours: 6:00 a.m. - 5:00 p.m. Pacific Time • Routine maintenance and cleaning. • Duct work external to the range hood. • Breakage, discoloration or damage to glass, metal surfaces, plastic components, trim, paint or other cosmetic finish, caused by improper usage or care, abuse or neglect. • Damage to the product caused by accident, fire, flood or other acts of God. Contact us through our web site at: www.Dacor.com You may also write us at: Dacor Customer Service 1440 Bridge Gate Drive Diamond Bar, CA 91765 At Dacor , we believe that our quality of service equals that of our product. Should your experience with our service network or product be different, please contact our Customer Service Team and share your encounter with us. We will do our utmost to resolve the situation for you and deliver on our Dacor promise. If you need anything clarified, just let us know. What Is Covered CERTIFICATE OF WARRANTIES: DACOR HOODS WITHIN THE FIFTY STATES OF THE U.S.A., THE DISTRICT OF COLUMBIA, AND CANADA*: FULL ONE-YEAR WARRANTY If your DACOR product fails to function within one year of the original date of purchase, due to a defect in material or workmanship, DACOR will remedy the defect without charge to you or subsequent users. The owner must provide proof of purchase upon request, and have the appliance accessible for service. THE REMEDIES PROVIDED FOR IN THE ABOVE EXPRESS WARRANTIES ARE THE SOLE AND EXCLUSIVE REMEDIES. THEREFORE, NO OTHER EXPRESS WARRANTIES ARE MADE, AND OUTSIDE THE FIFTY STATES OF THE UNITED STATES, THE DISTRICT OF COLUMBIA, AND CANADA, ALL IMPLIED WARRANTIES, INCLUDING BUT NOT LIMITED TO, ANY IMPLIED WARRANTY OF MERCHANTABILITY OR FITNESS FOR A PARTICULAR USE OR PURPOSE, ARE LIMITED IN DURATION TO ONE YEAR FROM THE DATE OF ORIGINAL PURCHASE. IN NO EVENT SHALL DACOR BE LIABLE FOR INCIDENTAL EXPENSE OR CONSEQUENTIAL DAMAGES. NO WARRANTIES, EXPRESS OR IMPLIED, ARE MADE TO ANY BUYER FOR RESALE. Some states do not allow limitations on how long an implied warranty lasts, or do not allow the exclusion or limitation of inconsequential damages, so the above limitations or exclusions may not apply to you. This warranty gives you specific legal rights, and you may also have other rights that vary from state to state. Warranty is null and void if non-CSA approved product is transported from the U.S. 8 fold here NO POSTAGE NECESSARY IF MAILED IN THE UNITED STATES BUSINESS REPLY MAIL FIRST-CLASS MAIL PERMIT NO. 4507 DIAMOND BAR CA POSTAGE WILL BE PAID BY ADDRESSEE DACOR INC. ATTN: WARRANTY PROCESSING DEPT 1440 BRIDGE GATE DR STE 200 PO BOX 6532 DIAMOND BAR CA 91765-9861 Please visit www.Dacor.com to activate your warranty online. WARRANTY INFORMATION IMPORTANT: Please rest assured that under no conditions will Dacor sell your name or any of the information on this form for mailing list purposes. We are very grateful that you have chosen Dacor products for your home and do not consider the sale of such information to be a proper way of expressing our gratitude! Owner’s Name: Street: Last (Please Print or Type) First City: Middle State: Purchase Date: Email: cut here Your warranty will not be activated until you activate it online or return this form to Dacor. If you have purchased more than one Dacor product, please return all forms in one envelope or activate the warranty for each product online. Zip: Telephone: Dealer: City: State: Zip: Your willingness to take a few seconds to fill in the section below will be sincerely appreciated. Thank you. 1. How were you first exposed to Dacor products? (Please check one only.) A. T.V. Cooking Show F Builder B. Magazine G. Architect/Designer C. Appliance Dealer Showroom H. Another Dacor Owner D. Kitchen Dealer Showroom I. Model Home E. Home Show J. Other 2. Where did you buy your Dacor appliances? A. Appliance Dealer B. Kitchen Dealer C. Builder Supplier D. Builder E. Other 3. For what purpose was the product purchased? A. Replacement only B. Part of a Remodel C. New Home D. Other 4. What is your household income? A. Under $75,000 B. $75,000 – $100,000 C. $100,000 – $150,000 D. $150,000 – $200,000 E. $200,000 – $250,000 F. Over $250,000 6. Would you buy or recommend another Dacor product? Yes Comments: cut here 5. What other brands of appliances do you have in your kitchen? A. Cooktop C. Dishwasher B. Oven D. Refrigerator No Thank you very much for your assistance. The information you have provided will be extremely valuable in helping us plan for the future and giving you the support you deserve. Place Serial Number Label Here Web site: Corporate phone: www.Dacor.com (800) 793-0093