1
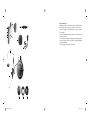
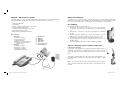
Australia: Tel. +61 3 9899 8633
GN 9120
GN 9120
Austria: Tel. +43 1 403 4134
Canada: Tel. +1 416 620 1440
Denmark: Tel. +45 43 43 15 52
France: Tel. +33 1 30 58 30 31
Germany: Tel. +49 80 31 26 510
Hong Kong: Tel. +852 21 04 68 28
Italy: Tel. +39 02 58 32 8253-61-74
Japan: Tel. +81 3 3239 1721
P. R. China: Tel. +86 10 6583 2311
Singapore: Tel. +65 65 42 45 50
Spain: Tel. +34 91 639 8064
Sweden: Tel. +46 86 93 09 00
United Kingdom: Tel. +44 1784 220 140
USA: Tel. +1 603 598 1100
www.gnnetcom.com
GN9120_cover_USA_flap.indd 1
www.gnnetcom.com
31-03-2003, 15:20:05
1e
1a
Limpar e substituir as peças
A almofada para o auricular e o auricular podem ser limpos ou substituídos. Quando
limpar, utilize apenas água e um pouco de produto lava-loiças, se for necessário.
• Para limpar ou substituir o auricular (5), retire primeiro o auricular do receptor do
microauscultador.
• Para limpar ou substituir a almofada (6) para o auricular do microauscultador, retire-a
suavemente do auricular.
• O microauscultador está equipado com uma bateria recarregável. Para substituir a
bateria, leia com cuidado as instruções neste guia. Só podem ser utilizadas baterias
aprovadas pela GN Netcom.
Mais nenhuma peça pode ser substituída pelo utilizador.
8
1b
1c
1d
1
7
9
3
2d
2b
2c
2a
2
4
GN9120_cover_USA_flap.indd 2
5
6
31-03-2003, 15:20:20
English - GN 9120 user guide
About the GN 9120
This user guide provides you with information and instructions on assembling, using
and maintaining your GN 9120. This guide contains the following sections:
The GN 9120 is a cordless headset solution, made up of a cordless headset and a base
unit that is connected to your telephone. The GN 9120 gives you full mobility, handsfree convenience and superior sound quality for your telephone conversations.
•
•
•
•
•
•
•
About the GN 9120
Assembling
Battery charging and assembly verification
Features and customisation
Answering and making telephone calls
Frequently asked questions
Operational and safety information
Assembling
Box contents:
1. Base unit
1a) On-line indicator
1b) Link-up indicator
1c) Mute indicator
1d) Battery re-charge indicator
1e) Telephone Termination
Switch (back)
2. Headset
2a) On-line indicator
2b) Volume – button
2c) Volume + button
2d) Multifunction button
3.
4.
5.
6.
7.
8.
9.
Headband
Earhook
Earplate
Earcushion
Base foot
Connection cord
Power adaptor
To integrate the unit to your telephone:
1. Disconnect the handset cord from the telephone’s handset
socket and connect it to the socket marked 0 on the base unit
(1).
2. Connect the connection cord (8) to the telephone’s handset
socket.
3. Connect the power adapter (9) to the socket marked 2 at the
bottom of the base unit and then connect to a power socket.
4. Insert the base unit into the foot (7) and turn until secure.
5. If your telephone has volume control, set the volume to the
middle setting.
6. Place the headset into the base unit for battery charging.
Battery charging and assembly verification
Initial battery charging
The battery in the headset is not initially charged and will require a
minimum of 20 minutes of charging before use. It takes 1.5 hours
before the battery is fully charged, providing up to 8 hours of talk
time.
The battery charging indicator (1d) on the base unit will flash continuously during charging and will light when the battery is fully
charged.
Note: The headset may become warm during battery charging.
This is normal and will not affect the safety or performance of the
headset.
2
GN9120_contents_usa_version 110403.indd 2-3
3
11-04-2003, 15:53:07
Battery charging and use
When not in use, place the headset in the base unit, ensuring the link-up indicator (1b)
is not lit, to charge the battery. If the link-up indicator is lit after placing the headset,
remove the headset from the base unit and place it in the base again.
If battery charge is too low, a beep will be heard in the headset every 20 seconds.
Note: The battery charging indicator (1d) on the base unit will flash continuously during
charging and be lit when the battery is fully charged.
Assembly verification
Verify that the assembling of the product has been completed correctly. After removing the headset from the base unit, the green
link-up indicator (1b) on the front of the base unit will light and the
on-line indicator on the headset will flash.
Multifunction button (2d)
The multifunction button serves several functions, depending on
how long the button is pressed for.
Press for 2 sec
Press momentarily
x
x
Press for 2 sec
x
(+/- simultaneously)
1. Put on your headset.
2. Lift the telephone’s handset and listen for a dial tone in your headset.
3. If there is no dial tone or it is not clear, move the telephone termination switch (1e), at the rear of the base unit, along the A-G range
until the dial tone is clear. If the dial tone is just as clear in position
A as in position G, leave the switch in position A.
Features and customisation
Press momentarily
x
x
x
Functions
Volume +
Volume Transmit volume
adjustment
Clear dial tone adjustment
In order to hear a dial tone, you must set the correct dial tone setting.
Complete the following:
If the green link-up indicator does not light, check the wiring connections on the base unit and ensure that the power adapter is connected. If the on-line indicator on the headset does not flash continuously, replace the headset in the base unit and remove it again.
Functions
Mute
Un-mute
Answer/make call
End call
Conference mode
Tone control adjustment
Transmit volume
adjustment
Functionality of the + and – buttons (2b & 2c)
The + and – buttons serve several functions, depending on how long the button is
pressed for.
Press for 6 sec
x
x
x
Transmit volume adjustment
Adjust the volume of transmitted sound according to personal preference.
To adjust the volume:
1. Make a telephone call and ask the person you are calling to assist you.
2. Press the +/– buttons on the headset simultaneously for 2 seconds. A beep will indicate when 2 seconds has passed.
3. Adjust the volume level by pressing the + or – button.
4. When the person you are speaking with finds the volume of your
voice appropriate, press the +/– buttons simultaneously for 2
seconds. This setting is now stored in the headset.
x
4
GN9120_contents_usa_version 110403.indd 4-5
5
11-04-2003, 15:53:08
Received sound volume adjustment
Adjust the volume of received sound according to personal preference. To adjust the volume:
1. Make a telephone call and ask the person you are calling to assist
you.
2. Adjust the volume of the received sound by pressing the + or
– button. This setting is now stored in the headset.
Note: When the volume reaches maximum or minimum, you will hear
a beep in your headset. The product will save the set volume in its memory.
Tone control adjustment
Select the tone (from Treble Lift to Bass Lift) according to personal
preference. To select the tone:
1. Make a telephone call and ask the person you are calling to assist
you.
2. Press the multifunction button for 6 seconds. A beep will indicate
when 6 seconds has passed.
3. Press the volume + or – button to toggle between the 4 sound
modes.
4. When the desired sound mode is reached, exit the sound mode
adjustment by pressing the multifunction button momentarily.
Positioning of microphone
Adjust the boomarm of your headset so that the microphone is positioned in the direction of your mouth, as close as possible to your
mouth.
Muting the microphone
To mute and un-mute the microphone, press the multifunction button
momentarily. You are still able to hear your caller, but your voice will
not be transmitted to the caller.
Note: When the microphone is muted, you will hear a beep every 15
seconds in your headset and the red mute indicator on the base unit
will light.
Wearing styles: headband and earhook
The wearing style of your headset may be changed by attaching a headband (3) or
earhook (4).
To remove a wearing style from your headset
1. Remove the earcushion (5+6) from the headset receiver (headband version only).
2. Hold the headband/earhook with one hand and the headset receiver in the other hand.
3. Gently press the headset receiver’s speaker with your thumb and
pull the headband/earhook ring away.
To attach a headband for headband wearing style:
1. Gently press the headband ring to the headset receiver until it
clicks. The square knob on the headband ring will match the
square hole in the headset receiver.
2. Click the earcushion on to the headset receiver.
To attach an earhook for over-the-ear wearing style:
1. For wearing over your left ear, align the “L” inside the ear hook
with the square hole on the headset, and gently press the ear hook
onto the headset receiver. For wearing over your right ear, align
the “R” inside the earhook with the square hole on the headset,
and gently press the ear hook onto the headset receiver.
2. Attach the earhook to the earhook ring’s clutch.
After attaching the earhook, you may now adjust the headset to be worn on your
right or left ear, depending on personal preference. See the changing wearing ear
section for instructions.
Changing wearing ear
Headband (3) wearing style.
Your headband allows you to wear your headset on your right or left
ear, according to personal preference. Simply rotate the boomarm
180 degrees and your headset is ready for wearing on the other ear.
Note: The boomarm cannot be rotated a full 360 degrees. Do not
force the boomarm when it cannot be rotated any further.
6
GN9120_contents_usa_version 110403.indd 6-7
7
11-04-2003, 15:53:10
Earhook (4) wearing style.
With an earhook, you can wear your headset on your right or left ear, according to
personal preference. Complete the following steps:
1. Rotate the boomarm 180 degrees.
Note: The boomarm cannot be rotated a full 360 degrees.
Do not force the boomarm when it cannot be rotated any further.
2. Detach the earhook ring, turn it 180 degrees and click it back on to the receiver.
3. Detach the earhook from the earhook clutch.
4. Insert the earhook into the opposite side of the earhook clutch.
Note: The buttons on the headset must be facing upwards.
6. The conference mode is terminated when:
• the master headset is placed in the base unit
• or the master headset’s multifunction button is pressed for 2 seconds
(this will end the call)
Note: Repeat steps 3-5 to add more headsets to the conference mode.
Up to 4 headsets may participate in the conference mode.
Conference mode
Using the conference mode, more than one headset may be joined
to a telephone conversation via the base unit. The headset you use
with your base unit is the master headset.
Making telephone calls:
To make a telephone call:
1. Remove the headset from the base unit. The link will be established
and the on-line indicator will light.
2. Lift the telephone’s handset and listen for a dial tone in your headset.
3. Dial the desired number.
To end the call, simply lower your telephone’s handset to its
cradle.
Note: If you connect the telephone connection cord to your telephone’s headset socket instead of the handset socket, this will enable the telephone’s line button. You can
now answer and end calls by pressing the line button instead of using the handset.
1. Lift your master headset out of the base unit.
2. Initiate or answer a call. See the answering and making telephone calls section.
3. During the telephone call, place an additional headset into the
base unit and leave it untill all lights stop flashing and only the
battery indicator is on. Remove the new headset from the base
unit - a beep will then be heard in the master headset, after
which you have 15 seconds to accept the additional headset.
4. Accept the additional headset by pressing the multifunction button momentarily.
5. An additional headset leaves the conference call by pressing its
multifunction button for 2 seconds.
Answering and making telephone calls
Answering telephone calls:
To answer a telephone call:
1. Lift the telephone’s handset out of its cradle when alerted to an
incoming call.
2. Remove the headset from the base unit. The link will be established
and the on-line indicator (1a) on the front of the base unit will light.
To end the call, place the headset in the base unit and replace the
telephone’s handset to its cradle.
Answering telephone calls using the GN 1000 RHL (Remote Handset Lifter):
You may purchase a GN 1000 RHL as an accessory, which lets you answer and
end telephone calls while away from your desk. Please contact your vendor or visit
www.gnnetcom.com for further information.
8
GN9120_contents_usa_version 110403.indd 8-9
9
11-04-2003, 15:53:11
To answer a telephone call using the GN 1000 RHL:
1. Remove the headset from the base unit when
you receive a call. The link will be established
and the on-line indicator (1a) on the front of the
base unit will begin to flash.
Note: If you are already wearing the headset, simply
press the multifunction button (2d) on the headset
momentarily to answer the incoming call.
To end the call, press the multifunction button
momentarily or place the headset in the base unit.
Making telephone calls using the GN 1000 RHL (Remote Handset Lifter):
To make a telephone call using the GN 1000 RHL:
1. Remove the headset from the base unit. The link will be established and the on-line
indicator (1a) on the front of the base unit will begin to flash.
2. Dial the desired number.
To end the call, press the multifunction button for 2 seconds or place the headset in
the base unit.
Note: The connection (8) cord must be connected to your telephone’s handset socket
in order for the GN 1000 RHL to function.
Frequently Asked Questions
I do not hear a dial tone.
• Check that all the cords and plugs are connected correctly.
• Check that the power adapter is plugged in and has power.
• Check that the on-line indicator is lit. If it is not, place the headset in the base unit and
take it out again.
• Check that the battery is fully charged. If the battery is fully charged, the battery
charging indicator on the base unit will light when the headset is placed correctly in
the base unit.
I hear beeps in my headset.
• A beep every 15 seconds means that the mute function is on.
• A beep every 10 seconds means that you are out of range
(up to 100 m, depending on environment) of the headset’s
base unit. Move closer to the base unit.
• A beep every 20 seconds means that the battery charge is
low and needs to be recharged.
The person I am talking to has difficulties hearing me.
• Check that the mute function is off.
• Readjust the microphone volume.
• Check the position of the boomarm and make sure that the microphone is placed as
close as possible to your mouth.
• You may be out of range (up to 100 m, depending on environment) of the headset’s
base unit. Move closer to the base unit.
• Static electricity may occur if your base unit is placed too close to your telephone or
other electronic devices.
Operational and safety information
Read the operational and safety instructions below. These contain important information about using the product. Keep this user guide for future use.
Replacing the battery
The battery provided with the product will provide you with years of
use. If you need to replace the battery, complete the following:
1. Remove the wearing style as previously explained.
2. In the headset receiver, where the battery is located, press down
the plastic tab securing the battery and pull the battery out.
3. Insert a new battery into the battery compartment.
Note: Make sure that the battery is placed correctly in the headset
with the + of the battery corresponding to the + indicated in the
battery slot of the headset.
4. Re-attach the wearing style as previously explained.
10
GN9120_contents_usa_version 110403.indd 10-11
11
11-04-2003, 15:53:13
Memory reset
When the battery is removed or the power adapter is unplugged (for at least a few seconds), all customised headset settings are returned to factory-set default settings.
Registering a new master headset
A new master headset may be registered to the product in case of loss or damage to
the original headset. To register a new master headset, complete the following:
1. Unplug the power adapter for a couple of seconds.
2. Place the new master headset into the base unit.
3. Plug the power adapter back to the power socket.
4. All lights flash for app. 4 seconds. After this only the battery indicatorwill be lit.
5. The new headset is now ready for use.
Cleaning and replacing parts
The earcushion and earplate may be cleaned or replaced. When cleaning, use water
only and a little washing-up liquid if required.
• To clean or replace the earplate (5), first remove the earplate from the headset
receiver.
• To clean or replace the headset’s earcushion (6), gently peel it off the earplate.
• The headset is equipped with a rechargeable battery. For replacing the battery,
please read the instructions in this guide carefully. Only GN Netcom-approved batteries can be used.
No other parts can be replaced by the user.
12
GN9120_contents_usa_version 110403.indd 12-13
13
11-04-2003, 15:53:14