1
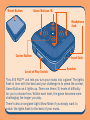
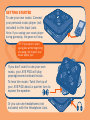
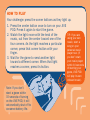
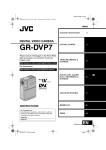
DIO
AUIN
AGES 8+
77313
USER’S MANUAL
Thank you for purchasing JIVE POD™! Be
sure to read and follow these instructions
carefully before using this product, and
keep this manual as a reference.
Note to the consumer: This toy is
packaged in “TRY ME” mode. When
you bring the toy home, activate its
full range of features by moving the
toy’s TRY-ME switch to a numbered
“play” position.
DIO
AUIN
Reset Button
Game Buttons (4)
Headphone
Jack
Center Button
Level of Play Switch
DIO
AUIN
Input Jack
Speaker
This JIVE POD™ unit lets you turn your music into a game! The lights
flash in time with the beat and your challenge is to press the correct
Game Button as it lights up. There are three (3) levels of difficulty
for you to choose from. Within each level, the game becomes more
challenging the longer you play.
There’s also a non-game Light Show Mode if you simply want to
watch the lights flash to the beat of your music.
GETTING STARTED
To use your own music: Connect
your personal music player (not
included) to the Input Jack.
Note: If you unplug your music player
during gameplay, the game will stop.
DIO
AUIN
DIO
AUIN
TIP: If you want to start
your game at the beginning
of a song, don’t start your
music player yet!
If you don’t want to use your own
music, your JIVE POD will play
preprogrammed onboard music.
To hear the music: Twist the top of
your JIVE POD about a quarter turn to
expose the speaker.
Or you can use headphones (not
included) with the Headphone Jack.
DIO
AUIN
HOW TO PLAY
Your challenge: press the corner buttons as they light up.
1. Press the center button once to turn on your JIVE
POD. Press it again to start the game.
TIP: If you are
2. Watch the light move with the beat of the
using your own
music, out from the center toward one of the
music, start a
four corners. As the light reaches a particular
song on your
corner, press that corner button with your
personal music
finger.
player now. (If
you don’t start
3. Wait for the game to send another light
your music player
toward a different corner. When that light
within 10 seconds
reaches a corner, press its button.
of starting your
game, JIVE POD
will play its own
onboard music).
Note: If you don’t
start a game within
15 seconds of turning
on the JIVE POD, it will
automatically shut off to
conserve battery life.
As you play longer, the game becomes more challenging. The lights
will continue to flash to the beat of the music, but they’ll advance
to the corners much faster so you’ll have to press the buttons
faster. When you advance to Level 3, you might even have to press
2 buttons at the same time!
At the end of each round, the JIVE POD game will tell you how
you did by flashing 1 or more rows of light. The more rows you
see flashing, the better you did! You’ll also hear your score: If you
did poorly, you’ll hear a “booing” sound; if you did OK, you’ll hear
moderate applause; and if you did very well, you’ll hear a lot of
applause!
Didn’t see/hear your score? Maybe you didn’t play long enough
— you need to play for at least 30 seconds for the game to register
a score for you.
To turn off your JIVE POD: press and hold center button
for 3 seconds.
To quit the game or the light show (see “Activating the Light
Show”), press and release the center button.
ACTIVATING THE LIGHT SHOW
You can also connect your personal music player (not included) and
watch how your JIVE POD unit responds! Plug in your music player
to the Input Jack. Press the center button once to turn on your
JIVE POD. After about 10 seconds, the light show will start and the
lights will flash to your music.
The JIVE POD will automatically shut down from this mode after 60
minutes with no button presses.
TROUBLESHOOTING
If the product begins acting erratically, press the Reset Button and/
or change the batteries.
If the JIVE POD does not recognize your personal music, try turning
up the volume on your music player.
TO REPLACE BATTERIES
Use a Phillips/cross head screwdriver
(not included) to loosen screws in battery
compartment cover (screws stay attached
to cover). Remove cover. Remove and
discard old batteries. Replace with 3 x
1.5V “AA” or R6 size batteries. Alkaline
batteries recommended. Replace cover
and tighten screws.
CAUTION: TO AVOID BATTERY LEAKAGE
1. Be sure to insert the batteries correctly and always follow the
toy and battery manufacturers’ instructions;
2. Do not mix old and new batteries or alkaline, standard
(carbon-zinc) or rechargeable (nickel-cadmium) batteries;
3. Always remove weak or dead batteries from
the product.
IMPORTANT: BATTERY INFORMATION
Please retain this information for future reference.
Batteries should be replaced by an adult.
CAUTION:
1. Always follow the instructions carefully. Use only batteries specified
and be sure to insert item correctly by matching the + and – polarity
markings.
2. Do not mix old and new batteries or standard (carbon-zinc) with alkaline
batteries.
3. Remove exhausted or dead batteries from the product.
4. Remove batteries if product is not to be played with for a long time.
5. Do not short-circuit the supply terminals.
6. Should this product cause, or be affected by, local electrical interference,
move it away from other electrical equipment. Reset (switching off and
back on again or removing and re-inserting batteries) if necessary.
7. RECHARGEABLE BATTERIES: Do not mix these with any other types of
batteries. Always remove from the product before recharging. Recharge
batteries under adult supervision. DO NOT RECHARGE OTHER TYPES
OF BATTERIES.
FCC STATEMENT
This device complies with part 15 of the FCC Rules. Operation is subject to the
following two conditions: (1) This device may not cause harmful interference, and (2)
this device must accept any interference received, including interference that may
cause undesired operation.
Changes or modifications to this unit not expressly approved by the party responsible
for compliance could void the user’s authority to operate the equipment.
This equipment has been tested and found to comply with the limits for a Class B
digital device, pursuant to Part 15 of the FCC Rules. These limits are designed to
provide reasonable protection against harmful interference in a residential installation.
This equipment generates, uses and can radiate radio frequency energy, and, if not
installed and used in accordance with the instructions, may cause harmful interference
to radio communications. However, there is no guarantee that interference will not
occur in a particular installation. If this equipment does cause harmful interference to
radio or television reception, which can be determined by turning the equipment off
and on, the user is encouraged to try to correct the interference by one or more of the
following measures:
- Reorient or relocate the receiving antenna.
- Increase the separation between the
equipment and the receiver.
- Consult the dealer or an experienced
radio/TV technician for help
Product and colors may vary.
© 2007 Hasbro. All Rights Reserved. TM & ®
denote U.S Trademarks PN 6725230000
Questions? Call 1-800-844-3733