1
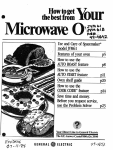
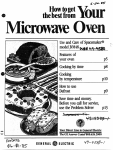
UseandCareofSpacemaker”
modelJVIWW
Featuresofyouroven
p5
Howto usethe
AIIK)ROAST
feature
p8
JP1O
Cooking
bytime
Cooking
bytemperature p12
Howto usethe
COOK
CODETM
feature p14
ovenshelfguide
p20
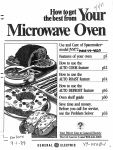
Savetime.andmoney,
Beforeyoucallforservice,
usetheproblemSolver p22
YourDirectLineto(AmendElectric
TheGEAnswer
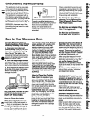
Readthisbookcarefully.
It is intendedto help you operate
and maintainyour new Microwave
Ovenproperly.
Keepit handyfor answersto your
questions.
If you don’t understandsomething
or need morehelp.. .
Call,toll free:
The GE AnswerCenter’”
800.626.2000
consumerinformationservice
or write: (includeyour phone
number);
ConsumerAffairs
GeneralElectricCompany
AppliancePark
Louisville,KY40225
Writedownthemodeland
serialnumbers.
BesureyourMicrowave
Ovenisregistered.
Itis importantthat we,the manufacturer,know the locationof your
MicrowaveOvenshoulda need
occur for adjustments.
Your supplieris responsiblefor
registeringyou as the owner.
Pleasecheck with your supplierto
be sure he hasdoneso;alsosend
in your ConsumerProductOwnership RegistrationCard.If you move,
or if you are not the original purchaserpleasewrite to us,stating
modeland serial numbers.This
appliancemustbe registered.
Pleasebecertainthatit is.
Writeto:
GeneralElectricCompany
RangeProductService
AppliancePark
Louisville,KY40225
You’llfind them on a label inside
the ovenon the upper left side.
If youreceiveda damaged
oven..
Thesenumbersare alsoon the
ConsumerProductOwnership
RegistrationCard that camewith
your MicrowaveOven.Before
sendingin this card,pleasewrite
thesenumbershere:
immediatelycontactthe dealer(or
builder)that sold you the MicrowaveOven.
— .-.—
——.
ModcANo.
&ariaiNo, ‘“
--
—
To
S
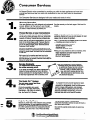
Savethe andmoney.
Beforeyourequestsewke,check
theProblemSolvercmpage22.
It lists minor causesof operating
——
problemsthat you can correct
yourself.
.————_—_.——
(a) DONotAttemp8’to
operatethis
ovenwith the door open sinceopen
door operationcan resultin harmful
exposureto miwc)waveenergy.H is
impofiant not to defeator-tamper
with the safetyinterhneks.
- r(b) Do FM Placeany object
betweenthe ovenfront facearid the
door or allow SONor cleanerresidue
to accumulateon sealingsuflaces$
(G)Do NotOperdethe ovenif it is
damaged.His particularlyImportant
that the ovendoor closeproperly
and that there is no damageto the:
!,~‘.
(1) door (bent), ‘ ..
(2) hingesand!ateh~~’{l?,roken
or
loosened), ‘:--+
(3) door sealsand sealingsurfaces.
(d) The (Men Shouldnotbe
adjustedor repairedby anyone
exceptproperlyqualified$etvic@
personnel.
Usethesenumbersin any
correspondenceor servicecalls
concerningyour MicrowaveOven.
,’
This microwaveovenis l.fL listedfor instalk%tion
overelectric
and gas range%
2
——
.—.
-..
BeforeMicrowaving . . . . . . . . . . . . 2
SafetyInstructions . . . . . . . . . . . 3, 4
Featuresof YourOven . . . . . . . . . . 5
TouchControl Panel . . . . . . . . . . . 6
Setthe Clock . . . . . . . . . . . . t..... 6
Auto Roast&Chart . . . . . . . . . . 8,9
Time Cook . . . . . . . . . . . . . . . . . . . 10
Defrost . . . . . . . . . . . . . . . . . . . . . . 11
TempCook..... . . . . . . . . . . . . . . 12
Hold/Timer. . . . . . . . . . . . . . . . . . . 13
Cook CodeT”control. . . . . . . . 14,15
Grounding Instructions. . . . . . . . 17
Careof YourOven ... ...O.. 17,1e
The ExhaustFeature . . . . . . . . . . 1~
OvenShelf Guide .. ........20,21
The ProblemSolver . . . . . . . . . . . 22
ConsumerSewices.. . .ttoct..$ 23
Warranty. . . . . . . .. ... tBack CoVef’
Tips
e Makesure all utensilsusedin
your microwaveoven are labeled
“suitablefor microwaving”.Check
your Cookbookfor specifictest
to determine“microwave-safe”
utensils.
a Papertowels,wax paper,and
plasticwrap can be usedto cover
dishesin order to retain moisture
and preventspattering.
o Some microwavedfoods require
stirring,rotating,or rearranging.
Checkyour Cookbook for specific
instructions.
a Somefoods such as unshelled
eggsand hot dogs must be pierccx
to allow steamto escapeduring
cooking.
beforeusingthis
Read all
Whenusingelectricalappliances a Seedoor cleaninginstructions on page 17.
basicsafetyprecautionsshould
be followed, including the
a To reducethe risk of fire iri
fW3wing:
the ovencavity:
WARNING—TOreducethe risk
—-Donot oyercookfood. Careof burns,electric shock,fire,
fully attendapplianceif paper,
injuty to personsor exposureto
plastic,or other combustible
excessivemicrowaveenergy:
materialsare plaGedinsidethe
ovento facilitatecooking.
e Use this applianceon!y for its
intendeduse as describedin this
-FlemOvewire twist-tiesfrom
manual.
paperor plastic bagsbefore
placing bag in oven.
@ Readand follow the specific
“PRECAUTIONSTO AVOID
-Do not useyour microwave
EXPOSLIRE
TO
POSS1i3LE
ovento dry newspapers.
EXCESSIVE
MICROWAVE
your
-Do notpoppopcorn”ln
found on page2.
ENEF?CN’
rnicrowavi
oven.
uniessin a spea This appliancemustbe
cial microwavepopcorn accesgrounded.Connectonly to
sory or unlessyou use pqpcorn
properly grounded cmtlet.See
labeledfor use in microwave
“GRC?LU$UW3
INSTRUCTIONS” ovens. ‘
found on page 17.
theevenwhile
-Do notoperate
* Forbestoperation,plug this
emptytoavoiddama@”to
the
applianceinto it own electrical
ovenandthedangf!r
ofWa.If by
outlet,to preventflickering of
accidentthe<~venshould run
lights, blowing of fuseor tripempty a rnin~}td”q~
two, no harm
ping of circuit breaker.
is done. ~ow+yer,’w%?avoid
at all
e Installor locatethis appliance operatingthe O~~fl-~%@y
times—itsav~ efikktgyand proonly in accordancewith the prolongs life of the oven.
vided installationinstructions.
-if materialsinsidethe oven
@ Do not cover or block any
should
ignite, I@p oven door
openingson the appliance.
dosed,
turn ~venoff,anddiss Do not use outdoors,
connectth”epowercord, or shut
a !30not immersefxxd or plug
off power at the fuse or-cireuh
in water,
breaker panel.
e Keepcord awayfrom heated
* Somepioductssucha~
surfaces.
wholeeggs.ands6aled-cxm@ Do not let cord hangover
tainers—+gr
imample,-cidsed
edgeof table or counter.
glassjars-mayexplode and o
@ Do not operatethis appliance shouldnotbeheatedin this
if it hasa damagedcordor plug, oven.
if it is not working properly,or If
o AvoklheatingMbytfqr~in
it hasbeendamagedor dropped. glassjam,evenwithout their
lids; especiallymeatand egg @ This applianceshould be sermixtures,
viuxi only by qualifiedservice
persanneiltContact nearest o
e Don’t dehistfrgzenbeww-authorizedservicefacility for
Sfjesinnarrowneckedbottles;
repairoor
especiallycarbonatedones,
txijLW7Kmt*
Hen if thecontaineris opened,
cam-b!.dlci
up,,l’’hiscan
pressut’e
a As with any applianc$,close
Gameth~
eoh{alnerto
burst,
supervisionis necwwwy when
used by chikiren,
3
—
I
(continued)
e Use metalonlyasdirectedin
Cookbook.Metal strips as used
on meat, roasts are helpful when
used as shown in Cookbook.
TV dinners may be cooked in
metal trays but when using shelf
they must be replaced in their
box. However, when using metal
in microwave oven, keep metal
(otherthanmetalshelf)at least
l-inch awayfromsidesof oven.
e Cookingutensilsmay
becomehot because of heat
transferred from the heated
food. This is especiallytrue if
plasticwrap has beencovering
the top and handlesof the
utensil. Potholdersmay be
neededto handlethe utensil.
e Sometimes,theovenfloor
canbecometoo hotto touch.
Be careful touching the floor
during and after cooking.
s Do not use anythermometer
in food you are microwaving
unlessthat thermometer is
designedor recommendedfor
use in the microwaveoven.
e Removethetemperature
probefromthe ovenwhennot
using it to cook with. If you leave
the probe insidethe ovenwithout
inserting it in food or liquid, and
turn cmmicrowaveenergy, it can
createelectrical arcing in the
oven,and damageovenwalls.
Utensils-Plastic
* Plastic
utensilsdesignedfor microwave
cooking are very useful,but
should be used carefully. Even
microwaveplastic may not be as
tolerant of overcooking ccmditions as are glass or ceramic
materialsand may softenor
char if subjectedto short periods
of overcooking. In longer exposuresto overcooking,the food
and utensilscould ignite, For
these reasons:1) Use microwave plzWiCSonly “and use
them” in strict compliancewith
the utw?silmanufacturer’s
recx3mmenc#aticms.
2) Do not
subject empty utensils to microwaving.3) Do not permit children
to use plastic utensils without
completesupervision.
e Whencookingpork follow
our directions exactly and
always cook the meat to at least
170°. This assuresthat, in the
II-E
HOcm:
o Haveit installedandproperly
groundedbya qualifiedinstal@.
installation
bookSeethe
special
remotepossibilitythat trichina
let packedwith the microwave
may be presentin the meat,it
oven.
will be killed and meatwill be
e The ventfanin yourSpacesafeto eat.
maker@
ovenwilloperate
e Boilingeggs (in and out of
automatically
undercertain
shell) is not recommendedfor
conditions
(seeAutomatic
Fan
microwave cooking. Pressure
Feature,
p
age7).
Whilethefanis
can build up insideegg yolk and
qxrating cautionis requiredto
may causeit to burst,resulting
preventthestartingandspreadin injury.
ingof accidentalcookingfires
Q Foodswith unbrokenouter
whiletheventfanis In use.For
“skin”such as potatoes,hot
thisreason:
dogs or sausages,tomatoes,
—Neveriezwesurfaceunits
apples,chicken liversand other
unattendedat highheatsettings.
giblets,and eggs (seeabove)
Boilovercausessmoking and
should be piercedto allow
greasyspilloversthat
may ignite
steamto escapeduring cooking.
and spread if ventfan is opero “Boilable”cooking pouches
ating. To minimizeautomaticfan
andtightlyclosedplasticbags
operation,useadequatesized
should be slit, piercedor vented
utensilsand usehigh heatsetas directed in Cookbook. If they
tings only when necessary.
are not, plastic could burst during or immediatelyaftercooking, -In theeventof a greasefire,
smotherflaming pan on surface
possibly resulting in injury. Also,
plasticstoragecontainersshould unit by coveringpan completely
with well-fitting lid, cookie sheet
beat leastpartially uncovered
or flat tray.
becausethey form a tight seal.
-=4$tever
framefoodsunderthe
Whencooking with containers
tightly coveredwith plastic wrap, ovenwiththeventfanoperating
removecovering carefully and
becauseit mayspreadthe
flames.
direct steamawayfrom hands
and face.
-Keep hQodandgreasefiiters
@ use cdthe $Mf $CXXM3$ory. ekmn,accordingto instructions
on pages 18and 19,to maintain
(Seeyour Cookbook for proper
good venting and avoid grease
use.)
fires.
—-Remove
the shelf from oven
when not in use.
--Do not store or cook with
shelf on floor of oven.Product
damagemay result.
–-Use potholderswhen handihg
tJ{e;sJ3fand utensils.They may
—-Do;ot use microwave
browning dish on shelf.The
shelf could overheat.
4
——
. ——.
. —
ilEc
1’
@
111
fib
d?
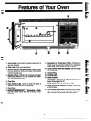
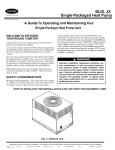
1{ DoorHandle.Ovendoesn’toperateunlessdoor is
securelylatched.
2, DoorLatch.Pushinto open door.
Metal screen
34Viewing Window withMetalShh?ld,
permits viewing of foods and keepsmicrowaves
confined insideoven.
4, Antenna cover. Protects the microwave energy
distributing antenna. Do not removethis cover.
Youwiil damagethe oven.
,,
@
Fieeeptaale
for TemperatureProbe.Temperature
Probe must be securely inserted into receptacle
whenusing TEMPCOOK or AUTO ROAST.
TouchControlParmland 13ispiay.
Seenext page
for instructions.
Grwwe
Filterst
Cooktop
L@ht,
Hoed Controls:
FanSwitch.Pressoncefor high andtwice for iow
5. oven vent.
6. Oven [email protected] on when the door is
openedor when the ovenis operating.
7* Oven Floor.
TemperatureProbe.
8*
Use with TENIPCOOK and ALJ?OROASTfunctions only.
speed.Pressagainfor off,
Lamp Switch.Pushand releasefor light,
Model and Serial Pfumbem.Locatedinside oven
at top left side.
IWOPosition
MetalSheif.Doubles
theovencapacity whenreheatingor cookingsmalierfood items.
(Forcompleteuseof shelf,seepages20=21,)
5
.
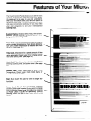
The Touch Control Panelallows you to set the oven
controls electronically with the touch of a finger.
It’s designed to be easy to use and understand.
With your microwave oven, you have the option of
using the Cook Code’” or Auto Roastpadsfor quick
and easy convenience cooking. (h you may make
your own programs to suit your individualized
cooking style.
ReadoutOispiay.Displaystime of day, time or temperature during cooking functions, power level
being usedand cooking mode.
n
m
TempCook. Use thetemperature probe td cook by
using a preset temperature. Oven shows temperature until preset temperature is reached and then
turns off. (See page 12.)
~m–misr-—=.
F
=
— .. —
.--—=
m ~E#lllml’~=
—=a=A.=~—~
-
■✌n—-’✝
.
Cook Code~M
Use this pad as a short-cut method for
entering cooking time, and power level. (See page
14.)
..-—
..
Number Pads. Touch these pads to enter Time,
Temperature, Power Level, Cook Code digits, or
Auto Roast Code number.
-
. . .
-
-—.
.......
.
--———.
——-----—
————
———
——
—
-.-7--.
-—.
—
. .
—-—
.
—
——
—.---
-.---------—
-=-.===
.—.
-=-=.—.==—
&-=------–-----”--“-- —
-...,.=...=.==.—.-.—
——--=
-—
——---.—
.-—
-— —.....—— ----=~
.
—
---.=.
..-—:___
-——.
—
—
--------
1–
.—= =—
--.=======.==-=-===::=
--.5G:Ee,Fiic<.EEG..——=
~
m
\
. -
—
==
- —
.=. =.-.—
-~
.—
.———.
~=
Start. Must touch this pad for oven to begin any
functions.
.- —
.- . .—==
gglsj=—...
==:~:—.
Time Cook. Microwave for a preset amount of time
using automatic Power Level 10 or change power
level after setting time. (Seepage 10.)
--
—...
..—
... -— ———_.
-.==.
—i ——zi.
.-
———-——
.-—
——
—..—
-.
-......-...-.===-=
---===
=—
—---=iii.
......
:=,
==..
-..
-.
—-
—--
z ,Z.=..,aa=.—.-—.
——
=-====—-—------—-—————
====
—
—T–—
Power’ Levei. Touch this pad before entering
another power level number if you want to change
from automatic Power Level 10 (HIGH) for cooking
or Power Level 3 (LOW) for defrosting. (During
cooking, touch this pad to see Power Level being
used,)
I
—
.-. — -------_~——-.
—..
.—-.
—
----
——
———..————
——
I m~—”1/
6
-.-u-———
—
-
-—---
—
.
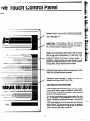
Defrost.Gentle, more uniform thawing at automatic
Power Level3, or change power level after entering
time. (Seepage 11.)
/
—-.
.....
—— —
---- —.—
—.. ..>
. -——-—
--
llold/TTmer. This feature uses no microwave
energy while it functions as both a kitchen timer or
as a holding period between defrost and time or
temperature cooking. (See page 13.)
0’
K 49
#
-——–
—-—
.-.—-—
—.—
--. ...— —
—-.
...
.=.—
-~
———-. —----———
—
-.--.-.4.—
——
..—
—-—..
—.-
---
—-.—
..
.-. . —
----.—
---————
-——
.“.
—-===-=.=—
—
———
.—
—-
—
—
—
.-
—..
.
-.
-.—-------z .
—-.
——
=
.-—
——.—
. . . .. .. .
. —.
. - . . . .
. ..
---
w.-—
---
-~
-
—
——
..a.—a
...———
—
—
L.-—
--
—-
-.—
Auto Ros$t, Insert probe, touch this pad, and
desired number pad for Code to temperaturecook
meatwith automatic preset program.
——
—
—
———-
——
-...———
-. .-—
——-. . . . -.
—....--.
......... —...———
..--..—. ————
.—— —.- -— .......
-.—....
—-—
——.--.....—-......-——
—
—————
.————
Clock.Touch this pad to enter time of day or check
time of day while microwaving. To set clock, first
touch CLC)CKpad and then enter time of day, For
example, if time is 1:30, touch number pads 1, 3,
and Oand 1:30will appear in readout display. Touch
STARTthus setting the clock. If yoti wish to resetor
change time, simply repeat above process.
Clear/Off.When touched, it stops the oven and
——
erasesM settings except time of day.
/
-SIR-A
._—
-—w—~iiiiii-
...
...—~
~
AIJ’I’CNUIA’T%C
FAN FEA’VXJRE
Cooking appliances installed undw the oven might,
under some heavy usage conditions, cause temperatures high enough to overheat some internal
parts of the microwave oven.
To prevent overheating from taking place, the vent
fan is designed to automatically turn on at low
speed if excessivetemperatures occur. Should this
happen, the fan cannot be manually turned off, but
it will automatically turn off when the internal parts
have cooled, The fan may stay on up to approximately 30 minutes after the range and microwave
oven controls have been turned off.
-..—.—
-———
—
— --–
-—
IYmJ
7’
——
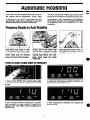
Auto Roast uses the temperature probe to cook to
the desired serving temperature. Unlike Temp
Cook, which uses a single power level, Auto Roast
is designed to use up to 3 power settings which
automatically switch during roasting, for even and
tender cooking results without overcooking.
Just as in conventional roasting, only tender roasts
should be Auto Roasteduntil specified internal temperaturesare reached.Lesstender roastsshouid be
microwaved by time, according to the Cookbook
which comes with your oven. Complete information
on preparing roasts for microwaving is in your
Cookbook.
IFkxmts
forAuto
Place tender beef roasts on trivet
in microwave safe dish. Insert
probe from front horizontally into
center meaty area not touching
bone or fat. Cover with wax paper.
to
Poultry, pork or ham roasts need
no trivet. Add !4 cup water to roast
dish, cover with plastic wrap, (For
cooking bag method, see cookbook.) Insert probe into center
meatyarea.
Place meat with probe in oven. insert cable end of probe firmly into
receptacleon ovenwall.
to
f. Touch AUTO ROAST Pad. Cooking signal light
over Code flashes. Touch number pad 3. Touch
START.
2. Light over Code shows on display. Readout disptays internal food temperature.
3. OVOnmonitors internal terqxwature, automaticatty switching to lowor power as meat’s temperature rises. This helps prevent toughening or
overcooking.
4. After temperature Is reached, oven signals and
then shuts off’
8
~
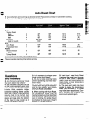
AtJto
Chat
~ LJsecontainers and coverings as directed at left. Placeprobe correctly in roast before cooking.
@ Turn over when 80° (except pork) has been reached.
Beef
Tender Roast
2
80°
Rare
3
Medium
80°
4
80°
Well
Meatloaf
4
No Turn
(loaf or round)
Over
Pork
4
120°
Loin Roast
1
80°
Precooked Ham
Poultry
5
80°
Whole Chicken
(31b.)
4
80°
Turkey Breast
(insert probe horizontally into meatiestarea.)
*Recommendedstanding time before serving.
awl
Q. Are there any particular trivets
that work better than others?
A, Yes,flat glasstrivets such as lids
or dish covers generally give more
even cooking results than plastic
trivets. Also, ceramic ridgebottomed roasting dishes usually
work well. Plastic trivets generally
require meat to be turned over
more frequently because the grid
design and legs allow the bottom
of the meat to stay cooler as it
cooks, than glass trivets do.
125°
140°
170°
170°
12-14
14-16
17-18
30-40
5“10
10-15
30
5“10
170°
115°
18-20
17-19
20
5-10
190°
13-15
20
170°
13-15
20
Q. Is it necessary to always cover
foods during Auto Roast?
A. No, but a loose covering helps
prevent spattering and hold moisture in food.
Q. Why was my roast not fully
cooked even though the temperature on the readout was correct
and Auto Roast completed?
A. When cooking with Auto Roast,
the temperature probe must be
inserted properly as fully described
in the Cookbook.After turning meat
over or rotating, the probe should
be checked to make sure it hasn’t
slipped or changed position.
Q. Last time I used Auto Roast
I removed the roast from the oven
to turn it over, When I replaced
roast in oven and reconnected the
meat probe, a lower temperature
appeared,Why?
A. The oven and roast may have
cooled to below the temperature
when you removed it, w probe
may have been repositioned. Continue roasting and numbers will
soon count upward again.
‘–
——
-—
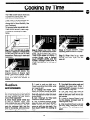
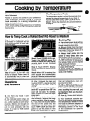
Time
The TIME COOKfeatureallowsyou
to presetthe cooking time.The
ovenshuts off automatically,
PowerLevel10 is automaticallyset
for time cooking, but you may
changethis for moreflexibility.See
your Cookbook.
To becomebetteracquaintedwith
TIMECOOK function, makea cup
of coffeeby following the steps
below.
Step 1: Fill a cup 2/3 full of water
and add 1 teaspoon of freezedried
coffee. Use a cup that has no metal
decoration, Place cup in oven and
close door.
Step 4: Touch START. Time
counting down shows on display.
Step 3: Select your time. Touch
1, 2-and Ofor a minute and 20 seconds. 1:20 and signal light above
TIME COOK appear on display. If
another Power Level is desired
touch POWER LEVEL and the
number, although Power Level 10
(HIGH) is preferred for this cup of
coffee.
Step S: When ?!ms is up, oven
sounds and oven, light, and fan
shut off.
Q. I want to cook my dish on a
Power Levelother than HIGH, what
do I need to do?
A. To change the Power Level,
touch the POWERLEVELpad after
ente?ing desired cooking time.
Enter the desired number and then
touch START.
Q. Can 1 interrupt my Time Cook
function to check the food?
A. Yes,To resume Gooking,simply
dose the door and touch START,
NOTE: Microwave power will not
come on until you are ready. You
must touch START for cooking to
begin.
Q. I touched the number pads and
selected my power level, When I
touched START,however,my oven
didn’t come on. Why not?
A. The TIME COOK pad must be
touched before setting the number
pads or else your oven will not begin cooking,
G). I tried to change Power Level
but the display changed back to
cooking time. Why?
A. After touching Power Level pad
you only have 4 seconds to enter
the number. Try setting controls
again.
Step 2: ‘?’OUdlTIME COOKt The
display shows :0. Signal light
above TIME CJ30K flashes.Power
Level ‘fO Is automatically set in
oven, but does not appear In
display.
iiwtcl
Q. f set my oven for the time called
for in the recipe but at the end of
the time allowed, my dish wasn’t
done, What happened?
A. Since house power varies due
to timo or location, many Time
Cook r9ciPe$f2JiVf3YOU a the I’W7fj0
to prevent overcooking. Set the
oven for minimum time, test the
food for doneness, and cook your
dish a little longer, if nece$sary.
10
—
——
Defrosting Tips
The Defrostsettingis designedfor
eventhawing necessaryfor large
amountsof food and is oneof the
mostimportantadvantagesof a
microwaveoven.
@ PowerLevel3 is automatically
setfor defrosting,but you may
changethis for moreflexibility.
s Seeyour Cookbookfor the
completedefrostingchart
To becomebetteracquaintedwith
the defrostfunctions,defrostfrozen
pork chops by following the steps
below.
@ Foodsfrozen in paper or plastic
can be defrosted in the package.
@ Forevendefrosting,many foods
need to be broken up or separated
part of the way through the defrosting time.
#&=---
--
----
Stsp3:Touch 8,0, and Ofor 8 minutes. 8:00 and signal light above
REF. are displayed. If you wish to
change Power Level,touch Power
Level pad and then new number.
Step 1: Place package of frozen
chops in the oven and close door.
e Homemadedinners can be frozen in shallow foil trays and heated
for later use. Select foods which
microwavewell.
o Pre-packaged frozen dinners
can be defrosted and microwave
cooked.
I
reads :0. Power Level3 is automatically set in oven but does not
appear on readout. Signal Light
EitXW61DEFsflashes.
Step4: Touch START.Time counts
down on display. When cycle is
completed, the oven signals and
automatically shuts off.
Step !5:
Turn package over, close
door and,repeat Steps 2,3 and 4.
Step 6: When oven signals and
shuts off, removepackageand separate chops to finish defrosting,
Q. When [ press START, I hear a
dull thumping noise.What is it?
A, This sound is normal. It is letting
you know the oven is using a
PowerLevellower than HIGH+
CL Can I Defrost small items in a
hurry?
A. Yes, but they will need more
frequentattentionthan usual.Raise
the Power Level after entering the
time by touching POWER LEVEL
and 7 or 10,Power Level 7’cuts the
time about in %; F%war Level 10
cuts the time to approximately %,
During either, rotate or stir food
frequently,
Q. Can I open the door during DE=
FROST to check cm the progress
of my food?
A. Yes, You may open the daor at
any time during microwaving. To
resume defrosting, close the door
and press START.
Q. Why don’t the defrosting times
in the Cookbook seem right for my
food?
A, Cookbook times are average.
Defrosting time can vary according
to the temperature in your freezeri
Set your oven for the time indicated in your Cookbook) if your
food is stilt not completely thawed
at the end of that time, re-set your
oven and adjust the time accordingly.
Step2: Touch DEFROST.Display
11
@Check your Cookbook for other
defrosting tips.
Q. Can I select a Power Levelother
than automatic Power Level 3 foL
defrosting?
A, Yes.Somesmallerfoods maybe
defrosted quicker on higher Power
Levels but for even, cwefree defrosting, Power Level 3 is suggested. Check the chart in the
Cookbook for specific times and
PowerLevels.
-—
T’~f3 Tkmperatwe Probe
The temperature probe is a food thermometer that
gaugesthe internal temperature of your food; it
must be used when using TEMP COOK or AUTO
ROAST.Follow the directions for use and insertion
on page 8.
HANDLE
For many foods, internal temperature is the best
test of doneness.
Roasts or poultry are cooked to your preference
when temperature cooking. Heating or reheating
foods accurately to a serving temperature you
desire is simple and easy.
TEMP COOK takes the gu6sswork out of cooking
becausethe oven shuts off automatically when the
food is done.
SENSOR
ciw
Howto Wnp Cooka RolledBeefRibRoastto
Cooking~ip$
Step 1: Insert temperature probe
as directed in Cookbook and attach probe securely in oven wall.
Step 2: Touch TEfvlP COOK. The
readout display shows Oand signal
light above TEMP COOK flashes.
Step’3~Touch 1, 3,0 or 130*. 130
shows on display. Power Level 10
is automatically set in oven but
does not appear on display.
and
Q. Are there any foods I can’t
Tf3vIPCOOK?
A, Yes. Delicate butter icings, ice
cream, frozen whipped topping$,
etc., soften rapidly at warm temperatures. Batters and doughs as
well as frozen foods are also difficult to cook precisely with the
probe. It Is best to TIME COOK
these foods.
St@p4?Touch POWEFILEVELpad.
Touch 5 for MEDIUM power. P-5
shows on display and then display
reverts back to set finished
temperature.
Step 5: Touch START. t)i$ph)l
shows temperature of food counting up.
Step 6: When 130° Is reached, the
oven sounds and automatically
shuts off, Removeprobe and food
from the oven.
0. After I followed the steps and
touched START, a signa! sounded
and oven did not start. What is
wrong?
A. If you set the temperature either
below 80° or greater than 199° the
oven will not start. To re-enter,
touch CLEAR/OFF pad and begin
steps again,
(2. Oven sounded and would not
start although I entered the temperatur~ correctly. What is wrong?
A. If you have not securely seated
the end of the probe into the
receptacle in the oven wall, if you
touch TEMP COOK and have forgotten to use the probe or if the
actual food temperature is higher
12
o Usea lower power level setting;
it will heat more evenly, even
though requiring more time.
o Be sure frozen food has been
completely defrostedbefore inserting probe. Probe may break off if
used in frozen foods.
o Always kwert probe into the
center of meaty areas; take care
not to touch the fat or the bone.
9 Insert probe as horizontally as
possible into foods as directed in
the recipes. Make sure the handle
does not touch the food.
8 Use the cllp to keep the probe
in place while heating.
$s Cover foods as directed in
Cookbook for moisturecontrol and
quick, even heating.
than set temperature, oven will
sound and not start.
Q. Can I leave my probe in the
oven If it’s not inserted in the food?
A. No. If the probe is left inside the
oven, touching the oven wall, and
not Inserted in food, you may damage the oven.
Q. How do I know what temperature to set?
A. Your Cookbook contains sections on all types of food$ showing
the temperatures needed to cook
the foods to different degrees of
doneness. For reheating,ref$r to
Reheating Charts in the front
of the Cookbook for specific
temperatures.
-
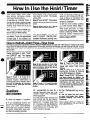
which
Oper.
ates without microwave ene-rgy,
has three timing functions.
It operates as a Minute Timer, it
can be set to delay cooking or may
be used as a hold setting after defrosting. Hold/Timer can he set up
to 99 minutes.
are timing a three minute phone
call, touch 3,0, and O.The-display
shows 3:00.
Step3:Touch START.The readout
display shows the time as it counts
down.
Step 4: When time is up, a signal
sounds and the timer turns off.
Step 1: Touch llOLD/TIMER pad.
The display shows :0. Signal light
above HOLC)/TIMERflashes.
Step 2: Select the amount of time
you desire. Touch the appropriate
number pads. If, for example, you
The HOLR/TIMER can also be
used to program “standing time”
between microwavecooking func-
y~lj~
~~L~/TIMER,
tions. The time can range from one
second to 99 minutes and 99 seconds. A HOLD,or “standing” time
may be found in some of your own
recipesor Cookbook.
To set the oven to delay cooking
up to 99 minutes follow Steps 1
and 2 to enter hold time, then set
Time Cook and time, or Temp
Cook and temperature desired
before pressing START. When
holding before temperature
cooking, be sure probe is in food
before pressingSTART.
Howto Defrost~Hold/Time~TimeCook
To help you become acquainted with the HOLD/TIMEFl feature as used with Time Cook or Temp Cook follow
steps below to defrost a frozen casserolefor 15minutes, then hold 10minutes and then cook 25 minutes. If using
Temp Cook after Hold/Timer, be sure to insert probe correctly asshown in Temp Cook section of this book, after
HOLD time.
Step1:Removecasserolefrom the
freezer and place in oven. Touch
the DEFROST pad. The display
shows :0 and signal light above
DEF.flashes.
Step 3: Set standing or hold time
by touching HOLD/TIMER. :0 appearson display.Signal light above
HOLD/TIMER flashes.
Step 2: Touch 1, 5, 0 and O for
defrosting time. 15:00appears on
readout display. (Defrosting is
automatically set on Power Level3
but can be changed by touching
POWER LEVEL pad and the new
Power Level.)
and
Q. What will happen if I accidentally reversethe instructions?
A. If you accidentally reverse the
sequence of programming instructions, your oven automatically
rearranges your program. Defrosting always comes first, then hold,
and then the cooking function,
Step 4: Touch 1,0,0 and Oto hold
for ten minutes. 10:00appears on
display,
~, I programmed my oven for a
specific defrosting time but it defrosted longer than necessary.
What happened?
A, When instructions conflict, the
oven carries out the last instruc~
tion, You may have set the oven to
Defrost for 4 minutes, Hold/Time
for 2 miriutes, and then Defrost for
6 minutes, In this case, the oven
would Defrost for 6 minutes and
HoldlTime for 2 minutes,
4n
Step 5: Touch the TIME COOK
pad. The display shows :0 and
signal light above TIME COOK
flashes.
Step 6: Touch 2, 5, 0 and O for
twenty-five minutes of cooking
time, 25:00appears on display.
Step7:Touch START.15:00counting down shows on display. As
each function is automatically performed ovendisplayshowsentered
information and light above that
function comes on. While cooking,
you may touch appropriate pad to
recall times you set.
(2. Can I Defrost-Hold only on my
oven?
A. Yes, for foods you don’t want
to cook, like frozen fruit, frozen
whipped topping, etc.—refer to
Cookbook,
NOTE: Allow foods to remain at
room temperature only as long as
safe,Times will vary.
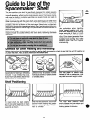
Cook CodeTUControl is a short-cut method for entering time and the Power Level on your microwave
oven. Cooking Codes are only used for recipes
which need little or no attention, and which require
no change of power level during cooking. Recipes
which require additional ingredients, attention or
change of power level during microwaving should
be cooked in the usual manner. Also, recipes with
cooking time of less than one minute or more than
99 minutes can not use Cooking Codes.
To understand the Cook Code control, it is important to know what the numbers mean and what the
sequence is. The first and second numbers, if setting a 3 digit Cooking Code, indicate the amount of
time you desire; the last control entry number is
always the Power Level. For example, 125 means
12 minutes at Power Level 5. NC)TE:Your oven can
only be programmed to 99 minutes when using the
Cook Code control and the highest Power Level is
10 which is represented by “O”. When setting a
2 digit Cook Code’control entry, the first is time, the
second is power level. For example, 50 means
5 minutes at Power level 10.
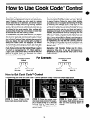
For
COOKING CODE
2-E)igit
E
On the following page is shown many frequently
prepared foods and their codes. It’s easy, though,
to make Cooking Codes for many other recipes.
Just select one or two digits representingthe length
of cooking time desired, and a final digit for the
Power Level required. The Cooking Codes given on
the chart are for the minimum time needed,to avoid
overcooking which can dry out food and make it
tastelessand tough. If you feel that more cooking is
needed, add additional time by changing the first
digit of the Code. You cannot add seconds to the
cycle time—Cooking Codes are for whole minutes
only. If your recipe calls for Power Levelchangesor
different amounts of time needed between addition
of ingredients, you may set one Cooking Code for
the first part of the recipe, then after completion, set
another Cooking Code for that period of time and
Power Level.
Remembet that Cooking Codes are for microwaving by time only. If you are microwaving by
temperature, you must use the Temp Cook or Auto
Roastfunction.
COOKING CXX3E
3“12igR
50
Time in
Minutes
Power Level
High (10)
R
Time in
Minutes
Power Level
Med (5)
to Set
Programming you?oven for Cook CodeT”Control operation is easy, Follow the simple steps below,
$~~~ I; Touch COOK CODE,
Signal light above Code flashes.
fN~~ ~: Enter the proper code
into Cook Code control, For exam=
pie, a recipe calling for 12 minutcw
cooking time at Power Level 10
would be 120, 120 appears on the
display panel.
$~~~ ~: Touch START, Signal
light above TIME COOK shows as
well as time counting down on
display.
Detach and Tape to
IhwideCd3hw3t
Dooror OtherProminent Place
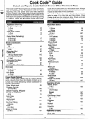
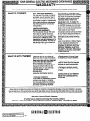
book which comes with your microwave oven. Always
use microwave-safe containers and microwave techniques as described in the Cookbook.
To set Cook Codes for many other foods or recipes
refer to page 14 in this Use and Care Book. Cook
Codes given are for minimum time. Check and add
time if necessaryto complete cooking.
The Cook Code’” feature gives you an easy automatic
way to accurately set microwave time for foods
requiring only one power level and little attention
during cooking. The Chart below shows frequently
prepared foods and the suggestedCook Codes to use
with each. For specific information on stirring, turning
or rotating, check the Microwave Guide and Cook-
Appetizers(Warming)
Meats/Ma\nDishes
Bacon
2 Slices
4 Slices
Beef Stew
(2 Ibs.)
Chicken
8-10 pieces
2 pieces
4 pieces
Chuck Roast
(3 tbs.)
Eggs, Baked
2 Eggs
Eggs,Scrambled
2 Eggs
Entrees,Frozen
802,
1602,
2 Ibs,
Fish Fillets
(1 lb.)
Franks (in bun)
2
4
Meat Loaf
(1%tbs.)
Sausage(Flaw)
4 Patties
4 Links
Swiss Steak
(2 Ib$,)
Frozen TV Dinner
(10oz.)
Vegetables(Fresh)
Beans,Green
(1 lb.)
Broccoli
(1!4-1%Ibs,)
Spears
cut
Cauliflower, Head
Corn on Cob
(4)
Potatoes
(4)
Squash
(1 lb,)
Zucchini
(1 lb,)
Vegetables(Frozen)
10 OZ, pkg.
Dip (cream Cheese)
25
%cup
45
1 cup
Dips (Sour Cream)
13
%cup
43
1 cup
Pastry Bites (Reheating)
17
2 Servings
10
4 Servings
Breadsand Desserts
Apples
40
(2)
Bran Muffins
37
(5-6)
60
Brownies (Mix)
Cakes (Mix)
110
(16 cup fluted mold)
Cheese Bread, Yeast
105
(1 loaf)
50
Chocolate Chip Bars
Nut Bread (Mix)
97
(1 loaf)
60
Pudding Mix ( 3 oz. pkg.)
Beverages
Coffee, Soup
10
(1 clJp)
Milk Bases
28
(1 cup)
Frozen FoodsK?efrost)
Note: Times given b~low are for entire defrost
cycle. Usually food must be rotated, broken up or
turned over while defrosting. Check Cookbook for
specific information.
23
Cake, Whole Iced
Chicken, Cut-Up
143
(2XAYAIbs.)
13
DessertTopping, Whipped
130ughutsor Pastries
13
(2-4)
Fish Fillets
(1 It).)
83
Hamburgers
123
(2 Ibs.)
PiQ,Fruit Filling
83
(Whole)
Roast
403
(4-5 Ibs.)
Steak or Chops
(2 Ibs.)
83
15
28
48
607
150
40
70
605
25
20
50
110
200
60
10
30
150
30
20
706
107
150
157
120
137
120
120
100
100
70
-
Thisappliancemust be grounded.
Inthe eventof an electrica~short
circuit,grounding reducesthe risk
of electricshock by providingan
escape wire for the electriccurrent.
Thisappliance is equippedwith a
cord havinga grounding wire with
a grounding plug, The plug must be
pluggedinto an outlet that is properly installedand grounded.(Fig. 1)
WARNING—improperuseof the
grounding plug can result in a risk
of electrii shock.
.
Wherea standardtwo-prong wall
receptacleis encountered,it is the
personalresponsibilityand obligation of the customerto haveit
replacedwith a properlygrounded
three-prongwall receptacle.
Q
‘1
e
\
Fig.1
INSURE PROPER GROUND
EXISTS BEFORE USE
Consulta qualifiedelectricianor
servicemanif the grounding instructions are not completelyunderstood,or if doubt existsas to
whetherthe applianceis properly
grounded.
Do IitkXUnderAnyCircumstancesCutw Flemovethe
Third(Ground)ProngFrom
The PowerCordm
!30 bid UseanAdapterPlug
WithThisAppliance.
Do NotUsean Extension
CordWithThisAppliance.
care
for
C’he$’l
Your
YourNewNllcrowav43
Ovenisa
ValuableAppliance,ProtectIt From
MisuseBy FoliowlngTheseRules:
@ Keepyourovencleanand
sweet-smelling.
Openingthe oven
door a few minutesaftercooking
helps“air-out” the interier.An
occasionalthorough wiping with a
solutionof bakingsoda and water
keepsthe interior fresh,
e Don’tusesharp-ed~edutensils
withyouroven,The interiorand exterior oven walls can be scratched.
Thecontrol panelcan be damaged.
e IX3n’tremovetheantennacover
at the top of the oven (microwave
featur~4 on page5). Youwill
damagethe oven.
may requirea damp cloth. Remove
gre~syspatterswith a sudsycloth,
then rinseand dry. Do not use
abrasivecleanerson ovenwalls.
NEVERUSEA CCXvlMERCIAL
OVENCLEANERON ANY PART
OF YOURMICROWAVE
OVEN.
Door-inskfe.Glass:Wipeup spatters
daily,washwhen soiled,with a minimum of sudsywarm water.Rinse
thoroughly and dry.
Metaland plasticpartson door:
Wipefrequentlywith a damp cloth
to removeall soil. DO NOT USE
ABRASIVES,SUCH AS CLEANING
PC)WDERSC)F?
STEELAND PLASTIC PADS.THEY MAYMARTHE
SURFACE.
How toCmm”t
theChJtfwh?
IBECERTAINPOWER1SOFF
BEFORECLEANINGANY
PARTCM=
‘THISOVEN.
Howto Cleanthe Inside
~
Walls,floorandpla$ticcover.!3ethere is Ihtle heat exceptin
: food, or sometimesIn the utww
sils,spills and spattersara easyto
remove.Somespatterscan be removedwith a papertowel, others
Case.Cleanthe outsideof your
ovenwith soapand damp cloth,
then rinseand dry, The outer pane
of the window is glass.Just wipe
clean with a damp cloth. Chrome
trim is bestwjped with a damp cloth
and then with a dry towel,
ControlPanel.Wipe with a damp
cloth. Dry thoroughly. Do not use
abrasivesor sharpobjectson the
panel.They can damageit,
Door$urfaca Whencleaningsurfacesof door and oventhat come
togetheron closing the door, use
only mild, non-abrasivesoapsor
detergent$appliedwith a sponge
or soft cloth.
SpecialnotewhenusingBrownW
SearDish:High heatgeneratedon
bottom of Brown ‘N SearDish can
causescorchedappearingstainsto
bakeonto the ovenfloor if greaseis
present.Thesemay be removed
with 13arI@epersFriend@Cleanser
by SerVaasLaboratories,Inc.
After using Bar Keep@rs
Friend@
Cleanser,rinseand dry thoroughly,
following instructionson can: Do
not use Bar KeepersFriend@
Cleanseron the paintedsurfaces
such as the walls. it may scratchthe
paint.
Bar KeepersFriend@Cleanseris
sold in many grocery,hardware,
and departmentstores,
DOUBLEDLJTV shelf,Your shelf
accessoryis designedfor usein a
microwaveovenonly; do not use in
a conventionaloven.Do not usea
browning dish with the shelf.Arcing
could occur.
Clean shelfwith mild soapand
water or in the dishwasher.Do not
cleaninself-cleaningoven.
Automatic
Tempwature
Probe.
Probeis sturdy, but care should be
taken in handling,Do not twist or
bend;avoiddropping temperature
probe.
Cleanas soon after using as pos=
sible.To clean,wipe with sudsy
cloth, then rub lightly with plastic
scouring ball if necessary,Rinse
and dry. (C)rwash in dishwasher,)
17
—..—-.———.
—-—.
—.
—————.—-—
-....
”-..-....
. . -- ——
.-.
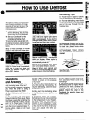
To replace hood lamp, first dhwrmect powerat
main fuse or clwwlt breaker panel or pull plug.
Remove2 screws from each side cdlower panel and
3 screws from front edge. Lower panel until it rests
on range below. 13esure bulb to be replaced is cool
TOreplaceyour oven lamp, first dhwormmtpowerat
mainfuseor circuitbreakeror pullplug, Removethe
top grill by taking off 2 screws which hold it in place,
Next, remove the single screw on top left that
secures lamp housing. (On models so equipped.)
Open oven door for easier removal of the lamp housing assembly.Then grasp tab and pull out and up to
clear door hinge and front lip of oven. To remove
bulb, push it inward gently and turn to left, then pull
outward from socket, Replace with GE Lamp
$$25T8DC.
K)onot attempt$0operatethe ovenunlessthe grill is
.in plim%
before removin~oRemovebulb or bulbs and rePlace
with 40 watt ap~liance bulbs. Raise lower panel and
replace screws. Connect electrical power to microwaveoven.
Clean off the grease and dust on hood surfaces
often. the a warm detergent solution. About 1 tablespoon of ammonia may be added to the water. Take
care not to touch the filters and enameled surfaces
with this. Ammonia will tend to darken metal.
II
Ill “
~
-—
II II
I
. —
The exhaust hood feature on your GE microwave
oven is equipped with a metal filter which collects
grease, When the fan is operated, air is drawn up
through the filter and is then discharged through
provided venting to the outside. The hood also ha~a
light for illumina~ingthe counter surface,
To removegrease filter, grasp the “finger hold” on
the filter and push to the rcvartThe filter will dropout,
To replace grease filter, insertthe filter in the top
frame slot on the back of the opening. Push to the
rear and upward to snap into place.
Soak, then agitate filter in hot detergent solution,
Don’t use ammonia or other alkali because it will
darken metal. Light brushing can be used to remove
embedded dirt. Rinse, shake and remove moisture
before replacing. Filtersshould be cleaned at least
oncea month.Neveropmite your hood wlthou?the
filter in place. In situations where flaming might
occur cmsurfaces below hood, filter will retard entry
of flames into the unit,
19
——.—
—-—
The two-position wire shelf is specifically designed for added capacity
heating and reheating in your Spacemaker’” microwave oven. Now heating and reheating, which are the most popular uses of microwave ovens,
may now be done in multiple quantities, so several foods are ready to
serveat the same time.
When microwaving with the oven shelf, some techniques will differ from
the cookbook which camewith your oven. It is important to arrangefoods
properly, and this is shown on the next page. Utensil size is important;
select from among the suggestions below. Also, food size should be considered; foods over 3%inches high, or 3 pounds are not recommendedfor
shelf cooking.
Batters and dough foods and also foods for oven meals using scratch
recipes should be cooked without the oven shelf, following cookbook
directions.
Use potholders when handling
foods heated together with your
ovenshelf,especiallywhen heating
larger amounts of food in 8 inch
square or other 2 quart size casseroles. Extra steam generated from
multiple food cooking may make
utensils hotter than with regular
microwaving.
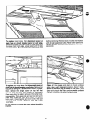
Wensilsfor ShelfItleatingand
Before placing food in the dishes you plan to use for shelf microwaving, check to see that they will fit together on
or under the shelf. Also, be sure utensils are microwave safe.
Casserolesfor heating or reheating
include ‘1 cup measuring cup,
8x4x3-inch loaf dishes, 9x5x3-inch
loaf dishes or %ir%pie plates.
lse wax paper or plastic wrap
instead of lids on casseroles. Lids
may add too much height to dish.
./’
..
‘..
-.
I
‘—1
—.
/
Leftovers may be placed in smal
individual ceramic or plastic bowls
or divided plates.
-
\
\
TO insert shelf, tip back slightly
and fit into shelf supports on back
oven wali. Set front of shelf on side
supports as shown.
/“-’
\
Shelf has two positions, Use in low
position wh@nheating two casseroles or reheating frozen TV dinners or entrees.
20
/“
.—.
.—.—
‘\
The high shelf position more
evenly spaces the area above and
below shelf. Use this position for
heating plates of leftovers.
To 11-leat
or ReheatSirnik3r
of Food
\%.
‘-’x.
‘t
–-.. .—...
---1
Two pia!esof leftoversmay be reheated together. Arrange thick or
dense foods to outside edges cd
plate and cover with plastic wrap.
Microwave at HIGH (10) for 3 minutes. Reverse position of plates
(top to bottom) and rotate % turn.
Continue microwaving at HIGH
(10) for 3 to 4 minutes, Continue
heating, if necessary,until hot.
Reheatingtwo casseroles(height
should be less than 3% inches) is
now possible. Cover with plastic
wrap. Usestaggeredarrangements
of food, placing food on right side
of shelf and left side of floor. Refer
to Heating or ReheatingGuide (see
inside front cover of cookbook) for
suggested microwave time per
casserole and add together the
times. Microwave at HIGH (10),
reversing position of foods (top to
bottom) after half of time. Also,
heat several smaller bowls of leftovers this way, stirring and reversing positions after half of time.
Twofrozenindividualentrees(5 to
7 oz. ea.) or two ‘W dinners(10 to
12 oz. ea.) are both ready to serve
at the same time. Remove batter
foods; cook these conventionally.
Return foil trays containing food
to boxes in which they were purchased. Place in oven with one TV
dinner on right shelf and the second dinner on left floor. Microwave at HiGH (10) for 6 minutes.
Reversepositions (top to bottom)
and rotate foods V2turn. Continue
microwavingat HIGH (10)for 6 minutes, Check dinners for heating. If
one dinner seems less done than
desired, return it to the box and
continue heating on shelf 1 to 2
more minutes.
Typesof FoodsTog&!ww
\
When heating several different
types of food together, foods
which should be served hot must
be placed on the oven shelf, while
foods which are only warmed
should be placed on the floor, This
is because microwave energy
enters the oven from the top only.
Also, it is important to remember
that foods absorb microwave
energy at different rates.Ratescan
be affected by the size of the food,
and its starting temperature.
Heat or reheat different types of
food at HiGH (10). To determine
heating times, add together times
for all foods. (see heating guide
inside front cover of cookbook)
After half of time, stir or rearrange
foods (do not reverse positions),
Check foods (top shelf especially)
after Y4of total time and remove
any which are done, Continue
cookirm others.
w
Because of the varying rates you
may need to start reheating a large
or dense food a few minutes ahead
of time, then add other smaller or
less dense foods. Alternately, if
one of the several foods you are
heating seems under cooked but
the others are heated satisfactorily, let the underheated food
continue cooking.
21
Placeon shelflargeor densefoods
which need the most heating, such
as ieftoverfried chicken,casseroles
of canned or leftover vegetables,
rice or pasta. Place on oven floor
those foods which need only be
warmed, such as bakery pies, rolls,
muffins or breads,
The
!sdvw’
To Save Time and fUloney—
before you request service,
check the ProblemSolver
If you have a problem, it maybe
minor. You may be able to correct
it yourself. Just usethis Problem
Solverto locateyour problem and
then follow the suggested
recommendations.
All mm ‘mr’igsAre Nm’mai
on YourMicrowaveOven:
@Steamor vaporescapingfrom
aroundthe door.
● Ljg~t reflectionarounddoor or
out{r case.
e Dimmingovenlight and change
in blowersound may occur while
operatingat power levelsother than
A:-k
I Uyl 1.
~ DIM thumping soundwhile operating at power levelsother than
high,
o SomeTV-Radiointerference
might be noticedwhiie using your
microwaveoven.It’ssimilarto the
interferencecausedby other small
armliancesand does not indicatea
p~~blernwith your oven.
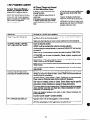
PROBLEM
POSSIBLECAUSENW REMEDY
OVENWILL NC3TCOMEON
A fuse In your home may be blown or the circuit breaker tripped.
Replacefuseor resetcircuit breaker.
Makesure3=prongplug on ovenis fully insertedinto wall receptacle.
CX3NTFK3L
PANELLIGHTED,
YETOVENWILL NC)TSTART
Door not securelyclosed.
STARTmust be touchedafterenteringcooking selection.
Anc?therseiection
enteredalready in ovenand CLEAFVC)FF
not touched
to cancelit.
Makesure you haveenteredcooking time after touching TIME CO(3K.
CLEAF?/OFFwas touched accidentally. Reset cooking
program and
,=‘.\
touch START)
!.
Temperature probe tlot inserted properly or not’’~eing=-u~:sd
during
T’EMP(XXX or AIJTOROASTfunctions.
.-7.
Makesureyou haveentereddesiredfinishedtemperatur~aftertouching
TEMPCOOK.
After touching COOKCODEnor AUTf3RC)ASTpads,no code number
was entered.
F’CX3DS
ARE EITHEROVER=
COOKEDOR UhfDERC00KEf3
Crookingtimes may vary becauseof starting food temperature,food
densityor amount d foods Ifi cwen.TouchTIME COOK and addltimwd
cookingtime for completion.
Incorrect Power Level entered. Check Cookbook for recommended
PowerLevelor changinglevelsduring cooking if necessary.
Dish was not rotated,turned or stirred. Somedishes require specific.
instructions,CheckCookbookor recipefor theseinstructions.
Too manydishesin ovenat sametime. Cooking time mustbe increased
when co~king more than one food item, Che6k Cookbook for recornmendationon increasingtime.
Probe not inserted properly into meat or dish. Check Cookbook for
probe placement.
lncorrec~COC)KCXXM?”numbersentered.
‘~~”APPEAR$ ON 121
SPLAY
Appearswhen oven,is first piugged in. This is normal.
.....—.-.,—..—————.
Appear$when powerto oven has been interrupted,and then resumed.
Touch CLEAFVOFFto erase“PF”, Clock must be re-set.
.-.—
22
service.
Our Consumer Servicesare designed with your needs and wants in mind.
WarrantyProtection
Yournew applianceis a well designedand engineered Seethe warrantyon the back pageof this book for
product. Beforeit leftthefactory,it wentthrough
details.
1
rigorousteststo detectmanufacturing
defects.And
youhavea writtenwarrantyto protectyou,
PromptServiceat yourConvenience
Whetheryourapplianceis in or outof warranty,
you’rejust a phonecall awayfromour nationwide
networkof FactoryTrainedServiceprofessionals.
Simplycall ourGEservieeorganization.
You’iifind
themin theWhitePagesunder%eneraiElectric
Company”or ‘GeneralElectricFactoryService;’
andin theYellowPagesunder“GeneralElectric
CustomerCare*Service!’
Serviceis scheduledat yourconvenience
andthe
techniciandrivesa fully=stocked
partsservicetruck
sothat,in mostcases,the repaircanbecompleted
in onevisit.
We’reproudof ourserviceandwantyouto be
pleased,but if for somereasonyouarenothappy
with theserviceyoureceive,herearethreestepsto
followfor furtherhelp.
ServiceContracts
For troubkfrm w7Acebeyond
the writtenwarmntyperbd.
If youpreferto budgetyourrepairexpenditu
insteadof beingsurprisedbythem,GEoffe
servicecontractsforvaryinglengthsof tim
all GEmajor8ppliance8*
Witha contract,we’ll
T1’iii!
QuickFixTM
system
Youcansavemoneyand time
by dcdngH ymmelf=
Fordo”it=yourselfers
whowould
prefw’to fix GEmajorappliances
themselves
...GEoffersan industry
fit’st,theQuickFix?/~
System.
HdpforYOMBYPhcme
~
$houldyouneedhelpin theselactionandpurchase
of newappliances,or havequestionsaboutthe
oporationof theGEappliancesyounowown-orhave
my otherquestionsaboutourconsumerproducts
or services,YOUareonlya T(XL-FREE!
will away,
FIRST,contactthe peoplewhoservicedyour
appliance.Explainwhyyouarenot pleased.In most
cases,this will solvethe problem.
NEXT,if youarestill notpieasedwriteall thedetails
— includingyourphonenumberto:
Manager,ConsumerRelations
GeneralElectricCompany
AppliancePark
Louisville,Kentucky40225
FINALLY,
if your problem is stiil not resolved,write:
MajorApplianceConsumerActionPanel
20NorthWackerDrive
Chicago,Illinois60606
p yourappliancein goodoperating
conditionduringthecontractperiodat
noadditionalcharge,Servicecontracts
t youpaytoday’spricesfor service
a month,a year,or severalyearsfrom
now,And,you’llreceiveservicefrom
GEtrainedservicetechniciansusin9
onlyGenuineGEparts.
A programfor do”it~yourself
appliancerepair,
thesystemincludesstep=hy=step
repair
mi2nua/sfor refrigerators,
mostnon=microwave
electricranges,dishwashers,
andstandard
andlargecapacitywashersanddryers,plus
specially packaged replacementfiarts, and
technicalhelpwith a to//free 800numbe~
TheGEAnswerCenterTM
800.626,2000
consumerinformationsetviceis open24hoursa
day,swim daysa week,
~~uf~;~fof expertsstandsreadyto assistyou
*
WHATIS COVERED
— —. . -
-
FULLC)NE=YEAR
WARRANTY
This warrantyis extendedto the
originalpurchaserandanysucceedFor one yearfrom dateof original
ing ownerfor productspurchased
purchase,we will provide,freeof
for ordinaryhome use in the 48
charge,parts and servicelabor in
your hometo repairor replaceany mainlandstates,Hawaiiand
partof themicrowave
oven/range Washington,D.C.in Alaskathe
warrantyis the sameexceptthat it
that fails becauseof a manufacis LIMITEDbecauseyou must pay
turing defect.
to ship the productto the service
shopor for the servicetechnician’s
LIMITEDADDITIONAL
travelcosts to your home.
FOUR-YEAR
WARRANTY
For the secondthroughfifth year
All warrantyservicewili be provided
from date of original purchase,
by our FactoryServiceCentersor
by our authorizedCustomerCare@
we will provide,freeof charge,a
during normalworking
replacementrnagnefmntube if the :~~v~~ers
*
magnetrontube fails becauseof a
manufacturingdefect,Youpay for
Look in the White or YellowPages
the servicetrip to yourhomeand
of yourtelephonedirectoryfor
servicelaborcharges.
GENERALELECTRICCOlvlPANY,
GENERALELECTRICFACTORY
SERVICE,GENERALELECTRIC=
HOTPC)INT
FACTORYSERVICEor
GENERALELECTRICCUSTOMER
CARE”SERVICE.
—
--- . -----
.—. .-.-=:-.-:
~=
WHAT1SNOTCOVERED * Servicetrips to yourhometo
teachyou how to usethe product.
ReadyourUsemf (We material.
If you then haveany questions
about operatingthe product,
pleasecontactyourdealeror our
ConsumerAffairs office at the
addressbelow,or call, toll free:
The GEAnswerCenter~~
800$26,2000
consumerinformationservice
~Improperinstallation.
If youhaveaninstallationproblem,
z.
.—.=... .===...
—...
:=-==
==—===—
o Replacementof housefuses
or resettingof circuit breakers.
● Failureof tho produotif it is
usedfor otherthan its intended
purposeor usedcommercially.
e Damageto productcaused
by accident,fire, floods or acts
of God.
WARRANTOR
IS NOTRESPON=
S#LIH&l CC)NSEQUENTIAL
,
contact your dealeror installer.
Youare responsiblefor providing
adequateelectrical,exhausting
and other connectingfacilities.
!
—
Some states do not allow the exclusion or limitation of incidental or consequential damages, so the above limitation or exclusion
may not apply to you. This warranty gives you specific legal rights, and you may ai!m have other rights whichvaryfromstateto state.
Toknow what your legal rights are in your state, consuit your local or state consumer affairs officeor yourstate’sAttorneyGeneral.
.
Warmntar:GeneralElectricCompany
If furtherhelpis neededconcerningthiswarranty,contact:
Manager-ConsumerAffair$,GeneralElectricCompany,AppliancePark,Louisville,KY40225
‘“-
EIECI’I?IC
Part.No. 862A725P80Rev.1
Pub. Nc).49-4562”1
1/84
,,v&