1
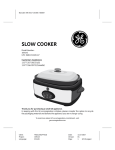
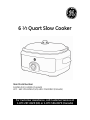
6 ½ Quart Slow Cooker
Item Stock Number
169084 (US) 169085 (Canada)
UPC : 681131690843 (US) 681131690850 (Canada)
For Customer Assistance, call Customer Service at
1-877-207-0923 (US) or 1-877-556-0973 (Canada)
IMPORTANT SAFEGUARDS
When using electrical appliances especially when children are present, basic safety
precautions should always be followed to reduce the risk of fire, electric shock, and/or
injury to persons, including the following:
READ ALL INSTRUCTIONS
1.
2.
3.
4.
5.
6.
7.
8.
9.
10.
11.
12.
13.
14.
Do not touch hot surfaces. Use potholders when removing cover or
handling hot containers.
To protect against electrical shock, do not immerse cord, plug or base unit in
water or other liquid.
Close supervision is necessary when any appliance is used by or near
children.
Unplug unit from the outlet when not in use. Allow to cool completely before
cleaning.
Do not operate appliance with a damaged cord or plug, or after the
appliance malfunctions or has been damaged in any manner. Call our tollfree customer service number for information on examination, repair or
adjustment.
The use of accessory attachments not recommended by this appliance
manufacturer may cause injury.
Do not use outdoors.
Do not let cord hang over edge of table or counter, or touch hot surfaces.
Do not place on or near a hot gas or electric burner, or in a heated oven.
Extreme caution must b e used when moving an appliance containing hot
food, water or other hot liquids.
Do not use appliance for other than intended use.
Lift and open lid carefully to avoid scalding, and allow water to drip into unit.
To disconnect, turn control OFF, then remove the plug from the outlet.
The ceramic insert is designed for use with this appliance only. It must never
be used on a range top. Do not set the insert, while hot, on a wet or cold
surface. Do not use a cracked insert.
SAVE THESE INSTRUCTIONS!
This appliance is for HOUSEHOLD USE ONLY. It may be plugged into an AC electrical
outlet (ordinary household current). Do not use any other electrical outlet.
DO NOT OPERATE APPLIANCE IF THE LINE CORD SHOWS ANY DAMAGE, OR IF
APPLIANCE WORKS INTERMITTENTLY OR STOPS WORKING ENTIRELY.
A short power-supply cord (or detachable power-supply cord) is to be provided to
reduce the risk resulting from becoming entangled in or tripping over a longer
cord. Longer detachable power-supply cords or extension cords are available and
may be used if care is exercised in their use. I a longer detachable power-supply
cord or extension cord is used,
2
1) The marked electrical rating of the cord set or extension cord should be at least
as great as the electrical rating of the appliance, and
2) The cord should be arranged so that it will not drape over the countertop or
tabletop where it can be pulled on by children or tripped over unintentionally.
CORD PLUG
This appliance has a polarized plug (one blade is wider than the other). To reduce the
risk of electric shock, this plug is intended to fit into a polarized outlet only one way; if
the plug does not fit fully into the outlet, reverse the plug. If it still does not fit, contact
a qualified electrician. Do not attempt to defeat this safety feature.
LINE CORD SAFETY TIPS
1. Never pull or yank on cord or the appliance.
2. To insert plug, grasp it firmly and guide it into outlet.
3. To disconnect appliance, grasp plug and remove it from outlet.
4. Before each use, inspect the line cord for cuts and/or abrasion marks. If any are
found, this indicates that the appliance should be serviced and the line cord
replaced.
5. Never wrap the cord tightly around the appliance, as this could place undo
stress on the cord where it enters the appliance and cause it to fray and break.
PARTS
1. Glass Lid
1.
2. Removable Ceramic Insert
2.
3. Cool-Touch Side Handles
4. Non-Skid Rubber Feet
5. Adjustable Temp Control
(Low/High/Warm)
3.
6. Enamel Insert
5.
4.
6.
3
BEFORE FIRST USE
IMPORTANT
During the first few minutes of initial use, you may notice smoke and/or a slight odor.
This is normal and should quickly disappear. It will not recur after appliance has been
used a few more times.
For your safety, always read and understand the Use and Care Manual before
attempting to use any electric appliance.
BEFORE USING:
1. Carefully unpack the slow cooker.
2. Wash ceramic insert, enamel insert and glass lid in warm, soapy water. Rinse
well and dry thoroughly.
3. Wipe interior and exterior surfaces of the base with a soft, moist cloth to
remove dust particles collected during packing and handling. NEVER IMMERSE
THE BASE, CORD OR PLUG IN WATER OR ANY OTHER LIQUID.
4. Slow cooker should be operated before initial use. After cleaning unit, place
ceramic insert inside the base. Pour 2 cups of water into the ceramic insert,
place into the cooking base and cover with the lid. Plug slow cooker into your
electrical wall outlet and turn the unit to the HIGH setting. Allow to operate for
approximately 20 minutes. After 20 minutes, turn unit Off and unplug. Allow
to cool, remove the ceramic insert, and discard water. Rinse the ceramic
insert, dry thoroughly, and replace in the base.
5. Your slow cooker is now ready to use.
SLOW COOKER MODEL
Model No.
Rated voltage
Rated power
Capacity
Dimensions
Weight
169084/169085
120V
260W
6 ½ quarts
18.25 x 13.5 x 10 (in)
14.5 LBS
OPERATING INSTRUCTIONS
Using a slow cooker is easy but different from conventional cooking. To help you, this
manual contains many helpful hints for successful slow cooking. Many more slow
cooker recipes books are available in libraries and bookstores. Keep these materials
handy whether preparing favorite recipes or trying something new.
This slow cooker has three heat settings: LOW, HIGH, and WARM. Use the
recommended guidelines offered in the recipe to determine cooking time and heating
position. Dishes can be prepared well in advance of mealtime and cooking time
regulated so that food is ready to serve at a convenient time.
4
A general rule of thumb for most slow cooker meat-and-vegetable combos is:
Cooking Time:
Recommended Temp Setting:
6-8 hours
LOW
3-6 hours
HIGH
USING YOUR SLOW COOKER
SLOW COOKING
1. Prepare recipe according to instructions.
2. Place food in ceramic insert, place insert into the cooking base and cover with
glass lid.
3. Plug slow cooker into wall outlet. Select the desired temperature based off the
cooking time required for your recipe.
4. When cooking is complete, you may switch the unit to WARM until you are ready
to serve.
5. When food is ready to be served, turn slow cooker OFF and unplug it from the wall
outlet.
6. Remove the glass lid.
CAUTION: When removing cover, grasp the designated area on the lid with a pot
holder or oven mitt and lift to allow steam to escape before setting cover aside.
To avoid burns, always hold cover so that escaping steam flows away from hands
and face.
7. Food may be served from the ceramic insert while it is in or out of the base. If
removing the ceramic insert from the base, always use potholders or oven mitts
to grasp the ceramic insert by the handles and remove it from the base.
8. Serve contents. If serving directly from the ceramic insert while removed from the
cooking base, always place a trivet or protective padding under pot before
placing it on a table or countertop.
ENAMEL PAN
1. Prepare recipe according to instructions.
2. Place food in enamel insert, place insert into cooking base and cover with glass
lid.
3. Plug slow cooker into wall outlet. Use the HIGH temperature setting when using
the enamel insert.
4. When cooking is complete, you may switch the unit to WARM until you are ready
to serve.
5. When food is ready to be served, turn slow cooker OFF and unplug it from the wall
outlet.
6. Remove the glass lid.
CAUTION: When removing cover, grasp the designated area on the lid with a pot
holder or oven mitt and lift to allow steam to escape before setting cover aside.
To avoid burns, always hold cover so that escaping steam flows away from hands
and face.
7. Food may be served from the enamel insert while it is in or out of the base. If
removing the enamel insert from the base, always use potholders or oven mitts to
grasp the insert by the handles and remove it from the base.
5
Serve contents. If serving directly from the enamel insert while removed from the
cooking base, always place a trivet or protective padding under pot before placing it
on a table or countertop.
This appliance contains no user serviceable parts. Do not try to repair it yourself. Call
our toll-free customer service number for information on examination, repair or
adjustment.
PRECAUTIONS
• Always unplug unit and allow to cool before cleaning.
• Always handle ceramic insert or enamel pan carefully. Avoid hitting inserts
against the sink, the faucet or other hard surfaces.
• Do not touch sides of slow cooker base while food is cooking. Always use handles
on the base. Use potholders or oven mitts to lift either insert.
CLEANING AND STORAGE
TO CLEAN:
This appliance should be cleaned after every use.
After unit has been allowed to cool, wash stoneware insert, enamel insert and glass
lid in warm, soapy water. Rinse well and dry. If food sticks to the surface of either
insert, fill it with warm, soapy water and allow it to sit for a few hours before cleaning.
Wipe interior and exterior surfaces of the base with a soft, slightly damp cloth or
sponge.
NEVER IMMERSE THE BASE IN WATER.
NEVER USE ABRASIVE CLEANSERS OR SCOURING PADS TO CLEAN THE CERAMIC
COOKING POT, ENAMEL INSERT OR BASE, AS THESE CAN DAMAGE THE SURFACES.
Dishwasher Cleaning
The stoneware cooking insert and enamel insert may be cleaned in an automatic
dishwasher. To prevent damage, position them in the rack so they will not hit other
items during cleaning.
Special Cleaning
If stoneware insert becomes stained, clean with a non-abrasive cleanser or apply a
paste of baking soda with a soft cloth. To remove water spots or mineral deposits,
wipe with distilled white vinegar, or pour a small amount into pot and let it soak. After
cleaning, wash insert in warm, soapy water, rinse and dry.
TO STORE:
Be sure all parts are clean and dry before storing. Store appliance in its box or in a
clean, dry place. Never store it while it is hot or wet. To store, place the stoneware
insert inside the enamel insert and place both inserts inside the base. The glass lid
will fit on the stoneware insert. Never wrap cord tightly around the appliance; keep it
loosely coiled.
CARING FOR YOUR SLOW COOKER
CERAMIC STONEWARE AND ENAMEL PAN INSERTS:
Like any fine ceramic, the stoneware insert may crack or break if not properly
handled. To prevent injury or property damage, follow the instructions below:
6
1. All stoneware is breakable. Handle with care.
2. ALWAYS USE POTHOLDERS OR OVEN MITTS WHEN HANDLING HOT
INSERTS.
3. DO NOT place hot inserts on counter. Use protective trivet.
4. NEVER place HOT glass lid in sink or on cold or wet surfaces.
5. DO NOT strike utensils against rim to dislodge food.
6. DO NOT use any insert to pop corn, carmelize sugar, or make candy.
7. DO NOT use abrasive cleaners, scouring pads, or any object that will
scratch the inserts or accessories.
8. DO NOT use or repair any item that is chipped, cracked, or broken.
9. Bottom of product may be rough. To avoid scratching surfaces, place on
placemat, tablecloth, or trivet.
10. Never subject the stoneware insert to sudden changes in temperature.
NEVER place it where it can come in contact with direct heat (e.g., on top
of a range or under a broiler).
11. Always place foods into the inserts at room temperature. Place inserts in
base once filled and before turning on slow cooker.
12. Ingredients for a particular dish may be prepared in advance and stored in
the ceramic insert in the refrigerator until ready to cook.
13. DO NOT preheat base before adding either insert. NEVER heat the insert
when it is empty.
14. Unplug unit and allow it to cool after use. Do not pour cold water into a
hot insert.
15. Use only wooden, nylon, or plastic utensils. Metal utensils can scratch or
leave marks.
16. DO NOT allow ceramic insert to soak/stand in water for an extended
period of time. Applied heat after soaking may cause damage to the glaze.
GLASS COVER:
To prevent cracking or breaking of the glass cover, which may cause personal injury,
cover should be treated with special care.
CAUTIONS: Glass cover may shatter if it is exposed to direct heat or subjected to
severe temperature changes. Chips, cracks or deep scratches may also weaken
the cover.
• KEEP COVER AWAY FROM broiler, microwave oven, hot stovetop burners, oven
heat vents. If cover has been utilized in any of these locations, do not use it again,
even if there are no signs of damage. Order a replacement cover immediately.
• IF COVER BECOMES CHIPPED, CRACKED OR SCRATCHED, DO NOT USE IT.
Discard it and order a replacement.
• ALWAYS LET COVER COOL on a dry, heat-resistant surface before handling. Do
not place it on cold or wet surfaces, as this may cause it to crack or shatter.
• ALWAYS USE POTHOLDERS OR OVEN MITTS when removing the hot cover. To
avoid burns from escaping steam, always tilt cover away from hands and face.
HELPFUL HINTS IN SLOW COOKING
•
The cover of the slow cooker does not form a tight fit on the cooking pot but
should be centered on the pot for best results. Do not remove the cover
unnecessarily – this will result in a major heat loss.
7
Stirring is not necessary when slow cooking. However, if cooking on HIGH, stirring
occasionally will help to distribute flavors throughout the recipe.
• For best results, the slow cooker should be at least half-filled.
• If cooking soups or stews, allow a 2-inch space between the food and the top of
the cooking pot, so ingredients can come to a simmer. When cooking on HIGH,
keep checking progress, as some soups may come to boil.
• Less tender, cheaper cuts of meat are better candidates for slow cooking than
more expensive varieties. When possible, remove excess fat before cooking. If
recipe calls for browning the meat, brown it on a range top using a separate
cooking utensil before placing meat in cooking pot.
• The greater the fat content of the meat, the less liquid needed for cooking. If
cooking meat with a high fat content, place thick onion slices beneath it, so the
meat will not sit and cook in the fat. Roasts may be prepared in cooker without
adding liquid, if cooked on LOW.
• Always use a meat thermometer to determine if meats have been cooked to
proper temperature.
• Add fresh or thawed fish or seafood to cooking pot an hour before serving, as
these ingredients can fall apart during long hours of cooking.
• Since raw vegetables usually take longer to cook than meats, cut vegetables into
uniform, bite-sized pieces (about ½ inch in diameter) before adding them to the
cooking pot.
• If recipe calls for milk, sour cream or other fresh dairy products, add just prior to
serving, as they tend to break down over long hours of cooking. If preferred,
substitute condensed creamed soups (undiluted) or evaporated milk. Processed
cheese may be substituted for naturally aged cheese.
• Rice or pasta may be cooked separately or added uncooked to recipes no more
than two hours before serving. If adding uncooked pasta, there should be at least
2 cups of liquid in the pot. Stir occasionally to keep pieces from sticking together.
• To thicken juices or making gravy at the end of the cooking process, make a
smooth mixture consisting of 2-4 tablespoons or cornstarch or flour and ¼ cup
water or 2 tablespoons of butter. Remove cooked food from pot, letting juices
remain. Add mixture to juices, set control at HIGH, and stir until liquid thickens.
• Don’t worry if food is allowed to cook a bit longer than specified.
ADAPTING RECIPES (General Hints)
• The LOW setting is recommended for all-day cooking. Most meat-and-vegetable
combinations required at least 7 hours on LOW.
• For best flavor, use whole-leaf herbs and spices during initial preparation. If
ground herbs and spices are used, stir in during last hour of cooking.
• Many factors can affect how quickly a recipe will cook. The water and fat content
of food, its temperature, and the size of the item(s) will all affect the cooking time.
Food cut into pieces will cook faster than larger pieces.
• Recipes for vegetable-type casseroles must contain liquid to prevent scorching on
the sides of the cooking pot.
• If using a specific recipe, one item may be substituted for another, if an equal
quantity is used. For example, if recipe calls for a 12-oz. can of chicken broth, a
10-oz. can of tomato soup plus 2 oz. of something else (water, wine, canned
tomatoes) may be substituted.
•
8
•
Canned beans may be added directly to any recipe, but dried beans, especially
red kidney beans, should be soaked in water (if desired) and boiled first. After
covering and boiling in 3 times their volume of unsalted water, add beans to
recipe and discard water. Beans must be softened completely before they are
combined with sugary and/or acid foods, as these have a hardening effect on
beans. In this case, beans should be allowed to simmer until tender (about 1 ½
hours) after boiling.
9
CUSTOMER ASSISTANCE
If you have a claim under this warranty, please call our Customer Assistance Number.
For faster service, please have the model, type and series numbers ready for the operator
to assist you. These numbers can be found on the bottom of your appliance.
MODEL :________________ TYPE :__________________ SERIES :__________________
Customer Assistance Number 1-877-207-0923 (US) or 1-877-556-0973 (Canada)
Keep these numbers for future reference!
For more information, please visit us at www.walmart.com
TWO- YEAR LIMITED WARRANTY
What does your warranty cover?
• Any defect in material or workmanship.
·
For how long after the original purchase?
• Two years.
What will we do?
• Provide you with a new one!
• For those items still under warranty but no
longer available, WAL-MART reserves the
right to replace with a similar GE branded
product of equal or greater value.
How do you make a warranty claim?
• Save your receipt.
• Properly pack your unit. We recommend
using the original carton and packing
materials.
• Return the product to your nearest WALMART store or call Customer Assistance at
1-877-207-0923 (US) or 1-877-556-0973
(Canada)
What does your warranty not cover?
• Parts subject to wear, including, without
limitation, glass parts, glass containers,
cutter/strainer, blades, seals, gaskets,
clutches, motor brushes, and/or agitators,
etc.
• Commercial use or any other use not found in
printed directions.
• Damage from misuse, abuse, or neglect,
including failure to clean product regularly in
accordance with manufacturer’s instructions.
is a trademark of General Electric Company
and is used under the license by
Wal-Mart Stores Inc., Bentonville, AR 72716
10
How does state law relate to this warranty?
• This warranty gives you specific legal
rights, and you may also have other rights
which vary from state to state or province to
province.
• THIS WARRANTY IS IN LIEU OF ANY OTHER
WARRANTY OR CONDITION, WHETHER EXPRESS
OR IMPLIED, WRITTEN OR ORAL, INCLUDING,
WITHOUT LIMITATION, ANY STATUTORY
WARRANTY OR CONDITION OF
MERCHANTABILITY OR FITNESS FOR A
PARTICULAR PURPOSE.
• WAL-MART, GE AND THE PRODUCT
MANUFACTURER EXPRESSLY DISCLAIM ALL
RESPONSIBILITY FOR SPECIAL, INCIDENTAL AND
CONSEQUENTIAL DAMAGES OR LOSSES CAUSED
BY USE OF THIS APPLIANCE. ANY LIABILITY IS
EXPRESSLY LIMITED TO AN AMOUNT EQUAL TO
THE PURCHASE PRICE PAID WHETHER A CLAIM,
HOWEVER INSTITUTED, IS BASED ON
CONTRACT, INDEMNITY, WARRANTY, TORT
(INCLUDING NEGLIGENCE), STRICT LIABILITY OR
OTHERWISE. SOME STATES OR PROVINCES DO
NOT ALLOW THIS EXCLUSION OR LIMITATION OF
INCIDENTAL OR CONSEQUENTIAL LOSSES SO
THE FOREGOING DISCLAIMER MAY NOT APPLY
TO YOU.
What if you encounter a problem with this
product while using it outside the country of
purchase?"
• The warranty is valid only in the country of
purchase and you follow the warranty claim
procedure as noted.
Marketed in Canada by:
Wal-Mart Canada Corp.
1940 Argentia Road, Mississauga, Ontario L5N1P9