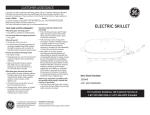
1
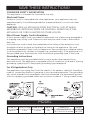
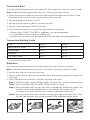
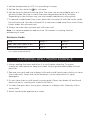
COUNTERTOP OVEN
Item Stock Number
169074
UPC: 681131690744
For Customer Asistance, call Customer Service at
1-877-207-0923 (US) or 1-877-556-0973 (Canada)
Important Safeguards
When using electrical appliances, basic safety precautions should always be
followed, including the following:
• Read all instructions
before using.
•Use extreme caution when removing
tray or disposing of hot grease.
•Do not clean with metal scouring pads.
Pieces can break off the pad and touch
electrical parts, creating a risk of
electrical shock.
•To disconnect, turn any control to Off,
then remove plug from wall outlet.
•Oversize foods or metal utensils must
not be inserted in an oven as they may
create a fire or risk of electric shock.
•Before do not place eyes or face in
close proximity with tempered safety
glass door, in the event that the safety
glass breaks.
•A fire may occur if the oven is covered,
touching, or near flammable material,
including curtains, draperies, walls, and
the like, when in operation. Do not store
any item on top of the appliance when
in operation.
•Condensation and a grease deposit
may form around the door and the air
and steam outlet grilles. This is normal.
•Extreme caution should be exercised
when using containers constructed of
other than metal or glass.
•Do not store any materials, other than
manufacturer-recommended
accessories, in this oven when not in
use.
•Do not place any of the following
materials in the oven: paper, cardboard,
plastic, and the like.
•Do not cover crumb tray or any part of
the oven with metal foil. This will cause
overheating of the oven.
•Do not touch hot surfaces. Use handles
or knobs.
•To protect against risk of electrical
shock, do not immerse cord, plug or
oven in water or other liquid.
•Close supervision is necessary when
any appliance is used by or near
children.
•Unplug from outlet when not in use and
before cleaning. Allow to cool before
cleaning appliance and putting on or
taking off parts.
•Do not operate any appliance with a
damaged cord or plug, or after the
appliance malfunctions or has been
dropped or damaged in any manner.
Call our toll-free customer assistance
number for information on
examination, repair, or adjustment.
•The use of accessory attachments not
recommended by the manufacturer
may cause injuries.
•Do not use outdoors.
•Do not let cord hang over edge of table
or counter, or touch hot surfaces,
including stove.
•Do not place on or near a hot gas or
electric burner, or in a heated oven.
•Extreme caution must be used when
moving an appliance containing hot oil
or other hot liquids. Be sure to allow hot
oil or liquids to cool before moving
appliance.
•If the plug gets hot, please call a
qualified electrician.
•Do not use appliance for other than
intended use.
SAVE THESE INSTRUCTIONS!
CONSUMER SAFETY INFORMATION
This appliance is intended for household use only.
Electrical Power
If electric circuit is overloaded with other appliances, your appliance may not
operate properly. It should be operated on a separate electric circuit from other
appliance.
CAUTION: UNPLUG APPLIANCE FROM ELECTRICAL OUTLET WHEN
ASSEMBLING, REMOVING PARTS OR CLEANING. NEVER PLACE THIS
APPLIANCE OR CORD IN WATER OR OTHER LIQUIDS.
Short Power Supply Cord Information
A short power supply cord is provided to reduce the risk of becoming entangled in
or tripping over a long cord. Extension cords may be used if care is exercised in
their use.
If an extension cord is used, the marked electrical rating of the extension cord
should be at least as great as the electrical rating of the appliance. The cord
should be arranged so that it will not drape over the countertop or tabletop where
it can be pulled on by children or tripped over unintentionally. If the appliance is of
the grounded type, the extension cord should be a grounding-type 3-wire cord.
Grounding Instructions
This appliance must be grounded while in use to protect the operator from
electrical shock. The appliance is equipped with a 3-conductor cord and a 3-prong
grounding-type plug to fit the proper grounding-type receptacle.
For US Application Only
The appliance has a plug that looks like sketch A. An adaptor, sketch B, should be
used for connecting sketch A-type plug to two-ground receptacles. The grounding
tab, which extends from the adaptor, must be connected to a permanent ground
such as a properly grounded outlet box as shown in sketch C, using a metal screw.
MODEL
Model No. Rated voltage Rated power Capacity
169074
120V
1440W
20L
3
Dimensions
Weight
50x36x26.5CM
8.18Kg
19.7x14.2x10.4 inches 18.03 lb.
Parts
1.Power indicator light
2.Temperature knob
3.Function knob
4.Timer knob
5. Bake pan
6. Wire rack
7.Drip tray
8.Pizza pan
9.Handgrip
10.Rotisserie spit and skewers
11.Rotisserie lift
12. Crumb tray
1
1
2
5
2
5
6
6
7
3
7
3
8
8
9
10
9
10
11
4
11
4
12
12
before using for the first time
1. Read the instructions for use and follow them carefully.
2. Wipe Unpack the appliance and remove all stickers, except her rating label.
3. Wash all accessories including wire racks, bake pan, rotisserie spit and skewers
with soapy water, rinse with clear water and dry. Replace parts once dry.
4. Do not touch the electric heating tubes.
5. Place the appliance on a flat, stable surface out of the reach of children.
6. Preheat the oven. First close the oven door and then set the temperature to the
highest temperature 450°F, set at
for toast/pizza mode, and turn timer to 15
minutes.
NOTE: Initial operation of oven may result in minimal smell and smoke, this is
normal. It is due to the protective substance on heating elements that protects
them from salt effects during shipping from the factory.
operating instructions
Warm/Defrost
1. Place wire rack in desired position.
2. Place food directly on wire rack or use bake pan.
3. Set the temperature knob according to warm/defrost.
4. Set the function knob to
for warm/defrost mode.
5. Set the Timer to desired time. It is not recommended to use the warm/defrost
mode for longer than30 minutes. Longer periods of time are not recommended
as food will become dry or will spoil.
Toast/Pizza
Both the top and bottom heating elements will heat continuously when this oven
function is used.
1. Place wire rack in desired position. Put the food directly on wire rack or bake
pan. When cooking pizza, place round pizza pan on the top of rack.
2. Set the temperature knob to desired temperature.
3. Set the function knob to
for toast/pizza.
4. Set the Timer to desired cooking time up to 60 minutes.
5. The pilot light turns on when timer is started.
6. You can interrupt the operation before the end of the cycle by returning the
timer to the 0 position.
7. At the end of cooking time, Timer will automatically return to the 0 position and
a sound is heard; the light switches off.
8. Turn the temperature knob back to “0.’
TOASTING GUIDE
Food
Temp °F
Time M
Potatoes/sweet potatoes
450°F
40-50
12” Pizza
450°F
20-25
*Depending on size and topping, cook until bubbling hot and crust is crisp. This oven can
accommodate a 12-inch pizza.
Convection Bake
Both the top and bottom heating elements will heat with FAN when this oven
function is used.
Note: When the heating element turns off, the fan will stop running.
With convection bake mode, a fan gently circulates the heated air with the oven,
providing a more even temperature and is faster than traditional baking. In
general, meats and poultry can be cooked in less time. Cakes, pies, cookies, etc.,
can be baked at a lower temperature.
Note: The general rule for using the package directions and baking recipes with
a convection oven is to lower the temperature by 20oF. For larger roasted items
such as meats, apply the same temperature as given, but reduce the cooking
time. Be sure to check the food 5 to 10 minutes before the time is up; you may
need to adjust the time and/or temperature for best results.
1. Put the food directly on bake pan and choose a low position.
2. Set the temperature knob to desired temperature.
3. Set the function knob to
for convection bake.
4. Set the timer to desired cooking time up to 60 minutes.
5. The pilot light turns on when timer is started.
6. You can interrupt the operation before the end of the cycle by returning the
timer to the 0 position.
Convection Baking guide
Food
Temp °F
Time M
Pork loin or rib toast, 2-4 lbs.
350°F
90
Fruit pie
400°F
30-35
Brownies
350°F
30
*The chart above is only a guideline for cooking temperature and time may vary according to
your recipe and preferences.
6
Convection Broil
Only the top heating elements will heat with FAN when this oven function is used.
Note: When the heating element turns off, the fan will stop running.
1. Place food to be cooked on wire rack and choose the high rack position. Then
place the drop tray at a lower position than the wire rack.
2. Set the temperature knob to 450°F.
3. Set the function knob to
for convection broil.
4. Set the Timer between 5 and 15 minutes.
5. Turn food over midway through the prescribed cooking time.
• When using CONVECTION BROIL, preheat is not recommended.
• It is advisable to leave the door slightly ajar.
• Always allow at least one inch between the food and the heating elements.
Convection Broiling Guide
Food
Temp °F
Time M
Beef and pork chop
400°F
15-20
Hamburgers
400°F
15-20
Sausage
400°F
15-20
Fish fillets, steak
350°F
15-20
*The chart above is only a guideline for cooking temperature and time may vary according to
your recipe and preferences.
Rotisserie
Only the top heating elements will heat when this oven function is used.
Note: When the heating element turns off, the Rotisserie spit will not rotate.
1. Put the drip tray at lower rack position.
2. Always begin with a cold oven to prevent burn while inserting the rotisserie rod
into oven.
3. Follow the directions below to set the rotisserie with food:
Step 1: Tie the chicken wings and legs tightly with butcher’s twine to secure them
Step 2: Insert rotisserie rod into center of the chicken or meat.
Step 3: Place rotisserie forks on spit with forks inserted into the bottom side of the
chicken. Center meat lengthwise on rod. Tighten the screws on the
rotisserie forks after the chicken or meat is centered on the spit.
Step 4: Use rotisserie lift to insert the spit into the right side of the oven first, then
the left side and rest spit on the bracket. Place bake pan under meat.
7
4. Set the temperature to 400°F or according to recipe.
5. Set the function knob to
for rotisserie.
6. Set the timer to desired cooking time. The oven can accommodate up to a 4pound chicken. Be sure to check the meat temperature after 45 minutes.
Depending on the chicken size, you may need to add extra cooking time.
7. To remove cooked meat from oven, place the rotisserie lift with the hooks under
the rotisserie rod. Use the rotisserie lift to remove cooked meat from oven. Place
hooks under the rotisserie spit.
8. Always unscrew the rotisserie spit with oven mitt.
Note: It is recommended to add an extra 10 minutes of cooking time for
preheating of oven.
Rotisserie Guide
Food
Temp °F
Time M
Beef, veal, pork roast (5 lbs.)
375°F
50-75
Whole chicken (4 lbs.)
400°F
50-90
*The chart above is only a guideline for cooking temperature and time may vary according to
your recipe and preferences.
Cleaning and Maintenance
1. Always unplug the oven and allow it to cool before cleaning. To assure
maximum safe operation, keep unit clean, free of grease and buildup of food
particles.
2. Remove wire rack and use a damp cloth and a mild liquid soap solution to clean
the inside walls. Never use harsh abrasives, corrosive products or spray
detergents
3. Do not clean interior with metal scouring pads. Pieces can break off and touch
electrical parts, creating risk of electrical shock.
4. To clean the glass door, use a glass cleaner or a damp cloth. Wipe dry with a
clean cloth.
5. Never immerse the appliance in water.
Customer Assistance
If you have a claim under this warranty, please call our Customer Assistance Number.
For faster service, please have the model, type and series numbers ready for the
operator to assist you. These numbers can be found on the bottom of your appliance.
Model: __________Type:_____________________ Series:____________________
Customer Assistance Number 1-877-207-0923 (U.S.) or 1-877-556-0973 (Canada)
Keep these numbers for future reference!
For more information, please visit us at www.walmart.com
Two-Year Limited Warranty
What does your warranty cover?
•Any defect in material or workmanship.
For how long after the original purchase?
•Two years.
What will we do?
•Provide you with a new one.
•For those items still under warranty but
no longer available, WAL-MART reserves
the right to replace with a similar GE
branded product of equal or greater value.
How do you make a warranty claim?
•Save your receipt.
•Properly pack your unit. We recommend
using the original carton and packing
materials.
•Return the product to your nearest
WAL-MART store or call Customer
Assistance at 1-877-207-0923 (U.S.)
or 1-877-556-0973 (Canada).
What does your warranty not cover?
•Parts subject to wear, including, without
limitation, glass parts, glass containers,
cutter/strainer, blades, seals, gaskets,
clutches, motor brushes, and/or
agitators, etc.
•Commercial use or any other use not
found in printed directions.
•Damage from misuse, abuse, or neglect,
including failure to clean product
regularly in accordance with
manufacturer’s instructions.
is a trademark of General Electric
Company and is used under the
license by Wal-Mart Stores Inc.,
Bentonville, AR 72716
How does state law relate to this
warranty?
•This warranty gives you specific legal
rights, and you may also have other
rights which vary from state to state
or province to province.
•This warranty is in lieu of any other
warranty or condition, whether express
or implied, written or oral, including,
without limitation, any statutory warranty
or condition of merchantability or fitness
for a particular purpose.
•WAL-MART, GE and the product
manufacturer expressly disclaim all
responsibility for special, incidental and
consequential damages or losses caused
by use of this appliance. Any liability is
expressly limited to an amount equal to
the purchase price paid whether a claim,
however instituted, is based on contract,
indemnity, warranty, tort (including
negligence), strict liability, or otherwise.
Some states or provinces do not allow
this exclusion or limitation of incidental
or consequential losses so the foregoing
disclaimer may not apply to you.
What if you encounter a problem with
this product while using it outside the
country of purchase?
•The warranty is valid only in the country
of purchase and you follow the warranty
claim procedure as noted.
Marketed in Canada by:
Wal-Mart Canada Corp.
1940 Argentia Road, Mississauga, Ontario L5N1P9