1
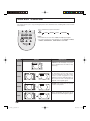
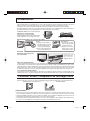
Operating Instructions
SAP
POWER
DBS/CBL
VCR
TV
DV
D
CH
OK
VOL
VOL
CH
RETURN
EXIT
MENU
TV/VIDEO
RECALL
1
R-STANDBY/POWER ON
4
POWER
7
MUTE
2
5
8
GUIDE
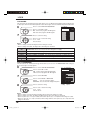
LCD Television
3
6
9
SLEEP
PROG
R-TUNE
0
PULL
REW
PLAY
FF
PAUSE
STOP
REC
ASPECT
TV/VCR
VCR/DBS CH
TV
Model No.
TC-26LX50
TC-26LE55
TC-32LX50
POWER
R ON
R-STANDBY/POWE
TV screen image is simulated.
For assistance, please call : 1-800-211-PANA (7262)
or visit us at www.panasonic.com/contactinfo
(U.S.A.)
For assistance, please call : 787-750-4300
or visit us at www.panasonic.com
(Puerto Rico)
For assistance, please call : 1-800-561-5505
or visit us at www.panasonic.ca
(Canada)
Before connecting, operating or adjusting this product, please read these instructions completely.
Please keep this manual for future reference.
English
Espan˜ol
tc_26LX50_eng_2010.indd 1
[Resumen]
TQB2AA0541-2
2005/05/09 15:29:53
Important Safety Instructions
CAUTION
RISK OF ELECTRIC SHOCK
DO NOT OPEN
The lightning flash with arrow
head within a triangle is intended
to tell the user that parts inside
the product are a risk of electric
shock to persons.
The exclamation point within a
triangle is intended to tell the
user that important operating
and servicing instructions are in
the papers with the appliance.
■ Note to CATV System Installer: This reminder is provided to direct the CATV system installer’s
attention to Article 820-40 of the NEC that provides guidelines for proper grounding and, in particular, specifies
that the cable ground shall be connected to the grounding system of the building, as close to the point of
cable entry as practical.
■ Secure ventilation
Slots and openings in the cabinet and the back or bottom are provided for ventilation, and to ensure reliable
operation of the LCD TV and to protect it from overheating. These openings must not be blocked or covered.
There should be at least 10 cm of space from these openings. The openings should never be blocked by
placing the LCD TV on a bed, sofa, rug or other similar surface. This LCD TV should not be placed in a builtin installation such as a bookcase unless proper ventilation is provided.
■ Important Safety Instructions for LCD TV
1)
2)
3)
4)
5)
6)
7)
8)
Read these instructions.
Keep these instructions.
Heed all warnings.
Follow all instructions.
Do not use this apparatus near water.
Clean only with dry cloth.
Do not block any ventilation openings. Install in accordance with the manufacturer’s instructions.
Do not install near any heat sources such as radiators, heat registers, stoves, or other apparatus (including
amplifiers) that produce heat.
9) Do not defeat the safety purpose of the polarized or grounding-type plug. A polarized plug has two
blades with one wider than the other. A grounding type plug has two blades and a third grounding prong.
The wide blade or the third prong are provided for your safety. If the provided plug does not fit into your
outlet, consult an electrician for replacement of the obsolete outlet.
10) Protect the power cord from being walked on or pinched particularly at plugs, convenience receptacles,
and the point where they exit from the apparatus.
11) Only use attachments / accessories specified by the manufacturer.
12) Use only with the cart, stand, tripod, bracket, or table specified by the manufacturer, or sold
with the apparatus. When a cart is used, use caution when moving the cart / apparatus
combination to avoid injury from tip-over.
13) Unplug this apparatus during lightning storms or when unused for long periods of time.
14) Refer all servicing to qualified service personnel. Servicing is required when the apparatus has been
damaged in any way, such as power-supply cord or plug is damaged, liquid has been spilled or objects
have fallen into the apparatus, the apparatus has been exposed to rain or moisture, does not operate
normally, or has been dropped.
15) Operate only from the type of power source indicated on the marking label. If you are not sure of the
type of power supplied to your home consult your television dealer or local power company.
16) Follow all warnings and instructions marked on the LCD TV.
17) Never push objects of any kind into this LCD TV through cabinet slots as they may touch dangerous
voltage points or short out parts that could result in a fire or electric shock. Never spill liquid of any kind
on the LCD TV.
2
tc_26LX50_eng_2010.indd 2
2005/05/09 15:29:54
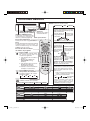
Important Safety Instructions
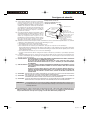
18) If an outside antenna is connected to the EXAMPLE OF ANTENNA
television equipment, be sure the antenna system GROUNDING AS PER (NEC)
is grounded so as to provide some protection NATIONAL ELECTRICAL
ANTENNA
CODE
LEAD-IN WIRE
against voltage surges and built up static
GROUND
charges. In the U.S. Section 810-21 of the
CLAMP
National Electrical Code provides information
ANTENNA
with respect to proper grounding of the mast and
DISCHARGE UNIT
ELECTRIC
(NEC SECTION 810-20)
supporting structure, grounding of the lead-in wire
SERVICE
to an antenna discharge unit, size of grounding
EQUIPMENT
GROUNDING CONDUCTORS
(NEC SECTION 810-21)
conductors, location of antenna discharge unit,
GROUND CLAMPS
connection to grounding electrodes, and
POWER SERVICE GROUNDING
ELECTRODE SYSTEM
requirements for the grounding electrode.
(NEC ART 250, PART H)
19) An outside antenna system should not be located
in the vicinity of overhead power lines or other
electric light or power circuits, or where it can fall into such power lines or circuits. When installing an
outside antenna system extreme care should be taken to keep from touching such power lines or circuits
as contact with them might be fatal.
20) Unplug this LCD TV from the wall outlet, and refer servicing to qualified service personnel under the
following conditions:
a. When the power cord or plug is damaged or frayed.
b. If liquid has been spilled into the LCD TV.
c . If the LCD TV has been exposed to rain or water.
d. If the LCD TV does not operate normally by following the operating instructions.
Adjust only those controls that are covered by the operating instructions as improper adjustment of
other controls may result in damage and will often require extensive work by a qualified technician to
restore the LCD TV to normal operation.
e. If the LCD TV has been dropped or the cabinet has been damaged.
f. When the LCD TV exhibits a distinct change in performance - this indicates a need for service.
21) When replacement parts are required, be sure the service technician uses replacement parts specified by
the manufacturer that have the same characteristics as the original parts. Unauthorized substitutions may
result in fire, electric shock, or other hazards.
22) WARNING : TO REDUCE THE RISK OF FIRE OR ELECTRIC SHOCK, DO NOT EXPOSE THIS
APPARATUS TO RAIN OR MOISTURE.
DO NOT PLACE LIQUID CONTAINERS (FLOWER VASES, CUPS, COSMETICS, ETC.)
ABOVE THE SET. (INCLUDING ON SHELVES ABOVE, ETC.)
23) WARNING : SMALL PARTS CAN PRESENT CHOKING HAZARD IF ACCIDENTALLY SWALLOWED.
KEEP SMALL PARTS AWAY FROM YOUNG CHILDREN.
DISCARD UNNEEDED SMALL PARTS AND OTHER OBJECTS, INCLUDING PACKAGING
MATERIALS AND PLASTIC BAGS/SHEETS TO PREVENT THEM FROM BEING PLAYED
WITH BY YOUNG CHILDREN, CREATING THE POTENTIAL RISK OF SUFFOCATION.
24) CAUTION : TO PREVENT ELECTRIC SHOCK DO NOT USE THIS PLUG WITH A RECEPTACLE OR OTHER
OUTLET UNLESS THE BLADES CAN BE FULLY INSERTED TO PREVENT BLADE EXPOSURE.
25) CAUTION : USE WITH OTHER STAND MAY RESULT IN INSTABILITY POSSIBLY CAUSING INJURY.
26) CAUTION : DANGER OF EXPLOSION IF BATTERY IS INCORRECTLY REPLACED. REPLACE ONLY
WITH THE SAME OR EQUIVALENT TYPE.
NOTE :
This equipment is designed to operate in North America and other countries where the broadcasting
system and AC house current are exactly the same as in North America.
■ This product utilizes tin-lead solder, and has a fluorescent lamp containing a small amount of mercury. Disposal of
these materials may be regulated in your community due to environmental considerations. For disposal or recycling
information please contact your local authorities, or the Electronics Industries Alliance: www.eiae.org.
3
tc_26LX50_eng_2010.indd 3
2005/05/09 15:29:54
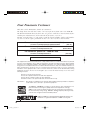
Dear Panasonic Customer
Welcome to the Panasonic family of customers.
We hope that you will have many years of enjoyment from your new LCD TV.
To obtain maximum benefit from your set, please read these instructions before
making any adjustments, and retain them for future reference.
Retain your purchase receipt, and record the model number and serial number
of your set in the space provided on the rear cover of these instructions.
For assistance, please call : 1-800-211-PANA (7262)
or visit us at www.panasonic.com/contactinfo
(U.S.A.)
For assistance, please call : 787-750-4300
or visit us at www.panasonic.com
(Puerto Rico)
For assistance, please call : 1-800-561-5505
or visit us at www.panasonic.ca
(Canada)
Federal Communication Commission Information
This equipment has been tested and found to comply with the limits for a TV Broadcast Receiver, pursuant
to Part 15 of the FCC Rules. These limits are designed to provide reasonable protection against harmful
interference in a residential installation. This equipment generates, uses and can radiate radio frequency
energy and, if not installed and used in accordance with the instructions, may cause harmful interference to
radio communications. However, there is no guarantee that interference will not occur in a particular
installation. If this equipment does cause or receive interference, which can be determined by turning
equipment off and on, the user is encouraged to try to correct the interference by one or more of the
following measures:
Reorient or relocate the TV antenna.
Increase the separation between TV and other equipment.
Connect TV into separate outlet from other equipment.
Consult the dealer or an experienced radio / TV technician for help.
FCC Caution:
Any changes or modifications not expressly approved by the party responsible for compliance
could void the user’s authority to operate this equipment.
The ENERGY STAR label, a symbol for energy efficiency, was created by the U.S.
Environmental Protection Agency (EPA) and the U.S. Department of Energy
(DOE) to help customers identify products that can save them money and protect
the environment by saving energy. ENERGY STAR compliant products generally
consume less energy than similar standard products.
HDMI, the HDMI logo and High-Definition Multimedia Interface are
trademarks or registered trademarks of HDMI Licensing LLC.
4
tc_26LX50_eng_2010.indd 4
2005/05/09 15:29:54
Table of Contents
Important Safety Instructions .............................. 2
SUPPLIED ACCESSORIES ................................... 5
Remote control battery installation ...................... 6
How to remove the TV-Stand ............................... 6
Installation ............................................................. 7
How to hang the LCD Television on the wall ....... 7
Connections .......................................................... 8
Antenna Connection ............................................ 8
Cable Box Connection ......................................... 8
Connecting Other Equipment .............................. 9
Front Panel Connection ..................................... 11
Power ON / OFF ................................................... 12
Basic Controls ..................................................... 13
Menu Operations ................................................. 14
Tuning Channels ................................................. 16
LOCK .................................................................... 17
CLOSED CAPTION .............................................. 21
INPUT LABEL ...................................................... 21
OTHER ADJUST .................................................. 22
PICTURE ADJUST ............................................... 23
POSITION/SIZE .................................................... 24
AUDIO ADJUST ................................................... 25
ASPECT Controls ................................................ 26
Operating peripheral equipment using
the remote control ............................................ 27
Programming the remote control code .............. 27
Infrared Code Index ........................................... 28
Mode Operational Key Chart ............................. 30
Manuel de instrucciones [ Resumen ]
Instalación .................................................. 31
Instalación de las pilas del mando a distancia ..... 31
Conexión .................................................... 32
Conexión de antena .................................. 32
Conexión del receptor de TV por cable ..... 32
Conexión de otro equipo ........................... 33
Conexiones del panel frontal ..................... 35
Conexión / desconexión de la alimentación ... 36
Controles básicos ...................................... 37
Operaciones con menús ........................... 38
Sintonización de canales .......................... 40
Troubleshooting .................................................. 41
Specifications ...................................................... 42
Maintenance ........................................................ 42
Limited Warranty (for U.S.A.) .............................. 43
CUSTOMER SERVICES DIRECTORY (for U.S.A.) ........... 45
Limited Warranty (for Canada) ........................... 46
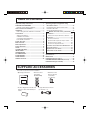
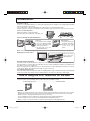
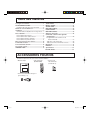
SUPPLIED ACCESSORIES
Check the accessories before installation.
• Operating Instructions
• Remote Control
Transmitter
(EUR7613ZE0)
• Product Registration Card and
Customer Care Plan Card (For
U.S.A.)
• Batteries for the
Remote Control
Transmitter
(2 × AA size)
• F-Type Antenna Connector
(for 4C-2V) ( × 1)
5
SUPPLIED ACCESSORIES
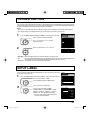
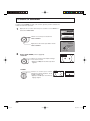
Remote control battery installation
Requires two AA batteries.
1. Open the battery cover.
2. Install the batteries.
Note the correct polarity (+ and -).
3. Replace the cover.
Two AA size
Precaution on battery use
Incorrect installation can cause battery leakage and corrosion that will damage the remote control transmitter.
Disposal of batteries should be in an environmentally friendly manner.
1. Always use new batteries when replacing the old set.
2. Do not attempt to charge, short-circuit, disassemble, heat or burn used batteries.
3. Battery replacement is necessary when remote control acts sporadically or fails to operate this unit.
Notes:
• Do not drop, apply shock to or step on the remote control.
• Do not spill water on the remote control.
• Do not place objects between the remote control and remote control receiver.
• Do not use remote controls for other equipment at the same time.
• If the TV does not operate even when using the remote control from a close range, it is time to replace
the batteries.
How to remove the TV-Stand
Follow the procedure below when the TV-Stand needs to be removed for wall-hanging.
1
Place the TV face down
on a foam mat or a thick
soft cloth to prevent
damage to the panel.
4
Carefully pull out the TV-Stand.
5
Reinstall the cable cover.
(see page 7)
Foam mat or thick soft
cloth
2
Remove the cable cover. (see page 7)
3
Remove screws. (at 4 points)
6
tc_26LX50_eng_2010.indd 6
2005/05/09 15:29:55
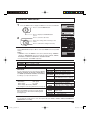
Installation
Receiver Location
Locate at a comfortable distance for viewing. Avoid placing where sunlight or other bright light (including
reflections) will fall on the screen.
Use of some types of fluorescent lighting can reduce remote control transmitter range.
Adequate ventilation is essential to prevent internal component failure. Keep away from areas of excessive heat or moisture.
How to use the LCD stand
Adjust the stand to your desired angle.
The stand angle can be rotated 20 ° to the right / left.
POWER
ER ON
R-STANDBY/POW
Cable cover Removal and Reinstallation
Removal
1. Push down hooks and pull
the cover slightly towards
yourself to disengage the
claws (at 3 points).
2. Slowly pull out in the
downward direction.
Reinstallation
1. Insert the claws (at 3
points) at the bottom.
2. Push the cover until
hooks click into
place.
Note: To avoid interference appearing on the screen, do not bundle the RF cable and AC cord together.
Opening Front Control Door
Raise the lower
part of the door
labeled “PULL”.
PULL
R-STANDBY/POWER ON
POWER
PULL
Optional External Equipment
The Video / Audio connection between components can be made with shielded video and audio cables. For
best performance, antenna cables should utilize 75 ohm coaxial shielded wire. Cables are available from
your dealer or electronic supply store.
Before you purchase any cables, be sure you know what type of output and input connectors your various
components require. Also determine the length of cable you’ll need.
For optimum quality picture
When the LCD is exposed to light from outdoors or lighting fixtures, high-contrast pictures may not be displayed
clearly. Turn off florescent lamps near the LCD and place in a location not exposed to outdoor light.
How to hang the LCD Television on the wall
This LCD Television is for use only with the following optional accessory. Use with any other type of optional
accessories may cause instability which could result in the possibility of injury.
Wall-hanging bracket ........................................................ TY-WK32LX20W
•
WARNING:
• Failure to use Panasonic bracket or choosing to mount the unit yourself will be done at the risk of the consumer.
Any damage resulting from not having a professional installer mount your unit will void your warranty.
• Always be sure to ask a qualified technician to carry out set up.
Incorrect fitting may cause equipment to fall, resulting in injury and product damage.
• For more details, please refer to the wall hanging bracket installation manual.
• Please contact your nearest Panasonic dealer for purchasing the wall-hanging bracket.
7
tc_26LX50_eng_2010.indd 7
2005/05/09 15:29:55
Connections
Note:
Cables and connectors are not supplied with this set.
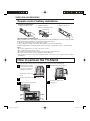
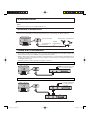
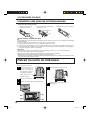
Antenna Connection
For proper reception of VHF/UHF channels, an external antenna is required. For best reception, an outdoor
antenna is recommended. The antenna mode must be set to TV (see page 16, Mode selection).
Back of the TV
VHF Antenna UHF Antenna
Antenna Terminal
ANT
F-Type Antenna
Connector
75 Ohm
Coaxial Cable
Mixer
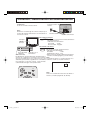
Cable Box Connection
• For reception of cable channels (01 - 125), connect the cable supplied by your local cable company. The
antenna mode must be set to CABLE (see page 16, Mode selection).
• Certain cable systems offset some channels to reduce interference or view Premium (scrambled) channels.
A cable converter box is required for proper reception. Check with your local cable company for its
compatibility requirements.
• Set the TV channel to CH3 or CH4 when using this connection.
Cable Box
Back of the TV
Incoming 75 Ohm Cable
from Cable Company
ANT
OUTPUT
INPUT
CABLE BOX
Cable Box and VCR
Back of the TV
Incoming 75 Ohm Cable
from Cable Company
ANT
OUTPUT
ANT OUTPUT ANT INPUT
INPUT
CABLE BOX
VCR
8
tc_26LX50_eng_2010.indd 8
2005/05/09 15:29:55
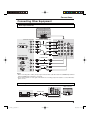
Connections
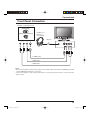
Connecting Other Equipment
Rear Input Terminals
Back of the TV
COMPONENT VIDEO OUT
COMPONENT VIDEO cable
Y
Y
DVD / STB
S-VIDEO
PB
VIDEO
PB
VIDEO
PR
PR
L
L
Audio
OUT
L
R
AUDIO
R
AUDIO cable
Super-VHS VCR
1
2
COMPONENT VIDEO INPUT 1
INPUT
S-VIDEO cable
CAMCORDER
R
TO AUDIO
AMP
INPUT 2
PROG OUT
S-Video
OUT
VIDEO cable
Video
OUT
VIDEO GAME
CONSOLE
AUDIO cable
R
Audio
OUT
L
Notes:
• When connecting video cables, priority is given to the S-Video cable when both the S-VIDEO input terminal
and the VIDEO input terminal are connected.
• Please make inquiries of video game manufacturers concerning component cables to connect with video
game console.
Rear Output Terminals
Back of the TV
Y
S-VIDEO
VIDEO
PB
VIDEO
PR
AUDIO cable
L
L
Audio
IN
R
L
AUDIO
R
1
2
COMPONENT VIDEO INPUT 1
INPUT
INPUT 2
R
TO AUDIO
AMP
PROG OUT
9
tc_26LX50_eng_2010.indd 9
2005/05/09 15:29:56
Connections
HDMI Connection
HDMI∗1 (High Definition Multi media Interface) is the first all-digital consumer electronics A/V interface that
supports uncompressed standard. The HDMI terminal supports both video and audio information.
To the HDMI∗1 input terminal, you can connect an EIA/CEA-861/861B∗2 compliant consumer electronic device,
such as a Set Top Box or DVD player with HDMI or DVI output terminal.
Input a High-bandwidth Digital Content Protection (HDCP) high-definition picture source to this HDMI terminal,
so you can display high-definition pictures on this TV in digital form.
• An audio cable should be connected only when using an HDMI conversion
adapter to connect with a DVI cable.
• If the external device has DVI output only, use a DVI to HDMI adapter cable∗3
to connect to the HDMI terminal.
• Connect the audio cables to the AUDIO IN terminals for HDMI.
• Select the audio setting in HDMI In (see page 25).
L
R
Y
S-VIDEO
VIDEO
PB
VIDEO
Example of HDMI input signal source
DVD player
HDMI OUT
PR
R
AUDIO
OUT
HDMI AUDIO IN
L
AUDIO
R
L
Set-Top Box
AUDIO cable
HDMI IN
HDMI cable
AV IN
Compatible VIDEO Signal
720p
1080i
480p
480i
No. of dots (H × V)
1,280 × 720p
1,920 × 1,080i
720 × 480p
640 × 480p
720 × 480i
Vertical scanning frequency (Hz)
59.94/60
59.94/60
59.94/60
59.94/60
59.94/60
Notes:
• This input terminal is not intended for use with computers.
• 720p/1080i signals will be re-formatted for viewing on your LCD display.
Compatible sampling freguency of AUDIO signal through HDMI (L.PCM) : 48 kHz / 44.1 kHz / 32 kHz
Notes:
• This HDMI connector is Type A.
• If you connect equipment without a digital output terminal, connect to the COMPONENT VIDEO, S-VIDEO or
VIDEO input terminal on the TV so you can receive an analog signal.
• The HDMI IN terminal can only be used with 720p, 1080i, 480i or 480p picture signals. Set the Digital Set Top Box DIGITAL OUT terminal Output setting to 720p, 1080i, 480i or 480p. For detailed information, refer to
the Digital Set -Top Box instruction manual. If you cannot display the picture because your Digital Set -Top
Box does not have a DIGITAL OUT terminal Output setting, use the component Video Input (or the S-Video
Input or Video Input). In this case the picture will be displayed as an analog signal.
∗1. HDMI, the HDMI logo and High-Definition Multimedia Interface are trademarks or registered trademarks
of HDMI Licensing LLC.
∗2. EIA/CEA-861/861B profiles compliance covers profiles for transmission of uncompressed digital video
including high bandwidth digital content protection.
∗3. Consult your consumer electronics dealer for availability details.
[for USA]
HDMI-DVI conversion cable (TY-SCH03DH): available on Panasonic website (www.panasonic.com).
10
tc_26LX50_eng_2010.indd 10
2005/05/09 15:29:56
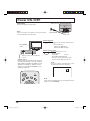
Connections
Front Panel Connection
Example of input signal source
CAMCORDER
VIDEO GAME CONSOLE
Headphones /
Earphones
(not supplied)
R-STANDBY/POWER ON
L
AUDIO
OUT
R
VIDEO
OUT
POWER
M3 plug
S-VIDEO
OUT
HPJ
S-VIDEO
L-AUDIO-R
VIDEO
INPUT 3
S-VIDEO cable
VIDEO cable
AUDIO cable
Notes:
• When connecting video cables, priority is given to the S-Video cable when both the S-VIDEO input terminal
and the VIDEO input terminal are connected.
• Please make inquiries of video game manufacturers concerning component cables to connect with video
game console.
11
tc_26LX50_eng_2010.indd 11
2005/05/09 15:29:56
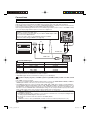
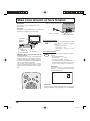
Power ON / OFF
Preparation
Back of the TV
Connect the plug to the wall outlet.
Note:
The TV consumes some power as long as the power
cord is inserted into the wall outlet.
AC120V, 60Hz
Power cord
On the main unit
POWER
Main POWER
switch
R-STANDBY/POWER ON
POWER
PULL
Press to turn the TV’s main power on /
off.
• Power indicator
Main power ON: Green
Main power OFF: No light
On the remote control
R-STANDBY G-POWER ON
Remote control Power Indicator
sensor
C.A.T.S. sensor
LCD C.A.T.S. (Contrast Automatic Tracking
System) automatically senses the ambient
light conditions and adjusts the brightness and
gradation accordingly, to optimize contrast.
C.A.T.S. is in effect when PIC MODE is set to
AUTO (see page 23).
POWER
Press to turn the TV on / off.
• Power indicator
Power ON
: Green
Power OFF (Standby): Red
• This does not work when the main
power is off (No light) (see above).
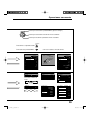
Note:
The screen below is displayed for a few
moments when the TV is turned on.
ZOOM
CH
6
STEREO
SAP
MONO
SAP
POWER
DBS/CB
VCR
L
DV
TV
D
CH
Note:
Select the menu language before operating the TV (see
pages 14, 15, LANGUAGE).
12
tc_26LX50_eng_2010.indd 12
2005/05/09 15:29:57
Basic Controls
< Front Side Controls >
SAP button
Selects Audio mode (see page 25).
POWER
STEREO
R-STANDBY G-POWER ON
TV/VIDEO
TV/VIDEO button
Volume Up/Down
Main POWER switch
Press to turn the TV’s main power
on/off.(see page 12)
Channel Up/Down
Power button
Press to turn the TV ON or OFF.
Note:
The TV’s power cord must first be plugged
into the wall outlet and then the TV can
be turned on using the POWER switch.
Mode Selection buttons
Digital Broadcasting Satellite mode
for Remote Control / Cable TV Mode
Selection for Remote Control
Digital Video
VCR Mode
Disc Mode
Selection for
Selection for
Remote Control
Remote Control
DBS/CB
TV Mode Selection for Remote Control
L
TV
DV
D
Changes to the next channel up
Moves cursor upward during menu mode.
CH
OK
VOL
R-TUNE button
Switches to previously viewed
channel or video mode.
Not effective under the following
conditions:
1. Right after the TV is turned on.
2. After switching TV / CATV
(MODE in PROGRAM
CHANNELS).
3. Right after the ACP
(Automatic channel
programming) execution.
4. When the same channel as
the present channel is selected.
PROG dash button / SLEEP TIMER button
Program dash channel numbers for
DTV and DBS.
Sleep timer (MINUTES)
CH
RETURN
EXIT
RECALL
MUTE
Increases volume
Moves cursor to
the right during
menu mode.
Reduces volume
Moves cursor to
the left during
menu mode.
VOL
MENU
TV/VIDEO
GUIDE
CH
OK
VOL
1
2
3
VOL
CH
MENU
4
5
6
7
8
9
SLEEP
PROG
R-TUNE
0
REW
PLAY
FF
PAUSE
STOP
REC
ASPECT
TV/VCR
RETURN
EXIT
Displays menu Press to Return
Press to access to previous
TV, DTV, DBS
MENU or EXIT
or DVD menus.
from menu.
Changes to the next channel down
Moves cursor downward during menu mode.
Press to display input mode menu.
While the menu is displayed, press
again to change the input mode.
The input mode changes each time
this button is pressed.
Press this button to mute the sound,
press again to cancel the mute.
VCR/DBS CH
TV
TV/VIDEO RECALL MUTE GUIDE
ASPECT
TV/VCR
DV
D
SAP
VCR
Direct program number
selection buttons
DBS/CBL
VCR
TV
POWER
SLEEP
PROG
MONO
CH
– VOL +
Remote control
sensor
Within about 23 feet
(7 meters) in front of
the TV set.
R-TUNE
SAP
ASPECT button
Change screen size (see page 26).
GUIDE button
for DBS.
Press to display the current system
status, for example, Aspect mode,
Channel number, Stereo mode, TV/
VIDEO and Off timer.
Operation of other Device
Buttons
Device
REW
FF
PLAY
PAUSE
STOP
VCR
VCR REW/FF
PLAY
Pause
CABLE/DBS
-
-
-
-
DVD
Skip Search REW/FF
PLAY
Pause
STOP
Buttons
Device
REC
ASPECT
TV/VCR
VCR/DBS CH
VCR
VCR RECORD
TV/VCR Switch
VCR CH up/down
CABLE/DBS
-
STB-ASPECT
DVD
-
Open / Close
PAGE up/down
Slow +/--
STOP
13
tc_26LX50_eng_2010.indd 13
2005/05/09 15:29:57
#8AH%C8E4G<BAF
+I<JJ KF ;@JGC8P ( )0
J:I<<E
.+
. /0+
+$/0+$/0- %0./
+*.$/$*).$5
+*2 -
( )0
%0./
( )0
%0./
0$*
.
'
1-
. /0+
1
/1
+$/0+$/0- %0./
0$*%0./
FI
( )0
%0./
+*.$/$*).$5
0$*
. /0+
')"0"
0$*%0./
,%"
+-*"-(#
'*&
'*. +/$*)
- /0-)
3$/
/11$ * - ''
*,,%
?8E><K?<@EGLKDF;<
T+I<JJKF;@JGC8PK?<$EGLK
J<C<:K@FED<EL
/1
*(+*) )/
*(+*) )/
#($
1$ *
1$ *
(0/
$)+0/' '
*/# -%0./
"0$
( )0
%0./
. /0+
+$/0+$/0- %0./
0$*
.' +
+-*"
0$*%0./
+*.$/$*).$5
-
/0)
1$ *
T+I<JJ:FII<JGFE;@E>
ELD9<IB<PFEK?<
I<DFK<:FEKIFCKFJ<C<:K
K?<@EGLKF=PFLI:?F@:<
$BG8
1@;<F @EGLK :8E 8CJF 9<
/11$ *
J<C<:K<;9PGI<JJ@E>
K?<EK?<#
9LKKFEJ
8E;GLJ?R*&UB<P
( )0
%0./
. /0+
')"0"
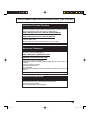
%$)($"&3AFGEH6G<BA5BK
E*E.:I<<E#<CG9FO@J;@JGC8P<;N?<E8D<EL@J;@JGC8P<;
FEK?</1/?@J#<CG9FO@E;@:8K<JN?@:?B<PJFEK?<I<DFK<:FEKIFC
8I<LJ<;KFE8M@>8K<K?<D<ELJ?FNE
+-*"-(#
'*&
'*. +/$*)
$)+0/' '
*/# -%0./
')"0"
')"0"
)"'$.#
#)"
- /0-)
tc_26LX50_eng_2010.indd 14
2005/05/09 15:29:57
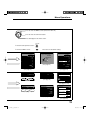
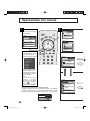
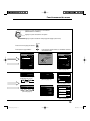
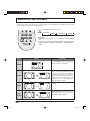
Menu Operations
Press to select the MENU screen (ADJUST or SET UP).
CH
OK
VOL
VOL
Press to select the sub-menu feature.
CH
Press to display the sub-menu screen.
• To return to the previous screen :
•
RETURN
EXIT
MENU
To exit the MENU screen:
This returns TV to normal viewing.
PICTURE ADJUST PAGE 1/2
NORMAL
STANDARD
PIC MODE
BACK LIGHT
+ 20
PICTURE
+ 20
BRIGHTNESS
0
COLOR
0
TINT
0
SHARPNESS
0
AI PICTURE
AUDIO ADJUST
POSITION/SIZE
NORMAL
BASS
– 2
TREBLE
+ 6
RETURN
BALANCE
POSITION
(See page 24)
Select the menu language.
OFF
OFF
ON
ON
SURROUND
OFF
ON
STEREO
SAP
MONO
DIGITAL
(See page 25)
PROGRAM CHANNELS
ENGLISH
0
AI SOUND
HDMI IN
(See page 23)
LANGUAGE
STANDARD
MODE
NORMALIZE
SIZE
15
COOL
COLON
OFF
OFF
ON
LANGUAGE
PAGE 1/2
NORMAL
MODE
TV
CABLE
AUTO PROGRAM
MANUAL PROGRAM
LOCK
BLOCK PROGRAMS:
U. S. MOVIES
STATUS
OFF ON
CHANGE SETTING
(See page16)
ENTER CODE FIRST
(See pages 17-20)
CLOSED CAPTION
OFF
MODE
INPUT LABEL
COMPONENT1 COMPONENT1
OTHER ADJUST PAGE 1/2
VIDEO NR
OFF ON
COMPONENT2 COMPONENT2
C2
C3
C1
C4
OFF
(See page 21)
HDMI
VIDEO1
HDMI
GAME
VIDEO2
DVD
VIDEO3
VIDEO3
(See page 21)
MPEG NR
OFF ON
3D Y/C FILTER
OFF ON
COLOR MATRIX
SD HD
(See page 22)
15
tc_26LX50_eng_2010.indd 15
2005/07/15 17:14:13
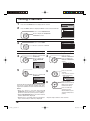
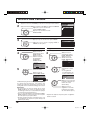
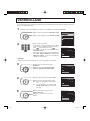
Tuning Channels
1
2
Press the TV/VIDEO button to display the TV channel.
MENU
ADJUST
Press the MENU button to display the MENU screen and select SET UP.
SET UP
LANGUAGE
PROGRAM CH
LOCK
Press to select PROGRAM CH.
CLOSED CAPTION
CH
OK
VOL
VOL
Press to display the PROGRAM
CHANNELS screen.
INPUT LABEL
OTHER ADJUST
CH
Mode selection
Press to select MODE.
3
PROGRAM CHANNELS
TV
MODE
Press to select TV or CABLE.
CH
OK
VOL
CABLE
AUTO PROGRAM
VOL
MANUAL PROGRAM
CH
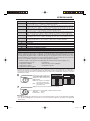
Automatic channel programming
Automatically scans and stores all the TV channels.
4
CH
OK
VOL
VOL
CH
Press to select AUTO
PROGRAM.
Press to display the
AUTO PROGRAM
screen.
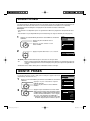
Manual channel programming
Add or delete a channel manually.
4
CH
OK
VOL
VOL
CH
AUTO PROGRAM
PROGRAM CHANNELS
MODE
Activate
“AUTO PROGRAM?”
YES
5
Press to select
MANUAL PROGRAM.
Press to display the
MANUAL PROGRAM
screen.
TV
CABLE
AUTO PROGRAM
MANUAL PROGRAM
NO
Press to select YES.
5
CH
OK
VOL
Press to start AUTO
PROGRAM.
VOL
CH
MANUAL PROGRAM
AUTO PROGRAM
ENTER CHANNEL
121
In “AUTO PROGRAM”
CHANNEL
Press to select the
channel.
• You can also use the
numbered buttons.
59
MENU
STOP
Channels will automatically advance until all channels
have been scanned. Channel numbers with video
signal received will be stored in the Channel Memory.
Notes:
• When any button is pressed during AUTO
PROGRAM, the TV will return to normal viewing.
(Channels searched up to that point are added.)
• After AUTO PROGRAM finishes, the lowest channel
number added will be displayed.
• When there is no receivable channel, channel 69 (for
TV) or channel 125 (for cable TV) is displayed.
6
CH
OK
VOL
VOL
CH
Press to add the
channel to the Channel
Memory (the channel
number turns blue).
Press to delete the
channel from the
Channel Memory (the
channel number turns
yellow).
• Repeat steps 5 and 6 for other channels.
16
tc_26LX50_eng_2010.indd 16
2005/05/09 15:29:59
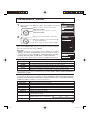
LOCK
V-Chip technology allows parents to use the TV rating codes to block programs that they feel are inappropriate
for their children to watch.
1
Press the MENU button to display the MENU screen and select SET UP.
Press to select LOCK.
SET UP
Press to display the LOCK screen.
CH
OK
VOL
MENU
ADJUST
LANGUAGE
VOL
PROGRAM CH
CH
LOCK
CLOSED CAPTION
INPUT LABEL
2
1
2
3
4
5
6
7
8
9
0
Input 4-digit code.
• To clear the numbers while entering the code,
press Up
or Down
.
• You will need the code to enter the LOCK menu.
• After entering your password for the first time,
ENTER CODE FIRST will change to CHANGE
CODE.
OTHER ADJUST
LOCK
BLOCK PROGRAMS:
U. S. MOVIES
STATUS
OFF ON
CHANGE SETTING
ENTER CODE FIRST
Note:
Use a code that is easy to remember and record it in a safe place.
3
Press to select BLOCK PROGRAMS.
CH
OK
VOL
VOL
CH
4
Press to select U.S. MOVIES, U.S. TV
PROGRAMS, CANADIAN ENGLISH
or CANADIAN FRENCH.
Press to select STATUS.
CH
OK
VOL
VOL
CH
5
Press to select OFF or ON.
OFF : Can view all programs.
ON : Cannot view programs locked in
CHANGE SETTING.
Press to select CHANGE SETTING.
Press to enter the next menu.
CH
OK
VOL
VOL
LOCK
BLOCK PROGRAMS:
U. S. TV PROGRAMS
STATUS
OFF ON
CHANGE SETTING
CHANGE CODE
LOCK
BLOCK PROGRAMS:
U. S. TV PROGRAMS
STATUS
OFF ON
CHANGE SETTING
CHANGE CODE
LOCK
BLOCK PROGRAMS:
U. S. TV PROGRAMS
STATUS
OFF ON
CHANGE SETTING
CH
CHANGE CODE
17
tc_26LX50_eng_2010.indd 17
2005/05/09 15:30:00
LOCK
U.S. MOVIES
This TV features the “V-Chip technology” which allows you to use Motion Picture Ratings when viewing movies
or video tapes. This innovation allows parents to block various types of movies and video tapes at their discretion.
6
Press to select VIEW NR PROGRAMS?.
CH
OK
VOL
VOL
CH
7
Press to select NO or YES.
NO : Cannot view programs with NR signals.
YES : Can view programs with NR signals.
U. S. MOVIES
VIEW NR PROGRAMS?
NO YES
G
PG
PG-13
Press to select the rating.
R
NC-17
CH
OK
VOL
VOL
CH
Press to lock or unlock the rating.
Lock : Red
Unlock: Green
X
Notes:
• When a rating is locked, all ratings below this rating are locked.
• When a rating is unlocked, all ratings above this rating are unlocked.
CONTAINS NO RATING (NOT RATED) AND NA (NOT APPLICABLE)
PROGRAMS. Movie has not been rated or rating does not apply.
GENERAL AUDIENCES. All ages admitted.
PARENTAL GUIDANCE SUGGESTED. Some material may not be suitable for children.
PARENTS STRONGLY CAUTIONED. Some material may be inappropriate for children under 13.
RESTRICTED. Under 17 requires accompanying parent or adult guardian.
NO ONE 17 AND UNDER ADMITTED.
ADULTS ONLY.
NR
G
PG
PG-13
R
NC-17
X
U.S. TV PROGRAMS
This TV features the “V-Chip technology” which allows you to use U.S. TV PROGRAMS Guide ratings to
block various types of TV programs.
6
Press to select VIEW NR PROGRAMS?
CH
OK
VOL
VOL
CH
7
Press to select NO or YES.
NO : Cannot view programs with NR signals.
YES : Can view programs with NR signals.
Press to select SETTING.
U. S. TV PROGRAMS
VIEW NR PROGRAMS?
NO YES
SETTING
BASIC
TV–Y
TV–Y7
FV
TV–G
CH
OK
VOL
VOL
CH
Press to select BASIC or DETAILED.
BASIC
: You can select the ratings.
DETAILED : You can select the ratings and options.
Press to select the rating.
8
CH
OK
VOL
VOL
CH
TV–PG
V
S
L
D
TV–1 4
V
S
L
D
TV–MA
V
S
L
Rating
Option
Press to lock or unlock the rating.
Lock : Red
Unlock : Green
Notes:
• When a rating is locked, all ratings (including options) below this rating are locked.
• When a rating is unlocked, all ratings (including options) above this rating are unlocked.
• When an option (V, S, L or D) is locked, all the same options (V, S, L or D) below this rating are locked.
• When an option (V, S, L or D) is unlocked, all the ratings and the same options (V, S, L or D) above this
rating are unlocked.
18
tc_26LX50_eng_2010.indd 18
2005/05/09 15:30:00
LOCK
Not Rated. See Customer Caution below.
All children. The themes and elements in this program are specifically designed for a
very young audience, including children from ages 2-6.
Directed to older children. Themes and elements in this program may include mild physical
or comedic violence, or may frighten children under the age of 7.
General audience. It contains little or no violence, no strong language, and little or no
sexual dialogue or situations.
Parental guidance suggested. The program may contain infrequent coarse language,
limited violence, some suggestive sexual dialogue and situations.
Parents strongly cautioned. This program may contain sophisticated themes, sexual
content, strong language and more intense violence.
Mature audiences only. This program may contain mature themes, profane language,
graphic violence, and explicit sexual content.
FANTASY/CARTOON VIOLENCE
VIOLENCE
SEX
OFFENSIVE LANGUAGE
DIALOGUE WITH SEXUAL CONTENT
NR
TV-Y
TV-Y7
TV-G
TV-PG
TV-14
TV-MA
FV
V
S
L
D
Customer Caution
The V-Chip system that is used in this set is capable of blocking “NR” programs (non rated, not applicable
as and none) per FCC Rules Section15.120(e)(2). If the option of blocking “NR” programs is chosen
“unexpected and possibly confusing results may occur, and you may not receive emergency bulletins or
any of the following types of programming:”
• Emergency Bulletins (Such as EAS messages, weather warnings and others)
• Locally originated programming • News • Political • Public Service Announcements • Religious • Sports
• Weather
CANADIAN ENGLISH / CANADIAN FRENCH
The V-CHIP used in this TV allows you to block various types of movies and television programs based on
the two rating systems used in Canada. It also lets you block or unblock Canadian French programs according
to various ratings categories.
6
CH
OK
VOL
VOL
CH
7
CH
OK
VOL
VOL
CH
Press to select VIEW E
PROGRAMS?.∗
Press to select NO or YES.
NO : Cannot view programs
with E signals.
YES : Can view programs
with E signals.
∗ E means Exempt
Press to select the rating.
CANADIAN ENGLISH
VIEW E PROGRAMS?
NO YES
CANADIAN FRENCH
VIEW E PROGRAMS?
NO YES
C
G
C8+
8 ANS+
G
13ANS+
PG
16ANS+
14+
18ANS+
18+
Press to lock or unlock the rating.
Lock : Red
Unlock: Green
Notes:
• When a rating is locked, all ratings below this rating are locked.
• When a rating is unlocked, all ratings above this rating are unlocked.
19
tc_26LX50_eng_2010.indd 19
2005/05/09 15:30:00
LOCK
CANADIAN ENGLISH RATINGS CHART
E
C
C8+
G
PG
14+
18+
Exempt - Exempt programming includes: news, sports, documentaries and other
information programming, talk shows, music videos, and variety programming.
Programming intended for children under age 8. No offensive language, nudity or sexual
content.
Programming generally considered acceptable for children 8 years and over. No profanity,
nudity or sexual content.
General programming, suitable for all audiences.
Parental Guidance suggested. Some material may not be suitable for children.
Programming contains themes or content which may not be suitable for viewers under
the age of 14. Parents are strongly cautioned to exercise discretion in permitting viewing
by pre-teens and early teens.
18+ years old. Programming restricted to adults. Contains constant violence or scenes
of extreme violence.
CANADIAN FRENCH RATINGS CHART
E
G
8 ANS+
13ANS+
16ANS+
18ANS+
Exempt - Exempt programming.
General - Programming intended for audience of all ages. Contains no violence, or the
violence content is minimal or is depicted appropriately.
8+ General - Not recommended for young children. Programming intended for a broad
audience but contains light or occasional violence. Adult supervision recommended.
Programming may not be suitable for children under the age of 13 - Contains either a
few violent scenes or one or more sufficiently violent scenes to affect them. Adult
supervision strongly suggested.
Programming may not be suitable for children under the age of 16 - Contains frequent
scenes of violence or intense violence.
Programming restricted to adults. Contains constant violence or scenes of extreme
violence.
20
tc_26LX50_eng_2010.indd 20
2005/05/09 15:30:00
CLOSED CAPTION
This unit has a built in decoder that provides a visual depiction of the audio portion of a television program
in the form of written words across the screen (white or colored letters on a black background). It allows you
to read the dialogue of a television program or other information.
Notes:
• This feature is available only with the 480i input signal and with programs that include closed captions.
• The closed caption is not displayed when you set the aspect to “ZOOM” (see page 26).
1
Press the MENU button to display the MENU screen and select SET UP.
Press to select CLOSED CAPTION.
MENU
ADJUST
SET UP
LANGUAGE
PROGRAM CH
CH
OK
VOL
VOL
Press to display the CLOSED
CAPTION screen.
LOCK
CLOSED CAPTION
INPUT LABEL
CH
OTHER ADJUST
2
Press to select OFF, C1, C2, C3 or C4.
CLOSED CAPTION
OFF
MODE
• OFF (NO) : Recommended mode when Closed Caption is not being used.
• C1
: For video related information that can be displayed (up to 4 lines of script strategically placed on
the television screen so that it does not obstruct relevant parts of the picture).
• C2/C3/C4 : Other modes used for video related information.
INPUT LABEL
You can change the video input labels displayed on the screen to match the connected
device (VCR, DVD player, etc.).
1
Press the MENU button to display the MENU screen and select SET UP.
Press to select INPUT LABEL.
MENU
ADJUST
SET UP
LANGUAGE
PROGRAM CH
LOCK
Press to display the INPUT LABEL screen.
CH
OK
VOL
CLOSED CAPTION
INPUT LABEL
VOL
OTHER ADJUST
CH
Press to select the video input.
2
CH
OK
VOL
VOL
CH
Press to select the INPUT LABEL.
(COMPONENT1 / COMPONENT2 / HDMI /
VIDEO1 / VIDEO2 / VIDEO3 / VCR, LD,
GAME, DVD, DTV, [BLANK] and SKIP∗)
∗ Select to skip unused video input when
pressing TV/VIDEO button.
INPUT LABEL
COMPONENT1 COMPONENT1
COMPONENT2 COMPONENT2
HDMI
VIDEO1
HDMI
GAME
VIDEO2
DVD
VIDEO3
VIDEO3
21
tc_26LX50_eng_2010.indd 21
2005/07/15 17:14:14
OTHER ADJUST
1
Press the MENU button to display the MENU screen and select SET UP.
Press to select OTHER ADJUST.
Press to display the OTHER ADJUST
screen.
CH
OK
VOL
VOL
CH
MENU
ADJUST
SET UP
LANGUAGE
PROGRAM CH
LOCK
2
Press to select the item.
CLOSED CAPTION
INPUT LABEL
Press to select the setting.
CH
OK
VOL
OTHER ADJUST
VOL
CH
OTHER ADJUST PAGE 1/2
VIDEO NR
VIDEO NR
Reduce video noise in the picture.
OFF
ON
OFF ON
3D Y/C FILTER
MPEG NR
Noise unique to DVD, STB, etc. will be reduced.
OFF
OFF ON
MPEG NR
OFF ON
COLOR MATRIX
SD HD
ON
3D Y/C FILTER
Minimizes noise and cross color in the picture. Not available for
COMPONENT VIDEO INPUT.
OFF
ON
OTHER ADJUST PAGE 2/2
POWER SAVE
STANDARD
BLACK LEVEL
DARK
COLOR MATRIX
Displays input signals (480p signals) in natural color. Automatically adjusts
color parameters for HD (high definition) and SD (standard definition).
SD
HD
Note:
COLOR MATRIX is effective only when 480p signal is input in COMPONENT
input mode.
In any other case the indication of COLOR MATRIX becomes blue, and
changing between SD and HD is not possible.
POWER SAVE
Reduces screen brightness to lower power consumption. Eye-friendly for
viewing in a dark room.
STANDARD
SAVING
BLACK LEVEL
Select DARK or LIGHT depending on the picture conditions, when selecting
the video or component input.
The dark scene becomes easy to see.
DARK
LIGHT
Note:
Fixed to DARK when selecting TV mode.
22
tc_26LX50_eng_2010.indd 22
2005/05/09 15:30:01
PICTURE ADJUST
1
Press the MENU button to display the MENU screen and select ADJUST.
MENU
ADJUST
Press to select PICTURE ADJUST.
Press to display the PICTURE ADJUST screen.
CH
OK
VOL
SET UP
PICTURE
PICTURE ADJUST
POSITION / SIZE
VOL
AUDIO
CH
AUDIO ADJUST
2
Press to select the sub-menu.
CH
OK
VOL
VOL
CH
Adjust the setting while watching the picture
behind the menu.
Press to activate the setting if necessary.
NORMAL / NORMALIZE
Select “NORMALIZE” and press “OK” to return each PIC MODE to the factory
default setting.
Notes:
• “NORMAL” means the PIC MODE is at the factory default setting. “NORMAL”
changes to “NORMALIZE” when you change the setting of BACK LIGHT,
PICTURE, BRIGHTNESS, COLOR, TINT, SHARPNESS, AI PICTURE,
COLOR TEMP or COLOR ENHANCE.
• You can normalize each PIC MODE separately.
PICTURE ADJUST PAGE 1/2
NORMAL
PIC MODE
STANDARD
BACK LIGHT
+ 20
PICTURE
+ 20
BRIGHTNESS
0
COLOR
0
TINT
0
0
SHARPNESS
AI PICTURE
COOL
COLON
OFF
OFF
ON
PICTURE ADJUST PAGE 2/2
COLOR TEMP
NORMAL
COLOR ENHANCE
COOL
COLON
OFF
OFF
ON
PIC MODE
MODE
STANDARD
CINEMA
VIVID
AUTO
Function
Displays a standard image for average lighting conditions.
Ideal for watching movies in a dark room.
Displays a clear image with high contrast in a bright room.
Automatically senses the ambient light conditions and adjusts the brightness
and gradation accordingly, to optimize contrast.
PIC MODE is stored for TV, VIDEO1, VIDEO2, VIDEO3, COMPONENT1, COMPONENT2 and HDMI
individually.
BACK LIGHT, PICTURE, BRIGHTNESS, COLOR, TINT, SHARPNESS, AI PICTURE, COLOR TEMP, COLOR ENHANCE
You can change the level of each Item (BACK LIGHT, PICTURE, BRIGHTNESS, COLOR, TINT,
SHARPNESS, AI PICTURE, COLOR TEMP and COLOR ENHANCE) for each MODE (STANDARD,
CINEMA, VIVID and AUTO) according to your personal preference.
Function
Luminance of the back light is adjusted.
Selects proper contrast and density for the room.
Adjusts for easier viewing of dark pictures such as night scenes.
Adjusts the level of color.
Adjusts for flesh tone color (more green or more red).
Adjusts the degree of sharpness.
Controls dark areas without affecting the black level or brightness in the overall picture.
Increases or decreases WARM (red) and COOL (blue) colors to suit personal
COLOR TEMP
WARM
COOL
(Color temperature) preference. NORMAL
Sub-menu
BACK LIGHT
PICTURE
BRIGHTNESS
COLOR
TINT
SHARPNESS
AI PICTURE
COLOR ENHANCE
Enables automatic vivid color adjustment.
23
tc_26LX50_eng_2010.indd 23
2005/05/09 15:30:01
POSITION/SIZE
During “ZOOM” mode finely adjust the vertical position and the size of the screen.
1
Press the MENU button to display the MENU screen and select ADJUST.
Press to select POSITION/SIZE.
CH
SET UP
PICTURE
PICTURE ADJUST
OK
VOL
MENU
ADJUST
VOL
POSITION / SIZE
CH
AUDIO
AUDIO ADJUST
Press to display POSITION/SIZE screen.
POSITION/SIZE
NORMAL
NORMALIZE
SIZE
15
RETURN
POSITION
2
For “ZOOM” mode (see page 26)
ZOOM
• POSITION
CH
OK
VOL
VOL
Press to move the picture up or down.
• Press OK to return to the factory default
setting.
CH
• SIZE
ZOOM
Press to shrink the picture vertically
[by 15 steps: 15 (original setting) down
to 1].
• Press OK to return to the factory
default setting.
24
tc_26LX50_eng_2010.indd 24
2005/05/09 15:30:01
AUDIO ADJUST
1
Press the MENU button to display the MENU screen and select ADJUST.
Press to select AUDIO ADJUST.
CH
SET UP
PICTURE
PICTURE ADJUST
OK
VOL
MENU
ADJUST
VOL
POSITION / SIZE
CH
AUDIO
AUDIO ADJUST
Press to display the AUDIO ADJUST
screen.
AUDIO ADJUST
2
Press to select the sub-menu.
STANDARD
MODE
CH
OK
VOL
VOL
CH
PAGE 1/2
NORMAL
Select the setting while listening to the
sound.
BASS
– 2
TREBLE
+ 6
Press to activate the setting if necessary.
BALANCE
0
AI SOUND
SURROUND
NORMAL / NORMALIZE
Select “NORMALIZE” and press “OK” to return each MODE to the factory default
setting.
Notes:
• “NORMAL” means the MODE is at the factory default setting. “NORMAL”
changes to “NORMALIZE” when you change the setting of BASS, TREBLE,
BALANCE, AI SOUND, SURROUND or AUDIO LEVELER.
• You can normalize each MODE separately.
STEREO
OFF
OFF
ON
ON
OFF
ON
SAP
HDMI IN
MONO
DIGITAL
AUDIO ADJUST
PAGE 2/2
NORMAL
AUDIO LEVELER
0
MODE
STANDARD
DYNAMIC
SPEECH
Emits the original sound.
Gives contrast to sound.
Make voice sound clear.
BASS, TREBLE, BALANCE, AI SOUND,
SURROUND
You can change the level of each sub-menu (BASS,
TREBLE, BALANCE, AI SOUND, SURROUND) for
each MODE (STANDARD, DYNAMIC and SPEECH)
according to your personal preference.
BASS
TREBLE
BALANCE
AI SOUND
SURROUND
STEREO / SAP / MONO
• Red display
: With signal
White display
: No signal
White display (All modes) : MONO
• To change the mode using SAP button (see page 13).
HDMI IN
When using HDMI connection (see page 10), this
feature will let you switch between Analog Input
and Digital Input.
STEREO
SAP
MONO
AUTO
DIGITAL
ANALOG
Adjusts low frequencies.
Adjusts high frequencies.
Adjusts left and right volume.
Automatically adjusts sound
quality when ON is selected.
To enjoy a concert hall effect,
select ON when stereo is playing.
Two channel Audio reception.
Second Audio Programming
( typically used for bilingual audio ).
Select when stereo signal is weak.
Automatically selects Analog /
Digital signal.
Digital Input only.
Analog Input only.
AUDIO LEVELER
You can adjust the volume level for each of the input modes (TV, VIDEO1, VIDEO2, VIDEO3, COMPONENT1,
COMPONENT2 and HDMI).
25
tc_26LX50_eng_2010.indd 25
2005/05/09 15:30:01
ASPECT Controls
This feature allows you to enjoy viewing the picture at its maximum size, including wide screen cinema
format picture.
R-TUNE
PROG
Each time you press the button:
ASPECT
TV/VCR
0
JUST
REW
PLAY
FF
PAUSE
STOP
REC
ASPECT
TV/VCR
ZOOM
FULL
NORMAL
Notes:
• This feature does not work for 1080i and 720p input signals.
• The aspect setting is stored separately for TV, VIDEO1, VIDEO2,
VIDEO3, COMPONENT1, COMPONENT2 and HDMI.
VCR/DBS CH
TV
Mode
Picture
Explanation
4
NORMAL
NORMAL
3
4
JUST
JUST
3
4
ZOOM
JUST mode will display a 4:3 picture at
its maximum size but with aspect
correction applied to the sides of the
screen so that elongation is only
apparent at the left and right edges of
the screen. The size of the picture will
depend on the original signal.
ZOOM
ZOOM mode magnifies the central
section of the picture.
FULL
FULL will display the picture at its
maximum size but with slight elongation.
3
4
FULL
NORMAL mode will display a 4:3 picture
at its standard 4:3 size without any
stretching.
3
26
tc_26LX50_eng_2010.indd 26
2005/05/09 15:30:02
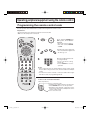
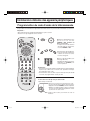
Operating peripheral equipment using the remote control
Programming the remote control code
You can operate other manufacturers’ components using this TV’s remote control.
Preparations:
• Connect the plug of the external component to the wall outlet.
• Make sure the component is turned off.
SAP
1
CH
OK
+
POWER
VOL
POWER
Press and hold POWER and
OK together, for at least 5
seconds.
• The mode selection buttons
flash, then release POWER
and OK.
VOL
CH
DBS/CB
VCR
L
TV
DV
D
CH
OK
2
VOL
DBS/CB
VCR
L
DV
TV
VOL
D
Select the type of the component.
• The selected button lights and
all others go out.
CH
RETURN
EXIT
MENU
TV/VIDEO
RECALL
1
MUTE
2
GUIDE
3
4
5
6
7
8
9
SLEEP
PROG
R-TUNE
0
REW
PLAY
FF
PAUSE
STOP
REC
ASPECT
TV/VCR
VCR/DBS CH
3
1
2
3
4
5
6
7
8
9
0
Enter the 3-digit infrared code
(see pages 28, 29).
• Factory default setting:
Panasonic
• Press POWER to test the
operation.
Notes:
• If the component does not operate with the remote control, repeat
the procedure using another code. (Some brands have multiple
codes).
• If an incorrect code is entered, or if the procedure takes longer
than 30 seconds, the programming will fail.
To find a code not listed in the index
After step 2 above,
TV
Press to select the code.
• A potential code is loaded for the device selected in step 2.
• Press POWER button to test the operation.
• Repeat the steps until the component code is
found. It may take many attempts before the
correct code is found.
Press to store the code.
27
tc_26LX50_eng_2010.indd 27
2005/05/09 15:30:02
Operating peripheral equipment using the remote control
Infrared Code Index
The Universal Remote Control is capable of operating many component brands after entering a code. Some
components may not operate because the codes are not available due to limited memory. The Universal
Remote Control does not control all features found in each model.
Write the code numbers from tables in this space. This will serve as a reference if you need to
program your Remote Control.
VCR
DBS
CABLE
DVD
Codes for VCR
VCR
Brand
Admiral
Aiwa
Akai
Audio Dynamic
Bell &Howell
Broksonic
Canon
Citizen
Craig
Curtis Mathes
Daewoo
DBX
Dimensia
Emerson
Fisher
Funai
GE
Goldstar
Gradiente
Hitachi
Instant Replay
Jensen
JVC
Kenwood
LXI
Magnavox
Marantz
Marta
Memorex
MGA
Minolta
Mitsubishi
Multitech
NEC
Olympic
Optimus
Code
335
332
314, 315, 316, 329
311, 339
305, 313
320, 326
323, 325
306
305, 306, 329
324, 345
301, 324, 343
310, 311, 339
345
303, 319, 320, 325, 326, 343
305, 307, 308, 309, 313
320, 326, 334
324, 333, 345
306
334
300, 323, 345
323, 324
339
310, 311, 334, 339
306, 310, 311, 339
300, 305, 306, 307, 308, 309
323, 324, 331
310, 311, 339
306
309, 324
338, 340, 341, 347, 348
300, 345
338, 340, 341, 347, 348
304, 347
310, 311, 334, 339
323, 324
306, 321, 328, 335
Brand
Orion
Panasonic
J.C.Penney
Code
320, 326
321, 322, 323, 324
300, 305, 310, 311, 324,
339, 345
Pentax
300, 311, 345
Philco
320, 323, 324, 326, 331, 343
Philips
323, 324, 331
Pioneer
323
Proscan
300, 301, 302, 323, 324,
331, 333, 345, 346
Quasar
321, 322, 323, 324
Radio Shack
305, 309, 324, 333, 336, 340
RCA
300, 301, 302, 323, 324,
331, 333, 345, 346
Realistic
305, 309, 324, 336, 340
Samsung
302, 304, 333
Sansui
320, 326, 339, 352
Sanyo
305, 309, 313
Scott
301, 302, 304, 309, 320,
326, 338, 340, 347, 348
Sears
300, 305, 306, 307, 308
Sharp
335, 336
Shintom
317
Signature 2000 335
Singer
317
Sony
328, 329, 330
Sylvania
323, 324, 331
Tashiro
306
Tatung
310, 311, 339
Teac
310, 311, 339
Technics
321, 322, 323, 324
Teknika
324
Toshiba
301, 346
Vector Research 311
Wards
306, 309, 335, 336, 344
Yamaha
305, 310, 311, 339
Zenith
306, 344
Codes for Personal Video Recorders
VCR
Brand
Panasonic Replay 100
Philips Tivo
101
Sony Tivo
102
Code
28
tc_26LX50_eng_2010.indd 28
2005/05/09 15:30:02
Operating peripheral equipment using the remote control
Codes for Cable Box
DBS/CB
L
Brand
ABC
Archer
Cableview
Citizen
Curtis
Diamond
Eagle
Eastern
GC Brand
Gemini
General
Instrument/
Jerrold
Hamlin
Code
224
225, 232
205, 232
205, 222
212, 213
224, 225, 232
229
234
205, 232
222
211, 219, 220, 221, 222,
223, 224, 225, 226, 227
212, 218, 240, 241, 242,
245
203, 224
203, 204, 205
233
230
205, 232
202, 237, 239
209, 210, 214
206, 207, 228, 229, 230
201, 216
205, 232
Hitachi
Macom
Magnavox
Memorex
Movietime
Oak
Panasonic
Philips
Pioneer
Pulsar
Brand
Puser
RCA
Realistic
Regal
Code
232
215
232
212, 218, 240, 241, 242,
245
Regency
234
Rembrandt
205, 232, 237
Samsung
205
Scientific Atlanta 211, 212, 213
Slmark
201, 205
Sprucer
205, 210
Stargate
205, 232
Teleview
201, 205
Texscan
244
Tocom
235
Toshiba
204
Unika
225, 232
Universal
222, 232
Videoway
206
Viewstar
229, 230
Zenith
200, 217
Zenith /Drake 200
Satellite
Codes for DBS
DBS/CB
L
Brand
Dish Network
Echo Star
(Echostar)
Express VU
G.E.
G.I.
(General Instrument)
Gradiente
Hitachi
HNS (Hughes)
Code
105, 115, 116
105
105, 115
106
108
114
103, 111, 112
103
Brand
Magnavox
Panasonic
Philips
Primestar
Proscan
RCA
Sony
Star Choice
Toshiba
Uniden
Code
101, 102
104
101, 102
108
106, 109, 110, 113
106, 109, 110, 113
107
103, 108
100
101, 102
Brand
Saba
Samsung
Sharp
Sony
Technics
Thomson
Toshiba
Yamaha
Zenith
101
110
108
104
100
101
103
100
107
Codes for DVD
DV
D
Brand
Denon
Ferguson
JVC
Mitsubishi
Nordmende
Panasonic
Philips
Pioneer
RCA
Code
100
101
109
105
101
100
103
102
101
Code
29
tc_26LX50_eng_2010.indd 29
2005/09/06 13:12:58
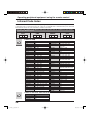
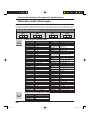
Operating peripheral equipment using the remote control
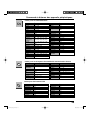
Mode Operational Key Chart
This chart defines which keys are operational after programming (if needed), while in the selected remote
control mode : DTV, CABLE, DBS, VCR, DVD ...etc.
KEY NAME
POWER
SAP
MUTE
TV/VIDEO
TV MODE
VCR MODE
CABLE MODE
DBS MODE
DVD MODE (DVD)
POWER
POWER
POWER
POWER
POWER
SAP ON/OFF
-
-
STB AUDIO TRACK
-
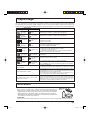
MUTE
TV MUTE
TV MUTE
STB MUTE
TV MUTE
TV INPUT SW
TV INPUT SW
TV INPUT SW
TV INPUT SW
TV INPUT SW
CHANNEL
UP/DOWN
TV CHANNEL
UP/DOWN
ACTION
TV ACTION
CABLECHANNEL STB NAVIGATION NEXT/PREVIOUS
CHAPTER
UP/DOWN
UP/DOWN
CH
OK
VOL
VOL
CH
VOL + / -
MENU
RECALL
RETURN
EXIT
GUIDE
1
2
3
4
5
6
7
8
9
ENTER
TV VOLUME +/- CABLE VOL +/-
STB ACTION
-
STB NAVIGATION
TV VOLUME +/RIGHT/LEFT
MENU
-
-
STB MENU
-
DISPLAY
ONSCREEN VCR
DISPLAY
-
EXIT
-
-
STB EXIT
-
-
-
-
STB GUIDE
-
Select Channel
Select Channel
Select Channel
Select Channel
-
PREVIOUS CHAN
OR VIDEO MODE
-
SLEEP
-
-
0
R-TUNE
SLEEP
PROG
REW
CABLE PREVIOUS STB PREVIOUS
-
-
STB PROGRAM/
DASH
-
VCR REW/FF
-
-
-
PLAY
-
-
PLAY
-
PAUSE
-
-
PAUSE
-
STOP
-
-
STOP
-
VCR RECORD
-
-
-
ASPECT
TV/VCR SWITCH
-
STB ASPECT
OPEN/CLOSE
-
VCR CHANNEL
UP/DOWN
-
PAGE UP/DOWN
SLOW +/-
FF
PLAY
PAUSE
STOP
SKIP SEARCH
<<REW/>>FF
REC
ASPECT
TV/VCR
VCR/DBS CH
30
tc_26LX50_eng_2010.indd 30
2005/05/09 15:30:03
Manual de instrucciones [Resumen]
Estimado cliente de Panasonic
Bienvenido a la familia de clientes de Panasonic.
Esperamos sinceramente que disfrute durante muchos años de su nuevo televisor LCD.
Para obtener el máximo beneficio de su aparato, lea estas instrucciones antes de hacer
cualquier ajuste, y guárdelas para poder utilizarlas como referencia en el futuro.
Guarde también el recibo de su compra, y anote el número del modelo y el número de
serie de su aparato en el espacio provisto en la cubierta posterior de estas instrucciones.
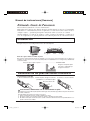
Instalación
Ajuste el soporte con el ángulo deseado
El ángulo del soporte se puede girar 20° hacia la derecha/izquierda.
POWER
OWER ON
R-STANDBY/P
Modo de colgar el televisor LCD en la pared
Este televisor LCD solamente puede ser utilizado con el accesorio opcional siguiente. Si se utiliza con
cualquier otro tipo de accesorio opcional podrá producir inestabilidad con la consiguiente posibilidad de
ocasionar heridas.
• Soporte para colgar en pared ........................................... TY-WK32LX20W
Asegúrese siempre de pedir
a un técnico cualificado que
le haga la instalación.
Instalación de las pilas del mando a distancia
Se necesitan dos pilas AA.
1. Abra la cubierta de las pilas. 2. Instale las pilas. Tenga en cuenta las
polaridades (+ y -) al instalar las pilas.
3. Vuelva a colocar la cubierta.
Dos pilas tamaño AA
Precauciones relacionadas con la utilización de las pilas
La instalación incorrecta de las pilas puede causar fugas en las mismas que podrían estropear el transmisor
de mando a distancia.
Las pilas deben desecharse por medios ecológicos.
1. Utilice siempre pilas nuevas cuando reemplace las viejas.
2. No intente cargar, cortocircuitar, desarmar, calentar o quemar las pilas usadas.
3. El cambio de las pilas resulta necesario cuando el mando a distancia funciona esporádicamente o no
puede controlar esta unidad.
31
tc_26LX50_eng_2010.indd 31
2005/05/09 15:30:03
Conexión
Nota:
Con este aparato no se suministran cables ni conectores.
Conexión de antena
Para recibir correctamente los canales de VHF/UHF se requiere una antena externa. Para obtener la mejor
recepción se recomienda utilizar una antena para exteriores. El modo de antena debe ajustarse a TV
(consulte la página 40, Selección del mode).
La parte posterior del televisor
Antena de VHF Antena de UHF
Terminal de antena
ANT
Conector de
antena tipo F
Cable coaxial
de 75 ohmios
Mezclador
Conexión del receptor de TV por cable
• Para recibir los canales de televisión por cable (01 - 125) conecte el cable suministrado por su compañía
de televisión por cable. El modo de antena debe ajustarse a CABLE (consulte la página 40, Selección del
mode).
• Ciertos sistemas de televisión por cable neutralizan algunos canales para reducir interferencias o tienen
canales especiales (codificados). Para recibir correctamente estos canales se necesita un sintonizador
de conversión de televisión por cable. Póngase en contacto con su compañía de televisión por cable para
conocer los requerimientos de compatibilidad.
• Ponga el canal del televisor en CH3 o CH4 utilice esta conexión.
Receptor de TV por cable
Cable entrante de 75
ohmios procedente
compañía de televisión por
cable
La parte posterior del televisor
OUTPUT
ANT
INPUT Receptor de TV por cable
Receptor de TV por cable y Videograbadora
La parte posterior del televisor
Cable entrante de 75 ohmios
procedente compañía de
televisión por cable
ANT
OUTPUT
INPUT
ANT OUTPUT ANT INPUT
Receptor de TV por cable
Videograbadora
32
tc_26LX50_eng_2010.indd 32
2005/05/09 15:30:03
Conexión
Conexión de otro equipo
Terminales de entrada traseros
La parte posterior del televisor
COMPONENT VIDEO OUT
Cable de vídeo componente
Y
Y
Reproductor de DVD
Caja sobre el Equipo
S-VIDEO
PB
VIDEO
PB
VIDEO
PR
PR
L
L
Audio
OUT
L
R
AUDIO
R
Videograbadora
Super-VHS
Cable de audio
1
2
COMPONENT VIDEO INPUT 1
INPUT
Cable de s-vídeo
VIDEOCAMARA
R
TO AUDIO
AMP
INPUT 2
PROG OUT
S-Video
OUT
Cable de vídeo
Video
OUT
CONSOLA DE
VIDEOJUEGOS
Cable de audio
R
Audio
OUT
L
Notas:
• Al conectar cables de vídeo se da prioridad al cable de S-vídeo cuando están conectados el terminal de
entrada S-VIDEO y el terminal de entrada VIDEO.
• Consulte a los fabricantes de los videojuegos acerca de los cables necesarios para conectar la consola
de videojuegos.
Terminales de salida traseros
El panel posterior
del televisor
Y
S-VIDEO
VIDEO
PB
VIDEO
PR
Cable de audio
L
L
Audio
IN
R
L
AUDIO
R
1
2
COMPONENT VIDEO INPUT 1
INPUT
INPUT 2
R
TO AUDIO
AMP
PROG OUT
33
tc_26LX50_eng_2010.indd 33
2005/05/09 15:30:03
Conexión
Conexión HDMI
HDMI∗1 (interfaz multimedia de alta definición) es la primera interfaz A/V para electrónica de consumidor
completamente digital que soporta todos los estándares no comprimidos. El terminal HDMI soporta información
de video y audio. Al terminal de entrada HDMI∗1 , usted puede conectar un dispositivo electrónico de consumidor
que cumpla con la norma EIA/CEA-861/861B∗2 como, por ejemplo, un decodificador o un reproductor DVD
con terminales de salida HDMI o DVI.
Introduzca en este terminal una fuente de imagen de alta definición con protección digital de copia con alto
ancho de banda (HDCP), para poder mostrar las imágenes de alta definición en este televisor en forma digital.
• Un cable de sonido debe ser conectado sólo cuando se usa un adaptador
de conversión HDMI para conectarse con el cable DVI.
• Si el dispositivo externo tiene una salida DVI solamente, utilice un cable
adaptador DVI a HDMI∗3 para conectar al terminal HDMI.
• Conecte los cables de audio a los terminales AUDIO IN para HDMI.
• Seleccione el ajuste de audio en HDMI In (vea la página 25).
L
R
Y
S-VIDEO
VIDEO
PB
VIDEO
Ejemplo de fuente de la señal de entrada HDMI
Reproductor de DVD
HDMI OUT
R
AUDIO
OUT
PR
HDMI AUDIO IN
L
AUDIO
R
L
Caja sobre el Equipo
Cable de audio
HDMI IN
Cable HDMI
Señal VIDEO compatible
720p
1080i
480p
480i
N° de puntos (H × V)
1,280 × 720p
1,920 × 1,080i
720 × 480p
640 × 480p
720 × 480i
AV IN
Frecuencia de exploración vertical (Hz)
59.94/60
59.94/60
59.94/60
59.94/60
59.94/60
Notas:
• Este terminal de entrada no es para utilización con ordenadores.
• Las señales 720p/1080i serán reformateadas para poderlas ver en la pantalla LCD.
Frecuencia de muestreo compatible de las señales AUDIO a través de HDMI (L.PCM): 48 kHz / 44,1 kHz / 32 kHz
Notas:
• Este conector HDMI es del Tipo A.
• Si conecta un equipo sin terminal de salida digital, conecte al terminal de entrada COMPONENT VIDEO, S
VIDEO o VIDEO del televisor para disfrutar de la señal analógica.
• El terminal HDMI IN sólo puede utilizarse con señales de imagen 720p, 1080i, 480i o 480p. Ajuste la salida del
terminal DIGITAL OUT de la caja digital sobre el aparato a 720p, 1080i, 480i o 480p. Para más detalles, consulte
el manual de instrucciones de la caja digital sobre el aparato. Si no aparecen imágenes porque su caja digital
sobre el aparato no tiene un ajuste de salida de terminal DIGITAL OUT, utilice la entrada de video componente (o
la entrada S Video o la entrada Video). En este caso la imagen aparecerá como una señal analógica.
∗1. HDMI, el símbolo HDMI y la Interface de Multimedios de Alta Definición son marcas comerciales o
marcas registradas de HDMI Licensing LLC.
∗2. Los perfiles EIA/CEA-861/861B cumplen con los perfiles para transmisión de video digital sin comprimir/
incluyendo la protección del contenido digital de alto ancho de banda.
∗3. Cable de conversión HDMI-DVI (TY-SCH03DH): disponible en el sitio Web de Panasonic (www.panasonic.com).
[para USA]
Consulte a su concesionario de productos electrónicos para conocer más detalles.
34
tc_26LX50_eng_2010.indd 34
2005/05/09 15:30:04
Conexión
Conexiones del panel frontal
Ejemplo de fuente de la señal
de entrada
CÁMARA DE VÍDEO
CONSOLA DE JUEGOS
Los cascos auriculares/
auriculares
(no suministrados)
R-STANDBY/POWER ON
L
AUDIO
OUT
R
VIDEO
OUT
POWER
Clavija M3
S-VIDEO
OUT
HPJ
S-VIDEO
L-AUDIO-R
VIDEO
INPUT 3
Cable de vídeo S
Cable de vídeo
Cable de audio
Notas:
• Al conectar cables de vídeo se da prioridad al cable de S-vídeo cuando están conectados el terminal de
entrada S-VIDEO y el terminal de entrada VIDEO.
• Consulte a los fabricantes de los videojuegos acerca de los cables necesarios para conectar la consola de
videojuegos.
35
tc_26LX50_eng_2010.indd 35
2005/05/09 15:30:04
Conexión / desconexión de la alimentación
Preparación
Conecte el enchufe al tomacorriente.
La parte posterior del
televisor
Nota:
El televisor consumirá algo de corriente siempre que el
enchufe del cable de alimentación esté introducido en
la toma de corriente.
CA 120 V, 60 Hz
Cable de alimentación
En el aparato principal
POWER
Interruptor
POWER
principal
R-STANDBY/POWER ON
POWER
PULL
Púlselo para conectar / desconectar la alimentación
principal del televisor.
• Indicador de la alimentación
Conectada
: Verde
Desconectada : Apagado
En el mando a distancia
R-STANDBY G-POWER ON
POWER
Sensor de mando Indicador de la
alimentación
a distancia
Sensor C.A.T.S.
El LCD C.A.T.S. (Contrast Automatic Tracking System =
Sistema de seguimiento automático del contraste)
detecta automáticamente las condiciones de la luz
ambiental y ajusta el brillo y la gradación en conformidad,
para optimizar el contraste. C.A.T.S. estará activado
cuando Modo de Imagen esté ajustado a Auto.
Púlselo para encender / apagar el televisor.
• Indicador de la alimentación
Encendido
: Verde
Apagado (En espera) : Rojo
• Esto no funciona cuando la alimentación principal
está desconectada (apagado) (consulte arriba).
Nota:
La pantalla de abajo se visualiza durante unos
momentos cuando se enciende el televisor.
ACERCAMIENTO
Canal
6
ESTEREO
SPA
MONO
SAP
POWER
TV
VCR
DBS/CB
L
DV
D
Nota:
Seleccione el idioma de menú antes de utilizar el
televisor (consulte la página 38, 39, Idioma).
36
tc_26LX50_eng_2010.indd 36
2005/05/09 15:30:04
Controles básicos
< Controles del lado superior >
Botón SAP
Selecciona el modo de audio.
POWER
ESTEREO
SPA
MONO
R-STANDBY G-POWER ON
TV/VIDEO
Botones de selección de modo
Satélite de emisión digital para el control remoto
Selección del modo de televisión por cable
para el control remoto
Selección del modo de Selección del modo de
videograbadora para el disco de vídeo digital
para el control remoto
control remoto
CH
– VOL +
Sensor de mando a
distancia
Dentro de unos 7 metros
enfrente del televisor.
Botón TV/VIDEO
Subida/bajada del volumen
Interruptor POWER principal
Púlselo para conectar/desconectar
la alimentación principal del
Canal superior/inferior
televisor (consulte la página 36)
Botón de la alimentación
Púlselo para encender o apagar el televisor.
Nota:
El cable de la alimentación del televisor deberá
enchufarse primero al tomacorriente, y el
televisor encenderse luego con el interruptor
CH
OK
POWER (modo de espera).
VOL
VOL
Botones de selección directa
CH
de números de programas
VCR
DBS/CBL
TV
SAP
DV
D
Selección del modo de televisor para el control remoto
POWER
DBS/CB
VCR
L
TV
DV
D
RETURN
EXIT
MENU
Botón R-TUNE
Cambia al canal o modo de vídeo anterior.
No resulta efectivo bajo las
condiciones siguientes:
1. Justo después de encender el
televisor.
2. Después de cambiar TV /
CATV(MODO en Prog.
Canales).
3. Justo después de la ejecución
de ACP (programación
automática de canales).
4. Cuando se selecciona el mismo
canal que el canal actual.
R-TUNE
CH
OK
TV/VIDEO
0
ASPECT
TV/VCR
30
60
RECALL
MUTE
GUIDE
1
2
3
4
5
6
7
8
9
SLEEP
PROG
R-TUNE
0
REW
PLAY
FF
PAUSE
STOP
REC
ASPECT
TV/VCR
VCR/DBS CH
TV
90
ACERCAMIENTO
VOL
MENU
RETURN
EXIT
Visualiza el menú
Presione para
P r e s i o n e p a r a volver MENU
acceder a los menús anterior o salir de
MENU.
DTV, DBS o DVD.
Cambia al siguiente canal inferior
Mueve el cursor hacia abajo
durante el modo del menú.
Púlselo para visualizar el menú del modo de
entrada. Mientras se visualiza el menú, púlselo
de nuevo para cambiar el modo de entrada.
El modo de entrada cambia cada vez que se
pulsa este botón.
Pulse este botón para silenciar el
sonido, y púlselo de nuevo para
cancelar el silenciamiento.
TV/VIDEO RECALL MUTE GUIDE
Botón ASPECT
Cambia el tamaño de la pantalla.
JUSTIFICADO
VOL
CH
Botón PROG raya / Botón
Temporizador de cancelado
Programa números de canales
para DTV y DBS.
SLEEP
PROG
Cambia al siguiente canal superior
Mueve el cursor hacia arriba durante el
modo del menú.
Reduce el volumen
Aumenta el volumen
Mueve el cursor
Mueve el cursor hacia
hacia la izquierda
la derecha durante el
durante el modo
modo del menú.
del menú.
COMPLETO
NORMAL
Botón GUIDE
para DBS
Púlselo para visualizar el estado actual del
sistema como, por ejemplo, el modo de
aspecto, el número del canal, el modo estéreo,
TV/VIDEO y el temporizador de apagado.
Funcionamiento de otro dispositivo
Botones
REW
FF
PLAY
PAUSE
STOP
Aparato
Reproducción
Pausa
CABLE/DBS
-
-
-
-
DVD
Búsqueda con salto en rebobinado / avance rápido
Reproducción
Pausa
Parada
ASPECT
TV/VCR
VCR/DBS CH
Videograbadora Rebobinado / avance rápido de videograbadora
Botones
REC
Parada
Aparato
Videograbadora
Grabación de videograbadora
CABLE/DBS
-
ASPECTO de STB
UP / DOWN de Página
DVD
-
Abertura/cierre
Lentamente / + / --
Conmutación de televisor / videograbadora Subida / bajada de canalpara videograbadora
37
tc_26LX50_eng_2010.indd 37
2005/05/09 15:30:05
%C8E46<BA8F6BA@8AYF
+bCJ<CFG8I8M@JL8C@Q8IC8
G8EK8CC8( )0
.+
+*2 -
( )0
ALJK<
FE=@>L
$D8><E
ALJK<$D8><E
+*./(\*
.FE@;F
( )0
ALJK<
.
'
1-
FE=@>L
1
/1
$D8><E
ALJK<$D8><E
ALJK<.FE@;F
F
( )0
ALJK<
+*./(\*
FE=@>L
.FE@;F
ALJK<.FE@;F
$;@FD8
,%"
+IF>8E8C<J
CFHL<F
.L9K_KLCFJ
- /0-)
3$/
*,,%
8D9@8<CDF;F;<<EKI8;8
T +LCJ<G8I8M@JL8C@Q8I<C
D<Eb;<J<C<::@aE;<<EKI8;8
/11$ * - ''
/1
FDGFE<EK<
FDGFE<EK<
#($
1@;<F
1@;<F
(0/
+FE>8/_KLCFJ
*KIFALJK<
"0$
( )0
ALJK<
FE=@>L
$D8><E
ALJK<$D8><E
+*./(\*
.FE@;F
ALJK<.FE@;F
1@;<F
T+LCJ<C8K<:C8;<EbD<IF
:FII<JGFE;@<EK<<E<C
D8E;F8;@JK8E:@8G8I8
J<C<::@FE8IC8<EKI8;8
;<JL<C<::@aE
$BG4
'8 <EKI8;8 ;< M _;<F
K8D9@^E J< GL<;<
J<C<::@FE8I GLCJ8E;F
/11$ *
GI@D<IFCL<>FCFJ
9FKFE<J #
P
=@E8CD<EK<C8K<:C8R*&U
( )0
ALJK<
FE=@>L
$;@FD8
+IF>8E8C<J
CFHL<F
H47EB78<AFGEH66<BA8F784LH748AC4AG4??4
L8E;FJ<M@JL8C@Q8LED<Eb<E<CK<C<M@JFI8G8I<:<LE:L8;IF;<
8PL;8<EC8G8EK8CC8 JK<:L8;IF;<8PL;8@E;@:8HL^K<:C8J;<C
D8E;F8;@JK8E:@8J<LK@C@Q8EG8I8E8M<>8IGFI<CD<EbDFJKI8;F
.L9K_KLCFJ
+FE>8/_KLCFJ
*KIFALJK<
$;@FD8
$;@FD8
.+\*'
($
10 '1
tc_26LX50_eng_2010.indd 38
2005/05/09 15:30:05
Operaciones con menús
Púlselo para seleccionar la pantalla MENU (Ajuste o Configu.).
CH
OK
VOL
VOL
Púlselo para seleccionar la función de menú secundario.
CH
Púlselo para visualizar la pantalla de menú secundario.
• Para volver a la pantalla anterior :
RETURN
EXIT
MENU
• Para salir de la pantalla MENU :
Con esto se retorna a la visión normal.
Ajuste Imagen PAGINA 1/2
Normal
Normal
Imagen
Luz de Atras
+ 20
CONTRASTE
+ 20
POS / TAMAÑO
Normal
Normalizar
TAMAÑO
15
Ajuste Sonido PAGINA 1/2
Normal
BAJOS
– 2
ALTOS
+ 6
BRILLO
0
COLOR
0
TINTE
0
NITIDEZ
0
ESTEREO
Si
Entr. HDMI
Imagen IA
No
VUELVE
Idioma
ESPAÑOL
Posicion
MODO
SON. ENVOL
No
Si
No
Si
SPA
MONO
Digital
Bloqueo
TV
CABLE
PROGRAMA AUTO
Seleccione el idioma del
menú.
0
BALANCE
SONIDO IA
Prog. Canales
Idioma
Normal
Sonido
PROGRAMA MANUAL
Programas:
Películas de EEUU
No
Activado
Si
Modificar
INGRESAR CLAVE
Subtítulos
Ponga Títulos
No
MODO
C2
C3
C1
C4
No
Otro Ajuste
Componente1 Componente1
PAGINA
1/2
REDUC DE RUIDO
Componente2 Componente2
No Si
HDMI
HDMI
Video1
Video1
REDUC DE RUIDO MPEG
No Si
Video2
Video2
Video3
Video3
3D Y/C Filtro
No Si
Matriz Color
SD HD
39
tc_26LX50_eng_2010.indd 39
2005/07/15 17:14:18
Sintonización de canales
1
2
MENU
Ajuste
Pulse el botón TV/VIDEO para visualizar el canal de TV.
Pulse el botón MENU para visualizar la pantanlla MENU y seleccione
Configu.
Pulse para seleccionar Prog.
Canales.
Pulse para visualizar la pantalla
OK
Prog. Canales.
CH
VOL
VOL
Configu.
Idioma
Prog. Canales
Bloqueo
Subtítulos
Ponga Títulos
Otro Ajuste
CH
Selección del mode
Pulse para seleccionar MODO.
3
Prog. Canales
TV
MODO
Pulse para seleccionar TV o CABLE.
CH
OK
VOL
CABLE
PROGRAMA AUTO
VOL
PROGRAMA MANUAL
CH
Programación automática de canales
Programación automática de canales
Explora y guarda automáticamente todos los canales de TV. Añada o borre un canal manualmente.
4
CH
OK
VOL
VOL
CH
Pulse para seleccionar
PROGRAMA AUTO.
Púlselo para visualizar la
pantalla PROGRAMA
AUTO.
4
CH
OK
VOL
VOL
CH
PROGRAMA AUTO
Prog. Canales
Activar
“PROGRAMA AUTO?”
Si
5
MODO
TV
CABLE
PROGRAMA AUTO
No
PROGRAMA MANUAL
Pulse para seleccionar
Si.
5
CH
OK
VOL
Púlselo para iniciar
PROGRAMA AUTO.
VOL
CH
Pulse para seleccionar
canal.
• También puede utilizar
los botones numerados.
PROGRAMA MANUAL
PROGRAMA AUTO
Entre Canal
121
En Programa Auto
Canal
Pulse para seleccionar
PROGRAMA MANUAL.
Pulse para visualizar la
pantalla PROGRAMA
MANUAL.
58
MENU
PARAR
Los canales avanzarán automáticamente hasta que todos ellos
hayan sido explorados. Los números de los canales con señal
de vídeo recibida se guardarán en la memoria de canales.
Notas:
• Cuando se pulse cualquier botón durante PROGRAMA
AUTO, el televisor volverá a mostrar la imagen normal.
(Los canales encontrados hasta ese punto se añaden.)
• Después de terminar PROGRAMA AUTO se
visualizará el número del canal más bajo añadido.
• Cuando no hay canal que puedan recibirse, se
visualizará el canal 69 (para TV) o el canal 125
(para TV por cable).
6
CH
OK
VOL
VOL
CH
Púlselo para añadir el canal
a la memoria de canales
(el número del canal se
pone de color azul).
Púlselo para borrar el
canal de la memoria de
canales (el número del
canal se pone amarillo).
• Repita los pasos 5 y 6 para otros canales.
40
tc_26LX50_eng_2010.indd 40
2005/05/09 15:30:08
Troubleshooting
If there is a problem with your TV please refer to the table below to determine the symptoms, then carry out the
suggested check. If this does not solve the problem, please contact your local Panasonic dealer, quoting the
model number and serial number (both found on the rear of the TV).
Picture
Symptoms
Sound
Checks
Antenna location, direction or connection.
Snowy Picture
Noisy Sound
Multiple Images
Normal Sound
Antenna location, direction or connection.
Interference
Normal Picture
No Picture
Noisy Sound
No Sound
No Sound
No Color
Normal Sound
Poor or Distorted Picture
Weak or No Sound
Electrical appliances.
Cars / Motorcycles.
Fluorescent lights.
Volume level.
Sound mute switched on.
STEREO/SAP/MONO
TV set to AV mode.
Not plugged into AC outlet.
Not switched on.
Picture / Sound controls set at minimum levels.
Check if in Standby mode.
Color controls set at minimum levels.
Weak signal.
Retune Channel(s).
Normal Picture
Weak, Wrong
or No Sound
Sound reception may have deteriorated.
Set STEREO/SAP/MONO setting (AUDIO ADJUST menu) to SAP or
MONO until reception improved.
Cannot operate with the remote control.
The battery/ies is/are exhausted.
The batteries’ polarity is wrong.
The remote control sensor is exposed to strong light from a fluorescent
lamp, etc.
The main unit is hot.
The main unit radiates heat and some of the parts may become hot.
This is not a problem for performance or quality.
Set up in a location with good ventilation.
Do not cover the ventilation holes of the TV with a tablecloth, etc., and
do not place on top of other equipment.
There may be red spots, blue spots, green
spots and black spots on the screen.
This is a characteristic of liquid crystal panels and is not a problem.
The liquid crystal panel is built with very high precision technology
giving you fine picture details. Occasionally, a few non-active pixels
may appear on the screen as fixed points of red, blue, green, or black.
Please note this does not affect the performance of your LCD.
41
tc_26LX50_eng_2010.indd 41
2005/05/09 15:30:09
Specifications
Power Source
Power Consumption
LCD
Screen Size
(W × H × diagonal)
Channel Capability
Sound
Speakers
Audio Output
Headphones
FEATURES
Operating Conditions
Connection Terminals
INPUT
COMPONENT
VIDEO INPUT
OUTPUT (PROGRAM OUT)
HDMI
Dimensions ( W × H × D )
Including TV Stand
TV Set Only
Mass (Weight)
TC-26LX50, TC-26LE55
AC 120 V, 60 Hz
Average use : 121 W
Maximum Current : 2.2 A
Stand-by condition : 0.1 W
1366 × 768 pixels widescreen LCD panel.
22.7 ″ ×12.8 ″ × 26 ″
(576 mm × 324 mm × 661 mm)
VHF-12 : UHF-56 : Cable-125
TC-32LX50
Average use : 147 W
Maximum Current : 2.6 A
Stand-by condition : 0.1 W
1366 × 768 pixels widescreen LCD panel.
27.5 ″ × 15.4 ″ × 31.5 ″
(698 mm × 392 mm × 800 mm)
ø8 cm × 2 pcs, ø5cm × 2 pcs
20 W [10 W + 10 W] (10%THD)
M3 (3.5 mm) Jack × 1
3D Y/C Digital Comb Filter, CLOSED CAPTION, V-Chip
Temperature : 41 °F - 95 °F (5 °C – 35 °C)
Humidity : 5 % - 90 % RH (non-condensing)
VIDEO (RCA PIN Type × 1) × 3
S-VIDEO (MINI DIN 4pin × 1) × 3
AUDIO L-R (RCA PIN Type × 2) × 3
Y×2
PB / PR × 2
AUDIO L-R (RCA PIN Type × 2) × 2
AUDIO L-R (RCA PIN Type × 2) × 1
HDMI TYPE A Connector × 1
AUDIO L-R (RCA PIN Type × 2) × 1
26.1 ″ × 21.9 ″ × 11.8 ″
(663 mm × 556 mm × 299.5 mm)
26.1 ″ × 19.5 ″ × 5.54 ″
(663 mm × 494.3 mm × 140.7 mm)
18 kg (39.6 lb.) NET
1.0 Vp-p (75 Ω)
Y : 1.0 Vp-p (75 Ω),
C : 0.286 Vp-p (75 Ω)
0.5 Vrms
1.0 Vp-p
(including synchronization)
±0.35 Vp-p
0.5 Vrms
0.5 Vrms, VIDEO (RCA PIN Type × 1) × 1
0.5 Vrms
31.3 ″ × 25 ″ × 11.8″
(795 mm × 634.7 mm × 299.5 mm)
31.3 ″ × 22.6 ″ × 5.54 ″
(795 mm × 573 mm × 140.7 mm)
21 kg (46.2 lb.) NET
Note:
Design and Specifications are subject to change without notice. Weight and Dimensions shown are approximate.
Maintenance
To clean this unit, wipe with a soft, dry cloth.
If the surfaces are extremely dirty, use a soft cloth dipped in a soap and
water solution or a weak detergent solution.
• Use eyeglass cleaner to remove stubborn dirt from the LCD.
• Never use alcohol, paint thinner or benzine to clean this unit.
• Before using a chemically treated cloth, carefully read the instructions that
came with the cloth.
Mild
detergent
CAUTION :
If water or other liquid enters the monitor through the display panel surface, a malfunction may occur.
42
tc_26LX50_eng_2010.indd 43
2005/05/09 15:30:09
Limited Warranty (for U.S.A.)
PANASONIC CONSUMER ELECTRONICS COMPANY,
DIVISION OF:
PANAWSONIC CORPORATION OF NORTH AMERICA
One Panasonic Way
Secaucus, New Jersey 07094
PANASONIC SALES COMPANY,
DIVISION OF:
PANASONIC PUERTO RICO, INC.
Ave. 65 de Infanteria, Km. 9.5
San Gabriel Industrial Park
Carolina, Puerto Rico 00985
Panasonic LCD Televisions
Limited Warranty
Limited Warranty Coverage
If your product does not work properly because of a defect in materials or workmanship, Panasonic
Consumer Electronics Company or Panasonic Sales Company (collectively referred to as “the warrantor”) will, for the length of the period indicated on the chart below, which starts with the date of original
purchase ("warranty period"), at its option either (a) repair your product with new or refurbished parts,
or (b) replace it with a new or a refurbished product. The decision to repair or replace will be made by
the warrantor.
LCD TV CATEGORIES
Up to 20’ (diagonal)
21” (diagonal) and larger
PARTS
1 (ONE) YEAR
LABOR
1 (ONE) YEAR
SERVICE
Carry-In or Mail-in
In Home or Carry-in / Mail in
During the "Labor" warranty period there will be no charge for labor. During the "Parts" warranty
period, there will be no charge for parts. You must carry-in or mail-in your product during the warranty
period. If non-rechargeable batteries are included, they are not warranted. This warranty only applies
to products purchased and serviced in the United States or Puerto Rico. This warranty is extended
only to the original purchaser of a new product which was not sold "as is". A purchase receipt or other
proof of the original purchase date is required for warranty service.
In-Home or Carry-in Service
For In-Home or Carry-In Service in the United States call 1-800-211-PANA(7262) or visit the Panasonic web Site: http://www.panasonic.com.
For assistance in Puerto Rico call Panasonic Sales Company (787)-750-4300 or fax (787)-768-2910.
In-Home service requires clear, complete and easy access to the product by the authorized servicer
and does not include removal or re-installation of an installed product. It is possible that certain inhome repairs will not be completed in-home, but will require that the product, or parts of the product,
be removed for shop diagnosis and/or repair and then returned.
Limited Warranty continued on next page
43
Limited Warranty (for U.S.A.)
Limited Warranty continued from previous page
Limited Warranty Limits And Exclusions
This warranty ONLY COVERS failures due to defects in materials or workmanship, and DOES NOT
COVER normal wear and tear or cosmetic damage, nor does it cover markings or retained images on
the LCD panel resulting from viewing fixed images (including, among other things, letterbox pictures
on standard 4:3 screen TV’s, or non-expanded standard 4:3 pictures on wide screen TV’s, or onscreen
data in a stationary and fixed location). The warranty ALSO DOES NOT COVER damages which
occurred in shipment, or failures which are caused by products not supplied by the warrantor, or failures which result from accidents, misuse, abuse, neglect, mishandling, misapplication, alteration,
faulty installation, set-up adjustments, misadjustment of consumer controls, improper maintenance,
power line surge, lightning damage, modification, or commercial use (such as in a hotel, office, restaurant, or other business), rental use of the product, service by anyone other than a Factory
Servicenter or other Authorized Servicer, or damage that is attributable to acts of God.
THERE ARE NO EXPRESS WARRANTIES EXCEPT AS LISTED UNDER "LIMITED WARRANTY
COVERAGE". THE WARRANTOR IS NOT LIABLE FOR INCIDENTAL OR CONSEQUENTIAL
DAMAGES RESULTING FROM THE USE OF THIS PRODUCT, OR ARISING OUT OF ANY
BREACH OF THIS WARRANTY. (As examples, this excludes damages for lost time, cost of having
someone remove or re-install an installed unit if applicable, or travel to and from the servicer. The
items listed are not exclusive, but are for illustration only.) ALL EXPRESS AND IMPLIED WARRANTIES, INCLUDING THE WARRANTY OF MERCHANTABILITY, ARE LIMITED TO THE PERIOD OF
THE LIMITED WARRANTY.
Some states do not allow the exclusion or limitation of incidental or consequential damages, or limitations on how long an implied warranty lasts, so the exclusions may not apply to you.
This warranty gives you specific legal rights and you may also have others rights which vary from state
to state. If a problem with this product develops during or after the warranty period, you may contact
your dealer or Servicenter. If the problem is not handled to your satisfaction, then write to the warrantor's Consumer Affairs Department at the addresses listed for the warrantor.
PARTS AND SERVICE (INCLUDING COST OF AN IN-HOME SERVICE CALL, WHERE
APPLICABLE) WHICH ARE NOT COVERED BY THIS LIMITED WARRANTY ARE YOUR
RESPONSIBILITY.
44
CUSTOMER SERVICES DIRECTORY (for U.S.A.)
Customer Services Directory
Obtain Product Information and Operating Assistance; locate your nearest
Dealer or Servicenter; purchase Parts and Accessories; or make Customer
Service and Literature requests by visiting our Web Site at:
http://www.panasonic.com/consumersupport
or, contact us via the web at:
http://www.panasonic.com/contactinfo
You may also contact us directly at:
1-800-211-PANA (7262)
Monday-Friday 9 am-9 pm; Saturday-Sunday 10 am-7 pm, EST.
For hearing or speech impaired TTY users, TTY : 1-877-833-8855
Accessory Purchases
Purchase Parts, Accessories and Instruction Books on line for all Panasonic
Products by visiting our Web Site at:
http://www.pasc.panasonic.com
or, send your request by E-mail to:
[email protected]
You may also contact us directly at:
1-800-332-5368 (Phone) 1-800-237-9080 (Fax Only) (Monday - Friday 9 am to 8
pm, EST.)
Panasonic Services Company
20421 84th Avenue South,
Kent, WA 98032
(We Accept Visa, MasterCard, Discover Card, American Express, and Personal
Checks)
For hearing or speech impaired TTY users, TTY : 1-866-605-1277
Service in Puerto Rico
Panasonic Puerto Rico, Inc.
Ave. 65 de Infantería, Km. 9.5, San Gabriel Industrial Park,
Carolina, Puerto Rico 00985
Phone (787)750-4300, Fax (787)768-2910
45
en.indd 42
2005/04/21 15:53:29
Limited Warranty (for Canada)
Panasonic Canada Inc.
PANASONIC PRODUCT - LIMITED WARRANTY
Panasonic Canada Inc. warrants this product to be free from defects in material and workmanship and agrees to remedy
any such defect for a period as stated below from the date of original purchase.
Plasma TV / Monitor
In-home service
One (1) year, parts (including Plasma Panel) and labour.
LCD TV (26 in & over)
In-home service
One (1) year, parts (including LCD Panel) and labour.
LCD TV (25 in & under)
Carry-in service only
One (1) year, parts (including LCD Panel) and labour.
LCD Projector
Carry-in service only
One (1) year, parts (lamp ninety (90) days) and labour.
Accessories
Ninety (90) days (parts only)
In-home Service will be carried out only to locations accessible by roads and within 50 km of an authorized Panasonic
service facility.
LIMITATIONS AND EXCLUSIONS
This warranty does not apply to products purchased outside Canada or to any product which has been improperly installed,
subjected to usage for which the product was not designed, misused or abused, damaged during shipping, or which has
been altered or repaired in any way that affects the reliability or detracts from the performance, nor does it cover any
product which is used commercially. Dry cell batteries are also excluded from coverage under this warranty.
This warranty is extended to the original end user purchaser only. A purchase receipt or other proof of date of original
purchase is required before warranty service is performed.
THIS EXPRESS, LIMITED WARRANTY IS IN LIEU OF ALL OTHER WARRANTIES, EXPRESS OR IMPLIED,
INCLUDING ANY IMPLIED WARRANTIES OF MERCHANTABILITY AND FITNESS FOR A PARTICULAR PURPOSE.
IN NO EVENT WILL PANASONIC CANADA INC. BE LIABLE FOR ANY SPECIAL, INDIRECT OR CONSEQUENTIAL
DAMAGES.
In certain instances, some jurisdictions do not allow the exclusion or limitation of incidental or consequential damages, or
the exclusion of implied warranties, so the above limitations and exclusions may not be applicable.
WARRANTY SERVICE
For product operation and information assistance, please contact:
Our Customer Care Centre:
Telephone #:
(905) 624-5505
1-800 #:
1-800-561-5505
Fax #:
(905) 238-2360
Email link:
“Contact Us” on www.panasonic.ca
FOR PRODUCT REPAIRS, please locate your nearest Authorized Servicentre at www.panasonic.ca :
Link: “Servicentres™ locator” under “Customer support”
Panasonic Factory Service:
Vancouver
Mississauga, Ontario
Panasonic Canada Inc.
12111 Riverside Way
Richmond, BC V6W 1K8
Tel: (604) 278-4211
Fax: (604) 278-5627
Panasonic Canada Inc.
5770 Ambler Dr.
Mississauga, ON L4W 2T3
Tel: (905) 624-8447
Fax: (905) 238-2418
IF YOU SHIP THE PRODUCT TO A SERVICENTRE
Carefully pack and send prepaid, adequately insured and preferably in the original carton.
Include details of the defect claimed, and proof of date of original purchase.
46
Notes
47
Customer’s Record
The model number and serial number of this product can be found on its rear panel. You should
note this serial number in the space provided below and retain this book, plus your purchase
receipt, as a permanent record of your purchase to aid in identification in the event of theft or loss,
and for Warranty Service purposes.
Model Number
Panasonic Consumer Electronics
Company, Division of Panasonic
Corporation of North America
One Panasonic Way Secaucus
New Jersey 07094
Serial Number
Panasonic Puerto Rico Inc.
Ave. 65 de Infanteria, Km 9.5
San Gabriel Industrial Park,
Carolina, Puerto Rico 00985
2005 Panasonic Corporation of North America.
en.indd 44
All Rights Reserved.
Panasonic Canada Inc.
5770 Ambler Drive
Mississauga, Ontario
L4W 2T3
Printed in U.S.A.
2005/04/21 15:53:30
Mode d’emploi
SAP
POWER
DBS/CBL
VCR
TV
DV
D
CH
OK
VOL
VOL
CH
RETURN
EXIT
MENU
TV/VIDEO
RECALL
1
R-STANDBY/POWER ON
4
POWER
7
MUTE
2
5
8
GUIDE
Téléviseur à cristaux liquides
3
6
9
SLEEP
PROG
R-TUNE
0
PULL
REW
PLAY
FF
PAUSE
STOP
REC
ASPECT
TV/VCR
VCR/DBS CH
TV
Modèles
TC-26LX50
TC-32LX50
POWER
R ON
R-STANDBY/POWE
L’image à l’écran du téléviseur est simulée.
Pour bénéficier d’une assistance, appelez le : 1-800-211-PANA (7262)
ou bien consultez notre site www.panasonic.com/contactinfo
(États-Unis)
Pour bénéficier d’une assistance, appelez le : 787-750-4300
ou bien consultez notre site www.panasonic.com
(Porto Rico)
Pour bénéficier d’une assistance, appelez le : 1-800-561-5505
ou bien consultez notre site www.panasonic.ca
(Canada)
Avant d’effectuer quelque raccordement que ce soit ou de régler l’appareil, veuillez lire attentivement et
complètement ce mode d’emploi. Conservez-le à titre de référence.
Français
fr.indd 1
TQB2AA0541-2
2005/04/21 15:57:45
Consignes de sécurité
ATTENTION
RISQUE DE CHOC ÉLECTRIQUE
NE PAS OUVRIR
L’éclair avec la flèche dessiné à
l’intérieur d’un triangle avertit
l’utilisateur que les éléments internes
au produit présentent un risque de
choc électrique.
Le point d’exclamation dessiné à
l’intérieur d’un triangle avertit l’utilisateur
que d’importantes instructions de
fonctionnement et d’entretien sont
fournies avec l’appareil.
■ Conseils pour l’installateur du système de câblodistribution:
Il est recommandé de
consulter le Code canadien de l’électricité en ce qui a trait à la mise à la terre du fil de câblodistribution. Ce code spécifie que
le fil doit être relié au système de mise à la terre de l’édifice, le plus près possible du point d’entrée.
■ Ventilation sûre
Les fentes et les ouvertures situées à l’arrière ou en dessous du téléviseur sont prévues pour assurer sa ventilation, et
garantir ainsi son bon fonctionnement en évitant toute surchauffe. Ces ouvertures ne doivent pas être recouvertes ou
obstruées. Ménagez au moins un espace de 10 cm autour de ces ouvertures. Ainsi, ne posez jamais l’appareil sur un lit,
un canapé, un tapis ou toute autre surface qui risquerait de gêner la ventilation. Ce téléviseur DCL ne doit pas être
encastré dans un meuble, à moins de prévoir une ventilation adéquate.
■ Précautions de sécurité importantes
1)
2)
3)
4)
5)
6)
7)
8)
9)
10)
11)
12)
13)
14)
15)
16)
17)
Lisez ces instructions.
Conservez ces instructions en lieu sûr.
Respectez toutes les consignes de sécurité.
Suivez toutes les instructions fournies.
N’utilisez pas ce téléviseur à proximité d’une source d’eau.
Ne nettoyez cet appareil qu’avec un chiffon sec.
N’obstruez pas les évents de ventilation de l’appareil. Installez-le en respectant les instructions du fabricant.
N’installez pas le téléviseur DCL près d’une source de chaleur, par exemple un radiateur, un réchaud ou tout autre
appareil (y compris des amplificateurs) produisant de la chaleur.
N’invalidez pas les caractéristiques de sécurité de la fiche polarisée ou avec mise à la terre. Une fiche polarisée
possède deux lames dont une est plus large que l’autre. Une fiche avec mise à la terre possède deux lames plus une
troisième lame pour la mise à la terre. La lame large ou la lame de mise à la terre sont conçues pour des raisons de
sécurité. Si la fiche fournie ne peut pas être branchée dans votre prise secteur, consultez un électricien pour faire
remplacer la prise.
Faites en sorte que personne ne puisse marcher sur le cordon d’alimentation ou le plier, tout particulièrement à ses
deux extrémités.
Utilisez uniquement les accessoires prévus par le fabricant.
Ne placez l’appareil que sur la table, le trépied ou le support spécifié par le fabricant ou fourni avec
l’appareil. Si vous utilisez une table roulante, veillez, lorsque vous déplacez l’ensemble, à éviter tout
basculement qui pourrait entraîner des blessures corporelles.
Débranchez l’appareil pendant les orages ou lorsque vous ne comptez pas vous en servir pendant une
période prolongée.
Pour toute intervention, adressez-vous à un technicien qualifié. Une intervention est nécessaire lorsque l’appareil a
été endommagé, par exemple en cas de rupture du cordon secteur ou de sa fiche, lorsque du liquide s’est répandu
sur le téléviseur ou qu’un objet est tombé à l’intérieur, lorsque l’appareil a été exposé à la pluie ou à l’humidité, quand
il ne fonctionne pas normalement ou quand il est tombé.
N’alimentez l’appareil que par une source électrique conforme aux indications apposées sur l’étiquette de l’appareil.
Si vous avez des doutes sur les caractéristiques de votre courant domestique, consultez votre installateur de télévision
ou votre fournisseur d’électricité.
Respectez toutes les instructions et consignes de sécurité figurant sur le téléviseur DCL.
N’introduisez aucun objet par les ouvertures du téléviseur DCL ; ils pourraient entrer en contact avec des composants
sous tension élevée ou provoquer un court-circuit susceptible d’entraîner un incendie ou une décharge électrique.
Ne répandez jamais de liquide sur le téléviseur DCL.
2
fr.indd 2
2005/04/21 15:57:45
Consignes de sécurité
18) Si une antenne extérieure est reliée à ce téléviseur, Exemple de mise à la terre de
assurez-vous que celle-ci a été mise à la terre afin de l’antenne recommandé par le code
protéger l’appareil contre les surtensions et canadien de l’électricité
l’accumulation d’électricité statique. La partie 1 du Code
canadien de l’électricité contient des informations
Fil de descente
concernant la mise à la terre des mâts d’antenne et de
Collier de mise
leurs structures, celle du fil de descente, le calibre du
à la terre
fil de descente requis et les exigences concernant la
Parafoudre
tige de la mise à la terre.
(partie 1 du code
19) Un système d’antenne extérieur ne doit jamais se situer
canadien de l’électricité)
Service
d’entrée
à proximité de lignes électriques aériennes ou de tout
électrique
Fils de terre (partie 1 du code
autre circuit d’éclairage ou circuit électrique, ni à un
canadien de l’électricité)
endroit où il risque d’en être trop près. Lors de
Sangles de mise à la terre
l’installation d’un système d’antenne extérieur, prenez
Système de mise à la terre du
bien soin de ne pas toucher ces lignes ou ces circuits
réseau électrique
électriques, car le moindre contact peut être fatal.
(code canadien de l’électricité)
20) Débranchez le téléviseur DCL de la prise murale et demandez les services d’un technicien qualifié dans les cas suivants:
a . Quand le cordon d’alimentation ou sa fiche sont endommagés ou usés.
b . Si du liquide s’est renversé sur le téléviseur DCL.
c . Si le téléviseur DCL a été en contact avec la pluie ou l’eau.
d . Si le téléviseur DCL ne fonctionne pas normalement alors que vous respectez son mode d’emploi.
Réglez uniquement les paramètres décrits dans le mode d’emploi, car des réglages incorrects d’autres paramètres
risquent de provoquer des dommages et de demander davantage de travail à un technicien qualifié pour une remise
en état du téléviseur DCL.
e . Si le téléviseur DCL est tombé ou si son coffret a été endommagé.
f . Lorsque le téléviseur DCL subit un changement notable au niveau des performances (cela indique qu’il faut le
réparer).
21) Lorsqu’il faut remplacer des pièces, assurez-vous que le technicien utilise les pièces préconisées par le fabricant, avec
les mêmes caractéristiques que celles d’origine. Un remplacement non conforme risque de causer un incendie, un choc
électrique ou tout autre dommage.
22) AVERTISSEMENT: POUR RÉDUIRE LES RISQUES D’INCENDIE ET DE DÉCHARGE ÉLECTRIQUE, N’EXPOSEZ
PAS CET APPAREIL À L’HUMIDITÉ OU À LA PLUIE.
NE PLACEZ AUCUN RÉCIPIENT CONTENANT DE L’EAU (VASE DE FLEUR, TASSE,
BOUTEILLE DE PRODUIT DE BEAUTÉ, ETC.) SUR L’ APPAREIL (OU SUR UNE ÉTAGÈRE
LE DOMINANT).
23) AVERTISSEMENT: LES PETITES PIÈCES PEUVENT PRÉSENTER DES DANGERS D’ÉTOUFFEMENTS SI ELLES
SONT AVALÉES PAR ACCIDENT. GARDEZ LES PETITES PIÈCES HORS DE LA PORTÉE
DES ENFANTS.
JETEZ LES PETITES PIÈCES INUTILES, AINSI QUE LES AUTRES OBJETS INUTILES, Y
COMPRIS LES MATÉRIAUX D’EMBALLAGE ET LES SACS/FEUILLES EN PLASTIQUE, AFIN
D’ÉVITER QUE DES ENFANTS JOUENT AVEC, CRÉANT UN RISQUE POTENTIEL DE
SUFFOCATION.
24) ATTENTION : POUR ÉVITER LES CHOCS ÉLECTRIQUES, N’UTILISEZ PAS CETTE FICHE POLARISÉE DANS
UNE PRISE OÙ ELLE NE PEUT ÊTRE INSÉRÉE COMPLÈTEMENT.
25) ATTENTION : UTILISATION AVEC UN AUTRE SUPPORT QUE CELUI FOURNI OU RECOMMANDÉ PEUT RENDRE
L’ENSEMBLE INSTABLE ET ÊTRE CAUSE DE BLESSURES CORPORELLES.
26) ATTENTION : IL EXISTE UN RISQUE D’EXPLOSION EN CAS D’UTILISATION DE PILES NON CONFORMES. NE
REMPLACEZ LES PILES QUE PAR DES PILES IDENTIQUES OU DE TYPE ÉQUIVALENT.
REMARQUE:
équipement est conçu pour être utilisé en Amérique du Nord et dans tout pays où le
• Cet
système de télévision et le courant alternatif domestique sont exactement les mêmes qu’en
Amérique du Nord.
■ Ce produit utilise des soudures à l’étain-plomb et une lampe fluorescente contenant une petite quantité de mercure. Le
rejet de ces matières peut être soumis à restrictions dans votre région en raison de considérations environnementales.
Pour plus d’informations sur le rejet ou le recyclage, contactez votre administration publique locale.
3
fr.indd 3
2005/04/21 15:57:46
Cher client de Panasonic
Bienvenue dans la grande famille des clients de Panasonic.
Nous espérons que vous serez enchanté pendant de nombreuses années par votre
nouveau téléviseur à cristaux liquides.
Pour tirer le meilleur parti de votre appareil, veuillez lire ce mode d’emploi
avant d’entreprendre tout réglage et conservez-le en lieu sûr au cas où vous en
auriez de nouveau besoin.
Conservez également la facture de votre achat et inscrivez la référence du modèle
et son numéro de série dans l’emplacement réservé à cet effet sur la couverture
arrière de ce mode d’emploi.
Pour bénéficier d’une assistance, appelez le : 1-800-211-PANA (7262)
ou bien consultez notre site www.panasonic.com/contactinfo
(États-Unis)
Pour bénéficier d’une assistance, appelez le : 787-750-4300
ou bien consultez notre site www.panasonic.com
(Porto Rico)
Pour bénéficier d’une assistance, appelez le : 1-800-561-5505
ou bien consultez notre site www.panasonic.ca
(Canada)
Informations fournies par la Commission fédérale des communications américaine (FCC)
Cet équipement est conforme aux limites relatives aux récepteurs de télévision définies à la section 15 de
la réglementation de la FCC. Ces limites ont été instaurées pour fournir une protection raisonnable contre
toutes interférences nuisibles en milieu résidentiel. Cet équipement génère, utilise et peut émettre de l’énergie
radioélectrique et, s’il n’est pas installé et utilisé conformément aux instructions du constructeur, il peut
perturber la réception radio. Si cet équipement devait causer des interférences ou en être victime, ce qui
peut être vérifié en l’éteignant puis en le remettant sous tension, l’utilisateur est invité à essayer de remédier
au problème en prenant les mesures suivantes:
Réorienter ou déplacer l’antenne réceptrice.
Augmenter la distance qui sépare le téléviseur d’autres appareils électriques.
Raccorder le téléviseur à une prise de courant se trouvant sur un circuit différent de celui utilisé par
d’autres équipements.
Consulter votre revendeur ou demander l’aide d’un technicien radio/TV expérimenté.
Avertissement de la FCC: Les changements ou modifications réalisés sans accord écrit de l’entité
responsable de la conformité du produit peuvent entraîner pour l’utilisateur une
interdiction d’utiliser cet équipement.
La marque d’agrément ENERGY STAR , un symbole de reconnaissance de l’efficacité
énergétique, a été créée par l’agence américaine de protection de l’environnement (EPA) et le
ministère de l’Énergie des États-Unis pour aider les consommateurs à identifier les produits
susceptibles de leur permettre de faire des économies et de protéger l’environnement par leur
rendement énergétique élevé. Les appareils conformes aux normes ENERGY STAR
consomment, en général, moins d’énergie que les modèles ordinaires semblables.
HDMI, le logo HDMI et High-Definition Multimedia Interface sont des
marques de commerce ou des marques déposées de HDMI Licensing
LLC.
4
fr.indd 4
2005/04/21 15:57:47
Table des matières
Consignes de sécurité .......................................... 2
ACCESSOIRES FOURNIS ..................................... 5
Installation des piles de la télecommande ........... 6
Retrait du socle du téléviseur .............................. 6
Installation ............................................................. 7
Comment utiliser l’adaptateur de montage mural .... 7
Raccordements ..................................................... 8
Raccordement de l’antenne ................................. 8
Raccordement d’un câblosélecteur ..................... 8
Raccordement d’autres appareils ........................ 9
Raccordement au panneau avant ..................... 11
Mise sous tension et hors tension .................... 12
Commandes de base .......................................... 13
Fonctionnement du menu .................................. 14
Accord des canaux ............................................. 16
VERROUILLAGE .................................................. 17
SOUS-TITRES ...................................................... 21
IDENTIF. PRISES ................................................. 21
AUTRES RÉGL. ................................................... 22
RÉGLAGES VIDÉO .............................................. 23
POSIT./FORMAT ................................................... 24
RÉGLAGES AUDIO ............................................. 25
Sélection de formats ........................................... 26
Commande à distance des appareils
périphériques ................................................... 27
Programmation du code d’accès de
la télécommande ............................................ 27
Table des codes infrarouges .............................. 28
Tableau de fonctionnement des touches ........... 30
Dépannage ........................................................... 31
Entretien ............................................................... 31
Spécifications ..................................................... 32
Garantie limitée ................................................... 33
ACCESSOIRES FOURNIS
Contrôlez la présence des accessoires avant l’installation.
• Mode d’emploi
• Télécommande
(EUR7613ZE0)
• Piles pour la
télécommande
(format AA × 2)
• Connecteur d’antenne de type F
(pour 4C-2V) ( × 1)
5
fr.indd 5
2005/04/21 15:57:47
ACCESSOIRES FOURNIS
Installation des piles de la télécommande
Deux piles AA sont nécessaires.
1. Ouvrez le couvercle du
logement des piles.
2. Insérez les piles. Respectez la
polarité (+ et -).
3. Remettez le couvercle en place.
Deux piles AA
Précautions d’emploi des piles
Une installation incorrecte des piles peut entraîner une fuite de celles-ci et une corrosion qui peut endommager
la télécommande.
La mise au rebut des piles doit se faire en respectant l’environnement.
1. Utilisez toujours des piles neuves en remplacement de piles usées.
2. N’essayez pas de recharger, de court-circuiter, de démonter, de chauffer ou de brûler des piles usées.
3. Il est nécessaire de changer les piles lorsque le fonctionnement de la télécommande est sporadique ou
lorsqu’elle n’agit plus du tout sur l’appareil.
Remarques:
• Ne faites pas tomber la télécommande, ne la soumettez pas à des chocs ni ne marchez dessus.
• Ne renversez pas de l’eau sur la télécommande.
• Ne placez pas d’objet entre la télécommande et le capteur de télécommande.
• N’utilisez pas la télécommande d’autres appareils en même temps.
• Si le téléviseur ne répond pas correctement à la télécommande même lorsque vous l’utilisez à une distance proche,
c’est qu’il est temps de remplacer les piles.
Retrait du socle du téléviseur
Suivez les instructions ci-dessous dans l’éventualité où il deviendrait nécessaire de retirer le socle pour
fixer le téléviseur à un mur.
1
Placez le téléviseur face endessous sur une surface en
mousse ou un linge doux
épais de manière à prévenir
tout dommage au panneau.
4
Avec précaution, retirez le socle.
5
Remettez le couvercle des câbles.
(Voir page 7).
Tapis de mousse ou
linge doux épais
2
Retirez le couvercle des câbles. (Voir page 7).
3
Retirez les vis (aux quatre emplacements).
6
fr.indd 6
2005/04/21 15:57:48
Installation
Choix de l’emplacement du téléviseur
Placez l’appareil de façon optimale pour le confort des spectateurs. Placez le téléviseur de telle sorte que la
lumière du soleil ou une autre lumière forte (y compris la lumière réfléchie) ne frappe pas l’écran.
La présence de certains éclairages de type fluorescent peut réduire la portée de la télécommande.
Il est important que le lieu soit correctement ventilé pour prévenir toute surchauffe des composants internes
de l’appareil. Ne placez pas l’appareil dans un local trop chaud ou trop humide.
Comment utiliser le socle pour le
téléviseur à cristaux liquides
Ajustez le socle sur l’angle souhaité.
L’angle d’inclinaison du socle de l’écran peut être
pivoté latéralement sur une plage de 0° à 20°.
POWER
ER ON
R-STANDBY/POW
Retrait et réinstallation du couvercle des câbles
Retrait
1. Appuyez sur les taquets et
tirez légèrement le couvercle
vers soi pour dégager les 3
crochets (aux 3 endroits).
2. Retirez délicatement le
couvercle en l’abaissant.
Réinstallation
1. Insérez les crochets
(aux 3 endroits) dans
la partie inférieure.
2. Appuyez sur le couvercle
jusqu’à ce que les crochets
s’enclenchent en position.
Remarque: Afin d’éviter la présence d’interférences à l’écran, ne rassemblez pas le câble RF et le cordon d’alimentation.
Ouverture du panneau avant
des commandes
PULL
R-STANDBY/POWER ON
Soulevez la
partie inférieure
du couvercle
indiquée "PULL".
POWER
PULL
Utilisation de périphériques
La liaison audio/vidéo entre le téléviseur et des équipements périphériques peut être effectuée à l’aide de câbles audio
et vidéo blindés. Pour bénéficier des meilleures performances, utilisez un câble coaxial blindé de 75 ohms comme
câble d’antenne. Ces câbles sont disponibles chez votre revendeur ou dans une boutique de composants électroniques.
Avant d’acheter un câble, assurez-vous des différents types de connecteurs nécessaires pour raccorder
les différents appareils concernés. Calculez également les longueurs de câble dont vous avez besoin.
Pour optimiser la qualité d’image
Lorsque l’écran DCL est exposé à la lumière du jour ou à celle de lampes, il est possible que les images très contrastées ne soient pas reproduites de façon
suffisamment bonne. Dans ce cas, éteignez les éclairages fluorescents situés à proximité du téléviseur et placez ce dernier à l’écart de la lumière du soleil.
Comment utiliser l’adaptateur de montage mural
Le téléviseur DCL doit être utilisé avec l’accessoire en option suivant uniquement. Si vous l’utilisez avec
d’autres types d’accessoires en option, l’installation risquera d’être instable et de causer des blessures.
Adaptateur de montage mural ........................................... TY-WK32LX20W
•
AVERTISSEMENT:
• L’utilisateur qui choisirait de ne pas utiliser l’adaptateur de montage mural Panasonic ou d’installer le téléviseur lui-même le fait à ses propres
risques. Tout dommage résultant d’une installation qui n’aurait pas été effectuée par un technicien qualifié entraînera la résiliation de la garantie.
• Confiez l’installation du téléviseur à un technicien qualifié. Une installation inadéquate peut causer la chute
de l’appareil susceptible de l’endommager ou de causer des blessures.
• Pour de plus amples renseignements, reportez-vous à la notice d’installation de l’adaptateur de montage mural.
• Procurez-vous un adaptateur de montage mural auprès d’un détaillant Panasonic.
7
fr.indd 7
2005/04/21 15:57:48
Raccordements
Remarque:
Les câbles et les adaptateurs sont vendus séparément.
Raccordement de l’antenne
Pour pouvoir recevoir les canaux VHF/UHF, une antenne externe est requise. Pour une réception optimisée,
il est même recommandé d’utiliser une antenne extérieure. Le sélecteur du mode d’antenne doit être réglé
sur “ TÉLÉ ” (voir à la page 16, Sélection de mode).
Panneau arrière du téléviseur
Antenne VHF
Borne d’antenne
ANT
Connecteur
d’antenne de
type F
Antenne UHF
Câble
coaxial
75 ohms
Mélangeur
Raccordement d’un câblosélecteur
• Pour recevoir les canaux du câble (de 01 à 125), raccordez le câble fourni par votre opérateur de télévision
par câble. Le sélecteur du mode d’antenne doit être réglé sur “ CÂBLE ” (voir à la page 16, Sélection de
mode).
• Certains opérateurs de câble modifient la numérotation de certains canaux pour réduire les interférences
entre signaux ou mettre en place des canaux brouillés. Dans ce cas, un convertisseur est nécessaire pour
une réception correcte. Consultez votre opérateur de câble pour savoir quels convertisseurs sont
compatibles avec l’installation.
• Syntonisez le canal 3 ou 4 lorsqu’un tel raccordement est effectué.
Câblosélecteur
Panneau arrière du téléviseur
Câble (75 ohms)
d’arrivée de
câblodistribution
ANT
OUTPUT
INPUT
CÂBLOSÉLECTEUR
Câblosélecteur et magnétoscope
Câble (75 ohms)
d’arrivée de
câblodistribution
Panneau arrière du téléviseur
ANT
OUTPUT
ANT OUTPUT ANT INPUT
INPUT
CÂBLOSÉLECTEUR
Magnétoscope
8
fr.indd 8
2005/04/21 15:57:49
Raccordements
Raccordement d’autres appareils
Bornes d’entrée sur le panneau arrière
Panneau arrière du téléviseur
COMPONENT VIDEO OUT
Câble vidéo composant
Y
Y
Lecteur
DVD/Décodeur
S-VIDEO
PB
VIDEO
PB
VIDEO
PR
PR
L
L
Audio
OUT
L
R
AUDIO
R
Câble AUDIO
Magnétoscope super VHS
1
2
COMPONENT VIDEO INPUT 1
INPUT
Câble S-VIDÉO
CAMÉSCOPE
R
TO AUDIO
AMP
INPUT 2
PROG OUT
S-Video
OUT
Câble VIDÉO
Video
OUT
CONSOLE DE
JEU VIDÉO
R
Câble AUDIO
Audio
OUT
L
Remarques:
• En ce qui concerne le magnétoscope, la priorité est donnée à la liaison S-Vidéo lorsque les deux types de
liaison vidéo (Vidéo et S-Vidéo) sont établies en parallèle.
• Veuillez vous renseigner auprès des fabricants des consoles de jeux vidéo concernant les câbles de
raccordement à utiliser.
Bornes de sortie sur le panneau arrière
Panneau arrière
du téléviseur
Y
S-VIDEO
VIDEO
PB
VIDEO
PR
Câble AUDIO
L
L
Audio
IN
R
L
AUDIO
R
1
2
COMPONENT VIDEO INPUT 1
INPUT
INPUT 2
R
TO AUDIO
AMP
PROG OUT
9
fr.indd 9
2005/04/21 15:57:50
Raccordements
Connexion HDMI
HDMI∗1 [HDMI : High-Definition Multimedia Interface (Interface multimédia haute définition)] est la première interface
audio/vidéo conçue pour les appareils numériques grand public qui prenne en compte les formats sans compression.
Une seule prise permet de faire transiter en même temps la vidéo et l’audio.
À la prise d’entrée HDMI∗1 , vous pouvez connecter un appareil électronique grand public conforme à EIA/CEA-861/
861B∗2 , tel qu’un décodeur ou un lecteur de DVD muni d’une prise de sortie HDMI ou DVI.
En appliquant sur la prise HDMI de ce téléviseur une source d’images haute définition à contenu numérique protégé
à large bande passante (HDCP), il est possible d’obtenir sur l’écran des images numériques haute définition.
• Un câble audio doit être connecté uniquement lors de l’utilisation d’un
adaptateur de conversion HDMI pour connecter avec un câble DVI.
• Si l’appareil auxiliaire ne possède qu’une sortie DVI, branchez un câble
d’adaptation∗3 DVI-HDMI à la prise HDMI.
• Reliez les câbles audio aux prises AUDIO IN pour signal HDMI.
• Sélectionnez le réglage audio au menu ENTR. HDMI (voir page 25).
L
R
Y
S-VIDEO
VIDEO
PB
VIDEO
Exemple de source de signal d’entrée HDMI
Lecteur DVD
HDMI OUT
PR
R
AUDIO
OUT
HDMI AUDIO IN
L
AUDIO
R
L
Décodeur
Câble AUDIO
HDMI IN
Câble HDMI
Signal vidéo admissible
720p
1080i
480p
480i
Nombre de points (H × V)
1 280 × 720p
1 920 × 1 080i
720 × 480p
640 × 480p
720 × 480i
AV IN
Fréquence du balayage vertical (Hz)
59,94/60
59,94/60
59,94/60
59,94/60
59,94/60
Remarques:
• Cette prise d’entrée n’est pas destinée à une liaison avec un ordinateur.
• Les signaux 720p/1080i seront reformatés pour permettre le visionnement sur le téléviseur à cristaux liquides.
Fréquences d’échantillonnage du signal audio admissible (L.PCM) : 48 kHz / 44,1 kHz / 32 kHz
Remarques:
• Ce connecteur HDMI est de type A.
• Si un appareil sans borne de sortie numérique est raccordé, connectez le téléviseur au moyen des bornes
d’entrée vidéo composante, S-Vidéo ou vidéo pour un traitement analogique du signal.
• La prise HDMI IN peut être uniquement utilisée avec les signaux d’image 720p, 1080i, 480i ou 480p. Réglez
la sortie de la prise DIGITAL OUT du décodeur numérique sur 720p, 1080i, 480i ou 480p. Pour en savoir
plus, reportez-vous au mode d’emploi du décodeur numérique. Si vous ne pouvez pas afficher l’image parce
que votre décodeur numérique ne possède pas de réglage de sortie de la prise DIGITAL OUT, utilisez
l’entrée vidéo composante (ou l’entrée S-Vidéo ou l’entrée vidéo). Dans ce cas l’image est affichée comme
un signal analogique.
∗1. HDMI, le logo HDMI et High-Definition Multimedia Interface sont des marques de commerce ou des
marques déposées de HDMI Licensing LLC.
∗2. La conformité aux profils EIA/CEA-861/861B couvre les profils de transmission de la vidéo numérique
non compressée, y compris la protection du contenu numérique à large bande passante.
∗3. Communiquez avec un revendeur de produits électroniques pour plus de renseignements.
10
fr.indd 10
2005/04/21 15:57:50
Raccordements
Raccordement au panneau avant
Exemple de source de signal d’entrée
CAMÉSCOPE
CONSOLE DE JEU VIDÉO
Casque d’écoute /
écouteurs
(en option)
R-STANDBY/POWER ON
L
AUDIO
OUT
R
VIDEO
OUT
POWER
Connecteur M3
S-VIDEO
OUT
HPJ
S-VIDEO
L-AUDIO-R
VIDEO
INPUT 3
Câble S-VIDÉO
Câble VIDÉO
Câble AUDIO
Remarques:
• En ce qui concerne le magnétoscope, la priorité est donnée à la liaison S-Vidéo lorsque les deux types de
liaison vidéo (Vidéo et S-Vidéo) sont établies en parallèle.
• Veuillez vous renseigner auprès des fabricants des consoles de jeux vidéo concernant les câbles de
raccordement à utiliser.
11
fr.indd 11
2005/04/21 15:57:51
Mise sous tension et hors tension
Panneau arrière du téléviseur
Préparatifs
Raccordez le cordon d’alimentation à la
prise secteur.
Remarque:
Tant que le cordon d’alimentation est branché, le
téléviseur consomme un peu d’énergie.
120 V c.a., 60 Hz
Cordon d’alimentation
Interrupteur
principal
POWER
Sur l’appareil principal
R-STANDBY/POWER ON
POWER
PULL
POWER
R-STANDBY G-POWER ON
Capteur de
réception de
télécommande
Voyant
d’alimentation
Détecteur de contrôle automatique du
contraste (CATS)
Le système de contrôle automatique du
contraste détecte automatiquement les
conditions d’éclairement ambiant et règle en
conséquence la luminosité et la gradation de
manière à optimiser le contraste.
(Le contrôle automatique du contraste
s’active automatiquement lorsque le mode
vidéo est réglé sur AUTO.) (voir à la page
23).
Appuyez sur l’interrupteur principal
pour mettre le téléviseur sous/hors
tension.
• Voyant d’alimentation
Sous tension : Vert
Hors tension : A u c u n v o y a n t
lumineux
Sur la télécommande
POWER
Appuyez pour mettre le téléviseur sous/hors
tension.
• Voyant d’alimentation
Sous tension
: Vert
Hors tension (veille) : Rouge
• L’interrupteur de la télécommande ne
fonctionne pas si le téléviseur est hors
tension (voyant éteint) (voir ci-dessus).
Remarque:
L’écran ci-dessous s’affiche pendant
quelques secondes après la mise sous
tension du téléviseur.
ZOOM
SAP
CA
6
STÉRÉO
SAP
MONO
POWER
DBS/CB
VCR
L
DV
TV
D
CH
OK
VOL
VOL
Remarque:
Sélectionnez la langue d’affichage des menus avant
d’utiliser l’appareil (voir aux pages 14 et 15, LANGUE).
12
fr.indd 12
2005/04/21 15:57:51
Commandes de base
<Commandes de base sur panneau avant>
Touche SAP
Choisit le mode sonore (voir page 25).
STÉRÉO
SAP
MONO
POWER
R-STANDBY G-POWER ON
TV/VIDEO
CH
– VOL +
Touches de sélection de mode
Sélection du mode récepteur SRD pour
la télécommande (Digital Broadcasting
Satellite) / Sélection du mode
câblodistribution pour la télécommande
Sélection du
mode DVD
Sélection du mode
magnétoscope pour la pour la
télécommande
télécommande
Capteur de
réception de
télécommande
Tenez-vous à moins
de 7 m (25 pi) de
l’avant du téléviseur.
Touche TV/VIDEO
Réglage du volume
Interrupteur principal POWER
Appuyez sur l’interrupteur principal
pour mettre le téléviseur sous/hors
Sélection du canal
tension (voir à la page 12).
DBS/CBL
VCR
Touche POWER
Appuyez sur cette touche pour mettre le
téléviseur en/hors marche.
Remarque:
Le cordon d’alimentation du téléviseur doit
d’abord être branché sur une prise secteur
murale puis le téléviseur doit être mis sous
tension à l’aide de l’interrupteur d’alimentation
POWER.
SAP
POWER
DBS/CB
VCR
L
TV
DV
D
CH
Sélection du mode téléviseur pour la
télécommande
Permet de choisir le canal supérieur suivant
Déplace le curseur vers le haut en mode menu.
VOL
CH
RETURN
EXIT
MENU
TV/VIDEO
RECALL
MUTE
Augmente le volume
Déplace le curseur
vers la droite en
mode menu.
Réduit le volume
Déplace le curseur
vers la gauche en
mode menu.
GUIDE
CH
OK
VOL
SLEEP
PROG
Touche R-TUNE
Permet de revenir au canal précédemment
capté ou au mode vidéo précédent.
Cette fonction n’est pas disponible :
1. Immédiatement après la mise en
marche du téléviseur.
2. Après avoir commuté TV/CATV(l’option
MODE sous PROG. CANAL).
3. Après la programmation automatique
des canaux.
4. Lorsque le même canal que
celui syntonisé est sélectionné.
Touche SLEEP/PROG (minuterie de mise
hors service/programmation des numéros)
Tiret pour la sélection des numéros
de canal pour DTV et SRD.
Minuterie-sommeil (minutes)
0
ASPECT
TV/VCR
30
60
1
2
3
ZOOM
C o m m a n d e
d’autres appareils
4
5
7
8
6
9
SLEEP
PROG
R-TUNE
0
REW
PLAY
FF
PAUSE
STOP
REC
ASPECT
TV/VCR
RETURN
EXIT
Affiche les menus Appuyez sur cette
Appuyez sur cette
touche pour
touche pour accéder revenir au menu
aux menus télé, précédent, ou pour
DTV, SRD ou DVD.
quitter le menu.
Permet de choisir le canal inférieur précédent
Déplace le curseur vers le bas en mode menu.
Appuyez sur cette touche pour afficher
le menu du mode d'entrée. Lorsque le
menu est affiché, appuyez à nouveau
pour modifier le mode d'entrée.
Le mode d’entrée change chaque fois
que vous appuyez sur cette touche.
VCR/DBS CH
TV
Appuyez sur cette touche pour
couper le son, appuyez de
nouveau pour rétablir le son.
90
TV/VIDEO RECALL MUTE GUIDE
Touche GUIDE
pour SRD
Appuyez sur cette touche pour afficher les
paramètres actuels de l’appareil, c’est-à-dire
le format d’image, le numéro de canal, le mode
stéréo, le choix TV/VIDEO et la minuterie.
NORMAL
PLEIN ÉCRAN
Touches
Appareil
VOL
CH
MENU
Touche ASPECT
Change la taille de l’écran (voir page 26).
INTÉGRAL
D
OK
VOL
Touches de sélection directe
d’un numéro de programme
R-TUNE
DV
TV
REW
FF
PLAY
PAUSE
STOP
MAGNÉTOSCOPE
Rebobinage/avance rapide
du magnétoscope
LECTURE
Pause
CÂBLE/SRD
-
-
-
-
DVD
Saut,recherche,
avance/retour rapide
LECTURE
Pause
ARRÊT
Touches
Appareil
REC
ASPECT
TV/VCR
Commutation
téléviseur/magnétoscope
VCR/DBS CH
CÂBLE/SRD
-
DÉCODEUR-ASPECT
Canal haut/bas pour
le magnétoscope
Canal haut/bas pour
le récepteur SRD/téléviseur
DVD
-
OUVERTURE/FERMETURE
Lecture ralentie +/--
MAGNÉTOSCOPE
Enregistrement
du magnétoscope
ARRÊT
13
fr.indd 13
2005/04/21 15:57:52
=<1B7=<<3;3<B2C;3<C
GGLP<Q JLI C8 KFL:?<
( )0 GFLI 8==@:?<I
Cc:I8E( )0
( )0
-["'" .
.+
( )0
-["'" .
*)!$"0
1$[*
-["'" .1$[*
+*.$/!*-(/
+*2 -
0$*
.
'
1-
*)!$"0
1
/1
1$[*
-["'" .1$[*
-["'" .0$*
FL
( )0
-["'" .
+*.$/!*-(/
0$*
*)!$"0
')"0
-["'" .0$*
*#
+-*")'
1 --*0$''"
.*0.
/$/- .
- /0-)
3$/
(**#
?8E><C<DF;<;<EKIc<
U GGLP<QGFLI8==@:?<IC<
D<EL;<JcC<:K@FE;<EKIc<
/['[
*(+*.)/
*(+*.)/
#($
1$[*
1$[*
/11$ * - ''
(0/
$ )/$!+-$. .
0/- .-["'
"0$
( )0
-["'" .
*)!$"0
1$[*
-["'" .1$[*
+*.$/!*-(/
.' +
+-*"
-
/0)
0$*
-["'" .0$*
1$[*
UGGLP<QJLIC8KFL:?<
ELDcI@HL<
:FII<JGFE;8EK<;<C8
KcCc:FDD8E;<GFLI
JcC<:K@FEE<IC<EKIc<
;cJ@Ic<
&3;/@?C3
'<EKIc< M@;cF G<LK
c>8C<D<EK dKI<JcC<:K@FEEc<
/11$ *
<E8GGLP8EKJLI
GL@J JLI C<J KFL:?<J #
JL@M@ ;< C8 KFL:?<
S*&V
( )0
-["'" .
*)!$"0
')"0
+-*")'
1 --*0$''"
K L&"3<SB@327<AB@C1B7=<A
.*0.
/$/- .
?8HL<=F@JHLLED<EL<JK8==@:?cLE<=<EdKI<;8@;<8GG8I8gK a
Cc:I8E ;L KcCcM@J<LI CC< @E;@HL< HL<CC<J KFL:?<J ;< C8
KcCc:FDD8E;<G<LM<EKdKI<LK@C@Jc<J;8EJ:<D<EL
$ )/$!+-$. .
0/- .-["'
')"0
')"0
!-)Z$.
(*$!
- /0-)
fr.indd 14
2005/04/21 15:57:53
Fonctionnement du menu
Appuyez ici pour sélectionner le menu désiré
(RÉGLAGES ou CONFIGU.).
CH
OK
VOL
VOL
Appuyez ici pour sélectionner une option.
CH
Appuyez ici pour sélectionner chaque page de réglage (sous-menu).
• Pour revenir à la page précédente :
•
RETURN
EXIT
MENU
Pour quitter la page MENU :
Pour replacer l’appareil dans les conditions normales
de fonctionnement.
RÉGLAGES VIDÉO PAGE 1/2
NORMAL
STANDARD
MODE
RÉTROÉCL.
+ 20
IMAGE
+ 20
BRILLANCE
0
COULEUR
0
NUANCES
0
NETTETÉ
0
POSIT. /FORMAT
NORMAL
NORMALISER
FORMAT
15
RÉGLAGES AUDIO PAGE 1/2
NORMAL
STANDARD
MODE
GRAVES
- 2
AIGUS
+ 6
0
ÉQUILIBRE
RETURN
SON IA
POSITION
SON AMBIO
(Voir à la page 24)
PROG. CANAL
FRANÇAIS
LANGUE
Sélectionnez la langue
d’affichage des menus.
HF
EF
SAP
MONO
NUMÉRI.
(Voir à la page 25)
(Voir à la page 23)
LANGUE
EF
ENTR. HDMI
COOL
COLEF
OFF
ON
HF
IMAGE IA
STÉRÉO
HF
MODE
VERROUILLAGE
TÉLÉ CÂBLE
BLOQUER:
FILMS USA
PROG. AUTO
PROG. MANUELLE
HF EF
ÉTAT
MODIF. RÉGLAGE
(Voir à la page 16)
ENTR. CODE D’ABORD
(Voir aux pages 17-20)
SOUS-TITRES
IDENTIF. PRISES
HF
MODE
C2
C3
C1
C4
HF
(Voir à la page 21)
AUTRES RÉGL.
COMPOSANT1
COMPOSANT1
COMPOSANT2
COMPOSANT2
HDMI
HDMI
VIDÉO1
VIDÉO1
VIDÉO2
VIDÉO2
VIDÉO3
VIDÉO3
(Voir à la page 21)
PAGE 1/2
RÉDUC. BRUIT VIDÉO
HF EF
RÉDUCTEUR BRUIT MPEG
HF EF
FILTRE 3D Y / C
HF EF
CODEUR COULEUR
DS HD
(Voir à la page 22)
15
tc26LX50_fra_2011.indd 15
2005/07/19 11:43:29
Accord des canaux
1 Appuyez sur la touche TV/VIDEO pour sélectionner la réception de la télévision.
pour afficher l’écran MENU et sélectionnez CONFIGU.
2 Appuyez sur la touche MENUAppuyez
ici pour sélectionner
CH
OK
VOL
VOL
l’option PROG. CANAL.
Appuyez ici pour afficher l’écran
PROG. CANAL.
MENU
RÉGLAGES
CONFIGU.
LANGUE
PROG. CANAL
VERROUILLAGE
SOUS-TITRES
IDENTIF. PRISES
AUTRES RÉGL.
CH
Sélection de mode
Appuyez ici pour sélectionner l’option MODE.
3
PROG. CANAL
CH
OK
VOL
VOL
Appuyez ici pour choisir le réglage TÉLÉ ou
CÂBLE de cette option.
Programmation automatique des canaux
Balaie et mémorise automatiquement tous les canaux.
4
CH
OK
VOL
CH
Appuyez ici pour
sélectionner l’option
PROG. AUTO.
Appuyez ici pour
afficher l’écran de
programmation
automatique
(PROG. AUTO).
Programmation manuelle des canaux
Ajout ou suppression manuelle d’un canal.
4
CH
OK
VOL
VOL
CH
MODE
TÉLÉ CÂBLE
PROG. AUTO
Sélectionner
“PROG. AUTO?”
OUI
Appuyez ici pour
sélectionner l’option
PROG. MANUELLE.
Appuyez ici pour
afficher l’écran de
PROG. MANUELLE.
PROG. CANAL
PROG. AUTO
5
TÉLÉ CÂBLE
PROG. AUTO
PROG. MANUELLE
CH
VOL
MODE
PROG. MANUELLE
NON
Appuyez ici pour
sélectionner OUI.
5
CH
OK
VOL
VOL
CH
Appuyez ici pour
lancer PROG. AUTO.
Appuyez ici pour
sélectionner le canal
voulu.
• Il est également
possible d’utiliser les
touches numérotées.
PROG. AUTO
PROG. MANUELLE
En “PROG. AUTO”
ENTRER CANAL
121
CANAL
59
MENU
ARRÊT
L’indicateur de progression avance jusqu’à ce que tous
les canaux aient été détectés. Les numéros des
canaux sur lesquels un signal vidéo est présent sont
sauvegardés avec la fonction de balayage des canaux.
Remarques:
• Si une touche est pressée tandis que le mode
PROG. AUTO est en service, le téléviseur revient
en affichage normal. (Les canaux détectés jusqu’à
ce moment-là restent mémorisés.)
• Une fois la programmation automatique (PROG.
AUTO) terminée, le téléviseur passe en réception
du canal ayant le plus petit numéro.
• Si aucun canal ne peut être correctement reçu, c’est
le canal 69 qui est sélectionné (canal 125 pour la
télévision par câble).
6
CH
OK
VOL
VOL
CH
Appuyez ici pour ajouter
le canal en mémoire (le
numéro de canal
devient bleu).
Appuyez ici pour
supprimer le canal de
la mémoire (le numéro
de canal devient jaune).
• Répétez les étapes 5 et 6 pour ajouter ou supprimer
d’autres canaux.
16
fr.indd 16
2005/04/21 15:57:58
VERROUILLAGE
La technologie de la puce antiviolence permet aux parents de bloquer le visionnement de certaines émissions,
et ce, à leur entière discrétion.
1
Appuyez sur la touche MENU pour afficher l’écran MENU et sélectionnez CONFIGU.
Appuyez ici pour sélectionner VERROUILLAGE.
CONFIGU.
Appuyez ici pour afficher l’écran VERROUILLAGE.
CH
OK
VOL
MENU
RÉGLAGES
LANGUE
VOL
PROG. CANAL
CH
VERROUILLAGE
SOUS-TITRES
IDENTIF. PRISES
2
1
2
3
4
5
6
7
8
9
0
Entrez un code à 4 chiffres.
• Pour effacer ce numéro tandis que vous tapez
un mot de passe, appuyez sur la flèche vers le
haut
ou la flèche vers le bas
.
• Ce code sera nécessaire pour afficher le menu
VERROUILLAGE.
• Après avoir entré le code secret pour la première
fois, ENTR. CODE D’ABORD est remplacé par
MODIFIER CODE. Il est alors possible de
changer le code d’entrée.
AUTRES RÉGL.
VERROUILLAGE
BLOQUER:
FILMS USA
HF EF
ÉTAT
MODIF. RÉGLAGE
ENTR. CODE D’ABORD
Remarque:
Utilisez un code facile à mémoriser ou conservez-le dans un endroit sûr.
3
Appuyez ici pour sélectionner l’option
BLOQUER.
CH
OK
VOL
VOL
Appuyez ici pour choisir FILMS USA, ÉMIS.
TÉLÉ USA, CANADA, CANADA-QUÉBEC.
CH
VERROUILLAGE
BLOQUER:
FILMS USA
HF EF
ÉTAT
MODIF. RÉGLAGE
MODIFIER CODE
4
Appuyez ici pour sélectionner l’option ÉTAT.
VERROUILLAGE
BLOQUER:
CH
OK
VOL
VOL
CH
5
CH
OK
VOL
VOL
Appuyez ici pour sélectionner HF ou EF.
HF : Tous les programmes peuvent être
vus.
EF : Les programmes verrouillés dans
MODIF. RÉGLAGE ne peuvent pas
être vus.
Appuyez ici pour sélectionner l’option
MODIF. RÉGLAGE.
Appuyez ici pour passer au menu
suivant.
FILMS USA
HF EF
ÉTAT
MODIF. RÉGLAGE
MODIFIER CODE
VERROUILLAGE
BLOQUER:
FILMS USA
HF EF
ÉTAT
MODIF. RÉGLAGE
CH
MODIFIER CODE
17
fr.indd 17
2005/04/21 15:57:58
VERROUILLAGE
FILMS USA
Ce téléviseur est muni d’une puce antiviolence qui permet d’utiliser le classement “Motion Picture Ratings”
lors de la visualisation d’un film ou d’une cassette vidéo. Cette innovation permet aux parents de censurer
divers types de films et de cassettes vidéo, comme ils le souhaitent.
Appuyez sur cette touche pour choisir VUE
SANS VISA.
FILMS USA
Appuyez
ici pour sélectionner NON ou OUI.
OK
VUE SANS VISA
NON : Les programmes avec des signaux
NON OUI
sans visa ne peuvent pas être vus.
G
OUI : Les programmes avec des signaux
PG
sans visa peuvent être vus.
PG-13
Appuyez ici pour choisir le niveau de
R
verrouillage.
6
CH
VOL
VOL
CH
7
CH
OK
VOL
VOL
CH
NC-17
Appuyez ici pour verrouiller ou déverrouiller
le niveau.
Verrouillé
: Rouge
Déverrouillé : Vert
X
Remarques:
• Lors du verrouillage d’un classement, tous les classements inférieurs à celui-ci sont également verrouillés.
• Lors du déverrouillage d’un classement, tous les classements supérieurs à celui-ci sont également déverrouillés .
NE CONTIENT PAS DE CLASSEMENT (NON CLASSÉ) ET PROGRAMMES NON SUJETS À
SANS VISA
LA CLASSIFICATION. Films qui n’ont pas été classés ou dont le classement n’est pas applicable.
PUBLIC GÉNÉRAL. Autorisé à tous les âges.
G
CONTRÔLE PARENTAL CONSEILLÉ. Certains programmes ne conviennent pas aux enfants.
PG
MISE EN GARDE IMPORTANTE DES PARENTS. Certaines scènes ne conviennent pas
PG-13
aux enfants de moins de 13 ans.
CONTRÔLÉ. Les enfants de moins de 17 ans doivent être accompagnés par un parent ou un gardien adulte.
R
INTERDIT AUX MOINS DE 17 ANS.
NC-17
POUR ADULTE UNIQUEMENT.
X
ÉMIS. TÉLÉ USA
Ce téléviseur est muni d’une puce antiviolence qui vous permet d’utiliser le classement ÉMIS. TÉLÉ USA
pour bloquer divers types de programme de télévision.
Appuyez sur cette touche pour choisir VUE
ÉMIS. TÉLÉ USA
SANS VISA.
VUE SANS VISA
NON OUI
Appuyez
ici
pour
sélectionner
NON
ou
OUI.
OK
NON : Les programmes avec des signaux
RÉGLAGE
DE BASE
sans visa ne peuvent pas être vus.
TV–Y
OUI : Les programmes avec des signaux
FV
TV–Y7
sans visa peuvent être vus.
Appuyez ici pour sélectionner RÉGLAGE.
TV–G
6
CH
VOL
VOL
CH
7
CH
OK
VOL
VOL
CH
Appuyez ici pour sélectionner DE BASE ou
DÉTAILLÉ.
DE BASE : Sélectionnez les classements.
DÉTAILLÉ : Sélectionnez les classements et les options.
TV–PG
V
S
L
D
TV–1 4
V
S
L
D
TV–MA
V
S
L
Classement Option
Appuyez ici pour choisir le niveau de verrouillage.
8
CH
OK
VOL
VOL
CH
Appuyez ici pour verrouiller ou déverrouiller.
Verrouillé
: Rouge
Déverrouillé : Vert
Remarques:
• Lors du verrouillage d’un classement, tous les classements (incluant les options) inférieurs à celui-ci sont également verrouillés.
• Lors du déverrouillage d’un classement, tous les classements (incluant les options) supérieurs à celui-ci sont également déverrouillés.
• Lors du verrouillage d’une option (V, S, L ou D), toutes les options inférieures au classement sont également verrouillées.
• Lors du déverrouillage d’une option (V, S, L ou D), tous les classements et les mêmes options (V, S, L ou
D) supérieurs au classement sont également déverrouillés.
18
fr.indd 18
2005/04/21 15:57:59
VERROUILLAGE
Non classé. Reportez-vous aux précautions pour l’utilisateur ci-dessous.
Tous les enfants. Le thème et le contenu de ce programme sont spécialement conçus
pour un public jeune, y compris les enfants de 2 à 6 ans.
Destiné aux enfants plus âgés. Le thème et le contenu de ce programme peuvent contenir des
éléments de violence légère ou comique, ou peuvent effrayer les enfants de moins de 7 ans.
Public général. Programme contenant peut ou pas du tout de violence, pas de mots
grossiers et peu ou aucun dialogue ou situation d’ordre sexuel.
Contrôle parental conseillé. Ce programme peut contenir de façon rare des mots grossiers,
des scènes de violence limitée, certains dialogues et situations sexuels suggestives.
Mise en garde importante des parents. Ce programme peut contenir des thèmes
sophistiqués, des scènes sexuelles, un langage grossier et des scènes d’intense violence.
Public adulte uniquement. Ce programme peut contenir des thèmes pour adulte, un
langage blasphématoire, de la violence et des scènes sexuelles explicites.
VIOLENCE FANTASTIQUE/DESSIN ANIMÉ
VIOLENCE
SEXE
LANGUAGE AGRESSIF
DIALOGUE À CONTENU SEXUEL
SANS VISA
TV-Y
TV-Y7
TV-G
TV-PG
TV-14
TV-MA
FV
V
S
L
D
Précautions pour l’utilisateur
La puce antiviolence utilisée dans ce téléviseur est capable de bloquer les programmes sans “visa” (non
classés, auquel aucun classement ne s’applique et avec aucun classement) tels que définis par la section
15.120(e)(2) du Règlement FCC. Si l’option de blocage des programmes sans “visa” est choisie, “des
résultats inattendus et éventuellement confus peuvent être obtenus, il se peut même que vous ne puissiez
pas recevoir les bulletins d’urgence ni les types de programmes suivants:”
• Bulletins d’urgence (tels que des messages EAS, des avertissements météorologiques, etc.)
• Programme d’origine locale
• Informations
• Programmes politiques
• Annonces des services publiques
• Programmes religieux
• Programmes sportifs
CANADA
/ CANADA-QUÉBEC
• Programmes
météorologiques
Ce téléviseur incorpore la technologie de la puce antiviolence qui vous permet de bloquer certains films et
émissions de télévision selon deux systèmes de classification utilisés au Canada. La puce antiviolence
vous permet aussi de verrouiller ou de déverrouiller les émissions canadiennes françaises selon des
classifications variées.
6
CH
OK
VOL
VOL
CH
7
Appuyez sur cette touche pour
choisir ÉMISSIONS EXEMPTÉES?
Appuyez ici pour sélectionner
NON ou OUI.
NON : Les émissions exemptées
ne peuvent pas être vues.
OUI : Les émissions exemptées
peuvent être vues.
CANADA-QUÉBEC
CANADA
ÉMISSIONS EXEMPTÉES?
NON OUI
ÉMISSIONS EXEMPTÉES?
NON OUI
C
G
C8+
8 ANS+
G
13ANS+
PG
16ANS+
14+
18ANS+
18+
Appuyez ici pour choisir le niveau de verrouillage.
CH
OK
VOL
VOL
CH
Appuyez ici pour verrouiller ou déverrouiller le niveau.
Verrouillé
: Rouge
Déverrouillé : Vert
Remarques:
• Lors du verrouillage d’un classement, tous les classements inférieurs à celui-ci sont également verrouillés.
• Lors du déverrouillage d’un classement, tous les classements supérieurs à celui-ci sont également
déverrouillés.
19
fr.indd 19
2005/04/21 15:57:59
VERROUILLAGE
Tableau de classement CANADA
EXEMPTÉES
C
C8+
G
PG
14+
18+
Les programmes exemptés comprennent: informations, programmes sportifs,
documentaires, autres programmes d’information, causeries, vidéo musicales et
programmes de variété.
Programmes pour les enfants de moins de 8 ans. Pas de langage offensif, de nudité, ni
de contenu sexuel.
Programme généralement considéré acceptable pour les enfants de plus de 8 ans. Pas
de blasphème, de nudité ni de contenu sexuel.
Programmes généraux, pour tout public.
Contrôle parental conseillé. Certains programmes ne conviennent pas aux enfants.
Programmes contenant des thèmes ou un contenu qui peut ne pas convenir aux enfants
de moins de 14 ans. Les parents sont fortement mis en garde d’interdire leur accès aux
jeunes adolescents et aux enfants plus jeunes.
Programme réservé aux adultes. Contient des scènes constantes de violence ou des
scènes d’extrême violence.
Tableau de classement CANADA-QUÉBEC
EXEMPTÉES
G
8 ANS+
13ANS+
16ANS+
18ANS+
Les programmes exemptés.
Général - Programmes pour tout public et tous les âges. Ne contient pas de violence ou
le contenu violent est faible ou représenté de façon acceptable.
8+ Général - N’est pas recommandé pour les jeunes enfants. Programme destiné à un
public jeune mais contenant occasionnellement des scènes de violence légère.
Supervision par un adulte recommandée.
Programmes qui peuvent ne pas convenir aux enfants de moins de 13 ans - Contient
quelques scènes de violence ou une ou plusieurs scènes violentes pouvant l’affecter.
Supervision par un adulte fortement conseillée.
Programme pouvant ne pas convenir aux enfants de moins de 16 ans - Contient des
scènes fréquentes de violence ou de violence intense.
Programme réservé aux adultes. Contient des scènes constantes de violence ou des
scènes d’extrême violence.
20
fr.indd 20
2005/04/21 15:58:00
SOUS-TITRES
Cet appareil intègre un décodeur qui offre une description visuelle de la portion audio d’un programme de
télévision sous la forme de mots écrits sur l’écran (lettres blanches ou de couleur sur un fond noir).
Il permet la lecture des dialogues d’un programme de télévision ou d’autres informations.
Remarques:
• Cette fonction n’est disponible qu’avec un signal d’entrée 480i et les programmes comprenant des soustitres.
• Cette fonction n’est pas disponible lorsque le format d’image est réglé sur ZOOM. (voir à la page 26.)
1
Appuyez sur la touche MENU pour afficher l’écran MENU et sélectionnez
CONFIGU.
Appuyez ici pour sélectionner SOUSTITRES.
Appuyez ici pour afficher l’écran
OK
SOUS-TITRES.
CH
VOL
VOL
MENU
RÉGLAGES
CONFIGU.
LANGUE
PROG. CANAL
VERROUILLAGE
SOUS-TITRES
IDENTIF. PRISES
CH
AUTRES RÉGL.
2
Appuyez ici pour choisir HF, C1, C2, C3 ou C4.
SOUS-TITRES
HF
MODE
• HF (NON) : Mode recommandé lorsque les sous-titres ne sont pas voulus.
• C1
: Pour les images contenant des informations pouvant être affichées (un maximum de 4 lignes de
texte placé stratégiquement sur l’écran de façon qu’il ne gêne pas la partie correspondante de
l’image).
• C2/C3/C4 : Autres modes utilisés pour les informations relatives à l’image.
IDENTIF. PRISES
Le nom des différentes entrées vidéo peut être adapté à l’appareil connecté
(magnétoscope, lecteur de DVD, etc.).
1
Appuyez sur la touche MENU pour afficher l’écran MENU et sélectionnez
CONFIGU.
Appuyez ici pour sélectionner l’option
IDENTIF. PRISES.
Appuyez ici pour afficher le menu IDENTIF.
OK
PRISES.
CH
VOL
VOL
MENU
RÉGLAGES
CONFIGU.
LANGUE
PROG. CANAL
VERROUILLAGE
SOUS-TITRES
IDENTIF. PRISES
AUTRES RÉGL.
CH
Appuyez ici pour sélectionner les entrées vidéo.
2
IDENTIF. PRISES
CH
OK
VOL
VOL
CH
Appuyez ici pour changer la valeur de IDENTIF. PRISES.
(COMPOSANT1/COMPOSANT2/HDMI/VIDÉO1/
VIDÉO2/VIDÉO3/MAGNÉTO, LECT.LASER,
JEU, DVD, TVN, [ESPACE] ou OMETTRE∗)
∗ Sélectionnez cette option pour sauter des entrées vidéo
non utilisées lorsque la touche TV/VIDÉO est pressée.
COMPOSANT1
COMPOSANT1
COMPOSANT2
COMPOSANT2
HDMI
HDMI
VIDÉO1
VIDÉO1
VIDÉO2
VIDÉO2
VIDÉO3
VIDÉO3
21
tc26LX50_fra_2011.indd 21
2005/07/19 11:43:31
AUTRES RÉGL.
1
Appuyez sur la touche MENU pour afficher l’écran MENU et sélectionnez CONFIGU.
Utilisez ces touches pour sélectionner
MENU
AUTRES RÉGL.
RÉGLAGES
Utilisez ces touches pour accéder au menu
OK
AUTRES RÉGL.
LANGUE
CH
VOL
CONFIGU.
VOL
PROG. CANAL
CH
VERROUILLAGE
SOUS-TITRES
2
CH
OK
VOL
Utilisez ces touches pour sélectionner l’option à modifier.
IDENTIF. PRISES
Appuyez ici pour sélectionner le réglage.
AUTRES RÉGL.
VOL
CH
AUTRES RÉGL.
RÉDUC. BRUIT VIDÉO
Le bruit vidéo est réduit.
HF
EF
RÉDUCTEUR BRUIT MPEG
Le bruit propre au DVD, décodeur, etc., est réduit.
HF
EF
PAGE 1/2
RÉDUC. BRUIT VIDÉO
HF EF
RÉDUCTEUR BRUIT MPEG
HF EF
FILTRE 3D Y / C
HF EF
CODEUR COULEUR
DS HD
FILTRE 3D Y / C
Réduit le bruit et le décalage des couleurs. Cette option n’est pas disponible
pour les entrées vidéo composante.
HF
EF
AUTRES RÉGL.
CODEUR COULEUR
Affiche les signaux d’entrée (signaux 480p) avec des couleurs naturelles.
Règle automatiquement les paramètres couleur dans le cas de la haute
définition (HD) et de la définition standard (DS).
DS
HD
Remarque:
Le réglage CODEUR COULEUR n’est effectif qu’en présence de signal
480p en mode d’entrée COMPOSANT.
Autrement, l’indication de CODEUR COULEUR devient bleue et la
commutation entre la définition standard (DS) et haute définition (HD) n’est
pas possible.
PAGE 2/2
ÉCO-ÉNERGIE
STANDARD
NIVEAU DU NOIR
FONCÉ
ÉCO-ÉNERGIE
Réduit la luminosité de l’écran pour réduire la consommation et convient
pour une utilisation nocturne.
STANDARD
ÉCONOMIE
NIVEAU DU NOIR
Lors du réglage d’une entrée VIDÉO ou COMPOSANT, sélectionnez FONCÉ
ou CLAIR selon les conditions de l’image.
Le visionnement de scènes sombres est amélioré.
FONCÉ
CLAIR
Remarque:
Le niveau du noir est fixé sur FONCÉ lors de la sélection du mode TÉLÉ.
22
fr.indd 22
2005/04/21 15:58:01
RÉGLAGES VIDÉO
1
Appuyez sur la touche MENU pour afficher l’écran MENU et sélectionnez
RÉGLAGES.
Appuyez ici pour sélectionner l’option
RÉGLAGES VIDÉO.
Appuyez ici pour afficher l’écran
OK
RÉGLAGES VIDÉO.
MENU
RÉGLAGES
POSIT. /FORMAT
CH
VOL
VOL
CONFIGU.
VIDÉO
RÉGLAGES VIDÉO
AUDIO
RÉGLAGES AUDIO
CH
2
Appuyez ici pour sélectionner le sous-menu.
RÉGLAGES VIDÉO PAGE 1/2
NORMAL
MODE
CH
OK
VOL
VOL
CH
STANDARD
Effectuez le réglage tout en observant l’image
en arrière-plan du menu.
RÉTROÉCL.
+ 20
IMAGE
+ 20
Au besoin, appuyez ici pour activer le réglage.
BRILLANCE
0
COULEUR
0
NUANCES
0
NORMAL/NORMALISER
Sélectionnez “NORMALISER” et appuyez sur “OK” pour rétablir les réglages
d’usine de chaque paramètre vidéo de MODE.
Remarques:
• “NORMAL” signifie que tous les réglages d’usine de MODE ont été rétablis.
“NORMAL” est remplacé par “NORMALISER” lorsque vous modifiez le réglage de
l’un des paramètres suivants : RÉTROÉCL., IMAGE, BRILLANCE, COULEUR,
NUANCES, NETTETÉ, IMAGE IA, TEMP. COUL. ou REHAUT COULEUR.
• Il est possible de normaliser chaque paramètre de MODE individuellement.
0
NETTETÉ
IMAGE IA
COOL
OFF
HF
EF
ON
RÉGLAGES VIDÉO PAGE 2/2
TEMP. COUL.
NORM.
REHAUT COULEUR
HF EF
MODE
MODE
STANDARD
CINÉMA
ÉCLATANT
AUTO
Fonction
Affiche une image normale.
Convient bien au visionnement de films dans une pièce sombre.
Affiche une image claire et contrastée.
Mesure automatiquement l’éclairage ambiant et ajuste la luminosité et la
gradation en conséquence, assurant ainsi le meilleur contraste possible.
Le mode image est mis en mémoire individuellement pour TÉLÉ, VIDÉO1, VIDÉO2, VIDÉO3, COMPOSANT1,
COMPOSANT2 et HDMI.
RÉTROÉCL., IMAGE, BRILLANCE, COULEUR, NUANCES, NETTETÉ, IMAGE IA, TEMP. COUL., REHAUT COULEUR
Il est possible de changer le niveau de chaque paramètre (RÉTROÉCL., IMAGE, BRILLANCE, COULEUR,
NUANCES, NETTETÉ, IMAGE IA, TEMP. COUL. et REHAUT COULEUR) pour chaque MODE (STANDARD,
CINÉMA, ÉCLATANT et AUTO) en fonction des préférences.
Sous-menu
RÉTROÉCL.
IMAGE
BRILLANCE
COULEUR
NUANCES
NETTETÉ
IMAGE IA
TEMP. COUL.
REHAUT COULEUR
Fonction
Réglage de luminosité du rétroéclairage.
Réglage de luminosité et de densité d’image en fonction de la pièce.
Réglage de luminosité utile pour visionner les scènes sombres, notamment les scènes de nuit.
Réglage fin d’éclaircissement des couleurs.
Réglage de la couleur de la peau.
Réglage de la netteté de l’image.
Réglage des sections sombres sans affecter le niveau du noir ni la luminosité
de l’ensemble de l’image.
Pour augmenter ou réduire les couleurs
NORM.
BLEU
ROUGE
ROUGE et BLEU selon vos préférences.
Permet un réglage éclatant automatique de la couleur.
23
fr.indd 23
2005/04/21 15:58:01
POSIT./FORMAT
Lorsque le mode ZOOM est réglé, cette fonction ajuste la position verticale et le
format de l’écran avec précision.
1
Appuyez sur la touche du menu pour accéder à l’écran MENU et
sélectionnez RÉGLAGES.
MENU
RÉGLAGES
CONFIGU.
VIDÉO
RÉGLAGES VIDÉO
POSIT. /FORMAT
OK
VOL
AUDIO
Utilisez ces touches pour sélectionner
POSIT./FORMAT.
CH
RÉGLAGES AUDIO
VOL
CH
Appuyez sur cette touche pour afficher l’écran
POSIT./FORMAT.
POSIT. /FORMAT
NORMAL
NORMALISER
FORMAT
15
RETURN
POSITION
2
Pour le mode ZOOM (voir à la page 26)
ZOOM
• POSITION
CH
OK
VOL
VOL
CH
Utilisez ces touches pour déplacer l’image
vers le haut ou le bas.
• Appuyez sur OK pour retourner à la position
originale.
• FORMAT
ZOOM
Utilisez ces touches pour rétrécir
l’image à la verticale [15 paliers : de 15
(réglage original) à 1].
• Appuyez sur OK pour retourner au
réglage original.
24
fr.indd 24
2005/04/21 15:58:02
RÉGLAGES AUDIO
1
Appuyez sur la touche MENU pour afficher l’écran MENU et sélectionnez
RÉGLAGES.
Appuyez ici pour sélectionner l’option RÉGLAGES
OK
AUDIO.
CH
MENU
RÉGLAGES
CONFIGU.
VIDÉO
RÉGLAGES VIDÉO
POSIT. /FORMAT
VOL
VOL
AUDIO
CH
Appuyez ici pour afficher le menu RÉGLAGES AUDIO.
2
Appuyez ici pour sélectionner l’option à modifier.
CH
OK
VOL
VOL
CH
Sélectionnez le niveau souhaité du réglage en vous
guidant sur le son émis.
Au besoin, appuyez ici pour activer le réglage.
RÉGLAGES AUDIO
RÉGLAGES AUDIO PAGE 1/2
NORMAL
STANDARD
MODE
GRAVES
- 2
AIGUS
+ 6
SON IA
NORMAL/NORMALISER
Sélectionnez “NORMALISER” et appuyez sur “OK” pour rétablir les réglages
d’usine de chaque paramètre de MODE.
Remarques:
• “NORMAL” signifie que tous les réglages d’usine de MODE ont été rétablis.
“NORMAL” est remplacé par “NORMALISER” lorsque vous modifiez le réglage
de l’un des paramètres suivants : GRAVES, AIGUS, ÉQUILIBRE, SON IA,
SON AMBIO ou ÉGALIS. AUDIO.
• Il est possible de normaliser chaque paramètre de MODE individuellement.
0
ÉQUILIBRE
SON AMBIO
STÉRÉO
SAP
ENTR. HDMI
HF
EF
HF
EF
MONO
NUMÉRI.
RÉGLAGES AUDIO PAGE 2/2
NORMAL
ÉGALIS. AUDIO
0
MODE
STANDARD Reproduction du son d’origine.
DYNAMIQUE Ajout d’un plus grand contraste au son.
VOIX
Rend les voix plus claires.
GRAVES, AIGUS, ÉQUILIBRE, SON IA, SON
AMBIO
Vous pouvez changer le niveau de chaque
paramètre (GRAVES, AIGUS, ÉQUILIBRE,
SON IA et SON AMBIO) pour chaque MODE
(STANDARD, DYNAMIQUE et VOIX) en
fonction des préférences.
STÉRÉO/SAP/MONO
Remarques:
• Affichage en rouge : Avec un signal
Affichage en blanc : Sans signal
Affichage en blanc (tous les modes) : MONO
• Pour changer le mode au moyen de la touche
SAP (voir à la page 13).
Volume des fréquences graves
Volume des fréquences aiguës
Balance des canaux droit et gauche
Ajuste automatiquement la qualité du
SON IA
son.
Pour bénéficier d’une ambiance sonore de salle
SON AMBIO de concert, mettez le son ambiophonique en
fonction lors des diffusions stéréo.
GRAVES
AIGUS
ÉQUILIBRE
STÉRÉO
SAP
MONO
Réception audio sur deux canaux
droit et gauche.
Second Audio Programming
(Deuxième canal audio distinct, utilisé en
général pour une diffusion bilingue).
Sélectionnez ce mode lorsque le signal
stéréo est faible.
ENTR. HDMI
Lorsque vous utilisez la prise HDMI (voir à la page 10), cette fonction permet de commuter entre l’entrée
analogique et numérique.
AUTO
NUMÉRI
ANALOG.
Sélectionne automatiquement le signal analogique/numérique.
Entrée numérique seulement
Entrée analogique seulement
ÉGALIS. AUDIO
Il est possible d’ajuster le niveau de volume pour chacun des modes d’entrée (TÉLÉ, VIDÉO1, VIDÉO2,
VIDÉO3, COMPOSANT1, COMPOSANT2 et HDMI).
25
fr.indd 25
2005/04/21 15:58:02
Sélection de formats
Cette fonction vous permet de visionner vos programmes au format adéquat, et notamment de voir en plein
écran les films tournés en format grand écran.
R-TUNE
PROG
REW
PLAY
FF
PAUSE
STOP
REC
ASPECT
TV/VCR
INTÉGRAL
VCR/DBS CH
Image
4
INTÉGRAL
PLEIN ÉCRAN
NORMAL
Explication
Explanation
Le mode NORMAL affiche une image 4:3
dans son format 4:3 standard.
NORMAL
NORMAL
ZOOM
Remarques:
• Cette fonction est inopérante lors de l’entrée de signaux 1080i et
720p.
• Les réglages de format sont mémorisés individuellement pour TÉLÉ,
VIDÉO1, VIDÉO2, VIDÉO3, COMPOSANT1, COMPOSANT2 et
HDMI.
TV
Mode
Sur chaque pression de la touche :
ASPECT
TV/VCR
0
3
Le mode INTÉGRAL affiche une image
4:3 à sa taille maximale mais la
correction de l’aspect de l’image ne
s’applique qu’aux côtés de l’écran de
façon que l’étirement de l’image n’est
apparent que sur les bords gauche et
droit de l’écran. La taille de l’image
dépend du signal original.
ZOOM agrandit la partie centrale de
l’image.
ZOOM
PLEIN
ÉCRAN
PLEIN ÉCRAN affiche l’image la plus
grande possible mais avec une
déformation dans la largeur.
26
fr.indd 26
2005/04/21 15:58:03
Commande à distance des appareils périphériques
Programmation du code d’accès de la télécommande
Il est possible de commander les appareils d’autres fabricants au moyen de la télécommande de ce téléviseur.
Préparatifs :
• Raccordez la fiche de l’appareil périphérique à la prise secteur.
• Assurez-vous que l’appareil est hors tension.
SAP
1
CH
OK
+
POWER
VOL
POWER
Maintenez simultanément une
pression sur les touches
POWER et OK, pendant au
moins 5 secondes.
• Lorsque la touche de sélection
de mode clignote, relâchez les
touches POWER et OK.
VOL
CH
DBS/CB
VCR
L
TV
DV
D
CH
OK
2
VOL
DBS/CB
VCR
L
DV
D
TV
VOL
CH
RETURN
EXIT
MENU
TV/VIDEO
RECALL
1
MUTE
2
GUIDE
3
4
5
6
7
8
9
SLEEP
PROG
R-TUNE
0
REW
PLAY
FF
PAUSE
STOP
REC
ASPECT
TV/VCR
VCR/DBS CH
3
1
2
3
4
5
6
7
8
9
0
Sélectionnez le type d’appareil.
• La touche de mode sélectionnée
s’allume et toutes les autres
touches s’éteignent.
Entrez le code de 3 chiffres (voir
aux pages 28 à 29).
• Réglage par défaut : Panasonic
• Appuyez sur POWER pour
tester l’opération.
Remarques :
• Si le contact ne peut être établi sur l’appareil avec la télécommande,
répétez la procédure avec un autre code. (Certaines marques
possèdent plus d’un code.)
• Si un mauvais code est entré ou que l’entrée prenne plus de 30
secondes, la programmation n’aura pas lieu.
Pour trouver un code qui n’est pas dans l’index
Après l’étape 2 ci-dessus
TV
Utilisez ces touches pour sélectionner le code.
• Un code possible est entré pour l’appareil sélectionné à I’étape 2.
• Appuyez sur la touche POWER pour tester l’opération.
• Répétez ces étapes jusqu’à ce que vous trouviez
le code correct. Il faut peut-être plusieurs essais
pour trouver le code correct.
Utilisez cette touche pour mettre le code en
mémoire.
27
fr.indd 27
2005/04/21 15:58:03
Commande à distance des appareils périphériques
Table des codes infrarouges
La télécommande universelle est capable de commander le fonctionnement d’appareils d’autres marques après
l’entrée d’un code. Certains appareils peuvent ne pas être commandés si les codes ne sont pas disponibles en raison
d’un manque de mémoire. La télécommande universelle ne peut contrôler toutes les fonctions de chaque modèle.
Inscrivez les numéros de code des appareils dans ces cases. Ils serviront de référence si la
télécommande doit être reprogrammée.
VCR
SRD
CBL
DVD
Codes pour les magnétoscopes
VCR
Marque
Admiral
Aiwa
Akai
Audio Dynamic
Bell &Howell
Broksonic
Canon
Citizen
Craig
Curtis Mathes
Daewoo
DBX
Dimensia
Emerson
Fisher
Funai
GE
Goldstar
Gradiente
Hitachi
Instant Replay
Jensen
JVC
Kenwood
LXI
Magnavox
Marantz
Marta
Memorex
MGA
Minolta
Mitsubishi
Multitech
NEC
Olympic
Optimus
Code
335
332
314, 315, 316, 329
311, 339
305, 313
320, 326
323, 325
306
305, 306, 329
324, 345
301, 324, 343
310, 311, 339
345
303, 319, 320, 325, 326, 343
305, 307, 308, 309, 313
320, 326, 334
324, 333, 345
306
334
300, 323, 345
323, 324
339
310, 311, 334, 339
306, 310, 311, 339
300, 305, 306, 307, 308, 309
323, 324, 331
310, 311, 339
306
309, 324
338, 340, 341, 347, 348
300, 345
338, 340, 341, 347, 348
304, 347
310, 311, 334, 339
323, 324
306, 321, 328, 335
Marque
Orion
Panasonic
J.C.Penney
Code
320, 326
321, 322, 323, 324
300, 305, 310, 311, 324,
339, 345
Pentax
300, 311, 345
Philco
320, 323, 324, 326, 331, 343
Philips
323, 324, 331
Pioneer
323
Proscan
300, 301, 302, 323, 324,
331, 333, 345, 346
Quasar
321, 322, 323, 324
Radio Shack
305, 309, 324, 333, 336, 340
RCA
300, 301, 302, 323, 324,
331, 333, 345, 346
Realistic
305, 309, 324, 336, 340
Samsung
302, 304, 333
Sansui
320, 326, 339, 352
Sanyo
305, 309, 313
Scott
301, 302, 304, 309, 320,
326, 338, 340, 347, 348
Sears
300, 305, 306, 307, 308
Sharp
335, 336
Shintom
317
Signature 2000 335
Singer
317
Sony
328, 329, 330
Sylvania
323, 324, 331
Tashiro
306
Tatung
310, 311, 339
Teac
310, 311, 339
Technics
321, 322, 323, 324
Teknika
324
Toshiba
301, 346
Vector Research 311
Wards
306, 309, 335, 336, 344
Yamaha
305, 310, 311, 339
Zenith
306, 344
Codes pour les enregistreurs vidéo personnels
VCR
Marque
Panasonic Replay 100
Philips Tivo
101
Sony Tivo
102
Code
28
fr.indd 28
2005/04/21 15:58:04
Commande à distance des appareils périphériques
Codes pour les câblosélecteurs
DBS/CB
L
Marque
ABC
Archer
Cableview
Citizen
Curtis
Diamond
Eagle
Eastern
GC Brand
Gemini
General
Instrument/
Jerrold
Hamlin
Code
224
225, 232
205, 232
205, 222
212, 213
224, 225, 232
229
234
205, 232
222
211, 219, 220, 221, 222,
223, 224, 225, 226, 227
212, 218, 240, 241, 242,
245
203, 224
203, 204, 205
233
230
205, 232
202, 237, 239
209, 210, 214
206, 207, 228, 229, 230
201, 216
205, 232
Hitachi
Macom
Magnavox
Memorex
Movietime
Oak
Panasonic
Philips
Pioneer
Pulsar
Marque
Puser
RCA
Realistic
Regal
Code
232
215
232
212, 218, 240, 241, 242,
245
Regency
234
Rembrandt
205, 232, 237
Samsung
205
Scientific Atlanta 211, 212, 213
Slmark
201, 205
Sprucer
205, 210
Stargate
205, 232
Teleview
201, 205
Texscan
244
Tocom
235
Toshiba
204
Unika
225, 232
Universal
222, 232
Videoway
206
Viewstar
229, 230
Zenith
200, 217
Zenith /Drake 200
Satellite
Codes pour les récepteurs de satellite de communication directe
DBS/CB
L
Marque
Dish Network
Echo Star
(Echostar)
Express VU
G.E.
G.I.
(General Instrument)
Gradiente
Hitachi
HNS (Hughes)
Code
105, 115, 116
105
105, 115
106
108
114
103, 111, 112
103
Marque
Magnavox
Panasonic
Philips
Primestar
Proscan
RCA
Sony
Star Choice
Toshiba
Uniden
Code
101, 102
104
101, 102
108
106, 109, 110, 113
106, 109, 110, 113
107
103, 108
100
101, 102
Marque
Saba
Samsung
Sharp
Sony
Technics
Thomson
Toshiba
Yamaha
Zenith
101
110
108
104
100
101
103
100
107
Codes pour les lecteurs DVD
DV
D
Marque
Denon
Ferguson
JVC
Mitsubishi
Nordmende
Panasonic
Philips
Pioneer
RCA
Code
100
101
109
105
101
100
103
102
101
Code
29
tc26LX50_fra_2011.indd 29
2005/09/06 13:42:28
Commande à distance des appareils périphériques
Tableau de fonctionnement des touches
Ce tableau décrit le fonctionnement de chaque touche qui peut être utilisée après la programmation (si
nécessaire), quand la télécommande se trouve dans le mode de commande de TÉLÉVISION NUMÉRIQUE,
câblosélecteur, récepteur SRD∗, magnétoscope, lecteur DVD, etc.
∗SRD: Satellite de communication directe
NOM DE LA TOUCHE
ALIMENTATION ALIMENTATION ALIMENTATION
POWER
MODE DE LECTEUR DVD
(DVD)
ALIMENTATION ALIMENTATION
PISTE SON POUR LE
TÉLÉVISEUR
SOURDINE POUR SOURDINE POUR LE SOURDINE POUR LE SOURDINE POUR
SOURDINE
LE TÉLÉVISEUR
TÉLÉVISEUR
RÉCEPTEUR SRD
LE TÉLÉVISEUR
COMMUTATEUR D’ENTRÉE COMMUTATEUR D’ENTRÉE COMMUTATEUR D’ENTRÉE COMMUTATEUR D’ENTRÉE COMMUTATEUR D’ENTRÉE
POUR LE TÉLÉVISEUR
POUR LE TÉLÉVISEUR
POUR LE TÉLÉVISEUR
POUR LE TÉLÉVISEUR
POUR LE TÉLÉVISEUR
CANAL DE TÉLÉVISEUR CANAL DE CÂBLODISTRIBUTION NAVIGATION SRD CHAPITRE SUIVANT/
CANAL HAUT/BAS
HAUT/BAS
HAUT/BAS
HAUT/BAS
PRÉCÉDENT
ACTION POUR LE
ACTION POUR LE
ACTION
ENTRÉE
TÉLÉVISEUR
RÉCEPTEUR SRD
VOLUME
NAVIGATION SRD DROITE / VOLUME +/- DU
VOLUME +/- DU
VOLUME +/CÂBLOSÉLECTEUR +/GAUCHE
TÉLÉVISEUR
TÉLÉVISEUR
MENU POUR LE
MENU
RÉCEPTEUR SRD
SAP
MUTE
TV/VIDEO
CH
OK
VOL
MODE TÉLÉVISEUR MODE DE MAGNÉTOSCOPE MODE CÂBLOSÉLECTEUR MODE RÉCEPTEUR SRD
VOL
CH
MENU
SAP EF/HF
-
-
AFFICHAGE
AFFICHAGE
MAGNÉTOSCOPE
À L’ÉCRAN
-
-
-
SORTIE
-
-
SORTIE SRD
-
-
-
-
GUIDE SRD
-
RECALL
RETURN
EXIT
GUIDE
-
1
2
3
4
5
6
7
8
9
Sélection des canaux Sélection des canaux Sélection des canaux Sélection des canaux
-
CANAL DE
TÉLÉVISEUR ou MODE
VIDÉO PRÉCÉDENT
-
CANAL SRD
PRÉCÉDENT
-
SOMMEIL
-
-
PROGRAMME
SRD/TIRET
-
-
Rebobinage/avance
rapide du magnétoscope
-
-
RECHERCHE
ARRIÈRE/AVANT
-
LECTURE
-
-
LECTURE
-
PAUSE
-
-
PAUSE
-
ARRÊT
-
-
ARRÊT
-
ENREGISTREMENT
SUR MAGNÉTOSCOPE
-
-
-
FORMAT D’IMAGE
COMMUTATION
TÉLÉVISEUR/
MAGNÉTOSCOPE
-
FORMAT SRD
OUVERTURE/
FERMETURE
-
CANAL DE
MAGNÉTOSCOPE HAUT/BAS
-
PAGE HAUT/BAS
LECTURE
RALENTIE +/-
0
R-TUNE
SLEEP
PROG
REW
FF
PLAY
-
PAUSE
-
CANAL DE
CÂBLOSÉLECTEUR
PRÉCÉDENT
STOP
REC
ASPECT
TV/VCR
-
VCR/DBS CH
30
fr.indd 30
2005/04/21 15:58:05
Dépannage
S’il y a des problèmes de fonctionnement avec le téléviseur, veuillez vous reporter au tableau ci-dessous afin de déterminer
les symptômes, puis exécuter les remèdes suggérés. Si cela ne résout pas le problème, veuillez noter les numéros de
modèle et de série et contacter un détaillant Panasonic local (les deux numéros se trouvent sur la face arrière du téléviseur).
Symptômes
Vidéo
Solutions
Audio
Présence
de neige
Présence de
bruit
Emplacement, orientation ou branchement de l’antenne.
Image
dédoublée
Son normal
Emplacement, orientation ou branchement de l’antenne.
Interférence
Présence de
bruit
Appareils électroménagers.
Voitures/motocyclettes.
Lumières fluorescentes.
Image
normale
Absence de
son
Niveau du volume.
La fonction de coupure du son est activée.
Paramètre STÉRÉO/SAP/MONO
Absence
d’image
Absence de
son
Le téléviseur est réglé au mode AV.
Le téléviseur n’est pas branché à la prise secteur.
Le téléviseur n’est pas en fonction.
Les paramètres de l’image/du son sont réglés au niveau minimum.
Vérifiez si le téléviseur est en mode veille.
Absence
de couleur
Son normal
Les paramètres de couleur sont réglés au niveau minimum.
Signal faible.
Image déformée
ou de piètre
qualité
Son faible ou
absent
Syntonisez de nouveau les canaux.
Image
normale
Son faible,
incorrect ou
absent
La réception du signal sonore s’est peut-être dégradée.
Dans le menu AUDIO, réglez le paramètre STÉRÉO/SAP/MONO sur
SAP ou MONO jusqu’à ce que la réception du signal sonore s’améliore.
Fonctionnement impossible avec la
télécommande.
Les piles sont épuisées.
Les piles sont installées avec la mauvaise polarité.
Le capteur de réception de télécommande sur le téléviseur est éclairé
par une lumière assez forte provenant d’une lampe fluorescente ou autre.
L’appareil principal est chaud.
L’appareil génère de la chaleur et certaines de ses parties peuvent atteindre en effet
une température élevée. Cela ne pose pas de problème de performance ou de qualité.
Installez l’appareil dans un lieu correctement ventilé.
Ne recouvrez pas les évents de ventilation avec quoi que ce soit (napperon, etc.), et
ne placez pas l’appareil sur un autre (par exemple le magnétoscope).
Des points rouges, bleus, verts et noirs
apparaissent à l’écran.
Ceci est une caractéristique des écrans à cristaux liquides. Il ne s’agit pas d’un défaut.
Le panneau à cristaux liquides incorpore des technologies de haute précision pour
produire une image d’une grande netteté. Il arrive parfois que des pixels inactifs
apparaissent à l’écran sous la forme d’un point fixe de couleur bleu, rouge, vert ou
noir. Cela ne pose pas de problème de performance ou de qualité.
Entretien
Pour nettoyer cet appareil, essuyez-le avec un chiffon doux et sec.
Si les surfaces sont très sales, utilisez un chiffon doux trempé dans un
mélange de savon liquide et d’eau ou dans une solution diluée de détergent.
• Utilisez du liquide de nettoyage de lunettes pour retirer les saletés tenaces de l’écran DCL.
• N’utilisez jamais d’alcool, de diluant à peinture ou de benzine pour nettoyer cet appareil.
• Avant d’utiliser des lingettes pré-imprégnées de produit, lisez attentivement
les instructions fournies avec celles-ci.
Détergent
doux
ATTENTION :
Si de l’eau ou une substance similaire pénètre dans l’écran via la surface de l’écran, cela peut entraîner une panne du téléviseur.
31
fr.indd 31
2005/04/21 15:58:05
Spécifications
Alimentation électrique
Consommation de
courant
Écran à cristaux
liquides (DCL)
Dimensions de l’écran
(L × H × diagonale)
Nombre de chaînes
mémorisables
Son
Haut-parleurs
Sortie audio
Casque d’écoute
FONCTIONNALITÉS
Conditions ambiantes
de fonctionnement
Connecteurs
Entrée
Entrée vidéo
composante
Sortie (PROGRAM OUT)
HDMI
Dimensions ( L × H × P )
Avec socle
Sans socle
Masse (Poids)
TC-26LX50
120 V c.a., 60 Hz
Consommation moyenne : 121 W
Intensité maximale : 2,2 A
En veille : 0,1 W
Écran large à cristaux liquides 1366 × 768 pixels
576 mm × 324 mm × 661 mm
(22,7 po × 12,8 po × 26 po)
VHF-12 : UHF-56 : Câble-125
TC-32LX50
Consommation moyenne : 147 W
Intensité maximale : 2,6 A
En veille : 0,1 W
Écran large à cristaux liquides 1366 × 768 pixels
698 mm × 392 mm × 800 mm
(27,5 po × 15,4 po × 31,5 po)
ø8 cm × 2 pièces, ø5 cm × 2 pièces
20 W [10 W + 10 W] (D.H.T. de 10 %)
Prise M3 de 3,5 mm × 1
Filtre peigne numérique Y/C 3D, sous-titres, puce antiviolence
Température : 5 °C à 35 °C (41 °F à 95 °F)
Humidité : 5 % à 90 % (sans condensation)
VIDEO (Prise à broches RCA × 1) × 3
S-VIDEO (Mini prise à 4 broches × 1) × 3
AUDIO L-R (Prise à broches RCA × 2) × 3
Y×2
1,0 V c.-à-c. (75 ohms)
Y : 1,0 V c.-à-c. (75 ohms),
C : 0,286 V c.-à-c. (75 ohms)
0,5 V eff.
1,0 V c.-à-c.
(y compris la synchronisation)
±0,35 V c.-à-c.
Explanation
0,5 V eff.
0,5 V eff., VIDEO (Prise à broches RCA × 1)× 1
PB / PR × 2
AUDIO L-R (Prise à broches RCA × 2) × 2
AUDIO L-R (Prise à broches RCA × 2) × 1
Connecteur HDMI de type A × 1
AUDIO L-R (Prise à broches RCA × 2) × 1 0,5 V eff.
663 mm × 556 mm × 299,5 mm
(26,1 po × 21,9 po × 11,8 po)
663 mm × 494,3 mm × 140,7 mm
(26,1 po × 19,5 po × 5,54 po)
18 kg (39,6 lb) NET
795 mm × 634,7 mm × 299,5 mm
(31,3 po × 25 po × 11,8 po)
795 mm × 573 mm × 140,7 mm
(31,3 po × 22,6 po × 5,54 po)
21 kg (46,2 lb) NET
Remarque:
La forme et les caractéristiques du produit peuvent être modifiées sans préavis. Le poids et les dimensions
fournis sont approximatifs.
32
fr.indd 26
2005/04/21 15:58:03
Garantie limitée
Panasonic Canada Inc.
Certificat de garantie limitée Panasonic
Panasonic Canada Inc. garantit cet appareil contre tout vice de fabrication et accepte, le cas échéant, de remédier à toute
défectuosité pendant la période indiquée ci-dessous et commençant à partir de la date d'achat original.
Écrans/téléviseurs a
plasma
Service à domicile
Téléviseurs à cristaux
liquides (26 po et plus)
Téléviseurs à cristaux
liquides (25 po ou
moins)
Projecteurs à cristaux
liquides
Service à domicile
Service en atelier seulement
Service en atelier seulement
Accessoires
Un (1) an, pièces (panneau d’affichage compris) et
main-d’œuvre
Un (1) an, pièces (écran à cristaux liquides compris)
et main-d’œuvre
Un (1) an, pièces (écran à cristaux liquides compris)
et main-d’œuvre
Un (1) an, pièces (90 jours sur la lampe) et maind’œuvre
Quatre-vingt-dix (90) jours (pièces seulement)
Le service à domicile ne sera offert que dans les régions accessibles par routes et situées dans un rayon de 50 km d’un centre de service agréé Panasonic.
LIMITATIONS ET EXCLUSIONS
Cette garantie n'est valide que pour les appareils achetés au Canada et ne couvre pas les dommages résultant d'une installation
incorrecte, d'un usage abusif ou impropre ainsi que ceux découlant d'un accident en transit ou de manipulation. De plus, si l'appareil a
été altéré ou transformé de façon à modifier l'usage pour lequel il a été conçu ou utilisé à des fins commerciales, cette garantie devient
nulle et sans effet. Les piles sèches ne sont pas couvertes sous cette garantie.
Cette garantie est octroyée à l’utilisateur original seulement. La facture ou autre preuve de la date d’achat original sera exigée pour
toute réparation sous le couvert de cette garantie.
CETTE GARANTIE LIMITÉE ET EXPRESSE REMPLACE TOUTE AUTRE GARANTIE, EXPRESSE OU IMPLICITE, INCLUANT LES
GARANTIES IMPLICITES DU CARACTÈRE ADÉQUAT POUR LA COMMERCIALISATION ET UN USAGE PARTICULIER.
PANASONIC N’AURA D’OBLIGATION EN AUCUNE CIRCONSTANCE POUR TOUT DOMMAGE DIRECT, INDIRECT OU
CONSÉCUTIF.
Certaines juridictions ne reconnaissent pas les exclusions ou limitations de dommages indirects ou consécutifs, ou les exclusions de
garanties implicites. Dans de tels cas, les limitations stipulées ci-dessus peuvent ne pas être applicables.
RÉPARATION SOUS GARANTIE
Pour de l’aide sur le fonctionnement de l’appareil, veuillez contacter notre service à la clientèle au :
N° de téléphone :
(905) 624-5505
Ligne sans frais :
1-800-561-5505
N° de télécopieur :
(905) 238-2360
Lien courriel : << Contactez-nous >> à www.panasonic.ca
Pour la réparation des appareils, veuillez consulter notre site www.panasonic.ca pour connaître le centre de service agréé le plus près
de votre domicile :
Lien : <<Centres de service >> sous << support à la clientèle >>
Centres de service Panasonic :
Vancouver
Mississauga, Ontario
Panasonic Canada Inc.
12111 Riverside Way
Richmond, BC V6W 1K8
Tél. : (604) 278-4211
Téléc. : (604) 278-5627
Panasonic Canada Inc.
5770 Ambler Dr.
Mississauga, ON L4W 2T3
Tél. : (905) 624-8447
Téléc. : (905) 238-2418
Expédition de l'appareil à un centre de service
Emballer soigneusement l'appareil, de préférence dans le carton d'origine, et l'expédier port payé et assuré au centre de service.
Inclure la description détaillée de la panne et la preuve de la date d'achat original.
33
fr.indd 13
2005/04/19 14:34:48
LCD warranty US and Canada new.fm Page 6 Thursday, April 21, 2005 2:56 PM
Nota
LCD warranty US and Canada new.fm Page 7 Thursday, April 21, 2005 2:56 PM
Nota
LCD warranty US and Canada new.fm Page 8 Thursday, April 21, 2005 2:56 PM
Nota
LCD warranty US and Canada new.fm Page 9 Thursday, April 21, 2005 2:56 PM
Nota
LCD warranty US and Canada new.fm Page 6 Thursday, April 21, 2005 2:56 PM
Nota
LCD warranty US and Canada new.fm Page 7 Thursday, April 21, 2005 2:56 PM
Nota
Consignation du numéro de série
La référence de modèle et le numéro de série de ce produit se trouvent sur sa face arrière. Notez
ce numéro de série dans l’espace réservé à cet effet ci-dessous et conservez ce manuel et votre
facture comme preuve de votre achat, pour aider à identifier l’appareil en cas de perte ou de vol
et pour recours à la garantie.
Modèle
Panasonic Consumer Electronics
Company, Division of Panasonic
Corporation of North America
One Panasonic Way Secaucus
New Jersey 07094
Numéro de série
Panasonic Puerto Rico Inc.
Ave. 65 de Infanteria, Km 9.5
San Gabriel Industrial Park,
Carolina, Puerto Rico 00985
2005 Panasonic Corporation of North America.
fr.indd 30
Tous droits resérvés.
Panasonic Canada Inc.
5770 Ambler Drive
Mississauga, Ontario
L4W 2T3
Imprimé aux États-Unis
2005/04/21 15:58:05