1
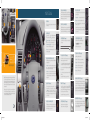
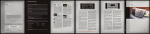
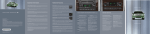
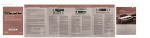
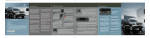
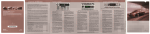
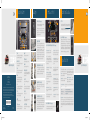
audio system
seating
14
17
memory seats (if equipped)
01
15
13 03
Position seat, mirrors and adjustable pedals to desired position
■ Press SET control on driver’s door panel.
03 05
04
f
freestar
r
quick reference guide
01
02 phone /mute
Press to mute the playing media. Press again to
return to playing media.
Press Seek to access the next strong station. In CD
mode, press Seek to access the next track.
04
Ford Motor Company
Customer Relationship Center
P.O. Box 6248
Dearborn, MI 48121
1-800-392-3673 (FORD)
(TDD for the hearing impaired: 1-800-232-5952)
This Quick Reference Guide is not intended to replace your Owner’s Guide which contains more detailed
information concerning the features of your vehicle as well as important safety warnings designed to help
reduce the risk of injury to you and your occupants. Please read your entire Owner’s Guide carefully as you begin
learning about your new Freestar and refer to the appropriate sections when questions arise.
All information contained in this Quick Reference Guide was accurate at the time of duplication.
We reserve the right to change features, operation and/or functionality of any vehicle specification at any time.
Your Ford dealer is the best source for the most current information.
21722 Freestar QRG 1-6
4F2J-19G217-AA
menu
Press to toggle through the following modes:
Treble, Bass, Balance, Fade, Speed Sensitive
Volume, Setting the Clock and Autoset.
aux
Press to toggle between FES (Family Entertainment
System)/DVD (if equipped) and AUX modes.
06 text
In CD mode, this feature reads track name, artist
name and disc name (if available).
shuffle
07
08 comp
Press to play tracks in random order.
*F4F2J19G217AA*
October 2003
Second Printing
Quick Reference Guide
05
Ford Freestar
Litho in U.S.A.
03
09
10 fast forward
11 rewind
12 memory presets
Press to repeat the current CD track.
02
Press to manually advance in a CD track.
01
01
Press to manually reverse in CD track.
03 seek
(compression)
In CD mode, brings soft and loud CD passages
together for a more consistent listening level.
01
To set a station: select frequency band AM/FM;
tune to a station, press and hold a preset button
until sound returns.
13 am / fm
14 cd
Press to select AM/FM frequency band.
01
Press to enter CD mode. If a CD is already loaded in
the system, CD play will begin where it ended last.
15 cd eject
16 scan
The 3rd row seat is equipped with a tailgate function to be
utilized only when the vehicle is parked and engine turned off.
This rearward-facing position allows you to open the liftgate
and sit facing out of the vehicle rearward ■ To access the
tailgate function, the seat must be in the upright position ■
Once the seat is in the seating position, release the cushion
latches by pulling the left (2) strap ■ Pull the seat rearward by
the long (3) strap and set the seat on the liftgate scuff plate ■
The right (1) strap is not used to access this position.
fold and tumble 2nd row seat
Lift the lever (1) located on the rear lower corner of the 2nd row
seat ■ The seat will fold flat ■ Continuing to lift the handle will
tumble the seat forward ■ For additional information on 2nd row
seating operation, please consult your Owner’s Guide.
adjustable 3rd row seats
To adjust 3rd row seat, pull the strap (1) located near the plastic
shield in the center of the seat ■ When seat is in desired
position, release the strap.
Press to eject a CD.
Press to turn ON/OFF. Turn to increase/decrease
the volume level.
stowing the 3rd row seats
03
Press for a brief sampling of radio stations or CD
tracks. Press again to stop.
17 on / off / volume
LATCH
Your vehicle is equipped with the LATCH attachments at certain seating positions.
This type of seat eliminates the need to use seat belts to attach child seats.
For complete details on this feature, see Attaching safety seats with tether straps
in the Seating and Safety Restraint section of your Owner’s Guide.
05
03 04
tailgate function
repeat
Press to manually go up or down the radio frequency.
Also use in menu mode for various settings.
10 12 13
07
11
08
power sliding doors (if equipped)
04
12
11 10 09 08 07 06
tuner
additional features
02
Within 5 seconds, press any control on the remote transmitter
and then press 1 or 2 on the driver’s door panel to set the
positions to Driver 1 or 2. For complete details of this feature,
please see your Owner’s Guide.
02
16
climate control
02
01
From the rear of the vehicle, fold the seat back by pulling and releasing
the right (1) strap ■ Release the cushion latches by pulling the left (2)
strap ■ Pull the long (3) strap on the seatback to tumble the seat
all the way into the tub in the floor ■ To return the seat back to the
seating position, pull the right (1) strap, then while holding the right
(1) strap, pull the long (3) strap to raise the seat back.
06
09
Sliding door must be unlocked for power door to open. ■ The shift lever must be
in (P) Park for sliding door to open. ■ The power sliding doors can be opened by
pushing and releasing the overhead console control. ■ The power sliding doors may
also be opened by pushing and releasing the control(s) located on the trim panel in
the front of the sliding door. ■ If anything is in the path of the sliding door, the door
will automatically reverse its path or stop, depending on the position of the door.
14
electronic automatic temperature control (if equipped)
01
02
03
04
05
06
07
Driver temperature control ■ Increases/
decreases the temperature of the driver.
Auto ■ The system will automatically
determine fan speed, airflow location, A/C
on or off, and outside or recirculated air, to
heat or cool the vehicle to reach the desired
cabin temperature.
Front fan speed control
the front fan speed.
■
Increases/decreases
Driver heated seat control (if equipped) ■
Press once to activate high heat, press a
second time to activate low heat. Press a third
time to deactivate.
A/C ■ Engages/disengages the air
conditioning.
Airflow direction controls ■ These modes
allow you to choose the air distribution mode
you desire.
Rear ■ Allows rear passengers to control the
auxiliary climate control system.
08
09
10
11
12
13
14
Recirculation ■ Recirculates air in the cabin;
reducing the amount of time to cool down the
interior of the vehicle when used with A/C.
For further information on this feature, please see your Owner’s Guide.
Passenger heated seat control ■ Press once
to activate high heat, press a second time
to activate low heat. Press a third time to
deactivate.
Defrost ■ Used to clear ice or fog from the
windshield by distributing air through the
windshield defroster vents.
specifications
The following specifications are important for
proper maintenance and operation of your vehicle.
Used to defrost rear window.
Tire Pressure ■ Tire pressure should be maintained
according to the Certification Label.
Rear temperature control ■ Increases/
decreases the airflow temperature to the rear
of the vehicle. Rear temperature settings are
affected by the driver temperature setting.
Changing the Tires ■ Replace tires when wear
band is visible through the tire treads.
Rear defrost
■
Passenger temperature control ■ Increases/
decreases the temperature of the front
passenger.
Rear fan speed control
the rear fan speed.
heated outside mirrors (if equipped)
Heated mirrors operate whenever rear window defrost is activated.
are heated automatically to remove ice, mist and fog.
■
Both mirrors
■
Increases/decreases
Location of the spare tire & tools
■
Fuses ■ If electrical components in the vehicle are not
working, a fuse may have blown. Blown fuses are identified
by a broken wire within the fuse. Check the appropriate
fuses before replacing any electrical components.
04
f
freestar
r
quick reference guide
Unleaded Fuel Recommendation ■ Your vehicle is
designed to use “Regular” unleaded gasoline with a
pump (R+M)/2 octane rating of 87.
The spare tire and tools for your vehicle are stored in the following location:
Item
Location
Spare Tire
Under the vehicle, just forward of the rear bumper
Jack, wheel nut wrench
Behind the access panel located on the right rear quarter panel interior
Jack Handle
Attached to jack with clip
Roadside Assistance ■ Ford Motor Company offers a complimentary roadside assistance program. The service
is available 24 hours, seven days a week for the New Vehicle Limited Warranty period of 3 years/36,000 miles,
whichever occurs first. The service includes: changing a flat tire, jump-starts, lock-out assistance, limited fuel
delivery, towing of disabled vehicle. ■ Complete your roadside assistance identification card and place it in your
wallet for quick reference. This card can be found in the Owner Information Guide in the glove compartment of
your vehicle.
10/29/03, 2:56:53 PM
11
08
09 10
01
06
interior features
01
13
12
02
The hood release for your vehicle is located under the bottom left hand corner of
the instrument panel.
04
03
03
quick reference guide
Safety. It’s the most important consideration when buying a family vehicle. Knowing
your family is safe is the best kind of peace of mind. That’s why you chose Ford
Freestar. It provides just that kind of reassurance. With upgraded safety innovations,
steering and performance, you get a minivan that is Ford’s best-driving, safest
minivan ever. Add to that versatile seating and interior comfort and you have the
ideal family vehicle.
Turns the lamps off. ■
Turns on the Parking lamps, instrument panel
lamps, license plate lamps and tail lamps. ■
Turns the headlamps on.
But before you put it to the test, take the time to see everything Freestar has to
offer. This quick reference guide is designed to give you a preview of the most
commonly used features and is not intended to replace the Owner’s Guide. Please
refer to it for more detailed information on your vehicle.
■
check fuel cap warning lamp
This light illuminates when the fuel cap may not be properly installed. If this light
illuminates during driving, stop the car, turn off the ignition and re-install the cap.
For complete details on all the Warning Lights, please see your Owner’s Guide.
Specific details of the operation of these systems are determined by the Climate
Control System with which your vehicle is equipped. For complete details, please
see your Owner’s Guide.
08
adjustable pedals
14
04
(if equipped)
Press and hold the rocker control to adjust accelerator and brake pedal toward
or away from you.
13
setting the digital clock (on radio)
Press MENU until SELECT HOUR or SELECT MINUTE is displayed.
Press
/
/
SEEK
to adjust the hours/minutes.
09
The windshield washer/wiper is located on the turn indicator stalk. The Multifunction
lever is operated as follows:
(if equipped)
The controls for Speed Control are located on your steering wheel. ■ Press
the ON control and release it ■ Accelerate to desired speed ■ Press the SET
+ control and release it ■ Take your foot off the accelerator pedal. ■ The
indicator
light on the instrument cluster will turn on. ■ To disengage Speed
Control, depress the brake pedal. For complete details on this function, please
see your Owner’s Guide.
accelerator
and
brake
pedal
should
only
be
adjusted
when
Press MENU again to disengage clock mode.
the
vehicle is stopped and the gearshift lever is in (P) Park position.
Pull the
message center controls (if equipped)
With your ignition in the ON position, the message center, located on your
instrument cluster, displays important vehicle information.
Info ■ This control displays the following options: Odometer, Distance to Empty, Trip
Odometer, Average Fuel Economy, Trip Elapsed Drive Time, and Display On/Off.
Setup ■ Press this control for the following displays: Language, Units (English/
Metric), System Check.
For washer function ■ Push end of the stalk briefly for a single swipe of wipers
without washer fluid. ■ Push and hold quickly for three swipes with washer fluid.
■ For rear window wiper/washer feature, rotate the rear window wiper control to
the desired position.
04
Controls the direction of the airflow in the vehicle.
07
For wiper function ■ Rotate the end of the control away from you to increase wiper
speed. ■ Rotate it towards you to decrease wiper speed. A long push and hold
will activate wipers and washer fluid for up to ten seconds.
02
Controls the temperature of the airflow in the vehicle.
MAX A/C ■ Uses recirculated air in A/C mode to cool the vehicle, reducing the
amount of time to cool the cabin.
The
■
■
■
Turn
turn signal & windshield wiper washer
speed control
Your vehicle is equipped with a climate control system. The basic functions of this
system are described below:
Temperature selection
headlamp control
High Beams ■ Push the lever toward the instrument panel to activate.
lever towards you to deactivate.
f reestarr
12
climate control system
Air flow selections
Daytime Running Lamps (if equipped) ■ Turn key to ON position.
headlamp control to OFF, parking lamps or autolamp position.
05
This light indicates that the On-Board Diagnostics System (OBD-II) has detected
a malfunction. If this light illuminates or blinks during driving, drive at a moderate
speed and have the vehicle serviced immediately. For complete details on all the
Warning Lights, please see your Owner’s Guide.
hood release
Autolamp control (if equipped) ■ Rotate the control counterclockwise to turn
autolamp on. ■ Rotate the control clockwise to turn autolamps off.
070
06
check engine warning lamp
14
steering wheel controls (if equipped)
Press MEDIA to select AM, FM1, FM2, TAPE or CD.
In radio mode
In tape mode
■
■
Press SEEK to select a preset station from memory.
Press SEEK to listen to the next selection on the tape.
In CD mode
■
Press SEEK to listen to the next track on the disc.
In any mode
■
Press VOL up or down to adjust the volume.
In any mode
■
Press MUTE to mute volume.
Reset ■ Press this control to select and reset functions shown in the INFO and
SETUP menus.
For complete details on this feature, please see your Owner’s Guide.
rear audio system controls (if equipped)
10
AdvanceTrac
™
(if equipped)
AdvanceTrac™ may be manually turned Off or On by pressing the
button.
■ AdvanceTrac™ automatically turns on when the vehicle is started. ■ When
system is off, the TRAC OFF indicator light will appear in the instrument cluster. ■
AdvanceTrac™ does not operate when vehicle is in (R) Reverse.
Your vehicle may be equipped with auxiliary audio controls. This feature allows
the front and middle seat passengers to listen to different media sources (radio,
cassette, CD or DVD) simultaneously. (However, the front and middle seat
passengers cannot listen to two different radio stations at the same time.) Rear seat
passengers can use the controls to change the playing media for all passengers
(Single Play mode). For complete details, please see your Owner’s Guide.
For complete details on this system, please see your Owner’s Guide.
signal indicator mirrors (if equipped)
05
21722 Freestar QRG 7-12
low tire pressure warning system
This light illuminates when the low tire warning system is enabled. Tire pressure
should be checked if this light remains on while driving. For complete details on all
the Warning Lights, please see your Owner’s Guide.
11
setting the analog clock (if equipped)
Press the right + control to move the time display forward.
Press the left – control to move the time display backwards.
When turn signal is activated, the appropriate mirror will show a blinking yellow
arrow. ■ Blinking arrow is dimmer when parking lights are on. ■ When sliding
door is open, the indicator in the appropriate mirror will flash to indicate that
people may be entering/exiting vehicle.
10/29/03, 12:22:12 PM