1
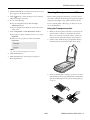
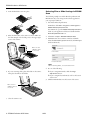
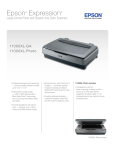
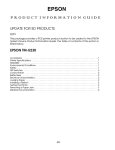
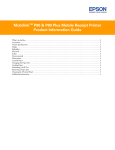
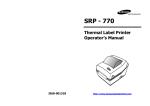
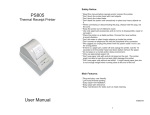
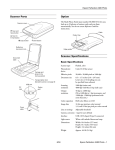
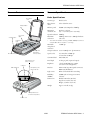
EPSON Perfection 4870 Series Scanner Parts Scanner Specifications TPU indicator light Basic Specifications Document cover Transportation lock ] Start button Scanner type Flatbed, color Photoelectric device Color CCD line sensor Effective pixels 40,800 × 56,160 pixels at 4800 dpi Maximum document size US letter or A4 size (8.5 × 11.7 inches [216 × 297 mm]) Optical resolution 4800 dpi Document table Maximum resolution* Indicator light * The maximum hardware resolution of 4800 × 9600 dpi is achieved using EPSON’s Micro Step Drive™ technology. Maximum interpolated resolution Carriage and lamp (in the home position) P Power button Transparency unit (TPU) connector Transparency unit (TPU) under lid 12,800 dpi Output resolution 25 to 12,800 dpi in 1 dpi increments Speed (color) 16.9 msec/line at 4800 dpi 4.1 msec/line at 600 dpi Command level ESC/I (B8), FS Pixel depth 16 bits per pixel (input and output) Brightness 7 levels (in EPSON Scan, gamma correction controls brightness) Interface USB 1.1/2.0 (Type B receptacle connector) IEEE 1394 (FireWire) Light source White cold cathode fluorescent lamp Reliability (MCBF) 36,000 cycles of carriage movements (scanner) Dimensions Width: 12.0 inches (30.4 cm) Depth: 18.7 inches (47.6 cm) Height: 5.3 inches (13.4 cm) Weight Approx. 14.8 lb (6.7 kg) USB port IEEE 1394 port 4800 dpi (main scan) × 9600 dpi hardware (sub scan) Transportation lock (in unlocked position) Power cord 12/03 EPSON Perfection 4870 Series - 1 EPSON Perfection 4870 Series Electrical Transparency Unit Input voltage range 100-120 VAC ± 10% Rated frequency 50 to 60Hz Rated input current 0.7 A Power consumption Approx. 24 W operating Approx. 16 W in stand-by mode Approx. 4.5 W in power saving mode Note: Scanners sold outside the US market may operate at a different voltage. Check the label on the back of the scanner for voltage information. Environmental Temperature Operation: 41 to 95 °F (5 to 35 °C) Storage: –13 to 140 °F (–25 to 60 °C) Humidity (without condensation) Operation: 10% to 80% Storage: 10% to 85% Operating conditions Ordinary office or home conditions; avoid extreme dust, direct sunlight, and strong light sources. Safety Approvals Safety UL 60950 CSA C22.2 No. 60950 EMC FCC part 15 subpart B class B CSA C108.8 class B The transparency unit is built into the scanner lid. Rated voltage DC 24 V ± 10%, DC 5 V ± 5% Document specifications Positive or negative film in the following sizes: 35 mm strips (24 frames) 35 mm slides (8 slides) 120/220 (6 × 12 cm) film (3 frames) 4 × 5-inch film (2 frames) Readable area 5.7 × 9.1 inches (144 × 231 mm) Scanning and Restoring Photos The following example uses Adobe® Photoshop® Elements and EPSON Scan. If you are using another software application, your steps may be different. 1. Start Adobe Photoshop Elements: In Windows, click Start > Programs or All Programs > Adobe Photoshop Elements 2.0. On a Macintosh, open the Adobe Photoshop Elements 2 folder (in your Applications folder) and double-click the Photoshop Elements 2.0 icon. 2. Select File > Import > EPSON Perfection 4870. 3. In EPSON Scan, choose Home or Professional mode. You see a screen similar to this: USB Interface Interface type Universal Serial Bus Specification Revision 2.0 Connector type One receptacle (Type B) FireWire Interface Interface type IEEE 1394a-2000 compatible Data transfer Half-duplex data/strobe differential serial Synchronization Clock synchronization with DS-Link Encoding/ Decoding DS-Link Logic level 3.3 V 2 - EPSON Perfection 4870 Series 12/03 EPSON Perfection 4870 Series 4. Click the Preview button at the bottom of the screen. Your photo appears in the Preview window. 5. Click the button to select the image area to be scanned. Adjust the marquee if necessary. 6. Do one of the following: Scanning Transparencies and Film Before scanning transparent documents, you need to remove the scanner’s reflective document mat; this exposes the scanner’s transparency unit (light source), which is built into the lid. ❏ If you’re using Home Mode, click the Image Adjustments button. If you’re scanning slides or film strips, you’ll also need to use one of the film holders. ❏ If you’re using Professional Mode, scroll to the bottom of the screen. Using the Transparency Unit 7. Select the Digital ICE or Color Restoration checkbox: ❏ If your photo is dirty, scratched, creased, or torn, select Digital ICE. ❏ If the colors in your photo are faded, select Color Restoration. 1. Make sure the transparency unit cable is connected to the option interface connector on the back of the scanner. (If it is not connected, turn off the scanner, connect the transparency unit cable, then turn the scanner back on.) 2. Lift the scanner lid all the way up and pull the reflective document mat up and off of the scanner lid, as shown. Note: You can select both settings if necessary. 8. Click the Scan button. 9. Click the Close button. Your image now appears in Photoshop Elements. 3. If you are scanning film or negatives, open the cover, then slide the film into the corresponding holder, with the film’s shiny base side facing down. (If you are scanning slides, go to step 6.) 12/03 EPSON Perfection 4870 Series - 3 EPSON Perfection 4870 Series Selecting Film or Slide Settings in EPSON Scan 4. Lock the film holder cover into place The following example uses Adobe Photoshop Elements and EPSON Scan. If you are using another software application, your steps may be different. 1. Start Adobe Photoshop Elements: In Windows, click Start > Programs or All Programs > Adobe Photoshop Elements 2.0. On a Macintosh, open the Adobe Photoshop Elements 2 folder (in your Applications folder) and double-click the Photoshop Elements 2.0 icon. 5. Place the film holder on the scanner as shown. Make sure the white triangle on the holder points to the upper-right corner of the scanner. 2. Select File > Import > EPSON Perfection 4870. 3. In EPSON Scan, choose Home or Professional Mode. Select the Document Type (Home Mode) and Film Type (Professional Mode). Make sure this calibration space is uncovered Home Mode Professional Mode Note: When scanning slides, choose Positive Film. 4. Do one of the following: ❏ If you’re using Home Mode, click the Image Adjustments button. 6. If you are scanning slides, place the holder on the scanner. Then place the slides in the holder. ❏ If you’re using Professional Mode, scroll to the bottom of the screen. 5. Click the Preview button at the bottom of the screen. Make sure this calibration space is uncovered 7. Close the scanner cover. 4 - EPSON Perfection 4870 Series 12/03 EPSON Perfection 4870 Series Thumbnails of your images appear in the Preview window: Indicator Light The indicator light (next to the ] Start button) indicates the status of the scanner, as described below. Light Color On Green The scanner is ready to scan images. Flashing Green The scanner is initializing (warming up) or is busy scanning. Flashing Red Check the following, then turn your scanner off and back on to reset it: ❏ Color Restoration. Restores color to faded images. ❏ Dust Removal. Removes dust. Select the level of dust removal by clicking the button. ❏ Digital ICE. Removes scratches, dust and fingerprints. ❏ Make sure the transportation lock is turned to the unlocked position. See the Start Here sheet for details. ❏ Make sure the scanner is properly connected to your computer. ❏ If you are scanning transparencies, make sure you’ve removed the reflective document mat. See page 3. If this does not eliminate the error, the fluorescent lamp may need to be replaced or the scanner may have another problem. Consult your dealer or EPSON. 6. For each thumbnail, select from the following Image Adjustment options: ❏ Grain Reduction (available only in Professional mode). Use with high-speed film or under-exposed images. Select the level of grain reduction by clicking the button. Status Off — The scanner is unplugged or turned off. Transporting the Scanner If you need to ship your scanner, you must prepare it for transportation in it’s original box or one of a similar size. 1. Turn on the scanner and wait until the carriage moves to the home position. When the indicator light remains solid green, turn off the scanner. 2. Disconnect the power cable. 3. Disconnect the USB or IEEE 1394 cable. Note: You cannot select Dust Removal and Digital ICE at the same time. 4. Disconnect the transparency unit cable. 5. Turn the transportation lock to the locked position to secure the carriage. 7. Click the Scan button. 8. Click the Close button. Your images now appear in Photoshop Elements. 12/03 EPSON Perfection 4870 Series - 5 EPSON Perfection 4870 Series 6. Slide the transportation lock to the locked position to secure the transparency unit. 6 - EPSON Perfection 4870 Series Related Documentation CPD-16641 EPSON Perfection 4870 Photo Start Here poster CPD-16660 EPSON Perfection 4870 Pro Start Here poster CPD-16643 EPSON Perfection 4870 Series scanner software CD-ROM CPD-16642 EPSON Perfection 4870 Series Quick Guide — Reference Guide (HTML) 12/03