1
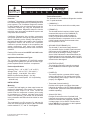
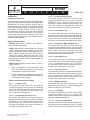
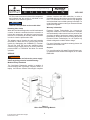
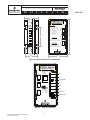
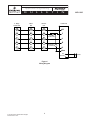
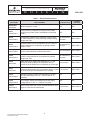
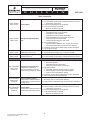
Application
Engineering
Application
Engineering
B
L LL E L T EI
BU U
N
T
AE8-1385
I
AE8-1385
N
October 2011
CoreSense™ Diagnostics
for Copeland Scroll® UltraTech® Air Conditioning Compressors
TABLE OF CONTENTS
Safety
Safety Instructions................................................................. 2
Safety Icon Explanation ........................................................ 2
Instructions Pertaining to Risk of Electrical Shock, Fire,
or Injury to Persons ............................................................... 3
Safety Statements ................................................................. 3
Introduction
Overview ............................................................................... 4
Application Restrictions and Types ....................................... 4
Product Specifications........................................................... 4
Installation
Mounting ............................................................................... 4
Terminal Description.............................................................. 4
Operation
Compressor Protection ......................................................... 4
Module LED Description ....................................................... 5
Module Operation/Code Description ..................................... 5
Resetting Alert Codes ........................................................... 6
Service
Module History Download ..................................................... 6
Warranty Information ............................................................. 6
Support.................................................................................. 6
Figures and Tables
Wires Pulled Through Module ............................................... 6
Module Dimensions in Millimeters......................................... 7
Terminal Locations ................................................................ 7
Wiring Diagram ..................................................................... 8
Flash Code Description ......................................................... 9
LED Troubleshooting Information...................................... 10-12
© 2011 Emerson Climate Technologies
Printed in the U.S.A.
1
Application Engineering
B
U
L
L
E
T
I
N
AE8-1385
Safety Instructions
Copeland Scroll® compressors with CoreSense™ Diagnostics technology are manufactured according to the latest
U.S. and European Safety Standards. Particular emphasis has been placed on the user's safety. Safey icons are
explained below and safety instructions applicable to the products in this bulletin are grouped on Page 3. These
instructions should be retained throughout the lifetime of the compressor. You are strongly advised to follow
these safety instructions.
Safety Icon Explanation
DANGER
DANGER indicates a hazardous situation which, if not avoided, will result
in death or serious injury.
WARNING
WARNING indicates a hazardous situation which, if not avoided, could
result in death or serious injury.
CAUTION
CAUTION, used with the safety alert symbol, indicates a hazardous
situation which, if not avoided, could result in minor or moderate injury.
NOTICE
CAUTION
© 2011 Emerson Climate Technologies
Printed in the U.S.A.
NOTICE is used to address practices not related to personal injury.
CAUTION, without the safety alert symbol, is used to address practices
not related to personal injury.
2
Application Engineering
B
U
L
L
E
T
I
N
Instructions Pertaining to Risk of Electrical Shock, Fire, or Injury to Persons
WARNING
WARNING
WARNING
CAUTION
ELECTRICAL SHOCK HAZARD
• Failure to follow these warnings could result in serious personal injury.
• Disconnect and lock out power before servicing.
• Discharge all capacitors before servicing.
• Use compressor with grounded system only.
• Molded electrical plug must be used when required.
• Refer to original equipment wiring diagrams.
•
PRESSURIZED SYSTEM HAZARD
• Failure to follow these warnings could result in serious personal injury.
• System contains refrigerant and oil under pressure.
• Remove refrigerant from both the high and low compressor side before
removing compressor.
•
• Never install a system and leave it unattended when it has no charge,
a holding charge, or with the service valves closed without electrically
locking out the system.
• Use only approved refrigerants and refrigeration oils.
• Personal safety equipment must be used.
BURN HAZARD
• Failure to follow these warnings could result in serious personal injury or
property damage.
• Do not touch the compressor until it has cooled down.
• Ensure that materials and wiring do not touch high temperature areas of
the compressor.
• Use caution when brazing system commponents.
• Personal safety equipment must be used.
COMPRESSOR HANDLING
• Failure to follow these warnings could result in personal injury or
property damage.
• Use the appropriate lifting devices to move compressors.
• Personal safety equipment must be used.
Safety Statements
• Refrigerant compressors must be employed only for their intended use.
•
install, commission and maintain this equipment.
•
• All valid standards and codes for installing, servicing, and maintaining electrical and
refrigeration equipment must be observed.
© 2011 Emerson Climate Technologies
Printed in the U.S.A.
3
AE8-1385
Application Engineering
B
U
L
L
E
T
I
N
AE8-1385
INTRODUCTION
Terminal Description
Overview
The terminals for the CoreSense Diagnostics module
are ¼” spade terminals.
CoreSense Diagnostics is a breakthrough innovation
for troubleshooting residential air conditioning and heat
pump systems. The CoreSense Diagnostics module
is easily installed in the unit electrical panel near the
compressor contactor. By using the compressor as
a sensor, CoreSense Diagnostics helps the service
technician more accurately troubleshoot system and
compressor fault conditions.
™
• COMMON (C)
The 24 volt common terminal for module power.
• DEMAND (Y)
The demand terminal requires a 24VAC signal
measured with respect to the COMMON (C)
terminal when there is a call for heating or
cooling. A signal above 6VAC indicates the
thermostat wants the compressor to be on, while
0-6VAC signal indicates the thermostat wants
the compressor to be off.
CoreSense Diagnostics also provides compressor
and system protection through its proprietary lockout
feature. Depending on the severity and frequency of
the fault that caused the trip condition, the CoreSense
Diagnostics module can lockout the compressor
contactor to prevent damage to the compressor and
system components. Less severe fault conditions
resulting in an occasional trip will not result in a lockout
condition.
• SECOND STAGE DEMAND (Y2)
The demand (Y) and second stage demand
(Y2) terminals require a 24VAC signal measured
with respect to the COMMON (C) terminal when
there is a call for heating or cooling. A signal
above 10VAC indicates the thermostat wants the
Ultratech solenoid to be energized, while 0-10VAC
signal indicates the thermostat wants the Ultratech
solenoid to be deenergized.
Flashing LEDs communicate ALERT and LOCK codes
to the service technician.
Application Restrictions and Types
The CoreSense Diagnostics (571-0072-00) module
is designed and qualified for use with ZPS*K5 singlephase Copeland Scroll® UltraTech™ compressors.
• PROTECTION (PROT)
The protection terminal is internally connected
to the COMMON terminal through a solid state
switch.
Product Specifications
Operating Temp: - 40° to 150°F (- 40° to 65°C)
Storage Temp: - 40° to 175°F (- 40° to 80°C)
Supply Voltage: 18 to 28VAC , 48 to 62Hz
Module Current Sensing Range: 2 to 30A
Maximum Power Consumption: 2.5 VA (Excluding
solenoid load)
• POWER (R)
The module requires a constant 24VAC supply
power to this terminal. The module must receive
an independent power supply in order to operate
properly. See Figure 4.
INSTALLATION
• Thermostat Communication (L)
Provides a 24V signal to an indoor thermostat
indicating the number of ALERT flashes displayed
on the module. (Reference thermostat manual for
available capability)
Mounting
Four #8 or #10 self tapping or sheet metal screws are
required for installation of the module. The maximum
mounting screw torque is 20 in.lbs. Locate the
module near the compressor contactor (wire routing
for compressor run, common, and start wires will be
easier in this position). The module can be mounted
in any orientation and LEDs should be visible for ease
of service.
• Solenoid (DC SOL)
Provides a connection to the Copeland Scroll
UltraTech second stage compressor solenoid. This
solenoid is internal to the compressor, and has
a voltage range of 18 to 28VDC. Please refer to
bulletin AE-1311 for information on the Copeland
Scroll® UltraTech® compressor.
The compressor’s run (R), common (C), and start (S)
wires are routed through the holes in the CoreSense
module marked “R”,”C”, and “S”. See Figure 1.
© 2011 Emerson Climate Technologies
Printed in the U.S.A.
4
Application Engineering
B
U
L
L
E
T
I
N
AE8-1385
OPERATION
Code 3 – Pressure Switch Cycling
Compressor Protection
The module will flash yellow three times when the
compressor operates from 12 seconds to 15 minutes
followed by a trip condition lasting between 35
seconds to 7 minutes. When four consecutive or ten
total Code 3 events are recorded, the module will
lockout the compressor and flash red three times.
The CoreSense Diagnostics module utilizes proprietary
algorithms to protect the compressor and system from
repeated trips of system pressure controls and the
compressor internal overload. The protection terminal
of the module should be wired in series with the system
low pressure and high pressure cutouts, as well as
the compressor contactor. When the module detects
a series of trips as described below, it will activate a
lockout feature that opens the solid state switch in the
module, thereby cutting power to the contactor and deenergizing the compressor.
Code 4 – Locked Rotor Trip
The module will flash yellow four times when the
compressor trips within 12 seconds of operation and
does not reset and start within 35 seconds. When ten
consecutive Code 4 events are recorded the module
will lockout the compressor and flash red four times.
Module LED Description
Code 5 – Compressor (Moderate Run) Trip
POWER LED (Green): indicates the module is
powered with 18 to 28 volts.
The module will flash yellow five times when the
compressor has operated between 15 minutes and
18 hours, followed by a compressor trip lasting longer
than 7 minutes. When four consecutive or ten total
Code 5 events are recorded, the module will lockout
the compressor and flash red five times.
ALERT LED (Yellow): communicates an abnormal
system condition through a unique flash code. The
ALERT LED will flash a number of times consecutively,
pause and then repeat the process. The number of
consecutive flashes, defined as the Flash Code,
correlates to a particular abnormal condition. Detailed
descriptions of specific ALERT Flash Codes are
shown in Table 1.
Code 6 – Open Start Circuit
The module will lockout the compressor and flash
red six times if the module detects a demand signal
in the “Y” terminal and current in the “R” winding of
the compressor, but no current is detected in the “S”
winding of the compressor for 2 seconds.
TRIP/LOCK LED (Red): indicates either a TRIP or
LOCK condition.
• TRIP: is indicated by a solid illumination of the
LED. This means the compressor is not running
and demand is present at the module.
Code 7 – Open Run Circuit
The module will lockout the compressor and flash red
seven times if the module detects a demand signal
in the “Y” terminal and current in the “S” winding of
the compressor, but no current is detected in the “R”
winding of the compressor for 2 seconds.
• LOCK: is indicated by a flashing LED correlating to
a LOCK condition in which the module will prevent
the compressor from starting.
Module Operation/Code Description
Code 8 – Welded Contactor
Code 1 – Long Run Time
The module will flash yellow eight times if it has
detected line currents in the “S” and “R” windings and
demand is absent for 15 seconds.
The module will flash yellow one time when the
compressor operates for longer than 18 continuous
hours. This is an alert code only, and the module will
not lockout the compressor for this condition. This
code is inactive for heat-pumps.
Code 9 – Low Voltage
The module will flash nine times if the module supply
voltage drops below 17VAC for 2 seconds. The
module will prevent the compressor from starting until
adequate voltage is established.
Code 2 – Compressor (Pressure) Trips
The module will flash yellow two times when the
compressor operates from 12 seconds to 15 minutes
followed by a trip condition lasting longer than 7
minutes. When four consecutive or ten total Code
2 events are recorded, the module will lockout the
compressor and flash red two times.
© 2011 Emerson Climate Technologies
Printed in the U.S.A.
Code 10 – Over-Current Protection
When the current at the PROT terminal is greater than
2A for 40ms, the module will flash a Code 10. The red
LED will flash 10 times with the yellow LED remaining
5
Application Engineering
B
U
L
L
E
T
I
N
AE8-1385
software interface and USB connection, in order to
download and store fault history and module operation
time. This information can be used to help diagnose
and review data from troubled systems in the field. For
more information, please contact your Emerson Climate
Application Engineer.
off. This event will cause a lockout of the compressor
and indicates that the module is mis-wired or the
contactor coil is shorted to ground.
NOTICE
Code 10 is not specified on the module label.
Resetting Alert Codes
Warranty Information
When the CoreSense Diagnostics module has detected
a series of adverse conditions that have caused it to
lockout the compressor, and after the issue has been
resolved, it is necessary to manually reset the module
in order to clear the present alert code.
Emerson Climate Technologies, Inc. warrants its
diagnostic module to be free from defects in materials
and workmanship under normal use for a period of one
year from the date of purchase or twenty months from
manufacture, whichever comes first. During this period,
Emerson Climate Technologies, Inc. will replace any
defective diagnostic module without charge.
The primary way of clearing the code and resetting
the ALERT or TRIP/LOCK is to cycle the power to the
module by disengaging the COMMON (C) Terminal.
This will not clear the seven day operating history
contained in the module memory. It will only clear the
present ALERT or TRIP/LOCK and allow for normal
operation.
For more information on product warranty please visit
www.EmersonClimate.com
Support
For more information visit www.EmersonClimate.com,
or contact Emerson Climate Technologies, Inc. at 1-888EMR-9950.
SERVICE
WARNING
Always disconnect and lockout the power supply
before beginning electrical troubleshooting.
Module History Download
The CoreSense Diagnostics module is capable of
communicating with a personal computer, tablet, or
laptop, via Emerson Climate Technologies computer
Figure 1
Wires Pulled Through Module
© 2011 Emerson Climate Technologies
Printed in the U.S.A.
6
Application Engineering
B
U
L
L
E
T
I
N
AE8-1385
47
POWER
Flash
Event
1
Long Run Time
2
Compressor (Pressure) Trip
3
Pressure Switch Cycling
4
5
Locked Rotor
Compressor (Mod Run) Trip
6
Open Start Circuit
7
Open Run Circuit
8
Welded Contactor
9
Low Voltage
R
62
C
Two Stage Control
DC SOL operating range: 18-28VDC
Compressor second stage is
energized when Y & Y2 are 24VAC
S
Active Protection
PROT breaks 24VAC common
leg of compressor contactor coil
Reset codes and PROT lockout
by removing 24VAC to module
ALERT
TRIP / LOCK
67
37
Figure 2 – Module Dimensions in Millimeters
065312345
Patent: 6,615,594
For Use With
Copeland Scroll
UltraTech
Compressors
P/N: 543-XXXX-XX
Y2
Y
Data Port
L
R
Use With Class 2
Circuits Only
Supply 24VAC
50/60Hz
Power 1.5VA
C
PROT
Solenoid
Figure 3 – Terminal Locations
© 2011 Emerson Climate Technologies
Printed in the U.S.A.
7
112
Application Engineering
B
U
L
L
E
2 - Stage
Thermostat
Indoor
Unit
Outdoor
Unit
Y2
Y2
Y2
Y1
Y1
Y1
T
I
N
AE8-1385
CoreSense
Y2
Y
High/Low
Pressure Switch
L
L
L
R
R
R
L
R
Compressor CC
Contactor
C
C
C
C
Prot
DC
Solenoid
Figure 4
Wiring Diagram
© 2011 Emerson Climate Technologies
Printed in the U.S.A.
8
Solenoid
Application Engineering
B
U
L
L
E
T
I
N
AE8-1385
Table 1 – Flash Code Description
Alert Code
Alert Condition
Lockout Level
Lockout
Indication
Normal Run
Solid Green
Normal operation, no trip.
N/A
N/A
Code1
Yellow Flash 1
Long run time. Compressor is running for more than
18 hours at full load. (Code1 is disabled in Heat Pump
mode.)
N/A
N/A
Code2
Yellow Flash 2
Compressor Pressure trip. Compressor runs for 12sec
to 15min followed by a compressor trip condition lasting
longer than 7min.
4x consecutive,
10x total
Red: Flash 2
Code 3
Yellow Flash 3
Pressure switch cycling. Compressor runs for 12sec to
15min followed by a compressor trip lasting between
35sec to 7min.
4x consecutive,
10 total
Red: Flash 3
Code4
Yellow Flash 4
Locked rotor. Compressor trips within a compressor run
time of 12sec and does not start within 35sec.
10x consecutive
Red: Flash 4
Code5
Yellow Flash 5
Compressor moderate run trip. Compressor runs for
15min to 18hrs followed by a compressor trip lasting
longer than 7min.
4x consecutive,
10x total
Red: Flash 5
Code6
Red Flash 6
Open start circuit. Module has detected Y or Y1, and
current in the R winding of the compressor and no
current in the S winding of the compressor for 2 seconds.
1 occurrence
Red: Flash 6
Code7
Red Flash 7
Open run circuit. Module has detected Y or Y1, and
current in the S winding of the compressor and no current 1 occurrence
in the R winding of the compressor for 2 seconds.
Red: Flash 7
Code8
Yellow Flash 8
Welded Contactor. Module has detected line currents
in R and S windings, and Y or Y1 is at 0 VAC for 15
seconds.
N/A
N/A
Code9
Yellow Flash 9
Low Voltage. Module has detected a 24 VAC supply
voltage below 17 VAC +/- 1 VAC for 2 seconds
N/A
N/A
Code10
Red Flash 10
Over Current Protection. PROT terminal has above a 2A
input for more than 40 milliseconds.
1 occurrence
Red: Flash 10
© 2011 Emerson Climate Technologies
Printed in the U.S.A.
9
Application Engineering
B
U
L
L
E
T
I
N
AE8-1385
Table 2 – CoreSense Diagnostics LED Troubleshooting Information
Flash Code number corresponds to the number of LED flashes, followed by a pause and then repeated.
TRIP and ALERT LEDs flashing at same time means control circuit voltage is too low for operation (brown-out conditions).
Status
Solid Green “RUN”
Solid Red “TRIP”
Description
Troubleshooting Information
Module has power and
operating normally
Supply voltage is present at module terminals
Thermostat demand signal Y is
present, but the compressor is
not running
1. Compressor protector is open
• Check for high head pressure
• Check compressor supply voltage
2. Outdoor unit power disconnect is open
3. Compressor circuit breaker or fuse(s) is open
4. Broken wire or connector is not making contact
5. High pressure switch open if present in system
6. Compressor contactor has failed open
“ALERT” Flash Codes
Long Run Time
Low Refrigerant Charge
Compressor is running extremely
long run cycles
1. Low refrigerant charge
2. Evaporator blower is not running
• Check blower relay coil and contacts
• Check blower motor capacitor
• Check blower motor for failure or blockage
• Check evaporator blower wiring and connectors
• Check indoor blower control board
• Check thermostat wiring for open circuit
3. Evaporator coil is frozen
• Check for low suction pressure
• Check for excessively low thermostat setting
• Check evaporator airflow (coil blockages or return air filter)
• Check ductwork or registers for blockage
4. Faulty metering device
• Check TXV bulb installation (size, location and contact)
• Check if TXV/fixed orifice is stuck closed or defective
5. Liquid line restriction (filter drier blocked if present in system)
6. Thermostat is malfunctioning
• Check thermostat sub-base or wiring for short circuit
• Check thermostat installation (location, level)
Yellow “ALERT”
Flash Code 2
Compressor (Pressure) Trip
High Refrigerant Charge
Discharge pressure out of limits
or compressor overloaded
1. Condenser fan is not running
• Check fan capacitor
• Check fan wiring and connectors
• Check fan motor for failure or blockage
2. High head pressure
• Check high pressure switch if present in system
• Check if system is overcharged with refrigerant
• Check for non-condensable in system
3. Condenser coil poor air circulation (dirty, blocked, damaged)
4. Return air duct has substantial leakage
Yellow “ALERT”
Flash Code 3
Pressure Switch Cycling
Compressor is running only
briefly due to pressure switch
cycling
1. Time delay relay or control board defective
2. If high pressure switch present go to Flash Code 2 information
Yellow “ALERT”
Flash Code 1
© 2011 Emerson Climate Technologies
Printed in the U.S.A.
10
Application Engineering
B
U
L
L
E
T
I
N
AE8-1385
Table 2 Continued
Locked Rotor
1. Run capacitor has failed
2. Low line voltage (contact utility if voltage at disconnect is low)
• Check wiring connections
3. Excessive liquid refrigerant in compressor
4. Compressor bearings are seized
• Measure compressor oil level
Yellow “ALERT”
Flash Code 5
Compressor (Moderate Run)
Trip
1. Evaporator blower is not running
• Check blower relay coil and contacts
• Check blower motor capacitor
• Check blower motor for failure or blockage
• Check evaporator blower wiring and connectors
• Check indoor blower control board
• Check thermostat wiring for open circuit
2. Faulty metering device
• Check TXV bulb installation (size, location and contact)
• Check if TXV/fixed orifice is stuck closed or defective
3. Condenser coil poor air circulation (dirty, blocked, damaged)
4. Low refrigerant charge
Yellow “ALERT”
Flash Code 8
Welded Contactor
Compressor always runs
1. Compressor contactor has failed closed
2. Thermostat demand signal not connected to module
Yellow “ALERT”
Flash Code 9
Low Supply Voltage
Voltage below 18V
1. Control Circuit transformer is overloaded
2. Low line voltage (contact utility if voltage at disconnect is low)
Yellow “ALERT”
Flash Code 4
“LOCKOUT” Flash Codes
Red “LOCKOUT”
Flash Code 2
Yellow Off
1. Condenser fan is not running
• Check fan capacitor
• Check fan wiring and connectors
• Check fan motor for failure or blockage
Compressor (Pressure) Trip
2. High head pressure
Compressor is locked out
after 4 consecutive or 10 total
• Check high pressure switch if present in system
compressor (pressure) trip events
• Check if system is overcharged with refrigerant
• Check for non-condensable in system
3. Condenser coil poor air circulation (dirty, blocked, damaged)
4. Return air duct has substantial leakage
Red “LOCKOUT”
Flash Code 3
Yellow Off
Pressure Switch Cycling
Compressor is locked out after 4
consecutive or 10 total pressure
cycling events
Red “LOCKOUT”
Flash Code 4
Yellow Off
1. Run capacitor has failed
2. Low line voltage (contact utility if voltage at disconnect is low
Locked Rotor
• Check wiring connections
Compressor is locked out after 10
3. Excessive liquid refrigerant in compressor
consecutive locked rotor events
4. Compressor bearings are seized
• Measure compressor oil level
© 2011 Emerson Climate Technologies
Printed in the U.S.A.
1. Time delay relay or control board defective
2. If high pressure switch present go to Flash Code 2 information
11
Application Engineering
B
U
L
L
E
T
I
N
AE8-1385
Table 2 Continued
Compressor (Moderate Run)
Trip
Compressor is locked out
after 4 consecutive or 10 total
compressor (moderate run) trip
events
1. Evaporator blower is not running
• Check blower relay coil and contacts
• Check blower motor capacitor
• Check blower motor for failure or blockage
• Check evaporator blower wiring and connectors
• Check indoor blower control board
• Check thermostat wiring for open circuit
2. Faulty metering device
• Check TXV bulb installation (size, location and contact)
• Check if TXV/fixed orifice is stuck closed or defective
3. Condenser coil poor air circulation (dirty, blocked, damaged)
4. Low refrigerant charge
Open Start Circuit
Current only in run circuit
1. Run capacitor has failed
2. Open circuit in compressor start wiring or connections
• Check wiring and connectors between supply and the
compressor “S” terminal
3. Compressor start winding is damaged
• Check compressor motor winding resistance
Red “LOCKOUT”
Flash Code 7
Yellow Off
Open Run Circuit
Current only in start circuit
1. Open circuit in compressor run wiring or connections
• Check wiring and connectors between supply and the
compressor “R” terminal. Confirm proper wire routing per
Figure 1.
2. Compressor run winding is damaged
• Check compressor motor winding resistance
Red “LOCKOUT”
Flash Code 10
Over Current Protection
Current to PROT is greater than
2A mps
1. Check for contactor shorted to ground
2. Check for mis-wiring to the PROT terminal
Red “LOCKOUT”
Flash Code 5
Yellow Off
Red “LOCKOUT”
Flash Code 6
Yellow Off
The contents of this publication are presented for informational purposes only and they are not to be construed as warranties or guarantees, express or implied, regarding the products or
services described herein or their use or applicability. Emerson Climate Technologies, Inc. reserves the right to modify the designs or specifications of such products at any time without
notice. Emerson Climate Technologies, Inc. does not assume responsibility for the selection, use or maintenance of any product. Responsibility for proper selection, use and maintenance of
any Emerson Climate Technologies, Inc. product remains solely with the purchaser and end-user.
© 2011 Emerson Climate Technologies
Printed in the U.S.A.
12