1
IMPORTANT SAFETY INSTRUCTIONS
The lightning flash with an arrowhead symbol within an
equilateral triangle, is intended to alert the user to the
presence of uninsulated “dangerous voltage” within the
product’s enclosure that may be of sufficient magnitude to
constitute a risk of electric shock to persons.
The exclamation point within an equilateral triangle is
intended to alert the user to the presence of important
operating and maintenance (servicing) instructions in the
literature accompanying the product.
1
2
3
4
5
6
7
8
9
Read these instructions.
Keep these instructions.
Heed all warnings.
Follow all instructions.
Do not use this apparatus near water.
Clean only with dry cloth.
Do not block any ventilation openings. Install in accordance with the manufacturer's instructions.
Do not install near any heat sources such as radiators, heat registers, stoves, or other apparatus (including amplifiers) that produce heat.
Do not defeat the safety purpose of the polarized or grounding-type plug. A polarized plug has two blades with one wider than the other. A
grounding type plug has two blades and a third grounding prong. The wide blade or the third prong are provided for your safety. If the provided
plug does not fit into your outlet, consult an electrician for replacement of the obsolete outlet.
10 Protect the power cord from being walked on or pinched particularly at plugs, convenience receptacles, and the point where they exit from the
apparatus.
11 Only use attachments/accessories specified by the manufacturer.
12
Use only with the cart, stand, tripod, bracket, or table specified by the manufacturer, or sold with the apparatus. When a cart is used,
use caution when moving the cart/apparatus combination to avoid injury from tip-over.
13 Unplug this apparatus during lightning storms or when unused for long periods of time.
14 Refer all servicing to qualified service personnel. Servicing is required when the apparatus has been damaged in any way, such as powersupply cord or plug is damaged, liquid has been spilled or objects have fallen into the apparatus, the apparatus has been exposed to rain or
moisture, does not operate normally, or has been dropped.
Warning!
•
To reduce the risk of fire or electrical shock, do not expose this equipment to dripping or splashing and ensure that no objects filled with liquids,
such as vases, are placed on the equipment.
•
This apparatus must be earthed.
•
Use a three wire grounding type line cord like the one supplied with the product.
•
Be advised that different operating voltages require the use of different types of line cord and attachment plugs.
•
Check the voltage in your area and use the correct type. See table below:
•
•
•
•
•
Voltage
Line plug according to standard.
110-125V
UL817 and CSA C22.2 no 42.
220-230V
CEE 7 page VII, SR section 107-2-D1/IEC 83 page C4.
240V
BS 1363 of 1984. Specification for 13A fused plugs and switched and un-switched socket outlets.
This equipment should be installed near the socket outlet and disconnection of the device should be easily accessible.
To completely disconnect from AC mains, disconnect the power supply cord from the AC receptable.
The mains plug of the power supply shall remain readily operable.
Do not install in a confined space.
Do not open the unit - risk of electric shock inside.
Caution:
You are cautioned that any change or modifications not expressly approved in this manual could void your authority to operate this equipment.
Service
•
There are no user-serviceable parts inside.
•
All service must be performed by qualified personnel.
a
IMPORTANT SAFETY INSTRUCTIONS
This equipment has been tested and found to comply with the limits for a Class B Digital device, pursuant to part 15 of the FCC rules.
These limits are designed to provide reasonable protection against harmful interference in residential installations. This equipment
generates, uses and can radiate radio frequency energy and, if not installed and used in accordance with the instructions, may cause harmful interference to radio communications. However, there is no guarantee that interference will not occur in a particular installation.
If this equipment does cause harmful interference to radio or television reception, which can be determined by turning the equipment off and on.
The user is encouraged to try to correct the interference by one or more of the following measures:
•
•
•
•
Reorient or relocate the receiving antenna.
Increase the separation between the equipment and receiver.
Connect the equipment into an outlet on a circuit different from that to which the receiver is connected.
Consult the dealer or an experienced radio/TV technician for help.
Caution:
You are cautioned that any change or modifications not expressly approved in this manual could void your authority to operate this equipment.
For the customers in Canada:
This Class B Digital apparatus meets all requirements of the Canadian Interference-Causing Equipment Regulations ICES-003.
Cet appareil numérique de la classe B respecte toutes les exigences du Réglement sur le matériel brouilleur du Canada.
This Class B digital apparatus complies with Canadian ICES-003. Cet appareil numérique de la classe B est conforme à la norme NMB-003 du Canada.
Advice on maintenance and care
Maintenance / Care
No special maintenance is necessary. Cleaning the
cabinet's surfaces with a damp cloth will suffice. Never use
cleaners or chemicals.
Certificate Of Conformity
TC Electronic A/S, Sindalsvej 34, 8240 Risskov,
Denmark, hereby declares on own responsibility that
following products:
BM12S and BM10S
About Wood Veneer Finishes
Dynaudio speaker cabinets are finished with the highest
quality real wood veneers. As with many natural products,
wood finish may change color over time, particularly if
exposed to bright sunlight.
- that are covered by this certificate and marked with
CE-label conforms with following standards:
EN 60065
(IEC 60065)
Safety requirements for mains
operated electronic and related
apparatus for household and similar
general use
EN 55103-1
Product family standard for audio,
video, audio-visual and entertainment
lighting control apparatus for
professional use. Part 1: Emission.
EN 55103-2
Product family standard for audio,
video, audio-visual and entertainment
lighting control apparatus for
professional use. Part 2: Immunity.
With reference to regulations in following directives:
73/23/EEC, 89/336/EEC
Issued in Risskov, April 2004
Mads Peter Lübeck
Chief Executive Officer
b
TABLE OF CONTENTS
introduction
Introduction
Important Safety Instructions &
Certificate of Conformity and Maintenance . . .a-b
Table of Contents . . . . . . . . . . . . . . . . . . . . . . .3
Introduction . . . . . . . . . . . . . . . . . . . . . . . . . . .4
Quick Setup Reference . . . . . . . . . . . . . . . . . . .5
Installation and Connections . . . . . . . . . . . . . . .6
Unpacking . . . . . . . . . . . . . . . . . . . . . . . . . . . .6
Connections . . . . . . . . . . . . . . . . . . . . . . . . . . .6
Back Panel . . . . . . . . . . . . . . . . . . . . . . . . . . . .7
Setting up & Tuning In
Master/Slave mode . . . . . . . . . . . . . . . . . . . . . .8
Single Subwoofer Connection . . . . . . . . . . . . . .8
Multiple Subwoofer Connection . . . . . . . . . . . . .8
Remote Control and Battery Connection . . . . . .9
Adjusting settings . . . . . . . . . . . . . . . . . . . . . .10
Switching the Subwoofer On/Off . . . . . . . . . . .10
Automatic Mode for On/Standby . . . . . . . . . . .10
Temporary Manual mode for On/Standby . . . .11
Subwoofer Level Control . . . . . . . . . . . . . . . .11
Setting Cross-over Frequency . . . . . . . . . . . . .12
Select EXT On or Off . . . . . . . . . . . . . . . . . . .12
Setting Phase . . . . . . . . . . . . . . . . . . . . . . . . .12
Storing and recalling presets . . . . . . . . . . . . . .12
Positioning the Subwoofer
Introduction . . . . . . . . . . . . . . . . . . . . . . . . . .13
Finding Optimal Settings . . . . . . . . . . . . . . . . .15
Level . . . . . . . . . . . . . . . . . . . . . . . . . . . . . . .15
Cross-over frequency . . . . . . . . . . . . . . . . . . .15
Phase . . . . . . . . . . . . . . . . . . . . . . . . . . . . . . .17
Finding Optimal Phase Settings . . . . . . . . . . .17
Troubleshooting . . . . . . . . . . . . . . . . . . . . . . .18
Factory Defaults . . . . . . . . . . . . . . . . . . . . . . .19
Technical Specifications . . . . . . . . . . . . . . . . .20
Prod. No. 606111012
Manual Rev. 1.01
3
INTRODUCTION
Congratulations!
Thank you for purchasing this Dynaudio subwoofer. With it, you have chosen for the latest in audio technology and
engineering, culminating into the finest in audio reproduction.
With their dynamic, accurate performance and ease of integration into even elaborate systems, Dynaudio subwoofers are
ideally suited to obtain maximum enjoyment from High-Resolution formats such as DVD-Audio™ and SACD™. These
characteristics in combination with sustained high volume level capabilities make Dynaudio subwoofers also an ideal
choice for demanding Home Theater set-ups.
In order to obtain the best possible performance from your Dynaudio subwoofer, please carefully read and follow the
instructions. We wish you many musical and exciting moments with your Dynaudio Subwoofer.
Wilfried Ehrenholz
Dynaudio.
Features:
• Powerful integrated amplifier
• Full remote control
• 4 presets to store your favorite settings for volume, roll-off frequency, phase and low
frequency extension.
• "Master" & "Slave" function for easy integration when using multiple subwoofers
• Automatic On/Standby switching through music-sensing
• XLR in- and Outputs for interference-free connections
• Front and back panel remote control command receivers ("eyes") allow for flexible
positioning
4
QUICK SETUP GUIDE
This quick set-up guide assumes some knowledge with
regards to installing, connecting and using a
subwoofer. We strongly recommend that you do read
through the instruction manual in order to get the best
performance from your Dynaudio subwoofer, even if
you already have installed the subwoofer.
Installing:
• Carefully unpack the subwoofer and accessories.
• Install the battery cell in the remote control.
• Connect the processor's or receiver's subwoofer Output
to either the RCA or XLR Input.
• Set the Input button to "Master" unless the subwoofer is
used in a multiple subwoofer setup where another
subwoofer is set as master.
• Set the Preset/Settings switch to "Store".
• Double-check all connections; now connect the supplied
mains lead to the subwoofer and AC outlet.
Using:
• Controlling the subwoofer is entirely done by using the
remote control. Whenever the subwoofer receives a
command from the remote control, the Power status LED
will blink.
• Set the mains switch on the back panel of the subwoofer
to On. The Power status LED will light up green.
• The subwoofer switches to On or Standby automatically:
It will switch to On when a signal presents itself, it will
switch to Standby when no signal has been available for
20 minutes. When switched to Standby, the power status
LED is red; switched to On, the LED is green.
It is possible to temporarily override Automatic switching:
Briefly pressing the green "I" (Power On) button on the
remote will switch the subwoofer to On, even if no signal is
present. Note that if no music signal presents itself within
20 minutes, the subwoofer will switch back to Standby
again. If you prefer the subwoofer to stay switched On all
the time -regardless of Input signal- press and hold the
green "I' button for 2 seconds to set to Manual Standby/On
switching: The Manual status LED will light up green.
Pressing either the "I" or "O" button briefly, regardless if the
subwoofer is switched On or in Standby mode, will set the
subwoofer back to Automatic switching again:. The Manual
status LED will extinguish.
• Set the subwoofers volume level by pressing the Level
"+" or "-" button.
• Select the desired cross-over frequency by pressing
either 60, 80, 100Hz or Flat. If cross-over frequency
selection is handled by the multi-channel processor or
receiver (most cases), select "Flat".
• Select the desired Phase setting by pressing either the
0°, 90°, 180 or 270° button.
• In the Ext Off mode, the very deepest bass will be
filtered; this will allow the subwoofer to achieve even
higher sound pressure levels. Generally speaking, this
setting is best suited for movies and most music. Press
the EXT On for deepest bass response, as suited for
some music or movie soundtracks with extreme deep
bass.
• You can store your settings in one of the 4 presets A, B,
C or D. Make sure the Preset/Settings switch on the
subwoofers back panel is set to "Store". Press and hold
the desired Preset button for 3 seconds to store. The
Power status LED will blink 3 times to confirm. Previously
stored settings will have been over-written. Set the
Preset/Settings switch to "lock" to prevent accidental
over-writing of the presets.
To recall a preset, simply press the desired preset button
briefly.
Install and make all connections to the subwoofer
and rest of the system before switching the system
and subwoofer on.
Briefly pressing the red "O" (Power Standby) button will
switch it to Standby, even if a music signal is still present.
Note that on the next occasion a music signal presents
itself (after a 20 minute silence), the subwoofer will switch
to On again automatically. If you prefer the subwoofer
remains switched to Standby all the time -regardless of
Input signal- press and hold the red "O" button for 2
seconds to set to manual Standby/On switching: The
Manual status LED will light up green.
5
INSTALLATION & CONNECTIONS
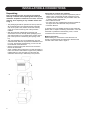
Unpacking
Due to its weight and size, we strongly recommend
that help is at hand when unpacking and installing the
subwoofer. Unpack the subwoofer on a clean, even and
soft area; floor carpeting is very suitable. Please refer
to Fig. 1.
• The packaging should be opened from the top. Remove
all accessories that come packed with the subwoofer,
such as AC power cord, remote control and warranty
card). Do not remove the top part of the protective
material.
• With the protective material still in place but with
accessories removed, carefully tilt the packaging on its
side and tilt again to turn it upside-down. Ensure that no
part of the top-cover is obstructing the opening at the
top.
• The outer packaging can now be lifted away from the
subwoofer itself. Remove the protective material that now
is on top. Through the polythene bag you can now see
the underside of the subwoofer.
• Open the polythene bag and remove from around the
base of the subwoofer.
• Again, carefully tilt the subwoofer on its side and again to
turn it onto its feet. Note that the top part of the protective
material will now come off easily so ensure that the
subwoofer doesn't drop or slide away in the process.
1
2
3
6
Check that the contents are complete:
• Subwoofer. The factory-set power requirements (refer to
label on rear of subwoofer) should correspond for the
region where the subwoofer was purchased. Refer also
to chapter "Safety Instructions".
• DSC1 Remote Control.
• AC mains lead. The supplied lead should be suitable for
the region where the subwoofer was purchased.
• Instruction Manual.
To decide on the most suitable location for the subwoofer,
please refer to chapter "Positioning Subwoofers". Once the
subwoofer is positioned in the listening room, it can be
connected to the rest of the system.
Making connections
Before making any connections to the subwoofer we
strongly recommend that the subwoofer is disconnected
from the mains outlet. Refer to figure 2.
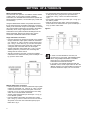
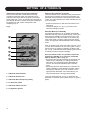
BACK PANEL
Figure 2
1. Mains power Input.
6. Unbalanced processed audio Output
2. Power switch
7. Input Master/Slave function switch
3. Balanced audio Input
8. Preset/Settings Store & Protect switch
4. Unbalanced audio Input
9. Remote Control sensor
5. Balanced processed audio Output
10. Heat sinks
7
SETTING UP & TUNING IN
Master and Slave mode
The subwoofer can operate in two different modes: Master
or Slave mode. If your system consists of multiple
subwoofers, it is desirable that all subwoofers operate with
identical settings (Volume, Low-Pass filter (Hz), Phase and
LF Extension).
Using the Master/Slave feature of Dynaudio subwoofers
this is easily achieved: The Master subwoofer (connected
directly to the subwoofer Output of the amplifier or receiver)
will control all Slave subwoofers (connected to the Master
subwoofer). Thus, using a single remote control, all
subwoofers in the system will follow all settings from the
Master subwoofer. Note that in Slave mode, only the
On/Off and Auto/Manual selections are available.
Single subwoofer connection
• From the processor or receiver's low-level (not a speaker
Output) subwoofer Output (often marked as "subwoofer
out", "Sub out" or "LFE"), connect a mono RCA-to-RCA
(No. 4 in fig. 2; refer also to fig. 3) or XLR-to-XLR patch
cord to the subwoofers Input. Refer also to the section
"Using the XLR connectors" below in this chapter.
• Set the subwoofers Input switch (No. 7 in fig. 2) to the
"Master" position if you wish to use and change the
settings with the remote control.
• After all connections are made, connect the supplied
mains lead to the subwoofers IEC power socket (No. 1 in
fig. 2) and a mains outlet.
Multiple Subwoofer connection
• From the processor or receiver's subwoofer Output (often
marked as "subwoofer out", "Sub out" or "LFE"), connect
a mono RCA-to-RCA or XLR-to-XLR patch cord to the
Input (No. 4 in fig. 2) of the first subwoofer in the daisychain. This is now the Master subwoofer.
• Set the master subwoofers Input switch (No. 7 in fig. 2)
to the "Master" position.
• From the Master subwoofers "processed Out" Output
(No. 6 in fig. 2), connect a mono RCA-to-RCA or XLR-toXLR patch cord to the next subwoofers (Slave) Input.
Refer also to fig. 4.
8
• Any subsequent Slave subwoofers can be connected in
a daisy-chain style, going from the "processed Out"
Output (No. 6 in fig. 2 to the next Slave subwoofers
Input.
• Set the Slave subwoofers Input switch (No. 7 in fig. 2) to
the "Slave" position.
• After all connections are made, connect the supplied
mains leads to the subwoofers IEC power sockets (No. 1
in fig. 2) and a mains outlet.
Figure 4
• In order to avoid interference and noise, we
recommend you use quality, well shielded cables.
• When using multiple subwoofers in a MasterSlave setup, it is recommended that the
subwoofers are all the same model.
• If you wish to use multiple subwoofers with full
individual control, set the Input switch for all to the
"Master" position. From the Amplifier, processor or
receiver's subwoofer Output, use a Y-connector.
SETTING UP & TUNING IN
Connecting using the XLR sockets
A balanced signal connection (XLR sockets) provides a
connection that is far less susceptible to cable signal
interference compared to an unbalanced connection (RCA
connection). It is for this reason that XLR and balanced
connections are used almost exclusively in critical and
professional installations.
Fig. 5
Provided your processor or receiver has a XLR symmetric
or balanced Output for subwoofer you should consider
using the XLR Input (No. 3 in fig. 2) on the Dynaudio
subwoofer. In a setup with multiple subwoofers you can
use the XLR connections between the Master and Slave
subwoofers, even if the connection between the processor
or receiver has been made using the RCA connectors.
Configuring and making connections using XLR is done in
the same way as using the RCA connectors. Please refer
to the sections "single subwoofer connection" and "multiple
subwoofer connections" in this chapter.
Dynaudio follows the most usual convention for termination
of XLR sockets:
Pin 1 = ground
Pin 2 = signal +
Pin 3 = signal • Always ensure that all connections are correct: It
may be that the source equipment follows a
different way of terminating the XLR sockets or it
may be that the XLR connection cables
themselves do not comply. When in doubt, consult
your dealer.
• DO NOT use XLR and RCA connections in
parallel at the same time for the same connection.
Remote Control battery & battery replacement
Before the DSC 1 remote control can be used, it needs to
be fitted with the battery cell that comes separately packed
with the remote control. To replace and insert a battery
(refer to fig. 5):
• Release the battery tray by pushing its locking tab (No. 1
in fig. 5) on the back of the remote sideways with your
nail and at the same time; slide the tray out of the remote
control battery compartment.
• Remove the exhausted battery and dispose of properly.
Insert a fresh battery in the battery tray: Observe correct
polarity (both battery and tray are marked with a "+").
• Slide the battery tray into the battery compartment until
the locking tab clicks into place. Make sure it is inserted
the correct way up, the tray will slide into place easily, do
not use force.
• The battery will last a considerable time,
depending on frequency of use. When you notice
that the subwoofer doesn't always respond or only
from a very close range to commands from the
remote control, it is likely the battery is exhausted
and will need replacing.
• Use only CR2025 button cell batteries to replace
the original battery with; these are readily
available from most electrical stores.
Do not leave the remote control in high temperature
environments (such as in direct sunlight). In worst cases
this can possibly result in deformation of the remote control.
9
SETTING UP & TUNING IN
Adjusting the settings and using the subwoofer
Once you have ensured yourself that all necessary
connections have been made, the subwoofer can be
switched on and used. With the exception of the mains
power switch (No. 2 in fig. 2) controlling the subwoofer is
done through the DSC 1 remote control; the numbering at
the beginning of each section corresponds to the
numbering in fig. 6.
Fig. 6
Switching the subwoofer On and Off
The Power Switch on the subwoofers back panel switches
the subwoofer completely off: Set to the Off position, the
subwoofer will not respond to commands from the remote
control. For normal operation, the switch will always be set
to the On position.
• Switch the subwoofer on with the Power switch on the
back panel.
• The Status LED (No. 2 in fig. 7) on the front of the
subwoofer will light up green.
Automatic Mode for On/Standby
The subwoofer switches to On or Standby automatically:
Automatic switching works by signal-sensing. As long as a
music signal is available on the subwoofers Input, it will
remain switched on. After 20 minutes of not sensing any
Input music signal or receiving a signal from the remote
control, the subwoofer will automatically switch to Standby
mode.
When in Standby mode, the Power status LED (No. 2 in fig.
7) is red; when switched to On, the LED is green. During
the minute prior to switching to Standby, the Status LED
(No. 2 in fig. 7) will alternate slowly between green and red
to indicate it is about to switch to Standby.
1. Subwoofer manual On/Off
2. Subwoofer Volume level
3. Subwoofer Roll-off frequency setting
4. LF Extension On/Off
5. Subwoofer Phase selection
6. Configuration presets
10
Even in automatic mode, it is possible to switch the
subwoofer to Standby or On, using the on/standby
buttons (buttons in No. 2 in fig. 6):
• By pressing the upper button briefly, the subwoofer will
switch On (if it was already on, nothing will happen).
Note that if no music signal presents itself within 20
minutes, the subwoofer will switch back to Standby
again.
• By pressing the lower button briefly, the subwoofer will
switch to Standby (if it was already in Standby, nothing
will happen). Note that on the next occasion a music
signal presents itself (after a 20 minute silence), the
subwoofer will switch to On again automatically.
The Power status LED (No. 2 in fig. 7) will show if the
subwoofer is in Standby mode (LED is Red) or On (LED is
green).
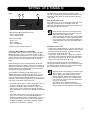
SETTING UP & TUNING IN
Fig. 7
1
2
3
The subwoofer can be switched from Standby either
manually or automatically. The subwoofer is factory-set at
Automatic, as this will be the most convenient setting in
most cases.
Back to Automatic mode:
Press either the "I" or "O" button briefly. Regardless if the
subwoofer is switched On or in Standby mode, the
subwoofer will switch back to Automatic mode again: The
Manual status LED will extinguish.
1 Manual Mode (Manual/Automatic) LED.
Green = Manual mode
Off = Automatic mode
2 Power Status LED
Green = On
Red = Standby
Off = completely Off
3 Remote control command receiver.
Temporary Manual Mode for On/Standby
It is possible to temporarily override Automatic switching:
Briefly pressing the green "I" (Power On) button on the
remote will switch the subwoofer to On, even if no signal is
present. Note that if no music signal presents itself within
20 minutes, the subwoofer will switch back to Standby
again.
Briefly pressing the red "O" (Power Standby) button will
switch the subwoofer to Standby, even if a music signal is
still present. Note that on the next occasion a music signal
presents itself (after a 20 minute silence), the subwoofer
will switch to On again automatically.
If you prefer the subwoofer to stay switched On or to
Standby all the time -regardless of Input signal- you can
override the Automatic mode completely in two different
ways. The Manual status LED (top button in No. 2 in fig. 6)
indicates to which state the subwoofer is set: Manual LED
is lit green; in Automatic mode, LED is off.
• Press and hold the green "I' button (top button in No. 2 in
fig. 6) for 2 seconds to set to Manual Standby/On
switching: The Manual status LED (No. 1 in fig. 7) will
light up green. If the subwoofer was already switched
On, it will remain On; if it was set to Standby, it will switch
to On.
• Unlike all other functions on the remote control,
the On/Standby buttons remain active when the
subwoofer is set to "Slave" mode.
• When powering up, the subwoofer always reverts
to the same settings as when it was switched off.
Even if mains power is removed completely for a
prolonged period of time, the last settings will be
retained.
Subwoofer Level control
• Press Level + (upper button No. 1 fig. 6) to increase the
volume of the subwoofer, release when the desired level
has been reached. Each short, momentary press will
increase the volume level with 1 dB.
• Press Level - (lower button No. 1 in fig. 6) to decrease
the volume of the subwoofer, release when the desired
level has been reached. Each short, momentary press
will decrease the volume level with 1 dB.
The right volume level is one of the critical aspects of
correct and seamless integration of any subwoofer as part
of a speaker system. Please refer to the chapter "Finding
the correct settings" for more information.
• Together with the other settings, the volume level
can be stored in one of the 4 presets. Refer to
section "Storing and recalling Presets" in this
chapter. Together with the other settings Crossover frequency and Phase we recommend that,
once found, you store the optimum volume level
into one of the presets.
• The Volume control is disabled when the
subwoofer is set to "Slave" mode. Refer also to
section "Master and Slave Mode" in this chapter.
• Press and hold the red "O' button (lower button in No. 2
in fig. 6) for 2 seconds to set to Manual Standby/On
switching: The Manual status LED (top button in No. 2 in
fig. 6) will light up green. If the subwoofer was already
switched to Standby, it will remain in Standby; if it was
switched On, it will switch to Standby.
11
SETTING UP & TUNING IN
Setting the Cross-over Frequency
The Cross-over frequency can be set to four positions: 60,
80, 100Hz and Flat. The roll-off slope is 24dB per octave.
In most cases, selecting cross-over frequencies is done
through the bass-management system of your processor or
receiver. In this case, use the "Flat" position. Refer to the
instruction manual of the processor or receiver how to set
cross-over frequency.
• The EXT mode is disabled when the subwoofer is set to
"Slave" mode. Refer also to section "Master and Slave
Mode" in this chapter.
• Press the button for the desired position. When pressing
the button, ensure that the command from the remote
control is received (the Power Status LED; No. 2 in fig. 7
blinks).
Setting Phase
Check the owner's manual of the other speakers in the
system if a specific frequency is recommended. Please
refer to the chapter "Finding the optimal settings" for more
information.
• Together with the other settings, the Cross-over
frequency can be stored in one of the 4 presets.
Refer to section "Storing and recalling Presets" in
this chapter. Together with the other settings
Volume and Phase we recommend that, once
found, you store the correct cross-over frequency
into one of the presets.
• The Cross-over frequency control is disabled
when the subwoofer is set to "Slave" mode. Refer
also to section "Master and Slave Mode" in this
chapter.
Selecting EXT On or Off
EXT stands for Extension, in this case Low Frequency
Extension. Dynaudio subwoofers allow for deep and
accurate bass response even at high levels. In the EXT Off
mode, the very deepest bass will be mildly filtered; this will
allow the subwoofer to achieve even higher sound
pressure levels. Generally speaking, this setting is best
suited for movies and most music. Some movies and high
quality, audiophile recordings can contain extreme low
frequencies. To experience these:
• Press the EXT On button (lower button in No. 4, fig. 6) to
switch Low Frequency extension on.
• Together with the other settings, the Low Frequency
Extension status can be stored in one of the 4 presets.
This way, you can program the EXT switched On as part
of a setting for "audiophile listening" and program EXT
Off as part of a setting for "cinema mode" for instance.
Refer to section "Storing and recalling Presets" in this
chapter.
• If you use a turntable, you will get the best results with
EXT switched off. Many vinyl records contain, and the
turntable itself will generate, very low frequencies
(rumble) which, with the subwoofers low frequencies
capabilities can otherwise prove distracting from enjoying
the music.
12
• Loud volume levels over prolonged periods of time
can cause permanent damage to your hearing!
The Phase setting of the subwoofer has been factory-set at
0° which in many cases will be the appropriate setting.
Press the 0°, 90°, 180° or 270° button (No. 5, fig. 6) to
select the desired phase setting.
• Together with the other settings, the Phase setting
can be stored in one of the 4 presets. Refer to
section "Storing and recalling Presets" in this
chapter. Together with the other settings, Volume
and Cross-over frequency, we recommend that,
once found, you store the correct phase setting
into one of the presets.
• The Phase selector is disabled when the
subwoofer is set to "Slave" mode. Refer also to
section "Master and Slave Mode" in this chapter.
Storing and recalling presets
With four presets available you have the flexibility of
recalling different sets of subwoofer settings, depending on
what suits the occasion best. For instance, you may store
the settings best suited for classical music setting under
Preset A, program Preset B to have the best settings for
action movies and program Preset C for late-night listening,
etc.
The presets are also an excellent tool for recalling different
settings when experimenting with either location or settings
of the subwoofer.
Once you have stored all presets, you can choose to block
access to storing, so that presets can not be over-written
by mistake.
Each preset stores settings for Volume Level, Cross-over
frequency, LF Extension and Phase.
To store a preset:
• Ensure that Preset programming hasn't been blocked:
The Preset/Settings switch on the subwoofers back panel
(No. 8 in fig. 2) must be in the "Store" position.
• Set all parameters (Volume Level, Cross-over frequency,
LF Extension and Phase) to your liking.
• Press and hold the desired Preset A, B, C or D button
(No. 6 in fig. 6) for 3 seconds. Ensure that the subwoofer
receives the commands from the remote control without
interruption.
• The Status LED (No. 2 in fig. 7) will blink 3 times to
confirm the preset has been stored. Any previously
POSITIONING THE SUBWOOFER
stored settings has been overwritten with your new
settings.
• To avoid accidental over-writing of presets, set the
Preset/Settings switch on the subwoofers back panel
(No. 8 in fig. 2) to the "Protect" position. Adjustments onthe-fly for all settings are still possible.
To recall a Preset:
• Simply briefly press the desired Preset button A, B, C or D.
• Presets can only be stored or recalled in "Master"
mode.
• Program one preset with the best global settings
for your system and use this as the starting point
to program the other presets. This way you always
have a starting and reference point.
Introduction
Although it is often said that the location of a subwoofer in
a listening room is not critical (as the human ear can not
locate direction at very low frequencies) we recommend
that you choose its position carefully so the subwoofer can
integrate fluently with the other speakers in the system and
interact in the correct way with the acoustical environment.
All of the following should be taken as rule-of-thumb
guidelines; bass response in general is very dependent on
the acoustics of the listening environment. Finding the best
position often involves a lot of trial-and-error experimenting.
Always trust your ears, even if seemingly the position of
the subwoofer goes against the guidelines. Contradictory
as it may seem, good integration of subwoofers has been
achieved when one isn't aware that a subwoofer is present
at all in the system, yet performance involves fast, deep
and solid bass without sounding stressed, even at loud
levels.
• Trying to find the right location will also involve finding
the right settings such as Level, Cross-over frequency
and Phase for that location. The subwoofers presets will
prove to be a useful tool when trying to find a suitable
setting: You can store the settings that match a particular
position so you can easily swap between locations. It will
also allow you to make small changes in settings and to
store these as separate presets. This way, you can
compare between presets to find the best setting. Refer
also to section "Storing and recalling a Preset" in Chapter
"Adjusting and Using the subwoofer".
• When experimenting to find the optimal location, use a
couple of music tracks with repetitive bass across a large
spectrum. The tracks should be sufficiently different from
each other and each should cover a wide bass-range.
Musical instruments, such as a double-bass, bass guitar,
church organ, etc. cover a wide spectrum in the bass
region and are therefore very suitable. Using non-music
(such as action movies) material to position and adjust
the subwoofer with, may lead to spectacular results with
such material but almost always it will result in overblown
and excessive bass when playing music with the same
setting. Remember that the Dynaudio subwoofers allow
for 4 different preset settings, so you can store a preset
with the setting that matches the occasion (be it for
action movie or music listening) best.
Every listening environment will have specific "roommodes", whereby in some specific locations in the room
and at particular frequencies, the bass may be too much or
too lean. This effect will be stronger in square and "shoebox" shaped rooms. With a single subwoofer, the better
position for the subwoofer relative to the listening position
will be the one where bass is perceived to be neither too
much or too lean at any given frequency.
13
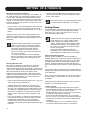
POSITIONING THE SUBWOOFER
Fig. 8
• Generally, avoid placing the subwoofer at ¼, ½ or ¾ of
either the length or width of the room as at these
locations the room-modes are likely to be strongest (the
dashed lines in fig. 8)
Fig. 9
Corner placement
This position still provides considerable boost but less than
the corner placement as above. Room-modes can also still
be considerable but less so than with corner placement.
From the listening position, check if the bass is even
across the entire bass spectrum. If not, move the
subwoofer away or towards your listening position until
most even response has been obtained.
Avoid placing the subwoofer exactly half-way or at a
quarter of the wall's length (refer to fig. 8).
Free standing, away from wall and corner
Fig. 11
Maximum boost of bass level but potentially uneven
distribution of bass in the room (room-modes), particularly
if the room is square or shoe-box shaped.
From the listening position, check if the bass is even
across the entire bass spectrum. If not, move the
subwoofer out of the corner. Try moving it along either wall.
Fig. 10
Next to the wall - away from the corner
14
This position will give least boost compared to wall or corner placement, but in general offers best flexibility at
achieving most even bass distribution at the listening position.
Avoid placing the subwoofer exactly half-way or at a quarter's length of either sidewall (refer to fig. 8).
Particularly in smaller square or "shoe-box" shaped rooms
the free standing position is recommended.
FINDING THE OPTIMAL SETTINGS
Multiple subwoofers.
By using carefully positioned multiple subwoofers it is possible to even out the different room-modes and thus create
a more coherent overall bass response in the room. It is
worth experimenting with different locations around the
room for the additional subwoofers, even using the rear of
the room. As adding subwoofers will not increase the effect
of room-modes, even adding a subwoofer without much
care or thought to positioning is likely to help even out
room-modes.
Always position subwoofers at least 1 mtr/3 ft away
from a television as the magnetic field emanating
from the subwoofer may otherwise distort the
picture. If you see discolorations on the television
screen, try moving the subwoofer and other
speakers close by away from the television.
Finding the correct settings
Before deciding on a final setting, you will probably want to
experiment with both location and adjustment of the
subwoofer. Here, the subwoofers presets will prove an
ideal tool. When trying to decide on a particular location,
simply store the settings that are best for the location and
swap back and forth, using the appropriate preset every
time. Refer also to section "Storing and recalling a Preset"
in Chapter "Adjusting and using the subwoofer".
• When experimenting to find the optimal settings, use a
couple of music tracks with repetitive bass across a large
spectrum. The tracks should be sufficiently different from
each other and each should cover a wide bass-range.
Musical instruments, such as a double-bass, bass guitar,
church organ, etc. covering a wide spectrum in the bass
region and above, are very suitable as these depend on
accurately balanced subwoofers and main speakers.
Level
With the "+" and "-" Level buttons (No. 2 in fig. 6) you can
adjust the relative volume level of the subwoofer to the
main speakers of the system:
• Play the same track a couple of times, adjusting the level
so that the instrument sounds homogenous across its
range.
• If you find that at certain specific bass tones the
response is either too loud (bloated sound) or soft (thin
sound), it may be that you have to experiment further
with the location of the subwoofer and/or the cross-over
settings. Refer to the chapter "positioning the subwoofer"
and section "Cross-over setting" in this chapter.
When using multiple subwoofers, ensure that all
settings such as level, cross-over frequency, phase
and LF extension are identical. Use the "Master"
and "Slave" mode options to ensure that all
subwoofers operate on the same settings (refer to
chapter "Installation and Connections", section
"Master and Slave mode").
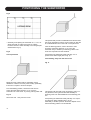
Cross-over frequency
With the Cross-over frequency setting you can select up to
what frequency the subwoofer will work. Fig. 12 shows the
effect of each setting. Note that curves are for explanation
purposes only.
Fig. 12
• Although in general it is best to make adjustments in the
sequence outlined below, note that changing one setting
may influence another. For example, finding the right
setting for "Phase" may result in having to decrease
"level", even if this was set correct before. It is
recommended that you double-check the previous
settings before moving on to the next one. Obtaining the
best integration of the subwoofers generally involves a
considerable amount of repeated fine-tuning.
• Once done, use the presets to store the settings. It is
advisable to reserve one preset as the "system default"
settings so you can always revert to this setting when
you have made temporary changes to any of the
settings.
Selecting the ideal cross-over frequency depends in most
part on the main speakers. Ideally, the signal to these
speakers has passed a low-frequency filter so that these
can take over seamlessly from the subwoofer at the correct
cross-over frequency. If the cross-over frequency for the
main speakers has been set too high (or looking at it
differently, the cross-over point for the subwoofer is set too
low), there will be a significant gap in the combined
15
FINDING OPTIMAL SETTINGS
frequency response; see fig. 13. In the same manner, with
the cross-over frequency for the main speakers set too low
(cross-over freq. for the subwoofer too high), there will be
too much of an overlap between subwoofer and main
speakers, again resulting in incorrect overall frequency
response; see fig. 14. Correct settings are illustrated in fig. 15.
Fig. 15
Subwoofer & main speakers cross-over frequencies set
correctly: Smooth frequency response.
Fig. 13
Subwoofer cross-over frequency set too high (main
speakers too low): Bump in frequency response.
Many multi-channel processors and receivers provide
elaborate bass-management systems where the cross-over
frequency for both subwoofer and main speakers can be
set. If you are using such a bass-management system, you
can select the "Flat" setting on the subwoofers remote
control, as all filtering has been done by the bassmanagement system. Carefully follow the instructions for
the amplifier/processor or receiver.
Fig. 14
Subwoofer cross-over frequency too low (main speakers
too high): Gap in frequency response
• If you are using your system's bass-management
system, ensure that the subwoofers cross-over
frequency hasn't been set to the same or lower
frequency compared to the setting chosen with the
bass management system.
• Selecting the correct frequency depends to a large
extend on the main speakers. Sometimes main
speakers are specifically intended to work with a
subwoofer. In such cases, the main speakers can
get damaged by a full-range amplifier signal. If in
doubt, check the instruction manual for the main
speakers for any restrictions or recommendations.
Of course it is possible to combine the subwoofer in a
system where the loudspeakers are being fed with a fullrange signal. In that case, setting the cross-over frequency
for the subwoofer depends very much on the natural roll-off
frequency in the bass of the main speakers. In general, a
large, floor-standing speaker will still have significant
Output in the deeper bass range, in which case the crossover frequency should be set to 60Hz. A small or very small
speaker will have less deep bass Output in which case the
setting should be 80Hz. or 100Hz. To find the correct
setting in such scenarios:
• Play a music track that has a significant amount of bass
over a large bass region. An instrument such as a
double-bass or bass-guitar is very suitable. Starting with
the "60" Hz position (first button left in row No. 3 in fig.
6), use this track to set the subwoofers relative volume
level.
16
FINDING OPTIMAL SETTINGS
• Listen carefully to the bass-line played by the instrument.
As it goes up and down in the bass range, the overall
bass volume should remain the same, be it with very
deep or higher bass notes. Particularly with very small
main speakers, it may be that you can hear a "hole" in
the bass response: You can hear the deepest bass notes
and everything from lower midrange easily, but overall
the bass leaves a thin impression. On the other hand, it
may be that using the 60Hz setting the system already
sounds good. In both cases, select the next setting, "80"
Hz.
• Playing the same track at the same volume level, again
listen to the overall bass volume level. If the apparent
hole in bass response is still present or if the system
sounds good now, move on to the next setting, 100Hz.
Should the bass volume suddenly become louder or
bloated at certain tones compared to the 60Hz setting
earlier, revert to this setting; in this case setting the
cross-over frequency is done.
• Again play the track to listen to the overall bass volume
level. If the bass sounds correct now, leave the setting at
100Hz. Should the bass volume suddenly become louder
or bloated at certain tones compared to the 80Hz setting
earlier, revert to this setting.
Phase
With the phase settings you can adjust the timing
relationship between the subwoofers and main speakers. If
either subwoofer or main speaker are slightly delayed in
response in relation to the other, it can result in decreased
bass Output in the frequency response area where they
overlap each other..
Fig. 16
Incorrect phase relation of subwoofer to main speakers in
critical overlap area: Reduced acoustical Output in overlap
area, even if levels are set correct.
Finding optimal Phase Settings
• Playing the same bass-rich track which also covers the
overlap area, repeatedly press the 0°, and its opposite
phase, the 180° button in succession. Without changing
volume level, do the same with the 90° and its opposite
phase, the 270° button (No. 5 in fig. 6). Note which set of
phase settings (0°-180° or 90°-270°) provides the biggest
difference in bass response.
• Using the set of phase settings found in the step above
(either 0°-180° or 90°-270°) press each of the two
buttons in alteration. The position in which you
experience the most bass is the correct setting, even if it
appears that the bass is too much (this can be adjusted
for later).
The Phase relationship between subwoofer and satellite
speakers is very dependent on relative distance,
construction and working principles of the main speakers.
Fig 16 shows a case whereby phase of the subwoofer and
main speakers are incorrect in the critical overlap area,
thus significantly reducing acoustic Output in the listening
room in that area.
17
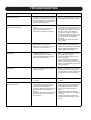
TROUBLESHOOTING
Problem
Cause
The subwoofer switches itself off while
music is being played
• There is hardly any low-frequency signal
• Use the temporary manual On/Standby
available in the signal. This can happen if
facility by pressing the green "I" button on
the music or movie itself does not contain
the remote for more than two seconds.
very low frequencies (e.g. long dialogues)
and if the processor or receiver already
performs bass-management.
The subwoofer responds intermittently to
remote control commands
• The remote control battery is becoming
weak.
• The remote control eye (either front- or
back panel) is obstructed.• The
subwoofer is in direct, strong sunlight
• Replace battery
• Ensure there is a clear line-of-sight from
the remote control to either the front- or
back panel remote receiver. If this is not
possible, consider an IR repeating
system which consists of a separate
remote receiver which connects by wire
to a remote control emitter which can be
positioned close to the subwoofers
remote eye.
• Avoid placing the subwoofer in strong
direct sunlight.
The subwoofer will not switch on at all
• AC mains cable has become
disconnected (no LEDs are lit).•
Mains switch on the back (No. 1 fig. 2) is
switched to off (no LEDs are lit).
• Reconnect mains cable• Switch
mains back on• Check if all signal
cables are connected properly. Make
sure to switch the system off first
before making any changes.
The subwoofer will not switch on
automatically
• No signal is present on either of the
• Check if all signal cables are connected
subInputs (Status LED is red)•
The
Make sure to switch the system off first
subwoofer has been set to temporary
before making any changes.
manual On/Standby switching. (Manual
• Check if the subwoofer Output on the
status LED is green)woofer's
source is engaged.
• Switch back to automatic On/Standby
facility by briefly pressing the green "I"
button on the remote: The subwoofer will
switch on and the Manual status LED will
extinguish properly.
The subwoofer will not switch to standby
automatically
• The subwoofer has been set to temporary • Use the temporary manual On/Standby
manual On/Standby switching. (Manual
facility by pressing the red "O" button on
status LED is green)
the remote for more than two seconds:
The subwoofer will switch to Standby and
the Manual status LED will extinguish.
I cannot store a setting
• Preset/Setting switch (No. 8 fig. 2) is set
to "protect"
• Set Preset/Setting switch from "Protect"
to "Store"
Subwoofer is switched on but no sound
from the subwoofer
• No signal is present on either of the
subwoofers Inputs.•In the processor or
receiver's bass-management set-up,
subwoofer has been disabled•
Subwoofer volume level has been turned
down all the way on the amplifier or
receiver.
• Subwoofer volume level has been turned
down all the way with the subwoofers
remote control
• Check if all signal cables are connected
properly. Make sure to switch the system
off first before making any changes.•
Check settings in Bass Management
menu of the connected amplifier or
receiver.
• Carefully and gradually Increase the
subwoofer volume level on the amplifier
or receiver.
• Carefully and gradually Increase the
subwoofer volume level with its remote
control.
18
Solution
FACTORY DEFAULTS
Factory Default settings.
The factory default settings are as follows:
Power Mode:
Automatic
Phase:
0°
Level:
0dB
EXT:
On
LF Cut-off:
100Hz
To reinstate the factory default settings:
• Switch the subwoofer off completely using the switch on
the back panel (No.2 in fig.2).
• Wait for at least 10 seconds.
• Press and hold the "A" preset button (No. 6 in fig 6).
• While holding down the "A" preset button, switch on
subwoofer back on: The power Status LED will start to
flash green.
• Release the "A" preset button. The subwoofer is now
reset to the factory default settings.
All previously stored presets will be deleted also
when resetting to factory defaults
19
TECHNICAL SPECIFICATIONS
Technical Specifications for BM10S BM12S
Frequency Response (+/- 3 dB)
Low Frequency Limit*
High Frequency Limit*
BM12S
18 Hz - 250 Hz
18 Hz - 27 Hz
60 Hz - 250 Hz
BM10S
25 Hz - 250 Hz
25 Hz - 33 Hz
60 Hz - 250 Hz
Amplifier Power
250 W @ 4 Ohms
200 W @ 5 Ohms
Crossover Frequencies
Crossover Slope
Crossover Bypass
Phase adjustment
60 Hz / 80 Hz / 100 Hz
4th order Linkwitz-Riley
Yes (Flat)
0° / 90° / 180° / 270°
60 Hz / 80 Hz / 100 Hz
4th order Linkwitz-Riley
Yes (Flat)
0° / 90° / 180° / 270°
Inputs
Input Sensitivity for Full Output*
Maximum Input
Input Impedance
Output
Single ended/RCA, Balanced/XLR
0.1 V - 5 V
10 V
20 k Ohms
Single ended/RCA, Balanced/XLR
Single ended/RCA, Balanced/XLR
0.1 V - 5 V
10 V
20 k Ohms
Single ended/RCA, Balanced/XLR
Master / Slave Link
Remote Control
No. of Presets
Each Preset includes
Yes
included
4
level, crossover frequency, phase,
extended frequency range
Yes
included
4
level, crossover frequency, phase,
extended frequency range
Drive Unit
Magnetic Shielding
12" (30 cm), long throw
Yes
10" (24 cm), long throw
Yes
Internal Cabinet Volume
Bass Principle
36 litres
Closed
19 litres
Ported
Power Consumption Max.
Power Consumption Standby
Mains Voltage**
480 W
5W
120 V/60 Hz or 230 V/50 Hz
480 W
5W
120 V/60 Hz or 230 V/50 Hz
Weight (net)
Dimensions (W x H x D)
28.2 kg
360 x 378 x 576 mm
16.7 kg
320 x 338 x 474 mm
* Depended on setting
** Please refer to your local network
Note: Technical specifications are subject to change without notice.
20