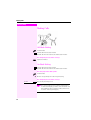
1
T-Octopus F 200/400/600
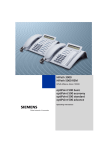
Octophon 22
Octophon 26
Operating Instructions
Deutsche
Telekom
!"§=========
Before You Begin
These operating instructions describe the Octophon 22/26 of the T-Octopus F 200/400/600 system,
T-Octopus F Server.
They describe all functions you can use from your telephone. You may find that some functions you wish to use
are not available on your telephone. This may be due to one of the following reasons:
• The function has not been configured for your telephone - address any questions to Customer Support.
• Your communication system does not support this function - contact your sales representative to upgrade
your system.
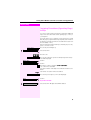
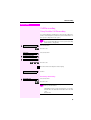
How to Use these Operating Instructions
You will find a graphic representation of the steps in logical sequence
in the left column. Below is an explanation of the symbols:
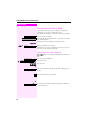
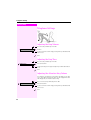
Step by Step
Lift the handset (off-hook).
Replace the handset (on-hook).
Conduct a call.
Enter a telephone number or code.
Enter the code.
or
Press volume controls on the telephone.
Program/Service
Press the key.
Speaker
Press the illuminated key.
Press the flashing key.
Start conference?
The option appears on the screen.
Press the OK key to confirm your selection.
Display contrast?
Search for an option.
Press the
keys,
until the option appears on the screen.
Then press the OK key to confirm your selection.
Screen Displays
Please dial
Return to held call?
>
Line 1 displays prompts or acknowledgment messages, depending
on the situation.
Line 2 displays functions that you can confirm by pressing
If the symbol ">" appears on the right, you can press
access further options.
2
OK
.
to
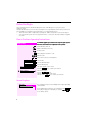
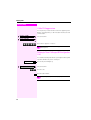
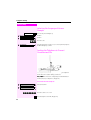
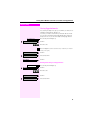
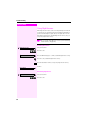
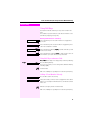
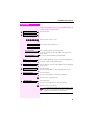
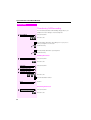
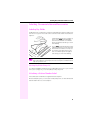
The Control Panel of the Octophon 22/26
Speaker
for open
listening
and ring tones
Handset
Keys for
telephone
settings
Display,
2 lines with
24 chars
Key field - fixed function keys:
Program/Service
Redial
Mute or Internal
Speaker
Keypad
ABC
Key field - freely
programmable keys
DEF
1
2
3
GHI
JKL
MNO
4
5
6
PQRS
TUV
WXYZ
7
8
9
Fixed function key:
Release
0
O.K.
Key for
confirming
a function
<
LEDs
>
Keys for
scrolling
to functions
Microphone for speakerphone mode
3
Important Notes
Do not operate the telephone in environments where there is a danger of explosions.
Never open the telephone or a key module. If you encounter any problems, contact System Support.
Use only original accessories (Æ page 92)! Using other accessories is dangerous and
will render the warranty and the CE mark null and void.
Never allow the telephone to come into contact with staining or aggressive liquids such as
coffee, tea, juice, or soft drinks.
For information on telephone maintenance Æ page 94.
CE Mark
The telephone conforms to EU directive 1999/5/EG, as attested by the CE mark.
4
Accessing Functions
Step by Step
Accessing Functions
... Interactively
You can select some functions while the telephone is idle
idle,
for example:
Use
cute it.
Forwarding on
to scroll to a function and press
OK
to exe-
You can select other functions directly depending on the situation.
situation
Example: you call a number, but the line is busy:
Press
Callback
OK
to confirm.
or
Use
cute it.
Send message
to scroll to a function and press
OK
to exe-
... Via the Program/Service Menu
First press the "Program/Service" key. You then see a list of selection
options, such as: "#0=Reset services" (Æ page 65).
Press the key
Program/Service
Use
cute it.
#0=Reset services?
to scroll to a function and press
OK
to exe-
or
Enter the code directly.
The Quick-Reference Operating Instructions contain a list of codes.
However, they are also displayed on screen along with the corresponding function.
... With Function Keys
If you saved a function on a key (Æ page 52), you can access it directly as follows :
Press the Mute key to execute the function.
5
Accessing Functions
Functions You Can Use
Basic and Enhanced Functions
You can use all basic and enhanced T-Octopus F 200/400/600 functions that appear interactively on the screen, in the Program/Service menu, and when you press function keys.
Additional Team and Executive/Secretary Functions
Æ page 73f.
To help working and project groups work together more efficiently, the service technician
can configure a variety of team functions, depending on your preferences when working in
the team. You can use these team functions in addition to the basic and enhanced functions.
In addition to call pickup, hunting groups (group call), and call distribution groups, you can
also set up teams with multiple lines per telephone.
You can tell if a telephone has trunk keys if your station number and the numbers of your colleagues are programmed on trunk keys. You can access all lines and can also conduct different calls simultaneously on multiple lines.
Another team function category includes the executive/secretary
functions, which are configured by the service technician. You can use executive and secretary functions in addition to the basic and enhanced functions as well as other team functions.
An executive/secretary telephone has DSS keys for the executive or secretary, trunk keys for
the executive and secretary, as well as ring transfer keys.
Using the Telephone Efficiently
• You probably have certain colleagues or external parties with whom you talk on the
phone especially frequently. To dial these numbers faster and more conveniently, you
can save them on keys
(Saving station numbers for repertory dialing on keys Æ page 50).
• All too often you reach a busy line when dialing a number. Amid the confusion of your
working day, it’s easy to forget to try the number again later on. To avoid this, make it a
habit to use the "Callback" (Æ page 44) function.
Basic and Enhanced Functions
6
Contents
Contents
Accessing Functions . . . . . . . . . . . . . . . . . . . . . . . . . . . . . . 5
... Interactively . . . . . . . . . . . . . . . . . . . . . . . . . . . . . . . . . . . . . . . . . . . . . . . . . . . . . . . . . . . . . . . . . . . . 5
... Via the Program/Service Menu. . . . . . . . . . . . . . . . . . . . . . . . . . . . . . . . . . . . . . . . . . . . . . . . . . . 5
... With Function Keys . . . . . . . . . . . . . . . . . . . . . . . . . . . . . . . . . . . . . . . . . . . . . . . . . . . . . . . . . . . . . 5
Functions You Can Use . . . . . . . . . . . . . . . . . . . . . . . . . . . . . . . . . . . . . . . . . . . . . . . . . . . . . . . . . . . 6
Basic and Enhanced Functions . . . . . . . . . . . . . . . . . . . . . . . . . . . . . . . . . . . . . . . . . . . . . . . . 6
Additional Team and Executive/Secretary Functions . . . . . . . . . . . . . . . . . . . . . . . . . . . . . 6
Using the Telephone Efficiently . . . . . . . . . . . . . . . . . . . . . . . . . . . . . . . . . . . . . . . . . . . . . . . . . . . . 6
Ø Basic and Enhanced Functions
Making and Answering Calls. . . . . . . . . . . . . . . . . . . . . .12
Answering a Call With the Handset . . . . . . . . . . . . . . . . . . . . . . . . . . . . . . . . . . . . . . . . . . . . . . . . 12
Answering a Call with the Speaker
(Speakerphone Mode and Open Listening). . . . . . . . . . . . . . . . . . . . . . . . . . . . . . . . . . . . . . . . . 12
Open Listening in the Room During a Call . . . . . . . . . . . . . . . . . . . . . . . . . . . . . . . . . . . . . . . . . . 13
Switching to Speakerphone Mode and Open Listening . . . . . . . . . . . . . . . . . . . . . . . . . . . . . . 13
Switching to the Handset . . . . . . . . . . . . . . . . . . . . . . . . . . . . . . . . . . . . . . . . . . . . . . . . . . . . . . . . . 14
Using Call Waiting . . . . . . . . . . . . . . . . . . . . . . . . . . . . . . . . . . . . . . . . . . . . . . . . . . . . . . . . . . . . . . . 14
Accepting a Waiting Call (Camp-On) . . . . . . . . . . . . . . . . . . . . . . . . . . . . . . . . . . . . . . . . . . 14
Preventing and Allowing Call Waiting (Automatic Camp-On). . . . . . . . . . . . . . . . . . . . . . 15
Turning the Call Waiting Tone On and Off . . . . . . . . . . . . . . . . . . . . . . . . . . . . . . . . . . . . . . 15
Accepting a Specific Call for Your Colleague . . . . . . . . . . . . . . . . . . . . . . . . . . . . . . . . . . . . . . . 16
Rejecting Calls . . . . . . . . . . . . . . . . . . . . . . . . . . . . . . . . . . . . . . . . . . . . . . . . . . . . . . . . . . . . . . . . . . 16
Using Mailboxes. . . . . . . . . . . . . . . . . . . . . . . . . . . . . . . . . . . . . . . . . . . . . . . . . . . . . . . . . . . . . . . . . 17
Accessing the Mailbox . . . . . . . . . . . . . . . . . . . . . . . . . . . . . . . . . . . . . . . . . . . . . . . . . . . . . . . 17
Using Timed Reminders. . . . . . . . . . . . . . . . . . . . . . . . . . . . . . . . . . . . . . . . . . . . . . . . . . . . . . . . . . 17
Using the Speakerphone . . . . . . . . . . . . . . . . . . . . . . . . . . . . . . . . . . . . . . . . . . . . . . . . . . . . . . . . . 18
Enabling and Disabling Handsfree Answerback. . . . . . . . . . . . . . . . . . . . . . . . . . . . . . . . . 18
Answering a Call With a Headset . . . . . . . . . . . . . . . . . . . . . . . . . . . . . . . . . . . . . . . . . . . . . . . . . . 18
Turning Do Not Disturb On and Off . . . . . . . . . . . . . . . . . . . . . . . . . . . . . . . . . . . . . . . . . . . . . . . . 19
Turning Ringer Cutoff On and Off . . . . . . . . . . . . . . . . . . . . . . . . . . . . . . . . . . . . . . . . . . . . . . . . . 19
Trace Call: Identifying Anonymous Callers. . . . . . . . . . . . . . . . . . . . . . . . . . . . . . . . . . . . . . . . . . 20
Turning the Microphone On and Off . . . . . . . . . . . . . . . . . . . . . . . . . . . . . . . . . . . . . . . . . . . . . . . 20
Answering Calls from the Entrance Telephone and Opening the Door . . . . . . . . . . . . . . . . . 21
Accepting a Call From an Answering Machine . . . . . . . . . . . . . . . . . . . . . . . . . . . . . . . . . . . . . . 22
Display Number of Waiting Calls and Overload Indication . . . . . . . . . . . . . . . . . . . . . . . . . . . . 23
7
Contents
Making Calls. . . . . . . . . . . . . . . . . . . . . . . . . . . . . . . . . . . . 24
Off-Hook Dialing . . . . . . . . . . . . . . . . . . . . . . . . . . . . . . . . . . . . . . . . . . . . . . . . . . . . . . . . . . . . . . . . 24
On-Hook Dialing . . . . . . . . . . . . . . . . . . . . . . . . . . . . . . . . . . . . . . . . . . . . . . . . . . . . . . . . . . . . . . . . 24
En-bloc Dialing/Correcting Station Numbers . . . . . . . . . . . . . . . . . . . . . . . . . . . . . . . . . . . 25
Caller ID Suppression. . . . . . . . . . . . . . . . . . . . . . . . . . . . . . . . . . . . . . . . . . . . . . . . . . . . . . . . . . . . 26
Talking to Your Colleague With a Speaker Call . . . . . . . . . . . . . . . . . . . . . . . . . . . . . . . . . . . . . 26
Activating Tone Dialing (DTMF Suffix Dialing) . . . . . . . . . . . . . . . . . . . . . . . . . . . . . . . . . . . . . . 27
Automatic Connection Setup (Hotline). . . . . . . . . . . . . . . . . . . . . . . . . . . . . . . . . . . . . . . . . . . . . 27
Reserve Trunk . . . . . . . . . . . . . . . . . . . . . . . . . . . . . . . . . . . . . . . . . . . . . . . . . . . . . . . . . . . . . . . . . . 28
Assigning a Station Number . . . . . . . . . . . . . . . . . . . . . . . . . . . . . . . . . . . . . . . . . . . . . . . . . . . . . 28
Trunk Flash. . . . . . . . . . . . . . . . . . . . . . . . . . . . . . . . . . . . . . . . . . . . . . . . . . . . . . . . . . . . . . . . . . . . . 29
Associated Dialing/Dialing Aid. . . . . . . . . . . . . . . . . . . . . . . . . . . . . . . . . . . . . . . . . . . . . . . . . . . . 29
Calling Multiple Parties Simultaneously . . . . . . . . . . 31
Calling a Second Party (Consultation Hold) . . . . . . . . . . . . . . . . . . . . . . . . . . . . . . . . . . . . . . . . 31
Switching to the Party on Hold (Toggle). . . . . . . . . . . . . . . . . . . . . . . . . . . . . . . . . . . . . . . . 31
Conducting a Conference . . . . . . . . . . . . . . . . . . . . . . . . . . . . . . . . . . . . . . . . . . . . . . . . . . . . . . . . 32
Adding Up to Five Parties to the Conference (Initiator Only) . . . . . . . . . . . . . . . . . . . . . . 32
Checking Which Parties Are in the Conference (Initiator Only). . . . . . . . . . . . . . . . . . . . 33
Removing Parties From the Conference (Initiator Only) . . . . . . . . . . . . . . . . . . . . . . . . . . 33
Leaving a Conference . . . . . . . . . . . . . . . . . . . . . . . . . . . . . . . . . . . . . . . . . . . . . . . . . . . . . . . 33
Ending a Conference (Initiator Only). . . . . . . . . . . . . . . . . . . . . . . . . . . . . . . . . . . . . . . . . . . 33
Transferring a Call. . . . . . . . . . . . . . . . . . . . . . . . . . . . . . . . . . . . . . . . . . . . . . . . . . . . . . . . . . . . . . . 33
...After a Speaker Call (Announcement) in a Group. . . . . . . . . . . . . . . . . . . . . . . . . . . . . . 34
Parking a Call. . . . . . . . . . . . . . . . . . . . . . . . . . . . . . . . . . . . . . . . . . . . . . . . . . . . . . . . . . . . . . . . . . . 35
Retrieving a Parked Call . . . . . . . . . . . . . . . . . . . . . . . . . . . . . . . . . . . . . . . . . . . . . . . . . . . . . 35
Placing External Calls on Hold . . . . . . . . . . . . . . . . . . . . . . . . . . . . . . . . . . . . . . . . . . . . . . . . . . . . 36
Picking up (Retrieving) a Held Call . . . . . . . . . . . . . . . . . . . . . . . . . . . . . . . . . . . . . . . . . . . . 36
Making Calls to Stored Destinations . . . . . . . . . . . . . . 37
Using a Caller List . . . . . . . . . . . . . . . . . . . . . . . . . . . . . . . . . . . . . . . . . . . . . . . . . . . . . . . . . . . . . . . 37
Retrieving the Caller List . . . . . . . . . . . . . . . . . . . . . . . . . . . . . . . . . . . . . . . . . . . . . . . . . . . . . 37
Ending Retrieval . . . . . . . . . . . . . . . . . . . . . . . . . . . . . . . . . . . . . . . . . . . . . . . . . . . . . . . . . . . . 37
Displaying the Call Time and Additional Call Information . . . . . . . . . . . . . . . . . . . . . . . . 38
Dialing a Station Number from the Caller List . . . . . . . . . . . . . . . . . . . . . . . . . . . . . . . . . . . 38
Removing an Entry from the Caller List . . . . . . . . . . . . . . . . . . . . . . . . . . . . . . . . . . . . . . . . 38
Saving the Other Party’s Station Number in the Caller List (Redial) . . . . . . . . . . . . . . . . 38
Redialing a Number . . . . . . . . . . . . . . . . . . . . . . . . . . . . . . . . . . . . . . . . . . . . . . . . . . . . . . . . . . . . . 39
Dialing a Number From the Internal Directory. . . . . . . . . . . . . . . . . . . . . . . . . . . . . . . . . . . . . . . 40
Using Repertory Dialing Keys . . . . . . . . . . . . . . . . . . . . . . . . . . . . . . . . . . . . . . . . . . . . . . . . . . . . . 41
Using Station and System Speed-Dial Numbers . . . . . . . . . . . . . . . . . . . . . . . . . . . . . . . . . . . . 41
8
Contents
Displaying and Assigning Call Charges . . . . . . . . . . . .42
Displaying Call Charges . . . . . . . . . . . . . . . . . . . . . . . . . . . . . . . . . . . . . . . . . . . . . . . . . . . . . . . . . 42
Displaying Call Charges for Another Telephone . . . . . . . . . . . . . . . . . . . . . . . . . . . . . . . . . . . . 42
Dialing with Call Charge Assignment . . . . . . . . . . . . . . . . . . . . . . . . . . . . . . . . . . . . . . . . . . . . . . 43
If You Cannot Reach a Destination ... . . . . . . . . . . . . . .44
Using Callback . . . . . . . . . . . . . . . . . . . . . . . . . . . . . . . . . . . . . . . . . . . . . . . . . . . . . . . . . . . . . . . . . 44
Storing a Callback . . . . . . . . . . . . . . . . . . . . . . . . . . . . . . . . . . . . . . . . . . . . . . . . . . . . . . . . . . . 44
Answering a Callback . . . . . . . . . . . . . . . . . . . . . . . . . . . . . . . . . . . . . . . . . . . . . . . . . . . . . . . . 44
Checking and Canceling a Saved Callback. . . . . . . . . . . . . . . . . . . . . . . . . . . . . . . . . . . . . 44
Call Waiting (Camp-On) . . . . . . . . . . . . . . . . . . . . . . . . . . . . . . . . . . . . . . . . . . . . . . . . . . . . . . . . . . 45
Busy Override - Joining a Call in Progress. . . . . . . . . . . . . . . . . . . . . . . . . . . . . . . . . . . . . . . . . . . 45
Telephone Settings . . . . . . . . . . . . . . . . . . . . . . . . . . . . . .46
Adjusting the Ring Volume . . . . . . . . . . . . . . . . . . . . . . . . . . . . . . . . . . . . . . . . . . . . . . . . . . . . . . 46
Adjusting the Ring Tone. . . . . . . . . . . . . . . . . . . . . . . . . . . . . . . . . . . . . . . . . . . . . . . . . . . . . . . . . . 46
Adjusting the Attention Ring Volume. . . . . . . . . . . . . . . . . . . . . . . . . . . . . . . . . . . . . . . . . . . . . . . 46
Adjusting the Speakerphone to the Room Acoustics. . . . . . . . . . . . . . . . . . . . . . . . . . . . . . . . . 47
Adjusting the Receiving Volume During a Call . . . . . . . . . . . . . . . . . . . . . . . . . . . . . . . . . . . . . . 47
Adjusting the Display to a Comfortable Reading Angle. . . . . . . . . . . . . . . . . . . . . . . . . . . . . . . 47
Selecting the Language of Screen Prompts. . . . . . . . . . . . . . . . . . . . . . . . . . . . . . . . . . . . . . . . . 48
Locking the Telephone to Prevent Unauthorized Use . . . . . . . . . . . . . . . . . . . . . . . . . . . . . . . . 48
Saving Your PIN . . . . . . . . . . . . . . . . . . . . . . . . . . . . . . . . . . . . . . . . . . . . . . . . . . . . . . . . . . . . . . . . . 49
Saving Station Numbers, Functions, Procedures and
Appointments. . . . . . . . . . . . . . . . . . . . . . . . . . . . . . . . . . .50
Saving Repertory Dialing Numbers on a Key . . . . . . . . . . . . . . . . . . . . . . . . . . . . . . . . . . . . . . . 50
Storing Station Speed-Dial Numbers . . . . . . . . . . . . . . . . . . . . . . . . . . . . . . . . . . . . . . . . . . . . . . . 51
Assigning Functions to Keys . . . . . . . . . . . . . . . . . . . . . . . . . . . . . . . . . . . . . . . . . . . . . . . . . . . . . . 52
Assigning Procedures (Operating Steps) to Keys . . . . . . . . . . . . . . . . . . . . . . . . . . . . . . . . . . . . 55
Saving Appointments . . . . . . . . . . . . . . . . . . . . . . . . . . . . . . . . . . . . . . . . . . . . . . . . . . . . . . . . . . . . 57
Testing the Telephone . . . . . . . . . . . . . . . . . . . . . . . . . . .58
Testing the Telephone Functions. . . . . . . . . . . . . . . . . . . . . . . . . . . . . . . . . . . . . . . . . . . . . . . . . 58
Checking the Key Assignment . . . . . . . . . . . . . . . . . . . . . . . . . . . . . . . . . . . . . . . . . . . . . . . . . . . . 58
Call Forwarding . . . . . . . . . . . . . . . . . . . . . . . . . . . . . . . . .59
Using Variable Call Forwarding . . . . . . . . . . . . . . . . . . . . . . . . . . . . . . . . . . . . . . . . . . . . . . . . . . 59
Using Night Answer. . . . . . . . . . . . . . . . . . . . . . . . . . . . . . . . . . . . . . . . . . . . . . . . . . . . . . . . . . . . . . 60
Call Forwarding in the Carrier Network and Forwarding Multiple Subscriber
Numbers (MSN) . . . . . . . . . . . . . . . . . . . . . . . . . . . . . . . . . . . . . . . . . . . . . . . . . . . . . . . . . . . . . . . . . 61
9
Contents
Using Other Functions. . . . . . . . . . . . . . . . . . . . . . . . . . . 62
Sending a Message . . . . . . . . . . . . . . . . . . . . . . . . . . . . . . . . . . . . . . . . . . . . . . . . . . . . . . . . . . . . . 62
Displaying and Deleting Messages You Have Sent . . . . . . . . . . . . . . . . . . . . . . . . . . . . . . 62
Answering Messages . . . . . . . . . . . . . . . . . . . . . . . . . . . . . . . . . . . . . . . . . . . . . . . . . . . . . . . . 62
Leaving an Advisory Message . . . . . . . . . . . . . . . . . . . . . . . . . . . . . . . . . . . . . . . . . . . . . . . . . . . . 63
Deleting Advisory Messages. . . . . . . . . . . . . . . . . . . . . . . . . . . . . . . . . . . . . . . . . . . . . . . . . . 63
Using Another Telephone Like Your Own . . . . . . . . . . . . . . . . . . . . . . . . . . . . . . . . . . . . . . . . . . 63
Change call number (relocate). . . . . . . . . . . . . . . . . . . . . . . . . . . . . . . . . . . . . . . . . . . . . . . . . . . . 64
Fax Details and Message on Answering Machine . . . . . . . . . . . . . . . . . . . . . . . . . . . . . . . . . . . 65
Resetting Services and Functions (System-Wide Cancellation for a Telephone) . . . . . . . . 65
Monitoring a Room . . . . . . . . . . . . . . . . . . . . . . . . . . . . . . . . . . . . . . . . . . . . . . . . . . . . . . . . . . . . . . 66
Activating Functions for Another Telephone. . . . . . . . . . . . . . . . . . . . . . . . . . . . . . . . . . . . . . . . 67
Locking Another Telephone to Prevent Unauthorized Use . . . . . . . . . . . . . . . . . . . . . . . . . . . 68
Using System Functions from the Outside (DISA: Direct Inward System Access) . . . . . . . . 68
Controlling Connected Computers or Other Programs and Telephone Data Service (TOctopus F400 Only) . . . . . . . . . . . . . . . . . . . . . . . . . . . . . . . . . . . . . . . . . . . . . . . . . . . . . . . . . . . . . 70
Controlling Relays. . . . . . . . . . . . . . . . . . . . . . . . . . . . . . . . . . . . . . . . . . . . . . . . . . . . . . . . . . . . . . . 71
Sensors . . . . . . . . . . . . . . . . . . . . . . . . . . . . . . . . . . . . . . . . . . . . . . . . . . . . . . . . . . . . . . . . . . . . . . . . 71
Radio Paging . . . . . . . . . . . . . . . . . . . . . . . . . . . . . . . . . . . . . . . . . . . . . . . . . . . . . . . . . . . . . . . . . . . 72
Simple Paging Equipment . . . . . . . . . . . . . . . . . . . . . . . . . . . . . . . . . . . . . . . . . . . . . . . . . . . 72
Ø Team and Executive/Secretary Functions
Team and Executive/Secretary
Functions With Trunk Keys . . . . . . . . . . . . . . . . . . . . . . 73
Using Trunk Keys . . . . . . . . . . . . . . . . . . . . . . . . . . . . . . . . . . . . . . . . . . . . . . . . . . . . . . . . . . . . . . . 73
Answering Calls With Trunk Keys . . . . . . . . . . . . . . . . . . . . . . . . . . . . . . . . . . . . . . . . . . . . . 74
Making Calls with Trunk Keys . . . . . . . . . . . . . . . . . . . . . . . . . . . . . . . . . . . . . . . . . . . . . . . . 74
Using a Trunk Key to Place a Call on Hold and Retrieve It Again . . . . . . . . . . . . . . . . . . 74
Switching Between Phone Calls on Multiple Trunks . . . . . . . . . . . . . . . . . . . . . . . . . . . . . 75
Forwarding Calls on Lines. . . . . . . . . . . . . . . . . . . . . . . . . . . . . . . . . . . . . . . . . . . . . . . . . . . . . . . . 75
Using DSS Keys. . . . . . . . . . . . . . . . . . . . . . . . . . . . . . . . . . . . . . . . . . . . . . . . . . . . . . . . . . . . . . . . . 77
Using DSS Keys to Answer Calls . . . . . . . . . . . . . . . . . . . . . . . . . . . . . . . . . . . . . . . . . . . . . . 77
Calling a Team Member Directly . . . . . . . . . . . . . . . . . . . . . . . . . . . . . . . . . . . . . . . . . . . . . . 77
Transferring a Call in Progress . . . . . . . . . . . . . . . . . . . . . . . . . . . . . . . . . . . . . . . . . . . . . . . . . . . . 78
Accepting a Call for Another Team Member. . . . . . . . . . . . . . . . . . . . . . . . . . . . . . . . . . . . . . . . 78
Joining or Leaving a Group Call
(Not for the Executive Telephone in an Executive/Secretary Team) . . . . . . . . . . . . . . . . . . . 78
Transferring Calls Directly to the Executive (Only in an Executive/Secretary Group) . . . . . 79
10
Contents
Using Other Team Functions . . . . . . . . . . . . . . . . . . . . .80
Turning Group Call On and Off . . . . . . . . . . . . . . . . . . . . . . . . . . . . . . . . . . . . . . . . . . . . . . . . . . . 80
Accepting a Call for Another Member of Your Team . . . . . . . . . . . . . . . . . . . . . . . . . . . . . . . . . 82
Activating and Deactivating a Ringing Group . . . . . . . . . . . . . . . . . . . . . . . . . . . . . . . . . . . . . . . 82
Uniform Call Distribution (UCD) . . . . . . . . . . . . . . . . . . . . . . . . . . . . . . . . . . . . . . . . . . . . . . . . . . . 83
Ø System networking via LAN (PC network)
Special Functions in the LAN (PC Network). . . . . . . .85
Leaving a Hunt Group/Group Call . . . . . . . . . . . . . . . . . . . . . . . . . . . . . . . . . . . . . . . . . . . . . . . . 85
Ø All About Your Telephone
Labeling, Documentation and Accessories . . . . . . . . .91
Labeling Key Fields . . . . . . . . . . . . . . . . . . . . . . . . . . . . . . . . . . . . . . . . . . . . . . . . . . . . . . . . . . . . . 91
Labeling Key Fields Using a PC . . . . . . . . . . . . . . . . . . . . . . . . . . . . . . . . . . . . . . . . . . . . . . . 91
Attaching a Station Number Label . . . . . . . . . . . . . . . . . . . . . . . . . . . . . . . . . . . . . . . . . . . . . . . . . 91
Ordering Operating Instructions . . . . . . . . . . . . . . . . . . . . . . . . . . . . . . . . . . . . . . . . . . . . . . . . . . . 92
Operating Instructions in the Internet . . . . . . . . . . . . . . . . . . . . . . . . . . . . . . . . . . . . . . . . . . 92
Ordering Accessories . . . . . . . . . . . . . . . . . . . . . . . . . . . . . . . . . . . . . . . . . . . . . . . . . . . . . . . . . . . . 92
Fixing Problems . . . . . . . . . . . . . . . . . . . . . . . . . . . . . . . . .94
Telephone Maintenance . . . . . . . . . . . . . . . . . . . . . . . . . . . . . . . . . . . . . . . . . . . . . . . . . . . . . . . . 94
Troubleshooting. . . . . . . . . . . . . . . . . . . . . . . . . . . . . . . . . . . . . . . . . . . . . . . . . . . . . . . . . . . . . . . . . 94
Responding to Error Messages on the Screen . . . . . . . . . . . . . . . . . . . . . . . . . . . . . . . . . . . . . . 95
Contacts for Resolving Problems . . . . . . . . . . . . . . . . . . . . . . . . . . . . . . . . . . . . . . . . . . . . . . . . . . 95
Index. . . . . . . . . . . . . . . . . . . . . . . . . . . . . . . . . . . . . . . . . . .96
Ø Quick-Reference Operating Instructions
11
Making and Answering Calls
Step by Step
Making and Answering Calls
The specific call signal with which your telephone rings indicates the
type of call:
• When you receive an internal call, your telephone rings once
every four seconds (single-tone sequence).
• When you receive an external call, your telephone rings twice in
rapid succession every four seconds (dual-tone sequence).
• When you receive a call from the entrance telephone, your telephone rings three times in rapid succession every four seconds
(triple-tone sequence).
• If a call is waiting, you hear a short tone (beep) every six seconds.
The number or the name of the caller appears on the display.
Answering a Call With the Handset
The telephone rings. The caller appears on the screen.
Lift the handset.
or
Raise or lower the volume. Keep pressing the key until the desired volume is set.
Ending the call:
Replace the handset.
or
Press the key.
Release
Answering a Call with the Speaker
(Speakerphone Mode and Open
Listening)
The telephone rings. The caller appears on the screen.
Press the key. The LED lights up.
Speakerphone mode and open listening.
Speaker
or
Raise or lower the volume. Keep pressing the key until the desired volume is set.
Ending the call:
Speaker
12
Press the key. The LED goes out.
Making and Answering Calls
Step by Step
or
Press the key.
Release
Notes on speakerphone mode and open listening:
• Tell the other party that you are using speakerphone mode and
open listening.
• The speakerphone works bests at a low receiving volume.
• The ideal distance between the user and the telephone set in
speakerphone mode is about 50 cm (approx. 20 inches).
Open Listening in the Room During a Call
You can let other people in the room join in on the call. Let the other
party know that you have turned on the speaker.
Precondition: You are conducting a call with the handset.
Activating ring transfer:
Press the key. The LED lights up.
Speaker
Deactivating this function:
Press the key. The LED goes out.
Speaker
Switching to Speakerphone Mode and
Open Listening
Precondition: You are conducting a call with the handset.
Speaker
and
Hold down the key and replace the handset.
Then release the key and continue the call.
13
Making and Answering Calls
Step by Step
Switching to the Handset
Precondition: You are engaged in a call in speakerphone mode with
open listening.
and
Lift the handset. Continue the call.
Using Call Waiting
Callers can still reach you while you are engaged in another call. A
signal alerts you to the waiting call.
You can either ignore or accept the waiting call.
When you accept the waiting call, you can either end the first call or
place it on hold and resume the call later on.
You can also bar call waiting or the call waiting tone (Æ page 15).
Accepting a Waiting Call (Camp-On)
Precondition: You are engaged in a phone call and hear a tone (every
six seconds).
Ending the first call and answering the waiting call:
Replace the handset. Your telephone rings.
Answer the second call. Lift the handset.
Placing the first call on hold and answering the second call:
Select and confirm.
Call waiting?
or
Press the key. The LED lights up. Enter the code.
Program/Service
You are connected to the call waiting party immediately. The first
party is placed on hold.
Ending the second call and resuming the first one:
Confirm.
Quit and return?
or
Press the key. The LED lights up. Enter the code.
Program/Service
or
Replace the handset. "Recall: ..." appears on the screen. Lift the
handset.
14
Making and Answering Calls
Step by Step
Preventing and Allowing Call Waiting
(Automatic Camp-On)
If this function has been configured (ask your service technician), you
can prevent or allow a second call (Æ page 14) from being signaled
by automatic camp-on during an ongoing call.
Press the key. The LED lights up
Program/Service
and
Select and confirm.
#490=Call wait.trm.off?
or
*490=Call wait.term.on?
or
or
Enter the code for "off" or "on".
Turning the Call Waiting Tone On and Off
You can suppress the call waiting tone (every six seconds) for external calls. A one-time special dial tone then alerts you to the waiting
call.
Select and confirm.
Waiting tone off?
or
Waiting tone on?
or
or
Enter code for "tone off" or "tone on".
15
Making and Answering Calls
Step by Step
Accepting a Specific Call for Your
Colleague
You hear another telephone ring.
Press the key. The LED lights up
Program/Service
*59=Pickup - directed?
Select and confirm.
or
Enter the code.
A called station appears on the screen.
If applicable
Select and confirm until you see the station you want.
Next?
Confirm.
Accept call?
or
If you know the number of the telephone that is ringing, enter it directly.
or
Press the flashing key.
Accepting calls in a team Æ page 82.
Rejecting Calls
You can reject calls that you do not want to accept. The call will be rerouted to a telephone assigned for this purpose (contact System Support).
The telephone rings. The caller is displayed.
Disconnect
Press the key.
Your telephone will continue to ring if the call cannot be rejected. The
message "Your request cannot currently be executed" will be displayed (e. g. in the case of automatic recalls).
16
Making and Answering Calls
Step by Step
Using Mailboxes
If you have programmed the "Mailbox" key (Æ page 52), the associated LED lights up when messages have arrived for you. If your telephone is connected to a voice mail system, the "Mailbox" key will also
light up to alert you to any messages that have arrived.
Accessing the Mailbox
Press the illuminated "Mailbox" key.
or
Confirm.
Display Messages?
Select and confirm.
Text?
or
Follow the user prompts.
Call Voice Mail?
Using Timed Reminders
Precondition: You must have saved a timed reminder (Æ page 57).
The current time is the time stored.
The telephone rings. The timed reminder appears on the screen.
Reminder at:
Press the key twice.
Speaker
or
Lift the handset and replace it again.
If you fail to answer the timed reminder, it repeats five times
and is then erased.
17
Making and Answering Calls
Step by Step
Using the Speakerphone
A colleague addresses you directly over the speaker with a speaker
call. You hear a tone before the announcement. The other party’s
name or station number appears on the screen.
You can conduct the call with the handset or in speakerphone mode.
Lift the handset and answer the call.
or
Press the "OK" key to confirm your selection and answer the call.
Mute off?
or
Press the key and answer the call.
Mute
If handsfree answerback is enabled (see below), you do not
need to switch on the microphone – you can answer directly.
You can answer immediately in speakerphone mode.
If handsfree answerback is disabled (default setting), follow
the procedure described above.
Placing a speaker call to a colleague (Æ page 26).
Enabling and Disabling Handsfree Answerback
Select and confirm.
HF answerback on?
or
HF answerback off?
or
or
Enter the code for "on" or "off".
Answering a Call With a Headset
Precondition: Your telephone must be equipped with an Headset
Adapter/Headset Plus Adapter. The Headset is connected to the
Adapter.
Answer?
Your telephone rings. Confirm.
Ending the call:
Release
18
Press the key. The LED goes out.
Making and Answering Calls
Step by Step
Turning Do Not Disturb On and Off
You can activate the do not disturb function if you do not want the receive any calls. When do not disturb is activated, internal callers hear
a busy signal and external callers are rerouted to a telephone assigned for this purpose (system support).
Select and confirm.
DND on?
or
DND off?
or
or
Enter the code for "on" or "off".
When you lift the handset, a special dial tone (continuous
buzzing tone) reminds you that do not disturb is active.
Authorized internal callers can automatically override the do
not disturb function after five seconds.
Turning Ringer Cutoff On and Off
You can activate the ringer cutoff function if you do not want the receive any calls. Calls are only identified by one ring signal, an indication on the display, and a key which has been programmed to flash
(such as a trunk key).
Select and confirm.
Ringer cutoff on?
or
Ringer cutoff off?
or
or
Enter the code for "on" or "off".
19
Making and Answering Calls
Step by Step
Trace Call: Identifying Anonymous
Callers
You can have the carrier identify malicious external callers. You can
save the caller’s station number during the call or for 30 seconds after the call ends. However, it is essential that you do not replace your
handset during this time.
Press the key. The LED lights up.
Program/Service
and
Select and confirm.
*84=Trace call?
or
Enter the code.
After you have finished tracing the call, the data is stored on
the carrier’s system. Now contact System Support.
Turning the Microphone On and Off
To prevent the other party from listening in while you consult with
someone in your office, you can temporarily switch off the handset
microphone or the handsfree microphone. You can also switch on
the handsfree microphone to answer an announcement via the telephone speaker (speaker call, Æ page 18).
Precondition: You are conducting a call. The microphone is switched
on.
Press the key. The LED lights up.
Mute
or
Press the illuminated key. The LED goes out.
Mute
or
Select and confirm.
Mute on?
or
Mute off?
or
Program/Service
or
20
Press the key. The LED lights up
Enter the code for "on or "off".
Making and Answering Calls
Step by Step
Answering Calls from the Entrance
Telephone and Opening the Door
If an entrance telephone has been programmed, you can use your
telephone to speak to someone at the
entrance telephone and to activate a door opener.
If you have the proper authorization (contact System Support), you
can activate the door opener
opener, enabling visitors to open the door themselves by entering a
5-digit code (using a DTMF transmitter or installed keypad).
Speaking to visitors via the entrance telephone:
Precondition: Your telephone rings.
Lift the handset within thirty seconds. You are connected to the entrance telephone immediately.
or
Lift the handset after more than thirty seconds.
Dial the entrance telephone number.
Opening the door from your telephone during a call from the entrance telephone:
Confirm.
Open door?
Opening the door from your telephone without calling the entrance telephone:
Press the key. The LED lights up.
Program/Service
*61=Open door?
Select and confirm.
or
Enter the code.
Dial the entrance telephone number.
Special features must be taken into consideration if your telephone operates with T-Octopus F Server (system networking
via PC network) (Æ page 90)!
21
Making and Answering Calls
Step by Step
Opening the door with a code (at the door):
After ringing the bell, enter the five-digit code (using the keypad or a
DTMF transmitter). Depending on how the door opener has been programmed, a doorbell call signal may or may not be forwarded.
Activating the door opener:
Press the key. The LED lights up
Program/Service
*89=Door opener on?
Select and confirm.
or
Enter the code.
Dial the entrance telephone number.
Enter the five-digit code. Default code = "00000".
or
Select the displayed function and press the "OK" dialog key to
change the code.
3=change password?
Select and confirm.
1=enable with ring?
or
You can also open the door without a doorbell ring.
2=enable w/o ring?
Deactivating the door opener:
Press the key. The LED lights up.
Program/Service
Select and confirm.
#89=Door opener off?
or
Enter the code.
Accepting a Call From an Answering
Machine
You can accept a call from any answering machine if the machine is
connected to your system (contact System Support) and you have
programmed the answering machine number on a key (Æ page 52).
The LED lights up. Press the key.
22
Making and Answering Calls
Step by Step
Display Number of Waiting Calls and
Overload Indication
You can show the number of external waiting calls on the display by
pressing the "View number of calls" key (Æ page 52).
Press the "Waiting calls" key.
If the number of waiting calls exceeds a preset limit while you are engaged in another call (overload), the LED on the key lights up. Contact System Support to find out the waiting call limit.
• LED off:
No callers waiting.
• LED flashes slowly:
You have reached the programmed threshold.
• LED flashes rapidly:
You have exceeded the threshold value (overload).
23
Making Calls
Step by Step
Making Calls
Off-Hook Dialing
Lift the handset.
Internal calls: Enter the station number.
External calls: Enter the external code and the station number.
The called party does not answer or is busy:
Replace the handset.
On-Hook Dialing
Internal calls: Enter the station number.
External calls: Enter the external code and the station number.
The other party answers with speaker:
Lift the handset.
or On-hook: Use speakerphone mode and open listening.
The called party does not answer or is busy:
Speaker
Press the key. The LED goes out.
Your system may also be programmed so that you have to
press the Internal key before you dial an internal number.
To call an external party, you have to enter an external code
before dialing the party’s telephone number (Prime Line is
not active; contact System Support).
24
Making Calls
Step by Step
En-bloc Dialing/Correcting Station Numbers
If this function is configured (contact System Support), you can enter
the station number without dialing. You can then correct the station
number if necessary.
The number will only be dialed if you so instruct.
Internal: Enter the station number.
External: Enter the external code and station number.
Dial the entered/displayed station number:
Lift the handset.
or
Confirm.
Dial?
Correct the entered station number:
Select and confirm.
The last digit entered will be deleted.
Delete digits?
Enter the required digit(s).
Terminate en-bloc dialing:
Select and confirm.
End?
or
Press the key. The LED goes out.
Speaker
or
Disconnect
Press the key.
25
Making Calls
Step by Step
Caller ID Suppression
You can prevent your station number or name from appearing on the
displays of external parties you call. The feature remains active until
you deactivate it.
Select and confirm.
Suppress call ID?
or
Restore caller ID?
or
or
Enter code for "suppress" or "restore".
System Support can turn caller ID suppression on and off for
all telephones.
Talking to Your Colleague With a Speaker
Call
You can talk to internal parties with an system telephone directly with
a speaker call without any action on their part.
Press the key. The LED lights up.
Program/Service
*80=Speaker call?
Select and confirm.
or
Enter the code.
Enter the station number.
Responding to a speaker call (Æ page 18).
26
Making Calls
Step by Step
Activating Tone Dialing
(DTMF Suffix Dialing)
You can transmit dual-tone multifrequency (DTMF
DTMF)
DTMF signals to control
devices such as an answering machine or automatic information system.
Press the key. The LED lights up.
Program/Service
Select and confirm.
*53=DTMF dialing?
or
Enter the code.
You can use the keys "0" through "9", "*", and "#" to transmit DTMF
signals.
Ending the call also deactivates DTMF suffix dialing.
Your system may be configured so that you can start DTMF
suffix-dialing immediately after setting up a connection.
Automatic Connection Setup (Hotline)
If this function is configured (contact System Support), the system automatically sets up a connection to a preset internal or external destination.
Lift the handset.
Depending on the setting, the connection is either set up immediately or only after a preset period of time (hotline after a timeout).
27
Making Calls
Step by Step
Reserve Trunk
If this feature is configured (contact System Support), you can reserve a busy trunk for your own use.
When the trunk is free, you receive a call and a message appears on
the display.
Precondition: The message "busy at the moment" appears on your
screen.
Confirm.
Reserve trunk?
When the reserved trunk becomes free:
Your telephone rings. The display shows " Trunk is free".
Lift the handset. You hear the CO dial tone.
Enter the number of the external station.
Assigning a Station Number
If this function has been configured (contact System Support), you
can selectively assign a specific number (DID number) to your telephone before making an external call. The assigned number then appears on the called party’s display.
Press the key. The LED lights up.
Program/Service
Select and confirm.
*41=Temporary MSN?
or
Enter the code.
Enter the DID number you wish to use.
Dial the external number.
28
Making Calls
Step by Step
Trunk Flash
To activate ISDN-type services and features through the network carrier’s analog trunks or those of other communication systems (such
as "consultation hold"), you must send a signal to the trunks before dialing the service code or telephone number.
Precondition: You have set up an external connection.
Press the key. The LED lights up.
Program/Service
*51=Trunk flash?
Select and confirm.
or
Enter the code.
Enter the service code and/or telephone number.
Associated Dialing/Dialing Aid
If this function has been configured (contact System Support), you
can use a dialing aid to dial numbers and set up calls for your telephone.
The operating procedure depends on whether the dialing aid is connected to the S0 bus or the a/b (T/R) port.
port
You can also use your system telephone as a dialing aid for other telephones.
Dialing aid on the S0 bus:
On the PC, select a destination and start dialing.
The speaker on your telephone is switched on. Lift the handset when
the other party answers.
Dialing aid at the a/b (T/R) port:
On the PC select a destination and start dialing.
"Lift the handset" appears on the PC screen.
Lift the handset.
29
Making Calls
Step by Step
Dialing aid from your telephone for another telephone:
Press the key. The LED lights up.
Program/Service
*67=Associated dial?
Select and confirm.
or
Enter the code.
Enter the internal station number ("Dial for:").
Enter the number you wish to dial.
30
Calling Multiple Parties Simultaneously
Step by Step
Calling Multiple Parties
Simultaneously
Calling a Second Party (Consultation
Hold)
You can call a second party while engaged in a call. The first party is
placed on hold.
Confirm.
Enquiry?
Call the second party.
Return to the first party:
Confirm.
Return to held call?
or
Quit and return?
or
Press the key. The LED lights up. Enter the code. The LED goes out.
Program/Service
Switching to the Party on Hold (Toggle)
Select and confirm.
Toggle/Connect?
or
Program/Service
Press the key. The LED lights up. Enter the code. The LED goes out.
31
Calling Multiple Parties Simultaneously
Step by Step
Combine the calling parties into a three-party conference
Select and confirm.
Conference?
or
Press the key. The LED lights up. Enter the code. The LED goes out.
Program/Service
Connecting the other parties to each other
Select and confirm.
Transfer?
Conducting a Conference
In a conference call, you can talk to as many as four other parties at
the same time. These may be internal or external users.
Call the first party.
Select and confirm.
Start conference?
Call the second station. Announce the conference.
Select and confirm.
Conference?
or
Press the key. The LED lights up. Enter the code. The LED goes out.
Program/Service
A tone sounds every 30 seconds to indicate that a conference is in
progress. Contact System Support for instructions on how to turn it
off.
If the second party does not answer:
Confirm.
Return to held call?
or
Enter the code.
Adding Up to Five Parties to the Conference
(Initiator Only)
Confirm.
Add party?
Call the new party. Announce the conference.
Select and confirm.
Conference?
or
Program/Service
32
Press the key. The LED lights up. Enter the code. The LED goes out.
Calling Multiple Parties Simultaneously
Step by Step
Checking Which Parties Are in the Conference
(Initiator Only)
View conf parties?
Select and confirm. The first station appears on the screen.
Next?
To display other stations, confirm each subsequent display.
Exit list?
To exit the list: Select and confirm.
Removing Parties From the Conference
(Initiator Only)
View conf parties?
Select and confirm. The first station appears on the screen.
Next?
Confirm as often as required until the desired station
appears.
Remove party?
Select and confirm.
Leaving a Conference
Replace the handset.
or
Select and confirm.
Withdraw?
Ending a Conference (Initiator Only)
Select and confirm.
End conference?
or
Press the key. The LED lights up. Enter the code. The LED goes out.
Program/Service
Transferring a Call
If the person you are speaking to wants to talk to another colleague
of yours, you can transfer the call that colleague.
Confirm.
Enquiry?
Enter the number of the party to which you want to transfer the call.
Announce the call, if necessary.
Replace the handset.
or
Transfer?
Select and confirm.
33
Calling Multiple Parties Simultaneously
Step by Step
...After a Speaker Call (Announcement) in a
Group
If this function has been configured (contact System Support), you
can use a speaker call (announcement, Æ page 26) to announce a
call in progress to a group of users (Æ page 80).
After a member of the group has accepted the call request, you can
transfer the waiting party.
Precondition: You are conducting a call.
Confirm. The other party is placed on hold.
Enquiry?
Press the key. The LED lights up.
Program/Service
*80=Speaker call?
Select and confirm.
or
Enter the code.
Enter the group’s station number.
Announce the call.
When a member of the group accepts the call (Æ page 18), you are
connected to this party.
Replace the handset.
or
Transfer?
Select and confirm.
If the connection between the two other parties is not established within 45 seconds, the call from the first part returns to
you (recall).
34
Calling Multiple Parties Simultaneously
Step by Step
Parking a Call
You can park up to ten calls, either internal, external, or both. Parked
calls can be displayed on and picked up from another telephone.
This feature is useful if you want to continue a call at another phone.
Precondition: You are conducting a call.
Press the key. The LED lights up.
Program/Service
Select and confirm.
*56=Park a call?
or
Enter the code.
...
Enter the number of the park slot (0 - 9) and make a note of it. If the
park slot number you entered is not displayed, it is already in use; enter another one.
Retrieving a Parked Call
Precondition: One or more calls have been parked. The telephone is
idle.
Press the key. The LED lights up.
Program/Service
Select and confirm.
Retrieve call?
or
Enter the code.
...
Enter the park slot number you noted earlier.
If the park slot number you enter is not in use, you cannot retrieve the
call.
If a parked call is not picked up, after a specific period of time
the call is returned to the telephone from where it was parked
(recall).
35
Calling Multiple Parties Simultaneously
Step by Step
Placing External Calls on Hold
If you have programmed a key on your telephone as a hold key
(Æ page 52), you can place external calls on hold.
This enables all other parties to retrieve the call on the assigned line.
Press the "Common Hold" key.
A message appears showing which line is on hold (e.g. 801); make a
note of the line number.
If a trunk key has been assigned, the LED flashes slowly.
Held on line: 801
If applicable
or
Replace the handset or press the key.
Depending on your system configuration, this may be necessary so
other users can also pick up the held call.
Release
Picking up (Retrieving) a Held Call
Precondition: One or more calls have been parked. The telephone is
idle.
Press the key. The LED lights up.
Program/Service
*63=Retrieve line?
Select and confirm.
or
Enter the code.
or
If the "Line retrieved" key (Æ page 52) has been configured, press
the key.
Enter the line number you noted earlier.
or
If a "Trunk key" was assigned to this line (Æ page 52): LED flashes
slowly. Press the key.
36
Making Calls to Stored Destinations
Step by Step
Making Calls to Stored Destinations
Using a Caller List
If you are unable to accept an external or internal call, the call attempt
is stored in the caller list.
You can store answered calls either manually (both internal and external calls) or automatically (external calls only; contact System Support for details).
Your telephone stores up to ten calls in chronological order. Each call
is assigned a time stamp. The most recent entry not yet answered in
the list is displayed first. Multiple calls from the same caller do not automatically generate new entries in the caller list. Instead, only the
most recent time stamp for this caller is updated and its number incremented.
Retrieving the Caller List
Precondition: System Support has set up a caller list for your telephone.
Caller list?
or
Enter the code.
The last call is displayed on the screen.
To view other calls, confirm each subsequent display.
Next?
Ending Retrieval
Select and confirm.
End?
or
Press the key. The LED goes out.
Program/Service
or
Speaker
Press the key. The LED goes out.
37
Making Calls to Stored Destinations
Step by Step
Displaying the Call Time and Additional Call
Information
Precondition: You have retrieved the caller list and the selected call is
displayed.
Select and confirm.
Time/Date sent?
or
View station no.
or
View name?
Dialing a Station Number from the Caller List
Precondition: You have retrieved the caller list and the selected call is
displayed.
Select and confirm.
Call?
The caller is automatically deleted from the caller list when a
connection is finally set up.
Removing an Entry from the Caller List
Precondition: You have retrieved the caller list and the selected call is
displayed.
Confirm.
Delete?
Saving the Other Party’s Station Number in the
Caller List (Redial)
Precondition: You are engaged in a call or have called an external
party.
Confirm.
Save number?
or
Program/Service
38
Press the key. The LED lights up. Enter the code.
Making Calls to Stored Destinations
Step by Step
Redialing a Number
The last three external telephone numbers dialed are stored automatically.
You can redial them simply by pressing a key.
The station number appears on your screen for two seconds and is
then dialed.
Redial
Press the key once to dial the number last dialed.
Press the key twice to dial the next to the last number dialed.
Press the key three times to dial the third-to-the-last number dialed.
Displaying and dialing saved station numbers
Redial
Press the key.
Next?
Press the "OK" dialog key within two seconds to confirm your choice.
Next?
The next stored number is displayed. Press the "OK" dialog key to
confirm four selection.
Call?
Select and confirm.
If this function is configured (contact System Support), any
project codes (Æ page 43) entered will also be saved.
39
Making Calls to Stored Destinations
Step by Step
Dialing a Number From the Internal
Directory
The internal directory contains all station numbers and system
speed-dial numbers assigned to a name. Contact System Support to
find out if one was configured for your system.
Precondition: Names have been assigned to the station numbers
stored in the system.
Lift the handset.
or
Press the key. The LED lights up.
Speaker
Confirm.
Directory?
The first entry is displayed on the screen.
To view further entries, confirm each subsequent display.
Scroll Next?
or
Select and confirm.
Scroll Previous?
or
Enter the name you want to find, or just the first few letters, using the
alphanumeric keypad.
You can use the keypad with the digits as an alphanumeric keypad in
this case and enter the names by pressing the appropriate keys one
or more times as needed.
For example, you can enter the letter "R" by pressing the "7" three
times or the letter "E" by pressing the "3" twice.
The first name with the entered letters is displayed.
Enter the following letters by using the same method.
If no entry exists for the entered letters, you will hear a short beep.
If applicable
To enter a space, press the "0".
Pressing "1" automatically displays the first entry in the internal directory.
The "*"and "#" keys have no function here.
Select and confirm each letter to be deleted. The last letter entered is
deleted.
Delete Character?
If applicable
Delete Line?
Select and confirm. All entered letters are deleted, and the first entry
in the internal directory is displayed again.
The entry you wish to dial appears on the screen.
Call?
40
Select and confirm.
Making Calls to Stored Destinations
Step by Step
Using Repertory Dialing Keys
Precondition: You have saved a station number on a repertory dialing
key (Æ page 50).
Press the key on which the number is saved.
If the station number is located on the second level, first press "Shift".
You can also press the destination key during a conversation. This effects an automatic consultation hold
(Æ page 31).
Using Station and System Speed-Dial
Numbers
Precondition: You have stored station speed-dial numbers
(Æ page 51) or System Support has stored system speed-dial numbers.
Press the key. The LED lights up
Program/Service
Confirm.
*7=Use speed-dialing?
or
Enter the code.
Enter a speed-dial number.
"*0" to *9" = station speed-dialing.
"000" to "999" = system speed-dialing (contact System Support).
41
Displaying and Assigning Call Charges
Step by Step
Displaying and Assigning Call
Charges
Displaying Call Charges
For the current call:
The display usually shows call charges at the end of a call (default setting).
If you wish to display charges continuously during a call in progress,
System Support must request this feature from your carrier.
Some carriers also let you display toll-free external calls. The message "Free of Charge" appears on the screen either before or during
the call.
If a call is transferred, the charges are assigned to the telephone to which the call was transferred.
For all calls and the last one conducted:
The connection charges for the last chargeable call conducted are
displayed first. Five seconds later, the total accumulated connection
charges appear.
Press the key. The LED lights up.
Program/Service
Select and confirm.
*65=Show call charges?
or
Enter the code.
Displaying Call Charges for Another Telephone
If this function is configured (contact System Support), you can display and print the chargeable calls for other telephones (such as a
pay phone)
Precondition: You have programmed the function "View call charges"
on a key (Æ page 52).
The LED lights up to indicate that a you have conducted chargeable
call since the last time you viewed the charges.
Press the "View call charges" key. The chargeable call appear on the
screen.
42
Displaying and Assigning Call Charges
Step by Step
To display further chargeable calls, confirm each subsequent display.
Next?
Select and confirm.
Print?
or
Delete?
or
Add’l information?
or
End?
Dialing with Call Charge Assignment
You can assign external calls to certain projects.
Precondition: System Support has set up account codes for you.
Press the key. The LED lights up.
Program/Service
Select and confirm.
*60=Account code?
or
Enter the code.
Enter the account code.
and
Press this key.
or
#=Save entry?
Confirm.
May be necessary, depending on how your system is configured;
contact System Support for details.
Enter the number of the external station.
You can also enter the account code during an external call.
43
If You Cannot Reach a Destination ...
Step by Step
If You Cannot Reach a Destination ...
Using Callback
If a user is busy or is not answering, you can store an automatic callback. This feature saves you from having to make repeated attempts
to reach the user.
You receive a callback,
• When the other party is no longer busy
• When the user who did not answer has conducted another call.
Storing a Callback
Precondition: You have reached a busy line or no one answers.
Confirm.
Set Callback
or
Enter the code.
Answering a Callback
Precondition: A callback was saved. Your telephone rings. "Callback:
..." appears on the display.
Lift the handset.
or
Press the key. The LED lights up.
Speaker
You hear a ring tone.
Checking and Canceling a Saved Callback
Select and confirm.
View callbacks?
or
Enter the code.
Display next?
44
Select the displayed function and press the "OK" dialog key to display
additional entries.
If You Cannot Reach a Destination ...
Step by Step
Deleting a displayed entry:
Press the "OK" dialog key to confirm your selection
Delete?
Ending callback display:
Select and confirm.
End?
or
Press the key. The LED goes out.
Program/Service
or
Press the key. The LED goes out.
Speaker
Call Waiting (Camp-On)
Precondition: You have dialed an internal number and hear a busy
signal. It is important that you reach the called party.
Wait (approx. 5 seconds) until "Camp-on" appears on the display and
the busy tone is followed by the ring tone.
Camp-on
The called party can then respond (Æ page 14)
The called party can prevent automatic call waiting
(Æ page 15).
If this function is configured (contact System Support) you
will immediately hear the ring tone and the message "You are
camped on!" will be displayed.
Busy Override - Joining a Call in Progress
This function is only available if it has been configured by the service
technician (contact System Support).
Precondition: You have dialed an internal number and hear a busy
signal. It is important that you reach the called party.
Select and confirm.
Override?
or
Enter the code.
The called party and person to whom this party is talking hear an
alerting tone every two seconds.
If the called party has a system telephone with display, the following
appears on the screen: "Override: (station no. or name)".
You can now start talking.
45
Telephone Settings
Step by Step
Telephone Settings
Adjusting the Ring Volume
or
Press these keys while the phone is idle.
Confirm.
Ringer volume?
or
To raise or lower the volume: Keep pressing the keys until the desired
volume is set.
Save.
Adjusting the Ring Tone
or
Press these keys while the phone is idle.
Select and confirm.
Ringer tone?
or
To adjust the ring tone: Keep pressing the keys until the desired tone
is set.
Save.
Adjusting the Attention Ring Volume
If you belong to a team that uses trunk keys, the telephone can alert
you to other calls in the team even when you are engaged in another
call (Æ page 78). You hear the attention ring.
or
Press one of these keys while the phone is idle.
Select and confirm.
Volume?
or
To raise or lower the volume: Keep pressing the keys until the desired
volume is set.
Save.
46
Telephone Settings
Step by Step
Adjusting the Speakerphone to the Room
Acoustics
To help the other party understand you clearly while you are talking
into the microphone, you can adjust the telephone to the acoustics in
your environment: "Quiet room", "Normal room" and "Noisy room".
or
Press one of these keys while the phone is idle.
Select and confirm.
Speakerphone mode?
or
To set the room type: Keep pressing these keys until the setting you
want appears on the screen.
Save.
Adjusting the Receiving Volume During a
Call
You are engaged in a call.
or
To raise or lower the volume: Keep pressing the keys until the desired
volume is set.
simultaneously Save.
Adjusting the Display to a Comfortable
Reading Angle
You can swivel the display unit. Adjust the display unit so that you can
clearly read the screen.
47
Telephone Settings
Step by Step
Selecting the Language of Screen
Prompts
Press the key. The LED lights up.
Program/Service
Confirm.
More features?
*48= Select language?
Confirm.
or
Enter the code.
Select the language you wish to use (such as "Spanish") and press
the "OK" dialog key to confirm.
15=Spanish?
Locking the Telephone to Prevent
Unauthorized Use
You can prevent unauthorized persons from using your telephone
and its electronic notebook during your absence.
Precondition: You must have configured a personal identification
number (PIN) for your telephone (Æ page 49).
To lock and unlock the telephone:
Select and confirm.
Changeover on?
or
Changeover off?
or
or
Enter the code for "on" or "off".
Enter the telephone lock PIN (Æ page 49).
48
Telephone Settings
Step by Step
While the telephone is locked, a special dial tone sounds
when you lift the handset. You can continue to dial internal
numbers as usual.
Your telephone can also be locked or unlocked again by an
authorized party (Æ page 68).
Saving Your PIN
To use the functions
• to prevent unauthorized persons from using your telephone
Æ page 48
• to use another telephone like your own Æ page 63
• to change your call number Æ page 64
you need to enter a personal identification number, which you can
save yourself.
Press the key. The LED lights up.
Program/Service
*93=Change PIN?
Confirm.
or
Enter the PIN.
Enter the current five-digit PIN.
If you have not yet assigned a PIN, use the PIN "00000" the first time
you enter it.
Enter the new PIN.
Repeat the new PIN.
If you forget your PIN, contact System Support, who can reset your PIN to "00000".
An authorized party (Æ page 68) can also lock and unlock
your telephone.
49
Saving Station Numbers, Functions, Procedures and Appointments
Step by Step
Saving Station Numbers,
Functions, Procedures and
Appointments
You can store a frequently needed station number, a frequently used
function or procedure (several operating steps) on each free key of
your telephone or auxiliary device.
If you have programmed a Shift key, you can assign numbers and
functions on two levels of the programmable keys. The second (Shift
level) can accept only an external station number.
Saving Repertory Dialing Numbers on a
Key
Press the key. The LED lights up.
Program/Service
Select and confirm.
*91=Prog. feature key?
or
Enter the code.
If applicable If the "Shift Key" has been configured (Æ page 52), press the key.
Press the key. If the key is already in use, its assignment appears on
the screen.
Change feature?
Confirm.
Repdial key?
Confirm.
Enter the station number.
Save entry?
Previous?
50
Confirm.
or If you make a mistake:
Select and confirm. This deletes all entered digits.
Saving Station Numbers, Functions, Procedures and Appointments
Step by Step
Confirm.
End?
or
Select and confirm.
Program another key?
Simply press the key to dial a stored telephone number
(Æ page 41).
If you have stored an internal station number (= direct station
selection), the relevant LED will indicate various states
(Æ page 53, Æ page 77).
You can do this while a call is in progress.
Storing Station Speed-Dial Numbers
You can store the ten numbers which you use the most and dial them
using your own station speed-dial numbers: *0 through *9
(Æ page 41).
Press the key. The LED lights up.
Program/Service
*92=Change Speed-dial?
Confirm.
or
Enter the code.
Enter the speed-dial number you wish to use (*0 to *9). If the speeddial number is already in use, the programmed station number appears on the screen.
Confirm.
Change entry?
First enter the external code and then the external station number.
Confirm.
Save entry?
or If you make a mistake:
Select and confirm. This deletes all entered digits.
Previous?
Confirm.
Next entry?
or
Select and confirm.
Change entry?
or
Select and confirm.
Delete?
or
End
Select and confirm.
51
Saving Station Numbers, Functions, Procedures and Appointments
Step by Step
Assigning Functions to Keys
Press the key. The LED lights up.
Program/Service
Select and confirm.
*91=Prog. feature key?
or
Enter the code.
Press the key. If the key is already in use, its assignment appears on
the screen.
Confirm.
Change feature?
Select and confirm the function, such as "Do not disturb".
All programmable functions appear on the screen. See QuickReference Operating Instructions (Appendix): section ... about
function keys.
If applicable
Select and confirm.
Some functions (such as "Call forwarding") accept incomplete entries. This means you have to add more digits later on when you activate the function by pressing a key.
Store incomplete text
Confirm.
End?
or
Program another key?
Select and confirm.
Now press the key to access the function directly. If the function can be turned on and off, such as "Do not disturb",
pressing the key multiple times turns the function on and off.
Meaning of LED Signals for Saved Functions:
Call forwarding, Forwarding - trunk, Forward Line, Night Service, Do
not disturb, Changeover, Advisory message, Ringer cutoff, HF answerback on/off, Hunt group join/leave, Caller ID suppression, Call
wait.term., Waiting tone off, Ring Transfer, Door opener on/off, Control Relay, Ringing group on, Shift Key, UCD (Available on/off, Work
on/off, Night answer on/off):
Saved function is not active.
Saved function is active.
Callback:
You have not set a callback.
You have set a callback.
52
Saving Station Numbers, Functions, Procedures and Appointments
Step by Step
Mute (on/off):
The microphone is switched on.
The microphone is switched off.
Caller list:
No calls saved.
Call request saved.
Repdial key (internal), Direct station select:
The other party is not engaged in a call.
The other party is engaged in a call or has activated do not disturb.
Flashing rapidly - A caller is trying to reach you, please pick up the
phone.
Flashing slowly - A caller is trying to reach another party, who has not
yet answered.
Mailbox:
No messages present.
Message(s) present.
Call key, General call key, Trunk key, MULAP Key, Temporary MSN:
No call on assigned trunk.
Active call on assigned trunk.
Flashing rapidly- A call has arrived on this line; press the key to pick
up the call.
Flashing slowly - A call on this line was placed on hold.
Trunk group key
At least one trunk is free.
All trunks in the trunk group are busy.
View call charges:
No chargeable calls have been made since the last time call charges
were displayed.
Chargeable calls have been made since the last time call charges
were displayed.
Call forwarding, Forward Line:
Flashing slowly - Either you or your trunk is the destination of a forwarded call.
Fax details/answering machine
No fax received or no message on answering machine.
Fax received or message on answering machine.
View number of calls:
53
Saving Station Numbers, Functions, Procedures and Appointments
Step by Step
No callers waiting
Flashing rapidly - Callers waiting (a certain number is exceeded).
Flashing slowly - Callers waiting (a certain number was reached).
The following functions are assigned to keys which have no LED:
Repdial key (external), Procedure key, Trace call, Speed-dial, Release
call, Clear, Lock all phones, Send message, Phonebook, Call waiting,
Shuttle, Conference, Speaker call, Retrieve line, Reserve trunk, Release trunk, Temporary Phone, Override, Call Park, Pickup - directed,
Pickup - group, Account code, Show call charges, Radio paging
equip, Answer page, Timed reminder, Open door, DTMF dialing, Recall key, Room monitor, Hold key, Consultation, Associated dial, Associated serv., Tel. data service, Relocate
54
Saving Station Numbers, Functions, Procedures and Appointments
Step by Step
Assigning Procedures (Operating Steps)
to Keys
You can store station numbers and functions that require additional
input, i.e. functions that include several operating steps, on a key of
your telephone.
This means that you can, for example, store the function "Associated
dial" (Æ page 30) together with the input required (station number of
the telephone for which the number is to be dialed + the station number to be dialed) on a key.
Station numbers that require further input, including any necessary
pauses, can also be stored.
Press the key. The LED lights up.
Service menu
Select and confirm.
*91=Prog. feature key?
or
Enter the code.
Press the key. If the key in question is already assigned, the assignment will be displayed.
Change key?
Confirm.
Procedure key?
Confirm.
Enter the procedure, for example "*67
*67 231 089123456
089123456".
*67= code for Associated dial
231=station number of the telephone for which the number is to be
dialed
089123456 = the station number to be dialed.
if appl.
Number redial
Save?
Press this key to enter pauses (a "P" is then displayed).
Confirm.
or If you make a mistake:
Back?
Select and confirm. All digits entered will be deleted.
55
Saving Station Numbers, Functions, Procedures and Appointments
Step by Step
Confirm.
End?
or
Other key?
Select and confirm.
Select the stored procedure by pressing the relevant key.
Procedures whose functions can be activated/deactivated
are activated and deactivated by pressing the same.
You can also press the procedure key during a conversation.
This automatically sends the stored digits as a DTMF signal
(Æ page 27).
56
Saving Station Numbers, Functions, Procedures and Appointments
Step by Step
Saving Appointments
You can tell your telephone to give you a call when you want to be reminded of an appointment (Æ page 17).
To do this, you need to save the time you want the call to be made.
You can enter a single appointment that will take place in the next
twenty four hours, or you can enter a daily recurring appointment.
Press the key. The LED lights up.
Program/Service
*46=Timed reminder on?
Confirm.
or
Enter the code.
Enter a 4-digit time, such as 0905 for 9:05 (= 9.05 a.m.) or 1430 for
14.30 (= 2.30 p.m.).
Confirm.
One time only?
or
Daily?
Select and confirm.
Save entry?
Confirm.
Deleting and checking a saved appointment:
Press the key. The LED lights up.
Program/Service
Confirm.
#46=Timed reminder off?
or
Enter the code.
Confirm.
Delete?
or
End
Select and confirm.
57
Testing the Telephone
Step by Step
Testing the Telephone
Testing the Telephone Functions
You can test your telephone functions.
Precondition: Your telephone is idle.
Press the key. The LED lights up.
Program/Service
*940=Phone test?
Select and confirm.
or
Enter the code.
If everything is OK,
• all LEDs on the telephone start flashing, including the ones on
the key module (only the Program/Service menu LED lights up);
• your station number appears on the screen;
• all pixels in the display are activated;
• the ringer signal sounds.
Checking the Key Assignment
You can check the assignment of keys on your telephone to see
which functions are programmed on which keys.
Press the key. The LED lights up.
Program/Service
*91=Prog. feature key?
Select and confirm.
or
Enter the code.
Press the key. The key assignment appears on the screen.
Select and confirm.
Program another key?
or
End?
58
Select and confirm.
Call Forwarding
Step by Step
Call Forwarding
Using Variable Call Forwarding
You can immediately forward internal or external calls to different internal or external telephones (destinations). (External destinations require special configuration in the system.)
Special features must be taken into consideration if your telephone operates with T-Octopus F Server (system networking
via PC network) (Æ page 86)!
Select and confirm.
Forwarding on?
or
Enter the code.
Select and confirm.
1=all calls?
or
2=external calls only?
or
3=internal calls only?
or
or
or
Enter the code.
Enter the number of the telephone that is ringing.
Confirm.
Save entry?
Deactivating call forwarding:
Select and confirm.
Forwarding off?
or
Enter the code.
When call forwarding is active, a special dial tone sounds
when you lift the handset.
If DID DTMF is active (contact System Support), you can also
forward calls to this destination. Destinations: fax = 870, DID
= 871,
fax DID = 872.
59
Call Forwarding
Step by Step
Using Night Answer
When night answer mode is active, for example during a lunch break
or after office hours, all external calls are immediately forwarded to a
specific internal telephone (night station). The night station can be
defined by System Support (standard night answer service) or by you
(temporary night answer service).
Special features must be taken into consideration if your telephone operates with T-Octopus F Server (system networking
via PC network) (Æ page 87)!
Activating this function:
Select and confirm.
Night answer on?
or
Enter the code.
*=default?
Press the "OK" dialog key to confirm ( standard night answer service)
or
Enter the code ( standard night answer service).
or
Enter the destination number (= temporary night answer service).
Confirm.
Save entry?
Deactivating night answer:
Select and confirm.
Night answer off?
or
Enter the code.
60
Call Forwarding
Step by Step
Call Forwarding in the Carrier Network
and Forwarding Multiple Subscriber
Numbers (MSN)
If this function has been configured (contact System Support), you
can forward calls to your assigned multiple subscriber number
(MSN) (DID number) directly within the carrier network.
For example, you can forward your phone line to your home phone after business hours.
Select and confirm.
Trunk FWD on?
or
Enter the code.
Select and confirm the line type you wish to use.
1=immediate?
or
2=on no answer?
or
3= on busy?
or
or
or
Enter the code.
Enter your DID number.
Enter the destination number (without the external code).
Confirm.
Save?
Deactivating call forwarding:
Select and confirm.
Forwarding - trunk off
or
Enter the code.
Confirm the displayed call forwarding type.
or
or
or
Enter the activated call forwarding type.
Enter your DID number.
61
Using Other Functions
Step by Step
Using Other Functions
Sending a Message
You can send short text messages to users who have system telephones.
Transmitted text messages are signaled in the same way as a callback request on the Octophon 22 and Octophon 26 models.
Select and confirm.
Send Message?
or
Enter the code.
Enter the recipient’s internal station number.
Select and confirm the preprogrammed message (which can be
changed by System Support).
0=Please call back
or
...
Enter the code directly.
The codes appear on the screen, next to the messages to which they
are assigned.
Confirm.
Send?
Displaying and Deleting Messages You Have
Sent
Select and confirm.
View sent message?
or
Enter the code.
Follow the display prompts.
Answering Messages
"Messages received:" appears on your screen, along with an indication of the length.
Display Messages?
Confirm.
Follow the display prompts.
62
Using Other Functions
Step by Step
Leaving an Advisory Message
You can leave an advisory message on your telephone screen for internal callers who want to reach you while you are away from your
desk.
When another party calls you, the message appears on the caller’s
screen.
Select and confirm.
Advisory msg. on?
or
Enter the code.
Select and confirm the preprogrammed message (which can be
changed by System Support).
0=Back at:
or
...
Enter the code directly.
The codes appear on the screen, next to the messages to which they
are assigned.
You can add numeric input to preprogrammed messages
that end in a colon.
Deleting Advisory Messages
Select and confirm.
Advisory msg. off
or
Enter the code.
or
If you have programmed an "Advisory message" key (Æ page 52):
The LED lights up. Press the key.
Using Another Telephone Like Your Own
Other people can temporarily use your telephone for outgoing calls
as though it were their own.
Press the key. The LED lights up.
Program/Service
*508=Temporary Phone?
Select and confirm.
or
Enter the code.
Enter the other user’s station number.
Enter the other user’s telephone lock PIN.(Æ page 49).
63
Using Other Functions
Step by Step
If applicable
Users who have not yet selected a personal identification number are
prompted to do so on their own telephones.
Change password
Dial the external number.
This state is canceled at the end of the call.
Change call number (relocate)
You can put your call number on every other available telephone
when it is set up (ask System Support).
Your previous telephone then receives the old call number of your
new telephone. The call number together with the settings (e.g. programmed keys) of the telephone are changed.
Precondition: Your old and new telephone are the first telephones at
each connection. The telephone are in idle state.
The following procedure is carried out on the new telephone.
Press the key. The LED lights up.
Program/Service
Select and confirm.
*9419=Relocate?
or
Enter the code.
Enter your own call number.
Enter code (telephone lock) Æ page 49.
(This is not necessary if you have not determined a code yet.)
Confirm.
Complete Relocate
or
Enter the code.
If you exchange call numbers from different system telephones, all programmed keys are replaced with the default
assignment.
You can, however, connect your telephone to another connection and carry out the procedure.
64
Using Other Functions
Step by Step
Fax Details and Message on Answering
Machine
If a fax or answering machine is connected to your system and you
have assigned the "Fax details" function to a programmable key
(Æ page 52), the key lights up when a fax or a message has been received.
Deactivating indication:
Press the illuminated "Fax details" key. The LED goes out.
Resetting Services and Functions
(System-Wide Cancellation for a Telephone)
There is a general reset procedure for activated functions. The following functions are canceled, if they were activated:
•
•
•
•
•
•
•
•
•
•
Forwarding on
Advisory msg. on
Ringing group on
Hunting group off
Suppress call ID
Waiting tone off
DND on
Ringer cutoff on
Messages received:
View callbacks
Press the key. The LED lights up.
Program/Service
Select and confirm.
#0=Reset services?
or
Enter the code.
65
Using Other Functions
Step by Step
Monitoring a Room
A telephone can be used to monitor a room. The function must be activated on the telephone that you want to monitor.
Calling this telephone lets you hear what is going on in the room.
Activating the telephone to be monitored:
Press the key. The LED lights up.
Program/Service
Select and confirm.
*88=Room monitor?
or
Enter the code.
You can either leave the telephone in speakerphone mode or lift the
handset and leave it directed towards the noise source.
Deactivating the telephone to be monitored:
Press the illuminated key. The LED goes out.
Program/Service
or
Replace the handset.
Monitoring the room:
Enter the internal number if the telephone in the room you wish to
monitor.
66
Using Other Functions
Step by Step
Activating Functions for Another
Telephone
If this function has been configured (contact System Support), you
can turn the following functions on and off for other telephones. This
feature is also known as associated service.
• Do not disturb, code: *97/#97 (Æ page 19)
• Call forwarding, code: *11, *12, *13/#1 (Æ page 59)
• Locking and unlocking telephone,
code: *66/#66 (Æ page 48)
• Group ringing, code: *81/#81 (Æ page 80)
• Leaving an advisory message,
code: *69/#69 (Æ page 63)
• Group call,
code: *85/#85 (Æ page 80)
• Reset services and functions,
code: #0 (Æ page 65)
• Control relay,
code: *90/#90 (Æ page 71)
• Night service, code: *44/#44 (Æ page 60)
• Appointments,
code *65 (Æ page 57)
Press the key. The LED lights up.
Program/Service
*83=Associated serv?
Confirm.
or
Enter the code.
Enter the internal number of the telephone for which you want to activate the function.
Enter the code, such as *97 for do not disturb.
Follow the prompts on the screen for any further input.
67
Using Other Functions
Step by Step
Locking Another Telephone to Prevent
Unauthorized Use
If this function has been configured (contact System Support), you
can lock other telephones to prevent unauthorized use and then
unlock them again later.
You can use this function to unlock the telephone for users who have
locked their telephones and then forgotten their PINs.
Press the key. The LED lights up.
Program/Service
Confirm.
*943=Lock all phones?
or
Enter the code.
Enter the internal number of the telephones that you want to lock or
unlock.
Confirm.
*=Lock phone?
or
#=Unlock phone?
or
or
Enter the code.
Using System Functions from the Outside (DISA: Direct Inward System
Access)
If this function has been configured (contact System Support), you
can set up external outgoing calls from outside the system, just like
an internal user. You can also activate and deactivate the following
functions in your system:
• Reset services and functions,
code: #0 (Æ page 65)
• Call forwarding, code: *1/#1 (Æ page 59)
• Lock and unlock all phones,
code: *66/#66 (Æ page 48)
• Save PIN,
code: *93 (Æ page 49)
• Send a message,
code: *68/#68 (Æ page 62)
• Leave an advisory message,
code: *69/#69 (Æ page 63)
68
Using Other Functions
Step by Step
• Group ringing, code: *81/#81 (Æ page 80)
• Group call, code: *85/#85 (Æ page 80)
• Suppress caller ID,
code: *86/#86 (Æ page 26)
• Waiting tone, code: *87/#87 (Æ page 15)
• Open door, code: *61 (Æ page 21)
• Door opener on/off, code: *89/#89 (Æ page 22)
• Control relay, code: *90/#90 (Æ page 71)
• Do not disturb, code: *97/#97 (Æ page 19)
• Ringer cutoff function, code: *98/#98 (Æ page 19)
• Speed-dialing, code: *7 (Æ page 41)
• Associated service, code: *83 (Æ page 67)
Precondition: You have a telephone that uses tone dialing (DTMF dialing) or you can switch your telephone to tone dialing. The telephone is not connected to the system.
Set up a call to the system. Enter the station number (contact System
Support).
Wait for a continuous tone (if necessary switch the telephone to tone
dialing), then enter the internal number that has been assigned to you
and the associated PIN.
Enter the code (necessary only if programmed in the system).
Wait for a dial tone and then enter the code, such as *97 for Do not
disturb on. Make other inputs as necessary; (refer to the operating instructions for pulse and DTMF telephones).
or
Dial the external number.
You can only execute one function at a time, or set up only
one outgoing connection.
The connection is immediately released after successful activation of a function.
In the case of an external-external call, the connection is released as soon as either of the parties ends the call.
69
Using Other Functions
Step by Step
Controlling Connected Computers or
Other Programs and Telephone Data
Service (T-Octopus F400 Only)
If this function has been configured (contact System Support), you
can control connected computers or programs running on them,
such as hotel services or information systems, from your telephone.
Precondition: You have set up a connection.
Press the key. The LED lights up.
Program/Service
Confirm.
*42=Tel. data service?
or
Enter the code.
The connected computer now prompts you to enter the data, which
you can do in one of two ways. Contact System Support to find out
which option is programmed in your system:
• Input in en-bloc mode.
...
Enter data.
Press this key at the end of the entry.
or
Confirm.
Entry complete?
or • Input in online mode:
The connected computer processes your entries directly.
Enter the code.
...
70
Enter data.
Using Other Functions
Step by Step
Controlling Relays
If this function has been configured (contact System Support), you
can turn up to four relays on and off to control different facilities (such
as a door opener).
Depending on how they are programmed, you can switch the relays
on and off or switch them on and have them switched off automatically after a timeout.
Special features must be taken into consideration if your telephone operates with T-Octopus F Server (system networking
via PC network) (Æ page 89)!
Select and confirm.
*90=Control Relay On?
or
#90=Control Relay Off?
or
or
Enter the code for "on" or "off".
...
Enter the relay.
Sensors
If this function has been configured (contact System Support), sensors detect signals, causing your phone to ring and a message to appear on your screen.
71
Using Other Functions
Step by Step
Radio Paging
If paging equipment is connected to your system (contact System
Support), you can contact people via their pocket receivers.
The pocket receiver indicates to the person you are looking for that
someone is trying to get in touch. The person you page can then go
to the nearest telephone and call you.
The operating procedures differ according to the type of radio paging equipment connected (simple or enhanced paging equipment).
Simple Paging Equipment
Paging:
To be paged, you must have activated a call ringing group
(Æ page 82), call forwarding (Æ page 59), or call redirection (service technician) to the internal station number of your paging equipment.
A call request is then signaled automatically.
Answering the page from the nearest telephone:
Lift the handset.
Enter the code.
Enter your own station number.
Team and Executive/Secretary Functions
72
Team and Executive/Secretary Functions With Trunk Keys
Step by Step
Team and Executive/Secretary
Functions With Trunk Keys
If this function has been configured (contact System Support), you
belong to a team of users for whom special keys were programmed:
• Trunk keys (MULAP keys)
• Direct station selection keys
• Group call key
(not on the executive telephone in an executive/secretary team)
• Ring transfer keys
(only in an executive/secretary team)
As a team member, you can also program these keys yourself ("MULAP key", "Direct station select", "Hunt group join/leave", "Ring transfer: on/off") (Æ page 52). You can also program a call forwarding key
("Forward Line") for each line.
Using Trunk Keys
A separate trunk is assigned to each team member. All other team
members have the same trunk keys for these trunks on their telephones. This means that every team member can use all programmed trunk keys.
Each team member can also be reached under a separate station
number, if one was assigned.
Meaning of LED Indications on Trunk Keys:
Trunk key LED is off - Trunk is free and can be used.
or
Trunk key LED is lit - Trunk is in use.
or
Trunk key LED is flashing rapidly - A call on the trunk needs to be answered.
or
Trunk key LED is flashing slowly - A call on hold is waiting.
73
Team and Executive/Secretary Functions With Trunk Keys
Step by Step
Answering Calls With Trunk Keys
Precondition: Your telephone is ringing and/or the trunk key is flashing rapidly.
Press the rapidly flashing trunk key.
This is not necessary if the trunk is automatically assigned to you
when you lift the handset or press the "Speaker" key; in this case the
assigned trunk key lights up.
Lift the handset.
or
With on-hook dialing: Use speakerphone mode and open listening.
Making Calls with Trunk Keys
Press the free trunk key that you want to use to set up your call.
This is not necessary if the trunk is automatically assigned to you
when you lift the handset or press the "Speaker" key; in this case the
assigned trunk key lights up.
Dial the station number.
When the other party answers: Lift the handset.
or
With on-hook dialing: Use speakerphone mode and open listening.
Using a Trunk Key to Place a Call on Hold and
Retrieve It Again
Precondition: You are conducting a call over a trunk in your group.
The "Common Hold" key has been programmed on your telephone
(Æ page 52).
Placing a call on hold:
Press the "Common Hold" key.
or
Release
Replace the handset or press the key.
Depending on the configuration (consult System Support), this may
be necessary so other team members can also pick up the call on
hold.
Retrieving the call:
Press the slowly flashing trunk key.
74
Team and Executive/Secretary Functions With Trunk Keys
Step by Step
Switching Between Phone Calls on Multiple
Trunks
Precondition: You are conducting a call over a trunk in your group.
Another trunk key starts flashing.
Press the flashing trunk key. The first party is placed on hold on the
other trunk.
Press the slowly flashing trunk key. The second party is placed on
hold.
You can switch between the two call as many times as you wish. Always press the slowly flashing trunk key.
Forwarding Calls on Lines
You can immediately forward internal or external calls on your lines to
different internal or external telephones (destinations); even external
destinations are possible in certain system configurations.
Activating call forwarding for one trunk activates the function for all
trunk keys assigned to this trunk in your group.
Press the key. The LED lights up.
Program/Service
*501=Forward Line: On?
Select and confirm.
or
Enter the code.
Press the trunk key you wish to use.
or
Enter the number of the trunk you wish to use.
or
If available. Press the "Forward Line" key.
(You have stored the incomplete "Forward Line" function on the key,
excluding the call forwarding type and destination Æ page 52.)
75
Team and Executive/Secretary Functions With Trunk Keys
Step by Step
Select and confirm.
1=all calls?
or
2=external calls only?
or
3=internal calls only?
or
or
or
Enter the code.
Enter the destination number.
Confirm.
Save entry?
or
If available. Press the "Forward Line" key. (You have stored the call forwarding type and destination on the "Forward Line" key Æ page 52.)
Deactivating call forwarding:
Press the key. The LED lights up.
Program/Service
Select and confirm.
#501=Forward Line: Off?
or
Enter the code.
Press the trunk key you wish to use.
or
Enter the number of the trunk key you wish to use.
or
If available. Press the "Forward Line" key.
If you have activated call forwarding for a trunk, a special dial
tone sounds when the line is seized.
Meaning of LED Indications on the "Forward Line" Keys:
The LED on the "Forward Line" key is off - call forwarding is not active
for this trunk.
or
LED on the "Forward Line" key is lit - call forwarding is active for this
trunk.
or
LED on the "Forward Line" key is flashing slowly - the trunk is a call
forwarding destination.
76
Team and Executive/Secretary Functions With Trunk Keys
Step by Step
Using DSS Keys
Each team member has a DSS key for every other member in the
team.
This enables every team member to reach all other members of the
team directly, simply by pressing a key.
Meaning of LED Indications on DSS Keys
LED on the DSS key is off - the team member is not engaged in a
phone call.
or
LED on the DSS key is lit - the team member is engaged in a phone
call or has activated do not disturb.
or
LED on the DSS key is flashing rapidly - a call has arrived for you and
needs to be answered.
or
LED on the DSS keys is flashing slowly - a caller is trying to reach another member of your team, who has not yet answered.
Using DSS Keys to Answer Calls
Precondition: Your telephone is ringing and/or a DSS key is flashing.
If appl.
Press the flashing DSS key.
This is not necessary if you are receiving a DSS call and the DSS key
is flashing rapidly.
Lift the handset.
or
With on-hook dialing: Use speakerphone mode and open listening.
Calling a Team Member Directly
Press the direct station selection key.
or
If the team member you wish to reach is engaged in another call, the
DSS key on your telephone is illuminated. You can make the call even
in this case.
When the other party answers: Lift the handset.
or
With on-hook dialing: Use speakerphone mode and open listening.
77
Team and Executive/Secretary Functions With Trunk Keys
Step by Step
Transferring a Call in Progress
Press the DSS key and announce the call, if desired.
or
Replace the handset or press the key.
Release
Accepting a Call for Another Team Member
Press the flashing DSS key or trunk key.
Lift the handset.
or
With on-hook dialing: Use speakerphone mode and open listening.
Joining or Leaving a Group Call
(Not for the Executive Telephone in an
Executive/Secretary Team)
By default, your telephone rings when a call arrives on your line.
If you want your phone to ring even when calls arrive on other lines,
you can turn your ringer on and off for each line in your group
(Æ page 80).
Your telephone rings (one time only or every four seconds) even
when you are engaged in another call (attention ring volume
Æ page 46).
78
Team and Executive/Secretary Functions With Trunk Keys
Step by Step
Transferring Calls Directly to the
Executive (Only in an Executive/
Secretary Group)
Normally, audible signaling of all calls for the executive is heard only
in the secretary’s office.
You can activate audible signaling so that calls are only signaled on
the executive telephone and on a second telephone assigned to it.
Activating ring transfer:
Press the Ring Transfer" key. The LED lights up.
or
Press the key. The LED lights up.
Program/Service
*502=Ring Transfer: On?
Select and confirm.
or
Enter the code.
Press the trunk key you wish to use.
or
Enter the number of the trunk you wish to use.
Deactivating ring transfer:
Press the "Ring Transfer" key. The LED goes out.
or
Press the key. The LED lights up.
Program/Service
Select and confirm.
#502=Ring Transfer: Off?
or
Enter the code.
Press the trunk key you wish to use.
or
Enter the number of the trunk you wish to use.
79
Using Other Team Functions
Step by Step
Using Other Team Functions
Turning Group Call On and Off
If this function has been configured (contact System Support), you
belong to one or more groups of users who can each be reached under a hunt group or group call number.
Incoming calls are signaled on all group member telephones in the
order in which they are received (= hunt group) or simultaneously
(= group call) until one member of the group accepts the call.
You can also belong to a team (including executive/secretary ones)
in which station numbers are programmed on trunk keys
(Æ page 73).
Each member of the group remains available under his or her own
station number.
You can activate and deactivate the audible signal for a hunt group,
group call or individual trunks in a group (including an executive/secretary team).
If the LED on a programmed "Hunt group join/leave" key
(Æ page 52) is illuminated, this means that the audible tone was activated for at least one group.
Special features must be taken into consideration if your telephone operates withT-Octopus F Server (system networking
via PC network) (Æ page 85)!
You belong to a hunt group or a group call:
Select and confirm.
Leave hunt group?
or
Join hunt group?
or
or
Enter the code for "leave" or "join".
or
Press the Hunt group join/leave key.
or
80
Using Other Team Functions
Step by Step
You belong to multiple groups or to one group with trunk keys (including executive/secretary teams).
Select and confirm.
Leave hunt group?
or
Join hunt group?
or
or
Enter the code for "leave" or "join".
or
Press the "Hunt group join/leave" key.
or
301 x group name
301
group name
If an "x" appears between group/trunk number
or (such as 301) and group name, the audible tone is active for this
group or trunk.
No "x" means that the audible tone was deactivated.
Press the "OK" dialog key to confirm your selection and display the
next group or trunk number and group name.
Next?
or
Select and confirm. This turns off the audible tone for the displayed
group or trunk.
Leave hunt group?
or
Select and confirm.
This turns off the audible tone for the displayed group or trunk.
Join hunt group?
or
Select and confirm.
This turns off the audible tone for all groups and trunks.
#=Leave all groups?
or
Enter the code for "Leave all groups".
or
Select and confirm.
This turns off the audible tone for all groups and trunks.
*=In hunt group?
or
Enter the code for "Join all groups".
If you deactivate the audible tone for another trunk, or deactivate it for all groups and trunks to which you belong, a special dial tone sounds when you lift the handset.
81
Using Other Team Functions
Step by Step
Accepting a Call for Another Member of
Your Team
You can accept calls for other telephones in your team from your telephone even while engaged in another call. To do this, contact System
Support to find out if a pickup group has been configured.
Precondition: You telephone rings briefly. The following message appears on the display: "Call for:".
Confirm.
Pickup - group?
or
Press the key. The LED lights up.
Program/Service
Enter the code.
Activating and Deactivating a Ringing
Group
You can have calls for your telephone signaled audibly at up to five
other internal phones. The person who answers first receives the call.
Special features must be taken into consideration if your telephone operates with T-Octopus F Server (system networking
via PC network) (Æ page 88)!
Saving, displaying, and deleting telephones for the ringing group:
Press the key. The LED lights up.
Program/Service
*81=Ringing group on?
Select and confirm.
or
Enter the code.
Follow the display prompts (enter the internal station number).
Removing all telephones in call ringing group:
Select and confirm.
Ringing group off?
or
Enter the code.
82
Using Other Team Functions
Step by Step
Uniform Call Distribution (UCD)
If this function has been configured (contact System Support), you
belong to a group of users (agents) to whom calls are distributed.
An incoming call is always assigned to the agent who has had the
longest break without a call.
Logging on and off at the beginning and end of your shift:
Press the key. The LED lights up.
Program/Service
Select and confirm.
UCD?
Confirm.
*401=Log on?
or
#401=Log off?
or
or
Enter the code for "Log on" or "Log off".
To log on, enter your identification number ("Agent:"). Contact System Support to find out what it is.
Logging on and off during your shift:
Press the key. The LED lights up.
Program/Service
Select and confirm.
UCD?
Confirm.
#402=Not available?
or
*402=Available?
or
or
Enter the code for "Not available" or "Available".
83
Using Other Team Functions
Step by Step
Requesting and activating a work time:
If you want to follow-up on the last call you answered without being
disturbed, you can request and activate a work time. This removes
your telephone from the call distribution cycle for a programmable
period of time until you log back on.
Press the key. The LED lights up.
Program/Service
Select and confirm.
UCD?
*403=Work on?
Confirm.
or
#403=Work off?
or
or
Enter the code for "on" or "off".
Turning the night service on and off for UCD:
Press the key. The LED lights up.
Program/Service
Select and confirm.
UCD?
*404=UCD night on?
Confirm.
or
#404=UCD night off?
or
or
Enter the code for "on" or "off".
Display the number of waiting calls:
Press the key. The LED lights up.
Program/Service
Select and confirm.
UCD?
*405=Calls in queue?
Confirm.
or
Enter the code for "on" or "off".
System networking via LAN (PC network)
84
Special Functions in the LAN (PC Network)
Step by Step
Special Functions in the LAN
(PC Network)
If your telephone is operating in a T-Octopus F Server environment,
multiple T-Octopus systems are interconnected via a LAN (LLocal Area
Network, e.g. proprietary PC network). Your telephone calls are conducted via the LAN (PC network).
If this is the case, you must take certain special features into consideration when performing various functions. These are described below.
Leaving a Hunt Group/Group Call
Precondition: you belong to a hunt group/group call (Æ page 80) of
another T-Octopus F 200/400/600:
Select and confirm.
Internal DISA?
or
Enter the code.
Enter the (DISA) call number of the other T-Octopus F 200/400/600.
or
Confirm the entry.
Enter the (DISA) call number of your telephone.
or
Confirm the entry.
Select and confirm.
Leave hunt group?
or
Join hunt group?
or
or
Enter the code for "leave" or "join".
You belong to multiple groups of another
T-Octopus F 200/400/600:
Enter the group number for "Join/Leave, directed".
85
Special Functions in the LAN (PC Network)
Step by Step
Transferring Call Forwarding
You can activate/deactivate call forwarding (Æ page 59) for your
telephone from other T-Octopus F Server telephones.
Select and confirm.
Internal DISA?
or
Enter the code.
Enter the (DISA) call number of the T-Octopus F 200/400/600 to
which your telephone is connected.
or
Confirm the entry.
Enter the (DISA) call number of your telephone.
or
Confirm the entry.
Activating this function:
Select and confirm.
Call forwarding on?
or
Enter the code.
Select and confirm.
1=all calls?
or
2=external calls only?
or
3=internal calls only?
or
or
or
Enter the code.
Enter the destination number.
Confirm.
Save?
Deactivating this function:
Select and confirm.
Call forwarding off?
or
Enter the code.
86
Special Functions in the LAN (PC Network)
Step by Step
Using Night Answer
If authorized (contact System Support), you can define telephones in
other T-Octopus F 200/400/600 systems as the night answer
(Æ page 60).
Select and confirm.
Internal DISA?
or
Enter the code.
Enter the (DISA) call number of the T-Octopus F 200/400/600 to
which the night answer telephone is connected.
or
Confirm the entry.
Enter the (DISA) call number of the telephone from which you wish to
activate/deactivate the night answer service.
or
Confirm the entry.
Activating this function:
Select and confirm.
Night answer on?
or
Enter the code.
Enter the destination number (= temporary night answer service).
Confirm.
Save?
Deactivating this function:
Select and confirm.
Night answer off?
or
Enter the code.
87
Special Functions in the LAN (PC Network)
Step by Step
Activating and Deactivating a Ringing
Group
You can have calls for your telephone signaled audibly at external
telephones or at telephones in other T-Octopus F 200/400/600 systems (Æ page 82).
Saving the telephones for the ringing group:
Press the key. The LED lights up.
Program/Service
*81=Ringng group on?
Select and confirm.
or
Enter the code.
Select and confirm
Add to ringing group?
or
Add another station?
or
Select and confirm, then follow the operating instructions.
Display remove?
Enter the call number.
Confirm.
#=Entry complete?
or
Enter
Save?
Confirm.
Exit?
Select and confirm.
Removing all telephones in call ringing group:
Select and confirm.
Ringing group off?
or
Enter the code.
88
Special Functions in the LAN (PC Network)
Step by Step
Controlling Relays
If this feature is configured (contact System Support), you can also
control relays (Æ page 71) in other T-Octopus F 200/400/600 systems.
Select and confirm.
Internal DISA?
or
Enter the code.
Enter the (DISA) call number of the T-Octopus F 200/400/600 in
which the relay is to be controlled.
or
Confirm the entry.
Enter the (DISA) call number of the telephone from which you wish to
control the relay.
or
Confirm the entry.
Select and confirm.
*90=Control Relay On?
or
#90=Control Relay Off?
or
or
Enter the code for "on" or "off".
...
Enter the relay.
89
Special Functions in the LAN (PC Network)
Step by Step
Opening the Door
If this feature is configured (contact System Support), you can also
activate the door opener (Æ page 21) in other T-Octopus F 200/
400/600 systems.
Select and confirm.
Internal DISA?
or
Enter the code.
Enter the (DISA) call number of the T-Octopus F 200/400/600 in
which the door is to be opened.
or
Confirm the entry.
Enter the (DISA) call number of the telephone from which you wish to
activate the door opener.
or
Confirm the entry.
Select and confirm.
Open door?
or
Enter the code.
Enter the call number of the entrance telephone.
All About Your Telephone
90
Labeling, Documentation and Accessories
Labeling, Documentation and Accessories
Labeling Key Fields
Key labeling sheets containing pre-cut cards are supplied with each telephone and key module in an accessory pack. These cards can be used on both sides, and are inserted into the
telephone.
To label the fixed function keys (Æ page 3),
punch out the small preprinted labeling
card. Insert the card and cover it with the
plastic foil supplied (matt side up), as shown
in the drawing.
Use one large card for labeling the programmable keys (Æ page 3). Punch out the card,
write down the stored functions and/or station numbers (in the white area), insert it,
and cover it with the plastic foil supplied
(matt side up), as shown in the drawing.
If you are using the "dual key assignment" function (Æ page 50), use the back of the
large card for labeling or assigning the two levels. Use the plastic foil with the narrow
strips as a protective cover.
Labeling Key Fields Using a PC
If you have the CD-ROM containing the electronic Operating Instructions for your communication system (Æ page 92), you can easily label your keys using a PC.
Attaching a Station Number Label
A sheet with station number labels is supplied with each telephone.
Fill out the label (fire, police, your own station number) and punch it out. Lift the handset and
attach the label in the recess of the telephone.
91
Labeling, Documentation and Accessories
Ordering Operating Instructions
You can reorder these operating instructions from Deutsche Telekom AG:
• in paper form in an accessory kit under the order number A31003-E8400-X908-*-7619
(also available in German),
• in electronic form (HTML and PDF) on CD-ROM under the order number P31003E8400-X904-1-7419 (bilingual).
Contact System Support for information and ordering instructions.
Operating Instructions in the Internet
You can download these operating instructions as a file from the Internet:
http://www.telekom.de/faq
The operating instructions are available in PDF format. To read them, you need the Adobe
Acrobat Reader, which is available free of charge.
To download files from the Internet you need a computer with Internet access and a Web
browser such as Netscape Communicator or Microsoft Internet Explorer.
Ordering Accessories
The following accessories help you customize your telephone to your individual preferences:
key module:
Key module with programmable keys. You can connect up to four key modules to your telephone.
data adapter:
Connects a PC to the V.24 interface.
ISDN adapter:
Connects an ISDN device, such as an ISDN fax machine, video recorder or PC to the S0 interface.
headset/headset plus adapter:
Connects a headset or tape recorder.
contact adapter:
Provides an additional bell for signaling calls in loud environments and similar situations and
controls illuminated display panels, such as "Please do not enter" at the entrance to a room.
control adapter:
Connects a headset to a telephone with a PC link.
Octophon adapter:
Connects a second Octophon telephone. Callers can reach the second Octophon telephone under a separate station number.
analog adapter:
Connects an additional analog telephone, fax machine or PC with a modem card.
92
Labeling, Documentation and Accessories
acoustic adapter:
Connects a desk microphone, external speaker or second handset.
PNT E:
A desktop unit (optionally available with PSU for power supply) for connecting up to 2 S0 terminals (e.g. PC and FAX).
93
Fixing Problems
Fixing Problems
Telephone Maintenance
• Always use a damp or antistatic cloth to clean the telephone. Never use a dry cloth.
• If the telephone is very dirty, clean it with a diluted neutral cleaner containing surfactants, such as a dish detergent. Afterwards remove all traces of the cleaner with a damp
cloth (using water only).
• Never use cleaners containing alcohol, cleaners that corrode plastic, or abrasive powders.
Troubleshooting
Pressed key does not respond:
Check whether the key is stuck.
Telephone does not ring:
Check whether the do not disturb function was activated on your telephone (" Do not disturb"
appears on the screen). If so, deactivate it (Æ page 19).
You cannot dial an external number:
Check whether you telephone is locked ("Access denied" appears on the screen). If so, unlock the telephone (Æ page 48).
To correct any other problem:
First contact System Support. If System Support is unable to correct the problem, contact
Customer Service.
94
Fixing Problems
Step by Step
Responding to Error Messages on the
Screen
UK: Incorrect entry
Possible cause:
The station number is incorrect.
Possible response:
Enter a correct station number.
UK: Access denied
Possible cause:
You tried to activate a disabled function.
Possible response:
Ask System Support to authorize you to use the function.
UK: Feature not available
Possible cause:
The station number you dialed does not exist. The telephone you are
trying to call is unplugged.
Possible response:
Enter a correct station number. Try calling the telephone again later
on.
UK: Number cannot be
dialed
Possible cause:
You dialed your own station number.
Possible response:
Enter a correct station number.
UK: Max.no.of keys
exceeded
Possible cause:
All memory locations for external station numbers are currently in
use.
Possible response:
Try again later on.
Contacts for Resolving Problems
If you encounter a problem that lasts longer than five minutes, contact System Support.
95
Index
Index
A
accessories ..................................................... 92
activating door opener ...................................... 21
adapters .......................................................... 92
advisory message ............................................. 63
agents ............................................................. 83
announcement ................................................. 26
answering a timed reminder .............................. 17
answering machine .......................................... 65
call pickup ................................................... 22
appointment .................................................... 57
assigning a DID number .................................... 28
assigning available keys ................................... 50
assigning programmable keys ........................... 50
associated dialing/dialing aid ............................ 29
Attention Ring Vol ............................................ 46
automatic connection setup .............................. 27
automatic line seizure ....................................... 24
C
call
accepting from answering machine ................ 22
accepting in a team ...................................... 78
accepting, group .......................................... 82
answering .................................................... 12
forwarding ................................................... 59
forwarding in a team ..................................... 75
forwarding MSN in CO .................................. 61
in a team with trunk keys ............................... 74
parking ........................................................ 35
pickup, directed ........................................... 16
placing on hold ............................................ 36
rejecting ...................................................... 16
retrieving from park ...................................... 35
retrieving held .............................................. 36
transfer ........................................................ 78
transfer after announcement .......................... 34
using DSS keys in a team .............................. 77
call charge assignment ..................................... 43
call charges for another telephone ..................... 42
call charges for your telephone .......................... 42
call forwarding ................................................. 59
MSN in CO ................................................... 61
call request ...................................................... 37
96
call signal ........................................................ 12
call transfer ...................................................... 33
call volume .................................................12, 47
call waiting
accepting .................................................... 14
allowing ....................................................... 15
preventing ................................................... 15
call waiting (camp-on) ....................................... 45
tone off ........................................................ 15
call waiting on/off ............................................. 15
call waiting tone on/off ..................................... 15
caller ID
restoring display of
suppressing display of caller ID .................. 26
caller ID suppression ........................................ 26
calling
entrance telephone ....................................... 21
calling a second party ....................................... 31
calls
distributing .................................................. 83
calls in queue ..............................................23, 83
CE mark ............................................................ 4
change call number .......................................... 64
charges for another telephone ........................... 42
charges for your telephone ................................ 42
checking the key assignments ........................... 58
cleaning the telephone ..................................... 94
codes ................................................................ 5
conducting calls with a headset ......................... 18
conference ...................................................... 32
connection setup, automatic ............................. 27
consultation hold .............................................. 31
contacts/problems ........................................... 95
D
deleting advisory messages ............................... 63
details, fax ....................................................... 65
dialing
en-bloc ........................................................ 25
internal/external calls .................................... 24
dialing a number
from the caller list ......................................... 38
with repertory dialing keys ............................. 41
dialing aid
S0–bus ........................................................ 29
dialing Internal calls .......................................... 24
dialing number, editing ..................................... 25
Index
dialing numbers
from the internal directory ............................. 40
using speed-dialing ...................................... 41
direct inward system access (DISA) .................... 68
direct station selection ........................... 51, 53, 77
directory, internal ............................................. 40
DISA ............................................................... 68
disconnect ..................................................16, 25
Display .............................................................. 3
display angle ................................................... 47
distributing calls ............................................... 83
do not disturb .................................................. 19
door opener ..................................................... 22
H
E
K
editing station numbers .................................... 25
editing the dialing number ................................ 25
en-bloc dialing ................................................. 25
entrance telephone .......................................... 21
error messages ................................................ 95
executive/secretary functions ............................ 73
explanation of symbols ....................................... 2
external code ................................................... 24
key fields, labeling .........................................3, 91
keys
assigning ..................................................... 50
fixed .............................................................. 3
incomplete save ........................................... 52
labeling ....................................................... 91
programmable ............................................... 3
handsfree answerback ...................................... 18
off ............................................................... 18
on ............................................................... 18
headset ........................................................... 18
hotline ............................................................. 27
HTML format .................................................... 92
hunt group ....................................................... 80
I
internal directory .............................................. 40
IP telephony ..................................................... 85
L
F
faceplate
Octophon 22 .................................................. 3
Octophon 26 .................................................. 3
fax details ........................................................ 65
forwarding ....................................................... 59
multiple subscriber number (MSN) ................. 61
forwarding MSN in CO ...................................... 61
forwarding multiple subscriber number (MSN) .... 61
function keys ..................................................... 5
functions
activating/deactivating for another
telephone associated service ......................... 67
programming on keys ................................... 52
resetting ...................................................... 65
G
group call ........................................................ 80
in a team ...................................................... 78
labeling key fields ..........................................3, 91
LAN telephony ................................................. 85
leaving an advisory message ............................. 63
LED (light-emitting diode) .................................... 3
LED indications, meaning .................................. 52
LED indications, meaning of ................... 73, 76, 77
locking
all phones .................................................... 68
locking all phones ............................................ 68
locking/unlocking the telephone ....................... 48
M
mailbox ........................................................... 17
making calls
on-hook dialing ............................................ 24
to stored destinations .................................... 37
using redial .................................................. 39
with the dialing aid ........................................ 29
making external calls ........................................ 24
making trunk calls ............................................ 24
malfunctions .................................................... 94
97
Index
meaning of LED indications ............... 52, 73, 76, 77
message
answering .................................................... 62
deleting/displaying ....................................... 62
receiving ..................................................... 62
sending ....................................................... 62
microphone for speakerphone mode ................... 3
MULAP keys .................................................... 73
MULAP trunk keys ............................................ 73
problems/contacts ........................................... 95
procedure
programming on keys ................................... 55
Program/Service ................................................ 5
programming available keys .............................. 50
programming keys ........................................... 50
programming your telephone ............................ 46
project calls ..................................................... 43
R
N
night answer .................................................... 60
notes ................................................................. 4
O
open door
with a code .................................................. 22
open listening .................................................. 13
opening door ................................................... 21
operating instructions
HTML format ................................................ 92
ordering ...................................................... 92
PDF format .................................................. 92
operating principle ............................................. 5
operating steps
programming on keys ................................... 55
operating systems .............................................. 2
optiset E ISDN adapter ...................................... 92
overload .......................................................... 23
override ........................................................... 45
P
parking a call ................................................... 35
PDF format ...................................................... 92
personal identification number .......................... 49
pickup (call) ................................................16, 82
PIN ................................................................. 49
for a telephone ............................................. 48
placing a call on hold ........................................ 36
in a team ..................................................... 74
plastic foil ........................................................ 91
preventing and allowing
automatic camp-on ........................................... 15
prime line on .................................................... 24
PRJ project code .............................................. 43
98
radio paging equipment PSE ............................. 72
recall ............................................................... 34
receiving volume .........................................12, 47
redialing a number ........................................... 39
from the caller list ......................................... 38
relays .............................................................. 71
release ...................................... 12, 13, 36, 74, 78
relocate ........................................................... 64
reserving a trunk .............................................. 28
resetting functions ............................................ 65
resetting services ............................................. 65
ring tone .......................................................... 46
ring transfer
in an executive/secretary team ...................... 79
ring volume ...................................................... 46
ringer cutoff ..................................................... 19
ringing group ................................................... 82
room monitor ................................................... 66
S
saving a PIN ..................................................... 49
second level ...............................................41, 50
secretary functions ........................................... 73
sensors ........................................................... 71
setting your telephone ...................................... 46
Shift ...........................................................41, 50
Shift key .....................................................41, 50
simple paging equipment .................................. 72
speaker ........................................................... 12
speaker call ..................................................... 26
speakerphone mode .......................... 3, 12, 13, 47
special dial tone ............................................... 19
speed-dialing
dialing numbers ........................................... 41
saving station speed-dialing .......................... 51
system ......................................................... 41
Index
station number
assigning ..................................................... 28
saving ......................................................... 50
station number label ......................................... 91
station numbers
correcting .................................................... 25
station speed-dialing ...................................41, 51
suffix-dialing .................................................... 27
switches .......................................................... 71
system speed-dialing ........................................ 41
system-wide cancellation .................................. 65
T
team with trunk keys ......................................... 73
telephone
cleaning ...................................................... 94
locking ........................................................ 48
locking another ............................................ 68
locking/unlocking ........................................ 48
locking/unlocking all phones ........................ 68
maintaining .................................................. 94
operating ....................................................... 5
settings ........................................................ 46
testing ......................................................... 58
using another like your own ........................... 63
telephone data service
....................................................................... 70
telephone maintenance .................................... 94
telephone test .................................................. 58
temporary phone .............................................. 63
testing the telephone ........................................ 58
testing the telephone functions .......................... 58
text message
answering .................................................... 62
deleting/displaying ....................................... 62
receiving ...................................................... 62
sending ....................................................... 62
three-party conference ...................................... 32
time-dependent hotline ..................................... 27
T-Octopus F Server
actuators ..................................................... 89
door opener ................................................. 90
group call .................................................... 85
hunt group ................................................... 85
night answer ................................................ 87
relays .......................................................... 89
ringing group ............................................... 88
transferring call forwarding ............................ 86
toggle .............................................................. 31
toggle/connect
in the team ................................................... 75
tone dialing ...................................................... 27
tone dialing (DTMF dialing) ............................... 27
trace call .......................................................... 20
transfer (call) .................................................... 78
after announcement ...................................... 34
transfer call ...................................................... 33
trunk flash ........................................................ 29
trunk keys in a team .......................................... 73
trunk keys, MULAP ........................................... 73
trunk, reserving ................................................ 28
U
UCD ................................................................ 83
using a caller list ............................................... 37
using a temporary phone .................................. 63
using functions from the outside ........................ 68
V
variable call forwarding ..................................... 59
W
waiting calls ..................................................... 23
work time ......................................................... 84
99
%
Quick-Reference Operating Instructions
Important telephone numbers
For problems:
For questions regarding sales:
Upon delivery of the equipment, please enter
telephone numbers!
The equipment referred to in these instructions conforms with the requirements of the EU directive:
1999/5/EG - Directive on radio equipment and telecommunications terminal equipment and
mutual recognition of conformity.
Compliance with the above directive is confirmed by the CE marking affixed to the equipment.
The declaration of conformity can be viewed at:
Deutsche Telekom AG
Geschäftsbereich Endgeräte
CE-Testlab Steinfurt
Sonnenschein 38
48565 Steinfurt
Tel: 02551 10 612
Mail: [email protected]
Issued by:
Deutsche Telekom AG
Right of modification reserved.
Reference number: A31003-E8400-X908-1-7619
SW version: 3.0
Status: 04/2002
Printed on environmentally compatible
recycled paper.
T-Octopus F 200/400/600
Octophon 22
Octophon 26
Quick-Reference
Operating Instructions
Deutsche
Telekom
!"§=========
Overview of Functions and Codes (Alphabetical)
Overview of Functions and Codes (Alphabetical)
The table below lists all available functions as they appear on the display. Functions that have been configured
(contact System Support) can be activated interactively (select + save). via the Program/Service menu (select +
save or enter a code), or by pressing function keys, provided that the functions have been configured (contact
System Support).
Functions
(display)
... Interactively
... Via the
Program/Service menu
Program/Service
... With
function
keys
Code
Account code
Advisory msg. on
Advisory msg. off
Associated dial
Associated serv.
Call waiting
Waiting tone off
Waiting tone on
Call wait.term.on
Call wait.trm.off
Caller List
Save number
Changeover on
Changeover off
Change PIN
Conference
Start conference
Adding a party to the conference
End conference
View conf parties
Remove party
Consult
Return to held call
Quit and return
Transfer/Accept
Control Relay On
Control Relay Off
DISA
Send message
View sent message
Display Messages
Mailbox
DND on
DND off
Door opener on
Door opener off
DTMF dialing
En-bloc dialing
Dialing
9
9
9
9
9
9
9
9
9
9
9
9
9
9
9
9
#69
*67
*83
*55
*87
#87
*490
#490
#82
*82
*66
#66
*93
*3
9
#3
9
9
*0
*0
9
9
*90
#90
X
X
9
9
9
9
9
9
*68
#68
#68
9
9
9
9
9
9
9
*97
#97
*89
#89
*53
X
X
X
X
X
X
X
X
X
9
9
9
9
9
9
9
9
9
9
9
9
9
9
9
9
9
9
9
9
*60
*69
X
X
X
X
X
X
X
X
X
X
X
X
X
X
X
Overview of Functions and Codes (Alphabetical)
Functions
(display)
... Interactively
... Via the
Program/Service menu
Program/Service
... With
function
keys
Code
Forwarding on
1=all calls
2=external calls only
3=internal calls only
Forwarding off
Trunk call forwarding on
Trunk call forwarding off
Forward Line: On
Forward Line: Off
Headset
Answer call
HF answerback on
HF answerback off
Hotline
Internal DISA
Join hunt group
Leave hunt group
Rejoin all groups
Leave all groups
Lock all phones
Monitoring
Mute on
Mute off
Night answer on
Night answer off
Open door
Override
Page
Answer page
Park a call
Retrieve call
Phone Test
Phonebook
Pickup - directed
Pickup - group
Accept call
Prog. feature key
Redial
Reject calls
Disconnect
Relocate
Complete Relocate
Reserve trunk
9
9
9
9
9
9
9
9
9
*1
*11
*12
*13
#1
*64
#64
*501
#501
X
X
X
X
X
X
X
X
X
9
9
*96
#96
X
X
9
9
9
9
9
9
9
9
9
9
9
*47
*85
9
9
9
9
9
9
9
9
9
9
9
9
9
9
9
#85#
*943
*944
*52
#52
*44
#44
*61
*62
*45
#45
*56
#56
*940
X
X
X
X
X
X
9
9
*59
*57
9
*91
9
*9419
#9419
9
9
9
9
9
9
9
9
9
9
9
9
9
9
9
9
#85
*85*
X
X
X
X
X
X
X
X
X
X
X
X
X
X
X
X
X
Overview of Functions and Codes (Alphabetical)
Functions
(display)
... Interactively
... Via the
Program/Service menu
Program/Service
... With
function
keys
Code
Reset services
Retrieve line
Ring Transfer: On
Ring Transfer: Off
Ringer cutoff on
Ringer cutoff off
Ringing group on
Ringing group off
Room monitor
Select language
Set Callback
View callbacks/Delete
Shift Key
Show call charges (own telephone)
View call charges (other party’s telephone)
Speaker call
Suppress call ID
Restore caller ID
Tel. data service
Temporary MSN
Temporary Phone
Timed reminder on
Timed reminder off
Toggle/Connect
Trace call
Transfer
Trunk Flash
UCD
Log on
Log off
Available
Not available
Work on
Work off
UCD night on
UCD night off
Calls in queue
Use speed-dialing
Change Speed-dial (station)
9
9
9
9
9
9
9
9
9
9
9
9
9
9
9
9
9
9
9
9
#0
*63
*502
#502
*98
#98
*81
#81
*88
*48
*58
#58
9
*65
9
9
9
*80
*86
9
9
9
9
9
9
9
9
9
9
9
9
9
9
9
9
9
9
9
9
X
X
X
X
X
X
X
X
X
X
X
X
X
X
X
X
#86
*42
*41
*508
*46
#46
*2
*84
X
X
X
X
X
X
*51
X
*401
#401
*402
#402
*403
#403
*404
#404
*405
*7
*92
X
X
X
X
X
X
X
X
X
X
X