1
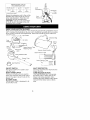
Operator's
Manual
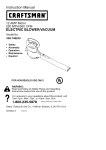
I CRRFTglVlRN°I
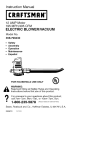
12 AMP Motor
200 MPH/350 CFM
ELECTRIC
Model
BLOWERNACUUM
No.
358.748220
•
Safety
• Assembly
•
•
Operation
Maintenance
•
Espar_ol,
p. 12
FOR HOUSEHOLD
USE ONLY
WARNING:
Read and follow all Safety Rules and Operating
Instructions
before first use of this product.
For answers Mon.-Sat.,
to your questions
about this
7am-Tpm,
or 10am-Tpm,
Sun.product,
•
1-800-235-5878
Sears, Roebuck
545001401
and Co., Hoffman
9/12/06
call
/Hoors
listed
are
CentraI
Time)
Estates,
IL 60179 U.S.A.
Warranty
Statement
Safety
Rules
Assembly
Operation
Maintenance
Service
&Adjustments
TWO YEAR FULL WARRANTY
2
2
5
8
9
10
Parts
Available
10
Storage
11
Troubleshooting
Table
11
Spanish
12
Parts
Ordering
Back
Cover
ON SEARS CRAFTSMAN
ELECTRIC
BLOWER
When used and maintained according to the operator's manual, if this product fails
due to a defect in material or workmanship within two years from the date of purchase, return it to any Sears store or other Craftsman outlet in the United States for
free replacement.
This warranty applies for only 30 days from purchase date if this product is used
for commercial or rental purposes.
This warranty gives you specific legal rights, and you may also have other rights
which vary from state to state.
Sears, Roebuck and Co., Hoffman Estates, IL 60179
IMPORTANT WARNINGS AND
SAFETY INSTRUCTIONS
AWARNING:
When using electric gardening appliances, basic safety precautions should always
be followed to reduce the risk of fire, electric shock, and serious injury. The warnings
and safety instructions in this manual must be followed to reduce the risk of fire, electric shock, or injury, and to provide reasonable safety and efficiency in using this unit.
The operator is responsible for following the warnings and instructions in this manual
and on the unit. Read the entire operator's manual before assembling and using the
unit! Restrict the use of this unit to persons who read, understand, and follow the
warnings and instructions in this manual and on the unit. Never allow children to use
this unit. Do not allow the unit to be used as a toy. Close attention is necessary when
used near children. Always disconnect unit from power source before servicing,
cleaning, performing maintenance, or storing. Nonconforming replacement components or the removal of safety devices may cause damage to the unit and possible
injury to the operator or bystanders. Use only accessories and replacement parts as
recommended. Use only for jobs explained in this manual.
OPERATOR SAFETY
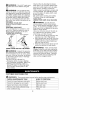
• Dress safely in long pants. Do not go
• Always wear safety glasses or similar
barefoot or wear short pants or sandals.
eye protection when operating, servicing, or performing maintenance on
• Do not operate the unit when you are
your unit. Wearing eye protection can
tired, ill, upset, or if you are under the
help to prevent rocks or debris from
influence of alcohol, drugs, or medication.
being blown or ricocheting into eyes
and face which can result in blindness
• Secure hair so it is above shoulder
or serious injury.
length. Keep loose hair, loose cloth• Always wear a respirator or face mask
ing, fingers, and all other parts of the
when working with the unit in dusty
body away from openings and movenvironments.
ing parts. Hair, jewelry, loose clothing, or clothing with loosely hanging
straps, ties, tassels, etc., can be
caught in moving parts.
ELECTRICAL
SAFETY
AWARNING:
Avoid a dangerous environment. To reduce the risk of electrical shock, do not
use in rain, in damp or wet locations, or
around swimming pools, hot tubs, etc.
Do not expose to snow, rain, or water to
avoid the possibility of electrical shock.
Do not use on wet surfaces. Do not
handle extension cord plug or unit with
wet hands. Avoid dangerous situations.
Do not use in the presence of flammable liquids or gases to avoid creating
a fire or explosion and/or causing damage to unit. Do not abuse cord. Never
carry the unit by the extension cord or
yank extension cord to disconnect unit.
To unplug, grasp the plug, not the cord.
Do not use cord as a handle, close a
door on cord, or pull cord around sharp
edges or corners. Turn off all controls
before unplugging. Do not expose cords
to heat, oil, or water. Do not use with
damaged cord or plug. If unit is not
working as it should, has been dropped,
damaged, left outdoors, or dropped into
water, return it to your Sears Service
Center for repair. Unplug the unit from
the power source when not in use, before servicing, cleaning, performing
maintenance, or storing. Do not put any
object into openings. Do not use with
any opening blocked; keep free of dust,
lint, hair and anything that may reduce
air flow.
• Use only a voltage supply as shown
on the nameplate of the unit.
• Avoid dangerous environments.
Do
not use in unventilated areas or where
dust or explosive vapors can build up.
• To reduce the risk of electrical shock,
this unit has a polarized plug (one
blade is wider than the other) and will
require the use of a polarized extension cord. The appliance plug will fit
into a polarized extension cord only
one way. If the plug does not fit fully
into the extension cord, reverse the
plug. If the plug still does not fit, obtain
a correct polarized extension cord. A
polarized extension cord will require
the use of a polarized wall outlet. This
plug will fit into the polarized wall outlet
only one way. If plug does not fit fully
into the wall outlet, reverse the plug. If
it still does not fit, contact a qualified
electrician to install the proper wall outlet. Do not change the equipment
plug, extension cord receptacle, or extension cord plug in any way.
• To reduce the risk of electrical shock,
use extension cords specifically
marked as suitable for outdoor appliances. The electrical rating of the
cord must not be less than the rating
of the unit. The cord must be marked
with the suffix '_#V-A"(in Canada, "W").
Make sure your extension cord is in
good condition. Inspect extension cord
before use and replace if damaged.
An undersized extension cord will
cause a drop in line voltage resulting
in loss of power and overheating. If in
doubt, use the next heavier gauge.
The smaller the gauge number, the
heavier the cord. (NOTE: The correct
size to be used depending on the cord
length is shown in this manual. See
SELECT AN EXTENSION CORD in the
ASSEMBLY section).
• Do not use multiple cords.
• Keep the extension cord clear of operator and obstacles at all times.
• Tie cord to cord retainer and connect
to recessed plug as shown in this
manual to prevent damage to unit and/
or extension cord and to reduce the
possibility of the extension cord disconnecting from the unit during operation.
• Do not attempt to repair unit. Inspect
the insulation and connectors on the
unit and extension cord before each
use. If there is any damage, do not
use until damage is repaired by your
Sears Service Center.
• Do not use the unit if the switch does
not turn the unit on and off properly.
Have the unit repaired by your Sears
Service Center.
• Avoid accidental starting. Be sure the
switch is in the OFF position and keep
your hand and fingers away from the
switch while connecting the unit to the
power source or when carrying a unit
connected to the power source.
• Avoid any body contact with any
grounded conductor, such as metal
fences, or pipes, to avoid the possibility of electric shock.
• Ground Fault Circuit Interrupter (GFCI)
protection should be provided on the
circuit or outlet to be used for this unit.
Receptacles are available having builtin GFCI protection and may be used
for this measure of safety.
• Stop the motor immediately if you are
approached.
DOUBLE INSULATION
CONSTRUCTION
This unit is double insulated to help
protect against electric shock. Double
insulation construction consists of two
separate "layers" of electrical insulation instead of grounding.
Tools and appliances built with a
double insulation system are not intended to be grounded, No grounding
means is provided on this unit, nor
should a means of grounding be added to this unit, As a result, the extension cord used with your unit can be
plugged into any standard 120 volt
electrical outlet. Safety precautions
must be observed when operating any
electrical tool. The double insulation
system only provides added protection
against injury resulting from an internal
electrical insulation failure.
, ILWARNING:
All electrical repairs to this unit, including
housing, switch, motor, etc., must be
diagnosed and repaired by qualified service personnel. Replacement parts for a
double insulated appliance must be
identical to the parts they replace. A
double insulated appliance is marked
with the words "double insulation" or
"double insulated". The symbol []
(square within a square) may also be
marked on the appliance. Failure to
have the unit repaired by Sears service
personnel can cause the double insulation construction to become ineffective
and result in serious injury.
UNIT/MAINTENANCE
SAFETY
• Do not set the unit on any surface except a clean, hard area while the unit
is running. Debris such as gravel,
sand, dust, grass, etc., could be
picked up by the air intake and thrown
out through the discharge opening,
damaging the unit, property, or causing serious injury to bystanders or operator.
• Do not overreach or use from unstable
surfaces such as ladders, trees, steep
slopes, rooftops, etc. Use extra care
when cleaning on stairways. Keep
firm footing and balance at all times.
Keep hands out of tubes.
• Inspect the entire unit before each use
for worn, loose, missing, or damaged
parts. Do not use until the unit is in
proper working order.
• This unit is double insulated. See the
DOUBLE INSULATION CONSTRUCTION
section. Have all internal service per-
formed by qualified service repair personnel to avoid creating a hazard or
voiding your warranty.
• Have all maintenance other than the
recommended procedures described
in the operator's manual performed by
your Sears Service Center.
• Always see your Sears Service Center
to replace a damaged impeller. Parts
that are chipped, cracked, broken, or
damaged in any other way can fly
apart and cause serious injury. Replace damaged parts before using the
unit.
• Never place any object in the air intake opening as this could restrict
proper air flow and cause damage to
the unit.
• Never douse the unit with water or
other liquids or squirt with a water
hose. Clean the unit using a damp
cloth. Wipe off with a clean dry cloth.
See MAINTENANCE.
• Check air intake openings and tubes
frequently, always with the unit
stopped and power source disconnected. Keep vents and tubes free of
debris which can accumulate and restrict proper air flow.
• Do not burn, incinerate, or expose this
unit to extreme heat.
• Store the unit unplugged in a high,
cool, dry, indoor area out of the reach
of children.
• Use only recommended attachments
and replacement parts to avoid creating a hazard and/or voiding warranty.
• Maintain the unit according to recommended procedures.
BLOWER SAFETY
• Use only in daylight or in good artificial
light.
• Inspect the area before using the unit.
Remove all debris and hard objects
such as rocks, glass, wire, etc., that
can ricochet, be thrown, or otherwise
cause injury or damage during operation.
• Never run the unit without the proper
equipment attached. When used as a
blower, always install a blower tube.
Use only recommended attachments.
• To avoid spreading fire, do not use
blower near leaf or brush fires, fireplaces, barbecue pits, ashtrays, etc.
• Never place objects inside the blower
tubes; always direct the blowing debris
away from people, animals, glass, and
solid objects such as trees, automobiles, walls, etc. The force of air can
cause rocks, dirt, or sticks to be
thrown or to ricochet which can hurt
people
oranimals,
break
glass,
or
cause
other
damage.
• Never
useforspreading
chemicals,
fertilizers,
oranyother
substances
which
maycontain
toxicmaterials.
VACUUM SAFETY
• Stop the motor and disconnect the
power source before opening the air
inlet door or attempting to insert or remove the vacuum tubes. The motor
must be stopped and the impeller
blades no longer turning to avoid serious injury from the rotating blades.
• Hard objects can be thrown through
the collection bag or the housing and
become dangerous missiles which
can cause serious injury to the operator or others.
• When using the vacuum attachment,
the unit is designed to pick up dry material such as leaves, grass, small
twigs, and bits of paper. Do not vacuum stones, gravel, metal, broken
glass, etc., to avoid severe damage to
the impeller. To avoid the possibility of
electrical shock, do not attempt to vacuum water or other liquids.
• Never run the unit without the proper
equipment attached. When used as a
vacuum, always install vacuum tubes
and collection bag assembly. Make
sure the collection bag assembly is
completely zipped when unit is running
to avoid flying debris. Use only recommended attachments.
• Avoid situations which could set the
collection bag on fire. Do not vacuum
discarded matches, cigars, cigarettes,
or ash from fireplaces, barbecue pits,
brush piles, etc. To avoid spreading
fire, do not use blower near leaf or
brush fires, fireplaces, barbecue pits,
ashtrays, etc.
• Always use the collection bag shoulder strap when vacuuming to avoid
loss of control.
• Check air intake openings, elbow tube,
and vacuum tubes frequently, always
with the unit stopped and the power
source disconnected.
Keep vents and
tubes free of debris which can accumulate and restrict proper air flow. Do
not use with any opening blocked,
Keep free of dust, lint, hair and anything that may reduce air flow.
STANDARDS
This product is listed by Underwriters
Laboratories, Inc., in accordance with
UL Standard 1017.
If situations occur which are not covered
in this manual, use care and good judgment. If you need assistance, contact
your Sears Service Center or call
1-800-235-5878.
Failure to follow all
Safety Rules and Precautions can result
in serious injury.
SAVE THESE INSTRUCTIONS
CARTON CONTENTS
Model 358.748220
• Blower
• Blower Tube
• 2 Vacuum Tubes
• Elbow Tube
• Collection Bag
Examine parts for damage. Do not use
damaged parts.
NOTE: If you need assistance or find
parts missing or damaged, call
1-800-235-5878.
_WARNING:
Stop the unit and
disconnect from the power source before opening the inlet cover or attempting to insert or remove the inlet restrictor,
blower tube, or vacuum tubes. The motor must be stopped and the impeller
blades no longer turning to avoid serious
injury from the rotating blades.
,t_,WARNING:
If received assembled, ensure your unit is properly
assembled and all fasteners are secure.
• A standard screwdriver is required for
assembly.
BLOWER ASSEMBLY
NOTE: Assembly instructions for using
your unit as a vacuum follow this section.
Attaching the blower tube
If you have already assembled your
unit for use as a vacuum, refer to the
section HOW TO CONVERT UNIT FROM
VACUUM USE TO BLOWER USE.
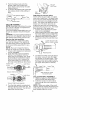
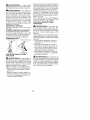
To attach blower tube:
1. Align the grooves on the blower
tube with the grooves on the blower
outlet.
2. Push
theblower
tubeontothe
blower
outlet
untilitsnaps
into
place
(tube
issecured
byredtube
release
button).
3. Toremove
theblower
tube,
press
the
tuberelease
button
while
pulling
on
tube.
{/_Tube
\('_'_,
_w_
Vacuum
}
Inlet
Restdctor
Release
Button
b,//
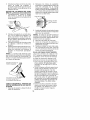
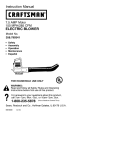
Attaching the vacuum tubes
There are 2 vacuum tubes, an upper
tube and a lower tube. The upper tube
has a vacuum assist handle attached
to one end and is cut straight on both
ends. The upper tube attaches to the
blower unit. The lower tube has an
angled end that you point toward the
ground during vacuum use. The lower
tube attaches to the upper tube.
1. Ensure unit is stopped and extension cord is unplugged.
2. While holding inlet cover open, place
the hooks of the vacuum assist handle on the retaining posts of the unit.
3. Raise the tube until it is secured to
the blower unit by the red inlet cover
latch.
Blower Tube
er outlet
VACUUM ASSEMBLY
NOTE: Assembly instructions for using
your unit as a blower are explained in
the previous section.
If you have already assembled your unit
for use as a blower, remove the blower
tube.
CAUTION:
To avoid causing damage to
the unit, DO NOT attempt to use the variable speed control during vacuum use.
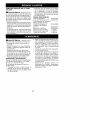
Remove the inlet restrietor
An inlet restrictor is used when using
your unit as a blower. This restrictor is
not used during vacuum use and must
be removed during assembly for vacuum use.
NOTE: Be sure to keep the inlet restrictor for using your unit as a blower.
1. Ensure unit is stopped and extension
cord is unplugged.
2. Open the inlet cover by inserting
the tip of a screwdriver into the
latch area on the blower unit. Gently tilt handle of screwdriver toward
the front of the unit to release the
latch while pulling up on the vacuum inlet cover with your other hand.
Bottom view
_
_k
!_._
4.
Retaining Post
To attach the lower vacuum tube to
the upper vacuum tube, first align
the arrows on the two tubes. Then,
press the two tubes together until
the lower tube is securely seated in
the upper tube (about 3 inches).
Latch Area
z_._4
it
Vacuum Inlet Cover (closed)
Impelle
vUaPuPe
rmV,_cuiu
tHTUn°cte
Latch Area
Upper Tube
Lower Tube
arrows
oeuppe
d,owertubes
COLLECTION
BAG ASSEMBLY
1. Open the zipper on the collection
bag and insert the elbow tube.
2. Push the small end of the elbow
tube through the small opening in
the bag.
NOTE: Make sure edge of the small
opening is flush against the flared area
of the elbow tube and the hole for the
tube release button is on top.
Vacuum' nlet Cover (opened)
3. Turn the inlet restrictor counterclockwise and remove it from the unit. Do
not close the inlet door. You will next
attach the vacuum tubes.
6
Elbow
Tube
Zipper
Opening
HOW TO CONVERT UNIT FROM
Tube
Release VACUUM USE TO BLOWER USE
Button 1. Stop unit and unplug the extension
cord.
Hole
2. Remove the vacuum tubes by inserting the tip of a screwdriver into the
latch area on the vacuum assist handle. Gently tilt handle of screwdriver
toward the front of the unit to release
the latch while pulling up on the vacuum assist handle with your other
hand.
_1
Opening
3.
Close the zipper on the bag. Make
sure the zipper is closed completely.
4. Align the grooves on the elbow
tube with the grooves on the blower
outlet.
5. Push the elbow tube onto the blower outlet until it snaps into place (elbow tube is secured by red tube release button).
ADJUSTING THE SHOULDER STRAP
ON THE COLLECTION
BAG
1. Carefully loop the shoulder strap
through the buckle as shown in the
illustration below.
Latch Area
3.
NOTE: If you are unable to locate the
inlet restrictor, the unit will still operate.
This restrictor improves the blower
function.
Last Int_
4. Remove the collection bag.
5. Close the inlet cover and make
sure it is latched closed.
6. Re-install the blower tube. Refer to
Aqq-AOHtNGTHE BLOWER TUBE for
instructions on how to attach this
item.
2.
Position the unit on your right-hand
side, blower outlet and bag pointing
toward the rear. Hold the unit in an
upright position with the lower vacuum tube on the ground to support it.
3. Place the shoulder strap over your
head and onto your left shoulder.
4. Adjust the strap to allow a free flow
of air from the blower. If the collection bag is kinked, the unit will not
operate properly.
NOTE: The strap is designed to position the collection bag on your shoulder
without kinks. The strap is not intended
to support the weight of the unit.
SELECT
AN EXTENSION
CORD
Use only a 120 A.C. voltage supply as
shown on nameplate of the unit to
power your blower.
The extension cord used to reach the
power source must be:
• Specifically marked as suitable for outdoor use. The cord must be marked
with the suffix WV-A" (in Canada "W")=
• Heavy enough to carry full current
from the power source to the unit.
Otherwise, loss of power and overheating can occur causing damage to
unit. Refer to table for minimum wire
Shoulder strap
on left shoulder
gauge recommendations. The cord
must be marked with the proper wire
gauge. (Appropriate extension cords
are available.) Do not use multiple
cords.
• In good condition. Cord insulation
must be intact with no cracks or
deterioration. Plug connectors must be
undamaged. DO NOT use multiple
cords.
No
allows
Install the inlet restrictor that was
removed when assembling for vacuum use.
free
7
MINIMUM
WIRE
GAUGE
RECOMMENDATIONS
Cord
Recessed
100 FT.
A.IW4G.*
*American
Wire
Receptacl_
Gauge
Secure the extension cord to the unit by
threading the cord through the cord retainer (see illustration). Insert the cord
receptacle into the recessed plug.
CAUTION:
Failure to use cord retainer could result in damage to the unit,
extension cord, or both.
°°tl,
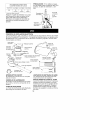
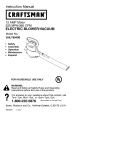
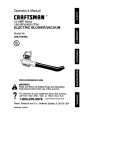
KNOW YOUR ELECTRIC BLOWER
READ THIS OPERATOR'S MANUAL AND SAFETY RULES BEFORE OPERATING YOUR
UNIT. Compare the illustrations to your unit to familiarize yourself with the location
of the various controls and adjustments. Save this manual for future reference.
ON/OFF Switch
....
Collection Bag
Cord
\ Y _2t_-_
Retainer _ (
Handle
Air Vents
\\
Elbow
Tube
,
_'
Inlet Cover
Latch
Upper vacuum Tube
Retaining Post
Vacuum Assist Handle
Upper Vacuum Tube
Blower Tube
Lower Vacuum Tube
_//
._let
Restrictor
ON/OFF SWITCH
The ON/OFF SWITCH is used to activate the motor.
INLET COVER LATCH
The INLET COVER LATCH is used to
open and close the inlet cover and to
secure the upper vacuum tube to the
blower unit.
BLOWER TUBE
The BLOWER TUBE is designed to direct the flow of air.
=:====i
/
z
INLET RESTRICTOR
The INLET RESTRICTOR improves the
blower function.
TUBE RELEASE BUTTON
The TUBE RELEASE BUqq-ONsecures
the blower tube or elbow tube to the
blower unit during operation. Also,
pressing the tube release button allows
removal of the blower tube or elbow
tube.
z_
4rLWARNING:
Direct air flow by directing the blower
tube down or to one side. Always work
away from solid objects such as walks,
large stones, vehicles, and fences.
Clean corners by starting in corners and
moving outward. This will help prevent
an accumulation of debris which could
fly into your face.
Be careful when working near plants.
The force of the air could damage
tender plants.
USING YOUR UNIT AS A VACUUM
You MUST make sure
the tubes are secure before using the
unit.
_WARNING:
Do not use the unit
without the tubes or collection bag properly attached to avoid flying debris and/
or impeller contact which can cause serious injury. Always wear eye protection
to prevent rocks or debris from being
blown or ricocheting into the eyes and
face which can result in blindness or serious injury.
STOPPING YOUR UNIT
Slide the ON/OFF switch to the OFF
position.
STARTING YOUR UNIT
Your unit has two run positions, LOW
and HIGH. Slide the switch to one of
these positions to turn on the unit.
OPERATING
POSITION
Eye Protection
Eye Protection
_'WARNING:
Blower
Vacuum
USING YOUR UNIT AS A BLOWER
_WARNING:
'_
If the unit becomes
clogged, stop the unit and unplug the
extension cord. Wait until the impeller
has completely stopped turning, then
remove the vacuum tubes. Carefully
reach into the vacuum opening and
clear out the clogged debris.
WARNING:
Inspect the area before using the unit. Remove all debris
and hard objects such as rocks, glass,
wire, etc., that can ricochet, be thrown,
or otherwise cause injury or damage
during operation.
Use your unit as a blower for:
• Sweeping debris or grass clippings
from driveways, sidewalks, patios, etc.
• Blowing grass clippings, straw, or
leaves into piles, or removing debris
from corners, around joints, or between bricks.
CUSTOMER
Do not vacuum
stones, gravel, metal, broken glass,
etc., to avoid severe damage to the impeller. To avoid the possibility of electrical shock, do not attempt to vacuum
water or other liquids.
Use your unit as a vacuum to pick up
dry material such as leaves, grass,
small twigs, and bits of paper.
• For best results during vacuum use,
operate your unit at high speed.
• Move slowly back and forth over the
material as you vacuum. Avoid forcing the unit into a pile of debris as
this can clog the unit.
• Keep the vacuum tube about an inch
above the ground for best results.
RESPONSIBILITIES
WARNING:
Disconnect
power source before performing
maintenance.
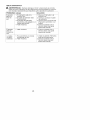
CARE & MAINTENANCE
TASK
WHEN TO PERFORM
Check for loose fasteners
and parts
Before each use
Check for damaged
Before each use
or worn parts
Inspect and clean unit and labels
After each use
Remove and empty collection
After each use
Clean collection
bag
bag
Yearly
9
GENERAL
RECOMMENDATIONS
AFTEREACH USE
Thewarranty
onthisunitdoes
notcover INSPECT AND CLEAN UNIT & LABELS
items
thathave
been
subjected
tooper- Stop unit and unplug extension cord.
atorabuse
ornegligence.
Toreceive
full
each use, inspect complete unit
value
fromthewarranty,
theoperator • After
for loose or damaged parts. Clean
must
maintain
unitasinstructed
inthis
the unit using a damp cloth.
manual.
Various
adjustments
willneed • Wipe off unit with a clean dry cloth.
tobemade
periodically
toproperly
CLEAN COLLECTION
BAG
maintain
yourunit.
IMPORTANT: THE COLLECTION BAG
BEFORE
EACHUSE
MUST BE PROPERLY EMPTIED.
CHECK
FORLOOSE
• You must properly empty and maintain
FASTENERS
ANDPARTS
the collection bag to avoid deteriora• InletCover
tion and obstruction of air flow.
• Blower
Tube
• Remove the collection bag from the
• Vacuum
Tubes
unit and empty after each use. Do not
• Collection
Bag
store bag without emptying the bag of
CHECK
FORDAMAGED
OR
all contents (grass, leaves, etc.).
WORN
PARTS
• Wash the bag once a year. Remove
the bag from the blower and turn the
Contact
yourSears
Service
Center
for
bag inside out. Wash the bag with a
replacement
ofdamaged
orworn
water hose. Allow the bag to hang and
parts.
• ON/OFF
Switch
- Ensure
switch
func- dry completely before you reuse the
bag.
tions
properly
bymoving
theswitch
to
theOFF
position.
Make
suremotor
stops;
thenrestart
motor
andcontinue.
• InletCover
- Discontinue
useofunitif
inletcover
failstolatch
properly
orifit
isdamaged
inanyway.
HOW TO REMOVE AN OBJECT
FROM THE AIR INTAKE
,_WARNING:
Stop tile unit and
disconnect from the power source before opening the inlet cover. The motor must be stopped and the impeller
blades no longer turning to avoid serious injury from the rotating blades.
1. While holding the inlet cover open,
remove the vacuum tubes. The inlet cover must be held open
through all remaining steps.
2. Carefully reach into the vacuum
opening and clear out the air intake
area. Clear all debris from impeller=
3.
Inspect the impeller for cracks. If
cracked or damaged, do not use
the unit. Have parts replaced by
your Sears Service Center. Do not
attempt to replace them yourself.
PARTS AVAILABLE
Blower Tube ...........
Elbow Tube ............
Upper Vacuum Tube/
Vacuum Assist Handle &
Lower Vacuum Tube ....
Inlet Restrictor
.........
Collection Bag .........
Gutter Kit ..............
Safety Glasses .........
Extension Cord .........
lO
530403765
530403769
530403989
530403791
530095599
71-79970
71-85707
71-85709
• Clean the entire unit before lengthy
storage.
• Open inlet cover and clean any dirt,
grass, or debris that has collected. Inspect the blower and all tubes. Close
and make sure the cover is latched.
• Clean air vents and air inlet of debris.
• Store your unit and extension cord in a
well ventilated area and covered, if
possible, to prevent dust and dirt accumulation. Do not cover with plastic.
Plastic cannot breathe and may cause
condensation and eventual rust or corrosion.
• Check entire unit for loose screws. Replace any damaged, worn, or broken
parts.
dlI_WARNING:
Perform the following steps after each use:
• Stop unit and disconnect from the
power source.
• Allow motor to cool before storing or
transporting.
• Store unit with all guards in place•
Position unit so that any sharp object
cannot accidentally cause injury.
• Store unit unplugged, well out of the
reach of children.
SEASONAL
STORAGE
Prepare unit for storage at the end of
the season or if it will not be used for
30 days or more.
If your blower is to be stored for a period of time:
• Stop unit and disconnect from the
power source.
TROUBLESHOOTING
,_
TABLE
WARNING:
Always stop unit and disconnect from the power source before
performing all of the recommended remedies below except remedies that require unit to be operating.
SYMPTOM
Unit fails to
operate.
CAUSE
REMEDY
1 • Switch in the OFF position=
2• Extension cord disconnected.
3• Circuit breaker tripped, or
fuse blown.
4• Mechanical failure
Unit
vibrates
abnormally.
1. Mechanical
Impeller will
not turn
freely.
1• Debris in air intake area.
2• Mechanical
failure
1• Slide switch to ON position.
2• Reconnect extension cord•
3• Reset circuit breaker or
fuse.
4• Contact Sears Service
(see back cover).
1• Contact Sears Service
(see back cover).
1. Clean unit. Remove any
debris.
2. Contact Sears Service
(see back cover).
failure.
11
Declaraci6n de Garantia
Reglas de Seguridad
Montaje
Uso
12
12
16
19
Servicio y Ajustes
Piezas Disponibles
Almacenaje
Tabla Diagn6stica
Mantenimiento
21
Piezas de Repuesto
DOS AI_IOS COMPLETO
DE C-_ARANTiA PARA EL SOPLADOR
DE LA MARCA CRAFTSMAN _
22
22
22
23
Contratapa
ELECTRICA
Si este producto falla per un defecto en el material o de mano de obra dentro de
dos aSos a partir de la fecha de compra y este se ha utilizado y mantenido de
acuerdo al manual del usuario, envielo a cualquier tienda Sears o otra tienda
Craftsman en los Estados Unidos para su reemplazo gratuita.
Esta garantia es aplicable per s61o 30 dias desde la fecha de compra si este producto se usa con fines comerciales o se usa para arriendo.
Esta garantia le otorga derechos legales especificos, y usted tambien puede
tener otros derechos que varian de estado a estado.
Sears, Roebuck and Co., Hoffman Estates, IL 60179
IMPORTANTES ADVERTENCIAS E
INSTRUCCIONES DE SEGURIDAD
: ADVERTENCIA:
AI usar aparatos de jardineria electricos, se deber_.n seguir siempre precauclones b_.sicas para reducir el riesgo de incendio, choque el6ctrico y accidentes
de alta gravedad. Deber_.n seguirse las advertencias e instrucciones de seguridad en este manual para reducir el riesgo de incendios, choque el6ctrico o accidentes y asimismo para proveer seguridad y eficiencia razonables en el uso de
este aparato. El usuario tiene la responsabilidad
de obedecer las advertencias e
instrucciones contenidas tanto en este manual como en el aparato, iLea el manual del usuario en su totalidad antes de armar y usar el aparato! Limite el uso de
este aparato a aquellas personas que hayan leido y comprendido
las advertencias e instrucciones tanto en este manual come en el aparato y que vayan o obedecerlas. No permita que los ni_os usen este aparato. No permita que el aparato sea utilizado como un juguete. Toda su atenci6n es necesaria cuando use este
aparato cerca de lugares en donde haya ni_os. Siempre desconecte el aparato
antes de dar servicio, limpiado, darle mantenimiento
o almacenado. Componentes
de repuesto que no concuerden con las piezas originales o la remoci6n de dispositivos de seguridad podria causar daSos al aparato y accidentes al usuario o a espectadores. Use exclusivamente los accesorios y repuestos recomendados. Use Onicamente para trabajos detallados en este manual.
SEGURIDAD
DEL USUARIO
• Use siempre anteojos de seguridad o
protecci6n similar de ojos al usar y al
hacer mantenimiento del aparato El
uso de protecci6n de ojos puede ayudara la prevenci6n de ceguera u
otras heridas graves producidas per
piedras o desechos impelidos per el
aparato y arrojados en los ojos y en la
cara.
• Use siempre mascarilla filtrante o
protectora al trabajar con el aparato
en ambientes polvorientos.
• Use vestimenta protectora con pantalones largos. No use el aparato
descalzo ni en pantalones cortos o
en sandalias.
• No use el aparato cuando se encuentre cansado, enfermo, agitado,
ni bajo la influencia del alcohol, de
drogas u otros medicamentos.
12
• Mantenga
elcabello
perencima
de
• Para reducir el riesgo de choque
loshombros,
at&ndolo
para
talefecto el6ctrico, este equipo cuenta con un
siesnecesario.
Mantenga
elcabello, enchufe polarizado (una aleta es
ropa
suelta,
ropa
contiras,
dedos
y
mrs ancha que la otra). Este enchufe entrara solamente en una sola
otras
partes
delcuerpo
alejados
de
lasaberturas
ypartes
enmovimiento. posici6n en un enchufe polarizado
Elcabello,
ropa
suelta
oropas
contidel cable de extensi6n. AsegOrese
ras,borlas,
corbatas,
etc.,pueden
en- de tenet un cable de extensi6n polaredarse
enlaspiezas
m6viles.
rizado. A su vez, el enchufe polarizaSEGURIDAD
ELECTRICA
: ,ADVERTENCIA:
Evite ambientes peligrosos. Para reducir
el riesgo de choque el_ctrico, no use su
aparato en lugares h0medos o mojados
ni cerca de piscinas, de los hidromasajes, etc. No exponga el aparato a la
nieve, a la Iluvia ni al agua para evitar la
posibilidad de cheque el6ctrico. No use
en superficies mojadas. No toque el enchufe del cable de extensi6n ni el del
aparato con las manos mojadas. Evite
situaciones peligrosas. No use en presencia de liquidos o gases inflamables
para evitar crear incendio o explosi6n
y/o causar daSo al aparato. No abuse
del cord6n. Nunca maneje el aparato
por el cable de extensi6n o tire del mismo para desconectar el aparato. Para
desconectar, sujete el enchufe, no el
cable. No use el cable como mango, no
cierre las puertas contra el cable, ni tire
del cable si 6ste est& apoyado contra un
borde filoso. Apague todos los controles
y permita que el motor se detenga antes
de desconectar el aparato del recurso
de energia. No exponga el cable al
calor, aceite o agua. No use el aparato
con el cable o el enchufe daSados. Si el
aparato no estR funcionando come
debe, si se ha caido, se ha daSado, dejade a la interperie o dejado caer al
agua, devuelvalo a su distribuidor autorizado del servicio para ser reparado.
Desconecte el aparato del recurso de
energia cuando no se enouentre en
use, antes de efectuar servicio, y al
cambiar accesorios. No ponga ning0n
objeto en las aberturas. No utilice con
ninguna de las aberturas bloqueadas.
Mantenga libre de polvo, pelusa, pelo y
cualquier otra cosa que reduzca la circulaci6n de aire.
• Use exclusivamente
el voltaje que
consta en la placa del aparato.
• Evite ambientes peligrosos. No use
su aparato en areas poco ventiladas
donde haya alta concentraci6n de
polvo o vapores explosivos.
•
•
•
•
•
13
do del cable de extensi6n entrara en
el tomacorriente de una sola forma.
Si el enchufe no entra completamente en el tomacorriente,
invierta el
enchufe. Si todavia no entra, contacte un electricista autorizado para
que instale el tomacorriente
apropiado. No cambie el enchufe de niguna
forma.
Para reducir el riesgo de cheque el_ctrico, use cables de extensi6n especificamente marcados como aptos
para usar con aparatos de use exterior y que tengan una clasificacion electrica no menor que la clasificaci6n del
aparato. El cable debe venir marcado
con el sufijo "W-A" ('_#V"en Canada).
AsegOrese que el cable de extensi6n
se encuentre en buenas condiciones.
Siesta daSado, cRmbielo. Los cables
de extensi6n demasiado finos causaran una baja en el voltaje de linea,
provocando baja de potencia y exceso de calentamiento. En case de
duda, use un cable de clasificaci6n
mrs alta. Cuanto mrs bajo es el
nQmero de clasificaci6n mrs grueso
sera el cable.(AVlSO: La clasificaci6n
correcta dependiendo del largo del
cable se muestran en este manual.
Vea ELIJA UN CABLE DE EXTENSION
en la secci6n MONTAJE).
No utilice las cables de extensi6n
mOltiples.
Mantenga el cable de extensi6n libre
de todo obstaculo y alejado del
usuario en todo momento.
Asegure el cable de extensi6n con el
seguidor del cable al conectar con el
enchufe embutido segOn Io demostrade en este manual para prevenir
dai7o a el aparato y/o cable de extensi6n y para reducir el riesgo de
que el cable de extensi6n se desconecte del aparato durante el uso.
No intente reparar el aparato. Inspeccione el aislante y los conectores en el aparato yen el cable de
extension antes de cada use. Si encuentra algOn daSo, no Io use hasta
no ser reparado por su Centro de
Servicio Sears.
• No use el aparato si el interruptor no
Io enciende o apaga como corresponde. H&galo reparar en un Centre
de Servicio Sears.
• Evite porter en marcha el motor accidentalmente. AsegQrese que el interruptor est6 el la posici6n OFF y mantenga su mano y sus dedos alejados
del interruptor mientras conecte el
aparato en el recept&culo de energia
o cuando mueva el aparato estando
enchufado.
• Evite todo contacto del cuerpo con los
conductores a tierra, tales como los
ca_os de metal o las cercas de
alambre, para evitar la posibilidad de
choque electrico.
• Debe proveerse Interrupter de Fallas
en el Circuito a Tierra (Ground Fault
Circuit Interruptor- GFCI) en el circuito
o en el tomacorriente usado con este
aparato. Hay tomacorrientes disponibles con protecci6n GFCI incorporaday estos pueden ser usados para
cumplir con esta medida de seguridad.
• Detenga el motor de inmediato si alguien se le acerca.
CONSTRUCCION
DE DOBLE AISLAMIENTO
Este aparato tiene un doble aislamiento para ayudar a proteger el mismo en
contra de choques el6ctricos. La
construcci6n
de doble aislamiento
consiste en dos "capas" de aislamiento el6ctrico en lugar de tenet toma de
tierra.
Herramientas y aparatos construidos
con el sistema de doble aislamiento no
ban sido dise_ados para que tomen tierra. No se ha provisto para esta m&quina
ningOn medic para la toma de tierra, y
no se deber&n a_adir medics para la
toma de tierra a la misma. Come resultado, el cable de extensi6n usado con
su aparato puede ser enchufado en cualquier tomacorriente el6ctrico normal
de 120 voltios. Precauciones de seguridad deben ser observadas cuando se
use cualquier herramienta el6ctrica. El
sistema de doble aislamiento s61o provee protecci6n adicional en contra de
accidentes causados pot fallo interno de
aislamiento el6ctrico.
.ADVERTENCIA:
Toda reparaci6n el6ctrica hecha a este
aparato, incluyendo la cubierta, el interruptor, el motor, etc., debe set diagnosticada y reparada par un personal de servicio cualificado. Las piezas de
reemplazo en productos de doble aislamiento deber_m set id6nticas alas piezas que se est&n reemplazando. Los
aparatos de doble aislamiento, vienen
marcados con las palabras "doble aislamiento" o "aislado doblemente'. El
simbolo [] (cuadrado dentro de otto
cuadrado) puede tambi6n aparecer en
el aparato. De no permitir que sea el
personal de servicio de Sears quien
haga las reparciones a este aparato,
puede causar que la construcci6n de
doble aislamiento se convierta ineficaz y
resulten accidentes muy serios.
SEGURIDAD DEL APARATO Y SU
MANTENIMIENTO
• No coloque el aparato en ninguna superficie que no est_ limpia y que sea
s61ida mientras el aparato este en funcionamiento. Escombros como Io son
la gravilla, arena, polvo, hierba, etc.,
poddan ser recogidos par la toma de
aire y arrojados hacia afuera a trav6s
de la abe_tura de descarga, da_ando
el aparato, la propiedad o causando
serios accidentes a espectadores o al
usuario.
• No se incline demasiado o use en
superficies inestables como Io son
las escaleras, &rboles, vertientes
empinadas, techos, etc. Maneje con
sumo cuidado cuando est6 limpiando escaleras. Mantenga un pie firme
y balance todo el tiempo. Mantenga
las manos alejadas de los tubos.
• Inspeccione el aparato entero antes
de ponerlo en marcha, verifique piezas gastadas, sueltas, perdidas o
daSadas. No use us aparato hasta
que 6ste se encuentre en forma
apropiada para el trabajo.
• Este aparato cuenta con un doble aislamiento. Vea la secci6n de DOBLE
AISLAMIENTO. Haga que todo servicio
intemo sea desempe_ado por un personal de servicio cualificado para evitar el crear peligro o evitar anular la
garantia.
• Permita que todo mantenimiento
no
especificado en este manual del
usuario, sea desempe_ado
por su
Centre de Servicio Sears.
• Siempre vea su Centro de Servicio
Sears para cambiar el impulsor si
_ste se encuentra da_ado. Piezas
que est6n astilladas, rajadas, rotas o
daSadas de cualquier otro modo,
podrian ser arrojadas al aire en pedazos y ocasionar graves accidentes. Cambie todas las piezas
daSadas antes de usar su aparato.
14
• Nunca ponga ningOn objeto en la abertura de la toma de aire ya que esto
puede obstruir la circulaci6n de aire
y causar da_os al aparato.
• Nunca sumerja el aparato en agua u
otros liquidos o riegue con una manguera. Limpie el aparato usando un
trapo ht_medo. Seque el aparato con
un trapo limpio y seco. Vea la secci6n
MANTENIMIENTO.
• Examine las aberturas de la toma de
aire y los tubos frecuentemente,
siempre con el aparato apagado y
desconectado.
Mantenga los tubos y
respiraderos limpios de escombros
los que pueden acumularse y restringir la circulaci6n de aire apropiada.
• No queme, incenere o exponga este
aparato a calor extremo.
• Almacene su aparato desconectado
en un lugar alto, fresco, seco, en un
_trea interior y fuera del alcance de los
ni_os.
• Use solamente piezas de reemplazo
y accesorios recomendadas,
para
evitar crear peligro y/o anular la garantia.
• Mantenga el aparato de acuerdo con
los procedimientos
recomendados.
SEGURIDAD
DE LA SOPLADOR
• Use s61o a la luz del dia o en buena
luz artificial.
• Inspeccione el _trea antes de usar su
aparato. Retire todos los escombros
y objetos s61idos tales como piedras,
vidrio, alambre, etc., que el aparato
pueda arrojar o hacer rebotar, causando heridas o series da_os.
• Nunca ponga el aparato en marcha
sin antes tener todo el equipo pertinente unido. Cuando se usa como
soplador, instale siempre el tubo de
soplador. Use s61o los accesorios
recomendados.
No use con ninguna
de las aberturas bloqueadas. Mantenga libre de polvo, pelusa, pelo o
cualquier otra cosa que pueda reducir la circulaci6n del aire.
• Para evitar que el fuego se propague, no use la soplador cerca de
donde hay fuego de hojas secas o
de maleza, chimeneas, barbacoas,
ceniceros, etc.
• Nunca ponga objetos dentro del tube
de soplador; siempre dirija los escombros en direcci6n contraria a donde
personas, animales, cristal, y objetos
s61idos como son los _.rboles, autom6viles, paredes, etc., se encuentran. La fuerza de aire puede causar
que rocas, suciedad o varillas sean
arrojadas al aire o reboten, Io que
puede causar heridas a personas o
animales, romper cristales o causar
otros da_os.
• Nunca utilice para esparcir productos quimicos, abono, o cualquier otra
clase de substancia que pueda contener materiales t6xicos.
SEGURIDAD DE LA ASPIRADOR
• Detenga el motor y desconecte el
enchufe antes de abrir la compuerta
de entrada de aire o intentar introducir o remover los tubos del aspirador.
El motor debe detenerse completamente y las aletas de la helice no
deben girar para evitar serias heridas causadas per las aletas girantes.
• Objetos s61idos pueden ser arrojados a trav6s de la bolsa de colecci6n
o la caja y convertirse en misiles peligrosos que pueden causar heridas
serias al usuario o a otras personas.
• Cuando est6 usando el accesorio de
la aspirador, el aparato est,. dise_ado para recoger material seco como
son hojas, hierba, ramas peque_as y
pedazos peque_os de papel. No aspire piedras, gravilla, metal, vidrio
roto, etc., para evitar da_'ios severos
a la aspirador. Para evitar la posibilidad de cheque el6ctrico, no intente
aspirar agua u otros liquidos.
• Nunca ponga en marcha el aparato
sin unir el equipo apropiado. Cuando
se usa como aspirador, siempre
instale los tubos del aspirador y el
ensamblaje de la bolsa de colecci6n.
AsegOrese de que la cremallera de
la bolsa de colecci6n est6 completamente cerrada cuando el aparato
est6 en marcha para evitar que escombros sean arrojados al aire. Use
s61o los accesorios recomendados.
• Evite situaciones que puedan causar
incendio en la bolsa de colecci6n.
No aspire cerillas, cigarros, cigarrillos usados o cenizas de chimenea,
barbacoas o ceniceros, etc. Para evitar la propagaci6n de incendios, no
use cerca de donde haya fuego de
hojas secas o de malezas, chimeneas, barbacoas, ceniceros, etc.
• Siempre use la banda para el hombro de la bolsa de colecci6n cuando
este aspirando para evitar la p_rdida
de control.
• Examine las aberturas de la toma de
aire, el tubo en forma de code y los
tubos del aspirador frecuentemente,
siempre con el aparato detenido y el
15
enchufe desconectado.
Mantenga
los respiraderos y tubos limpios de
escombros los que pueden acumularse y restringir la circulaci6n de aire
apropiada. No utilice con ninguna de
las abertauras bloqueadas.
Mantenga libre de polvo, pelusa, pelo y cualquier otra cosa que reduzca la circulaci6n de aire.
CRITERIOS
Este producto est& enlistado per Underwriters Laboratories, Inc., de acuerdo con UL Standard 1017.
Si ocurrieran situaciones que no hayan sido cubiertas en este manual, tenga cuidado y use el buen sentido. Si
necesita ayuda, contacte su Centro de
Servicio Sears o Ilame al
-800-235-5878.
De no cumplir con
todas las Reglas y Precauciones de
Seguridad, podrian resultar accidentes
muy serios.
GUARDE ESTAS INSTRUCCIONES
CONTENIDO
DE LA CAJA
Modelo 358.748220
• Soplador
• Tubo de Soplador
• 2 Tubas de Aspirador
• Tuba en Forma de Codo
• Bolsa de Colecci6n
empQjelo hasta sentir que se haya fijado a presi6n correctamente
en la
posici6n de uso (el tubo es fijado por
el bot6n rojo para aflojar el tubo).
3. Para remover el tube, presione el
bot6n, afloje el tubo mientras se
suelta.
_ADVERTENCIA:
Detenga el motor y desconecte
e] enchufe antes de
abrir la compuerta de entrada de aire o
intentar introducir o remover el limitador
de entrada de aire, tubo de soplador o
tubos de aspirador. El motor debe detenerse completamente
y las aletas de
]a h61ice no deben girar para evitar serias heridas causadas por las aletas girantes.
,"',_'_-_t_
Boton Dara afloar e] tubo
/
Tubo
de]soplador
aparato ya armado, asegOrese de que
el aparato haya sido armado correctamente y que todos los fijadores se encuentren bien ajustados.
• Un destorniilador se requiere para el
montaje.
MONTAJE DEL SOPLADOR
AVlSO: Instrucciones de montaje para
el uso del aparato como aspiradora,
las hallar& inmediatamente
despu6s
de terminar esta secci6n.
Safida de soplador
MONTAJE DEL ASPIRADOR
AVISO: Instrucciones de montaje para
el uso de su aparato como soplador, las
instrucciones han sido explicadas en la
secci6n anterior.
Si usted ya ha montado el aparato para
el uso como soplador, remueva el tubo
del soplador.
Remueva el limitador de entrada de
aire
El limitador de entrada de aire es usado cuando el aparato se est& utilizando como soplador. Este limitador no se
usa cuando el aparato se utiliza como
aspirador y tiene que ser removido durante e] montaje para e] uso del aspirador.
lnstalacion
del tubo de la soplador
Si usted ya ha montado el aparato
para el uso come aspiradora, vea la
secci6n COMO CONVERTIR ELAPARATO DE USO DE ASPIRADOR A USO DE
SOPLADOR.
Para instalar el tubo de la soplador:
1. Alinee ]a ranuras del tubo del soplador con ]a ranuras en la salida de aire
del soplador.
2. Introduzca
el tubo del soplador
sabre
la salida
del soplador
y
AVISO: AsegQrese de mantener el limitador de entrada de aire para cuando
use el aparato como sopiador.
1. Asegure que e] aparato se pare y se
desconecte la cable de extensi6n.
2. Introduzca un destornillador
dentro
del &rea de la cerradura de la compuerta de] aspirador. Suavemente,
incline el mango del destornillador
hacia el frente de] aparato tirando
hacia arriba de la compuerta de aspirador con su otra mano.
_ADVERTENCIA:
Si recibi6
el
16
Vista
inferior
delaparato Area
dela
Tube
Superior
dela
_/- Mango
Auxiliar
_
i,'I,111
N IfAspirador
I
Compuerta de Aspirador (cerrado)
",.I.
J _%_L_._,_
.ro do,a
cerradura
4.
Compuerta de Aspirador (abierto)
3. Gire el limitador de entrada de aire hacia la izquierda (en sentido contrario al
de las agujas del reloj), y despeguelo
del aparato. No cierre la compuerta de
aspirador. Usted entonces introducir_t
los tubos del aspirador.
aspirador
Limitador!e'_/_/I
entrada de aire
lnstalacion
de los tubos de aspirador
La aspiradora cuenta con dos tubos,
un tubo superior y un tubo inferior. El
tubo superior ester cortado de forma
recta en ambas puntas y tiene una
mango auxiliar para aspirador en un
extreme.
El tube superior se introduce
al aparato del soplador. El tubo inferior
se introduce al tube superior, y ester
cortado en _.ngulo en la punta inferior.
Esta punta inferior apuntar_t hacia el
suelo durante el uso como aspirador.
1. Asegure que el aparato se pare y se
desconecte la cable de extensi6n.
2. Manteni6ndolo abierto la compuerta
del aspirador, coloque los ganchos
que se encuentran
en el mango
auxiliar en el poste de retenci6n del
aparato.
3. Gire el tube hasta que este fijo per el
cierre de compuerta del aspirador.
._
I
_-
_.]j Poste de Retenci6n
Introduzca el tubo inferior de la aspiradora al tubo superior de la aspiradora
pero primero alinee las flechas en ambos tubos. Luego, presione juntos ambos tubos hasta que el tubo inferior se
ajuste firmemente en el tube superior
(alrededor de 3 pulgadas).
Tube Superior
Tubo Inferior
]_ _'_'_"
Alinee las flechas en
_-_
el tubo superior y el
II 11
tube h_ferior
MONTAJE DE LA BOLSA DEL ASPIRADOR
1. Abra la cremallera en la bolsa de la
dora e introduzca eltubo en forma de
code.
2. Empuje la punta peque_a del tubo
en forma de codo por la abertura peque_a de la bolsa del dor.
AVlSO: AsegOrese de que el borde de
la abertura pequef_a de la bolsa se encuentre pegado a la parte en forma de
embudo del tubo en forma de codo, y el
orificio para que el tubo se suelte, el
bot6n se encuentra en la parte superior
de la tapa.
Tubo en forma
de code
Orificio
para el
boton
t
Abertura de
///-
cremallera
saliente
3. Cierra la cremallera
de la bolsa.
AsegOrese de que la cremallera se
encuentre completamente
cerrada.
4. Alinee la ranuras saliente del tubo en
formo de codo con la ranuras en la
salida de soplador.
17
5.
Introduzca el tube en formo de code
sabre
el salida
de soplador
y
empQjelo hasta sentir que se haya fijado a presi6n correctamente
en la
posici6n de usa.
AJUSTE DE LA BANDA DEL HOMBRO EN LA BOLSA DE COLECCION
1. Cuidadosamente,
enlace la banda
del hombro a traves de la hebilla
como se muestra en la ilustraci6n a
continuaci6n.
2. Remueva los tubos de aspirador.
Introduzca un destomillador dentro del
area del cerradura de la mango
auxiliar para aspirador. Suavemente,
incline el mango del destornillador hacia el frente del aparato tirando hacia
arriba de la mango auxiliar para aspiradar con su otra mano.
Area del cerradura
Ultimo en
pasar
Primero en
pasar
3.
2. Coloque el aparato en su lado derecho, con la salida de soplador y la
bolsa apuntando hacia detr&s. Sujete el aparato en posici6n vertical y
el tubo inferior del aspiradora en el
suelo para apoye.
3. Coloque la banda del hombro sabre
su cabeza y sabre su hombre izquierdo.
4. Ajuste la banda para permitir la circulaci6n libre de aire del soplador. Si la
bolsa de colecci6n se enrosca, el
aparato no funcionar&
apropiadamente.
AVISO: La banda ester dise_ada para
que la bolsa de colecci6n tome tal posici6n en su hombro sin enroscarse. La
banda no ha sido diseSada para sostener el peso del aparato.
Banda de hombro
hombro izquierdo
en
enrosca, se permitir_t
la circulaci6n libre de aire
COMO CONVERTIR EL APARATO DE
USO DE ASPIRADOR
A USO DE SOPLADOR
1. Detenga el aparato y desenchufe el
cable de extensi6n.
Instale el limitador de entrada de aire
que fue removido al armar el aparato
para use de aspirador.
AVlSO:
Si usted no puede Iocalizar el
limitador de entrada de aire, el aparato
seguir& funcionando.
Este limitador mejora la funci6n de soplador.
4. Remueva la bolsa de colecci6n.
5. Cierre la compuerta de aspirador y
asegOrese que tenga el cerrojo campletamente cerrado.
6. Vuelva a instalar los tubo del soplador. Yea INSTALACION DEL TUBO DE
LA SOPLADOR para instrucciones de
como unit estos accesorios.
ELIJA UN CABLE DE EXTENSION
Use s61o suministro de voltaje de 120
A.C. come se muestra en la placa en
el aparato, como recurso de energia.
El cable de extensi6n utilizado para
alcanzar el recurso de energia debe:
• Estar marcado especificamente para
el usa exterior. El cable debe estar
marcado con el sufijo '_#V-A" ("W" en
Canad&).
• Tener la fuerza suficiente para transportar energia desde el recurso de
energia todo al aparato. De otra
manera, p6rdida de energia y recalentamiento podrian ocurrir, causando daSo al aparato. Vea la tabla para
las recomendaciones
minimas de
calibre del cable. El cable debe venir
ya marcado con el calibre apropiado.
(Cables de extensi6n apropiados vienen disponibles). No utilice cables
m_ltiples.
• Estar en buena condici6n. El aislamiento del cable debe estar intacto
sin grietas o sin deterioro. Los enchufes no deben tener ninguna
serial de daf_o.
18
RECOMENDACIONES
PARA
CALIBRE
MINIMO
DECABLE
PRECAUClON:
El no utilizar
dor del cable puede ocasionar
aparato, al cable de extensi6n,
bas.
el seguidaSo a el
o am-
Enchufe
*Calibre
de Cable
Americano
Recept_tculo
Asegure el cable de extensi6n a su aparato roscando la cable a trav6s del seguidor del cable (vea la ilustraci6n).
Introduzca el recept&culo del cable de
extensi6n al enchufe embutido en el
aparato.
del
-i I _
Cablt=_ I1_
del cable de
Seguidor
extensi6n _
embutido
_
enelat 0
_P
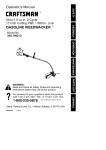
CONOZCA SU SOPLADOR ELECTRICA
LEA ESTE MANUAL DEL USUARIO Y LAS REGLAS DE SEGURIDAD ANTES DE PONEB
EN FUNCIONAMIENTO SU APARATO. Compare las ilustraciones a su aparato para
familiarizarse con la ubicaci6n de los diversos controles y ajustes. Guarde este
manual para uso futuro.
Bolsa de
collecci6n
Tubo en
forma de
codo
Poste de Retenci6n
Cerrojo de
Aspirador
para aflojar el tubo
Mango Auxiliar _ .(_,Y
para Aspirador -_
Tubo Superior
de Aspirador
Tubo de Soplador
Tubo Inferior
de Aspirador _/
_j
entrada
Umitador dedeaire
INTERRUPTOR
ON/OFF
El INTERRUPTOR ON/OFF se usa para
activar el motor.
CERROJO DE ASPIRADOR
El CERROJO DE ASPIRADOR es usado
para abrir y cerrar la compuerta de aspirador.
TUBO DE SOPLADOR
La TUBO DE SOPLADOR est& dise_ada
para dirigir la circulaci6n de aire.
/
/
=;;;;;;;==
LIMITADOR DE ENTRADA DE AIRE
La LIMITADOR DE ENTRADA DE AIRE
mejora la funci6n de soplador.
BOTON PARA AFLOJAR EL TUBO
La BOTON PARA AFLOJAR EL TUBO que
asegura el tubo de soplador o el tubo
en forma de codo de su aparato del soplador durante la operaci6n. Tambi6n,
presionando el bot6n permite el retiro
del tubo de soplador o el tubo en forma
de codo.
19
Dirija la circulaci6n del aire moviendo la
_ ADVERTENClA:UstedDEBEtubo
de soplador hacia aba o o hacia un
asegurarse
dequelostubes
seencuen- lade. Siempre aleje la circulacion de aire
trenseguros
antes
deusarelaparato. de objetos s61idos come son paredes,
grandes, vehiculos y cercas.
_ADVERTENOIA:Noutilicesu piedras
Limpie las esquinas comenzando
en la
unidad
sinantes
haberle
puesto
lostu- esquina y moviendose hacia afuera.
boso labolsa
decolecci6n
apropiada-Esto ayudar& a prevenir la acumulaci6n
mentesujeta
paraevitarqueescom- de escombros los que pueden ser arrobrosy/ocontacto
conlahelice
Ioque jades a su cara.
puede
acarrear
serios
accidentes.
Use
cuidadoso cuando este trabajando
siempre
protecci6n
paralosojospara Sea
cerca de plantas. La fuerza del aire
prevenir
queescombros
orocas
vuelen
daSar las plantas fr_tgiles.
o reboten
ensusojosy caraIoque puede
USO DE SU APARATO COMO
podria
causar
lap@dida
delavistaoac- ASPIRADOR
cidentes
muyserios.
DETENER
SUAPARATO
_ADVERTENCIA:
No aspire piePonga
elinterruptor
ON/OFF
enlaposi- dras, gravilla, metal, vidrio rote, etc.,
ci6nOFF.
para evitar daSos severos a la aspiradoPONER EN MARCHA SU APARATO
Su aparato tiene dos posiciones de
marcha, de baja velocidad (LOW) y alta
velocidad (HIGH). Coloque el interruptor en una de estas dos posiciones
para poner en marcha su aparato.
POSICION DE USO
Protecci6n de ojos
Protecci6n de ojos
Soplador
Aspirador
USO DE SU APARATO COMO
SOPLADOR
,I_ADVERTENClA:
Inspeccione
el
firea antes de usar su aparato. Retire todos los escombros y objetos s61idos tales
como piedras, vidrio, alambre, etc., que el
aparato pueda arrojar o hacer rebotar,
causando heridas o serios daSos.
Utilice su aparato come soplador para:
•Barrer escombros o recortes de hierba de caminos de entrada, aceras,
patios, etc.
• Soplar recortes de hierba, paja u hojas en montones, o para remover escombros de esquinas, alrededor de
uniones o entre ladrillos.
ra. Para evitar la posibilidad de cheque
el6ctrico, no intente aspirar agua u otros
liquidos.
Use su aparato como aspirador para recoger material seco como hojas, hierba,
ramas pequeSas y pedazos pequeSos
de papel.
• Para mejores resultados al usar la
aspiradora, activela en la m&s alta
velocidad.
• Mu6vase lentamente de un lado a
otro sobre el material que desea aspirar. Evite el forzar el aparato a recoger montones de desechos pues
esto podria obstruir el aparato.
• Para mejores resultados, mantenga
el tube de la aspirador una pulgada
m&s arriba del suelo.
_ADVERTENCIA:
Si el aparato se
atasca, detenga la unidad y desconecte
el cable de extensi6n. Espere a que las
h61ices se hayan detenido per completo,
entonces remueva los tubes de la aspiradora. Cuidadosamente, aclare el atasco
en la abertura de las aspiradora.
20
RESPONSABILIDAD
_,
DEL CLIENTE
ADVERTENCIA:
Desconecte del recurso de energ[a antes de dar mantenimiento a este aparato.
TAREA DE CUIDADO Y MANTENIMIENTO
CUANDO HACER
Verificar que no haya fijadores
flojos ni piezas sueltas
Vedfica que no haya piezas da_adas
Inspeccione
Remueva
o gastadas
y limpie el aparato y las placas
y vacia la bolsa de colecci6n
Limpiar la bolsa de colecci6n
RECOMENDAClONES
GENERALES
La garantia en este aparato no aplica
a los articulos sometidos al abuso o a
la negligencia del usuario. Para recibir
el valor completo de la garantia, el
usuario deber_t mantener el aparato
segOn las instrucciones en este manual. Ser_. necesario hacer varies ajustes
peri6dicamente
para mantener el aparato debidamente.
ANTES
DE CADA
USO
VERIFIQUE QUE NO HAYA FIJADORES FLOJOS NI PIEZAS SUELTAS
• Compuerta de Aspirador
• Tubo de Soplador
• Tubas de Aspirador
• Bolsa de Colecci6n
VERIFIQUE QUE NO HAY.& PIEZAS
DAI_IADAS O GASTADAS
El contacto su Centre de Servicio
Sears para el reemplazo de piezas
da_adas o gastadas.
• Interrupter ON/OFF - AsegQrese que
el interrupter funcione correctamente
movi6ndolo a la posici6n OFR Vea que
el motor se haya detenido; acto seguido, ponga el motor en marcha nuevamente y continue.
• Compuerta de Aspirador - No use el
aparato si el compuerta de aspirador
no puede trabar correctamente o si se
da_a de cualquier manera.
Antes de cada uso
Antes de cada usa
Despu_s de cada usa
Despu6s de cada use
Anualmente
DESPUES
DE CADA USO
INSPECCIONE Y MMPIE EL APARATO Y LAS PLACAS
Pare el aparato y desconecte el cable
de la extensi6n.
• Despu6s de cada use, inspeccione
el aparato completa para saber si
hay piezas flojas o da_adas.
Limpie
el aparato y las placas usando un
trapo hOmedo.
• Seque el aparato con un trapo limpio
y seco.
LIMPIE LA BOLSA DE COLECCION
IMPORTANTE:
LA BOLSA DE COLECCION DEBERA VACIARSE
APROPIADAMENTE.
• Se necesitar_t limpiar y mantener
a.p,ropiadamente
la bolsa de colecclon para evitar el deterioro y la obstrucci6n de la circulaci6n de aire.
• Remueva la bolsa de colecci6n del
aparato y vaciela despues de cada
use. No almacene la bolsa de colecci6n Ilena (hojas, hierba, etc.).
• Lave la bolsa una vez al aSo. Remueva la bolsa de la soplador y volvi6ndola al rev6s. Lave la balsa con
una manguera de agua. AsegQrese
que la balsa est6 completamente
seca antes de volverla a usar.
21
REMOVER
DE AIRE
OBJETOS
DE LA TOMA
_ADVERTENCIA:
Detenga el motor y desconecte
el enchufe antes de
abrir la compuerta de entrada de aire. El
motor debe deteneree completamente y
lae aletas de la helice no deben girar
para evitar eerias heridae caueadae por
lae aletas girantes.
• Mientrae sostiene la compuerta de aspirador abierta, remueva los tubes de
aspirador. La compuerta de aepirador
debe ser abierta durante los pasos siguientes.
• Cuidadosamente,
alcance la abertura
de la aspirador y aclare el &rea de la
toma de aire. Limpie todos los escombros de] h61ice.
_I_ADVERTENCIA:
Realice los siguientes pasos despu6s de cada uso:
• Detenga el motor y desconecte el
enchufe.
• Guarde el aparato en una Iocalizaci6n
estable. Asegure el aparato antes de
transportarlo.
• Guarde el aparato con todos sus
protectores en su debido lugar. Ponga el aparato en una posici6n tal que
no pueda causar ning0n accidente.
• Guarde su aparato completamente
fuera del alcance de los niSos.
ESTACIONAL
ALMACENAJE
Prepare el aparato para el almacenaje
al final de la temporada o siva estar
sin usar por m&s de 30 dias.
Siva guardar el aparato durante un
periodo largo:
• Detenga el motor y desconecte
el
aparato de la recurso de energia,
• Limpie el aparato por completo antes
del almacenaje.
• Examine que las h61ice no se hayan
roto ni quebrado. Si se hubieran dat_ado o quebrado, no use el aparato,
haga que su Centro de Servicio Sears
las reemplace. No intente reemplazarlas usted mismo.
PIEZAS DISPONIBLES
Tube de Soplador
......
530403765
Tube en Forma de Codo.
530403769
Tubo Superior de Aspirador/
Mango Auxiliar & Tubo
Inferior de Aspirador
....
530403989
Limitador de Entrada
de Aire ................
530403791
Bolsa de Colecci6n .....
530095599
Estuche para Canales...
71-79970
Anteojos de Seguridad
.. 71-85707
Cable de Extensi6n .....
71-85709
•
•
•
•
22
Abra la compuerta de aspirador y limpie la suciedad, hierba o escombros
que se hayan coleccionado.
Inspeccione la soplador y todos sus tubos.
Cierre y asegOrese que el cerrojo de
la compuerta
est6 completamente
cerrado.
Limpie de escombros los respiraderos y la toma de aire.
Si es posible, almacene su aparato y
el cable de extensi6n en un &rea cubierta y bien ventilada, para evitar la
acumulaci6n de polvo y de suciedad.
No cubra con un pl&stico. El pl&stico
no respira y puede causar condensaci6n y eventualmente corrosi6n o enmohecimiento.
Examine
el aparato
entero
en
bOsqueda de tornillos.
Reemplace
todas las piezas que est6n daSadas,
gastadas o rotas.
TABLA DIAGNOSTICA
,_
ADVERTENCIA:
Siempre detenga el motor y desconecte el enchufe
antes de hacer cualquiera de las reparaciones
recomendadas
a continuaci6n excepto reparaciones
que requieran que la aparato en operaci6n.
PROBLEMA
CAUSA
SOLUCION
El aparato
falla al intento de
1. El interruptor estA en la
posici6n OFR
2. El cable de extensi6n est&
desconectado.
3. El circuito del interruptor
autom&tico est& apagado o el
fusible est& fundido.
4. Falla mec&nica.
1. Mueva el interruptor a la
posici6n ON.
2. Vuelva a conectar el cable
de extensi6n.
3. Fije de nuevo el circuito del
interruptor automb, tico o el
fusible.
4. Entre en contacto con el
Servicio Sears (vea parte
trasera del manual).
El aparato
vibra de
forma anormal.
1. Falla mec&nica.
1. Entre en contacto con el
Servicio Sears (vea parte
trasera del manual).
La h&lice
no gira libremente.
1. Hay escombros en el &rea
de entrada de aire.
2. Falla mec&nica.
1. Limpie su aparato. Remueva
todo tipo de escombros.
2. Entre en contacto con el
Servicio Sears (vea part
trasera del manual).
USO.
23