1
Owner's Manual
ICRRFTSMRN+I
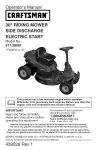
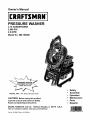
PRESSURE
WASHER
3.75 HORSEPOWER
2,000 PSI
2.0 GPM
Model No. 580.752000
HOURS:
•
•
•
•
•
•
Mon. - FrL 8 a.m. to 5 p.m. (CT)
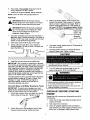
CAUTION:
Before using this product,
read this manual and follow all Safety
Rules and Operating Instructions.
SEARS,
ROEBUCK
and CO.,
Hoffman
Estates,
visit our Craftsman website: www.sears.com/craftsman
Part No. 191809GS
Draft 4 (01/2212004)
IL
60179
U.S.A.
Safety
Assembly
Operation
Maintenance
Parts
Espa_ol
01!!1!1!
WARRANTY
....................................
SAFETY RULES
ASSEMBLY
OPERATION
2
2-4
TROUBLESHOOTING
...................................
6-7
REPLACEMENT
.................................
8-10
MAINTENANCE
...............................
STORAGE .....................................
..............................
SPECIFICATIONS
LIMITED
16
18-22
23
ESPANOL ...................................
11
WARRANTY
............................
PARTS .......................
EMISSION CONTROL WARRANTY .................
11-14
...............................
15
24-39
HOW TO ORDER PARTS ................
ON CRAFTSMAN
PRESSURE
BACK PAGE
WASHER
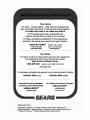
For one year from the date of purchase, when this Craftsman pressure washer is maintained and operated
according to the instructions in the owner's manual, Sears will repair, free of charge, any defect in material and
workmanship.
if this washer is used for commercial purposes, this warranty applies for only 90 days from the date of
purchase, if this pressure washer is used for rental purposes, this warranty applies for only 30 days after date
of purchase.
This warranty does not cover:
Expendable items such as spark plugs or air filters, which become worn during normal use.
Repairs necessary because of operator abuse or negligence, including damage resulting from no water
being supplied to pump or failure to maintain the equipment according to the instructions contained in the
owner's manual.
Warranty service is available by returning the pressure washer to the nearest Sears service center or dealer in
the United States.
This warranty gives you specific legal rights and you may also have other rights, which vary from state to state.
Sears, Roebuck
,_
and Co., Dept. 817WA,
Hoffman
Estates,
IL 60179
This isallthe
safetymessages
alert symbol.
It is used
alert you
to potential
personal
injury
hazards.
Obey
safety
that follow
this tosymbol
to avoid
possible
injury or
death.
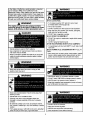
Hazard Symbols
_Read familiarthis
manual
become
with
your carefully
pressure and
washer.
Know its
applications, its limitations, and any hazards
involved.
The safety alert symbol (,_k) is used with a signal
word (DANGER, CAUTION, WARNING), a pictorial
and/or a safety message to alert you to hazards.
DANGER indicates a hazard which, if not avoided, will
result in death or serious injury. WARNING indicates a
hazard which, if not avoided, could result in death or
Toxic
Fire
Moving Parts
2
Electrical Shock
Fumes
Slippery Surface
serious injury. CAUTION indicates a hazard which, if
not avoided, might result in minor or moderate injury.
CAUTION, when used without the alert symbol,
indicates a situation that could result in equipment
damage. Follow safety messages to avoid or reduce
the risk of injury or death.
and Meanings
Fall
Explosion
Flying Objects
Fluid Injection
Hot Surface
Kickback
WARNING
n the State of California a spark a_rester is required
_y law (section 4442 of the california
Public
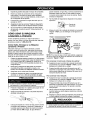
WHEN ADDING FUEL
,Turn
pressure washer OFF and !et it ceo! at least
2 minutes before removing gas oap.
, Fill fuel tank eutdoersi
WARNING
The engine exhaust from this product contains
chemicals known to the State of California to cause
cancer, b rth defects, or other reproduct ve harm,
,DO
NOT overfill tank. A!!ow space for fuel expansion.
Keep fuel away ftorn spark&open
heat; and ether ignitien seur_;
DANGER
flamesi pilot lightsi
DO NOT light a cigarette or' smoke.
WHEN OPERATING EQUIPMENT
, DO NOT tip engine or equipment
fuel to spill
at ang!e which _auses
,DO NO]- Spray flammable liquids
WHEN TRANSPORTING OR REPAIRING EQUIPMENT
, Transpert#epeir with fuel tank EMPTY
Valve
OFF.
• Operate pressure washer ONLY outdoor&
WHEN STORING FUEL OR EQUIPMENT wrrH FUEL IN
TANK
• Use a respirator or mesk whenever there is a _hance
that
vapors may be inhaled;
,Store away frem furnase% stoves; water heaters, clothes
dryers Or other appliances that have pilot light Or other
ignition source because they can ignite fuel Vapors.........
• Read all instructions pocked with mask so you are certain
mask
wil! provide necessary protection against inhaling
harmful
vapors;
WARNING
WARNING
WARNING
• Keep spray nozzle between 8 to 24 inches away from
cleaning
• Operate this unit on a stable surfacei
• Cleaning area should have adequate slopes and
drainage
to reduce possibility of fails due to slippery
surfacesi
, Be extremely carefu! if you must use pressure washer
from
a ladderi S_!ding
on any other relatiyely unstable
Iocetiom
, DO NOT touch hot surfaces:
• Slay clear of exhaust gases,
NEVER move equipment while operating
, F!rmly grasp spray gun with both hands when using high
Pressure spray to avoid injury if gun kicks b_ck.
• Allow equipment
3
to cool before touching
WARNING
CAUTION
WARNING
CAUTION
CAUTION
contact Searsi
WARNING
NEVER operate units with br0ken or missing parts; 0r
without protective housing or covers;
• DO NOT by--pass any sefety device on this machine
• Always wear eye protection _n
in vicinity of equipment in use,
,Before
starUng pressure washer in cold weatheri check
a!l parts of the equ!pment to be sure ice has not formed
there
using equipment or when
NEVER move machine by pu!l!ng on high pressure hose,
Use handle provided on unit,
• Che0k fuel system for leaks or signs o_ deterioration,
pongy hceei loose or missing
_
CAUTION
• DO NOT operate pressure washer above rated pressurei
4
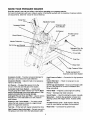
KNOW YOUR PRESSURE
WASHER
Read the owner's manual and safety rules before operating your pressure washer,
Compare the illustrations with your pressure washer to familiarize yourself with the locations of various controls
and adjustments. Save this manual for future reference.
$ ray Gun.............
Adjustable Nozzle
Ex_enSion With
Accessory
Cleaner
l"hrottle control
el! Fill Cap and Dipstick ..........
Detergent Pic_:-Up
I'ube and Filter
Primer Bulb
Fue!Cap
Wa_e r Inlet
High Pressure Outl_
_mp equipped with
Automatic Cool Down system
Accessory Holder, provides convienant storage for
High Pmesure Outlet _ c0nn_i0n
for high preSsUre
spray gun, _urbo wand and nozzle extension ...................... hosei...................................................
Adjustable Nozzle _ Adjust for high or low pressure;
narrow or faR s_ray,
N0zzle ]ExtensiOn _ Attach t_ spray gun to use
adjustable nOzzlei
Air Clesner _ Dry type filter element iimits the
amount of dir_ and_dLIstthat gets in the engine:
OilFi!! Cap and Dipstick- Check and f!!l engine with
el! herei See page 6 foroi I recommendations and
filling instructions
.......
......
Primer Bulb_ Prepares a co!d engine for starting. ......
Automatic Cool D0wn System _ cycies water
through pump when water reaches !2.5=,!55=F. Warm
water will discharge from pump onto ground This,
Pump _ Dove Iops high ware r p ressure
.......
...... ........................
system preven_ internal pump damage_
.....................................................................................
.......
....................................................
_.............
Recoil Starter _ Used f°r' starting the engine manually
Dete r........
gent Piek-Up
Tube and Filter- Used to slphon
......................
detergent
....
from
.... chem ca bert e to the ow pressure
.....
Spray....Gun - C0ntrols the applicati0n 0f water Oht0 .....
Water stream.
€!eanmg SUrface w!th tr!gger dev=ca !ncludes Safety
latch.
Extension with Turbo Nozzle _ The turbo nozzle ......................... _ ........................ .. ....................... . ..................
rotates the high pressure strea_ in a rapid circular
Thr°tt! e _0ntr01 Lever-_ets
engine in smrting
pa_ern for aggr0ssive Cleaning
m0do for re_il star_e_an d StoPS running engine •
Fuei Cap -Fill fuel tank Wi_ roguiai uni0ad0d fuel her0.
war er !nlet _ c0nnect-i0n for garden hose •
High Pressure Hose (not shown)- connect one end_
the spray gu n and Otherendte the high preSSure Outlet.
5
Yourpressure washer
requires some assembly and is
ready for use only after it has been properly serviced
with the recommended oil and fuel.
If you have any problems with the assembly of
your pressure washer, please call the pressure
washer helpline at 1-800-222-3t36.
IMPORTANT: Any attempt to run the engine before it
has been serviced with the recommended oil will result
in an engine failure.
REMOVE PRESSURE
FROM CARTON
2.
Place nozzle extension, turbowand and spray gun
into holder.
WASHER
Open carton and slice two corners opposite guide
handle from top to bottom so the panel can be
folded down flat.
Remove fillers, accessories and parts bag shipped
with your pressure washer.
Remove the pressure washer out the open end of
the carton.
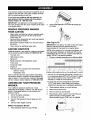
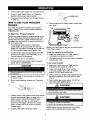
Add Engine Oil
IMPORTANT: Any attempt to crank or start the engine
before it has been properly serviced with the
recommended oil may result in an engine failure,
Check carton for additional loose parts.
CARTON
CONTENTS
NOTE: When adding oil to the engine crankcase, use
only high quality detergent oil rated with API service
classification SF, SG, SH, SJ or higher rated SAE 30
weight, DO NOT use special additives,
1. Choose a viscosity according to the following table.
Check all contents, If any parts are missing or damaged,
cell the pressure washer helpline at t-800-222-3136,
The main unit
High pressure hose
Spray gun
Nozzle extension with adjustable nozzle
Turbo wand
Accessory holder
Engine oil
Parts bag (which includes items listed below)
Owner's manual
STARTING TE_ FERATURE RANGE AINTICI PATE E) BEFORE NEXT OIL CHANGE
Registration card
Become familiar with each piece before assembling
the pressure washer. Compare contents against the
view on page 5. If any parts are missing or damaged,
call the pressure washer helpline at 1-800-222_3136.
* The use of multi-viscesiN oils (5W-30, 10W-30, etc.)
in temperatures above 40=F (4=C) will result in higher
than normal oil consumption. When using a multiviscosity oil, check oil more frequently.
ASSEMBLING
WASHER
** If using SAE 30 oil in temperatures below 40=F
(_=C), it will result in hard starting and possible
engine bore damage due to inadequate lubrication.
YOUR PRESSURE
Your Craftsman pressure washer was mostly
assembled at the factory, However, you will need to
perform these tasks before you can operate your
pressure washer:
1. Add oil to engine crankcase.
2. Add fuel to fuel tank.
3.
4.
Connect high pressure hose to spray gun and
pump.
Connect water supply to pump.
Attach
1,
Accessory
Holder
Place accessory holderonto top of handle,
6
2.
3.
Place pressure washer on a level surface.
Clean area around oil fill.
4.
Remove oil fill cap and dipstick.
5.
Wipe dipstick clean, insert it into oil fill hole and
tighten securely, remove dipsticK. Add
recommended oil up to "Fall" mark on dipstick.
6.
Pour slowly. Wipe dipstick clean each time oil
level is checKed. DO NOT overfill.
7.
Install oil fill plug and dipstick, tighten securely.
NOTE: ChecK oil often during engine breaK-in.
Add
Fuel
,
,_
WARNINGt
fill fuel
tank is
indoors.
NEVER fill fuelNEVER
tanK when
engine
running or
hot. DO NOT smoKe when filling fuel tank.
,_
WARNINGt
NEVER
tank completely
full. Provide space
for fill
fuelfuel
expansion.
Wipe
away any fuel spillage from engine and
equipment before starting.
1.
Use clean unleaded automotive fuel and store in
approved, clean, covered containers. Use clean fill
funnels. NEVER use ::stale"fuel left over from last
season or fuel stored for long periods.
2.
Clean area around fuel fill cap, remove cap.
3.
Slowly add fuel to fuel tank. Use a funnel to
prevent spillage. Fill tank to about 1.5" below the
top of the filler necK.
_,_
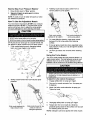
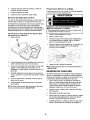
4.
Before connecting garden hose to wa1:erinlet,
inspect inlet screen. Clean screen if it con1:ains
debris or have it replaced if damaged. Refer to
section =O-Ring Maintenance" if inlet screen is
damaged. DO NOT run pressure washer if inlet
screen is damaged. NEVER siphon inlet water.
Inspect inlet
screen. DO
NOT use if
damaged;
clean if dirty.
4.
Run wa1:erthrough garden hose for 30 seconds to
flush out any debris.
5.
Connect garden hose (net 1:oexceed 50 feet in
length) to water inlet. Tighten by hand.
CAUTION
Fuel
Install fuel cap and wipe up any spilled fuel.
IMPORTANT: It is imporl:ant 1:oprevent gum deposits
from forming in essential fuel system parts, such as the
carburetor, fuel filter, fuel hose or tank during s1:orage.
Also, experience indica1:esthat alcohol-blended fuels
(called gasohol, ethanol or methanol) can attract
moisture, which leads to separation and formation of
acids during storage. Acidic gas can damage the fuel
sys1:em of an engine while in storage.
6.
Turn ON water and squeeze trigger on gun to
purge pump system of air and impurities.
WARNING
To avoid engine problems, the fuel sys1:em should be
emptied before storage of 30 days or longer. See
=Storage" on page 15. NEVER use engine or
carbure1:or cleaner products in the fuel 1:anKor
permanent damage may occur.
Connect
Hose
and Water
Supply to Pump
_aringadequate
IMPORTANT: To avoid pump damage, you must
assemble the nozzle extension to the spray gun and
attach all hoses before you start the engine.
1. Uncoil high pressure hose and attach one end of
hose to base of spray gun. Tighten by hand.
CHECKLIST
ENGINE
BEFORE
STARTING
Review the unit 1:oensure you have performed all of
the following:
1. Check that oil has been added to proper level in
engine crankcase.
2.
3.
2.
eye protection.
Attach other end of high pressure hose to high
pressure outlet on pump. Tighten by hand.
7
Add proper fuel 1:ofuel tanK.
Check for properly tightened hose connections
(high pressure and water supply) and there are no
kinks, cuts, or damage to high pressure hose.
Provide proper water supply (not 1:oexceed 100°F).
5.
,
Be sure 1:oread =Safety Rules" and ::Opera1:ion"
sections before using pressure washer.
If s1:arting unit after s1:orage, see ::S1:orage"section
on page 15.
HOW TO USE YOUR PRESSURE
WASHER
,
If you have any problems operating your pressure
washer, please call the pressure washer helpline at
1-800-222-3136.
To Start Your Pressure
Fast
,
4.
Stop
Washer
Threttle
Leverin
STOP
To el:art your engine-powered pressure washer for the
first time, follow these instructions step-by-step. This
s1:arting information also applies whenever you start
the engine after you have let the pressure washer sit
idle for at leas: a day.
1. Place pressure washer near an outside water
source capable of supplying water at a flow rate
greater than 3.0 gallons per minute and no less than
20 PSI at pressure washer end of garden hose.
2,
Move throttle lever to =Fast" position, shown here
as a rabbit.
position
NOTE: For a warm engine, be sure the throttle lever is
in the =Fast" position.
Check that high pressure hose is tightly connected
1:ospray gun and pump. See "Assembling Your
Pressure Washer" for illus1:ra1:ions.
To start the engine for the very first time:
Make sure unit is in a level position.
11. Push primer bulb firmly 5 times, waiting 2 seconds
between each push.
10. Make sure throttle lever is in ::Fast" position
(indice1:edon the engine as a rabbit).
Connect garden hose to wa1:erinlet on pressure
washer pump. Turn ON water.
To start engine thereafter:
10. Make sure throttle lever is in ::Fast" position
(indice1:ed on the engine as a rabbit).
CAUTION
11. Press primer bulb firmly 3 times, waiting
2 seconds between each push. For a warm
engine, DO NOT press primer bulb.
5.
Squeeze trigger on gun to purge pump system of
air and impurities.
12. Grasp s1:arter grip handle and pull slowly until you
feel some resistance. Then pull rapidly to start
engine.
6.
Attach nozzle extension to spray gun. Tighten by
hand.
13. Return s1:arter grip handle slowly. DO NOT let
rope =snap back" against starter.
\\
CAUTION
\
7,
8.
Position nozzle in low pressure mode (slide nozzle
forward) and squeeze trigger on spray gun to
relieve pressure caused by turning ON wa1:er.
Water will flow out of gun in a thin stream.
Continue to hold trigger until there is a s1:eady
stream of water and no air remains in system.
Release trigger.
CAUTION
NOTE: Always _:eep the throttle lever in the =Fast"
position when operating the pressure washer.
Engage safety latch 1:ospray gun trigger.
8
How
1.
2.
to Stop Your
Pressure
3.
Washer
Move throttle lover to "Stop" position.
Squeeze trigger on spray gun to relieve
pressure in hose,
Rotating nozzle adjusts spray pattern from a
narrow pattern to a fan pattern.
NOTE: A small amount of water will squirt out when
you release the pressure.
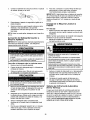
How To Use the Adjustable
Nozzle
You now should Know how to START your pressure
washer and how to STOP it. The information in this
section will tell you how to adjust the spray pattern
and apply detergent or other cleaning chemicals.
CAUTION
Twist no>71e counterclockwise
for fan Pattern
Twist nozzle ¢!o¢_ise for
narrow spray pattern,
• NEVER adjustspray pattern when spraying.
• NEVERput handsin front of nozzle toadjust spray p_tern
4.
On the end of your spray gun is a nozzle handle that
can adjust the spray pressure and the spray pa_ern.
1. Point nozzle toward ground, disengage safety
latch, and press trigger to l:est pa_ern.
For most effective cleaning, Keep spray nozzle
between 8 to 24 inches away from cleaning
surface.
5.
If you get spray nozzle too close, especially using
high pressure mode, you may damage the surface
being cleaned.
6.
DO NOT get closer than 6 inches when cleaning
tires.
Using the Turbo
Nozzle
The turbo nozzle rotates the high pressure stream in a
rapid circular pattern. The high pressure spray is most
effective when the tip of the nozzle extension is held
between 8 to 24 inches from the surface being cleaned.
CAUTION
hiddenarea.
2.
To attach the turbo nozzle to the spray gun:
1, Engage safety latch to spray gun trigger,
Sliding nozzle forward and bacK adjusts spray
pressure.
Siide nozzie backward
high pressurem0dei
Slide nozzle f0P,_vatd
for I_
p_essure mode and
detergent app!i_tion.
2.
Remove the nozzle extension from the spray gun,
if attached.
3.
Attach the turbo nozzle extension to spray gun.
_.
Disengage
5.
Always start the turbo nozzle at a disl:anca,
gradually getting closer to the surface until you get
the cleaning force you want.
safety latch to spray gun trigger.
NOTE: Detergent cannot be applied with turbo nozzle.
9
Applying
Detergent
with Adjustable
Pressure
Nozzle
IMPORTANT: Use chemicals designed specifically for
pressure washers. Household detergents could
damage the pump.
NOTE: You can also stop detergent flow by removing
detergent siphoning tube from container.
2. Keep spray gun a safe distance from area you
plan to spray.
WARNING
To apply detergent, follow these steps:
1. Review use of adjustable nozzle.
2.
Prepare detergent solution as required by job.
3.
Place filter end of detergent siphoning tube into
detergent container.
,Keep
CAUTION
_r_
Ira
Slide adjustable nozzle forward to low pressure
mode. Detergent cannot be applied with nozzle in
high pressure position.
MaKe sure garden hose is connected to water
inlet. Check that high pressure hose is connected
to spray gun and pump. Start engine.
6.
Apply detergent to a dry surface, starting from
bottom and working up.
8.
b_een 8 t024 inches away from
€leaningtrace
5.
7.
Sp!ayn_le
, Operate this unit on a stable surface:
, Be extremely careful is you must use the pressure
washer from a !adderi scaffo!djng or any other relatively
.... Unstableiocatien........................................................
............ ......
Firrn!y graS#SpraygunWith b°th hands when us!nghigh
pressure spray to ayoid injury if gun kicks back.
', When inserting the fi!ter into a detergent solution bottle,
route the tube s0 as t0 keep it fr0m inadvertently
c0nta_ing _e hot raUffler.
4.
Rinsing
For Rinsing:
1. Slide nozzle backward to high pressure, press
trigger and wait for detergent to clear.
CAUTION
Imlm_mM_llgJm
_'{'dil"_[ttlim m
/
lIE IIEaiI/
Washer
3.
Apply a high pressure spray to a small area, then
check surface for damage. If no damage is found,
it is okay to continue cleaning.
Start at top of area to be rinsed, working down
with same overlapping strokes as you used for
washing and applying detergent.
Automatic
(Thermal
Allow detergent to =soak in" for 3-5 minutes before
rinsing. Reapply as needed to prevent surface
from drying.
Cool
Relief)
Down
System
If you run the engine on your pressure washer for
3-5 minutes without pressing the trigger on the spray
gun, circulating water in the pump can reach
temperatures above 125=F. The system engages to
cool the pump by discharging the warm water onto
the ground.
For washing, start at lower portion of area to be
washed and work upward, using long, even,
overlapping strokes.
IMPORTANT: You must flush the chemical injection
system after each use by placing the filter into a clean
bucket of water and running the pressure washer in
low pressure for 1-2 minutes.
10
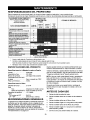
OWNER'S
RESPONSIBILITIES
Follow the hourly or calendar intervals, whichever occurs first.
More frequent service is required when operating in adverse conditions noted below.
MAINTENANCE
SCHEDULE
I
FILLIN DATESAS YOUCOMPLETE
REGULAR
SERVICE
HOURI-YOPERATING
Before
EV_
Usel
PRESSURE
i
INTERVAL
25
¥_y
EVe_50
sERvicE DATES
Every 100
I YearlyI Yearly
WASHER
Pur_epumpofair andContaminants
Change purep Qii
mmmm_mmmmmm
ENGINE
I
ChgPk 0il !e_e!
Charge engine _il
x
_
X
I
I
i
]
I
I
Servi_ sparkplug
If unit !St0 remain id!e for
I
=
ongerthan 30days.
(
Cleonif clogged. Replace if perforated
ortorn.
Changeoilafter thefirst (5) operating hoursandevery50 hoursor yearly thereafter.
Change sooner when operating under dirty or dusty conditions.
Replacemoreoftenunderdirty or dusty conditions.
PRODUCT
Pressure
SPECIFICATIONS
Washer
All service and adjustments should be made at least
once each season. Follow the requirements in the
=Maintenance Schedule" chart above.
Specifications
Pressure .......................
FlowRate ......................
Chemical Mix ....................
2,000 PSI
2.0 GPM
Use as directed
Water Supply Temperature .........
Not to exceed 100°F
Shipping Weight .................
48 Ibs,
NOTE: Once a year you should clean or replace the
spark: plug and replace the air filter. A new spark plug
and clean air filter assure proper fuel-air mixture and
help your engine run better and last longer.
If equipped with inflatable tires, _eep the air pressure
at the value marked on the tire or within 15 and 40 psi.
Engine Specifications
Rated Horsepower.................
Spark PlugType:
Resistor ....................
Set Gap To: ...................
Fuel Capacity....................
Oil
Above 40+:F ..................
0+F- 40+F ....................
GENERAL
BEFORE
3.75 HP
EACH USE
1.
Check engine oil level.
2.
3.
Check water inlet screen for damage.
Cheek in-line filter for debris.
1.0 Quarts
4.
5.
Cheek high pressure hose for leaks.
Cheek chemical filters for damage.
SAE 30
SAE 5W-30 or 10W-30
8.
Cheek gun and nozzle extension assembly for
leaks.
7.
Purge pump of air and contaminants.
ChampionRJ-19LM
0,030 inches(0.76turn)
RECOMMENDATIONS
The pressure washer warranty does not cover items
that have been subjected to operator abuse or
negligence. To receive full value from the warranty,
the operator must maintain pressure washer as
instructed in this manual including proper storage as
detailed in =Storage" on page 15.
Some adjustments will need to be made periodically to
properly maintain your pressure washer.
PRESSURE WASHER
MAINTENANCE
Check
and Clean
Inlet
Screen
Examine garden hose inlet screen. Clean if it is
clogged or replace if it is torn.
11
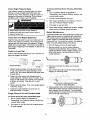
Check High Pressure
To remove contaminants from the pump, follow these
steps:
1. Set up pressure washer as described in
::Assembling Your Pressure Washer" section, and
connect water supply.
Hose
High pressure hoses can develop leaks from wear,
kinking, or abuse. Inspect hose before each use.
Check for cuts, leaks, abrasions, bulging of cover, or
damage or movement of couplings. If any of these
conditions exist, replace hose immediately.
WARNING
2.
Remove nozzle extension from gun.
3.
Start engine according 1:oinstructions in =How To
Use Your Pressure Washer" section.
4.
Pull trigger on gun and hold.
5.
When water supply is s1:eadyand cons1:ant, engage
safety la1:chand refes1:ennozzle extension.
Nozzle
pressure rating 0f Unit,
Check Gun and Nozzle
A pulsing sensation felt while squeezing the spray gun
trigger may be caused by excessive pump pressure.
The principal cause of excessive pump pressure is a
nozzle clogged or restricted with foreign materials,
such as dirt, e1:c.To correct the problem, immedia1:ely
clean the nozzle following these ins1:ructions:
Extension
Examine hose connection to gun and make sure it is
secure. Test trigger by pressing it and making sure it
springs back inl:o place when you release it. Engage
safety lal:ch and test trigger. You should not be able to
press trigger. Replace gun immediately if it fails any of
these tests.
Check
In-Line
1. Shut off engine and turn off water supply.
2. Remove nozzle from end of nozzle extension.
Separa1:e nozzle extension from spray gun. Twist
nozzle clockwise to stream position. Using a 2ram
(5/64) allen wrench, remove orifice from end of
nozzle extension.
Filter
Refer to the illustration and service the in-line filter if it
becomes clogged, as follows:
N0zzle extension
O-ring
=
3. Remove in-line filter from other end of nozzle
extension.
1. De1:achnozzle extension from gun and remove
o-ring and screen from nozzle extension. Flush
screen, gun, and nozzle extension with clean water
to clear debris.
4. Use a small paper clip to free any foreign material
clogging or restricting orifice.
2. Place in-line fil1:er screen into threaded end of
nozzle extension. Direction does not matter. Push
screen in with eraser end of pencil until it rests fiat
at bottom of opening. Take care not to bend
screen.
Insertwireint00rificoandtumback
and forth t0 Clear 0bstructi0ni
3. Place o-ring into recess. Push o-ring snugly against
in-line filter screen.
5. Using a garden hose, remove additional debris by
back flushing wa1:er through nozzle extension. Back
flush belween 30 to 60 seconds. Turn adjustable
nozzle extension to stream spray and move nozzle
from low to high while flushing.
4. Assemble nozzle extension to spray gun, as
described earlier in manual.
Purge Pump of Air and Contaminants
To remove air from the pump, follow these steps:
1. Set up pressure washer as described in
::Assembling Your Pressure Washer" section and
connect water supply.
2.
Maintenance
Pull trigger on gun and hold until a steady stream
of water appears.
12
6.
ENGINE MAINTENANCE
Reinstall orifice and in-line filter inl:o nozzle
extension. DO NOT overtighl:en orifice with allen
wrench.
Checking
7. Reconnect nozzle extension 1:ospray gun.
8. Reconnect wa1:ersupply, turn on wa1:er,and s1:art
engine.
Changing
9. Test pressure washer by operating nozzle in high
and low positions.
O-Ring
Oil
Level
Oil level should be checked prior to each use or at leas1:
every 8 hours of operation. Keep oil level main1:ained.
Oil
Change engine oil after the firs1:5 hours and every
50 hours thereafter. If you are using your pressure
washer under extremely dirty or dusty conditions, or in
extremely hot weather, change oil more often.
Maintenance
Purchase an O-Ring Repair Kit, i1:emnumber 7175116,
a1:your local Sears or by calling 1-800-366-PART or
online at www.ssers.com. It is not included with the
pressure washer. This kit includes replacement o-rings,
rubber washer and water inlet filter. Refer to the
ins1:ructionshee1:provided in the kit to service your units
o-rings.
CAUTION
Pump Maintenance
KEEP OUT OF REACH OF CHILDREN.
DON'T POLLUTE. CONSERVE
Changing Pump Oil
Change oil every 50 hours or once yearly, whichever
occurs first.
_
NOTE: You must purchase a premeasurad bottle of
pump oil, i1:emnumber 19C586GS, by calling
1-800-366-PART or online at www.sears.cem.
Change oil while engine is still warm from running,
as follows:
Change pump oil as follows:
1. Drain engine oil and fuel from pressure washer.
2.
Use a 8ram allen wrench to remove black pump
oil cap between high pressure outle1:and garden
hose inle1:.
\
1.
Drain fuel tank by running pressure washer until
fuel tank is empty.
2.
Disconnect spark plug wire and Keep it away from
spark plug.
3.
Clean area around oil fill, remove oil fill
cap/dipsticK. Wipe dipstick clean.
4.
Tip your pressure washer to drain oil from oil fill
into a sui1:ablecontainer making sure you tip your
unit away from sparK plug and air cleaner. When
crankcase is empty, re1:urnpressure washer to
upright position.
5.
Wipe dipstick clean, insert it in1:ooil fill hole and
tigh1:en securely, remove dipsticK. Add
recommended oil up to "Full" mark on dipstick.
Pour slowly. Wipe dipstick clean each time oil
level is checked. DO NOT overfill.
6.
Install oil fill plug and dipsticK, tighten securely.
7.
Wipe up any remaining oil.
8.
Reconnect spark plug wire to spark plug.
Oil Cap
3.
Tilt pressure washer to drain oil in1:oan approved
con1:ainer until it drips slowly from pump.
4.
Tilt pressure washer in opposite direction and
empty premeasured pump oil bottle into same
opening (a small funnel may be helpful).
5.
Ins1:allblack pump oil cap and tighten firmly.
6.
Set pressure washer in upright position. Add fuel
and engine oil.
) COLLECTION
RESOURCES. CENTERS.
RETURN USED OIL TO
13
Service
Air Cleaner
Your engine will not run properly and may be
damaged if you run it with a dirty air cleaner.
Service the air cleaner once every 25 hours of
operation or once each year, whichever comes first.
Service more often if operating under dirty or dusty
conditions. Replacements are available at your local
Sears service center.
1.
Clean area around spark plug.
2.
Remove and inspect spark plug.
3.
Replace spark plug with recommended plug if
electrodes are worn or if insulator is cracked or
chipped.
4.
Check electrode gap with wire feeler gauge and
set gap at 0.030 inches (0.76ram), if necessary.
5.
Install spark plug, tighten securely.
To service the air cleaner, follow these steps:
1. Remove screw.
NOTE: You can purchase a new spark plug by calling
1-800-366-PART.
2.
Carefully remove air cleaner assembly to prevent
debris from falling into carburetor.
3.
"]'a_e air cleaner assembly apart and clean all
parts. Wash foam air cleaner in liquid de;ergent
and water. Squeeze dry in a clean cloth.
4.
SATURATE foam air cleaner in engine oil and
squeeze in a clean cloth to remove excess oil.
5.
Reins;all clean or new foam air cleaner in body.
6.
Install air cleaner securely on carburetor with
screw.
AFTER
Water should not remain in the unit for long periods of
time. Sediments or minerals can deposit on pump
parts and _freeze" pump action. Follow these
procedures after every use:
1. Flush detergent siphoning tube by placing filter
into a pail of clean wa;er while running pressure
washer in low pressure mode (adjustable nozzle in
forward position). Flush for one to two minu;es.
NOTE: You can purchase now air cleaner elements by
calling 1-800_366-PART.
Service
Spark
EACH USE
2.
Shut off engine and let it cool, then remove all
hoses.
3.
Disconnect spark plug wire from spark plug.
Empty pump of all liquids by pulling recoil handle
about 6 times. This should remove most of the
Plug
Service the spark plug every 100 hours of operation or
yearly, whichever occurs first.
liquid in pump.
If storing for more than 30 days see "Long Term
Storage" on page 15.
WARNING
14
GENERAL
Protect
Inspect high pressure hose for damage. Cuts in
hose or fraying could result in leaks and loss of
pressure. Should any damage be found, replace
hose. DO NOT attempt to repair a damaged hose.
Replace hose with genuine Craftsman part.
Draining Fuel Tank:
,_
Drain water from hose, gun, and nozzle extension
and properly coil it on attached wiraform.
Reconnect spark plug wire to spark plug.
WARNINGI
NEVER
engine poorly
with fuel
in
the gas l:anK
indoors store
or inthe
enclosed,
ventilated areas where fumes may reach an
open flame, a sparK, or pilot light.
Change
Oil
While engine is s1:illwarm, drain oil from crankcase.
Refill with recommended grade. See "Changing Oil"
on page 13.
WINTER STORAGE
Oil Cylinder
, Freeze damage is not covered under warranty
Protect
3.
Use pump saver, available at Sears retail item
number 7174403, 1:otreat pump. This prevents
freeze damage and lubricates pis1:onsand seals.
4.
If pump saver is not available, connect a 3-foot
section of garden hose 1:owa1:er inlet adapter.
Pour RV-antifreeze (antifreeze without alcohol)
into hose. Pull recoil handle twice. Disconnect
3-foot hose.
Pump
To protect the pump use Sears pump saver to prevent
freeze damage and lubricate pistons and seals.
NOTE: Sears pump saver, item number 717,_03, is
available as an optional accessory. It is not included with
the pressure washer.
To protect the unit from freezing temperatures:
1. Flush detergent siphoning tube by placing filter
into a pail of clean wal:er while running pressure
washer in low pressure mode (adjustable nozzle in
forward position). Flush for one to two minul:es.
Empty pump of all pumped liquids by pulling recoil
handle about 6 times. This should remove most
liquid in pump.
Bore
Remove spark plug. Squirt about 1 ounce of clean
engine oil into the cylinder. Cover spark plug hole
with rag. Pull recoil handle slowly to distribute oil.
Avoid spray from spark plug hole.
Ins1:allspark plug. DO NOT connect spark plug wire.
CAUTION
2.
WARNINGIcon1:ainer
Drain fuel,
using away
a funnel,
approved
outdoors,
frominto
open
flame. Be sure engine is cool. DO NOT smoke.
Remove all fuel from cerbure1:or and fuel 1:anK1:o
prevent gum deposits from forming on these parts
and causing possible malfunction of engine.
Run engine until fuel tank is empty and engine
s1:opsdue 1:olack of fuel.
Sl:ora unit in a clean, dry area.
,_
Fuel System
CAUTION
,Failure to de so wi!l permanentlydamage your pump
and render you_ unit ineperablei
_ Freeze damage !Sn_ c0vered underwarran_ •
To use the pump saver:
CAUTION
1. Attach hose on pump saver can 1:opump inlet.
LONG TERM STORAGE
If you do not plan to use the pressure washer for more
than 30 days, you must prepare the engine and pump
for long 1:erm s1:orage.
It is imporl:ant 1:oprevent gum deposits from forming in
essential fuel system parts such as the carburetor, fuel
filter, fuel hose or 1:anKduring storage. Also,
experience indice1:es that alcohol-blended fuels (called
gasohol, ethanol or methanol) can attract moisture,
which leads to separation and formation of acids
during storage. Acidic gas can damage the fuel
system of an engine while in s1:orage.
2.
Push in can top to dispense pump saver.
3.
When pump saver fluid begins to exit pump outlet,
the pump is protected.
4.
Remove pump saver from pump inlet.
OTHER
DO NOT store fuel from one season to another.
If possible, s1:oreyour unit indoors and cover it to
give pro1:ection from dust and dirt. BE SURE TO
EMPTY THE FUEL TANK.
IMPORTANT: NEVER cover your pressure washer
while engine and exhaust area are warm.
15
CaLISQ
Co--Jot1
!i
NOzzle in !ow pressure mode.
!.
Pu!! nezz!e backward for high
2.
Water inlet is block:ed: ................
2.
cleariniet.
3i
Inadequate wal:er sUpp!y.
3.
Provide adequate water flowi
_-. Inlet h0se is _:inked or leaking.
4.
Straighten inlet hose; patch
leak,
Pump has following problems:
failure to produce pressumi
erratic pressUrei chatteringi ioss
5i
C Ogged n et hOSe stra neri
CheCk:an d € ean n e_ hOSe
strainer.
of pressure;!ow
6.
water Supply is over i00_F.
16.
High pressure hose is blocked
orleahcsi
i
water v0!ume;
8.
Gunieaks.
9i
Nozzle is obs_uctedi
!0; PUmp is fau!ty.
li
Detergent Siphoning tube is not
.submerged
Clear blOck:s in Outlethosei
g.
and runs rough,
Engine shuts down during
operationi
Engine lacks power.
Clean nozzlei
! O. ContaPt Sears se_ico facility
1.
Insert detergent siphoning l:ube
into del:ergent.
2.
Chemical filter is clogged.
2.
3i
Di_ in-line f!!te r .
3.
see i'check in--L!ne Fi!ter"
_.
Nozzle is in high pressure
4.
Push nozz!e forward for !ow
Detergent fai!s t0 mix with Sprayi
,,_,_e _r_, gooo a_ =o_oao
•...,_--.._,.._=_
'_
ProVide cooler water Supply
Clean or replace filter/detergent
Siphoning tU_e •
Engine speed is t0o s!ow
J
,
Move thrott!e _ntr01 to FAST
If engine Still t'b0gs down'i,
jcontactsears
se_ico facility
li
Dirty air cleaneri
2i
outeffueli
2.
3.
Sta!e fuel ...................................
3. Drain gas l:ank:; fi!! with fresh .......
fuel.
spark plug wire not connected
_0 sparkplug.
4.
I
Connect wire _ spark plug.
5
Bad spark piUg
'5.
Repiacasparkpiug
6i
water in fueli
6.
Drain gas l:ank:; fill With fresh
fuel
7i
Excassively rich fuel mixture.
7.
Contact Sears service facilityi
8i
Infa_e valve stuck open or
closed.
.8.
I
Contact Sears service facilityi
gi
Engine has los1:compressioni
g. Contact Sears service facility:
Out 0f fuel.
J
Fillfuell:an_i
Fill fuei _ank.
Di_ air fi!teri
Rep!a_ air fi!teri
16
17
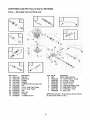
CRAFTSMAN
Main Unit --
Item
1
2
3
4
5
6
7
2,000 PSI Pressure
Exploded
Part #
190906GS
192162GS
190249GS
193482GS
194344DGS
B1236DGS
192525GS
Washer
580.752000
View and Parts List
Description
BASE
WIREFORM
HOSE
GUN
ASSY, Wand, Hi-Lo
ORIFICE
KIT, Pump/Engine Mntng Hrdwre
Item
8
9
10
11
12
900
Part #
194298GS
B1237DGS
194343BGS
23139GS
194216GS
NSP
Description
RELIEF, Thermal
ORIFICE
ASSY, Wand, Turbo
KEY
ASSY, Pump (see page 19)
ENGINE
Items Not Illustrated ..............................................................................................................................................
Part#
Description
191809GS
MANUALi Owner!s
192530GS
KIT; Decals
AB3061BGS
OILi Bottle
Optiona! Access0ries
7"175187GS
!"175!9_G$
7175115G$
7175116GS
7174_01GS
7"174403G$
7t74300GS
7t74301GS
7174302GS
7174303GS
7174307GS
NOt II!ustrated
Garden Hose QUick Connect
Acc_sS0_ QUiCk conne_
Rotating Brush Kit
O Ring Repair Kit
25' ExtenSion HOSe
PUmP saver
House Wash Concentral:e (maKes 4 gallons)
Deck Wash Concentral:e (maKes 2 gallons)
Vehicle/Boat Wash Concentrate (makes 4 gail0ns)
Degreaser concentrate (makes _ gallons)
Mold/Mildew concentrate (makes 2 gallons)
18
CRAFTSMAN
2,000 PSI Pressure
Pump -- Exploded
Washer
580.752000
View and Parts List
_E,L
Item
19
28
29
30
34
45
46
47
62
68
69
76
Part #
190571GS
190827GS
190575GS
190576GS
190577GS
190578GS
190629GS
190630GS
190581GS
190582GS
19058,_-GS
194298GS
Description
CAP, Oil
MANIFOLD
O-RING
SCREW
CONNECTION, Chemical Inlet
PIN
VALVE, Seat Plate, Plastic
VALVE, Seat, Plastic
CAP
BALL, SS
O-RING
THERMO RELIEF
Item
A
B
C
E
F
G
H
J
K
Part #
NSP
190832GS
19063_-GS
190591GS
190592GS
190593GS
190628GS
189971GS
190636GS
>_, .....................................
Description
ASSY, CASE, PISTON
KIT, WATER INLET, ALUM
KIT, OUTLET, ALUM
KIT,CHECK VALVES
KIT, INLET CHECK
KIT, CHEMICAL INJECTION
KIT, UNLOADER STEM
KIT, CHEMICAL HOSE
KIT, SEAL SET
NOTE: Item letters B - K are service _:itsand include
all parts shown within the box..
19
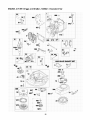
ENGINE,
3.75 HP, Briggs and Stratton,
10D902 - Exploded
View
523
306
iiiiiii51i_iiiii
iiii842_iiii
718_
200
1095 VALVE GASKET
SET
22,
iiiiiiiiiiiiiii
i_
11210__1
iiiiiiiiii_iiiii_iiiii,iiiiiiiiiiiiii
¸¸......_iiiiiiiiiiiiiiiiiiiiiiiiiiiiiiiii
,59__ iiiiiiiiiiiiiiiiiiiiiiiiiii
i
456_
2O
ENGINE,
3.75 HP, Briggs and Stratton,
10D902 - Exploded
View
iiiiiiiiiiiiiiiiiiiiiiiiiiiiiiiiiiiiiiiiiiiiiiiiii3"i iiiiiiiiiiiiiiisz9 iiiiiiiiiiiiiiiiiiiiiiiiiiiiiiiiiiii
163
121_
393
356
106
!24_
356A
9
.............
i3_iiiiiii
21
ENGINE,
Item
1
2
3
4
5
7
8
9
10
11
12
13
15
16
19
20
22
23
24
25
26
27
28
29
32
33
34
35
36
37
40
43
45
46
50
51
54
55
58
60
65
73
90
97
106
130
163
180
190
190A
3.75 HP, Briggs and Stratton,
Part#
399164
399269
299819
698691
690386
692288
495785
695890
691666
691245
692218
270895
270896
691697
691680
692989
293709
391483
691662
690843
222698
498668
498669
498670
498671
498680
498681
498682
498683
691588
298909
298908
496792
691664
296676
296677
690520
690520
691209
692194
698690
691762
691998
693446
270345
691111
692144
692259
691915
690837
691235
498811
691931
691901
691190
271139
494406
691697
692198
10D902 - Parts List
DeecripUon
CylinderAssembly
Kit-Bushing/Seal (Magneto Side)
Seal-Oil (Magneto Side)
Sump-Engine
Head-Cylinder
Gasket-Cylinder Head
BreatherAssembly
Gasket-Breather
Screw(BreatherAssembly)
Tube-Breather
Gasket-Crankcase (,015", Standard)
Gasket-Crankcase (.005")
Gasket-Crankcase (.009")
Screw (Cylinder Head)
Plug-Oil Drain
Crankshaft
Kit-Bushing/Side (PTO Side)
Seal-Oil (PTO Side)
Screw (Engine Sump)
Flywheel
Key-Flywheel
Piston Assembly (Standard)
Piston Assembly (,010" Oversize)
Piston Assembly (,020" Oversize)
Piston Assembly (,030" Oversize)
Ring Set (Standard)
Ring Set (,010" Oversize)
Ring Set (,020" Oversize)
Ring Set (,030" Oversize)
Lack-Piston Pin
Pin-Piston (Standard)
Pin-Piston (,005" Undersize)
Rod-Connecting
Screw (Connecting Rod)
Valve-Exhaust
Valve-Intake
Spring-Valve (Intake)
Spring-Valve (Exhaust)
Guard-Flywheel
Retainer-Valve
Slinger-Governor/Oil
Tappet-Valve
Camshaft
Manifold-Intake
Gasket-Intake
Screw (Intake Manifold)
Housing-Rewind Starter
Rope-Starter
Grip-Starter Rope
Screw (Rewind Starter)
Screen-Rotating
Carburetor
Shaft-Throttle
Seat-Inlet
Valve-Throttle
Gasket-AirCleaner
Tank-Fuel
Screw (Fuel Tank)
Screw(FuelTank)
Item
200
201
209
211
222
300
304
305
306
307
332
333
334
337
356
356A
358
365
390
393
394
426
455
456
469
523
529
534
535
536
592
597
608
612
617
621
633
635
668
670
689
718
718A
741
832
836
842
851
869
870
871
913
957
976
1095
1210
1211
1218
22
Part#
691912
690347
691862
691859
691445
394569
692536
692198
690400
690345
690662
496914
691061
802592
692390
398808
298989
692200
691839
691837
495770
691107
691236
692299
694420
691913
692189
691417
698369
698472
690800
691696
499706
496046
270344
692310
691321
66538
692889
691633
691855
690959
499047
691805
691443
691443
691876
493880
691701
691702
231348
63709
494409
497929
694394
498526
499901
499901
695866
Description
Blade-Governor
Link-Air Vane
Spring-Governor
Spring-Governed Idle
Bracket-Control
Muffler
Housing-Blower
Screw (Blower Housing)
Shield-Cylinder
Screw (Cylinder Shield)
Nut (Flywheel)
Armatu re-Mag neto
Screw (Magneto Armature)
Plug-Spark
Wire-Stop
Wire-Stop
Gasket Set-Engine
Screw (Carburetor)
Spring-Choke Diaphragm
Screen-Carburetor
Gasket-Carburetor Pump
Screw (Governor Blade)
Cup-Flywheel
Plate-Pawl Friction
Ring-Rotating Trim
Dipstick
Grommet
Screw (Air Cleaner)
Filter-Air Cleaner Foam
Cleaner-Air
Nut (Rewind Starter)
Screw (Pawl Friction Plate)
Starter-Rewind
Tube-Pick Up
SeaI-O Ring (Intake Manifold)
Switch-Stop
SeaI-ChoketThrotUe Shaft
Boot-Spark Plug
Spacer
Spacer-Fuel Tank
Spring-Friction
Pin-Locating
Pin-Locating
Gear-Timing
Guard-Muffler
Screw (Muffler Guard)
SeaI-O Ring (Dipstick)
Terminal-Spark Plug
Seat-Valve (Intake)
Seat-Valve (Exhaust)
Bushing-Guide (Exhaust)
Bushing-Guide (Intake)
Seat-Check Valve
Cap-Fuel Tank
Primer-Carburetor
Gasket Set-Valve
Pulley/Spring Assembly (Pulley)
Pulley/Spring Assembly (Spring)
SeaI-O Ring (Carburetor)
Sears, Roebuck
and Co., U.S.A.
the United
States
(Sears),
the California
Environmental
Air Resources
Protection
Agency
Board (CARB)
and
(U.S.EPA)
Emission Control System Warranty Statement
(Owner's Defect Warranty Rights and Obligations)
EMISSION CONTROL WARRANTY COVERAGE IS
a, Fuel Metedng System
APPLICABLE TO CERTIFIED ENGINES PURCHASED IN
CALIFORNIA IN 1995 AND THEREAFTER WHICH ARE
USED IN CALIFORNIA, AND TO CERTIFIED MODEL
YEAR 1997"AND LATER ENGINES WHICH ARE
PURCHASED AND USED ELSEWHERE IN THE UNITED
STATES (AND AFTER JANUARY 1, 2001 IN CANADA).
Cold start enrichment system
Carburetor and internal parts
Fuel Pump
b. Air Induction System
Air cleaner
Intake manifold
California and U.S. EPA Emission Control Warranty
Statement
Your Warranty Rights and Obligations
The California Air Resources Board (CARB), U.S.EPA and
Sears are pleased to explain the Emission Control System
Warranty on your r'nedel year 2000 and later small off-roed
engine (SORE). In California, new small off-reed engines
must be designed, built and equipped to meet the State's
stringent anti-smog standards. Elsewhere in the United
States, new non*mad, spark-ignition engines certified for
model year 1997" and later, must meet similar standards set
forth by the U.S.EPA. Sears must warrant the emission
control system on your engine for the pedods of time listed
below, provided there has been no abuse, neglect, or
improper maintenance of your small off-mad engine.
Your emission control system may include parts such as the
carburetor or fuel-injection system, the ignition system, and
catalytic converter. Also included may be hoses, belts,
connectors and other emission related assemblies.
c.
d.
e.
2,
Where a warrantable condition exists, Sears will repair your
small off-road engine at no cost to you including diagnosis,
parts and labor.
3,
Sears Emission Control Defects Warranty Coverage
The 1995 and later small off-road engines are warranted for
two years. If any emission-related part on your engine is
defective, the part will be repaired or replaced by Sears.
Owner's Warranty Responsibilities
As the small off-road engine owner, you are responsible for
the performance of the required maintenance listed in this
owner's manual. Sears recommends that you retain all your
receipts covering maintenance on your small off-mad
engine, but Sears cannot deny warranty solely for the lack of
receipts or for your failure to ensure the perfon'nance of all
scheduled maintenance.
4,
As the small off-road engine owner, you should however be
aware that Sears may deny you warranty coverage if your
small off-road engine or a part has failed due to abuse,
neglect, improper maintenance or unapproved modifications.
You are responsible for presenting your small off-road
engine to an approved Sears Service Center as soon as a
problem exists. The warranty repairs should be completed in
a reasonable amount of time, not to exceed 30 days.
If you have any questions regarding your warranty rights and
responsibilities, you should contact a Sears Service
Representative at 1-800-459-4553.
5,
Sears Emission Control Defects Warranty Provisions
The following are specific provisions relative to your
Emission Control Defects Warranty Coverage.
1, Warranted Parts
Coverage under this warranty extends only to the parts
listed below (the emission central systems parts) to the
extent these parts were present on the engine purchased.
6,
Ignition System
Spark plug(s)
Magneto ignition system
Catalyst System
Catalytic converter
Exhaust manifold
Air injection system or pulse valve
Miscellaneous Items Used in Above Systems
Vacuum, temperature, position, time sensitive valves
and switches
Connectors and assemblies
Length of Coverage
Sears warrants to the initial owner and each subsequent
owner that the Warranted Parts shall be free from
defects in materials and workmanship which caused the
failure of the Warranted Parts for a period of two years
from the date the engine is delivered to a retail
purchaser.
No Charge
Repair or replacement of any Warranted Part will be
performed at no charge to the owner, including
diagnostic labor which leads to the deten'nination that a
Warranted Part is defective, if the diagnostic work is
performed at an approved Sears Service Center.
Claims and Coverage Exclusions
Warranty claims shall be filed in accordance with the
provisions of the Sears Warranty Policy. Warranty
coverage shall be excluded for failures of Warranted
Parts which are not original Sears parts or because of
abuse, neglect or improper maintenance as set forth in
the Sears Engine Warranty Policy. Sears is not liable to
cover failures of Warranted Parts caused by the use of
add-on, non-original, or modified parts.
Maintenance
Any Warranted Part which is not scheduled for
replacement as required maintenance or which is
scheduled only for regular inspection to the effect of
"repair or replace as necessary" shall be warranted as to
defects for the warranty period. Any Warranted Part
which is scheduled for replacement as required
maintenance shall be warranted as to defects only for
the period of time up to the first scheduled replacement
for that part. Any replacement part that is equivalent in
performance and durability may be used in the
performance of any maintenance or repairs. The owner
is responsible for the performance of all required
maintenance, as defined in this owner's manual.
Consequential Coverage
Coverage hereunder shall extend to the failure of any
engine components caused by the failure of any
Warranty Part still under warranty.
Inthe USA _nd Canadai a 24-hour hotline, "i-800_469_4663ihas a menu of pre_recerdedmessages OfferingyOUproduct
maintenance information
23
GARANTIA
....................................
INSTRUCCIONES DE SEGURIDAD ..............
MONTAJE ..................................
OPERACION ................................
MANTENIMIENTO
............................
GARANTIA
LIMITADA
24
24-26
28-29
30-32
33-36
DE LA MAQUINA
ESPECIFICACIONES
............................
33
ALMACENAMIENTO
.............................
37
REPARACION DE DAI_IOS ........................
38
GARANTIA DEL CONTROL DE EMISIONES
.........
39
COMO ORDENAR PARTES ......
PAGINA POSTERIOR
LAVADORA
DE PRESION
CRAFTSMAN
Durante un aria a partir de la fecha de compra, Sears reparar_, sin cargo alguno, cualquier defecto en matedal y mano de
obra, siempre y cuando esta m_quina lavadora de alta presi6n Craftsman haya sido mantenida y puesta en funcionamiento
de acuerdo a lea instrucciones suministradas en el manual del propietado.
Si esta m_quina lavadorg es usada pare fines comereiales, la garantia se aplicar_ tan solo por 90 dies a partir de la fecha
de compra. Siesta mdquina lavadora de alta presi6n es usada pare alquiler, la garantia se aplicard tan solo por 30 dies
despu6s de la fecha de compra.
Esta garantia no cubre:
Elementos perecederos
como bujias O filtros de aire, los cuales se desgastan
con el usa normal.
Reparaciones necesarias debido al abuso o negligencia del operador, incluyendo danos ocasionados par la ausencia de
suministro de ague ala bomba o par no mantener el equipo de acuerdo a lea instrucciones contenidas en el manual del
propietario.
El servicio de garantia se hace efectivo devolviendo
Sears mas cercano en los Estados Unidos.
la m_quina lavadora de alta presi6n al centro de servicio o distribuidor
Esta garantia le proporciona derechos legales especificos;
estado a estado.
Sears,
Roebuck
usted tambi6n puede tener otros derechos, los cuales varian de
and Co., Dept. 817 WA, Hoffman
Estates,
IL 60179
_lk
ste es
el simbolo
de alerta
Es usado
paralosindicarle
con que
paligros
potenciales
lesion
pare
el personal.
Siga de
lagseguridad,
instrucciones
de todos
mensajessituacione$
de seguridad
aparscen
despuesde de
este simbolo pars evitar posibles lesiones o muerte.
[_Lea
este manual minuciosamente y conozca a
rondo las partes y el funcionamiento de su
m_quina lavadors a presi6n, Conozca sus
Simbolos
de Peligro
y Significados
aplicaciones, sus limitacione$ y los peligros
involucrados,
Gases T0xicos
DescargaElectrica
El simbolo de alerta de seguddad (_k) es usado con una
palabra (PELIGRO, ADVERTENCIA, PRECAUCI(_N), un
mensaje por escrito o una ilustracibn, pare alertarlo acerca
de cualquier situaci0n de peligro que pueda existir.
PELIGRO indica un riesgo el cual, si no se evita, ceusa_ la
Superficies Resbalosas
Caer
Inyecci6nLiquida
muerte o una herida grave. ADVERTENCIA indica un riesgo
el cual, si no se evita, puede causer la muerte o una hedda
grave. PRECAUCION indica un riesgo, el cual, si no se
evita, puede causer heridas menores o moderadas.
PREOAIJCI6N, cuando se usa sin el simbolo de alerta,
indica una situaci0n que podria resultar en el della del
Fue£o
Explosion
Superficie Caliente
equipo. Siga los mensajes de seguridad pare evitar o reducir
los desgos de heridas e inclusive la muerte.
Partes en Movimiento
24
Objetos Voladores
Contragolpe
-_-nel estado de California es obligatorio, seg0n la lay, el use
_e apagachispas (Secci6n 4442 del C6digo de Recursos
=0blicos de California), Otros estados pueden tener leyes
_imilares, Las leyes federales se aplican en tierras
'ederales, Si equipa el silensiador con un apagashispas,
_ste debe_ ser mantenido en buenas condiciones de
:rabajo, Usted puede ordenar el apagachispas a tray,s de
_u distribuidor de servicio autorizado Sears,
ADVERTENCIA
CUAN D0 AI_ADA
,
I
CoMBUsTI
BI-E
Apague el generador (posici6n OFF) y dejelo enffiar sl menos
pot2 minutGe antes de rem0ver la taps de la gas01ina.
ADVERTENClA
El escape
del motor
elementes
quimicos
California
per producir
u arras
dafies
de este
producto
NO iler_ demaslada
conSene
reconocido$
en el Estado de
c_ncer, defecto$
de nacimiento
,
de t po reproducUvo.
NO encienda un cigarfill0 0 fume.
CUANDO
'
NO retie
Oper'e e] lavadora de presibn SOLAMENTE
,
Utilic_ un respirador o mascara
posib!lidad de inhalar vapores.
'
Lea fades las instrucciones de la m_scara paraasegurarse de
qua le brindar,_ la protecoi6n nec_safia contrala inhalacibn de
OPERE
EL. EQUIPO
NO incli_ el mot0r 0 el equips, de tal manera qua la gasalina
se puede derramar.
CUANDO
,
Permits al men0s espaci0 pars
Mantenga Is gasolina alejada de ahispas, llamas abiertasi
pil_toSi aalor y otraS fU_
de ignition
,
PELIGRO
el tanquei
liquides inftamables.
TRANSPORTE
0
REPARE
EL EQUIPO
, Transp0rte 0 repare el _Uip0 c_n _1 tanqu_ de combustib!e
VaCIOi _ COn la v_Ivula pa_ apagar el COmbustible, apagada
(posici0n OFF)
al sire libr_
CUANDO ALMACENE
O GUARDE
COMBUS'I'IBLE
EN EL "I'ANQUE
siemp_'equa exists la
,
EL EQUIPO
CON
AIm_e
alejado de cald_s,
estufaSi calentaderes de agua,
secadaras de raps U 0ires aparatas elactrodom_-s'dcoS qua
pasean pi!ot_s U _ras _en_
d_ igni¢ibn, ponque el!as p_den
engender 10s Vapo_ de la gasolina
vapores natives.
ADVERTENCIA
de Io contrario podrfan _cw'rir d_argas
el6ctrJcas fatales.
roaiada cu_ndo el sistema este presurizada:
ADVERTENCIA
'El ar'ea de limpieza deber_ tenet ina!!na_ianes y drenajes
adecoadaa
pars d isrninui_ la pasibilided de coidas debido
superficies resbalosas.
Oper'e y almacone esta unidad sabr_ una superficie estable
,
'
Sujete !a pistols de la hidrolavadara "firmemerfie- con ambas
manes ,;uanda uti!ice e! t'ociado a a!ta presi_n D_ esl:a manem
evitar_ lesiones praducidas par _1 posilale galpe de la pistols
haaia atr_s.
NO toque ias superFiaie.scalierfies.
• Mantengase alejada de !as gases de escape.
,
NUNCA mueva el equipo mientras este en "_unrJanamiento.
, Permits qua el_uipo
25
se enfrie antes de rosario.
PRECAUCION
'NO
,
asegur_ la pistola de rociado en la posicibn (open =
NUNCA Utilir_ una p_st01a de rociad0 q0e no _:enga un segUro
Para gatill0 0 P_ci0n
Para gstill0 e n su !ugar Y e n buenas
_ondiciones.
PRECAUCION
PRECAUCION
,
$i 0Sl:ed tiene _lguna preg0n_a _ce_a de ITS5nalidach_s do us0
d_ I gen_rad0 r, Pr'_0nte!_ a SO c0ncos!0nario O ¢_ntac_ a
,
NUNCA de_r_n
,NO
o
cuando est6 corca de donde se _t_
set 0p_mdas las Unidades _n
part_ _s
eluda nirrg0n disp0sitivo de seg0ridad de esta m_q0ina.
A ntis de p0ner en ma_cha la mAquina lavadora a p_!_n en
#lima frio. _vise todas !as part_ de! equip0 y aseg0_'P_sed8
qU_ n0 se haya formado hiel0 sobre elias.
usando el equip0
PRECAUCION
26
,
NUNCA mueva la m_q0ina halande la manguera de al_a
presi0n. U_i!!co !a rnanija que viene _n la unidad.
,
Revise que el sistema de combustible no present_ fugas o
signos d_ d_i0roi
_rno mangue_s de..sgastadas 0 po_sasi
o
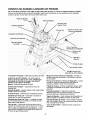
CONOZCA
SU MAQUINA
LAVADORA
DE PRESION
Lea el manual dal propiatario y lae reglae de eaguridad antes de poner an marcha eu m_quina lavadora a preeibn,
Compare las ilustraciones con su mdquina lavadora a presibn para familiarizarse con las ubiceciones de los diferentes
controles y ajustes. Guarde este manual para referencias futuras,
Pislola de Rociado
Boquilla Ajustab!e
ExtensiOn para
Poseedo
r Ace..eso ria
Filtro de Aite
Palance de Control dR I_
Vtllvula de Regu!acibn
Arrancad0r de Retr0ceso
Extension papa B0quillas
Tapa
del Depbsito
Filtro y Tubo para
Reco!e¢_iOnde Detergente
Bombilla mc_ls
Principal
pa de la
Gasolina
Entrada de Agua
I'oma deAl_
PresiOn
Elomba equ!pped with
Autom_ice se Enfria Sistema
Arrancador de Retroceso - Usado para el arranque del motor.
Manguara de Alta PresiOn (no moetrado) - Conecte un
extremo a la pistola de rociado y el _ro extremo a la toma
de alta presibn.
Autom_tico ea Enfria Sietema - Los ciclos regan por
bomba cuando agua alcenza 125'_-155'_F. Entibiar agua
deacargar_ de la bomba en el eualo, Eete eietema
previane el daffo intemo de bomba.
Bomba - Desarrolla alta presibn de agua,
Bombilla m_e Principal
motores frios,
Palanca de Control de la V_lvula de Regulaci6n - Coloce
el motor en modo de arranque para el arrancedor de
retroceso y detiene el motor en funcionamiento,
Pietola de Rociado - Controla la apliceci6n de agua sobre
la superficie de limpieza con el gatillo, Incluye cerrojo de
seguridad,
-- Usada para arranque de
Boquilla Ajuetable -Ajusta la presibn a alta o baja presi6n;
rociado a chorm o en abanice,
Entrada de Agua - ConexiOn para la manguera de jardin.
Poeeador Acceaoria - Proporeiona cenvienant
almacenamiento para el pistola de rociado, el extension
para boquillas turbo y extensi6n para boquillas.
Exlenei6n para Etoquillea - Conectada a la pistola de
rociado para un uso m_s conveniente.
Tapa de la Geaolina - Liana el tanque del combustible
gasolina regular sin centenido de plomo en este punto,
Exlenei6n para Etoquillea Turbo - La boquilla del turbo
gira la corriente alta de la presiOn en un modelo circular
r_pido para limpiar agresivo.
Tapa dal Depbeito dal Aceite - Llene el motor con aceite
aqui. Vea la p_gina 28 para las recemendaciones del aceite
y las instrucciones de Ilenado.
Filtro de Aire - El elemento de filtro tipo sece limita la
centidad de suciedad y polvo qua se introduce en el motor,
Toma de Alta PreaiOn - Conexibn para la manguera de
alta presi6n,
Filtro y Tubo para Recolecci6n de Datergente - Usado
para succionar detergente de la botella de quimices a la
cerriente de agua de baja presi6n,
27
con
Su m_quina lavadora a presi6n requiere de oierto ensamble
y estar_ lista para ser usada 0nicamente despu_s de haber
depesitado el combustible y el acoite recomendado.
Si tiene problemas con el ensamble de su m_quina
lavadora a presi6n, Ilame a la linea de ayuda de la
m_quina lavadora a presi6n al 1-800-222-3136.
IMPORTANTE: Cualquier intento de hacor funoionar el
moLor sin haber depesitado el aceite recomendado resultar_
en falla del mismo.
RETIRE LA MAQUINA LAVADORA
PRESlON DE LA CAJA
2.
Coloque al extension para boquillas, boquilla turbo y
pistola de rociado en el peseedor accesorio.
A
Abra la caja y code dos esquinas opuestas a la manija
guia de la parle superior a la inferior de tal forma que el
panel pueda set doblado hacia abajo.
Retire el material de relleno y la caja de repuestos
enviada con la mt=quina lavadora a presi6n.
Agregue
Retire la m&quina lavadora a presi6n de la caja.
Revise la caja para vet si existen partes sueltas adicionales.
CONTENIDO
Aceite de Motor
IMPOR'I'ANTE: Cualquier intento de hacor girar o arrancar
el motor antes de que se haya depesitado el acoite
recomendado puede resultar en falla del motor.
DE LA CAJA
NO'[A: Cuando agregue aceito al compartimiento del motor,
utilise 0nicamento aoeite detergento de alta calidad, designado
con la clesilicaoibn API de servicio SF, SG, SH, SJ o superior,
clesificado con el peso SAE 30. NO use aditives espeoiales.
Revise el contenido de la caja. Si alguna de las partes NO
est_ presente o est_ dafiada, Ilame a la Iinea de ayuda de
la m_quina lavadora a presiOn al 1-800-222-3136.
La unidad prinoipal
La manguera de alta presibn
l=istola de rociado
1.
Selecoione una viscosidad de acuerdo a la tabla siguiente.
Extensidn para boquillas con boquilla ajustable a
Alta/Baja presidn
Boquilla turbo
FIoseedor
aocesorJo
Aceite para motor
},
Caja de parLes (incluye los elementes descdtes a
continuacibn)
El uso de acoites multigrado (5W-30, 10W-30, etc.) en
temperaLures mayores a los 40'_F (4_C) esesionar_ un
consume de aceite mayor al normal. Cuando utilice un
acoite multigrado, revise con mayor frecuencia el nivel de
acoite del motor.
Manual del operador
Tarjeta de la matricula
Familiaricose con cada parte antes de ensamblar la
m_quina lavadora a presiOn. Compare el contenido con la
ilustracibn de la p_gina 27. Si alguna de la partes NO est_
presente o se encuentra dafiada, Ilame a la Iinea de ayuda
de la m_quina lavadora a presibn al 1-800-222-3136.
** Si utiliza aceite SAE 30 en temperaturas inferiores a los
40_F (4'_C), ocasionard que el arranque sea m_s dificil e
incluso que se desbiele el motor debido a su inadecuada
lubricacibn intern&
MONTAJE DE LA MAQUINA
LAVADORA A PRESION
La gran mayoda de su m_quina lavadora a presiOn Craftsman
ha sido ensamblada en la fdbrica. Sin embargo, usted deberd
Ilevar a cape los siguientes presedimientes antes de poner en
funcionamiento su m_quina lavadora a presibn:
1.
Deposite acoite en la caja del cigiJeffal del motor.
2.
Deposite combustible
3.
Conecte la manguera de alta presibn a la pistola de
rociado y a la bomba.
4.
Conecte el suministro de agua a la bomba.
Fijar el Poseedor
1.
en el tanque.
2.
Coloque la mdquina lavadora a presibn en una
superficie nivelada.
3.
Limpie area alrededor del Ilenado de aceite.
4.
Retire tap6n del of Qdo de Ilenado y la varilla de rTedici6n.
5.
Limpie la varilla de medici6n, insertela en el odficio de
Ilenado y aprietela firmemente; retire la varilla de
medici6n. Depesite el acoite recomendado hesta la
marca "Full" ("Lleno") de la varilla de medici6n.
DE_OSITAR
iiiiiiiiiiiiiiiiiiiiiiiiiiii
{_
_iiiiiiiiiiiiiiiiiiiiiiiiiiiiiiiiiiiiiiiiiiiiiiiiiiii
...........................
Accesorio
Coloque al peseedor acoesorio en la cima del manubrio.
28
LLENO
.........................
6,
Deposite el aceite lentamente. Limpie la vadlla de
medici6n cada vez que revise el nivel del aceite. NO
Ilene excesivamente,
1,
Desenrrelle la manguera de alta presibn y conecte un
extremo de la manguera a la base de la pistola de
rociado, Apriete con la mano,
2.
Conecte el if(re extremo de manguera de atia presi6n a
salida de alta presi6n de bomba, Apriete con la mano,
3,
Antes de que conecte la manguera de jardin a la
entrada de agua, inspecoione el colador de la entrada.
Limpie el colador si tiene residues o solicite su
remplazo si est_ datiado. Refi(_rase a la secoi6n
=Mantenimiento de los Anilles 'O'" si la colador de la
entrada se dafiado, NO haga funcionar la m_quina
lavadora a preeibn ei el colador de la entrada eet_
dahado, NUNCA agua de cala de siphon,
7,
Instale el tap6n del orificio de Ilenado de aceite y la
varilla de medicibn y aprietela firmemente.
NOTA: Revise el aceite frecuentemente
durante el
despegue del motor.
Agregue
A
Gasolina
IADVERTENCIA!
NUNCA Ilene el tanque de
combustible en recintes cerrades. NUNCA Ilene el
tanque de combustible cuando el motor est_
funcionando o est_ caliente. NO fume cuando est_
Ilenando el tanque de combustible.
,_
tanque
IADVERTENCIA!
de combustible,
NUNCA
Deje espacio
Ilene pot para
completo
la
el
expansibn del combustible, Limpie cualquier derrame
de combustible del motor y del equipo antes de darle
arranque a la unidad,
1,
Use combustible limpio y almac_nelo en recipientes
cubiertes, limpies y aprebades. Utilice embudes limpies,
NUNCA utilice gesolina "vieja" dejada de la estaci6n
anterior o gesolina almacenada por periodes de tiempo
prolongades.
2,
Limpie el drea alrededor de la tapa de Ilenado del
combustible, retire la tapa.
3,
Agregue lentamente gasolina regular"SIN PLOMO" al
tanque de combustible, Use un embudo para evitar que
se derrame, Llene el tanque lentamente hesta
aproximadamente 1.5" pot debajo de la parle la cima
del cuello del tubo de Ilenado.
-
Inspecoione la
rejilla de entrada,
NO la use si est_
datiada, limpiela si
_e
encuentra sucia,
4,
Haga cower el agua a tray,s de la manguera de su
jardin pot 30 segundes para limpiar cualquier escombro
que se encuentre en ella.
5,
Conecte la manguera de jardin (no exceder 50 pies en
la Iongitud) a la entrada del agua. Apriete con la mano.
PRECAUCIbN
4,
Instale la tapa del tanque de combustible y limpie la
gesolina que se haya derramado,
esta
IMPORTANTE: Es importante evitar la formacibn de depbsites
de goma en les partes esenciales del sistema de combustible
como en el carburador, filtre del combustible, manguera del
combustible o tanque, durante su almacenamiento, Los
combustibles mezclades con alcohol (llamades gesohol, etanol
o metanol) pueden atraer la humedad, la cual produce la
separaci6n y formacibn de _cides durante el almacenamiento.
La gesolina _cida puede dafiar el sistema de combustible de
un motor durante su almacenamiento.
6,
precauc!6ni no ser_ Cub!ertopot !a garan_fa.
ABRA el suministre del agua (abra la v_lvula de
suministre completamente),
Para evitar problemes en el motor, deber_ vaciar el sistema de
combustible antes de periodes de almacenamiento de 30 dies
o m_s. Yes "Almacenamiento" en la p_gina 37, NUNCA use
productes para limpiar motores o cerburadores en el tanque
del combustible; si Io hace esurrir_n daties permanentes.
Conecte la Manguera
Agua a la Bornba
y el Surninistro
Lista de Revision
Motor
de
Previa al Arranque
del
Revise la unidad para aseguraree que ha Ilevado a cabo los
siguientes procedimientes:
IMPORTANTE: Usted deberb armar la extension para
boquilles y conectar todas les mangueres antes de darle
arranque al motor. La bomba resutiar_ dafiada si arranca el
motor sin tenet todes les mangueres conectades y el
suministre agua abierto,
1,
29
Revise que haya sido depesitado aceite y est_ al nivel
correcto en la caja del cig0efial del motor.
2,
Deposite la gasolina adecuada en tanque del combustible.
3.
Revise que todas las conexiones de las mangueras
(alta presi6n y suministro de agua) est6n apretadas
correctamente y que no existan dobleces, cortes o daf_o
de la manguera de alta presi6n,
Proporcione el suministro de agua adecuado (que no
exceda los 100°F),
4.
pistola mediante un ligero flujo. Continee sosteniendo el
disparador hasta que haya un flujo estable de agua y
no quede reeiduo alguno de aire en el sistema. Suelte
entonces el disparador.
8.
Fije el pestillo de seguridad al disparador de la pistola
aspersora.
5.
Asegt_rese de leer las secciones "Reglas de Seguridad" y
"Operacidn" antes de usar la m_quina lavadora a presidn.
Cerrojo de
6.
Siva a encender la unidad deepu6s de haber estado
almacenada, consulte la secci6n "Almacenamiento" en
la p_gina 37.
Seguridad
9.
COMO USAR SU MAQUINA
LAVADORA A PRESION
Mueva el control de la v_lvula de admisidn a la posicidn
"R&pido" ("Fast"), que se distingue con la figura de un
conejo.
R_pido
Parado
Si tiene problemas operando su m&quina lavadora a
presidn, por favor Ilame a la linea de ayuda para m_quinas
lavadoras a presi6n al 1-800-222-3136
Cbmo Darle Arranque
Lavadora a Presibn
V_Ivula de
Admisi6n en
la posici6n
"Parado"
a su M_quina
Para darle arranque a su maquina lavadora a presi6n
movida a motor por primera vez, siga estas instrucciones
paso a paso. Esta informaci6n acerca del arranque inicial
tambi6n se aplica cuando vaya a darle arranque al motor
despu6s de haber dejado de la m_quina lavadora a presidn
fuera de uso por al menos un dia.
1.
2.
NOTA: En el caso de que el motor est6 caliente, asegt_rese
de que la control de la v_lvula de admisi6n se encuentre en
]a posici6n "Rbpido" ("Fast").
Coloque la m_quina lavadora a presi6n en un _rea cercana
a una suministro de agua exterior capaz de abastecer agua
a un volumen mayor de 3.0 galones por minL_oen no
menos que 20 PSI en el fin de arandela de presi6n de la
manga del jardin.
Para comenzar el motor para el tiempo muy primer:
10. Asegerese de que la control de la v_lvula de admisi6n
se encuentre en la posici6n "Rbpido" ("Fast"), que se
distingue con la figura de un conejo,
Revise que la manguera de alta presi6n se encuentre
conectada firmemente a la pistola de rociado y a la
bomba. Vea "Armado de Su M_quina Lavadora a Presidn".
3.
Asegt_rese que la unidad est6 nivelada.
4.
Conecte la manguera de jardin a la entrada del agua.
Aprietela con la mano. Abra el suministro de agua,
11. Empuje bombifla m&s principal firmemente vez de 5,
esperando 2 segundos entre cada empuj6n, Revise las
instrucciones especificas del comienzo de motor en el
manual de duefios de motor.
Para comenzar motor despu_s:
PRECAUCION
10. Asegt_rese de que la control de la v_lvula de admisiOn
se encuentre en la posiciOn "Rbpido" ("Fast"), que se
distingue con la figura de un conejo.
• El daSo a la lavadora a presi6n, resultado de la desatenci6n
esta precauci6n, no sera cubierto pot la garantia.
5.
6.
11. Empuje bombilla mas principal firmemente vez de 3,
esperando 2 segundos entre cada empuj6n. En el caso
de que el motor est6 caliente, NO apriete la bombilla
mas principal.
a
Presione el disparador en la pistola para purgar de aire
e impurezas el sistema de bombeo.
12. Jale la cuerda de arranque lentamente con su mano
derecha hasta que sienta alguna resistencia, entonces
jale con energia.
Acople la boquilla de extensi6n a la pistola aspersora.
Apri6tela manualmente.
\
13. Regrese la cuerda de arranque lentamente. No permita que
la cuerda regrese bruscamente y golpee el arrancador.
PRECAUCI6N
\
7.
\
Coloque la boquilla en el modo de baja presi6n (deslice
la boquilla hacia adelante) y presione el disparador en
la pistola aspersora para liberar la presi6n provocada
por haber abierto (ON) el agua. El agua Ilenar_ la
• Apriete el gatillo de la pistola rociadora cada vez que tire del
arrancador de retroceso y que el motor no arranque.
30
iiiPREiCAUCilONiiiiiiiiiiiiiiiiiiiiiiiii
NOTA: Siempre mantenga la control de v_lvula de admisibn
en el "R_pido" ('Fast") posicione cu_ndo operar la arandela
de la presibn.
CSmo Detener
PresiSn
su M__quina Lavadora
a
1,
Mueva v_lvula de admisibn a posicibn "Step" ("Parade").
2,
Apriete el gaUllo do la pistola do rociado para
eliminar la presi6n do la manguera,
MUeVa la b0quilla hacia atr,_s
para 0btener 81 mad0 de alia
presi6n
3,
NOTA: Observar_ una pequefla cantidad de agua cuando
elir'nine la presi6n,
CSmo Usar la Boquilla
Mueva la b0quilla hacia
adelante papa 0btener _1modo
de baja presi0n y para la
ap!isaci#n de! detergente.
El patn_n de rociado se ajusta de un patron angosto a
un patrbn en abanico girando la boquilla,
Ajustable
Usted ya debe saber came darle ARRANQUE a su r'n_quina
lavadora a presi6n y cor'no DE'I'ENERLA. La inforrnaci6n de
esta secci6n le dim cor'no ajustar el patrbn de rociado y
coma aplicar detergente u arras quimicos de lir'npieza,
iiiiiPRECAUCilON
,
NUNCA ajUste 81 pal:r6n de rosiad0 _an_
, NUNCA _10qu_ las marTas _rt _nte
el
pa.tr6n de rociado:
_
ro_iand0.
Gire
la boqui!la en sentid#
contrado alas manecillas del
reloj para un patr6n de roe!ado
en abanico.
de la b0quilla pafa ajustar
En el extremo de su pistola de rociado existe una manija que
se puede mover hacia adelante y hacia at_s para ajustar el
patrbn de rociado para qua sea de alta o baja presibn,
1,
4,
Apunte la boquilla hacia el suelo, desenganche el
cerrojo de seguridad y apdete el gatillo para probar el
patr6n de rociado,
Gire ]a boqui!la en sentido de
las m_neciilas del reloj para un
patr6n de roe!ado a chorro
Para una limpieza m_s efectiva, mantenga la boquilla
de rociado de 8 a 24 pulgadas de la superficie de
limpieza,
Si coloca la boquilla de rociado demasiado cerca podria
daflar la superficie, especialmente cuando este usando
el modo de alta presi6n,
%
6,
NO coloque la boquilla a menos de 6 pulgadas cuando
est6 limpiando Ilantas,
CSmo Usar la Boquilla
a Chorro
La boquilla a chorro hace girar la cordente de alta presibn
en un patn_n circular _pido. El rociado de alta presi6n es
r'n_s elective cuando la punta de la vara se encuentra entre
8 y 24 pulgadas de la superficie qua se est_ lir'npiando,
PRECAUCION
2,
Usted tambien puede ajustar el patrbn de rociado
girando la boquilla para qua est6 concentrado en un
patr6n de chorro o un patrbn expandido en abanico,
, Aseg_rese de qua la superfi¢ieno resulte da_adadebidoale
aH:apresi6n. Para elloi haga una prueba en une`zone.oculta.
Para ¢onectar el boquilla a ¢horro a la piatola do
rociado:
1, Coloque el pasador de seguridad al gatillo de la pistola
rociadora.
2,
31
Quite extensi6n de la lanza del pistola de rociado.
3,
Conecte el extension de la boquilla a chorro a la pistola
de rociado. Apriete con la mano.
\
8,
IMPORTANTE: Usted deber_ lavar el sistema de inyeooi6n
de quimicos despu_s de coda uso colocando el filtro en un
balde de agua limpia y haciendo funcionar la maquina
lavadora a presi6n de 1 a 2 minutos en el modo de baja
presi0n,
\
4,
Desembarazo el pasador de seguridad al gatillo de la
pistola rooiadora,
Enjuage
Presion
Siempre comience a usar la boquilla a chorro a cierta
distancia y vaya acorcandose a la superficie
gradualmente basra que obtenga la fuerza de limpieza
que desee.
Usando
de la Mbquina
Lavadora
a
Para Enjuage:
"1, Mueva la boquilla hacia at_s para obtener el modo de
alto presi6n, oprima el gatillo y espere que deje de salir
detergente.
NO'FA: Usted no puede aplicar detergente con la boquilla a
ohorro,
Aplicaci6n del Detergente
Boquilla Ajustable
Para lavar, comienco en la porte inferior del area que
est_ lavando y dirijase hacia arriba, utilizando
movimientos largos, parejos y superpuestos.
NO'FA: Tambi_n puede detener la cireulaci6n del detergente
retirando el tubo de sucoi6n del recipiente,
2, Mantenga la pistola de rociado a una distancia segura
del area que planea rooiar,
la
IMPORTANTE: Utilico quimicos disefiados especificamente
para mdquinas lavadoras a presibn, Los detergentes
caseros poddan dafiar la bomba.
ADVERTENCIA
PRECAUCION
,
Mantenga la boqui!la de rociado de 8 a 24 pu!gadas de la
superfk;ie de limpreza:
,
Oper_ y almacer_ esta unidad sobr_ una superficie _stabI_
Sea extremadam_
cuidadoso si usa ]a maquinalavadora
presi0n desde una escalera, andamio o c_Jalquiersuperficie
i_lativamente inestable.
Para aplicar
el detergente, siga los aiguientes
paso,s:
1,
Revise el uso de la boquilla ajustable.
2,
Prepare la solucibn detergente seg_in Io indic,ado para
el trabajo de limpieza.
3,
Coloque el extremo con el filtro del tubo para sucoibn
de detergente en el recipiente del detergente.
3,
Aplique un rociado de alto presibn en un area pequer3a,
despu_s revise si la superficie presenta dafios, $i no
encuentra dafios, puede continuar con el trabajo de
limpieza.
4,
Comienco en la par|e superior del _rea que va a
enjuagar, dirigiendose haoia abajo con los mismos
movimientos superpuestos que utiliz6 para el lavado y
la aplicacibn del detergente.
PRECAUCION
4,
Sistema de Enfriamiento
(Alivio T6rmico)
Mueva la boquilla ajustable haoia adelante para obtener
el modo de baja presi0n. El detergente NO puede set
aplicado si tiene la boquilla en la posicibn de alto
presi6n,
5,
Aseg0rese que la manguera de jardin est_ conectada a
la entrada del agua, Revise que la manguera de alto
presi6n est_ conectada a la pistola de rociado y a la
bomba. Dele arranque al motor,
6,
Aplique el detergente sobre la superficie seca,
comenzando en la porte inferior y dirigi_ndose hacia
arriba,
7,
Permita que el detergente "penetre" de 3 a 5 minutos
antes de enjuagar. Vuelva a aplicarlo cuando sea
necosario para evitar que la supeffioie se seque.
Autom&tico
El agua que ciroula dentro de la bomba puede alcanzar
tempera_uras entre los "125_-"155'_Fsi hace funcionar el
motor de su maquina lavadora a presiOn de 3 a 5 minutos
sin oprimir el gatillo de la pistola de rooiado. El sistema de
enfriamiento autom_tico se activa a esta temperatura y
enfria la bomba descargando agua caliente en el piao,
evitando a$i el dafio interno de la bomba,
32
RESPONSABILIDADES
DEL PROPIETARIO
Siga el programa de mantenimiento segLin el n0mero de horas o seg0n el oslendario, Io que suceda primero.
Se requiere de servioio con mayor frecuenoia cuando opere la unidad en las condioiones adversas descritas a continuaoi6n.
CALENDARIO DE MANTENIMIENTO
ANOTE LAS FECHAS CONFORME
,_ , ,-.._ r
SERViCiO
iNTERvAL.ODE
OPEFLACI6N
NORMAL
I
POR
FECHAS
Cads[ 25
A_de
Horas 0
C_tda US0 alAt_
1"AREA DE MANTENiMIEN/0
LAVADORA A PRESION
Revise/lirnpieel filtrode la entrada de
C_da 50
al Afro
...............................
i001
HOms0
alAfio
,
x_
Revise la rclan£uerade _lta pr_lOn
X
Revise a rnangU_rade
ReV S0 a p_s_o
a aSpers0ray Wdf)que
I...............
,
X
que no hayafugas en el ensarnblaje
Purgue I_born ba de airs y de
Gont_lnants_
DESERVICIO
HORA
iiiiiiiiiiiiiiiiliiiiiiiiiiiiiiliiiiiiiiiiiiiiliiiiiiiiiiiiiii
__
Prep_r_ la bomba para almaoanadaa
menoSde 32_F
I
Vea _Alrn_namie_o+
I_ patina 37.
en
I
I
I
I
................
I.............. I.............. I...............
C_mbiar el aGsite d_l
Servici0 al filtr_ de airs
$er_ici°a la buiia...........................
_rviCi0
__
a! SiSternade la
P_par a!m_cen_m!ent0
S! la
_nidad
permane¢_ S!n
_USO _or
111_[a _e
Limpiar si est_ obstruido. Remplazar
=
siesta perforado o roto.
Cambiar el aceite despues de las pdmeras (5) horas y despues cada 50 horas.
Hater el oarnbio de aceite con mayor frecuencia
='
cuando trabaje en condicianes
de muoha suoiedad o polvo.
Rernplazar m_s a menudo bajo condioionP_ de suoiedad o polvo.
ESPECIFICACIONES
Especificaciones
Algunos ajustes tendr_n que hacerse peri6dicamente para
mantener adecuadamente su m_quina lavadora a presi6n.
de la M_quina Lavadora a Pre$i6n
Presi6n ..................
Velocidad de flujo ..........
Mezcla de quimicos ........
Temperatura del suministro
de agua .................
Peso que Embarea .........
Especificaciones
DEL PRODUCTO
Todos los servicios y ajustes deber_n hacerse per Io menos
una vez en osda estacibn. Siga las instrucciones de la tabla
+Programa de Mantenimiento" descdta antedormente.
2,000 PSI
2.0 GPM
Use segQn iostrucciones
NOTA: Una vez al atio, usted deber_ limpiar o remplazar la
bujia y el filtro de aire. Una bujia nueva y un filtro de aire
limpio garantizan una mezcla de combustible-aire adecuada
y le ayuda a su motor a funcionar meier y a tener una vida
0til m_s prolongada.
Que no exceda los 100'_F
48 Ibs.
del Motor
Si equip6 con Ilantas que se pode hinchar, mantenga la
presi6n aerea en el valor mareado en la Ilanta o dentro de
15 y 40 psi.
Caballos de fuerza .........
3.75 HP
Bujia
Tipo: ................
Champion RJ-19LM o similar
Calibre la separaci6n a: 0.030 pulgadas (0.76 ram)
Capacidad de gasolina .....
1.0 Cuartos
Aceite
Per encima de 40_F .....
SAE 30
0_F - 40°F .............
SAE 5W-30 o 10W-30
RECOMENDACIONES
ANTES
GENERALES
La garantia de la m_quina lavadora a presi6n NO cubre los
elementos que ban side sujetos a abuse o negligencia por
parte del operador. Para hacer v_lida la cobertura total de la
garantia, el operador deber_ mantener la lavadora de
presi6n tal y como se indios en el manual, incluyendo su
adecuado almacenamiento, come se describe en la secci6n
"Almaosnamiento" en la p_gina 37.
33
DE CADA usa
1.
Revise el nivel de aceite del moLor.
2.
Revise si existen dafios en el colador de la entrada de
agua.
3.
Revise si existen dafios en el filtro en line&
4.
Revise si existen fugas en la manguera de alta presibn.
5.
Revise si existen dafios en los flltros de quimioss.
6.
Revise si existen fugas en el conjunto de la extension
para boquillas y pistol&
7.
Elimine el aire y los contaminantes
de la bomba.
MANTENIMIENTO
DE LA MAQUINA
LAVADORA A PRESION
4. Conecte la extensi6n para boquilles a la pistola de
rociado de la manera desorita anteriorr'nente en este
manual.
Revise y Limpie el Colador
Elimine
Bomba
de Entrada
Examine el colador de entrada de la r'nanguera de jardin.
Limpielo si est_ tapado o remplacelo si est_ reto.
Revise
la Manguera
2.
Hale el gatillo de la pistola y mant0ngalo apretado hesta
que obtenga una corriente de agua constante.
Para retirar los contaminantes de la bomba, siga los
siguientes pasos:
1, Instale la m_quina lavadora a presi6n como estd
descdto en la secoiOn de "Montaje De La Maquina
Lavadora A Presion" y conecte el suministre de agua.
ADVERTENCIA
y la Extensi6n
de la
Para reUrar el aire de la bomba, siga los aiguiente$
pesos:
I,
Instale la m_quina lavadora a presi6n cor'no est_
descdto en la secoiOn de "Montaje De La Maquina
Lavadora A Presion" y conecte el suministre de agua.
de Alta Presi6n
Les r'nangueras de alta presi6n pueden desarrollar fuges
debido al desgeste, doblecos o abuso. Revise la r'nanguera
antes de cada uso. Revise si existen cortes, fuges,
abrasiones, levantamiento de la cubierta, dar3o o movimiento
de los acoplamientes. Si existe cualquiera de estes
condiciones, remplaco la manguera inmediatamente.
Revise la Pistola
Boquillas
el Aire y los Contaminantes
para
Examine la conexi6n de la manguera a la pistola y
coreiorese de que est0 en buen estado. Pruebe el gatillo
opdmi0ndolo y esegur_ndese de que se devuelve a su sitio
ouando Io suelte. Coloque el corrojo de seguridad y pruebe
el gatillo. Usted no debe set capaz de oprimir el gaUllo.
Remplaco la pistola inmediatamente si falla oualquiera de
estes pruebes.
2.
Retire la extension para boquilles de la pistola.
3.
Ponga en mareha el motor de acuerdo a lea
instrucoiones de la secoi6n "C6mo Usar Su M_quina
Lavadora A Presi6n".
4.
Hale el gatillo de la pistola y mant0ngalo
5.
Cuando el suministro de agua sea uniforme y
constante, enganche el cerrojo de seguridad y vuelva a
ajustar la extensi6n para boquilles.
Mantenimiento
apretado.
de la Boquilla
Si siente una sensaci6n pulsante al r'nomento de apretar el
gaUllo de la pistola rooiadora, puede que sea causada por la
presiOn excesiva en la bomba. La causa principal de la
presiOn excesiva en la bomba es cuando la boquilla se
encuentra atescada o tapada con matedales extrafies, tales
como tierra, etc. Para corregir el problema, limpie
inmediatamente la boquilla les instrucoiones siguientes:
Revise el Filtro en Linea
Consulte la ilustraoi6n y suministre servioio al filtro en linea
si se tapa siguiendo estes pesos:
1. Apagueelmotoryapagueelsuministrodeagua.
_
2.
Filtro en linea
ExtensiOn
Boquillas
Anillo !O!
1. Retire la pistola y la extension para boquilles de la
manguera de alta presiOn. Retire la extensi6n para
boquillas de la pistola y retire el anillo 'o' y el colador de
la extension para boquilles. Lave el colador, pistola y
extension para boquilles con agua limpia para eliminar
toda olase de residues.
Remueva la boquilla del extremo de la extensi6n de la
boquilla. Separe la extension de la boquilla, de la pistola
rociadora. Gire la boquilla en direcoi6n de las agujes del
reloj, a la pesioi6n "stream" (chorre). Usando un Allen de
2mm (5/64) provista, remueva la boquilla del extremo de
la extension de la boquilla.
3, Quite el en el filtro de la Iinea del otto fin de la extension
de boquilla,
2. Coloque el colador del filtro en lines en el extremo con
rosca de la extension para boquilles. Su direcoi6n NO
importa. Coloque el colador ejereiendo presiOn con el
borrador de un I&piz hesta que se esiente pot completo
en el rondo de la abertura. Tonga cuidado de NO doblar
el colador.
4,
3. Coloque el anillo 'o' en la ranura respectiva. Empuje el
anillo 'o' hesta que quede ajustado contra el colador del
filtro en Iinea.
Use u n pequefio sujeta papeles para liberar cualquier
material extrafio que estO tapando la boquilla,
Introduzca el alambre dentro de la boquilla y girelo hacia los
!ados; h_ia adelante y atr_s hesta despejar !a 0bstru_Oni
34
5. Usandc una manguera de jardin, remueva cualquier
desechc adicicnal, pcniendo agua en la extensi6n de la
bcquilla. Haga _',stode 30 a 60 segundos. Gire la
extensi6n de la boquilla ajustable a "stream spray"
(chorrc rociador) y mueva la boquilla de "low" (bajc) a
"high" (alto), mientras drene el agua.
3.
Incline la limpiadora a presi6n hacia un lado para que
vaciar completamente la bomba de aceite, y vierta este
en un recipiente homologado.
4.
Incline la limpiadora a presi6n hacia el lado contrario y
Ilene la bomba con el aceite recomendado a tray,s del
mismo orificio (puede utilizar para clio un embudo
pequefio).
5.
Instale el tap6n negro de aceite de la bombay
firmemente.
apri_telo
Coloque la limpiadora de presi6n en su posici6n normal
(de pie). Afiada combustible y acoite de motor.
6. Instaledenuevolabc<luillayenelfiltroen-Iineaenla
MANTENIMIENTO
Revisi6n
extensi6n. NO la apriete demasiado con la Ilave Allen.
7. Ccnecte de nuevo la extensi6n de la boquilla a la pistola
rociadora.
Cambio
9. l=ruebe el lavador a presi6n al hacer funcionar la boquilla
en la posici6n "high"y "low".
de los Anillos
de Aceite
Cambie el acoite del motor despu_s de las pdmeras 5 horas
y cada 50 horas a partir de ese momento. Si est_ utilizando
su m_quina lavadora a presi6n bajo condiciones de extrema
suciedad o polvo, o en un clima demasiado caliente, haga el
cambio de aceite con mayor frecuencia.
'O'
Compre una O-Juego de Reparacibn de Anillo, el artlculo
numera 7175116, en sus Sears locales o Ilamando
1-800-366-PAR'r o en Ilnea en www.sears.com. No se
incluye con la arandela de la presi6n. Este juego incluye los
anillos del reemplazo O, arandela de caucho y flltro de cala
de agua. Refierase a la hoja de la instrucoi6n proporeionada
en el juego para atender a su unidad'los anillos de s O.
Mantenimiento
del Nivel del Aceite
El nivel del acoite deber_ set revisado antes de cada use o
al menos cada 5 horas de operacidn. Conserve el nivel del
acoite.
8. Conecte de nuevo el suministro de agua, prenda el agua,
y encienda el motor.
Mantenimiento
DEL MOTOR
PRECAUCION
de la Bomba
Cambio del aceite de la bomba
Cambie el acoite cada 50 horas o una vez al ar3o, Io que
suceda antes.
NIIgOS.
NOTA: Debe adquirir una botella de acoite para la bomba
previamente medido, N° de pieza 190586G8, Ilamando al
1-800-366-PAR'r o en linea en www.sears.com.
i_
Vacie el aceite del motor y el combustible de la
limpiadora a presibn.
2,
Use una 8ram Ilave allen para extraer el tap6n negro de
acoite de la bomba que hay entre la salida de presibn y
la entrada de la manguera de riego.
CONSERVE
los
VUELVA ACEITE USADO A la
FUERA
CENTR, DE
A. ALCANCE
DE
Cambie el aceite con el motor caliente despu_$ del
funcionamiento,
como se indica a continuaci6n:
1, Drene tanque del combustible haciendo funcionar la
m¢_lquinalavadora a presi6n hasta que tanque este vacio.
Cambie el aceite como se indica a continuaci6n:
1,
NO CONTAMINE.
RECURSOS.
I COLECCION
MANTENGA
Tac6n de
Acoite
35
2.
Desconecte alambre de bujla y Io mantiene lejos del
bujla.
3.
Limpie el _rea alrededor de la abertura para Ilenado de
acoite, retire la varilla de medicibnltapa del aceite.
Limpie la vadlla de medici6n.
4.
Incline su m_quina lavadora a presibn para drenar el
acoite a traves del orificio de Ilenado en un recipiente
adecuado asegur_ndose de inclinar la unidad hacia el
lado opuesto de la bujla. Cuando la caja del cigiJefial
este vacia, vuelva a colocar la m_quina lavadora a
presi6n en posici6n vertical.
5.
Limpie la vadlla de medici6n, insertela en el oflficio de
Ilenado y aprietela firmemente; despues, vuelva a retirar la
vafllla de medici6n. Deposi_ el aceite recomendado basra
la mama "Full" de la varilla de medicibn. Deposite el aceite
lentamente. Limpie la varilla de medicibn cada vez que
revise el nivel del aceite. NO Ilene exces_amer_e.
6,
Instale el tap6n del orifioio de Ilenado y la vadlla de
medioi6n, apriete firmemente.
7,
Limpie los residuos de aceite,
8,
Conecte de nuevo alambre de bujia al bujia.
Servicio
del Depurador
Proporcione
Servicio
a la Bujia
Proporoione servioio a la bujia coda 100 horas de operaoi6n
o una vez al afro, Io que suceda primero,
de Aire
Su motor no funcionarb adecuadamente y puede do,area si
usted Io hace funcionar con un depurador de aire sucio.
Suministre earvido al depurador de aire una vez Osda 25 horas
de operaoibn o una vez por afro, Io que suceda pdmero,
Suministre earvido m_s frecuen_men_ sila unidad fundona
bajo condicionea de mucha suciedad o polvo. Los repuestos se
encuenf_an disponiblea en su cenb"o de servicio local Sears,
Para dar setvicio al depurador de aire, siga los pasos
qoe se detallan a con_noaci6n:
1, Afloje el tornillo,
1,
2,
3,
Limpie el _rea alrededor de la bujia,
Retire y revise la bujia,
Cambie la bujia si los electrodos eat_n desgastados,
si el aislador eat_ roto o partido. Para su remplazo,
utilice una bujia Champion RJ-19LM.
o
4,
Revise la eaparacibn del electrodo con un calibrador de
alambre y ajuste la separaoi6n a 0,030 pulgadas
(0,76 mm) si ea necosado.
5,
Instale la bujia y aprietela firmemente,
2,
Quite detenidamente aire la asamblea m_s limpia para
prevenir eacombros de cear en el carburador,
3,
Tome aire la aeamblea m_s limpia aparte y limpie todo
deapide. Lave limpiador de aire de eapuma en el
detergente y el agua Iiquidea, El eatrujbn eaca en una
tela limpia,
NOTA: Usted puede comprar los bujia nuevos Ilamando al
1-800-366-PART.
4,
SATURE limpiador de aire de eapuma en el aceite de
motor y estruj6n en una tela limpia para quitar el excoso
acoite.
5,
Vuelva a instalar limpie o limpiador nuevo de aire de
eapuma en el ouerpo.
6,
Instale limpiador de aire eaguramente en carburador
con el tomillo.
NO deber_ haber agua en la unidad por largos periodos de
tiempo, Los eadimentos de minerales ea pueden depositor
en partes de la bomba y "congelar" su funcionamiento, Lleve
a cabo estea procodimientos deapu_s de coda uso:
1, Lave el tubo de sucoibn de detergente colocando el
filtro en un balde de agua limpia al mismo tiempo que
haco funcionar la m_quina lavadora a presi6n en el
modo de baja presibn (boquilla ajustable en posioibn
delantera). Lave pot un minuto o dos minutea,
DESPUES
NOTA: Usted puede comprar los elementea del depurador
de aire nuevos Ilamando al 1-800-366-PART.
36
DE CADA USO
2,
Apague el motor y d_jelo enfriar, deapu_s retire todas
los mangueras.
3,
Deaconecte el alambre de la bujia.
4,
Saque todea los Iiquidos de la bomba halando la manija
de retroceao apreaimadamente 6 vecos, Esto deber_
evacuar la mayoria del Iiquido de la bomba,
5.
Si planea almaosnar la unidad pot m_s de 30 dias, yea la
eacoi6n "Almaosnamiento Prolongado" en la p_gina 37,
GENERAL
Proteja
Revise la manguera de alta presi6n para ver si presenta
dafios. Los cortes en la manguera o el desgaste de la
misma pueden ocasionar fugas y p_rdida de presi6n. Si
encuentra alg0n dafio, remplaos la manguera. NO intente
reparar una manguera dafiada. Remplaco la manguera
con la parte Craftsman genuina.
,_
despejada,
lejos de llamas
en un en
recipiente
]ADVERTENCIA!
Drene abiertas,
el combustible
un area
adecuado y utilizando un embudo. Aseg_irese que el
motor est_ frio. NO Fume.
Retire toda la gaselina del carburador y del tanque del
combustible para evitar la formacibn de dep0sitos de
goma en estas partes, Io que puede causar un real
toncionamiento del motor.
Vuelva a conectar el alambre a la bujia.
Almacene la unidad en una t=rea limpia y seca.
Haga funcionar el motor hasta que el tanque quede vacio
y el motor se detenga.
Cambio
combustible
en el tanque
en recintos
en
ADVERTENCIA!
NUNCA
almacenecerrados
el motoro con
areas encerradas con poca ventilaci6n donde los
vapores puedan entrar en contacto con llamas
abiertas, chispas o luces de pilcto.
ALMACENAMIENTO
INVIERNO
de Combustible
Drenaje del "l'anque de Combustible:
Drene el agua de la manguera, boquilla de extensibn y la
pistola aspersora. Fnrollela adecuadamente en el soporte
incluido.
_i
el Sistema
de Aceite
Con el motor todavia caliento, drene el aceito de la caja del
cig0efial. Vuelva a Ilenarlo con el grade de aceite
recomendado. Yea "Cambio de Aceite" en la p_gina 35.
PARA
Aceite el Di&metro
Interior
del Cilindro
Retire la bujia. Rocie aproximadamente 1 onza de aosite
limpio para motor denb"o del cilindre. Cubra el orificiode la
bujia con un b"apo.Hale la manija de reb_,coso lentamente
para distnbuir el aosite. Fvite el rociado del orificiode la bujia.
Instale la bujia. NO conecte el alambre de la bujia.
PRECAUCION
Protecci6n
de la Bomba
A protege al salvador de bomba de use de bomba Sears a
previene congelar el dafio y lubdca _mbolos y sellos.
congelarniento.
NO'FA: El protector de la bomba, mimero de item Sears
n0mero 7174403, ost_n disponible s01ocome un acceserio
opcional. NO es incluido con la arandela de la presi0n.
Para proteger la unidad de las temperaturas de
congelamiento:
Lave el tube de sucoibn de detergente colocando el filtro
en un balde de agua limpia al mismo tiempo que haco
toncionar la m&quina lavadora a presi6n en el mode de
baja presi6n (boquilla ajustable en posici6n delantera).
Lave per un minute o dos minutes.
Saque redes los Iiquidos de la bomba halando la manija
de retrocese aproximadamente 6 veoss. Fsto deber_
evacuar la mayoda del liquido de la bomba.
Utilice un protector de bomba, disponible en Sears con el
n0mero de cat&logo 7174403, para cuidar la bomba.
Aqu_,l protege a la unidad contra el congelamiento y
lubrica tanto los pistones come los empaques.
Si el protector de bomba no est& disponible, conecte un
tramo de 3 pies de manguera de jardin a la entrada de
agua. Vierta anticongelante RV (anticongelante sin
alcohol) en la manguera. Jale la manija de arranque dos
veces. Desconecte despu_s la manguera de 3 pies.
ALMACENAMIENTO
PRECAUCION
AI ueo el salvador de bomba:
PRECAUCION
* Siempr_ pmteccibnde ojo de use cuando se usa PumpSaver.
Conecte manga en el salvador de bomba puede a la
cala de la bor'aba.
PROLONGADO
El empuj0n en puede la cima a distribuye bomba salvador.
Cu_ndo Iiquido de salvador de bomba comienza a la
salida de la bomba de la salida, la bomba es protegida.
Quite bomba salvador de la cala de bomba.
Si usted NO planea usar la mdquina lavadora a presibn per
m_s de 30 dias, deberd preparar el motor para un
almacenamiento prolongado.
Es importanto evitar la formacibn de depbsitos de goma en las
partos esenciales del sistema del combustible tales come
carburador,filf_o del combustible, manguera o tanque del
combustibledurante el almaosnamiento.Tambi_n, la expedencia
indies que los combosf_bles con mezdas de alcohol (llamados
gosohol, etanol o metanol) pueden af_aer la hurT_lad, Io que
Ileva a la separacibn y formad0n de de;_los durante el
almaosnamiento. La gaselina _¢;_lapuede dafiar el sistema del
combustiblede un motor duranto el almaoenamlento.
OTROS
NO almacene gasolina de una estaci0n a ctra.
Si es posible, almacene su unidad en un recinto corrado
y c_brala para protegeda del polvo y la suciedad.
ASFGURFSF DE VACIAR EL TANQUF DFL
COMBUSTIBLE.
IMPOR'I'AN'I'E: NUNCA cubra su m_quina lavadora a
presibn cuando el motor y el area del escape est_n calientos.
37
Problema
Causa
So!uci6n
"lLaboquillaest_enelmododebaja
presibni
1.
Mueva la b0qUilla hacia _FbS para
el r'a0do de alta presibni
2.
I_ir'apielaentradai
3.
Propor¢ione flujo de agua
2i
3;
Suministro de agua inadecuado,
4;
La manguera de entrada est'_
d0blada o prese_ fugas
L.a b0mba presenta !os siguien_$
pl_blemas:
Laentradadeaguaestb
b!oqueada
rio
_,adoi
traque_o; p_rdida de presi6n, bajo
volumen de agua.
de la m_ngUeia de
i
"
15.
ReViSe_ 'im_i_ e{ co{adOi d_ l_
s;_ihist_
de
;
rods fr!a.
La manguera de a!ta presibn est_
7.
Retire las obstmcciones
manguera de salida.
8
La pist01a presenta fugas.
8.
Remplace!apisto!a.
9
La boquilla est_ obstruida,
9.
I-ir'apie !a b0quil!a,
de!a
10, Bomba defectuosa.
10_ Pbngase en contacto con el centro
de Servici0 Searsi
"1
El |ubo de s_ccibn de detergente
no est_ Sur'aergido,
l.
Coloqueeltubodesuccibnde
detergente en el detergente,
2i
El filtro de quimicos est_ tapado.
2.
I_ir'apie 0 rer'apla_ el filtr0/tub0 de
3
SU_ioenelfilt_deiaiine_.
3.
Ve_'!ChequeEneiFiitr0deia
4;
La boquilla es_ en el r'aodo de alta
presibni
4.
Mueva la boquilla hacia adelar_e
paFa el modo de baja presi6ni
M_eva el control de la V_Ivula de
!egu!acibn a la p0s!cibn FAST
(RAPIDO)i Si el moto_ continua
fun_ionando ma!; pbngase en cor_acto
con el centro de servicio Sears:
1
Depurador de aire SUci0i
1.
I_ir'apie 0 rer'apla_
air'e;
2_
Sin gasolina,
2.
Lleneeltanquedecombustib!e.
3;
Gaso!ina vieja,
3.
Drene el tanque de gasolina; !!_ne!o
con combustible fresco;
4;
El alambre de la bujia no est'_
_eCtad0a
labuj!a
4.
Cone_te el alambre a la bujia:
5.
Remplace !a bujia
I
funciona mali
I
Estire la manguera de entrada,
co!oqueunparcheen!a{uga.
7_
I"
El motor no arranCa; o ar'ranca y
.4.
sbminiSiiO de _gUa est_
en0=r'aade !os !00Fo
L.a Velocidad del mot0r es demasiado
"
I
5
6
Buj!ama! a,
AgSa en ia gasoiina
el depurador de
I
16.
Drene ei tanqde de gaS01ina; iieneio
con Cor'abUstiblefrescoi
7i Mezcla de cor'abUstibledemasiado
ri_.
7.
Pbngase en contacto con el centro
de servjoio Sears;
8;
8.
Pbngase en ¢ontacto con el centro
de servicio Sears
9_Elmotorhaperdidocompresibm
9.
pbngase en ¢ontacto con el centre
de Servici0 Searsi
El motor se apaga durante la
0peraci_ni
Sin gasoI!na,
Llene e! tanque de combustib!e.
El motor no tiene fuem,
Filt_o de aire sucio:
Remplaceelfiltrodeaire,
Vblyula de entrada trabada en la
posit!on abierta o cerrada,
38
Sears, Roebuck and Co., U,S.A. (Sears), California Air Resources Board (Consajo da Racursoa sobra al Aire da
California, CARB, per sus siglaa an ingl*_e) y United States Environmental Protection Agency (Agancia da Protacci6n
Ambiantal da EE,UU,, EPA, per sus siglas en ingl*_e),
Declaracibn da garantia dal sistama de control de amisionoa
(darechos y obligacionoa dal propiatario pare la garantia contra defectos)
LA COBERTURA DE LA GARANT[A DE CONTROL DE EMISIONES SE
APLICA A LOS MOTORE$ CERTIFICADOS ADQUIRIDO$ EN
CALIFORNIA EN _995 Y POSTERIORMENTE, QUE SE UTILICEN EN
CALIFORNIA, Y A MOTORES CERTIFICADOS MODELO _997 Y
POSTERIORES QUE SEAN ADQUIRIDOS Y UTILIZADOS EN OTRA
REGION DE ESTADOS UNIDOS (_"A FARTIR DEL 1" DE ENERO DE
200"1, EN CANADA).
de emisionea) an le medida due dichse pertes heyea eatado
presentes an el meter adquiddo.
e
Sistarna de mediciOn de earndustidle
Sistarna de enriqeaoimiento pare arrandue en fr_e.
Cerbu raper y per_ea internee
Bom#a de combustible.
b
Dsetarsci6n de garsntia eobrs el control de emieionea de la EPA de
EE.UU. y California.
Filtro de airs
Colector de entrsda.
El Califomia.&Jr Reaour_es Board (CARD), 18EPA de EEUU y Sears se
complaean ea expliear le Garsntia pars el sistema de contrel de emisionea
_:_rs motorss boqueilea pare exteriorss (SORE) m#aeles e_o 2000 y
_toriorss
En California, lea nuevca motorss #aQuebos pare exteriorss se
de#an dise_iar,coeat_Jir y edui#ar #ars cumplir con Ise es_rictas normea
del eatado centre el src_)g En otras regionea de Estados Unidca, los
nuevca motorss pars interiorea de ignioiOn par chispa eartifeadca #are
m(_lelca a_o 1997 y postedores deben _mplir con earmea sirnilerss
eatableeidse per le EPA de EEUU. Sears debe 9arsn_zar el sisteme de
con_)l de emisionea de se motor pare los per'#aea indicadea a
conlJncaoiOn,siemprs y cuendo no se heya adueado, deseuidede o dedo
mentonimiento incor_cto el me{or boqueile pera exteriorss
Su sis_ema de control de emisieaea
bo_ra incluir
c.
e
de Sears
contra
Conectores y ceajunt_
#artse come el
dsfactos
en el control
LOS motorea boque_ea pare exteriorss
mo_elea 1995 y posteriorss
una gersnti8 de Pea e_ea Si elguna #ar_e de su motor releoienada
Ise emisienes ea_ defecfueaa, Sears la repersr_i e sustituir&
Reaponeabilidades
2
dal propiatario
prodietario del motor peQueilo
Vigencia de la cobarturs
Sears garsntize el propietsrie iniciel y a eade propieta_o
subsiguiente due Ise per_ea garantizedse eataran libres de defsetca
ea material y an mane de edra, qua ecasioean fallea de Ise pertes
_larsntizedea dursnta un parode de dos e_os a pertir de le feoha
ea qua el motor sea entrogedo el comprsdor minod_.
de
3
NO hab_ ¢arSea
La rs#arsoi_)n o reempleze de cualquier parte gersntizede se
rsalizar_ sin cargo elgcao pars el prspief,_do, incluyendo la meae de
obrs de diagn_s_ea qua derive an la determinaoi_n
de qua uea parte
_larsn_zade ea_ defeotuo_4a, si la labor de di_gn_ico
se realize en
un Centre da servicie Seer8 aprs#ado.
tienen
con
para le garsnt{a
4
Come
Colector de eacape
Sistarna de iny_citm de airs o vSIvul8 par irnpulsea
Distintes elementea utilizadea ea los sistarnseentedorss
V_lvulse e interruptorss de vaco, tamperaturs, posioi_ny de
detecoiOn de tiempo
Cuando exist8 une ¢ondicibn due puade ear cubierta per la gerant"8,
Seers re#ars_
el motor boque_ie pars extederos sin costa algune,
incluyendo el dia_lnbstico,
lea #artas de repueato y la mane de ebra.
de la gerantia
Sistema de ignioi_n
Bujiea
Sistama de ignition par magneto
Sistarna catalizador.
Ceavertidor cat_litico.
carsursdor
e el sisterna de inysecibn de combusUble, el sis_ema de
i_lnicibn y el eanveriJder catal_ea. Tambi_n se pueden incluir manguerss,
correse, conecterss y otrea componentos
relseionadea con Ise emisienea
Col_rturs
emieionee
Sistarna de inducoiOn de airs
par8 extedorea,
cated
Reclemea
y exclueionea
de cobet_urs
as
LOS reclames vinoulsdea con le gersntia se prssents_n
conforme a
Ise disbosioienea de le P_liza de garsnt"_ de Sears. La cobor_ura de
la gersnt"_ se excluira pars aquellea fallse de _r_es gersn_zadea
qua no eaan dsr_es eri_linalea de Seers o debido a aduse, dseouide
o mentanimien_
inearrecto, se_lOn ea es_sblaea en le P_lize de
_larsntta de moterss de Seers Sears no se rs$poneabla
per le
eabor_urs da fsIIse de dsr_es garsnfJzsdas
eeasienadas
per el use
da #artos adicionelse,
no originelse o mboif_cadse
rsspensebla
de realizer las ectJvide_es de mantonimiento
rer4uaridas
qua se indican an este manuel del propietario. Sears recomianda
due
conserve _dea los recibos due oubrsn el mantanimiento
de su motor
boque_e pars extedorss,
pore Sears no pueda negar le garentia
selamente
par la falt8 de recibca ni per su imposibilidad
de garentizer
rsalizseibn de redes lee ac_ividadse de mentenimianto
progrsmedas.
la
Come propietario del motor pequaPlo par8 ex[ariorss,
cated siemprs
debo toner an cuent8 qua Sears pod_ neger la cober_urs de le _arsntie
si su motor paduePlo pare ax_eriorss e una per_e del misme preaenta
fallas dedido a abuse, deseuide, man_enimiento
incorrscto o
modiflcacienea
no aprs#adse
5
Mentanir_ienlo
Cualquier perle gersntizada ouyo reemplazo no eat_ bo)_lrsmado
come mantanimiente requed_o o qua sate progrsmeda Onicamenle
pare ieapesei*)n freceante con el fin de "ropersr e reemplazer
conforme sea ne_eaedo", estate gersntizada en ceanto e defectca
per el periodo de la _tarsnte Cualquier porte _tarsntizadacuyo
reemplazo eat@pregrsmedo coma rnentanimiente reqeaddo tandra
8olamenta una gersntfa eantr8 defec_ea _nicameate bet el betided
hseta el pdmer reamplazo prs_lrsma_o pera eaa parte. Se pbor_
utilizer oualquier perle de ropueate due tenge un rendimiento y
dursbilided equivelentea, al realizer oualquier ac_ividad de
mantenimieato o repersei_)n. El propietsrio as respeaeable de
realizer t#ao el mantenirniente requeddo, segbo ea define ea eate
manual del prspietario.
Usted as reaboneable de preaentar su meter peque_o pare extedores
e
un Centrs de servioio Sears aprs#ado tan prseto come se prseente el
prsdleme
LaS repersciones
bsje _tarsntta dabo_n
¢oncluirse an un
peri#ao razonebla, due no exeadar_ de 90 dise
$i tieea elguea pre_lunta con respecte e sca dero_;heay
rssponeabilidadea pare la ger_ntf& ptm_lasean contacto con un
rspreaentanta de servicio Sears el "1-4500-469-4863
Diepeaicionea de le garsnt[a de Sears centre defectos an el control
de emisionea
Las siguientea sen disposioionseespe_;ificas releoionadse con le
eaborturs de la _tarsntta eantrs defectos an el control de emisionea
1.
Parlea garsntizadea
Cobarturs consiguiante
La coberturs be_e le prssente ea ampliar_ e la _lle de oualquier
compoeante del meter prsvocada par un desperfeoto en eualduier
#arte garsntizede qua sige gozando de 18coborturs de le garsntia.
La cobertura be_oeat8 _larsntie incluye selementa aquellea per_ea
qua se enumersn a eantinuseiOn (lea parsee del sisteme de control
En EE.UU y Cened_ contamea con uca Ifnee de emergencia Ise 24 horse (1-800-489-4683), due ofroea un men_ de meneajea prs_lrs#ados ean
informecibn sobro mentenimiento de productea
39
Your Home
For repair - in your home - of all major brand appliances,
lawn and garden equipment, or heating and cooling systems,
no matter who made it, no matter who sold it!
For the replacement parts, accessories and
owner's manuals that you need to do-it-yourself.
For Sears professional installation of home appliances
and items like garage door openers and water heaters.
1-800-4-MY-HOME
(1-800-469-4663)
www.sears.com
®
Anytime, day or night
(U.S.A. and Canada)
www.sears.ca
Our Home
For repair of carry-in products like vacuums, lawn equipment,
and electronics, call or go on-line for the nearest
Sears Parts and Repair Center.
1-800-488-1222
Anytime,dayornight(U.S.A.only)
www.seara.com
To purchase a protection agreement on a product serviced by Sears:
1-800-827-6655
(u.sA)
Para pedirserviciode reparacibn
a domicilio,y para ordenarpiezas:
I_U.HOG.,SJ_SM
1-800-361-6665
(Canada)
Au Canada pourserviceen fmngais:
1-800.LE-FOYER Mc
(l-e_-784-r_27)
(1-80o-533-6937)
www.sears.ca
#E/AR#
® Registered Trademark/TM Trademark I SMService Mark of Sears, Roebuck andCo.
® Mama Registrada l _ iarca de Fdbrica/sM iarca de Servicio de Sears, Roebuck andCo.
MCMarque de commerce/MO Marque d_poe6e de Sears i Roebuck and Coi