1
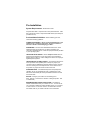
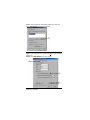
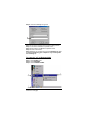
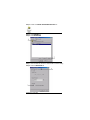
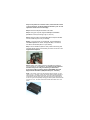
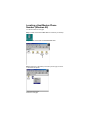
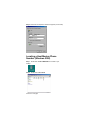
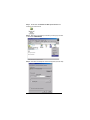
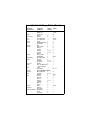
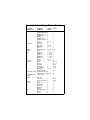
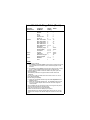
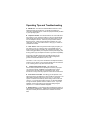
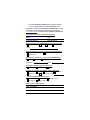
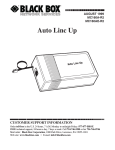
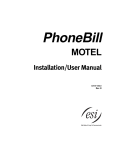
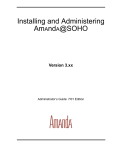
Data Port Anywhere Setup Guide Table of Contents Contacting KONEXX Inside Cover Pre-Installation 2 Data Port Anywhere Installation 3 Windows Connection Setup 5 Establishing Your Connection 9 Locating the Host Modem’s Phone Number 11 Level Switch Settings Table 14 Operating Tips & Troubleshooting 18 Warranty Information 22 Why Data Port Anywhere (DPA)? As a mobile notebook user you need modem connectivity to send and receive critical information when you are working at client sites and hotels. The problem is that notebook modems are analog and virtually all office and hotel phone systems are digital. Connectivity in this environment can be impossible. Worse, connecting to a digital line without protection can destroy your modem. The Konexx Data Port Anywhere provides an analog data port to connect your modem to virtually any office or hotel digital phone system. In addition, the DPA has a 2-Port USB Hub to simultaneously operate other USB devices. Contacting KONEXX You may contact KONEXX using any of the following methods: Voice: Toll Free: Fax: Website: E-mail: (858) 622-1400 (800) 275-6354 (858) 550-7330 www.konexx.com [email protected] [email protected] Address: KONEXX 5550 Oberlin Drive San Diego, CA 92121 Pre-Installation System Requirements - Windows 98 or later. Compliant with USB 1.1 requirements for bus powered devices. USB Hub supports low power or self powered USB devices (each USB port provides 100 mA). Pre-installation Guidelines - Before installing your DPA, observe the following guidelines: CONNECTION WARNING - Never connect the DPA directly to the telephone line or telephone wall outlet. Use the procedures in this User's Guide to avoid damaging your DPA. USB DRIVERS - The DPA uses standard Microsoft drivers. When installing the DPA for the first time you will be prompted by the computer to install/load drivers. Follow the prompts to identify the DPA to your operating system. TELEPHONE LEVEL SWITCH - Set the Telephone Level switch on the DPA for the telephone you are using (refer to the Level Switch Setting Table on page 14). Switch setting #3 is used on the majority of digital telephone systems. TELEPHONE SET VOLUME CONTROL - The Telephone Set Volume Control (handset and/or speakerphone volume) may impact your connection speed. KONEXX recommends that the volume control be set in the mid-range for most telephone sets. Some AT&T/Lucent / Avaya sets may require the volume set at a lower level. SPEAKERPHONES - If the attached telephone has speakerphone capability, do not use speakerphone mode. Speakerphone mode disconnects the handset jack used by the Modem Konnector to send and receive data. DIALING - Configure your modem for Tone Dialing (Go to Start…Settings…Control Panel…Modems…Dialing Properties…click on TONE DIAL ). MODEM SPEAKER CONTROL AND VOLUME - The telephone handset is deactivated when your modem is in use. You can use the “M1” command to enable the modem speaker and the “L3” command to set its volume. You can then "listen in" on dialed calls to monitor their status. Refer to your modem manual for more information. Data Port Anywhere Installation Step 1. Connect the USB cable on the DPA to your computer USB port. The first time you connect the DPA to your computer, you will be prompted to install USB drivers, simply follow the prompts. The DPA uses standard Microsoft drivers. Follow the prompts to identify the DPA to your operating system. Step 2. Remove the coiled handset cord from the telephone handset (2A) and insert it into the DPA jack labeled PHONE (2B). 2A 2B Step 3. Connect your PC Card or internal modem cable to the DPA jack labeled MODEM. The DPA is now installed and ready for use. If you choose to use the telephone handset for voice communications when your modem is not in use see next page. Optional Connection: If you want to use the telephone for voice communications while the modem is not in use, connect the included coiled handset cord to the telephone handset and the DPA jack labeled HANDSET. If you have connected the telephone handset to the DPA lift the telephone handset and listen for a dial tone. If you do not hear the dial tone, check your connections to ensure they match those shown in the diagram below. Return the handset to the cradle until you are ready to go on-line using your modem and the DPA. Windows Connection Setup If you use the DPA while traveling we recommend that you modify your modem settings to setup your modem for manual dialing. Why Manual Dial? Because most digital PBX systems, such as Nortel Meridian, Rolm and others do not accept the analog dialing tones generated by the modem. In order to connect with the host modem you will have to manually dial the host modem’s number on the telephone keypad. Why x3? The x3 command makes the manual dial process easier. Your modem normally requires dial tone in order to dial. By adding “x3” to your modem initialization or setup string you are instructing the modem to dial without requiring dial tone. Once the x3 is entered it remains in the Windows default settings. This will not affect modem use on an analog line. To enter the “x3” in Windows 98 (Windows 2000 see page 7): Step 1. Select START button Step 2. Select SETTINGS Step 3. Select CONTROL PANEL Step 4. Double click the MODEMS icon Continue to next page Step 5. In the General tab, highlight the modem to be used, then Select PROPERTIES (not Dialing Properties) Step 6. Select CONNECTION TAB Step 7. Under Call preferences uncheck the “Wait for dial tone before dialing” box Step 8. Select ADVANCED in the same window Continue to next page Step 9. In the Extra Settings box type x3 Step 10. Click OK to exit Advanced Connection Settings screen Step 11. Click OK to exit Modem Properties screen Step 12. Click Close to exit Modems Properties screen Step 13. Close Control Panel Step 14. Reboot your computer and proceed to Establishing Your Connection (Rebooting your computer is only necessary after first installing x3). To enter the “x3” in Windows 2000: Step 1. Select START button Step 2. Select SETTINGS Step 3. Select CONTROL PANEL Continue to next page Step 4. Double click PHONE AND MODEM OPTIONS icon Step 5. Click MODEMS tab Step 6. Click PROPERTIES Step 7. In the General Tab, Uncheck – Wait for dial tone before dialing Step 8. Click the ADVANCED tab Continue to next page Step 9. In the Extra Initialization commands box type x3 Step 10. Click OK to enter the x3 into the Windows default settings Step 11. Click OK to exit Phone and Modem Options screen Step 12. Close Control Panel Step 13. Reboot your computer and proceed to Establishing Your Connection (Rebooting your computer is only necessary after first installing x3). Establishing Your Connection Step 1. Write down the phone number (including area code if necessary) of the host modem that you wish to call. If you do not know how to find the host modem’s phone number in your computer see page 11 for Windows 98 users or page 12 for Windows 2000 users. NOTE: For proprietary software users see your Network Administrator Step 2. Set the Level switch on the DPA to the proper setting for the telephone system (see table on page 14). If the phone system is not listed, please see page 18 section E. Continue to next page Step 3. If the phone has a volume control, ensure that the volume is set to mid-range. Do this by lifting the handset to your ear and adjust the volume control to mid-range. Step 4. Return the telephone handset in the cradle. Step 5. Using your computer, begin the dial up or connection process as normal (choose login, sign on, dial, etc.). Step 6. After the modem completes dialing lift the telephone handset from the cradle and place it on your desktop. NOTE: If you cannot hear your modem dial - begin the dial up or connection process as normal, wait approximately 5-10 seconds, then lift the handset and place it on your desktop. Step 7. Get an outside line (dial 9 or other prefixes if necessary) and manually dial the number of the modem you wish to connect to on the keypad of the telephone. Step 8. Wait for your modem and host to negotiate the connection. Your connection is now established. Do not hang up the telephone handset until you are ready to terminate your connection. If you have trouble connecting, please call KONEXX Technical Support at 800-275-6354 or (858) 622-1400 (7:30 – 4:30 PST) NOTE: “Hum” Switch - When using the DPA with a laptop computer, you may notice a “buzz” or “humming” noise on the handset when the laptop computer is being powered by its’ external power supply. The noise is being generated by the computers’ external power supply and is being picked up by the telephone set due to a ground incompatibility. Changing the switch position should eliminate the “buzz” or “hum”. The white arrow below indicates the location of the “Hum” Switch. Locating a Host Modem Phone Number (Windows 98) For Windows 2000 see next page Step 1. Double click the MY COMPUTER icon located on your desktop Step 2. Double click the DIAL-UP NETWORKING folder Step 3. Right click on the Dial-Up connection you are trying to connect to and choose Properties. Continue to next page Step 4. Write down the telephone number that appears (w/ area code) Locating a Host Modem Phone Number (Windows 2000) Step 1. Double click the MY COMPUTER icon located on your desktop Step 2. Double click Control Panel Continue to next page Step 3. Double click the Network and Dial-up Connections icon located in the Control Panel Step 4. Right click on the Dial-up connection you are trying to connect to and choose PROPERTIES Step 5. Write down the telephone number that appears (w/ area code) Level Switch Settings Table The Data Port Anywhere Level switch adjusts the transmit level of your modem to the telephone set. The Level switch is manually set in one of four settings and is dependent on the telephone set you’re using. Level 3 - Approximately 75% of the electronic or digital PBX telephone systems you will encounter use Setting 3. Telephone Manufacturer Ameritech AT&T Avaya Avaya Comdial David Systems Eagle Ericsson Executone Telephone Switch Set Model Setting None Specified 1 (See Listings for Avaya) Definity 3 Destiny 3 Dimension 2 or 3 Horizon 2 ISDN 3 ISDN 7500 series 3 ISDN 8500 series 3 Infinity 3 Merlin 3 Merlin II 3 Merlin Legend 3 Partner 3 Spirit 3 System 25 3 System 75 3 System 85 3 Digitech 3 Executech 3 Executive --Executive II --Impact 3 InnTouch 3 None Specified 3 None Specified 2 MD-110 3 Encore CX 3 IDS 3 Key Systems 2 or 3 Notes 1a --2 2 --1a --------2 7 --8 3&4 3&4 3&4 ----2 2 --8 2 --1a 7 7 --- Level Switch Settings Table (Cont.) Telephone Manufacturer Telephone Switch Set Model Setting Model 227 --Model 432 --Fujitsu Focus 196 --Others 4 GAI-tronics Cohort 3 G.E. none specified --G.T.E. none specified --Harris Lanier 3 Hitachi Digital Model 200 1 HCX-5000 1 Intecom IBX 3 Inter-tel Hitech/1232 1 MPK-2 1 Axxess 3 Premier 1 or 4 Phoenix 1 or 4 Others 1 Isoetec Key Systems 3 Digital PBX 1 ITT/Cortelco None Specified 2 Iwatsu Omega 2 Omega III 2 or 3 Omega IV 1 or 4 Kokyo Co. Kanda 1 Lanier EKT-220 Electronic 2 Key Telephone Lexar Telex --2000 series --Lucent (See Listings for Avaya) Macrotel None Specified 4 Mitel Superset 2 or 3 SX-200 3 NEC Dterm II 1 Dterm III 1 Dterm V 1 Electra 2 or 3 Freedom 1 Mark II 1 Others 1 Nitsuko Onyx 3 Northcom Premier 3 (NC-1647) Northern Telecom Advantage 3 Focus 2 Logic One 3 Notes 7 & 1b 7 & 1b 5a --7 1a & 2 1a & 2 --2 2 7 4 2 7 2 2 ----1a & 2 2 ----4 ----7 5b, & 7 1a 7 1a & 7 1a 2 --7 ------1a & 2 --7 7 7 Level Switch Settings Table (Cont.) Telephone Telephone Switch Manufacturer Set Model Setting Northern Telecom Meridian Business 3 System (CENTREX) Meridian SL-1 3 Meridian SL-100 3 Meridian 1 3 Meridian 100 3 Meridian Norstar 3 Unity 2 or 3 Vantage 3 Panasonic KXT-23?5 3 DBS (old) 2 or 3 DBS (new) 2 or 3 Others 3 Phillips None Specified 1 or 4 Premier Digital 1 or 4 Rolm Model 120 1, 4 or 3 Model 240 1, 4 or 3 Model 312 1, 4 or 3 Model 400 1, 4 or 3 Model 600 1, 4 or 3 Others 1 or 4 Samsung Prostar 1 or 4 Siemens Dyad --Dyad Jr. --HCM-200 3 HCM-600 3 Hicom Digital 1 OptiSet E 1 or 4 Saturn Digit 260 --Southwestern Bell Freedom Phone-old 3 Freedom Phone-new 1 or 4 Shared Resources Vision Phone 2 (SRX) Tadiran EKT-221 --Coral I & II 4 Emerald & Others 4 Teledex All --Telrad Model 716 4 Model 2464 4 Symphony 4 Digital 717 4 Others 4 TIE BusinessComm 2 Datastar 2 DCX 2 Notes 7 7 7 7 7 ----2 --------2, 5b 6 7 7 7 7 7 7 1a 5b, & 7 5b, & 7 1a & 2 1a & 2 1a & 2 7 5b --1a 2 1b 1b & 2 1b & 2 9 ----7 7 2 2 ----- Level Switch Settings Table (Cont.) Telephone Manufacturer TIE Toshiba Trillium Vodavi Walker Telephone Set Model EX-2260 Meritore Onyx TC-22 Ultracom CX Keyset 8 DKT-1000 series DKT-2000 series EKT 2000 series EKT-3000 series EKT-6000 series Perception Strata (Key Syst) Strata (Digital) 103 series Panther Talkto 616 Electronic Key Sys Starplus Digital Marathon Poet Switch Setting 2 2 3 2 2 2 1 or 3 3 2 2 3 or 4 3 2 1 or 3 2 or 3 2 or 3 2 ----1 or 4 1 Notes --------2 2 1a 1a 2 1a --7 1a & 2 1a & 2 --1a & 2 1a & 2 1b 7 --1a NOTES: 1. Custom Factory Settings: a. The KONEXX product may require a custom factory setting for this phone set. If difficulties are encountered, contact Technical Support at 1 800 275-6354. b. The KONEXX product requires a custom factory setting to work on these phones. Contact KONEXX Technical Support at 1 800 275-6354 2. Insufficient data is available to determine whether the phone system will support autodialing. 3. The KONEXX product will not support autodial on Model 7300 series telephones. 4. You may have to dial an outside line access number, such as a 9, on the phone before autodialing. 5. Handset Wiring Compatibility: a. Phone has nonstandard handset wiring and is not compatible with the KONEXX product. b. Phone has nonstandard handset wiring. The KONEXX product requires the use of a special adapter cable set. Contact Technical Support at 1 800 275-6354. 6. When autodialing the user must dial a number on the keypad of the phone after the modem has dialed to maintain the line. 7. These phone systems do not support autodialing. 8. Modem connections limited to 2400 bps by this phone. 9. Teledex telephone is an analog handset and the laptop user may connect directly into the wall jack if the Teledex telephone set does not have a data port. Operating Tips and Troubleshooting A. USB Drivers - The DPA uses standard Microsoft drivers. When installing the DPA for the first time, you will be prompted by the computer to install/load drivers. Follow the prompts to identify the DPA to your operating system. B. Telephone Handset - The handset must be out of its cradle when the modem is in use. When the modem is in use, the handset will be electronically disconnected and you will not be able to talk on or hear from the telephone handset. This is the primary indication that the DPA is turned on. Make sure the telephone handset is out of the cradle until you finish your modem session. Hang up your modem to reactivate the handset. C. “Hum” Switch - When using the DPA with a laptop computer, you may notice a “buzz” or “humming” noise on the handset when the laptop computer is being powered by its’ external power supply. The noise is being generated by the computers’ external power supply and is being picked up by the telephone set due to a ground incompatibility. On the side of the DPA farthest from the USB I/O cable is a twoposition slide switch. Changing the switch position changes the ground and should eliminate the “buzz” or “hum”. This “buzz” or “hum” may not be noticeable on the telephone handset, however you may hear it on the computer speaker when the modem is in use. Buzzing or Hum may affect connection rate. D. Telephone Set Volume Control - The Telephone Set Volume Control (handset and or speakerphone volume) may impact your connection speed. KONEXX recommends that the volume control be set in the mid-range for most telephone sets. Some AT&T/Lucent / Avaya sets may require the volume set at a lower level. E. Level Switch on the DPA - The setting you use depends on the signal level used by the telephone to which the DPA is connected. The switch setting sequence from high to low is 2-3-1-4. If the phone system is not listed on the table try switch setting 3 which is the most common. If you set the Level switch too high, you will hear feedback through the modem speaker when the modem is in use. If you hear feedback, set the Level switch to the next lower setting using the sequence 2-3-1-4 until the feedback disappears. F. Speakerphones - If your telephone has a speakerphone mode, do not activate the speakerphone. Speakerphone operation disables the telephone handset jack that the DPA uses to transmit and receive data. G. Princess and Trimline telephones - DPA will not operate with "Princess" or "Trimline" telephones, which have the keypad in the handset. The electronics with which the DPA interacts are not accessible in these telephones. H. Tone dialing - Make sure your modem is configured for Tone (DTMF) dialing. Your DPA will not work with pulse (rotary) dialing. Your modem user guide or operating instructions should describe this procedure. I. "No Dial Tone" error message - The “No Dial Tone” error message is presented when the modem doesn’t receive dialtone or recognize what it is receiving as dialtone. Some telephone systems encountered in North America (such as Rolm or Siemens) and most foreign telephone systems do not use the standard dial tone. Your modem software will normally require your modem to detect dial tone and may not recognize non-standard tone as dial tone. The Hayes command X1 or X3 will tell your modem to dial without detecting dial tone. This is the same command used for Blind Dialing. J. V.90 Connections - Although the DPA is compatible with V.90 modems, the maximum connection speed through the DPA is normally 33.6Kbps. Your connection speed will be determined by the phone system's capabilities, your modems capabilities, and the quality of the phone line. When using the DPA, your connection is going through a digital phone system, which was not designed for data communications. Your connection speed will probably be slower than you would get on an analog phone line. In fact, V.34bis/V.90 connections at 28.8Kbps, 24Kbps, and 21.6Kbps are common. K. Hanging up the modem - The DPA disconnects the “Handset” jack when your modem is in use. After data transactions or when autodialing voice calls, use your communications software to hang up your modem so that the Handset jack is reactivated. The manual that came with your software should describe how to hang up the modem. L. USB Ports - Located next to the USB I/O cable are two USB ports. These ports can be used to connect low-powered USB devices. M. Lost or Missing User Guides - In the event the Quick Setup Guide is lost or missing, you can download this DPA Quick Setup Guide from our website at www.konexx.com/dpa/index.html. Also available on our web site is a more detailed DPA User Guide. N. System Requirements 1. Windows 98 or later. 2. Compliant with USB 1.1 requirements for bus powered devices. USB Hub supports low power or self powered USB devices (each USB port provides 100 mA). O. Contacting Technical Support – 800-275-6354. If Tech Support is not available to take your call, please leave a voice mail message including your name, the telephone number you would like us to call, and a brief description of the problem you’re encountering. You can also send questions and comments to our 24-hour fax line at (858) 550-7330 or send e-mail to [email protected]. Please have the following information available when you call so we can better assist you: KONEXX model (name or number) Telephone manufacturer, model name or model number Modem or manufacturer, model name or model number Computer operating system and communication software you’re using If possible, call us on the telephone which the DPA is connected to so that we can test and troubleshoot the problem on that telephone. Our goal is to make you a satisfied customer. FCC Requirements Part 68 This device has been granted a registration number by the Federal Communications Commission (FCC), under Part 68 rules and regulations for direct connection to the telephone lines. In order to comply with these FCC rules, the following instructions must be carefully read and applicable portions followed completely. These instructions must be supplied to the consumer. 1. This equipment complies with Part 68 of the FCC rules. A label located on the outside surface of this equipment contains, among other information, the FCC registration number and ringer equivalence number (REN). If requested, this information must be provided to the telephone company. 2. As indicated below the suitable jack (USOC connecting arrangement) for this equipment is shown. If applicable, the facility interface codes (FIC) and service order codes (SOC) are shown. 3. The ringer equivalence number (REN) is used to determine the quantity of devices which may be connected to the telephone line. Excessive RENs on the telephone line may result in the devices not ringing in response to an incoming call. In most, but not all areas, the sum of the RENs should not exceed five (5.0). To be certain of the number of devices that may be connected to the line, as determined by the total RENs, contact the telephone company to determine the maximum REN for the calling area. 4. If this equipment causes harm to the telephone network, the telephone company will notify you in advance. But if advance notice is not practical, the telephone company will notify the customer as soon as possible. Also, you will be advised of your right to file a complaint with the FCC if you believe it is necessary. 5. The telephone company may make changes in its facilities, equipment, operations, or procedures that could affect the operation of the equipment. If this happens, the telephone company will provide advance notice in order for you to make necessary modifications in order to maintain uninterrupted service. 6. If trouble is experienced with this equipment, please contact the service center for repair and/or warranty information. If the trouble is causing harm to the telephone network, the telephone company may request you to remove the equipment from the network until the problem is resolved. User repairs must not be made, and doing so will void the warranty. 7. This equipment cannot be used on coin service provided by the telephone company. Connection to party line service is subject to state tariffs. (Contact your state public utilities commission for information.) If so required, this device is hearing-aid compatible (EAC). Part 15 B FCC WARNING STATEMENT: NOTE: This equipment has been tested and found to comply with the limits for Class B digital device, pursuant to Part 15 of the FCC Rules. These limits are designed to provide reasonable protection against harmful interference in a residential installation. This equipment generates, uses and can radiate radio frequency energy and, if not installed and used in accordance with the instructions, may cause harmful interference to radio communications. However, there is no guarantee that interference will not occur in a particular installation. If this equipment does cause harmful interference to radio or TV reception which can be determined by one of more of the following measures: Reorient or relocate the receiving antenna. Increase the separation between the equipment and the receiver. Connect the equipment into an outlet on a circuit different from that which the receiver is connected. Consult the dealer or an experienced radio/TV technician for help. CAUTION changes or modifications not expressly approved by the party responsible for compliance could void the user’s authority to operate the equipment. Industry Canada (IC) Requirements LOAD NUMBER: 0.00 NOTICE: The Industry Canada (IC) label identifies certified equipment. This certification means that the equipment meets certain telecommunications network protective operational and safety requirements. The Department does not guarantee the equipment will operate to the user's satisfaction. Before installing this equipment, users should ensure that it is permissible to be connected to the facilities of the local telecommunications company. The equipment must also be installed using an acceptable method of connection. In some cases, the company's inside wiring associated with a single line individual service may be extended by means of a certified connector assembly (telephone extension cord). The customer should be aware that compliance with the above conditions may not prevent degradation of service in some situations. Repairs to certified equipment should be made by an authorized Canadian maintenance facility designated by the supplier. Any repairs or alterations made by the user to this equipment, or equipment malfunctions, may give the telecommunications company cause to request the user to disconnect the equipment. User's should ensure for their own protection that electrical ground connections of the power utility, telephone lines and internal metallic water pipe system, if present, are connected together. This precaution may be particularly important in rural areas. CAUTION: Do NOT attempt to make such connections yourself; contact the appropriate electrical inspection authority or electrician. The Load Number (LNG) assigned to each terminal device denotes the percentage of the total load to be connected to the telephone loop used by the device, without overloading. The termination on a loop may consist of any combination of devices, subject only to the requirement that the total of the Load Numbers of all the devices not exceed 100. Warranty (for Warranty/Registration Card see back panel) 2 Year Limited Warranty KONEXX warrants this product against all defects in material and workmanship, under normal use, for two years from the date of purchase. This limited warranty applies to the original purchaser of this product only. Customer’s sole and exclusive remedy and KONEXXs’ liability in the event of a defect is expressly limited to correction of the defect by adjustment, repair, replacement or substitution at KONEXXs’ option. This warranty does not cover, and KONEXX is not responsible for damage caused by misuse, neglect, fire, lightning, electrostatic discharge, or modification of this product or damage resulting from the use of this product with hardware not specifically recommended by KONEXX. If a defect should occur, contact KONEXX Technical Support for an RMA number. No product shall be accepted back for warranty repair without an RMA number. Except as specifically provided herein, there are no other warranties expressed or implied, including but not limited to, any implied warranties of merchantability or fitness for a particular purpose and in no event shall KONEXX be liable for indirect, incidental, consequential or other similar damages arising out of any breach of this warranty or otherwise. Some states do not allow the exclusion or limitation of incidental or consequential damages, so the above exclusion or limitation may not apply to you. This warranty gives you specific legal rights and you may also have other rights which vary from state to state. First Edition. Copyright 2001 by KONEXX, Unlimited Systems Corporation, Inc., San Diego, CA. All Rights Reserved. To receive TECHNICAL SUPPORT at no charge for a 2-year period, complete both sides of this Registration Card. Registration Card must be postmarked to KONEXX within 14 days of purchase. Stamp and mail, or register on our web site at www.konexx.com, or fax both sides to KONEXX at 858-550-7330. Where did you purchase your Data Port Anywhere? Vendor: City: Price Paid (Approx.): Date purchased: What are you using the KONEXX DPA for (check all that apply)? Internet connection, E-mail, Faxing, Int’l Travel Other: What type of phone(s) are you connecting the KONEXX DPA to? One particular office phone, Various Office Phones, Hotel Phones What type of computer are you using with the KONEXX DPA? Laptop, Handheld, Desktop Manufacturer: Model: What type of operating system are you using? Windows 98, Windows 2000, Mac OS How did you hear about the KONEXX Data Port Anywhere? Web Search, Editorial, Advertisement, Trade Show, Heard from a friend, Work Associate, Other: I found the KONEXX Data Port Anywhere: Very easy to use, Easy to use Somewhat difficult, Very difficult, Have not used it yet What is your company web site? Further Comments: