1
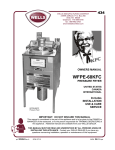
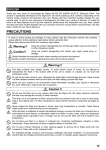
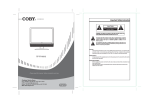
Important Safety Instruction
Important Safety Instruction
R
1. Read these instructions.
Table Of Contents
2. Keep these instructions.
Important Safety Instruction
3. Heed all warnings.
4. Follow all instructions.
5. Do not use near water.
6. Clean only with dry cloth.
7. Do not block any ventilation openings. Maintain well ventilated conditions around the product. Do
WARNING: TO REDUCE THE RISK OF FIRE OR ELECTRIC SHOCK, DO
NOT EXPOSE THIS APPLIANCE TO RAIN OF MOISTURE.
The lightning flash with arrowhead symbol, within an equilateral triangle, is intended
to alert the user to the presence of uninsulated “dangerous voltage” within the
product’s enclosure that may be of sufficient magnitude to constitute a risk of
electric to persons.
The exclamation point within an equilateral triangle is intended to alert the user to
the presence of important operating and maintenance (servicing) instructions in the
literature accompanying the appliance.
IMPORTANT FOR LASER PRODUCTS
CLASS 1 LASER PRODUCT
DANGER:
Visible laser radiation when open and interlock failed or defeated. Avoid direct exposure to beam.
TF-DVD1770
Please read this manual before connection and use.
CAUTION:
These servicing instructions are for use by qualified service personnel only. To reduce the risk
of electric shock, do not perform any servicing other than that contained in the operating
instructions unless you are qualified to do so. Refer to manual for servicinginstructions.
FCC NOTICE:
This equipment has been tested and found to comply with the limits for a Class B digital device.
Pursuant with the FCC Rules,Part 15. These limits are designed to provide reasonable protection
against harmful interference in a residential installation.
This equipment generates, uses and can radiate radio frequency energy and if not installed and
used in accordance with the instruction may cause harmful interference to radio communication.
POWER SUPPLY:
Connect the supplied adapter to the backside of the DVD player in the slot marked “Power In”.
Plug the two-prong end of the power cord to an AC100-240V outlet. If you have difficulty inserting
the plug, turn it over and reinsert it, if the unit will not be used for a long time, disconnect the
plug from the outlet.
NOTE:
Before plugging the power cord into an AC outlet, make sure that all the connections have
been made.
Unpacking -----------------------------------------------------------------------------------------------------------------------1
Disc Information-----------------------------------------------------------------------------------------------------------------3
Unit View-----------------------------------------------------------------------------------------------------------------------4-5
Remote Control --------------------------------------------------------------------------------------------------------------6-8
8. Do not install near any heat sources such as radiators, heat registers, stoves, or other apparatus
Cable Connections-------------------------------------------------------------------------------------------------------------9
9. Do not defeat the safety purpose of the polarized or grounding-type plug. A polarized plug has two
blades with one wider than the other. If the provided plug does not fit into your outlet, consult an
electrician for replacement of the obsolete outlet.
10. Protect the power cord from being walked on or pinched particularly at plugs, convenience receptacles,
and the point where they exit from the apparatus.
11.Only use attachments/accessories specified by the manufacturer.
Please make sure the following items are included with your LCD TV/monitor. if any items are missing,
contact your dealer.
1
4
7
-/--
PC Function----------------------------------------------------------------------------------------------------------------16-18
Play Operation ------------------------------------------------------------------------------------------------------------19-20
Playback Functions ----------------------------------------------------------------------------------------------------- 21-22
DVD Setup----------------------------------------------------------------------------------------------------------------- 23-26
12.Use only with the cart, stand, tripod, bracket, or table specified by the manufacturer, or sold with the
LCD Setup for DVD----------------------------------------------------------------------------------------------------- 27-28
apparatus. When a cart is used, use caution when moving the cart/apparatus combination to avoid
Troubleshooting -------------------------------------------------------------------------------------------------------------- 29
injury from tip-over.
Specifications ----------------------------------------------------------------------------------------------------------------- 30
This product incorporates DVD player, LCD display and TV receiver in one system.
DVD mode
VGA mode
VIDEO mode
S-VIDEO mode
TV mode
COMPONENT mode
TITLE
2
3
5
6
ANGLE
8
9
SUBTITLE
RETURN
AUDIO
0
DVD SETUP
MODE
MENU
LCD SETUP
TV Function----------------------------------------------------------------------------------------------------------------10-13
AC Function----------------------------------------------------------------------------------------------------------------14-15
Main Features
Multiple Mode
OPEN
POWER
Main Features ------------------------------------------------------------------------------------------------------------------2
not put product on bed, sofa or anything that blocks ventilation. Install according to instructions.
(including amplifiers) that produce heat.
Unpacking
Table of Contents
High Quality Property
High Resolution
Adopt an MPEG2 decoding format to achieve horizontal resolution more than 500 lines.
Superior sound
Built-in Dolby Digital decoder to output high quality sound effects.
Screen
Support the picture size of a normal screen (4:3).
Special playback
Support multi-angle, multi-language and multi-subtitle playback.
OK
CH
VOL
PLAY/PAUSE STOP SLOW/STEP MUTE
F.FWD
PREV
NEXT
PROGRAM GOTO
A-B
REPEAT
F.BWD
ZOOM
SOUND
P/N.SYS DISPLAY
COBY
TFT-DVD REMOTE
LCD (Liquid Crystal Display)
Designed with color TFT liquid crystal display
clearly shows the data.
Stereo amplifier
Built-in 2x3.5W speakers.
13.Unplug this apparatus during lightning storms or when unused for long periods of time.
14.Refer all servicing to qualified service personnel. Servicing is required when the apparatus has
been damaged in any way, such as power-supply cord or plug is damaged, liquid has been spilled
or objects have fallen into the apparatus, the apparatus has been exposed to rain or moisture,
Advanced Playing Features
does not operate normally, or has been dropped.
Compatibility
DVD, CD, MP3, CD-R, CD-RW, JPEG discs compatible.
Zoom Function
Enlarge the picture to enhance your enjoyment.
All Playback Functions
Fast forward and reverse, repeat playback, program playback.
Search By Time
Ability to search disc contents via time code.
15.Apparatus shall not be exposed to dripping or splashing and no objects filled with liquids, such as
vases, shall be placed on the apparatus.
Copyright Protection
Unauthorized copying, broadcasting, public performance, and lending of disks are prohibited. This
product incorporates copyright protection technology that is protected by method claims of certain U.S.
patents and other intellectual property rights owned by Macrovision Corporation and other rights
owners. Use of this copyright protection technology must be authorized by Macrovision Corporation,
and is intended for home and other limited viewing uses only unless otherwise authorized by
Macrovision Corporation. Reverse engineering or disassembly is prohibited.
NOTE: It is normal for a TFT screen to experience some light or dark spots appearing on the LCD
screen.
1
2
Unit View
Disc Information
Front/Top/Side Panel
Discs Formats Supported By This Player
Disc mark
DVD video
discs
Contents
Size
Audio+Video
12cm
(moving picture)
CD
Audio
MP3
Audio
JPEG
Still high resolution
12cm/8cm
12cm
Unit View
Rear Panel
12 3 4 5 6 7
Maximum playback time
133 min (SS-SL)
242 min (SS-DL)
266 min (DS-SL)
484 min (DS-DL)
1. POWER button
Press to access to or exit the STANDBY mode.
POWER
2. Open button
2
1
Press to open or close the disc tray.
3
2
3
1
3. TITLE button
When a DVD disc is playing, press to go to title menu
6
5
4
4
13
if the disc contains.
SUBTITLE
9
8
5
7
4. ANGLE button
AUDIO
Press to access various camera angles (if the DVD
0
6
-/-14
MODE
DVD SETUP
disc contains multiple camera angles).
9
8
MENU
LCD SETUP
5. SUBTITLE button
10
7
When a DVD is playing, press to select a subtitle
12
language (if the DVD disc contains multiple subtitles).
11
OK
6. AUDIO button
16
15
Press to access various audio languages (if the DVD
CH
VOL
disc contains multiple audio languages). Press to
21
18
select Sound effect from STEREO/MONO under TV
mode (if there is an ASP signal detected, the TV audio 17
22
will turn to ASP mode automatically)
NEXT
F.BWD F.FWD
23
20
24
19
7. MENU button
REPEAT
A-B
GOTO
28
Press to access the disc menu during DVD playback. 25 27
29
DISPLAY
8. MODE button
30
26
Press to shift modes among DVD, VGA, VIDEO,S32
VIDEO, TV, COMPONENT mode.
31
COBY
9. DVD SETUP button
TFT-DVD REMOTE
Press to access the DVD setup menu under DVD
mode.
10. LCD SETUP button
Press to access to LCD functional setup menu.
11. DIRECTION BUTTON
Press to move cursor.
12. OK button
Press to make confirmation
13. NUMERIC KEY PAD
Select numbers by pressing these buttons.
14. -/-- button
Under TV mode press to chose channel. For example if you want to select channel 52, you can
press the button twice repeatedly until OSD display --, and then input number buttons 5, 2.
15. CH+/- BUTTON
Under TV mode, press to choose the channel.
16. VOL+/_ button
Press to increase or decrease the speaker volume level.
17. Play/Pause button
Press to play/pause the disc under DVD mode.
OPEN
TITLE
2
3
4
5
6
7
74min/20min
600min
8
10
600min
The operating method of some DVD discs is specified by the software maker.
Please refer to the instruction manual of the disc.
The DVD Player will play most recordable (CD-R) or erasable (CD-RW) CDs, but
playback of CD-R or CD-RW discs created on a computer requires proper formatting
and finalization of the disc for audio playback. Some computers and/or software
programs may not be capable of creating compatible discs.
Remote Control Drawing
1
11
12
13
14
8
9
9
16 15
About Disc Terms
11 10
ANGLE
RETURN
PLAY/PAUSE STOP SLOW/STEP MUTE
Title
Generally, pictures or music compressed on a DVD are divided into several sections, "title".
Chapter
The smaller section unit of picture or music in a DVD under the title, usually one title is comprised of
one or more chapters and each of them is numbered for easy searching. But some discs may not have
a recording chapter.
Track
A segment of picture or music on a CD. Each track is numbered for searching.
Care of Disc
Video disc contains high-density compressed data that needs proper handling.
1. Hold the disc with fingers by outer edge and/or the center spindle hole. Do not touch the disc surface.
2. Do not bend or press the disc.
3. Do not expose the disc to direct sunlight or heating sources. Store discs in cabinet vertically, and in
dry condition. Prevent exposure to :
Direct sunlight
Heat or exhaust from a heating device
Extreme humidity
Clean the disc surface with a soft, dry cleaning cloth. Wipe the disc surface gently and radically from
center toward the outer edge.Do not apply thinner, alcohol , chemical solvent, or sprays when
cleaning. Such cleaning fluids will permanently damage the disc surface.
3
10. Disc Loading Slot
Used for loading discs.
11. PREV/NEXT Button
Press to skip backward /forward DVD
chapter or CD track
12. PLAY/PAUSE Button
Press it once to start playback.
Press it twice to pause playing.
Press it the third time to resume playback.
13 .STOP Button
Press the Stop button once to have a stop.
It will start playing from where it is stop
once PLAY/PAUSE button is pressed.
Press the Stop button twice to have a stop
It will start playing from the beginning once
PLAY/PAUSE button is pressed.
14. EJECT button
Press to eject /take in the disc.
15. Power On Indicator
In normal playback status, it turns green
16. Remote sensor
1. MUTE button
Press to turn on/off the speaker output.
2. ENTER button
3. MENU button
The same function as the LCD SETUP
button on the remote control.
4. CH -/+ button
Press to select channels backward/forward
While in TV mode, the same function as
DOWN/UP direction button when in LCD
menu set up.
5. VOL-/+ button
Press to decrease / increase the volume.
6. MODE button
Press to shift modes among DVD, VGA,
CATV,VIDEO, S-VIDEO,COMPONENT mode.
7. POWER button
Press to access to or exit from the STANDBY
mode.
8. LCD Screen
Present high resolution pictures.
9. Speakers
4
1. Antenna in jack
Connected to external antenna to receive TV program in TV mode.
2. L/R audio input jacks
Connection for external audio input under VIDEO, S-VIDEO or COMPONENT mode.
3. Video input jack
Connection for external video input.
4. PC Audio Input jack
Connection to the audio output jack on a personal computer.
5. Y/Cb/Cr Component Video Input
6. S-Video input jack
Connection for S-Video input.
7. DC 12V power supply cord
8. L/R audio output jacks
9. Video output jack
10. Coaxial digital audio jack
11. VGA Input jack
Connection to the VGA output jack on a personal computer.
5
Remote Control
Remote Control
PREV
PROGRAM
ZOOM
6
SOUND
P/N.SYS
Remote Control
18. Stop button
Press to stop playback, then press the PLAY button to resume normal playback.
19. F.BWD Button
Press to search forward under DVD mode.
20. F.FWD Button
Press to search backward under DVD mode.
21. SLOW /STEP button
Press to activate slow forward or slow rewind or start step frame by frame under DVD mode.
22. MUTE button
Press to turn on/off the speaker output.
23. PREV Button
Press to skip to the previous chapter/track for some discs under DVD mode.
24. NEXT Button
Press to skip to the next chapter/track for some discs under DVD mode.
25. PROG button
Allows the player to play the contents in a programmed sequence under DVD mode.
26. ZOOM button
When a DVD is playing, press this button to activate zoom funciton.
27. GOTO Button
To search specified section of a DVD disc or a CD disc.
28. A-B Button
Repeat certain portion of a performance
29. REPEAT Button
Repeat a title ,chapter or track .
30. DISPLAY Button
Press to show current playback status. To quit display mode, just keep on pressing until all the
infomations disappear from the screen.
31. SOUND Button
Press sound button to adjust sound output mode
32. P/N.SYS Button
Press to select NTSC or PAL system under DVD mode.
Remote Control
NOTE: Refer to playback function for detailed descriptions.
The operating distance may vary depending to the brightness around.
Preparation of Remote Control
1. Take the back cover off of the remote control and insert two AAA batteries and put on the cover.
Insert the batteries while observing the correct (+) and (-) polarities.
2. Under normal use, the battery will last for six months.
Using of Remote control
Point the remote control unit from no more than about 7meter from the remote control sensor and
within about 60 degrees of the front of the unit.
7
OPEN
POWER
1
4
3
TITLE
5
6
ANGLE
9
SUBTITLE
8
7
-/--
2
RETURN
AUDIO
0
DVD SETUP
MODE
MENU
LCD SETUP
OK
CH
VOL
PLAY/PAUSE STOP SLOW/STEP MUTE
Notes:
Do not point bright lights directly at the remote control sensor.
Do not place objects between the remote control unit and the remote control sensor.
Do not use this remote control unit while simultaneously operating the remote control unit of any other
COBY
equipment.
F.FWD
PREV
NEXT
PROGRAM GOTO
A-B
REPEAT
F.BWD
ZOOM
SOUND
P/N.SYS DISPLAY
TFT-DVD REMOTE
7
8
TV Function
Cable Connections
TV Function
Preparations
Figure. Cable connections
IN
VGA
P-SCAN
R
L
VIDEO
OUT AUDIO OUT
DC
12V S-VIDEO Y
Cb
V
E
PC D
I
Cr AUDIO O
L
R
AUDIO IN
TV ANT
SYSTEM Setup
1. Connect the antenna to the antenna jack on the unit side panel.
2. Connect the power supply cord. If the player is in standby mode, press the POWER button to turn
on the power.
3. Press the MODE button to select the TV mode.
4. Press CH buttons on the remote control, or use the number buttons directly, to select the channel
that you wish to view.
Picture Parameters setup
COAXIALT
1. Press the LCD SETUP button once on remote control to access picture parameters setup menu, the
screen will display as below:
IMA GE
ADAPTER
EXIT
DVD OR VCR
AC INPUT
TV Function
CONTRAST
BRIGHTNESS
SATURATION
SHARPNESS
HUE
EXIT
2. Press up/down direction button, it appears in succession SYSTEM setup menu, FUNCTION setup
menu, CHANNEL setup as well as EXTRA setup menu. Press OK button to confirm .
3. To exit the menu, press LCD SETUP button again, or press direction button to highlight the EXIT
and then press OK to confirm
CHANNEL Setup
P. Lock: If the P. Lock is selected, input a 4-digit code to enter the P Lock menu. (Enter 1234 if it is the
first use.) If the wrong code is input, the P. LOCK menu will not appear on screen.
CHA NNEL
SYSTEM
PICTURE
AUDIO
EXIT
EXIT
AUTO SEARCH
ANTENNA
TUNING
SKIP
EXIT
P. Lock
EXIT
1. Press up/down direction button to highlight the System setup menu. And press OK to confirm.
2. Press up/down direction button to highlight the desired option from Picture/Audio.
Press OK button to confirm.
Picture: Press up/down direction button to select the item from
Dynamic/Normal/Soft.. Press OK to confirm.
Audio: Press up/down direction button to select the item from
Standard/Classic/Rock/Jazz/Pop. Press OK to confirm
3. To exit system setup menu, highlight EXIT and press OK button.
(Table 1)
Item
Selection
Auto
Search
Instruction
Press up/down direction button to highlight Search
Press OK to start autosearch
Search:
17
9
EXIT
1. Press up/down direction button to highlight the Image setup menu. And press OK to confirm .
2. Press up/down direction button to highlight the desired option from Contrast/Brightness/Saturation/
Sharpness/Hue. Press OK to confirm.
3. Press left/right button to make adjustment. And press OK to confirm.
4. To exit the Image setup menu, highlight Exit and press OK to confirm.
FUNCTION
AV Function
The player has AV functions. You can enjoy programs from external input sources such as recorder,
vidicon, satellite receiver or game player etc.
Connect the external AV signal source to S-VIDEO or VIDEO jack, and then turn on the power of the
unit, and press the MODE button to shift to the VIDEO / S-VIDEO /COMPONENT mode.
Picture Parameters setup (S-VIDEO/COMPONENT MODE)
1. Under the S-VIEDO or COMPONENT mode, press the LCD SETUP button once on remote control
to access picture parameters setup menu, the screen will display as below:
IMA GE
2. To exit the Extra setup menu press up/down direcition button to highlight Exit, and press OK to
confirm.
P Lock:
Some movies and TV programs include signals that classify the contents of the program. The P. Lock
control feature in the TV detects the signal and blocks the programs according to your selections.
EXIT
2. Press up/down direction button, it appears SYSTEM setup menu and FUNCTION setup menu.
3. To exit the menu, press LCD SETUP button again, or press direction button to highlight the EXIT
and then press OK to confirm
IMAGE Setup
Antenna Press up/down button to select Air or Cable.
You can select an outer antenna or the
cable TV
Tuning
In order to improve the picture
and sound, you can use the function to
adjust the received program, and then
press OK to reserve it.
Press right direction button to increase fine tune.
Press left direction button to decrease fine tune.
1. Press direction button to highlight the Function menu. And press OK button to confirm.
2. Press direction button to highlight the desired option from Noise Reduce/input Source,
and press OK to confirm the selection.
Noise Reduction: press direction button to choose from ON/ OFF, and press OK to confirm.
If ON is selected, the image will be shown clearly, but with unclear background.
If OFF is selected, both image and background are displayed normally.
Input Source: a certain input mode has been tickled to indicate current situation
Press direction button to change the desired mode from DVD/VGA/VIDEO/S- VIDEO/TV/
COMPONENT and press OK to confirm.
3. To exit function setup, highlight EXIT and press OK button.
Skip
NOTE:
Press up/down direction button to select ON or OFF. Set "ON" to skip the present program.
It will not be displayed .
To restore to normal , set it to "OFF"
The program will be skipped when the signal is weak.
EXTRA Setup
Please keep a copy of it in a safe place. If the password is lost, the defaults setting will not be reverted
to the original password.
IMA GE
Closed Caption
P, Lock
Exit
EXIT
TV Rating
TV-MA:Mature audience only
TV-14: Not intended for ages under 14
TV-PG:Parental guidance suggested
TV-G:General audience
TV-Y7:For children age 7 and above.
TV-Y:All children
MPAA Rating
NR: Unrestricted
X: For adults only
NC17:Not intended for ages under 17
R: Restricted
PG-13:Not intended for ages under 13
PG:Parental guidance suggested
G:General audience
12
1. Press up/down direction button to highlight the Image setup menu. And press OK to confirm.
2. Press up/down direction button to highlight the desired option and press OK to confirm.
3. Press left/right button to make adjustment. And press OK to confirm.
4. To exit the Image setup menu, highlight Exit and press OK to confirm.
NOTE: When in component mode, the Hue item is unavailable.
SYSTEM Setup
SYSTEM
PICTURE
AUDIO
EXIT
EXIT
1. Press up/down direction button to highlight the System setup menu. And press OK to confirm.
2. Press up/down direction button to highlight the desired option and press OK to confirm.
Picture: Press up/down direction button to select the item from
Dynamic/Normal/Soft.. Press OK to confirm.
Audio: Press up/down direction button to select the item from
Standard/Classic/Rock/Jazz/Pop. Press OK to confirm
3. To exit system setup menu, highlight EXIT and press OK button.
1. Press direction button highlight the Extra setup menu and press OK to confirm.
Closed Caption: if the Closed Caption is selected, press direction button to select an option :
CC1
CC2
CC3
CC4
T1
T2
T3
T4
OFF
If OFF is selected, the caption will be hided.
NOTE:
The Closed Caption operation is not allowed on some movies and TV programs.
11
EXIT
CONTRAST
BRIGHTNESS
SATURATION
SHARPNESS
HUE
EXIT
There are two Rating systems: TV for broadcasters and MPAA for movies.
There are sub-categories within these ratings. As the rating increases, so does the intensity of the subcategory.
(I.e.) Under PG, V would be moderate violence. Under MA, V would be graphic violence.
D- Suggestive dialogue
L- Indecent language
S- Sexual situations
V- Violence
EXTRA
CONTRAST
BRIGHTNESS
SATURATION
SHARPNESS
HUE
EXIT
The default password to enter the system is 1234.
EXIT
NOTE: When in component mode, the Hue item is unavailable.
10
TV R ating
MPAA R ating
New Code
Exit
AV Function
To change the password, please select the New Code item, and enter your desired 4-digit code.
IMA GE
1. Connect TV RF sources to antenna port. TV RF signals include: receiving antenna/CATV net. You
can use 75 coaxial cable to connect outdoor antenna.
2. Connect the earpiece to the "phone" port.
3. Connect audio sources (including DVD/VCR/CAMCORDER/PC) to the proper audio input ports "L"
and "R" by RCA cable.
4. Connect video sources (DVD/VCR/CAMCORDER) to the "VIDEO" or "S-VIDEO" port by RCA cable
or S-VIDEO cable.
5. When used as computer screen, the PC port should be connected to computer display output by 15pin D-SUB signal cable.
6. Insert the AC power to the DC adapter, then connect 12v input port of the Display to its' DC output
port.
Search the channels from low to high,
and reserve the channels automatically. The reserved channel will
be displayed on screen. Press OK
to stop searching.
FUNCTION Setup
NOISE REDUCTION
INPUT SOURCE
EXIT
For your reference:
EXIT
1. Press direction button to highlight the Channel setup menu. And press OK button to confirm .
2. Press direction button to highlight the desired option and press OK to confirm the selection.
Refer to table 1 for detailed description.
PRG: 1
IMAGE Setup
CONTRAST
BRIGHTNESS
SATURATION
SHARPNESS
HUE
EXIT
TV Function
TV Function
13
14
FUNCTION Setup
FUNCTION
NOISE REDUCTION
INPUT SOURCE
EXIT
EXIT
1. Press direction button to highlight the Function menu. And press OK button to confirm .
2. Press direction button to highlight the desired option from Noise Reduce/input Source, and press
OK to confirm the selection.
Noise Reduction: press direction button to chose option from ON/ OFF, and press OK to confirm.
If ON is selected, the image will be shown clearly, but with unclear background.
If OFF is selected, both image and background are displayed normally.
Input Source: a certain input mode has been marked to indicate current situation
Press direction button to change the desired mode and press OK to confirm.
3. To exit function setup, highlight EXIT and press OK button.
Picture Parameters setup (VIDEO MODE)
1. Under the VIDEO mode, press the LCD SETUP button once on remote control to access picture
parameters setup menu, the screen will display as below:
IMA GE
EXIT
PC Function
You can use the unit's TFT LCD as your computer's monitor. Access the computer setup menu and
take the steps shown as below:
1. Please turn off the power of the unit and the computer. Connect the unit to the computer VGA jack
with the VGA cable.
2. Turn on power of this unit and the computer. If the unit is in standby mode, press the POWER button
to switch on. Press the MODE button on the remote control to select the "VGA" mode.
IMAGE Setup
Picture Parameters setup
1. Press up/down direction button to highlight the IMAGE setup menu. And press OK to confirm.
2. Press up/down direction button to highlight the desired option and press OK to confirm.
See Table 3 as below for detailed descriptions.
1. Press the LCD SETUP button under the VGA mode to access picture parameters setup menu, the
screen will display as below:
COLOR
EXIT
CONTRAST
BRIGHTNESS
GAMMA CORRECT
COLOR ADJUST
EXIT
2. Press up/down direction button, it appears in succession IMAGE setup menu , FUNCTION setup
menu, OSD Setup menu as well as MISCELLANEOUS setup menu.
3. To exit the menu, press LCD SETUP button again, or press direction button to
highlight the EXIT and then press OK to confirm
Refer to section of EXTRA SETUP of TV function on page 12 ,13 for how to work with extra setup menu
.
EXIT
H.POSITION
V.POSITION
PHASE
CLOCK
EXIT
OSD TIMER
TRANSLUCENT
EXIT
Adjustment
Instruction
Press left/right direction button to remove the position to left/right
Adjust the horizontal position to your satisfaction
V.Position
Press left/right direction button to remove the position to down/up Adjust the vertical position to your satisfaction
Phase
Range from 0 to 100
Adjust the picture quality
Clock
Range from 0 to 100
Enlarge or reduce the display zone horizontally
(Table 3)
1. Press up/down direction button to highlight the OSD setup menu. And press OK to confirm.
2. Press up/down direction button to highlight the desired option and press OK to confirm.
See Table 4 as below for detailed descriptions.
Item
Adjustment
Press up/down direction to select ON or OFF
Translucent
Press up/down direction to select ON or OFF
Color adjust
Instruction
Adjust the contrast to your satisfaction
Adjust the brightness to your satisfaction
Correct the brightness to your satisfaction
Adjust the color Temp to your satisfaction.
16
Disc Loading Steps:
1. Put the disc slightly into the disc tray.
2. The disc will be taken automatically into the tray. "read"will be highlighted on the screen and
playback will begin.
MISCELLANEOUS SETUP
MISCELLAN EOUS
MODE SELECT
RESET
EXIT
1. Press up/down direction button to highlight the FUNCTION setup menu. And press OK to confirm.
2. Press up/down direction button to select the desired item from Auto Adjust /Audio /Input Source.
and press OK to confirm.
Warning: Do not play poor quality discs that may damage the player's lens.
DVD Playback
Auto Adjust : Adjust the horizontal and vertical position
Audio:
Press up/down direction button to select the item from Standard/Classic/Rock
/Jazz/Pop. And press OK to confirm.
Input Source: A certain input mode has been marked to indicate current status
Press direction button to change the mode from DVD VGA/VIDEO/S-VIDEOEO/TV/
COMPONENT. And press OK to confirm.
1. Press up/down direction button to highlight the OSD setup menu. And press OK to confirm.
2. Press up/down direction button to highlight the desired option and press OK to confirm.
See Table 5 as below for detailed descriptions.
Item
Instruction
Model Select
Under the DOS mode, select resolution 640x400 or 720x400 for OSD
Reset
Select Reset to get to the factory setting.
NOTE:
When the Reset function is activated, the initial settings for all models will be reset.
17
18
(Table 5)
The player will play all tracks on a CD disc by default.
MP3 Playback
1. Load a MP3 disc into the disc tray.
2. Press the direction button to select the folder, use the OK button to enter it.
3. Press the direction button to select the track, press the OK or the PLAY/PAUSE button for playback.
4. Press the STOP button to stop playback.
JPEG Playback
JPEG is a common picture format that requires small amounts of storage per image and has low loss
in resolution. Hundreds of pictures can be stored on a disc in this format. In order to view JPEG photo
albums, you can ask your film development company to make a "PICTURE CD" when they develop
your film.
Normal Playback
1. Load a JPEG disc in.
2. Press up/down direction button to select a submenu and press OK to confirm
3. Press the up/down direction button to select the contents. Many discs have other contents besides
pictures.
(Table 4)
FUNCTION Setup
(Table 2)
15
NOTE: To set the unit into standby mode, press the POWER button . In standby mode the unit
is supplied with main voltage but not active. In this condition you can switch on the unit using
the POWER button.
When ON is selected, the OSD will be translucent.
EXIT
CONTRAST
BRIGHTNESS
GAMMA CORRECT
COLOR ADJUST
EXIT
Adjust Range
0-100
0-100
4 grades (0,1,2,3)
9300K: R (54), G(69), B (62)
6500K: R (59), G(62), B (49)
User: R (0-100), G (0-100), B (0-100)
When ON is selected, the OSD will automatically
disappear after 8 seconds.
When OFF is selected, the OSD can be closed just
after selecting the Exit Submenu.
EXIT
1. Press up/down direction button to highlight the COLOR setup menu. And press OK to confirm.
2. Press up/down direction button to highlight the desired option and press OK to confirm.
See Table 2 as below for detailed descriptions.
Item
Contrast
Brightness
Gamma Correct
Instruction
OSD Timer
AUTO ADJUST
AUDIO
INPUT SOURCE
EXIT
EXIT
Preparation:
After all connections have been made, Press the POWER button to switch on the unit and then press
MODE button to select DVD mode.
Under DVD mode , the following disc can be read by the player : DVD /CD /MP3 /JPEG.
EXIT
Item
CD Playback
Play Operation
OSD MENU
H.Position
COLOR Setup
COLOR
Refer to the section of "Picture Parameters setup (S-VIDEO/COMPONENT MODE)' of AV Function on
page 14 for how to work with IMAGE setup menu, SYSTEM setup menu and FUNCTION setup menu
OSD SETUP
IMA GE
Play Operation
Play Operation
PC Function
FUNCTION
CONTRAST
BRIGHTNESS
SATURATION
SHARPNESS
HUE
EXIT
2. Press up/down direction button, it appears SYSTEM setup menu , FUNCTION setup menu and
EXTRA setup menu.
3. To exit the menu, press LCD SETUP button again, or press direction button to highlight the EXIT
and then press OK to confirm
PC Function
PC Function
AV Function
MENU
Normally there is a selecting menu for DVD discs. Press direction button to move to the desired item
and press OK to confirm
During DVD playback, press menu button to get to the DVD start menu
TITLE & CHAPTER
Normally there are several titles in a DVD disc, and several chapters (sections) in a title.
AUDIO
Press the AUDIO button on the remote control to select a language for multi-language DVD disc.
There can be up to 8 audio languages on a DVD disc.
Press the SUBTITLE button to select different subtitles for multi-subtitle disc.
ANGLE
Press the ANGLE button repeatedly until the desired perspective is shown.The movies on some DVDs
have been recorded from various camera positions. This lets you enjoy the same scene from different
perspectives. In this case you'll usually find a marking on the DVD sleeve.
VOLUME
During playback, press the VOL+ button to increase the volume and press the VOL- button to
decrease the volume.
19
Picture Rotation
This can be used only when the picture is normally displayed. Once another picture is selected,
rotation will be cancelled automatically.
There are four kinds of rotational modes: Inversion, Enantiomorphism, rotate left and rotate right. You
can use direction buttons to select:
"UP" ----- Inversion/Normal
"DOWN" ----- Enantiomorphism/Normal
"LEFT" ----- Rotate left
"RIGHT" ----- Rotate right
Zoom and Move of Picture
The ZOOM button is used to turn on/off the zoom function and the move function.
During zooming status, you can use the direction buttons to move the picture.
During playback, press the STOP button to return to the previous menu.
NOTE: Depending on how the disc was made, a JPEG disc may allow playback , but not rotation or
zooming of the images.
20
LCD Setup for DVD
LCD SETUP
Under the DVD mode, press the LCD SETUP button once on remote control to access picture
parameters setup menu, the screen will display as below:
LCD Setup for DVD
FUNCTION Setup
AUDIO
INPUT SOURCE
EXIT
COLOR
EXIT
Symptom
FUNCTION
1. Press up/down direction button, it appears FUNCTION setup menu, and OSD MENU. Press OK
button to confirm.
2. To exit the menu, press LCD SETUP button again, or press direction button to highlight the EXIT
and then press OK to confirm.
COLOR Setup
1. Press direction button to highlight the Function menu. And press OK button to confirm.
2. Press direction button to highlight the desired option from Noise Reduce/input Source,
and press OK to confirm the selection.
Noise Reduction: press direction button to choose from ON/ OFF, and press OK to confirm.
If ON is selected, the image will be shown clearly, but with unclear background.
If OFF is selected, both image and background are displayed normally.
Input Source: a certain input mode has been marked to indicate current situation
Press direction button to change the desired mode from DVD/VGA/VIDEO/S- VIDEO/TV/
COMPONENT and press OK to confirm.
3. To exit function setup, highlight EXIT and press OK button.
COLOR
EXIT
CONTRAST
BRIGHTNESS
GAMMA CORRECT
COLOR ADJUST
EXIT
OSD MEN U
EXIT
1. Press up/down direction button to highlight the COLOR setup menu. And press OK to confirm.
2. Press up/down direction button to highlight the desired option and press OK to confirm.
Refer to below table for detailed descriptions.
Item
Contrast
Brightness
Gamma Correct
Color adjust
Make sure the unit has been powered on manually.
Check if the power cord has been properly connected to the power outlet.
Check if the main power has been switched on.
No picture
Try another TV channell
Check if the system connection is proper and secure.
Check if the connection cables are damaged.
No sound
Color distorted
Adjust Range
0-100
0-100
4 grades (0,1,2,3)
9300K: R (54), G(69), B (62)
6500K: R (59), G(62), B (49)
User: R (0-100), G (0-100), B (0-100)
27
Instruction
Adjust the contrast to your satisfaction
Adjust the brightness to your satisfaction
Correct the brightness to your satisfaction
Adjust the color Temp to your
satisfaction.
Increase the volume.
Check if the MUTE function of the unit has been activated.
Check if the sound system has been properly set.
Check if the AV audio signal input cable has been connected properly.
Reset the color system of the unit.
Check if the system has been properly connected.
Check if the AV video signal input cable is connected properly.
Picture and
sound are interfered
Check if the system has been properly connected.
If using antenna, adjust the antenna.
Remote control does
not work
Make sure the POWER button on the unit has been turned on manually.
Remove the obstacles between the remote control and the player.
Point the remote control towards the remote sensor on the player.
Check if the batteries of the remote control have been loaded with correct polarities.
Replace the batteries of the remote control.
OSD SETUP
OSD TIMER
TRANSLUCENT
EXIT
Check and Action
No power
EXIT
CONTRAST
BRIGHTNESS
GAMMA CORRECT
COLOR ADJUST
EXIT
Specification
Trouble Shooting
Screen is traverse
interfered under
PC mode
Correct the phase setting in PC mode.
Malfunction
Should the player develop a malfunction, unplug the player for 30 minutes. After that,
power on the player and the restore function should reset the player.
Size
Resolution
TFT Panel characteristic Pixel pitch
TV system
Standard
17"
1286x1024
0.264mm
NTSC 3.58/4.43 (VIDEO IN)
Tuning system
FS with PLL
AC/DC Adapter
AC input
DC output
100-240V 50/60Hz
+12V 5A
On working
35W (Max)
Power consumption
Adjustment
Press up/down direction to select ON or OFF
Translucent
Press up/down direction to select ON or OFF
28
Dimension
506x155x393 mm
Weight
5302g
When ON is selected, the OSD will automatically
disappear after 8 seconds.
When OFF is selected, the OSD can be closed just
after selecting the Exit Submenu.
When ON is selected, the OSD will be translucent.
29
2x (4
10 c-40 c
Instruction
OSD Timer
<2W
Speaker
Operating temperature range
1. Press up/down direction button to highlight the OSD setup menu. And press OK to confirm.
2. Press up/down direction button to highlight the desired option and press OK to confirm.
See Table 4 as below for detailed descriptions.
Item
Standing
30
, 3W)