1
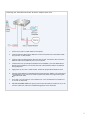
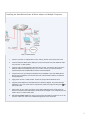
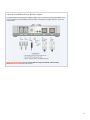
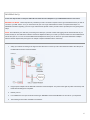
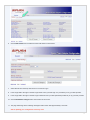
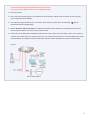
Cisco SPA 2100 Phone Adapter Installation Manual
Installation of the Cisco SPA 2100 Phone Adapter to NationPhone
Index
P. 1 Index, before you begin, and what is included
P.2 Installing the NationPhone Router & Phone Adapter SPA2100
P.3 Installing the NationPhone Router & Phone Adapter on Multiple Computers
P.4 About the NationPhone Router & Phone Adapter
P.5 Troubleshooting
P.6 DSL/PPPoE Set Up ( most cases when you have internet through you telephone company)
P.9 Troubleshooting for DSL/PPPoE Set Up
If you are experiencing issues with your service, please review these common troubleshooting
solutions.
If you need additional assistance please contact our Technical Support Center at 24 hours a day, 7
days a week.
Americas +1 888 744 8647
Overseas +1 781 613 8647
or
e-mail us at [email protected].
Getting Started
What’s included:
NationPhone Router & Phone Adapter SPA 2100
Ethernet Cable
AC Power Adapter
Equipment you will need:
Broadband Connection: DSL, cable modem, or other high-speed Internet connection
Router (optional): To share your broadband connection with more than one device. A
router is not necessary if you only use one computer.
Traditional Analog Telephone
To use enhanced features, you will need:
Computer
Web Browser
BEFORE YOU BEGIN: If you are using DSL service that requires a User Login and Password
entry in order to connect, please review the following information.
1
Installing the NationPhone Router & Phone Adapter SPA2100
1.
Power off your DSL or cable modem and computer.
2.
Insert an Ethernet cable into the WAN port. Connect the other end of an Ethernet cable
into your DSL or cable modem.
3.
Insert an end of another Ethernet cable into the LAN port. Connect the other end of the
Ethernet cable into the Ethernet port on your computer.
4.
Insert the line from your telephone handset into the PHONE 1 port of the NationPhone
Router & Phone Adapter. Connect the other end of the telephone cable to a traditional
analog telephone.
5.
Apply power to your DSL or cable modem. Ensure the proper status indicators are lit.
6.
Plug the power adapter into the NationPhone Router & Phone Adapter. The yellow STAT
light will blink for up to one minute. When complete the yellow STAT light and the green
light will remain solid.
7.
If you wish, you may power up your computer now. Your computer does not need to be
on in order to make calls.
8.
You can now make calls! Pick up the phone receiver and listen for a dial tone. If you do
not have a dial tone, refer to the troubleshooting portion of this document.
2
Installing the NationPhone Router & Phone Adapter on Multiple Computers
1.
Power of your DSL or cable modem, router, and any devices connected to the router.
2.
Insert an Ethernet cable into the WAN port. Connect the other end of the Ethernet cable
into your DSL or cable modem.
3.
Insert an end of another Ethernet cable into the LAN port. Connect the other end of the
Ethernet cable into the Ethernet port on your router. Connect your PC and all other
network devices into the NationPhone Router & Phone Adapter.
4.
Insert the line from your telephone handset into the PHONE 1 port of the NationPhone
Router & Phone Adapter. Connect the other end of the telephone cable to a traditional
analog telephone.
5.
Apply power to DSL or cable modem. Ensure the proper status indicators are lit.
6.
Plug the power adapter into the NationPhone Telephone Adapter. The yellow stat light
will blink for up to one minute. When complete the yellow STAT light and the green light
will remain solid.
7.
Apply power to your router. Ensure the proper status indicators are lit. Apply power to
devices connected to the NationPhone Router & Phone Adapter. Your computer(s) do not
need to be on in order to make calls.
8.
You can now make calls! Pick up the phone receiver and listen for a dial tone. If you do
not have a dial tone, refer to the troubleshooting portion of this document.
3
About the NationPhone Router & Phone Adapter
The NationPhone Router & Phone Adapter enables you to connect your phones and either one or
more computers to your broadband network. When connecting to a single computer, you do not
need a router.
BEFORE PROCEEDING: If you are using DSL that requires PPPoE authentication,
please see these important instructions.
4
Troubleshooting
ISSUE
SOLUTION
No Dial Tone
Check all connections to the NationPhone Router & Phone Adapter. Make sure that
the green light on the NationPhone Router & Phone Adapter blinks only when the
phone is off hook. If not, ensure that you have an Internet connection. Reboot your
equipment.
Phone Does Not
Ring
Check all connections to the NationPhone Router & Phone Adapter. Make sure the
ring volume on the phone is properly adjusted.
Reboot your equipment.
Fast Busy
Signal
Reboot your equipment.
Can’t Enable
DHCP
(Windows 2000,
Me, NT)
Select Start in the Windows task bar. Then select Settings, Control Panel, the
Network icon, and the Ethernet Adapter icon (or Local Area Connection). Then
select [Properties]. Select Internet Protocol (TCP/IP). Write down all of the
information provided in the window. Select Obtain an IP address automatically to
enable DHCP. Close all windows and reboot the computer.
Can’t Enable
DHCP
(Windows 95, 98)
Select Start in the Windows task bar. Then select Settings, Control Panel, and the
Network icon. Select the Configuration tab.Select TCP/IP in the list of network
components. Select the appropriate adapter associated with your computer’s
Ethernet adapter. Select Properties and write down all of the information in the
TCP/IP window that appears. Select Obtain an IP address automatically to enable
DHCP. Close all windows and reboot the computer.
Can’t Enable
DHCP
(Windows XP)
Select Start in the Windows task bar. Select Control Panel. Then select the
Network Connections icon (in Classic View), or select Network and Internet
Connections and then Network Connections (in Category View). Right click on the
Local Area Connection icon. Then select Properties, Internet Protocol (TCP/IP) and
then Properties. Write down all of the information provided in the window.
Select the General tab of the Internet Protocol (TCP/IP) Properties window. Then
select Obtain an IP address automatically and Obtain DNS server address
automatically. Select the Alternate Configuration tab and make sure that Automatic
private IP address is selected. Select the General tab again and select [Advanced].
In the Advanced TCP/IP Settings window, ensure that DHCP enabled is selected in
the IP address section of the IP Settings tab. Do not check any settings in the
Default gateways and Automatic metric box sections.
USB vs.
Ethernet Port
If your broadband provider requires a USB connection instead of Ethernet, you
must purchase a USB to Ethernet converter to connect to the NationPhone Router
& Phone Adapter. Most DSL/Cable modems permit use of only one port at a time,
either the USB or Ethernet Port. The NationPhone adapter should be connected to
the Ethernet port from the DSL/Cable Modem via the adapater's WAN port and
your PC connected to the adapter's LAN port. Use the USB port only if connecting
to the adapter's WAN port with a USB to Ethernet Converter.
5
DSL/PPPoE Set Up
Follow the steps below to setup the NationPhone Router & Phone Adapter for your DSL/PPPoE Internet connection.
BEFORE YOU BEGIN : These steps are only needed if your DSL connection requires a User Login and Password entry in order to
connect to your DSL service. If so, you must have both your User Login and Password in order to complete these steps. For
additional information regarding your User Login and Password, please contact your DSL service provider prior to beginning these
steps.
NOTE: The easiest way is to start is by connecting a PC directly to your DSL modem and logging into the world wide web as you
would normally do. The NationPhone Router and Phone adapter will allow you to share your Internet network for both NationPhone
service and your PC. You can connect the NationPhone adapter and move your PC to the PC port of the NationPhone adapter
after the first few steps below (see Figure 2 for multiple computer installation with a router/hub).
1.
Setup your network according to the Figure1 below. Be sure to connect your PC via an Ethernet cable to the LAN port of
the NationPhone Router & Phone Adapter.
Figure 1
2.
Plug the power adapter into the NationPhone Router & Phone Adapter. The yellow STAT light may blink continuously until
these PPPoE settings are completed.
3.
Reboot your PC.
4.
In an address bar of an open Internet browser type 172.16.5.1 and click the GO button or hit Enter on your keyboard.
5.
The following screen will be viewable in the browser:
6
6.
Click the Wan Setup tab. The following screen will appear in the browser.
7.
Select PPPOE from the drop down menu for Connection Type.
8.
In the empty field to the right of "PPPoE Login Name" enter your DSL login I.D. provided to you by your DSL provider.
9.
In the empty field to the right of "PPPoE Login Password" enter your DSL password provided to you by your DSL provider.
10. Click the Submit All Changes button at the bottom of the screen.
11. The page will change to the following message and then return after approximately 5 seconds:
SPA is updating your configuration. Unit may reset.
7
You will be redirected to the configuration page in 5 seconds.
If not, you can click HERE to return to the configuration page.
12. Close the browser.
13. Pull out the power supply plug from your NationPhone Router & Phone Adapter. Wait 10 seconds, and then plug the
power supply back into the Adapter.
14. The yellow STAT light will blink for up to one minute. Wait until both the yellow STAT and the Green (
lights are
illuminated and have stopped blinking.
15. Talk on the phone and surf the web! Your NationPhone Router & Phone Adapter is now configured to provide your
PPPoE Login information to access your DSL Internet service.
16. Please return to the NationPhone installations instructions or Figure 2 below if you are utilizing a router, hub or switch to
complete your network setup. As a reminder, the router, hub or switch connects to the PC port of the NationPhone Router
& Phone Adapter. The Adapter is a DHCP server/router and will provide IP addresses for use with a network switch.
Figure 2
8
Troubleshooting
If the Sipura Web Configuration page does not return to your browser after clicking the Submit All Changes button:
1.
Unplug the power to the NationPhone Router and Phone Adapter.
2.
Wait 10 seconds, and then plug the power back into the Adapter.
3.
Repeat steps 3-15 above.
If you are unable to surf the Web or use the NationPhone Adapter to make/receive calls:
1.
Confirm your DSL/PPPoE Logon User I.D. and Password with your DSL provider.
2.
Contact your DSL provider if necessary.
3.
Repeat steps 4-19 above.
If the yellow STAT light does not stop blinking:
1.
Power down your PC, the NationPhone Adapter, and your DSL Modem.
2.
Wait 60 seconds and then power up your DSL Modem.
3.
Repeat steps 2-19 above.
If you need additional assistance e-mail us at 24
hours a day, 7 days a week
Americas
+1 888 744 8647
Overseas
+1 781 613 8647
Or e-mail us at [email protected]
Before you call or in your email , inform us of your NationPhone number in the
subject line. We will call or email you with the information you need.
Please let us know whether you prefer to be contacted by email or
phone (and the best time to reach you).
9