1
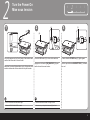
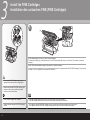
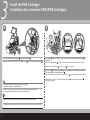
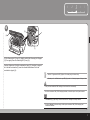
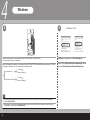
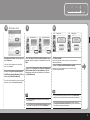
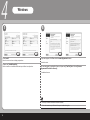
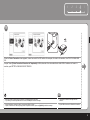
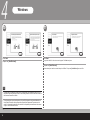
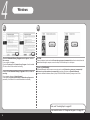
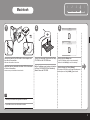
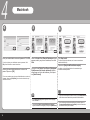
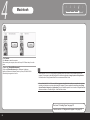
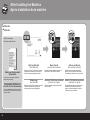
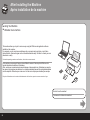
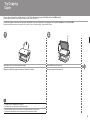
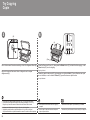
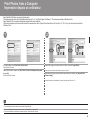
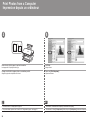
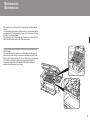
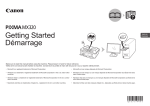
MP260
MP240
Getting Started
Démarrage
Make sure to read this manual before using the machine. Please keep it in hand for future reference.
Prenez soin de lire ce manuel avant d'utiliser la machine. Conservez-le ensuite à portée de main pour référence ultérieure.
ENGLISH
FRANÇAIS
Contents
Contenu
Model Number: K10321(MP260)
Model Number: K10321(MP240)
Numéro du modèle : K10321(MP260)
Numéro du modèle : K10321(MP240)
■ Symbols
1
2
3
4
5
Remove the Protective Material
Retrait des éléments de protection
Turn the Power On
Mise sous tension
The following symbols are used to mark important instructions. Observe these instructions.
Instructions that, if ignored, could result in personal injury or material damage.
Instructions that must be observed for safe operation.
Additional explanations.
Descriptions for operations that take some time to complete.
Install the FINE Cartridges
Installation des cartouches FINE
(FINE Cartridges)
■ Symboles
Les symboles suivants indiquent des instructions importantes. Veillez à respecter ces instructions.
Install the Software
Installation du logiciel
Le non-respect de ces instructions peut entraîner des blessures ou des dommages matériels.
Loading Paper
Chargement du papier
Explications supplémentaires.
After Installing the Machine
Après installation de la machine
For trademark information, refer to “Specifications” on page 32.
Pour plus d'informations sur les marques, reportez-vous à la section « Spécifications » de la page 33.
Instructions à respecter afin de garantir un fonctionnement en toute sécurité.
Descriptions d'opérations dont l'exécution peut prendre un certain temps.
1
Remove the Protective Material
Retrait des éléments de protection
Vérifiez tout d'abord les éléments fournis
2
3
4
5
2
1
First, check the included items
1
(C)
(B)
(A)
Open the Paper Output Tray
(A).
Ouvrez le bac de sortie papier
(A).
The Scanning Unit Support (C) is fixed automatically.
Levez l'unité de numérisation (capot) (B) jusqu'à
ce qu'elle se bloque.
Le support de l'unité de numérisation (C) se met
automatiquement en place.
• Manuals
• Setup CD-ROM (containing the drivers,
applications and on-screen manuals)
• Warranty
• Manuels
• [Setup CD-ROM/CD-ROM d'installation]
(contenant les pilotes, les applications et
les manuels en ligne)
• Garantie
Lift the Scanning Unit (Cover) (B) until it locks
into place.
• A USB cable is
necessary to connect
the machine with your
computer.
• Un câble USB est
nécessaire pour
connecter la machine
à l'ordinateur.
1
1
Remove the Protective Material
Retrait des éléments de protection
3
1
2
3
(E)
(B)
(C)
(D)
Pull the orange protective tape (D) and remove the protective material (E).
Then, lift the Scanning Unit (Cover) (B) slightly and fold the Scanning Unit Support (C), then gently close the Scanning Unit (Cover) (B).
Retirez la languette de protection orange (D), ainsi que l'élément de protection (E).
Soulevez ensuite légèrement l'unité de numérisation (capot) (B) et repliez le support de l'unité de numérisation (C) avant de fermer délicatement l'unité de numérisation (capot) (B).
• Before turning on the machine, remove all the orange tapes and the protective sheets.
• Avant de mettre la machine sous tension, veillez à retirer toutes les languettes oranges et les films de protection.
2
4
5
2
Turn the Power On
Mise sous tension
1
(2)
1
2
(A)
3
2
3
4
5
(C)
(B)
(1)
Plug in the power cord on the left side of the machine and
connect the other end to the wall outlet.
Branchez le cordon d'alimentation sur le côté gauche de la
machine et branchez l'autre extrémité à la prise murale.
Press the ON button (A) to turn on the machine.
Confirm that the POWER lamp (C) lights green.
Appuyez sur le bouton [ON] (MARCHE) (A) pour
mettre la machine sous tension.
Vérifiez que le témoin ALIMENTATION (C) s'allume
en vert.
• Do NOT connect the USB cable at this stage.
• Make sure that the Document Cover (B) is closed.
• Ne branchez PAS le câble USB à ce stade.
• Assurez-vous que le capot de document (B) est fermé.
3
3
Install the FINE Cartridges
Installation des cartouches FINE (FINE Cartridges)
1
(D)
(A)
(E)
Lift the Scanning Unit (Cover) (A) until it locks into place.
The Scanning Unit Support (D) is fixed automatically. The FINE Cartridge Holder (E) comes out to the center. (This is where you install the
cartridges.)
Levez l'unité de numérisation (capot) (A) jusqu'à ce qu'elle se bloque.
Le support de l'unité de numérisation (D) se met automatiquement en place. Le support de cartouche FINE (FINE Cartridge) (E) vient se placer
au centre. (C'est sur ce support que vous installez les cartouches.)
• Do not handle the FINE Cartridges roughly such as
applying them excessive pressure or dropping them.
• Manipulez les cartouches FINE (FINE Cartridges) avec
précaution, évitez de les soumettre à une pression
excessive ou de les laisser tomber.
• Be sure to use the supplied FINE Cartridges.
• If the FINE Cartridge Holder returns to the right, close the Scanning Unit (Cover) and reopen it.
• If the FINE Cartridge Holder does not come out to the center, make sure that the power is turned on.
• Veillez à utiliser les cartouches FINE (FINE Cartridges)
fournies.
• Si le support de cartouche FINE (FINE Cartridge) repart vers la droite, fermez l'unité de numérisation (capot), puis rouvrez-le.
• Si le support de cartouche FINE (FINE Cartridge) ne se place pas au centre, vérifiez que la machine est sous tension.
1
2
3
4
5
3
2
(F)
(G)
Open the Ink Cartridge Locking Cover (
) on the right side.
After removing the Black FINE Cartridge from its box, pull the orange protective
tape (G) in the direction of the arrow and remove it gently.
Pinch (F) firmly and pull up the cover.
Ouvrez le cache de verrouillage de la cartouche d'encre (
droite.
) situé à
Après avoir retiré la cartouche FINE (FINE Cartridge) noire de son logement, ôtez
délicatement la languette de protection orange (G) dans le sens de la flèche.
Serrez (F) fermement et soulevez le cache.
• Be careful not to stain your hands or surrounding work area with ink on the removed protective tape.
• Veillez à ne pas tacher vos mains ni les objets avoisinants avec l'encre restée sur la languette de
protection.
5
3
Install the FINE Cartridges
Installation des cartouches FINE (FINE Cartridges)
4
Place the Black FINE Cartridge (
5
) into the right slot (
Installez la cartouche FINE (FINE Cartridge) noire (
).
) dans le logement de droite (
).
Push down (
completely.
) until you hear a click to close the Ink Cartridge Locking Cover (
View the Ink Cartridge Cover (
Insert the Color FINE Cartridge (
)
) straight on and check that it is locked correctly (not at an angle).
) into the left slot (
) in the same way.
Appuyez sur ( ) le cache de verrouillage de la cartouche d'encre jusqu'à entendre
un clic qui indique qu'il est bien fermé ( ).
Vérifiez immédiatement que le cache de la cartouche d'encre (
Installez ensuite la cartouche FINE (FINE Cartridge) couleur (
en procédant à l'identique.
• Do not knock the FINE Cartridge against the sides of the holder.
• Also be sure to install it in a well-lit environment.
• Veillez à ne pas cogner la cartouche FINE (FINE Cartridge) contre les bords du support.
• Veillez également à l'installer dans de bonnes conditions d'éclairage.
• Install the Black cartridge into the right holder, and the Color one into the left holder.
• Installez la cartouche noire dans le support de droite, et la cartouche couleur dans celui de gauche.
) est correctement fermé (pas de travers).
) dans le logement de gauche (
)
1
6
(D)
2
3
4
5
(H)
(A)
(I)
Lift the Scanning Unit (Cover) (A) slightly and fold the Scanning Unit Support
(D), then gently close the Scanning Unit (Cover) (A).
Soulevez légèrement l'unité de numérisation (capot) (A) et repliez le support
de l'unité de numérisation (D) avant de refermer délicatement l'unité de
numérisation (capot) (A).
• Wait until “1” appears on the LED (H) (about 1-2 minutes) and go to the next step.
• Attendez que « 1 » s'affiche dans le voyant DEL (H) (environ 1 à 2 minutes) et passez à l'étape suivante.
• Once you have installed the FINE Cartridges, do not remove them unnecessarily.
• Une fois les cartouches FINE (FINE Cartridges) installées, ne les retirez pas si ce n'est pas nécessaire.
• If the Alarm lamp (I) lights orange, make sure that the FINE Cartridges are correctly installed.
• Si le témoin Alarme (I) s'allume en orange, vérifiez que les cartouches FINE (FINE Cartridges) sont
correctement installées.
7
4
Install the Software
Installation du logiciel
To use the machine by connecting it to a computer, software including the printer driver needs to be copied
(installed) to the computer's hard disk.
The screens below are based on Windows Vista operating system Ultimate Edition (hereafter referred to as
“Windows Vista”) and Mac OS X v.10.5.x.
Pour utiliser la machine avec un ordinateur, vous devez copier (installer) les logiciels, y compris le pilote
d'imprimante, sur le disque dur de l'ordinateur.
Les écrans ci-dessous sont extraits du système d'exploitation Windows Vista Ultimate Edition (ci-après appelé
« Windows Vista ») et Mac OS X v.10.5.x.
Windows :
Go to page 9
Aller à la page 9
Macintosh :
Go to page 17
•
•
•
•
Quit all running applications before installation.
You need to log on as the administrator (or a member of the Administrators group).
Do not switch users during the installation process.
It may be necessary to restart your computer during the installation process. Follow the on-screen instructions and click OK, and do not
remove the Setup CD-ROM during restarting.
The installation resumes from where it left off when your computer has been restarted.
• Mac OS 9, Mac OS X Classic environments, or Mac OS X v.10.3.8 or earlier are not supported.
•
•
•
•
Quittez toutes les applications en cours avant de procéder à l'installation.
Vous devez vous connecter en tant qu'administrateur (ou membre du groupe d'administrateurs).
Ne changez pas d'utilisateur au cours du processus d'installation.
Il se peut que vous deviez redémarrer l'ordinateur au cours du processus d'installation. Suivez les instructions qui s'affichent à l'écran et
cliquez sur [OK]. Ne retirez pas le [Setup CD-ROM/CD-ROM d'installation] lors du redémarrage.
L'installation reprend là où elle s'était arrêtée lorsque votre ordinateur a redémarré.
• Les environnements Mac OS 9, Mac OS X Classic, Mac OS X v.10.3.8 ou toute version antérieure ne sont pas pris en charge.
Aller à la page 17
1
Windows
If the Found New Hardware or Found New Hardware Wizard screen appears:
Si l'écran [Found New Hardware/Nouveau matériel détecté] ou [Found New Hardware
Wizard/Assistant Ajout de nouveau matériel détecté] s'affiche :
1
2
3
4
5
(A)
Press the ON button (A) to TURN OFF THE MACHINE.
Appuyez sur le bouton [ON] (MARCHE) (A) pour METTRE LA MACHINE HORS TENSION.
1
Remove the USB cable connected to your computer.
The screen may close. In this case, proceed from
.
Débranchez le câble USB connecté à l'ordinateur.
Il se peut que l'écran se ferme. Dans ce cas, commencez à l'étape
2
3
.
Click Cancel to quit the screen.
Cliquez sur [Cancel/Annuler] pour quitter l'écran.
Proceed from
.
Commencez à l'étape
.
• Operating noise continues for about 25 seconds until the machine turns off. Make sure that the POWER lamp
stops flashing.
• Un bruit de fonctionnement continue pendant environ 25 secondes jusqu'à ce que la machine soit hors tension.
Assurez-vous que le témoin ALIMENTATION arrête de clignoter.
9
4
Windows
3
2
Turn on the computer, then insert the Setup CD-ROM into the CD-ROM drive.
The setup program should run automatically.
Mettez l'ordinateur sous tension, puis insérez le [Setup CD-ROM/CD-ROM d'installation] dans le lecteur de CD-ROM.
Le programme d'installation doit, en principe, démarrer automatiquement.
Windows Vista
Go to Step .
Passez à l'étape
.
Windows XP/2000
Go to Step .
Passez à l'étape
.
• If the program does not start automatically, double-click the CD-ROM icon on the computer. When the CD-ROM contents appear,
double-click MSETUP4.EXE.
• Si le programme ne démarre pas automatiquement, double-cliquez sur l'icône du CD-ROM sur l'ordinateur. Lorsque le contenu du
CD-ROM s'affiche, double-cliquez sur [MSETUP4.EXE].
10
Windows Vista
AutoPlay screen appears, click Run Msetup4.exe.
Lorsque l'écran [AutoPlay/Exécution automatique] s'affiche,
cliquez sur [Run Msetup4.exe/Exécuter Msetup4.exe].
1
4
Windows Vista
User Account Control screen appears,
click Continue.
If the same screen reappears in subsequent
steps, click Continue.
Lorsque l'écran [User Account Control/
Contrôle du compte utilisateur] s'affiche,
cliquez sur [Continue/Continuer].
5
When the Select Your Place of Residence screen
appears, select your place of residence, then click
Next.
Lorsque l'écran [Select Your Place of Residence/
Sélectionnez votre lieu de résidence] s'affiche,
sélectionnez votre lieu de résidence, puis cliquez
sur [Next/Suivant].
2
3
4
5
6
Click Easy Install.
The drivers, application software, and on-screen manuals are
installed automatically.
Cliquez sur [Easy Install/Installation rapide].
Les pilotes, le logiciel d'application et les manuels en ligne
s'installent automatiquement.
Si le même écran réapparaît au cours des étapes
suivantes, cliquez sur [Continue/Continuer].
• If the Select Language screen appears, select a language,
then click Next.
• Si l'écran [Select Language/Sélectionner la langue] apparaît,
sélectionnez une langue, puis cliquez sur [Next/Suivant].
• If you want to select particular items to install, click Custom Install
and follow the on-screen instructions to proceed with the installation.
• Pour sélectionner des éléments spécifiques à installer, cliquez sur
[Custom Install/Installation personnalisée] et suivez les instructions
qui s'affichent à l'écran pour les installer.
11
4
Windows
7
Click Install.
Move the cursor over items to display explanations.
Cliquez sur [Install/Installer].
Passez le curseur sur les différents éléments pour afficher des explications.
8
If you can agree, click Yes on the License Agreement screen.
Installation starts.
Si vous acceptez le contrat de licence, cliquez sur [Yes/Oui] dans l'écran [License
Agreement/Contrat de licence].
L'installation démarre.
• Follow any on-screen instructions to install the software.
• Suivez les instructions qui s'affichent à l'écran pour installer les logiciels.
12
1
2
3
4
5
9
USB
When the Printer Connection screen appears, connect one end of the USB cable to the computer, the other to the machine, then TURN THE MACHINE
ON.
Lorsque l'écran [Printer Connection/Connexion de l'imprimante] s'affiche, branchez l'une des extrémités du câble USB à l'ordinateur et l'autre à la
machine, puis METTEZ LA MACHINE SOUS TENSION.
• When the machine is recognized by the computer, a message appears on the screen.
• If you cannot go to the next procedure after 10 minutes, click Help and confirm the message.
• The USB port is located on the right side of the
machine.
• Lorsque l'ordinateur a reconnu la machine, un message s'affiche sur l'écran.
• Si après 10 minutes vous n'êtes toujours pas passé à la procédure suivante, cliquez sur [Help/Aide] et validez le message.
• Le port USB se trouve sur le côté droit de la machine.
13
4
Windows
10
11
Click Next.
Click Next.
Cliquez sur [Next/Suivant].
It may take a while for the next screen to appear. Click Next only once.
Cliquez sur [Next/Suivant].
L'écran suivant peut mettre un certain temps à s'afficher. Cliquez sur [Next/Suivant] une seule fois.
• If straight lines are misaligned or print quality is not satisfactory after installing the MP driver, you
may need to align the Print Head. Refer to “When Printing Becomes Faint or Colors Are Incorrect” in
the on-screen manual: Basic Guide.
• Si les lignes droites ne sont pas alignées ou si la qualité d'impression n'est pas satisfaisante une
fois le pilote MP installé, vous devrez peut-être aligner la tête d'impression. Reportez-vous à la
section « L'impression devient pâle ou les couleurs ne s'impriment plus correctement » du manuel
en ligne : Guide d'utilisation de base.
14
1
2
3
4
5
12
Serial No.
Click Next.
If connected to the Internet, the user registration page appears. Follow the on-screen instructions to register your product. You will need your product serial number, which is located on the
inside of the machine.
Cliquez sur [Next/Suivant].
Si vous êtes connecté à Internet, la page Enregistrement de l'utilisateur s'affiche. Suivez les instructions qui s'affichent à l'écran pour enregistrer votre produit. Vous aurez besoin du numéro
de série du produit, indiqué à l'intérieur de la machine.
• Internet connection is required. (Connection fees apply.)
• Une connexion Internet est nécessaire.
(Des frais de connexion sont d'application.)
• To register later, click Cancel. User Registration can be started from the Solution Menu icon. For details, refer to “Solution Menu” on
page 25.
• The User Registration screen will only be displayed when Europe, Middle East, Africa is selected on the Select Your Place of
Residence screen.
• Pour procéder à l'enregistrement plus tard, cliquez sur [Cancel/Annuler]. Vous pouvez également ouvrir la page Enregistrement de
l'utilisateur à partir de l'icône [Solution Menu]. Pour plus de détails, reportez-vous à la section « Solution Menu » de la page 25.
• L'écran [User Registration/Enregistrement utilisateur] s'affiche uniquement si [Europe, Middle East, Africa/Europe, MoyenOrient, Afrique] est sélectionné dans l'écran [Select Your Place of Residence/Sélectionnez votre lieu de résidence].
15
4
Windows
13
14
When the Extended Survey Program screen appears, confirm
the message.
Click Exit.
If you can agree, click Agree.
If you click Do not agree, the Extended Survey Program will not be installed.
(This has no effect on the machine's functionality.)
Lorsque l'écran Extended Survey Program s'affiche, validez le
message.
If Restart is displayed, make sure that the Restart the system now (recommended) check box is selected, then click
Restart. After restarting the computer, remove the Setup CD-ROM and keep it in a safe place.
Cliquez sur [Exit/Quitter].
Si [Restart/Redémarrer] s'affiche, assurez-vous que la case à cocher [Restart the system now (recommended)/
Redémarrer le système maintenant (recommandé)] est activée, puis cliquez sur [Restart/Redémarrer].
Après avoir redémarré l'ordinateur, retirez le [Setup CD-ROM/CD-ROM d'installation] et rangez-le en lieu sûr.
Si vous acceptez, cliquez sur [Agree/J'accepte].
Si vous cliquez sur [Do not agree/Je refuse], l'Extended Survey Program n'est
pas installé. (Ceci n'affecte en rien les fonctionnalités de la machine.)
Next, read “5 Loading Paper” on page 23!
Lisez ensuite la section « 5 Chargement du papier » à la page 23 !
16
1
Macintosh
2
1
2
3
4
5
3
USB
Connect one end of the USB cable to the computer and
the other to the machine.
Turn on the computer, then insert the Setup
CD-ROM into the CD-ROM drive.
Double-click the Setup icon.
Mettez l'ordinateur sous tension, puis insérez
le [Setup CD-ROM/CD-ROM d'installation]
dans le lecteur de CD-ROM.
Double-cliquez sur l'icône [Setup].
Make sure the machine is turned on.
Branchez une des extrémités du câble USB à l'ordinateur
et l'autre à la machine.
Assurez-vous que la machine est sous tension.
If the CD-ROM folder does not open automatically,
double-click the CANON_IJ icon on the desktop.
Si le dossier du CD-ROM ne s'ouvre pas automatiquement,
double-cliquez sur l'icône [CANON_IJ] sur le bureau.
• The USB port is located on the right side of the machine.
• Le port USB se trouve sur le côté droit de la machine.
17
4
Macintosh
4
Enter your administrator name and password. Click OK.
If you do not know your administrator name or password, click
Help, then follow the on-screen instructions.
Entrez votre nom d'administrateur et votre mot de
passe. Cliquez sur [OK].
Si vous ne connaissez pas votre nom d'administrateur ou votre mot
de passe, cliquez sur [Help/Aide], puis suivez les instructions qui
s'affichent à l'écran.
5
When the Select Your Place of Residence screen
appears, select your place of residence, then click
Next.
Lorsque l'écran [Select Your Place of Residence/
Sélectionnez votre lieu de résidence] s'affiche,
sélectionnez votre lieu de résidence, puis cliquez
sur [Next/Suivant].
• If the Select Language screen appears, select a language,
then click Next.
• Lorsque l'écran [Select Language/Sélectionner la langue]
apparaît, sélectionnez une langue, puis cliquez sur [Next/Suivant].
1
6
Click Easy Install.
The drivers, application software, and on-screen manuals are
installed automatically.
Cliquez sur [Easy Install/Installation rapide].
Les pilotes, le logiciel d'application et les manuels en ligne
s'installent automatiquement.
• If you want to select particular items to install, click Custom Install and
follow the on-screen instructions to proceed with the installation.
• Pour sélectionner des éléments spécifiques à installer, cliquez sur
[Custom Install/Installation personnalisée] et suivez les instructions
qui s'affichent à l'écran pour les installer.
1
7
Click Install.
Move the cursor over items to display explanations.
Cliquez sur [Install/Installer].
Passez le curseur sur les différents éléments pour afficher des explications.
2
3
4
5
8
If you can agree, click Yes on the License Agreement screen.
Installation starts.
Si vous acceptez le contrat de licence, cliquez sur [Yes/Oui] dans l'écran
[License Agreement/Contrat de licence].
L'installation démarre.
• Follow any on-screen instructions to install the software.
• Suivez les instructions qui s'affichent à l'écran pour installer les logiciels.
19
4
Macintosh
9
10
Click Next.
Click Next.
Cliquez sur [Next/Suivant].
Cliquez sur [Next/Suivant].
• If straight lines are misaligned or print quality is not satisfactory after installing the MP driver, you may need
to align the Print Head. Refer to “When Printing Becomes Faint or Colors Are Incorrect” in the on-screen
manual: Basic Guide.
• Si les lignes droites ne sont pas alignées ou si la qualité d'impression n'est pas satisfaisante une fois le pilote
MP installé, vous devrez peut-être aligner la tête d'impression. Reportez-vous à la section « L'impression
devient pâle ou les couleurs ne s'impriment plus correctement » du manuel en ligne : Guide d'utilisation
de base.
20
• The Setup Complete screen will only be displayed when Europe, Middle East, Africa is selected
on the Select Your Place of Residence screen.
• L'écran [Setup Complete/Configuration terminée] s'affiche uniquement si [Europe, Middle
East, Africa/Europe, Moyen-Orient, Afrique] est sélectionné dans l'écran [Select Your Place of
Residence/Sélectionnez votre lieu de résidence].
1
2
3
4
5
11
Serial No.
Click Next.
If connected to the Internet, the user registration page appears. Follow the on-screen instructions to register your product. You will need your product serial number, which is located on the
inside of the machine.
Cliquez sur [Next/Suivant].
Si vous êtes connecté à Internet, la page Enregistrement de l'utilisateur s'affiche. Suivez les instructions qui s'affichent à l'écran pour enregistrer votre produit. Vous aurez besoin du numéro
de série du produit, indiqué à l'intérieur de la machine.
• Internet connection is required. (Connection fees apply.)
• Une connexion Internet est nécessaire.
(Des frais de connexion sont d'application.)
• To register later, click Cancel. User Registration can be started from the Solution Menu icon. For details, refer to “Solution Menu” on
page 25.
• The User Registration screen will only be displayed when Europe, Middle East, Africa is selected on the Select Your Place of
Residence screen.
• Pour procéder à l'enregistrement plus tard, cliquez sur [Cancel/Annuler]. Vous pouvez également ouvrir la page Enregistrement de
l'utilisateur à partir de l'icône [Solution Menu]. Pour plus de détails, reportez-vous à la section « Solution Menu » de la page 25.
• L'écran [User Registration/Enregistrement utilisateur] s'affiche uniquement si [Europe, Middle East, Africa/Europe, MoyenOrient, Afrique] est sélectionné dans l'écran [Select Your Place of Residence/Sélectionnez votre lieu de résidence].
21
4
Macintosh
1
2
3
4
5
12
Click Restart.
Click Restart to restart the computer.
After restarting the computer, remove the Setup CD-ROM and keep it in a safe
place.
Cliquez sur [Restart/Redémarrer].
Cliquez sur [Restart/Redémarrer] pour redémarrer l'ordinateur.
Après avoir redémarré l'ordinateur, retirez le [Setup CD-ROM/CD-ROM
d'installation] et rangez-le en lieu sûr.
• When using Mac OS X v.10.3.9, before using the operation panel on the machine to save scanned originals to the
computer, it is necessary to select MP Navigator EX as the launch application on Image Capture under Applications.
For details, refer to “Saving Scanned Data” in the on-screen manual: Basic Guide.
• Si vous utilisez Mac OS X v.10.3.9, avant d'utiliser le panneau de contrôle de la machine pour enregistrer des originaux
numérisés sur l'ordinateur, vous devez sélectionner [MP Navigator EX] comme application de démarrage dans [Image
Capture/Transfert d'images] sous [Applications]. Pour plus de détails, reportez-vous à la section « Enregistrement des
données numérisées » du manuel en ligne : Guide d'utilisation de base.
Next, read “5 Loading Paper” on page 23!
Lisez la section « 5 Chargement du papier » à la page 23 !
22
5
Loading Paper
Chargement du papier
1
3
4
5
3
2
1
2
(C)
(A)
(B)
(B)
(B)
(B)
Open the Paper Support (A) and
pull it out.
Move the Paper Guide (B) to both edge, and load paper in
the center of the rear tray (C).
Slide the left and right Paper Guide (B) against both edge of the
paper.
Ouvrez le support papier (A) et
déployez-le.
Faites glisser le guide papier (B) contre les côtés, puis
chargez du papier au centre du bac arrière (C).
Faites glisser les guides papier (B) gauche et droit jusqu'au bord
du papier.
• For details on how to handle paper, refer to “Loading Paper” in the on-screen
manual: Basic Guide.
• Load paper in portrait orientation with the printing side facing up.
• Chargez le papier en orientation portrait, face imprimable vers le haut.
• Pour en savoir plus sur la manipulation du papier, reportez-vous à la section
« Chargement du papier » du manuel en ligne : Guide d'utilisation de base.
Machine installation is now complete!
L'installation de la machine est à présent terminée !
23
After Installing the Machine
Après installation de la machine
■ Manuals
■ Manuels
Safety Precautions
Précautions de sécurité
Getting Started
(this manual)
Safety and Environment
Information
For proper use, read safety precautions
before using the product.
Informations relatives à la
sécurité et à l'environnement
Pour une utilisation adéquate de la machine,
prenez soin de lire les précautions de sécurité
avant de l'utiliser.
24
Describes how to set up and use your machine.
Introduces the machine and its functions, the
included manuals and application software.
Démarrage
(ce manuel)
Explique comment installer et utiliser la machine.
Présente la machine et ses fonctions, les
manuels inclus et le logiciel d'application.
Basic Guide
(on-screen manual)
Advanced Guide
(on-screen manual)
Describes the basic operations and gives an
introduction to other functions available.
Describes various operating procedures to
make full use of the machine. Also includes
“Troubleshooting” information for your machine.
Guide d'utilisation de base
(manuel en ligne)
Guide d'utilisation avancée
(manuel en ligne)
Décrit les opérations de base et présente les
autres fonctions.
Présente différents modes de fonctionnement
permettant de tirer pleinement parti de la
machine. Comprend également une section
« Dépannage » pour la machine.
■ Solution Menu
■ Solution Menu
Solution Menu is a gateway to functions and information that allow you to make full use of the machine!
Solution Menu est une passerelle vers des fonctions et des informations qui vous permettent de tirer pleinement parti de la machine.
Example:
Exemple :
Open various applications and on-screen manuals with a single click.
You can start Solution Menu from the Canon Solution Menu icon on the desktop (Windows) or on the Dock
(Macintosh).
If you have a problem with machine settings, click the Change settings or find solutions to problems. icon in
Solution Menu to open My Printer.
Ouvrez différentes applications et manuels en ligne d'un seul clic.
Vous pouvez démarrer Solution Menu en cliquant sur l'icône [Canon Solution Menu] sur le bureau (Windows)
ou dans le Dock (Macintosh).
Si vous avez un problème avec les paramètres d'impression, cliquez sur l'icône [Change settings or find
solutions to problems./Modifier les paramètres ou rechercher une solution aux problèmes.] dans Solution
Menu pour ouvrir [My Printer].
*The buttons displayed vary depending on the country or region of purchase.
*Les boutons affichés varient en fonction du pays ou de la région d'achat.
25
After Installing the Machine
Après installation de la machine
■ Using Your Machine
■ Utilisation de la machine
This machine allows you to print in various ways using the MPdriver and application software
installed on the computer.
For example, you can scan documents/images into a computer and copy them, or print them
without borders. Scanned images can be corrected/enhanced easily. Use them to create your own
calendar etc. easily.
For detailed operating procedures and functions, refer to the on-screen manuals.
Cette machine vous permet d'imprimer dans différents modes à l'aide du pilote MPdriver et du
logiciel d'application installés sur l'ordinateur.
Ainsi, vous pouvez numériser des documents/images et les enregistrer sur l'ordinateur pour ensuite
les copier ou les imprimer sans bordures. Les images numérisées peuvent être corrigées/améliorées
en toute simplicité. Utilisez-les pour créer en un tour de main votre propre calendrier, par exemple.
Pour plus d'informations sur les modes de fonctionnement et les fonctions, reportez-vous aux manuels en ligne.
Now let's use the machine!
Commencez à utiliser votre machine !
26
Try Copying
Copie
You can copy a document by simply placing it on the Platen Glass and pressing the Color button or the Black button.
For various copying procedures, refer to “Copying” in the on-screen manual: Basic Guide.
Vous pouvez copier un document en le plaçant simplement sur la vitre d'exposition et en appuyant sur le bouton Couleur ou sur le bouton Noir.
Pour découvrir différents modes de copie, reportez-vous à la section « Copie » du manuel en ligne : Guide d'utilisation de base.
1
2
Load a sheet of A4 or Letter-sized plain paper.
Open the Document Cover (A).
Chargez une feuille de papier ordinaire au format A4 ou Lettre.
Ouvrez le capot de document (A).
(A)
• For details, refer to “5 Loading Paper” on page 23.
• The machine may make operating noise when feeding paper.
• Pour plus de détails, reportez-vous à la section « 5 Chargement du papier » de la page 23.
• La machine peut émettre des bruits de fonctionnement lors du chargement du papier.
27
Try Copying
Copie
3
(B)
4
(A)
(C) (D)
(E)
Place the document face-down and align it with the Alignment Mark (B).
Placez le document face vers le bas et alignez-le sur le repère
d'alignement (B).
Close the Document Cover (A), then press the Black button (C) for black & white copying, or the
Color button (D) for color copying.
Copying will start.
Fermez le capot de document (A), puis appuyez sur le bouton Noir (C) pour effectuer une copie
en noir et blanc, ou sur le bouton Couleur (D) pour effectuer une copie couleur.
La copie démarre.
• Do not place any objects weighing more than 4.4 lb / 2.0 kg on the Platen Glass.
• Do not press or put weight on the original with pressure exceeding 4.4 lb / 2.0 kg.
Doing so may cause the scanner to malfunction or the Platen Glass to break.
• Ne placez pas d'objet de plus de 2 kg (4,4 lb) sur la vitre d'exposition.
• N'appliquez pas de pression ni de poids supérieur à 2 kg (4,4 lb) sur l'original.
Cela pourrait entraîner un dysfonctionnement du scanner ou casser la vitre d'exposition.
28
• Do not open the Document Cover until copying is
complete.
• Make sure that the Output Tray Extension (E) is extended.
• N'ouvrez pas le capot des documents tant que la
copie n'est pas terminée.
• Assurez-vous que l'extension du bac de sortie (E) est déployée.
Print Photos from a Computer
Impression depuis un ordinateur
Easy-PhotoPrint EX allows you to print photos easily.
This section explains how to print borderless photos using 4” x 6” size Photo Paper Plus Glossy II. The screens are based on Windows Vista.
Easy-PhotoPrint EX vous permet d'imprimer des photos en toute simplicité.
Cette section explique comment imprimer des photos sans bordure sur du Papier Photo Glacé Extra II au format [4” x 6”/10 x 15 cm]. Les écrans sont extraits de
Windows Vista.
1
2
In Solution Menu, click One-Click to Photo Print.
Select the image you want to print in a folder, then click Layout/Print.
Dans Solution Menu, cliquez sur [One-Click to Photo Print/Impression photo
en un clic].
When a photo is selected, the number of copies is set to “1.”
Easy-PhotoPrint EX starts.
Easy-PhotoPrint EX démarre.
Sélectionnez l'image à imprimer dans un dossier, puis cliquez sur [Layout/Print/
Présent./Impr.].
Lorsqu'une photo est sélectionnée, le nombre de copies est défini sur « 1 ».
• For opening Solution Menu, refer to “Solution Menu” on page 25.
• For more information refer to the on-screen manual: Advanced Guide.
• Pour ouvrir Solution Menu, reportez-vous à la section « Solution Menu » de la page 25.
• Pour plus d'informations, reportez-vous au manuel en ligne : Guide d'utilisation avancée.
29
Print Photos from a Computer
Impression depuis un ordinateur
3
Load a sheet of photo paper in portrait orientation.
Load paper with the printing side facing up.
Chargez une feuille de papier photo en orientation portrait.
Chargez le papier face imprimable vers le haut.
4
Click Print.
Printing will start.
Cliquez sur [Print/Imprimer].
L'impression démarre.
• For details, refer to “5 Loading Paper” on page 23.
• On Macintosh, if the Print screen is displayed, click Print to start printing.
• Pour plus de détails, reportez-vous à la section « 5 Chargement du papier » de la page 23.
• Sous Macintosh, si l'écran [Print/Impression] s'affiche, cliquez sur [Print/Imprimer] pour démarrer l'impression.
30
Maintenance
Maintenance
After a period of use, the inside of the machine may become stained
with ink.
To avoid staining your hands or clothes with ink, it is recommended that
you clean the Ink Cartridge Locking Cover (A) and the inside of the tray
(B) with a dry cloth as required.
If the Scanning Unit (Cover) is left open for more than 10 minutes, the
FINE Cartridge Holder move to the right automatically.
Après quelques temps d'utilisation, l'intérieur de la machine peut être
souillé d'encre.
Pour éviter de tacher vos mains ou vos vêtements avec de l'encre, il
est recommandé de nettoyer le cache de verrouillage de la cartouche
d'encre (A) et l'intérieur du bac (B) avec un chiffon doux, si nécessaire.
Si l'unité de numérisation (capot) reste ouverte pendant plus de
10 minutes, le support de la cartouche FINE (FINE Cartridge) se
déplace automatiquement vers la droite.
(A)
(B)
31
Specifications
General Specifications
Minimum System Requirements
External dimensions Approx. 17.5 (W) x 13.1 (D) x 6.1 (H) inches /
Approx. 444 (W) x 331 (D) x 155 (H) mm
* With the Paper Support and Paper Output Tray retracted.
Weight
MP260:
Approx. 5.6 kg (Approx. 12.3 lb)
Conform to the operating system’s requirements when higher than those given here.
General Specifications
Printing resolution
(dpi)
Interface
4800 (horizontal)* x 1200 (vertical)
* Ink droplets can be placed with a pitch of 1/4800 inch at
minimum.
Printer Port:
Hi-Speed USB*1
Direct Print Port: *2
PictBridge
*1 A computer that complies with Hi-Speed USB standard
is required. Since the Hi-Speed USB interface is fully
upwardly compatible with USB 1.1, it can be used at USB
1.1.
*2 MP240 only
Print width
8 inches / 203.2 mm max.
(for Borderless Printing: 8.5 inches / 216mm)
Acoustic noise level Approx.46 dB(A)
* When printing in the standard print quality mode on
Photo Paper Plus Glossy II.
Operating
Temperature: 5 to 35°C (41 to 95°F)
environment
Humidity: 10 to 90% RH (no condensation)
Storage
Temperature: 0 to 40°C (32 to 104°F)
environment
Humidity: 5 to 95% RH (no condensation)
Power supply
AC 100-240 V, 50/60 Hz
Power consumption MP260:
Printing (Copy): Approx. 12W
Standby (minimum): Approx. 2W
OFF: Approx. 0,9W
CANON FINE
Cartridges
MP240:
Approx. 5.5 kg (Approx. 12.2 lb)
* With the FINE Cartridges installed.
Nozzles:
Black: 320 nozzles
Cyan/Magenta/Yellow: 384 x 3 nozzles
Operating System
Processor
RAM
Windows Vista
1 GHz processor
512 MB
Mac OS X v.10.5
Intel processor, PowerPC G5,
PowerPC G4
(867 MHz or faster)
512 MB
Windows XP SP2
300 MHz processor
128 MB
Mac OS X v.10.4
Intel processor, PowerPC G5,
PowerPC G4, PowerPC G3
256 MB
Windows 2000 Professional SP4
300 MHz processor
128 MB
Mac OS X v.10.3.9
PowerPC G5, PowerPC G4,
PowerPC G3
128 MB
Copy Specifications
Multiple copy
1 - 9, 20 pages
Reduction/Enlargement Fit-to-page
Scan Specifications
Scanner driver
TWAIN / WIA (Windows Vista and Windows XP only)
Maximum scanning size A4/Letter, 8.5” x 11.7” / 216 x 297 mm
Scanning resolution
Optical resolution (horizontal x vertical) max: 1200 dpi
x 2400 dpi
Interpolated resolution max: 19200 dpi x 19200 dpi
Gradation (Input/Output) Gray: 16 bit/8 bit
Color: 48 bit/24 bit (RGB each 16 bit/8 bit)
MP240:
Printing (Copy): Approx. 12W
Standby (minimum): Approx. 1.3W
OFF: Approx. 0.8W
Note: Operation can only be
Note: Hard Disk must be formatted
guaranteed on a PC with Windows as Mac OS Extended (Journaled)
Vista, XP or 2000 pre-installed.
or Mac OS Extended.
Browser
Internet Explorer 6.0 or later
Safari
Hard Disk Space
650 MB
750 MB
Note: For bundled software
Note: For bundled software
installation.
installation.
CD-ROM Drive
Required
Display
XGA 1024 x 768
• Some functions may not be available with Windows Media Center
• To upgrade from Windows XP to Windows Vista, first uninstall software bundled with the
Canon inkjet printer.
Additional System Requirements for on-screen manuals
■ About This Manual
In this manual, most operations are described for MP260. The screens are based on MP260.
•
•
•
•
Microsoft is a registered trademark of Microsoft Corporation.
Windows is a trademark or registered trademark of Microsoft Corporation in the U.S. and/or other countries.
Windows Vista is a trademark or registered trademark of Microsoft Corporation in the U.S. and/or other countries.
Macintosh and Mac are trademarks of Apple Inc., registered in the U.S. and other countries.
32
Browser: Easy Guide Viewer
Note: Microsoft Internet Explorer 6.0 or later
must be installed. The on-screen manual
may not be displayed properly depending on
your operating system or Internet Explorer
version. We recommend that you keep your
system up to date with Windows Update.
Browser: Help Viewer
Note: The on-screen manual may not be
displayed properly depending on your
operating system. We recommend that you
keep your system up to date.
Specifications are subject to change without notice.
About Consumables
Consumables (ink tanks / FINE Cartridges) are available for 5 years after
production has stopped.
Spécifications
Spécifications générales
Résolution
d'impression (ppp)
Interface
4800 (horizontal)* x 1200 (vertical)
* Les gouttelettes d'encre peuvent être positionnées à un
pas d'impression de 1/4800 de pouce minimum.
Port imprimante :
Hi-Speed USB*1
Poids
Port d'impression directe : *2
PictBridge
Largeur
d'impression
Niveau acoustique
Environnement
d'utilisation
Environnement de
stockage
Alimentation
Consommation
*1 Un ordinateur répondant à la norme USB Hi-Speed est
nécessaire. L'interface USB Hi-Speed étant entièrement
compatible avec l'USB 1.1, elle peut être utilisée pour
l'USB 1.1.
*2 Modèle MP240 uniquement
8 pouces / 203,2 mm max.
([Borderless Printing/Impression sans bordure] :
8,5 pouces / 216 mm)
Environ 46 dB(A)
* Pour une impression sans bordure en qualité standard
sur du papier Papier Photo Glacé Extra II.
Température : 5 à 35 °C (41 à 95 °F)
Humidité : 10 à 90 % d'humidité relative (sans condensation)
Température : 0 à 40 °C (32 à 104 °F)
Humidité : 5 à 95 % d'humidité relative (sans
condensation)
100-240 V CA, 50/60 Hz
MP260 :
Lors de l'impression (Copie) : Environ 12 W
En veille (minimum) : Environ 2 W
Hors tension : Environ 0,9 W
MP240 :
Lors de l'impression (Copie) : Environ 12 W
En veille (minimum) : Environ 1,3 W
Hors tension : Environ 0,8 W
Configuration minimale requise
Spécifications générales
Dimensions
externes
Cartouches FINE
(FINE Cartridges)
Canon
Environ 17,5 (L) x 13,1 (P) x 6,1 (H) pouces /
Environ 444 (L) x 331 (P) x 155 (H) mm
* Avec le support papier et le bac de sortie papier
rétractés.
MP260 :
Environ 5,6 kg (environ 12,3 lb)
MP240 :
Environ 5,5 kg (environ 12,2 lb)
* Avec les cartouches FINE (FINE Cartridges) installées.
Buses :
Cartouche noire : 320 buses
Cartouche cyan/magenta/jaune : 384 x 3 buses
Si la configuration requise du système d'exploitation est supérieure à celle indiquée ici,
veillez à vous y conformer.
Système
d'exploitation
Processeur
Mémoire RAM
Windows Vista
Processeur de 1 GHz
512 Mo
Mac OS X v.10.5
Processeur Intel, PowerPC G5,
PowerPC G4
(867 MHz ou plus rapide)
512 Mo
Windows XP SP2
Processeur de 300 MHz
128 Mo
Mac OS X v.10.4
Processeur Intel, PowerPC G5,
PowerPC G4, PowerPC G3
256 Mo
Windows 2000 Professional SP4
Processeur de 300 MHz
128 Mo
Mac OS X v.10.3.9
PowerPC G5, PowerPC G4,
PowerPC G3
128 Mo
Spécifications du copieur
Copies multiples
Réduction/
Agrandissement
1 - 9, 20 pages
[Fit-to-page/Échelle papier]
Spécifications du scanner
Pilote du scanner
Format maximal pour
la numérisation
Résolution
Gradation
(Entrée/Sortie)
TWAIN / WIA (Windows Vista et Windows XP
uniquement)
A4/Lettre, 8,5” x 11,7” / 216 x 297 mm
Résolution optique (horizontal x vertical) max. : 1200 x
2400 ppp
Résolution interpolée max. : 19200 x 19200 ppp
Gris : 16 bits/8 bits
Couleur : 48 bits/24 bits (RVB chacun 16 bits/8 bits)
Navigateur
Espace disque dur
Remarque : le bon fonctionnement
ne peut être garanti que sur un
ordinateur tournant sous Windows
Vista, XP ou 2000.
Internet Explorer 6.0
ou version ultérieure
650 Mo
Remarque : Pour l'installation des
logiciels fournis.
Requis
Remarque : le disque dur doit
être formaté en Mac OS étendu
(Journalisé) ou Mac OS étendu.
Safari
750 Mo
Remarque : Pour l'installation des
logiciels fournis.
Lecteur de
CD‑ROM
Affichage
XGA 1024 x 768
• Certaines fonctions peuvent ne pas être disponibles avec Windows Media Center.
• Pour mettre votre système à niveau de Windows XP vers Windows Vista, commencez par
désinstaller les logiciels fournis avec l'imprimante à jet d'encre Canon.
Configuration système supplémentaire pour les manuels en ligne

■ À propos de ce manuel
La plupart des opérations décrites dans ce manuel concernent le modèle MP260. Les écrans sont extraits du modèle MP260.
•
•
•
•
Microsoft est une marque déposée de Microsoft Corporation.
Windows est une marque ou une marque déposée de Microsoft Corporation aux États-Unis et/ou dans d'autres pays.
Windows Vista est une marque ou une marque déposée de Microsoft Corporation aux États-Unis et/ou dans d'autres pays.
Macintosh et Mac sont des marques d'Apple Inc., déposées aux États-Unis et dans d'autres pays.
Navigateur : Easy Guide Viewer
Remarque : Microsoft Internet Explorer
6.0 ou une version ultérieure doit être
installé. Le manuel en ligne peut ne pas
s'afficher correctement selon votre système
d'exploitation ou la version d'Internet Explorer.
Nous vous recommandons de garder votre
système à jour avec Windows Update.
Navigateur : Help Viewer
Remarque : Le manuel en ligne peut ne pas
s'afficher correctement suivant le système
d'exploitation. Nous vous recommandons de
garder votre système à jour.
Ces spécifications sont susceptibles d'être modifiées sans avis préalable.
À propos des consommables
Les consommables (réservoirs d'encre / cartouches FINE (FINE Cartridges))
sont disponibles cinq ans après arrêt de la production.
33
The following ink cartridges are compatible with this product.
Les cartouches d'encre suivantes sont compatibles avec ce produit.
www.canon.ca
QT5-1663-V01
XXXXXXXX
©CANON INC.2008
PRINTED IN VIETNAM
IMPRIME AU VIETNAM