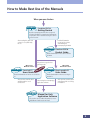
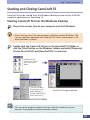
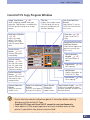
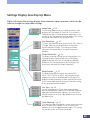
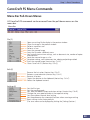
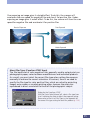
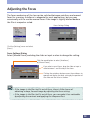
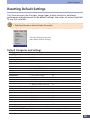
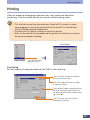
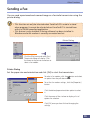
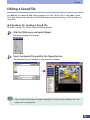
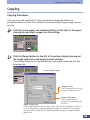
1
CanoCraft FS 3.6
for CanoScan FS2710/CanoScan 2700F Film Scanner
Users Guide
Two Ways to Learn About CanoCraft FS 3.6
• Quick Start Jump right into scanning
• Steps 1-3 Methodical approach
How to Make Best Use of the Manuals
When you open the box
Printed Manual
CanoScan FS2710
Getting Started
Describes operating procedure from set up and
software installation to scanning and confirmation
of operation. Please read before using the scanner
for the first time.
After reading this guide and
scanner is set up and ready
for use.
Detailed information
on care of the scanner
and handling the
accompanying CD-ROM.
Electronic Manual CanoScan FS2710
Product Guide
Detailed information on the scanner and the
CD-ROM.
Tells you how to get the best
scanning results.
When using
Windows version.
Electronic Manual
CanoCraft FS
Users Guide
e
uid
is G
Th
Electronic Manuals
Electronic Manual
Plug-in module FS
Users Guide
Detailed information on how to use CanoCraft
FS.
After you have read this book
and mastered the use of
CanoCraft FS
When using
Macintosh version.
Detailed information on how to use Plug-in
module FS.
When using the accompanying
application software.
After you have read this book
and mastered the use of Plugin module FS
Manual for Each
Application Software
Tells you how to use Adobe Photoshop LE, Presto!
PhotoAlbum LE and Presto! Mr. Photo.
2
How to Use the Users Guide
This guide is the instruction manual for CanoCraft FS 3.6 scanning application
software for use with Canon film scanners. In addition to functioning as a standalone application program on the Windows platform, CanoCraft FS also serves as a
TWAIN driver in TWAIN-compliant application programs. With the exception of
program starting and file saving, the basic procedures for using CanoCraft FS as a
stand-alone program and TWAIN driver are virtually the same. This guide,
therefore, illustrates the procedures using CanoCraft FS as a stand-alone
application. To use the program as a TWAIN driver from within other applications,
please supplement this guide with the Windows instruction manual and the guides
accompanying your TWAIN-compliant applications.
How to Use this Guide
Quick Start
A digest of the complete CanoCraft FS operating procedures. Those who wish to
jump into scanning should read this section.
Step 1
Basic Procedures
An explanation of how to install CanoCraft FS and the various program window
names and functions. Be sure to read this section.
Step 2
Scanning
A step-by-step explanation of the scanning process. Be sure to read this section.
Step 3
Adjusting Images
An explanation of how to adjust color balance and brightness. Read this section as
required.
Other Functions
An explanation of CanoCraft FS’s preference, printer and fax settings. Read this
section as required.
Editing
An explanation of CanoCraft FS’s image editing functions. Read this section as
required.
CanoCraft FS Copy
An explanation of how to use CanoCraft FS Copy. Read this section as required.
Appendices
Look to this section for troubleshooting tips, instructions on how to adjust
CanoCraft FS settings, a glossary and an index. Read this section as required.
3
Table of Contents
CanoCraft FS Features................................................................................9
Quick Start <Jump Right into Scanning>
Quick Start <Jump Right into Scanning>................................................11
Step 1 Basic Procedures
Installing CanoCraft FS ............................................................................15
Installing CanoCraft FS........................................................................................ 15
Precautions When Connecting the Scanner to a Windows® 95 Computer .... 16
Starting and Closing CanoCraft FS ..........................................................18
Starting CanoCraft FS from the Windows Desktop .......................................... 18
Starting CanoCraft FS from Photoshop (TWAIN- Compliant Application) ...... 19
Closing CanoCraft FS ........................................................................................... 19
Program Window Names and Functions ................................................20
CanoCraft FS Program Window ......................................................................... 20
CanoCraft FS Copy Program Window ................................................................ 21
Settings Display Area Pop-Up Menu .................................................................. 22
CanoCraft FS Menu Commands ..............................................................23
Menu Bar Pull-Down Menus............................................................................... 23
How to Find Out More About a Procedure You Don't Understand ......25
Step 2 Scanning
Scanning Procedures ................................................................................27
Selecting the Film Type ............................................................................29
Selecting the Image Type ........................................................................30
Determining the Image Format ......................................................................... 31
Selecting Resolution and Magnification Settings ..................................32
About Resolution and Magnification ................................................................ 32
Selecting a Scan Resolution Setting ................................................................... 33
Selecting an Output Resolution Setting ............................................................ 34
Procedures for Setting the Output Resolution ................................................. 35
Determining the Input and Output Resolution and Output Magnification ... 36
Previewing ................................................................................................37
Zooming an Image for Verification ............................................................... 38
Rotating the Image to Change Its Orientation............................................. 39
Rotate/Flip Dialog ........................................................................................... 39
4
Table of Contents
Adjusting Brightness and Coloring .........................................................40
Selecting the Scan Area ...........................................................................41
Selecting the Scan Area ...................................................................................... 41
Changing the Scan Area Selection ..................................................................... 42
Unlocked State
.......................................................................................... 42
Locked State
.............................................................................................. 43
Fixing the Aspect Ratio ....................................................................................... 45
Aspect Ratio Dialog ........................................................................................ 45
Final Scan and Saving ..............................................................................46
Step 3 Adjusting Images
To Obtain Better Images ..........................................................................50
Image Adjustment Commands ................................................................52
Changing the Adjustment Mode ............................................................54
Adjusting Brightness and Coloring (Easy Mode) ....................................55
Brightness Tab ..................................................................................................... 55
Coloring Tab ........................................................................................................ 56
Adjusting Highlights and Shadows (Easy Mode)....................................57
Adjusting a Histogram (Expert Mode) ....................................................58
How to Interpret a Histogram ....................................................................... 59
How to Adjust a Histogram ........................................................................... 59
Adjusting Brightness/Contrast (Expert Mode) ........................................61
Adjusting Brightness....................................................................................... 62
Adjusting Contrast .......................................................................................... 62
Adjusting Gamma Values (Expert Mode) ...............................................63
Setting the Gamma Value Correctly .............................................................. 64
Adjusting a Tone Curve (Expert Mode)...................................................65
How to Interpret the Tone Curve .................................................................. 66
Adjusting a Tone Curve .................................................................................. 66
Adjusting the Color Balance (Expert Mode) ...........................................67
Adjusting Threshold Settings (Easy/Expert Mode) .................................69
Adjusting the Exposure Settings .............................................................70
Adjusting the Focus .................................................................................72
5
Table of Contents
Other Functions
CanoCraft FS Preference Settings ...........................................................74
Resetting Default Settings .......................................................................76
Default Categories and Settings .................................................................... 76
Printing .....................................................................................................77
Printer Setup ............................................................................................78
Sending a Fax ...........................................................................................79
Fax Setup ..................................................................................................80
Selecting the Scanner ..............................................................................81
Scanner Self-Test ......................................................................................82
Viewing Version Data ..............................................................................83
Editing
Copying to the Clipboard ........................................................................85
Copying an Image ........................................................................................... 85
Clearing the Clipboard ................................................................................... 85
Redoing an Edit........................................................................................86
Undoing the Previous Action ......................................................................... 86
Redoing an Action After the Undo Command ............................................. 86
Undo All .......................................................................................................... 86
Adjusting an Image..................................................................................87
Sharpening an Image ..................................................................................... 87
Blurring an Image ........................................................................................... 88
Removing Noise .............................................................................................. 89
Inverting an Image ......................................................................................... 90
Formatting an Image ...............................................................................91
Find the Edges................................................................................................. 91
Find Lines ......................................................................................................... 92
Pixelate ............................................................................................................ 93
Posterize .......................................................................................................... 94
Low Relief........................................................................................................ 95
Halftone .......................................................................................................... 96
Editing a Saved File ..................................................................................97
Procedures for Loading a Saved File ............................................................. 97
Saving a File After Editing ............................................................................. 98
Deleting a File after Editing ........................................................................... 99
6
Table of Contents
Copying with CanoCraft FS Copy
Displaying the Copy Window ................................................................101
Procedures for Opening CanoCraft FS Copy ............................................... 101
Copying ..................................................................................................102
Copying Procedures ...................................................................................... 102
Adjusting CanoCraft FS Copy Settings ..................................................107
Changing the Printer Settings .......................................................................... 107
Changing the Scanner Settings ........................................................................ 108
Scan Resolution ............................................................................................. 109
Film Type ....................................................................................................... 109
Exposure ........................................................................................................ 109
Focus .............................................................................................................. 109
Adjust (Alt + A) ............................................................................................. 110
Preferences .................................................................................................... 110
Version Information ..................................................................................... 110
Appendices
Troubleshooting .....................................................................................112
Problems with Software Installation ........................................................... 112
Problems Starting Software Programs ........................................................ 113
Problems with Scanning ............................................................................... 114
Image Quality Problems ............................................................................... 116
Problems Saving Images ............................................................................... 117
Problems with Printing ................................................................................. 117
Uninstalling CanoCraft FS ......................................................................118
Configuring CanoCraft FS......................................................................120
CanoCraft FS Automatic Configuration ...................................................... 120
CanoCraft FS Configuration ......................................................................... 121
List of Film Types ....................................................................................124
Glossary ..................................................................................................126
Index .......................................................................................................130
Customer Support Help Desk ................................................................133
Trademarks
• Adobe® and Acrobat® are trademarks of Adobe Systems Incorporated.
• IBM, IBM PC/AT Series are trademarks of International Business Machines Corp., USA.
• Windows is a registered trademark of Microsoft Corporation in the United States
and/or other countries.
• All other brand names and product names used in this manual are trademarks or
registered trademarks of their respective holders.
7
Conventions Used in this Guide
The following symbols are used throughout the guide to indicate important
information.
• This symbol indicates precautions or limitations you need to know.
Ensure that you read all Important Notes to avoid errors.
• This symbol indicates supplementary information. Reading these notes is
recommended.
Names and Examples
CanoCraft FS 3.6 is generally referred to as CanoCraft FS in this guide. Although
CanoCraft FS 3.6 is compatible with Windows® 95, Windows® 98 and Windows NT®
4.0, the screen-capture examples in this guide are taken from Windows® 95.
References to Windows in this guide apply to all three versions above.
CanoCraft FS 3.6 may be used to operate CanoScan 2700F and CanoScan FS2710
film scanners. This guide presents the operating procedures using the CanoScan
FS2710 as the primary example.
Button and Menu Conventions in the Text
• Buttons that appear in application windows are enclosed with a [
Example
] mark.
Click [File] and select [Preview] or
click the [Preview] button.
• Menu items are enclosed in square brackets [
Example
].
Click the [Image Type] submenu
and select [24bit Color]
• Screen messages are also enclosed in square brackets [
].
8
CanoCraft FS Features
• Scanning Software that Can Perform Image Processing
Scanning Software that Can Perform Image Processing
CanoCraft FS is a scanning application that works with CanoScan FS2710 and
CanoScan 2700F film scanners on the Windows 95/98 and Windows NT 4.0
platforms. Equipped with a broad array of image retouching functions in
addition to its scanning and output features, the program also serves as a 32-bit
TWAIN Driver that can be called from TWAIN-compliant applications.
• Simple User Interface
Set the parameters, preview the image, make a few adjustments if required and
save the file: these four actions are simple to perform with the user-friendly
program window. Perform essential functions using your choice of buttons, pulldown menus, pop-up menus or keyboard shortcuts.
• Large, Easy-to-Read Preview Window
Priority has been placed on making it easy to examine scans by maximizing the
size of the preview window. Preview window sizes vary according to the monitor
resolution and type of film being scanned.
• Canon ColorGear™ Color Management System
The proprietary Canon ColorGear color management system produces consistent
results from input and output devices, reducing the need for time-consuming
manual color correction.
• Help with How to Use the Program is Always at Hand
Need assistance with a scanning command? Click on the [?] mark in each window
or dialog. Context-sensitive Help topics display on the screen. Select a topic or
perform a key-word search to find your answer.
• Includes CanoCraft FS Copy Software
CanoCraft FS Copy works with your scanner and printer to instantly turn into an
easy-to-use copier. The CanoCraft FS suite of programs includes CanoCraft FS
Copy, which enables you to readily output the images that you scan directly to
your printer.
9
Quick Start
Jump Right into Scanning
●
●
●
●
●
●
●
●
●
●
Quick Start
<Jump Right into Scanning>
This section briefly introduces CanoCraft FS to get you started scanning.
• The procedures introduced in the Quick Start section are for CanoCraft FS
as a stand-alone application (rather than a TWAIN driver).
• If you require more information about a procedure, consult the pages
noted in the margin.
• Starting CanoCraft FS as a TWAIN driver from TWAIN-compliant
applications, such as Photoshop LE, requires modification of the procedures
discussed in this section.
1. Install CanoCraft FS
p.
15
Place the software CD-ROM from your CanoScan FS2710/2700F package
into the CD-ROM drive. CD will auto-run and installation menu appears.
Click [Install/Uninstall Software] from the menu and install CanoCraft FS.
• If you have an old version of CanoCraft FS, version 3.1 or 3.5, ensure that
you delete (uninstall) it before you install version 3.6.
2. Start CanoCraft FS
p.
18
Double-click the [CanoCraft FS] icon in the [CanoCraft FS] folder or click the
[Start] button on the Windows taskbar and select [Programs], [Canon CanoCraft
FS] and [CanoCraft FS] in succession. The program window will display.
3. Select a Scanning Method
pp.
27-36
Click the [Settings]
button, click the [Settings] menu or right-click
the settings display area to select the image type and output resolution.
4. Insert the film.
Electronic Manual
11
Quick Start
5. Preview Scan
Click the [Preview]
[Preview].
p.
37
button or click the [File] menu and select
A progress bar will display and
the preview scan will begin.
Once the scan is complete, the
preview image will display in
the preview window.
Progress Bar
The scan’s progress is indicated by the
length of the bar and a percentage
figure. To stop the preview scan, click
the [Cancel] button.
6. Adjust the Brightness and Coloring
pp.
50-72
Click the [Adjust]
button or click the [Image] menu and select
[Adjust]. Adjust the shadows and highlights or coloring of the image (easy mode).
In expert mode, the image’s brightness and coloring can be revised by
adjusting gamma values, tone curve or the histogram.
Easy Mode
Expert Mode
12
Quick Start
7. Specify the Scan Area
p.
41
Click and drag the mouse cursor over the area of the preview scan that you
wish to include in the final image.
8. Scan and Save
p.
46
Click the [Save]
button or click the [File] menu and select [Save]
to open the Save dialog. Specify the destination and name for the scanned
image.
The selected scan area will be scanned with the specified brightness and
coloring adjustments and saved to a file. During the scan, a bar indicates
the progress of the procedure.
9. Print
p.
77
Click the [File] menu and select [Print] to output the scan results to a printer.
13
Step 1
Basic Procedures
●
●
●
●
●
●
●
●
●
●
Step 1 • Basic Procedures
Installing CanoCraft FS
Installing CanoCraft FS
After you have finished attaching the CanoScan FS2710 or 2700F film scanner to
your computer, install the CanoCraft FS program with the following procedures.
Turn the scanner and computer power on in that order.
Place the software CD-ROM that accompanied the scanner into the
computer drive.
Click the [Install/Uninstall Software] option in the CD-ROM menu and
select [Canon CanoCraft FS] and [CanoCraft FS] in succession.
Follow the on-screen instructions to complete the remaining steps.
Minimum computer system requirements for installing CanoCraft FS:
CPU:
Windows® 95
Windows® 98
Windows® NT
Hard Disk:
50 MB or more
Main Memory (RAM):
Windows® 95
Windows® 98
Windows® NT
486 or higher
MMX Pentium or higher
Pentium or Higher
16 MB or more
(32 MB or more recommended)
32 MB or more
(64 MB or more recommended)
24 MB or more
(40 MB or more recommended)
Display:
256 colors or more (65,000 or more recommended)
Other:
CD-ROM drive
• If you are using an old version of CanoCraft FS, version 3.1 or 3.5, ensure that
you delete (uninstall) it before you install version 3.6. (p. 118)
• Confirm that the scanner is correctly attached to the computer and always turn
on the scanner and computer in that order before starting Windows.
• At least 50 megabytes of free space are required on the disk to which the program
is being installed (5 megabytes for the application program and 45 megabytes for
image files).
• CanoCraft FS 3.6 is for exclusive use with CanoScan FS2710/2700F film scanners.
This program is not compatible with other Canon flatbed or sheet-fed scanners.
15
Step 1 • Basic Procedures
Precautions When Connecting the Scanner to a Windows® 95
Computer
A driver installation dialog will display the first time you attach your scanner to a
computer, turn on its power and start Windows. The contents of the dialog will
vary according to your version of Windows® 95. You can check the Windows® 95
version in the System Properties dialog. Open the control panel, double-click the
[System] icon and select the [General] tab.
This area will show the version number. Versions
4.00.950 and 4.00.950 A are old versions.
Version 4.00.950B is the new version.
General Tab, System Properties Dialog
If yours is an old version of Windows® 95, select [Choose from the list] and click
the [OK] button. In the next window that displays, select [Unsupported device] and
click the [OK] button.
16
Step 1 • Basic Procedures
If your is the new version of Windows® 95, click the [Next] button without
inserting anything into the drive. In the next window that displays, click the
[Finish] button.
After you start Windows® 95, the
scanner will display under the
[Other Device] category. This is not a
problem because CanoCraft FS is
equipped with its own specialized
driver for Canon film scanners.
• If the following message displays during installation, there is insufficient
free space on the hard disk to install CanoCraft FS.
• Delete files off the disk to free sufficient space or change the drive setting
to one with sufficient free space. (see previous page)
17
Step 1 • Basic Procedures
Starting and Closing CanoCraft FS
CanoCraft FS can be started from the Windows desktop or from within a TWAINcompliant applications as Photoshop LE.
Starting CanoCraft FS from the Windows Desktop
Plug in the scanner, turn on your computer and start Windows.
• Ensure that you turn the scanner power on before starting Windows. The
scanner cannot be operated with CanoCraft FS if the scanner power is off
when Windows is started.
Double-click the [CanoCraft FS] icon in the [CanoCraft FS] folder or
click the [Start] button on the Windows taskbar and select [Programs],
[Canon CanoCraft FS] and [CanoCraft FS] in succession.
Double-click the
CanoCraft FS icon in
the CanoCraft FS
folder
Click the Windows
[Start] button and
select [Programs],
[Canon CanoCraft FS]
and [CanoCraft FS]
CanoCraft FS Program Window
• The size of the program window will vary with the resolution of your
monitor. The program window cannot be resized.
18
Step 1 • Basic Procedures
Starting CanoCraft FS from Photoshop
(TWAIN- Compliant Application)
Turn on the computer and start Photoshop (TWAIN-compliant application).
Select [File], [Import], [Select TWAIN Source] and [CanoScan FS2710].
Start CanoCraft FS by clicking [File], [Import] and [TWAIN...].
Adobe Photoshop 4.0 Example
CanoCraft FS Program Window
• Select TWAIN 32 if TWAIN 16 also displays in the menu. (TWAIN 16 is
intended for use with Windows 3.1 and is incompatible with CanoCraft FS.)
• Please refer to the instruction manual accompanying each program for the
detailed procedures for summoning CanoCraft FS from TWAIN-compliant
applications.
Closing CanoCraft FS
To exit CanoCraft FS, click the close box in the window’s upper right
or click the [File] menu and select [Exit].
You can exit by right-clicking the title bar and
selecting [Exit] from the pull-down menu.
19
Step 1 • Basic Procedures
Program Window Names and Functions
CanoCraft FS Program Window
Title Bar
Displays the window name. Click and
drag this bar to move the window on
the Windows desktop.
p. 23
Menu Bar
All CanoCraft FS commands can be
accessed from these pull-down menus.
Output Magnification/Scan Resolution
pp. 32-36
Sets and displays the
output magnification
and scan resolution.
[%] selects and
displays the output
magnification and
[DPI] the scan resolution.
p. 43
Output Size
Displays the width and
height of the output
image in inches,
millimeters or pixels.
Submenu
Pull-Down Menu
Options with an arrow contain
further submenus.
p. 42
Lock Button
Locks the output size
and file size.
Close Box
p. 19
Closes
CanoCraft
FS.
pp. 29-36
Settings Button
Displays a pull-down menu of scan
settings, such as image type and
output resolution.
p. 37
Preview Button
Performs the preview scan and displays
the results in the preview window.
Preview Window
Displays the preview
image. Use it to specify
the scan area and view
the results of image
processing.
pp. 55-69
Adjust Button
Displays color correction dialogs, such
as the coloring and brightness
adjustments in easy mode, and the
histogram and tone curve dialogs in
expert mode.
p. 46
Save Button
Scans the film and saves the image
as a file in the specified location. This
button is labeled [Scan] when
CanoCraft FS is used within a
TWAIN-compliant application.
p. 22
Settings Display Area
Shows and sets various settings, such
as the image type, scan resolution,
output resolution, output magnification, the film type and ColorGear
settings. Also displays the image file
size and the remaining free space on
the specified save disk.
Rotate/Flip
Button
Rotate or flip an
image.
Eject Button
Returns the film to
the eject position.
RGB Values
Displays the pre- and postadjustment RGB values of
the area immediately
beneath the mouse cursor.
Zoom In Button
p. 38
Expands the selected area
to fill the preview window.
p. 38
Zoom Out Button
Contracts the selected area
to the size prior to zooming.
p. 38
Zoom Reset Button
Returns a zoomed image to the
original preview size.
p. 25
Help Button
Displays Help topics for CanoCraft FS.
20
Step 1 • Basic Procedures
CanoCraft FS Copy Program Window
Image Type Button
p. 104
Select a copying method: color and
grayscale. Color button is available only
with the printer setting set to a color
printer.
Title Bar
Displays the window name.
Click and drag this bar to
move the window on the
Windows desktop.
p. 106
Close Box
Closes CanoCraft FS
Copy.
Brightness Slide Bar
p. 105
Adjusts the copy
density. The value
displays to its right
and will accept direct
input.
Negative/Positive Film
Selection Button
Select either negative or
positive to match the
film in use.
Printer Setup
p. 107
Button
Displays the printer
setup dialog.
10-Key Numeric
p. 105
Keypad
Sets the number of
copies.
Scanner Setup
p. 108
Button
Sets the scan resolution, file type, color
balance, focus and
ColorGear settings.
Stop Button
Halts copying.
p. 105
Help Button
Displays Help topics for
CanoCraft FS Copy.
Printer Selection
p. 107
Button
Specifies the name of
the currently connected printer.
Scanner Selection
Button
Select the scanner
model in use.
Film Type Selection
Button
Select either 35 mm or
IX240 film to match the
film in use.
Start Button
p. 105
Starts copying.
Paper Size Selection
Button
Select the size of paper to
be output on the printer.
Reset Button
Resets the
number of
copies to one.
Copy Number Display
p. 105
Displays the number of copies
currently specified. Numbers can
be input directly.
• Ensure that the scanner and printer power is turned on before starting
Windows and CanoCraft FS Copy.
• CanoCraft FS Copy and CanoCraft FS cannot be run simultaneously.
• Color options in the image type panel are only available when a color
printer is specified in the printer selection field.
21
Step 1 • Basic Procedures
Settings Display Area Pop-Up Menu
Right-clicking on the settings display area summons a pop-up menu, which can be
used to change the adjustable settings.
Image Type
p. 30
The scanning mode can be set to black and white, 8-bit
grayscale or 24-bit colour. If CanoCraft FS is started as a
TWAIN driver from a TWAIN-compliant application, it can
also be set to 12-bit grayscale or 36-bit colour. (This setting
can also be adjusted with the Settings button.)
Scan Resolution
p. 33
The scan resolution can be set to either 340, 680, 1360, or
2720 dpi. Adjusting the magnification setting allows
custom resolution settings. (This setting can also be
adjusted in the display box at the top of the preview
window.)
Output Resolution
p. 34
The output resolution settings can be selected from a list.
Selecting [Display Dialog] enables items to be edited,
added or deleted. (Items can also be edited, added or
deleted via the [Settings] button or by clicking the [Settings] menu and selecting [Output Resolution].
Magnification
p. 35
The output magnification can be set to either 50%,
100%, 200%, 400% or 800%. Adjusting the output
magnification value in the display box at the top of the
program window also allows custom magnification values.
(It can also be adjusted with the output resolution setting
at the top of the preview window.)
Film Type
p. 29
You can select between 35 mm color negatives/color
positives/monochrome negatives or IX240 color negatives/
color positives/monochrome negatives. Set this with the
[Settings] button or the [Film Type] option on the Settings
pull-down menu.
Color Matching
p. 75
The ColorGear color management system can be turned on
or off. A check mark indicates it is on, no check mark
indicates off. Click to toggle between modes. (This setting
can also be set with the Preferences dialog.
22
Step 1 • Basic Procedures
CanoCraft FS Menu Commands
Menu Bar Pull-Down Menus
All CanoCraft FS commands can be accessed from the pull-down menus on the
menu bar.
Menu Bar
File (F)
Opens an existing file for display in the preview window
Closes the image in the preview window
Performs a preview scan
Performs a scan
Saves the scanned image
Saves the file under a different name
Sets facsimile transmission settings, such as document size, number of copies
and resolution
Sends the scanned image as a fax
Sets printer settings, such as document size, coloring and printing method
Prints the scanned image (shortcut key: Ctrl+P)
Closes CanoCraft FS (shortcut key: Ctrl+Q)
Edit (E)
Reverses the last action (shortcut key: Ctrl+Z)
Restores a reversed action (shortcut key: Ctrl+Y)
Reverses all actions
Copies the selection to the clipboard (shortcut key: Ctrl+C)
Deletes the clipboard contents
Settings (S)
Sets the film type
Sets the scanning mode
Sets, adds and deletes output resolution settings (shortcut key: Ctrl+R)
Changes the scan speed and adjusts the exposure setting
Sets the autofocus/manual focus setting
Sets the preferences for automated functions when scanning or exiting
Resets settings to the factory defaults
(The same menu can be displayed by clicking the [Settings] button.)
23
Step 1 • Basic Procedures
Image (I)
Selects the easy mode for adjusting color
Select the expert mode for adjusting color
Displays the color balance dialog (shortcut key: Alt+A
Rotates the scanned image
Fixes the aspect ratio (ratio of height to width) when selecting the scan area
Effect (E)
Sharpens the image
Softens the image
Deletes noise from the image
Inverts the colors of the image
Finds the edges of the image
Finds the vertical and horizontal lines of the image
Pixelates the image
Posterizes the image
Embosses the image
Converts the image to halftones
Device
Sets the scanner model (in a multiple scanner configuration)
Performs a self-test of the scanner
Checks the scanner version and SCSI ID
Help (H)
Displays an alphabetical list of Help topics (shortcut key: F1)
Displays the key-word search tab
Displays CanoCraft FS version information
24
Step 1 • Basic Procedures
How to Find Out More About a Procedure You Don't Understand
CanoCraft FS is equipped with a context-sensitive Help function that teaches
procedures on-screen. If you do not understand a procedure while running
CanoCraft FS, click the Help button . Instructions will display in the Help window.
You can also click on the Help menu to display topics or index tabs, which explain
procedures and terminology and how to use the Help function.
Help Pull-Down Menu
Help Button
Help Button
Help Pull-Down Menu
Help Window
Contents and Index Tabs
25
Step 2
Scanning
●
●
●
●
●
●
●
●
●
●
Step 2 • Scanning
Scanning Procedures
Although scanning procedures vary according to the image type (color, grayscale or
black and white), the basic procedures are the same. Read the following
procedures as a guideline for scanning.
Set the film type.
p. 29
Select a film type that matches the film in use from among the following
options: 35 mm color negatives/color positives/monochrome negatives or
IX240 color negatives/color positives/monochrome negatives.
Set the image type.
p. 30
For colour images, select [24-bit colour]. For grayscale images, select [8-bit
grayscale]. For black and white images, select [Black and White]. If
CanoCraft FS has been started as a TWAIN driver from within a TWAINcompliant application program, you can also [36-bit colour] for colour
images and [12-bit grayscale] for grayscale images.
Determine the image size and resolution.
pp. 32-36
Set the scan resolution, output resolution and magnification to suit your
requirements for the printing size and monitor size of the image.
Insert the film.
(Refer to the Quick Start Guide or electronic manual.)
Initiate the preview scan.
p. 37
Start off by previewing the image before initiating the final scan.
Adjust the color balance, halftone pattern or threshold values.
p. 40
If the preview image did not reproduce as well as expected, adjust the
coloring and brightness of a color image, or the shadows and highlights of a
grayscale image, or the threshold of a black and white image.
Select the area of the image to be included in the final scan.
p. 41
If you wish to crop the image, select the scan area by dragging the mouse
cursor.
Save (scan) the image.
p. 46
When CanoCraft FS is started from within Photoshop, the scanned image
cannot be saved. To save, close CanoCraft FS and save the file using the save
function in Photoshop.
27
Step 2 • Scanning
• 24-bit color and 36-bit color images are expressed in varying values of each
color: red, green and blue (RGB). 24-bit color images are expressed in 256
colors per RGB channel. 36-bit color images use 4096 colors. Use the 24-bit
color setting for most images unless you require particularly fine color
definition.
• Grayscale images are expressed in black, white or varying tones of gray. 8bit grayscale images are expressed in 256 tones. 12-bit grayscale images use
4096 tones.
• Black and white images are expressed in just two colors, white or black. The
threshold value determines the brightness value at which a particular pixel
is set to black or white.
28
Step 2 • Scanning
Selecting the Film Type
It is important to select the correct film type in the film type settings menu to
obtain the correct color balance in the scanned image.
Right-click the settings display area.
Click the [Settings] button or
[Settings] menu and [Film Type]
submenu.
Position the mouse cursor over an option and click to select it. The menu will close
and the new selection will appear in the settings display area.
Select from these options for 35 mm film.
For mounted slides, select the 35 mm color
positive setting.
Select from these options for IX240 film.
A check mark will appear beside the current selection
in this menu.
• If you are scanning several films of the same type consecutively, this setting
need only be set the first time.
• If the setting is saved, it can be used thereafter until it is changed.
• The current setting is displayed in the settings display area on the control
panel.
29
Step 2 • Scanning
Selecting the Image Type
The image type setting is used to select between 24bit color, grayscale or black and
white. Select an image type from the settings menu most suited to the type of film
and the way in which it will be used.
Right-click the settings
display area
Click the [Settings] button or click the
[Settings] menu and select [Image Type].
Position the mouse cursor over an option and click to select it. The menu will close
and the new selection will appear in the settings display area.
Scans at 8-bits per RGB channel. Use this setting for standard color images.
Scans at 12-bits per RGB channel when CanoCraft FS is started as a TWAIN
driver from a TWAIN-compliant application. Use this setting for
high-resolution color images.
Scans with 8-bit grayscale reproduction. Use this setting for standard
grayscale images.
Scans with 12-bit grayscale reproduction when CanoCraft FS is started as a
TWAIN driver from a TWAIN-compliant application. Use this setting when
high-resolution grayscale images are required.
Scans with black and white, two-color reproduction.
A check mark will appear beside the selected setting.
• The color image type setting cannot be selected when the film type is set to
monochrome film.
• At 2720 dpi, 35 mm color film scanned at the 36-bit color setting yields a file
approximately 58 megabytes. At the 24-bit color setting, it is approximately
29 megabytes; at the 12-bit grayscale setting, 19.6 megabytes; at the 8-bit
grayscale setting, 9.8 megabytes; and at the black and white setting, 1.2
megabytes.
• The 12-bit grayscale and 36-bit color settings are not available with the
CanoScan 2700F model.
30
Step 2 • Scanning
Determining the Image Format
The following five image types are available. Select the one best suited to the film
type and the intended use of the image.
24-Bit Color:
The image is expressed in 256 colors (8 bits) per RGB channel.
Select this setting to scan standard color films.
36-Bit Color:
(FS 2710 only)
The image is expressed in 4096 colors (12 bits) per RGB channel.
Select this setting for color films that require particularly high
definition.
8-Bit Grayscale: The image is expressed in 256 tones (black, white and 254 gray
shades). Select this setting for black and white films or when
monochrome images are required from color films.
12-Bit Grayscale: The image is expressed in 4096 tones (black,
(FS 2710 only)
white and 4094 gray shades). Select this setting
when particularly high definition grayscale
images are required.
Black and White: Images are expressed in two colors only, black
and white. The threshold value determines the
brightness value at which a particular pixel is set
to black or white.
• Attempting to scan images in the 12-bit grayscale or 36-bit color scanning
modes in application programs not compatible with these modes may cause
the programs to “hang.” Before attempting these modes, please confirm
that your application program is compatible. Photoshop 4.0 and later
versions are compatible (Photoshop LE is also compatible).
• Images scanned in 36-bit color with versions of Photoshop compatible with
36-bit color become 16-bit channel mode images.
• The 12-bit grayscale and 36-bit color scanning modes are not available
when CanoCraft FS 3.6 is used as a stand-alone application or when the
CanoScan 2700F film scanner is used.
• The 24-bit color and 36-bit color scanning modes are not available when the
film type is set to monochrome.
31
Step 2 • Scanning
Selecting Resolution and Magnification Settings
About Resolution and Magnification
The scanner reads the images on a film as a collection of dots that are assigned
values for brightness and tone. The density of these dots is referred to as the
resolution, and the resolution at which a film is scanned is called the scan
resolution.
The scan resolution should not be confused with the output resolution, which
determines the appearance of an image on a monitor or when output to a printer.
The ratio of the scan resolution to the output resolution is called the output
magnification. When both the scan and output resolution are the same, the
scanned image size and the output are the same size. When the output resolution
is lower than the scan resolution, the image is magnified, and when it is higher, the
image is reduced.
12”
Output Resolution = 180 dpi
Output Magnification = 200%
8”
6“
4”
Scan Resolution
= 360 dpi
3”
Output Resolution = 720 dpi
Output Magnification = 50%
2”
Why does the image size change with the magnification? Let us answer with
an example having the output resolution set to printer (720 dpi). If you set the
scan resolution to 360 dpi (a magnification factor of 50%), the image will
shrink because only 360 dots are scanned per inch while 720 are required to
match the specification for the output resolution. The image size changes
because the density has been increased without a corresponding increase in
the number of scanned dots.
Image size = 10” x 10”
Scanned at
360 dpi
Image size = 5” x 5”
Output resolution changed to 720 dpi
Output magnification = 50%
32
Step 2 • Scanning
Selecting a Scan Resolution Setting
The higher the scan resolution, the finer the result, the lower, the more coarse.
Select the resolution that best suits your use of the scanned image.
Select a setting by right-clicking the settings display area, positioning the mouse
over an option and clicking it. When the menu disappears, the new value will
appear in the settings display area.
The current
selection will have
a check mark
beside it
Select the [Custom] option to display
the Custom Resolution Setting dialog.
Input values to set the desired scan
resolution
Right-click the settings display area
To change the setting with the output magnification box at the top of the preview
window, set the units to [DPI] and click the up or down arrows or input a value
directly into the box.
Enter a value directly in this box
Raises the resolution
Click here to set the
units to DPI
Lowers the resolution
Data Volume Varies with Scan Resolution
As with magnification, the higher the scan resolution, the larger the resulting
image file. If the file size is too large, it can slow processing and may overload
your computer’s memory resources. To illustrate the difference in file size, we
show the results of a 35 mm film scanned in 24-bit color mode at the
respective scan resolutions.
29.5MB
35mm film
7.3MB
1.8MB
116KB
463KB
170dpi
340dpi
680dpi
1360dpi
2720dpi
* These numbers are approximate and may differ from actual results.
33
Step 2 • Scanning
Selecting an Output Resolution Setting
Select an output resolution setting that matches your printer and the purpose of
the scanned image. Select a setting by right-clicking the settings display area,
highlighting an option with the mouse cursor and clicking it. When the menu
disappears, the new value will appear in the settings display area.
Right-click the settings display area
Highlight an option and click
• The current selection will have a check mark beside it
Click here to display the Output Resolution Settings dialog.
The setting can also be changed with the [Output Resolution] dialog, which is
summoned by clicking the [Settings] button or by clicking the [Settings] menu and
selecting [Output Resolution].
Click the [Settings] button or click
the [Settings] menu and select
[Output Resolution].
Output Resolution Settings Dialog
Output Resolution Settings Dialog
Highlight an option and click the [Setting] button.
Deletes resolution settings
that have been added.
Sets the resolution to the
selected setting.
Cancels the selection and closes the dialog.
Accepts the new settings and closes the dialog.
Click the [Add] button to add
a new resolution setting if the
one you require is not already
on the list.
34
Step 2 • Scanning
Procedures for Setting the Output Resolution
Select the output resolution best suited to your intended print and monitor sizes.
Select a setting by right-clicking the settings display area, highlighting an option
with the mouse cursor and clicking it. When the menu disappears, the new value
will appear in the settings display area.
Right-click the settings display area
Highlight an option and click
The current selection will have
a check mark beside it
Selecting the [Custom] option
displays the Custom Magnification
Settings dialog, allowing you to
directly input a custom value.
To change the setting with the output magnification box at the top of the preview
window, set the units to [%] and click the up or down arrows or input a value
directly into the box.
Output Magnification Box at the
Top of the Preview Window
Click here and
select [%].
Enter a value directly in this box
Raises the magnification
Lowers the magnification
• Changing the scan resolution enables you to select [Custom] in the output
magnification pop-up menu.
35
Step 2 • Scanning
Determining the Input and Output Resolution and Output
Magnification
Under standard operating conditions, the output resolution is set by the output
device, such as the printer.
• Printing with Bubble Jets, Ink Jets and Other Color Printers
Set the output resolution to approximately half the printer resolution.
• Printing with Monochrome Printers and Color LBPs
Set the output resolution to the same value as the printer resolution.
• Display on a Computer Monitor
Set the output resolution to between 72 and 100 dpi. To expand the image,
use the magnification setting. The display size of the image will vary with the
resolution of the monitor.
• When printing in monochrome with printers such as the Canon BJC-4000
Series, the image is expressed using 360 dots per inch. However, color
printing is expressed with three colors, including cyan, magenta and yellow,
a process completely separate from monochrome printing. Accordingly, set
the output resolution for a printer such as the Canon BJC-4000 Series to the
same value as the printer resolution for monochrome printing, but set it to
approximately half the printer resolution (approximately 180 dpi) for color
printing.
• Limit resolution settings to the greatest extent possible. Setting the output
resolution above the printer resolution has practically no effect on the
quality of the printed image. Indiscriminately elevating the resolution not
only raises the file size, it takes longer to process and print. In addition, it
may be difficult to open images because of insufficient computer memory
resources or because of the memory settings of application programs.
36
Step 2 • Scanning
Previewing
Once you have inserted the film, selected a film and image type and adjusted the
resolution settings, preview the image and specify the scan area.
Settings Display Area
Displays the selected image type, scan
resolution, output resolution, output
magnification, image file size, film type
and ColorGear settings, as well as the
free disk space on the target drive.
Preview Window
Progress Bar
The scan’s progress is indicated by the
length of the bar and a percentage
figure to the right. To stop the preview
scan, click the [Cancel] button.
Once the preview scan commences, the preview image will begin to display in the
preview window.
• Changes in categories, such as image type and brightness, are reflected
immediately in the preview window. However, the preview image is only an
approximation of how the final image will appear.
• A message similar to [Initializing film scanner. Please remove film.] will
display if the film scanner's power is turned on with a film already inserted
or if a set period of time passes without the scanner being operated after
the power is turned on. If this happens, remove the film from the scanner
and follow the instructions on the screen.
37
Step 2 • Scanning
Zooming an Image for Verification
To zoom a portion of an image to verify its contents, click and drag the mouse
cursor over the area of interest and click the [Zoom In]
button.
The area enclosed by the frame will be
zoomed to filled the preview window.
• The
[Zoom Out] button contracts the selected area to the size prior to
zooming.
[Zoom Reset] button returns a zoomed image to the original
• The
preview size.
38
Rotating the Image to Change Its Orientation
The preview image can be rotated in 90° increments or flipped vertically or
horizontally. This can be used to correctly orient images that were shot with the
camera held sideways or images that were incorrectly oriented in the scanner
when scanned.
The rotate button to the right
of the preview area.
Click the [Image] menu and
select [Rotate...].
Rotate/Flip Dialog
Rotate/Flip Dialog
Click a rotate or flip icon to change the sample thumbnail in the dialog to the
desired orientation.
Sample Display Area
Rotate Icon (Right 90°)
Rotate Icon (Left 90°)
Flip Vertically Icon
Flip Horizontally Icon
Place a check mark in this box to override
the rotate or flip setting in this dialog
when the image is scanned.
• Shorten the time required for scanning by placing a check mark in the [No
rotate/flip at final image] box.
39
Step 2 • Scanning
Adjusting Brightness and Coloring
Is the Quality of the Preview Image up to Expectations?
If the image you are scanning is difficult to reproduce with standard scanning
parameters and the preview image is not up to expectations, click the [Adjust]
button or click the [Image] menu and select [Adjust] to change the image
properties, such as brightness and coloring.
• See Step 3, Adjusting Images, p. 49, for information on adjusting brightness
and coloring.
Click the [Adjust] button or click the
[Image] menu and select [Adjust]
Color Balance Dialog (Easy Mode)
Brightness Dialog (Easy Mode)
40
Step 2 • Scanning
Selecting the Scan Area
You can specify an area of the preview image for scanning (the scan area). Once
the area is selected, you can zoom it to fill the preview window for close
examination.
Selecting the Scan Area
Click and drag the mouse cursor over the portion of the image you wish to set as
the scan area. A frame will appear around the selected area.
• You can drag the mouse cursor in any direction.
• Clicking outside the frame or right-clicking the mouse deselects the scan
area.
• Double-clicking outside the frame expands the selection to fill the preview
window.
• If no area is selected, the entire preview image becomes the scan area.
41
Step 2 • Scanning
Changing the Scan Area Selection
You can adjust the scan area after it has been selected, as well as the output
magnification, scan resolution and other settings. You can also lock the file size
with the
[Lock] button at the top of the preview window.
• The lock button initially appears in the program window in the unlocked
state.
state and
• Clicking the unlocked [Lock] button changes it into the locked
locks the file. Re-clicking the [Lock] button changes the button into the
state and unlocks the file.
unlocked
Unlocked State
In the unlocked state, the scan area can freely be selected and changed. You can
also change the output magnification/scan resolution settings at the top of the
preview window and the scan resolution, output resolution and output
magnification settings in the settings display area.
Lock Button (Unlocked)
Resolution Units
Output Magnification/
Scan Resolution
Output Size (Width)
Output Size (Height)
Size Units
Scan Resolution
Output Resolution
Output Magnification
File Size
• Selection Frame in the Preview Window
Positioning the mouse cursor over the selection frame will transform it into one of
the arrow shapes shown here: ,
, . Clicking and dragging the selection frame
in the direction of the arrow allows you to enlarge or contract it. The aspect ratio,
the ratio of the height to width, can also be altered.
Moving the mouse inside the frame transforms it into a multidirectional arrow ,
indicating that the frame can be moved without changing size or shape.
• The output size and file size will change with the size of the scan area.
42
Step 2 • Scanning
• Output Magnification/Scan Resolution (Preview Window Top or Settings Display
Area)
In the unlocked state, you can change the output magnification/scan
resolution settings at the top of the preview window by clicking the arrows or
inputting a value directly. When the units to the right are set to [%], the
output magnification is altered, and when set to [dpi], the scan resolution
changes. The settings display area settings for [Output Magnification] and
[Scan Resolution] can be altered by right-clicking the settings display area and
selecting an option from the pop-up menu.
• Elevating the output magnification or scan resolution raises the file and
output sizes.
• Lowering the output magnification or scan resolution reduces the file and
output sizes.
• When the output magnification is set to 100%, the scan resolution and
output resolution are equal.
• When the output magnification or scan resolution are altered in the boxes at
the top of the preview window, the [Custom] option in the output
magnification and scan resolution sections of the settings display area popup menu becomes selectable.
• Output Resolution (Settings Display Area)
If the output resolution setting in the settings display area is altered, the
output magnification returns to 100% and the output resolution and scan
resolution settings show the same value.
• Output Size/Units (Preview Window Top)
The output size corresponding to the selected scan area and output
magnification (or scan resolution) will display. The units for this display can be
changed by clicking the box to the right and selecting pixels, inches or
centimeters.
Locked State
If you click the
[Lock] button to set it to the locked state after the scan area has
been selected, the output and file sizes become fixed at their current values.
Dragging the selection frame now expands or contracts the scope of the scan area
without changing the aspect ratio (the ratio of the height to width).
43
Step 2 • Scanning
Lock Button (Locked)
Resolution Units
Output Magnification/
Scan Resolution
Output Size (Width)
Output Size (Height)
Size Units
Scan Resolution
Output Resolution
Output Magnification
File Size
• Selection Frame in the Preview Window
In locked state, positioning the mouse cursor over the selection frame
transforms it into one of the arrow shapes shown here: ,
, . Clicking and
dragging the selection frame in the direction of the arrow expands or
contracts the frame, but the aspect ratio does not change. Moving the mouse
within the frame transforms it into a multidirectional arrow, indicating that
you can move the frame without changing its size.
• Expanding the selection frame lowers the output magnification and scan
resolution. Shrinking it raises them.
• Output Magnification/Scan Resolution (Preview Window Top or Settings Display Area)
In the locked state, you can change the output magnification/scan resolution
settings at the top of the preview window by clicking the arrows or inputting
a value directly. When the units to the right are set to [%], the output
magnification is altered, and when set to [DPI], the scan resolution changes.
The settings display area settings for [Output Magnification] and [Scan
Resolution] can be altered by right-clicking the settings display area and
selecting from the pop-up menu.
• Elevating the output magnification or scan resolution decreases the size of
the selection frame.
• Lowering the output magnification or scan resolution increases the size of
the selection frame.
• The file and output sizes do not change.
• When the output magnification or scan resolution are altered in the boxes at
the top of the preview window, the [Custom] option in the output
magnification and scan resolution sections of the settings display area popup menu becomes selectable.
• Output Resolution (Settings Display Area)
If the output resolution setting in the settings display area is altered, the lock
is released and the output resolution and scan resolution settings show the
same value.
• Output Size/Units (Preview Window Top)
The output size does not change in the locked state.
44
Fixing the Aspect Ratio
You can change the scan area that you specify in the preview window in one of
two ways: freely or with a fixed aspect ratio (height to width ratio). There are
three preset and one custom aspect ratio settings: normal (2:3), panorama (1:3), hi
vision TV (9:16) and custom.
Aspect Ratio Dialog
Click the [Image] menu and select [Aspect Ratio].
Aspect Ratio Dialog
Select a ratio or select custom and input values to fix the aspect ratio.
Click the
button to the right and select [Fixed
Aspect Ratio] to fix the aspect ratio or select [Normal] to set the aspect ratio to variable.
If fixed aspect ratio has been selected in the style box,
button to the right and select [Normal],
click the
[Panorama], [Hi Vision TV] or [Custom].
If custom has been selected in the box above, input
a value from 1 to 20 in the height and width boxes.
2
Normal
(C Type)
1
Panorama
(Panorama Type)
3
3
9
Hi Vision TV
(H Type)
16
• The default style setting is normal.
• The height and width values are reversed when the preview image is
rotated 90°. (p. 39)
• Please refer to the topic entitled Selecting the Scan Area for instructions on
how to change the scan area selection. (p. 41)
45
Step 2 • Scanning
Final Scan and Saving
Once you have finished adjusting the preview image and scan area settings, you
can initiate the final scan and save the file.
• When CanoCraft FS is used as a TWAIN driver in a TWAIN-compliant
application, the [Save] button title changes to [Scan]. In addition, the [Save]
menu option is deactivated. The procedures after the [Scan] button have
been clicked are different for each application program, so please refer to
the manuals accompanying the software for further instructions.
Click the [Save] button or click the
[File] menu and select [Save]. When
using CanoCraft FS as a TWAIN driver,
click the [Scan] button or click
[File] menu and select [Scan].
Use the Save As dialog to select the folder name and file format and to input a file
name. Click the [Save] button. (Please note that the Save As dialog will not display
when CanoCraft FS is started from within a TWAIN-compliant application.)
Click this button to navigate to the target drive and folder
Input a file name here
Click here to change the way the information is displayed
Click here to create a new folder
Click here to display the contents of a folder one level above
Click here and select a file type from the pull-down menu. You
can save files with the extensions BMP, DIB, GIF, JPG, PCX, RLE,
TIF and FPX.
Click here after you select the location, input a name and
select a file type
46
Step 2 • Scanning
Once the save or scan button is clicked, the final scan will commence. The image
will be written to the specified location in the specified file format (or will appear
in the window of the TWAIN-compliant application).
The Saved Image
• After the save or scan button is clicked,
a progress bar will display and the scan
will start a few seconds later.
• To cancel the scan, click the [Cancel]
button on the progress bar.
• The film will automatically eject from the scanner when auto eject is set to
on and the scan is finished.
About File Formats
The scanned image is saved as a file in the specified location. There are many
types of image file formats. A few examples include the TIFF, PCX, JPEG and
bitmap formats. However, the file formats accommodated by each application
can vary. If the scanned image is to be further processed with imaging editing
software, select a file format that can be read by that program.
Standard Windows format:
Generic image file formats:
Compressed file formats:
Other formats:
Bitmap (.BMP)
TIFF (.TIF), PC Paintbrush (.PCX)
JPEG (.JPG)
FlashPix (.FPX)
The period followed by three letters is called the file extension, which
indicates the file format. The file extension is automatically appended to the
file name when the file is saved.
47
• If you are scanning negative film with the exposure adjustment set to
[Auto], the expected coloration may, depending upon the image, not turn
out as expected. In that case, reset the highlight settings using the
eyedropper tool (white pointer tool) in the histogram tab of the Adjust
dialog. In expert mode, display the Adjust dialog by clicking the [Image]
menu and selecting [Adjust], or click the [Adjust] button. (p. 58)
Histogram Tab of the Adjust Dialog
1. Click this button (white pointer tool).
The mouse pointer will change to an eyedropper.
2. Position the eyedropper over a highlight in the
preview image and click.
48
Step 3
Adjusting Images
●
●
●
●
●
●
●
●
●
●
49
Step 3 • Adjusting Images
To Obtain Better Images
If the preview image requires adjustment, refer to the flowchart below for the
suggested procedures. If you wish to reject your adjustments, simply click the
[Preview] button again to redisplay the image as it first appeared. Try the
procedures mentioned here to test the various functions offered by CanoCraft FS.
Are the image’s brightness and coloring OK?
Do you wish to perform
advanced color correction?
There is no need for adjustment,
proceed to scanning.
Set the adjustment mode to expert mode.
Set the adjustment mode to easy mode.
Certain Color Tones
Are Too Strong
or Weak...
Too Bright
or Too Dark...
Adjust the
coloring with
color correction.
Choose the
best-matched
sample. (p. 56)
Adjust the
highlights and
shadows.
Choose the
best-matched
sample. (pp. 55, 57)
Go to (p. 54)
50
Step 3 • Adjusting Images
From p. 50
Adjust the
Gamma
Values
Adjust the
brightness to
match the
display
characteristics.
(p. 63)
Display has not been
color corrected
Which requires adjustment?
Brightness or Coloring?
Adjust the
Color Balance
Adjust the
balance
between red
(R), green (G)
and blue (B).
(p. 67)
Does the imbalance affect the
entire image? Or halftones?
Correct
Coloring with
the Brightness
settings
Correct the
brightness of
the entire
image.
(p. 61)
Adjust the
Contrast
Correct the
contrast
between
highlights and
shadows.
(p. 61)
Adjust with
the
Histogram
Smoothen
out
differences in
the halftone
brightness by
specifying the
highlight and
shadows
values in the
image. (p. 58)
Adjust with
the Tone
Curve
Adjust the
brightness of
the image by
changing the
balance
between the
input and
output values
for highlight
and shadow
data. (p. 65)
51
Step 3 • Adjusting Images
Image Adjustment Commands
Scanned image data is loaded as dots into CanoCraft FS. Each dot is assigned
various brightness and color values (tones). CanoCraft FS is equipped with several
color correction functions that use or change these values to adjust image
brightness and coloring.
Adjusting Highlights and Shadows (Easy Mode: pp. 55, 57)
Corrects the brightness of the entire image. Use this
method if the original document is too bright or dark.
This method can be used on these image types:
8-Bit Grayscale/24-Bit Color
Adjusting the Color Balance (Easy Mode: p. 56)
Corrects the color balance of the entire image. Use this
method if certain color tones are too strong or weak
relative to others.
This method can be used on these image types:
24-Bit Color
Adjusting the Histogram (Expert Mode: p. 58)
A histogram shows the concentrations of dots at
particular brightness levels. Halftone gradations can be
smoothened by adjusting the highest level of
brightness (highlights) or darkness (shadows).
This method can be used on these image types:
8-Bit Grayscale/12-Bit Grayscale/24-Bit Color/36-Bit Color
Adjusting Brightness/Contrast (Expert Mode: p. 61)
The brightness setting changes the luminescence of the
entire image. The contrast setting adjusts the
difference between the light and dark areas. Use this
method if the original document is too bright, too dark
or out of focus.
This method can be used on these image types:
8-Bit Grayscale/12-Bit Grayscale/24-Bit Color/36-Bit Color
52
Step 3 • Adjusting Images
Adjusting Gamma Values (Expert Mode: p. 63)
Match the brightness of the image data to the color
characteristics of the display device by changing the
gamma values of the data. Use this method to match
the scanned image tones on the display to the tones of
the original image.
This method can be used on these image types:
8-Bit Grayscale/12-Bit Grayscale/24-Bit Color/36-Bit Color
Adjusting Tone Curves (Expert Mode: p. 65)
Correct the brightness of the image by adjusting the
balance between highlights and shadows in the input
and output values of the image data. As a highly
selective method, adjusting the tone curve limits the
effect on the overall image and can smoothen halftone
gradients more finely than the histogram method.
This method can be used on these image types:
8-Bit Grayscale/12-Bit Grayscale/24-Bit Color/36-Bit Color
Adjusting Color Balance (Expert Mode: p. 67)
Correct the balance between the three primary colors
in a color image: red, green and blue (RGB). Use this
method when a particular color tone is too strong or
weak.
This method can be used on these image types:
24-Bit Color/36-Bit Color
Adjusting Threshold Values (Easy/Expert Mode: p. 69)
Adjust the level of brightness at which the original
image data is represented by either black or white.
This method can be used on this image type:
Black and White
53
Step 3 • Adjusting Images
Changing the Adjustment Mode
The method for adjusting brightness and coloring can be set to either easy mode
or expert mode. In easy mode, you can adjust the brightness and coloring (only
brightness is changed for grayscale images and threshold values for black and
white images) by looking at and selecting samples proposed by CanoCraft FS. In
expert mode, you adjust them with various image processing functions.
Easy Mode Categories
Brightness (24-Bit Color/8-Bit Grayscale)
Color Balance (24-Bit Color/36-Bit Color)
Threshold (Black and White)
Expert Mode Categories
Histograms (24-Bit Color/36-Bit Color/8-Bit Grayscale/12-Bit Grayscale)
Brightness/Contrast (24-Bit Color/36-Bit Color/8-Bit Grayscale/12-Bit Grayscale)
Gamma Values (24-Bit Color/36-Bit Color/8-Bit Grayscale/12-Bit Grayscale)
Tone Curves (24-Bit Color/36-Bit Color/8-Bit Grayscale/12-Bit Grayscale)
Color Balance(24-Bit Color/36-Bit Color)
Threshold (Black and White)
• If you are new to color correction, please ensure that you read the
instructions in this manual thoroughly before you attempt the expert mode.
Set the adjustment mode by clicking the [Image] menu and selecting an option.
Click the [Image] menu and select either
[Easy Mode] or [Expert Mode].
Highlight the desired adjustment mode
and click it.
The current selection will
have a check mark beside it
54
Step 3 • Adjusting Images
Adjusting Brightness and Coloring (Easy Mode)
In easy mode, the brightness and coloring of 24-Bit Color images can be adjusted
with the adjust dialog.
Brightness Tab
Coloring Tab
Click [Image] and select [Adjust] or
click the [Adjust] button.
Click a tab to change the image to the corresponding brightness and coloring settings.
• The brightness and coloring of an image may vary significantly if the display
and printer color profiles differ. To ensure conformity, test repeatedly to
ensure that the brightness and coloring settings are set to the best values
for the final output device (i.e. the printer).
Brightness Tab
Click on the samples until the adjusted image reaches the desired brightness in the
brightness tab. The brightness of the adjusted image changes each time you click a
sample. The amount by which the preview sample changes with each click is
controlled with the slider bar.
Original Image
Adjusted Image
Slider Bar Controlling the Change in
Brightness
Slide it right to increase the increments.
Slide it left to decrease the increments.
Reflect Changes in Preview Image
Placing a check in this box reflects the
changes in the preview image in the
preview window in real-time.
Cancels any adjustments and closes the
adjustment dialog.
Click on the sample closest to
the desired brightness.
Accepts the adjustments and applies them to the preview image
in the preview window.
55
Step 3 • Adjusting Images
Coloring Tab
Click on the samples until the adjusted image reaches the desired coloring in the
coloring tab. The coloring of the adjusted image changes each time you click a
sample. The amount by which the preview sample changes with each click is
controlled with the slider bar.
Original Image
Adjusted Image
Slider Bar Controlling the Change in
Coloring
Slide it right to increase the increments.
Slide it left to decrease the increments.
Reflect Changes in Preview Image
Placing a check in this box reflects the
changes in the preview image in the
preview window in real-time.
Cancels any adjustments and closes the
adjustment dialog.
Click on the sample closest to
the desired coloring.
Accepts the adjustments and applies them to the preview image
in the preview window.
56
Step 3 • Adjusting Images
Adjusting Highlights and Shadows (Easy Mode)
In easy mode, the highlights and shadows of 8-Bit Grayscale images can be adjusted
with the brightness tab of the adjustment dialog
Brightness Tab
Click the [Image] menu and select [Adjust]
or click the [Adjust] button.
Brightness Tab
Click on the samples until the adjusted image reaches the desired brightness in the
brightness tab. The brightness of the adjusted image changes each time you click a
sample. The amount by which the preview sample changes with each click is
controlled with the slider bar.
Original Image
Adjusted Image
Slider Bar Controlling the Change in
Brightness
Slide it right to increase the increments.
Slide it left to decrease the increments.
Reflect Changes in Preview Image
Placing a check in this box reflects the
changes in the preview image in the
preview window in real-time.
Cancels any adjustments and closes the
adjustment dialog.
Click on the sample closest to
the desired brightness.
Accepts the adjustments and applies them to the preview image
in the preview window.
57
Step 3 • Adjusting Images
Adjusting a Histogram (Expert Mode)
In expert mode, the highlights and shadows of 24-Bit Color, 36-Bit Color, 8-Bit
Grayscale and 12-Bit Grayscale images can be adjusted with histograms. This
method is used when you wish to change the portions of an image with extreme
highlights and shadows and to emphasize the halftone gradient. You can save and
reload the corrected values, which is useful when you wish to rescan the same
image without going through the color correction procedures.
Histogram Tab
Click the [Image] menu and
select [Adjust] or click the
[Adjust] button.
Select the Histogram Tab
Histogram Tab
Change the settings with the slider or by directly inputting values into the boxes.
You can save and reload the settings.
Click here to change all three RGB channels at once.
Click one of these to change any one of the R, G or B channels.
Set the shadow value with the slider or by inputting a
value (0-254) in the box. Click the black pointer tool and
click on an area of the image to set it to black (0).
Automatically sets the highlight and shadow settings.
Set the highlight value with the slider or by inputting a
value (1-255) in the box. Click the white pointer tool and
click on an area of the image to set it to white (255).
Loads settings from files with the extension [.adc] for
color images or [.adg] for grayscale images.
Saves settings to a file with the extension [.adc] for color
images or [.adg] for grayscale images.
Cancels the settings and closes the dialog.
Accepts the settings and closes the dialog.
Resets all the settings to the initial values.
Resets the histogram to its starting values.
58
Step 3 • Adjusting Images
How to Interpret a Histogram
You can select the entire image or specify an area for which a histogram will be
generated. The heights of the peaks of the histogram are directly related to the
volume of data with the corresponding values.
Bright Portion
Dark Portion
Entire Image
Distribution of data with
a bias toward highlights.
Distribution of data with
a bias toward shadows.
Distribution of data widely
distributed between
shadows and highlights.
How to Adjust a Histogram
To change the contrast in an image, the distribution of data between shadows and
highlights can be adjusted by dragging the shadow and highlight marks at the
bottom of the histogram. All of the data lying to the outside (left) of the shadow
mark is changed to a zero value and all of the data lying to the outside (right) of
the highlight mark is changed to a 255 value. The examples below show
adjustments to improve the contrast.
It is generally advisable to use the Auto Correction feature, which is explained
below, to adjust contrast settings. The Auto Correction feature will perform the
adjustments shown.
Image 1
Image with a bias toward highlights
The shadow mark is moved toward the highlight end.
Image 2
Image with a bias toward shadows
The highlight mark is moved toward the shadow end.
Image 3
Image with well distributed data
Both the shadow and highlight marks have been moved
inward.
59
Click the white pointer tool or black pointer tool button to change the mouse
pointer to an eyedropper. Position that eyedropper over an area of the preview
image and click to set either the highlights or shadows, respectively, equal to the
level of that area.
• To improve the reproduction of dark areas, change the value of the
shadows in the histogram tab from [1] to [0], then scan. Be aware, however,
that the 'noise' of the scanned image may increase. For your reference, the
default setting for shadows is [1].
60
Step 3 • Adjusting Images
Adjusting Brightness/Contrast (Expert Mode)
In expert mode, the overall brightness and contrast of 24-Bit Color, 36-Bit Color, 8Bit Grayscale and 12-Bit Grayscale images can be adjusted using the brightness/
contrast tab. Use this method when the original document is too bright or dark
and the contrast is low.
Brightness/Contrast Tab
Click the [Image] menu and
select [Adjust] or click the
[Adjust] button.
Click the Brightness/Contrast tab and
select brightness or contrast.
Brightness/Contrast Tab
Change the settings with the slider or by directly inputting values into the boxes.
You can save and reload the settings.
Slider
Drag the slider tab left or right or click
the arrows to change the value.
Brightness
Contrast
These numbers change with the
position of the slider.
You can also input numbers directly
into the boxes.
Loads settings from files with the
extension [.adc] for color images or
[.adg] for grayscale images.
Saves settings to a file with the
extension [.adc] for color images or
[.adg] for grayscale images.
Cancels the settings and closes the dialog.
Accepts the settings and closes the dialog.
Resets all the settings to the initial values.
Restores the brightness and contrast settings to the initial values.
61
Step 3 • Adjusting Images
Adjusting Brightness
This method adjusts the brightness of the entire image, which is effective for
images that are too bright or too dark overall. One must be careful, however, not
to raise the respective values too high or low to avoid creating excessive highlights
or obscuring shadows.
Brightness = 128 (Standard)
Brightness = 190
Brightness = 80
Adjusting Contrast
Contrast is the degree of deviation between light and dark areas. Raising the
contrast accentuates the difference between the light and dark areas. Lowering
the contrast reduces the difference between the two.
Contrast = 128 (Standard)
Contrast = 170
Contrast = -100
Raising the contrast of pictures with a blurred focus is effective in adding clarity to
the image. Raising the contrast too high, however, will obscure the dark portions
or create excessive highlights.
62
Step 3 • Adjusting Images
Adjusting Gamma Values (Expert Mode)
In expert mode, the gamma values of the display can be adjusted to 24-Bit Color,
36-Bit Color, 8-Bit Grayscale and 12-Bit Grayscale images. This method is suitable
for realizing colors on the monitor that are more closely matched to the original
image.
Gamma Value Tab
Click the [Image] menu and
select [Adjust] or click the
[Adjust] button.
Click the Gamma Value Tab and select
a gamma value.
Gamma Value Tab
Click the one of the preset gamma value check boxes or click [Custom] and change
the settings with the slider or by directly inputting values into the boxes. You can
save and reload the settings.
Click a checkbox to select a
preset gamma value.
Clicking this box allows you
to select a custom value.
With the [Custom] box
selected, set the gamma
value within a range of 0.10
to 10.00. The value will
change as the slider is moved.
You can also input a value
directly into the box.
Drag the slider tab left or
right or click the arrows to
change the value.
Loads settings from files with
the extension [.adc] for color
images or [.adg] for grayscale
images.
Saves settings to a file with
the extension [.adc] for color
images or [.adg] for grayscale
images.
Cancels the settings and closes the dialog.
Accepts the settings and closes the dialog.
Resets all the settings to the initial values.
Restores the gamma value to its initial setting.
63
Step 3 • Adjusting Images
Setting the Gamma Value Correctly
Different display models tend to reproduce color tones in characteristic ways that
are expressed with a gamma value. Most displays fall within a range from 1.4 to
2.2, which reproduces tones that are slightly darker than the original. To faithfully
reproduce the original tones, it is necessary to correct the display’s gamma value
with CanoCraft FS.
The program normally adjusts the display’s gamma value to 1.8, but if your display
does not operate at this value, you will need to adjust it.
Display Gamma Value vs. CanoCraft FS Gamma Value
CanoCraft FS and your display each have their own distinct gamma value,
which is defined as the coefficient each program or device uses to match its
output data to its input data. For CanoCraft FS, the input data is the image
data it receives from the scanner and the output data is the data it sends to
the display.
For the display, the input data is the image data it receives from CanoCraft FS
and its output is the image that appears on its screen. CanoCraft FS
automatically calculates its gamma value as the inverse of the display gamma
value that you specify. If, for example, the display gamma value is set to 1.8,
the scanner gamma value is automatically set to 0.56.
• Please read the documents shipped with your display or contact the
manufacturer’s customer service department to obtain the correct gamma
value for your particular display model.
64
Step 3 • Adjusting Images
Adjusting a Tone Curve (Expert Mode)
In expert mode, you can balance the input and output data by editing the tone
curve, a graphical depiction of the relationship of highlights and shadows in 24-Bit
Color, 36-Bit Color, 8-Bit Grayscale and 12-Bit Grayscale images. You can edit the
master tone curve or the individual tone curves for each RGB channel. This method
of brightness adjustment is particularly suited to making fine changes to specific
areas of an image.
Tone Curve Tab
Click the [Image] menu and
select [Adjust] or click the
[Adjust] button.
Click the Tone Curve Tab and adjust
the tone Curve.
Tone Curve Tab
Adjust the tone curve by dragging the mouse cursor on the graph to change the
shape of the curve. You can save and reload the settings.
Click on the tone curve to
display the control points, then
drag one to change the curve
shape. You can set a multiple
number of control points.
Select the channel to be edited.
Each channel can be set independently.
Loads settings from files with
the extension [.adc] for color
images or [.adg] for grayscale
images.
Displays the current
input and output levels
between 0 (dark) and
255 (light) corresponding to the position of
the mouse cursor.
The larger the output
level in relation to the
input level, the brighter
the reproduction of the
image.
Saves settings to a file with the
extension [.adc] for color
images or [.adg] for grayscale
images.
Cancels the settings and closes the dialog.
Accepts the settings and closes the dialog.
Resets all the settings to the initial values.
Restores the tone curve to its initial settings.
65
Step 3 • Adjusting Images
Output Brightness
How to Interpret the Tone Curve
In CanoCraft FS, the data from the
scanner is the input and the data
sent to the display is the output.
The tone curve expresses the
relationship between the input and
output values of the color tones,
from shadows to highlights.
Highlight
Tone Curve
Shadow
Shadow
Highlight
Input Brightness
Adjusting a Tone Curve
The images below demonstrate how to adjust the brightness of an image by
changing the tone curve.
The input halftone data value is higher
than the output highlights, making the
image brighter in the display.
Convex Curve
Output
Output
Tone Curve before
Adjustment
Input
Input
Output
The input halftone data value is higher
than the output shadows, making the
image darker in the display.
Concave
Curve
Input
The input highlights and shadows are
emphasized, providing the image with a
sharp contrast.
S Curve
Output
* Make the curve shape as
smooth as possible to provide
a natural appearing effect.
The changes in the settings
will be reflected in the
preview image, so check the
preview image from time to
time as you make changes.
Input
66
Step 3 • Adjusting Images
Adjusting the Color Balance (Expert Mode)
In expert mode, the color balance tab can be used to adjust the RGB balance in 24Bit Color and 36-Bit Color images.
Color Balance Tab
Click the [Image] menu and
select [Adjust] or click the
[Adjust] button.
Click the Color Balance Tab and adjust
the color balance.
Color Balance Tab
Change the settings with the slider or by directly inputting values into the boxes.
You can save and reload the settings.
Dragging the slider tab or clicking the arrows
changes the settings. (-127~+127)
Red
Green
Blue
Values corresponding to the positions of the
slider tabs display here. Values can also be
directly input into the boxes without dragging
the slider tabs.
Loads settings from files with the extension
[.adc] for color images.
Saves settings to a file with the extension
[.adc] for color images.
Cancels the settings and closes the dialog.
Accepts the settings and closes the dialog.
Resets all the settings to the initial values.
Restores the color balance to the initial values.
67
Step 3 • Adjusting Images
Red is accentuated
Green is accentuated
Blue is accentuated
• On color images, the RGB values of the portion of the image over which the
mouse cursor is positioned is displayed here. The values are expressed in the
XXX/YYY format where YYY represents a gamma value of 1.0 and the XXX
represents the post-adjustment color values. The XXX values will not change
unless the color adjustment is conducted with the Color Balance function.
XXX
YYY
68
Step 3 • Adjusting Images
Adjusting Threshold Settings (Easy/Expert Mode)
In easy mode or expert mode, the threshold tab can be used to adjust the threshold
value (the demarcation between black and white) of black and white images.
Images are collections of data assigned varying brightness values. 24-Bit Color and 8Bit Grayscale images express the brightness with values ranging from 0 to 255. When
a black and white image is processed, brightness is expressed with only two values,
black (0) or white (255). Accordingly, a point has to be determined at which a dot is
determined to be either black or white. This point is called the threshold value. By
changing the threshold value, you can alter the appearance of an image as shown
below. The default setting for CanoCraft FS is 128.
Threshold Tab
Click the [Image] menu and
select [Adjust] or click the
[Adjust] button.
Threshold Tab
Change the settings with the slider or by directly inputting values into the boxes.
You can save and reload the settings.
Dragging the slider tab
or clicking the arrows
changes the settings.
To input a value directly
into the box, click it
and type a number
from 0 to 255.
Typical Scanned Image
Saves settings to a file with the extension [.adc] for color images.
Loads settings from files with the extension [.adc]
for color images.
Restores the threshold value to 128, the default value.
Larger number
input or slider
moved to the right
Lower number
input or slider
moved to left
69
Adjusting the Exposure Settings
You can manually adjust the exposure setting (scan speed) for film that has been
intentionally over- or underexposed or that has an extremely bright or dark
background.
• The auto color adjustment function is turned off when the exposure setting
is adjusted. The default setting for the auto color adjustment function is
‘on’ so that the scanner can automatically adjust the exposure to the film
type.
• With CanoScan FS2710, only the exposure needs to be adjusted. Both the
exposure and the film type settings need to be adjusted with CanoScan
2700F. In addition, the exposure settings for color positives cannot be
adjusted with CanoScan 2700F.
• The film type is determined by the manufacturer and product. Please refer
to the List of Film Types to set the film type setting (CanoScan 2700F only).
Exposure Adjustment Dialog
Click the [Settings] menu and select [Exposure].
Exposure Adjustment Dialog
Set the auto color adjustment setting to off and set the exposure by dragging the
slider.
Click here to turn the
auto color adjustment
setting on or off. A
check mark will appear
in the box when it is
set to on.
Drag the slider left or right or click
the arrow buttons to adjust the
exposure setting. The setting is
enabled when the auto color
adjustment setting is set to off.
Cancels any adjustments and closes the dialog.
Accepts the adjustments and closes the dialog.
70
Over-exposing an image gives it a bright effect. To do this, the scanner will
accelerate the scan speed for negative film and slow it for positive film. Underexposing an image gives it a dark effect. To do this, the scanner will slow the scan
speed for negative film and accelerate it for positive film.
Neutral Exposure
Over-Exposed
Under-Exposed
About Film Types (CanoScan 2700F Users)
The film base color of color negative films, generally used to output prints on
photographic paper, varies between manufacturers and individual products.
As a result, you must select the correct film type when setting the exposure
manually to achieve the correct coloration. In contrast, there is no need to
specify the film type for color positive films, which are suited to projecting
images onto screens or creating printing plates, because the colors are
reproduced in direct correlation to those of the photographic subject.
Dialog for the CanoScan 2700F
With the [Auto Color Balance] off, select a film type from
A to D and drag the slider to adjust the exposure setting.
Please refer to the List of Film Types in the Appendix for
the correct film type setting for each film product (p. 124).
71
Adjusting the Focus
The focus mechanism of the lens can be switched between autofocus and manual
focus for scanning. Autofocus is adequate for most applications, but you may
occasionally wish to use the manual focus if the image is slightly blurred because
the film is warped or curled.
Focus Settings Dialog
Click the [Settings] menu and select
[Focus].
Focus Settings Dialog
Select [Manual Focus] and drag the slider or input a value to change the setting.
Click the round button to select [Autofocus]
or [Manual Focus].
If you select manual focus, drag the slider or input a
value between 1 and 9 to adjust the focus.
Clicking the autofocus button causes the autofocus to
operate and display the focal setting by the position of
the slider and the value in the box.
• If the image in the film itself is out of focus, there is little chance of
obtaining a sharp, focused image by adjusting the focus setting.
• If the image in the film itself is out of focus, you can make it less noticeable
by adjusting the contrast and applying the sharpen effect.
72
Other Functions
●
●
●
●
●
●
●
●
●
●
Other Functions
CanoCraft FS Preference Settings
The preference settings control CanoCraft FS’s automated routines for scanning
and closing.
Preferences DIalog
Click the [Settings] menu and
select [Preferences].
Click an option to place a check mark
in its box and activate the setting.
Save Preview Image
Placing a check in this option causes CanoCraft FS to save the last image in the
preview window at shut down. At the next startup, the image automatically
appears in the preview window. This option is set to off when CanoCraft FS is first
installed.
Single Scan
Placing a check in this option closes CanoCraft FS after it scans one image when
started as a TWAIN driver from within a TWAIN-compliant application. This option
is set to off when CanoCraft FS is first installed.
Auto Eject
Placing a check in this option causes the scanner to automatically eject the film at
the end of the scan. This option is set to on when CanoCraft FS is first installed.
• Auto eject only ejects the film after the final scan, not after a preview scan.
Set the Exposure and Autofocus Settings for Final Scan
The exposure and autofocus settings are usually set automatically to the
appropriate settings during the preview scan. If the preview scan is
skipped, however, these settings are not set and the results may not be
appropriate. Set this option to On to have the settings automatically set
during the final scan when you wish to skip the preview step.
74
Other Functions
ColorGear Color Matching
Placing a check in this option turns on the ColorGear color management system.
ColorGear automatically corrects for the differences in color characteristics
between scanners, displays and printers. When set to on, this function reduces the
effort required to set the printer color balance. Turn it off when you wish to
perform the color correction with Photoshop or other image editing programs.
This option is set to on when CanoCraft FS is first installed. You can also turn it on
and off by right-clicking the settings display area.
75
Other Functions
Resetting Default Settings
This function resets the file types, image types, output resolution, autofocus,
preferences and adjustments to the default settings, the values set when CanoCraft
FS was first installed.
• Selecting the menu item initiates the action.
Click the [Settings] menu and
select [Reset Default Settings].
Default Categories and Settings
Film Type:
Image Type:
Output Resolution:
Scan Resolution:
Output Magnification:
Size Units:
Exposure:
Autofocus:
Preferences:
Adjustment Mode:
Rotate/Flip Dialog:
Fixed Aspect Ratio Dialog
35 mm color negatives
24-bit color
File (340 dpi)
340 dpi
100%
Inches
• Auto color balance:
On
• Film Type (2700F Only):
A
• Exposure Default:
Halftone
On
• Save Preview Image:
Off
• Single Scan:
Off
• Auto Eject:
On
• Adjusts the exposure and focus settings during the final scan: Off
• ColorGear color matching:
On
Easy Mode
• Brightness:
0
• Contrast:
0
• Gamma Value:
1.8
• Tone Curve:
Linear
• Highlights:
255
• Shadows:
1
• Color Balance:
0
• Threshold:
128
Disables the rotate and flip functions when scanning.
• Style
Standard
• Detail
Normal C Type
76
Other Functions
Printing
After an image has undergone a preview scan, color correction and other
processing, it can be output directly to a printer without being saved.
• This function can only be selected when CanoCraft FS is used as a standalone program. It cannot be selected when CanoCraft FS is started from
within a TWAIN-compliant application.
• Set CanoCraft FS’s printer settings to match the printer.
• Refer to the manual that accompanied the printer for details on turning on
the power and paper handling.
Print Dialog
Click the [File] menu
and select [Print].
Print Dialog
Set the number of copies desired and click [OK] to start printing.
Click the arrow to select an alternate
printer to the one shown.
Click the [Properties] button to adjust
the printer settings.
The number of copies to be printed can
be set by inputting a figure directly in
this box or by clicking the arrow buttons,
( ▲ ) and ( ▼ ).
Click [OK] once you have finished
changing the settings.
77
Other Functions
Printer Setup
Correct printer settings are crucial to accurately printing images scanned with
CanoCraft FS. Open the printer setup dialog the first time you use CanoCraft FS by
clicking the [File] menu and selecting [Printer Setup]. Select the target printer, the
paper size, the print quality and colors.
• This function can only be selected when CanoCraft FS is used as a standalone program. It cannot be selected when CanoCraft FS is started from
within a TWAIN-compliant application.
• Setting the printer settings once is sufficient unless the printer selection
changes, or other setting changes are required.
• The printer settings are identical to those in the Windows printer setup
dialog. If your printer is correctly set up for Windows, there is no need to
alter these settings.
• The printer setup window varies printer. Refer to the manual accompanying
the printer for instruction on the printer properties dialog.
Click the [File] menu and select
[Printer Setup].
Set the properties according to the printer manual.
Examples of the Printer Properties
Dialog (BJC-4300)
78
Other Functions
Sending a Fax
You can send a previewed and scanned image as a facsimile transmission using the
printer dialog.
• This function can only be selected when CanoCraft FS is used as a standalone program. It cannot be selected when CanoCraft FS is started from
within a TWAIN-compliant application.
• This feature is only available if faxing software has been installed in
Windows and a fax modem is correctly connected and set.
Printer Dialog
Click the [File] menu and select [Fax].
The printer dialog will display. Click
the arrow on the printer name box to
select a fax modem.
Printer Dialog
Set the paper size and orientation and click [OK] to start the transmission.
To select a fax modem, click the button and select
an option from the pull-down menu.
To set the fax modem settings, click the [Properties]
button.
Click the desired paper orientation option to select
it.
Click the arrow of the size box to display a list of
options for selection.
Click [OK] once you have finished changing the
settings.
79
Other Functions
Fax Setup
The setup dialog can be used to set the paper size and orientation, number of
copies and resolution.
• This function can only be selected when CanoCraft FS is used as a standalone program. It cannot be selected when CanoCraft FS is started from
within a TWAIN-compliant application.
• This feature is only available if faxing software has been installed in
Windows and a fax modem is correctly connected.
• The fax settings for CanoCraft FS are identical to those for Windows. If your
fax modem is correctly set up for Windows, there is no need to alter these
settings.
Click the [File] menu and select
[Fax Setup]. Select the fax in the
printer name box and click the
properties button to display the
fax properties dialog.
80
Other Functions
Selecting the Scanner
CanoCraft FS works with both CanoScan FS2710 and CanoScan 2700F film scanners.
Use the following procedures to switch between models if required.
• The scanner attached to the computer will automatically be selected when
CanoCraft FS is installed or auto configuration is run. Accordingly, you need
only perform this procedure when you simultaneously use more than one
scanner and switch between them or when you wish to confirm the name
of the attached scanner.
• This function cannot be accessed when CanoCraft FS is started as a TWAIN
Driver from a TWAIN-compliant application. To select a scanner in this case,
use the application program’s scanner selection function.
Scanner Selection Dialog
Click the [Device] menu and select [Select].
Scanner Selection Dialog
This dialog allows you to select between different scanner models.
Click the
button on the right to display the names of
the scanners that can be selected (the attached scanner is
usually the only name available).
Click the name of the desired scanner to select it and click
the [OK] button.
Clicking the [Cancel] button returns the selection to its
prior setting and closes the dialog.
81
Other Functions
Scanner Self-Test
The scanner can perform a self-test to confirm the correct operation of its
mechanisms, circuits and lamp. Initiate the self-test after the scanner has been
completely set up using the following procedures. The self-test can also be used to
check a suspected malfunction during use.
• Ensure that you eject any film from the scanner before you initiate the selftest.
• If a message displays during the procedure, follow the instructions in the
message.
Self-Test Dialog
Click the [Device] menu and click [Diagnostics...].
Self-Test Dialog
Eject the film from the scanner and click the [Test] button.
A message will display in the dialog if a
problem is detected.
Initiates the self-test.
Ends the self-test and closes the dialog.
Ejects the film.
82
Other Functions
Viewing Version Data
The About dialog displays the scanner hardware version, SCSI ID and other version
information.
Click the [Help] menu and
select [About...]
83
Editing
This section describes the image editing
functions of CanoCraft FS. Experiment with the
numerous image processing features to
understand how they can be used on freshly
scanned images and images loaded from disk.
●
●
●
●
●
●
●
●
●
●
Editing
Copying to the Clipboard
● Copying an Image
Clicking the [Edit] menu and selecting [Copy] copies the selection in the preview
window to the clipboard. The clipboard contents can then be pasted into another
application for processing.
Clipboard
• The keyboard shortcut for copying the selection to the clipboard is
[Ctrl+C].
• The selection can only be pasted at the resolution of the preview image.
● Clearing the Clipboard
Clicking the [Edit] menu and selecting [Clear] deletes the contents of the
clipboard.
• To view the contents of the clipboard, click the [Start] button on the
Windows taskbar and select [Programs], [Accessories] and [Clipboard
Viewer]. If Clipboard Viewer is not installed, please install it from your
Windows software disk.
85
Editing
Redoing an Edit
● Undoing the Previous Action
Clicking the [Edit] menu and selecting [Undo] reverses the last action and restores
the image to its prior state. The Undo command is effective for reversing image
edits and adjustments, such as brightness and coloring adjustments.
• The keyboard shortcut for this command is [Ctrl+Z].
● Redoing an Action After the Undo Command
Clicking the [Edit] menu and selecting [Redo] reverses the [Undo] and [Undo All]
commands, restoring image edits and adjustments, such as brightness and coloring
adjustments.
• The keyboard shortcut for this command is [Ctrl+Y].
● Undo All
Clicking the [Edit] menu and selecting [All] reverses all the image edits and
adjustments, such as brightness and coloring adjustments, restoring the image to
its preview scan state.
Image Inverted
Redo
Undo
Edges Found
Image Posterized
Original Preview Scan
Undo All
Redo
86
Editing
Adjusting an Image
● Sharpening an Image
With the image type set to 8-bit grayscale or 24-bit color, use the sharpen effect
when an image is slightly out of focus or you wish to clarify the outlines of an
object.
Original
Sharpen Effect
Procedures
Click the [Effect] menu and select [Sharpen].
The sharpen effect will be applied to the image in the preview window.
• Processing an image repeatedly with the sharpen effect may reveal dirt or
scratches on the document or a light colored halo around outlines.
87
Editing
● Blurring an Image
With the image type set to 8-bit grayscale or 24-bit color, use the soften effect to
create a fuzzy or slightly unfocused image.
Original
Soften Effect
Procedures
Click the [Effect] menu and select [Soften].
The soften effect will be applied to the image in the preview window.
• Processing an image repeatedly with the soften effect may cause it to
appear blurred. Be careful not to overuse this effect.
88
Editing
● Removing Noise
With the image type set to 8-bit grayscale or 24-bit color, use the despeckle effect
to soften an image that appears coarse. This effect removes the noise associated
with image data.
Original
Despeckle Effect
Procedures
Click the [Effect] menu and select [Despeckle].
The despeckle effect will be applied to the image in the preview window.
• Processing an image repeatedly with the despeckle effect may cause it to
appear too dense. Be careful not to overuse this effect.
89
Editing
● Inverting an Image
With the image type set to black and white, 8-bit grayscale or 24-bit color, use the
invert effect to transform a positive into a negative or vice versa.
Original
Invert Effect
Procedures
Click the [Effect] menu and select [Invert].
The preview image will transform into the opposite state, positive or
negative.
• Inverting an image a second time restores it to its original state.
90
Editing
Formatting an Image
● Find the Edges
With the image type set to 8-bit grayscale or 24-bit color, apply one of the edges
special effects to an image to accentuate object outlines. There are four effects:
thin, thick, horizontal and vertical.
Original
Thin
Thick
Horizontal
Vertical
Procedures
Click the [Effect] menu and select [Edges].
The edges window will display.
Sample Window
Displays the edges samples
Edges Sample Selection Button
Click the [Edges Option Selection] button and select an effect from
the pull-down menu.
The image will appear with the effect applied in the sample window.
Click the [OK] button to accept the effect.
The edges of the image will be accentuated as shown in the sample in the
Edges window.
91
Editing
● Find Lines
With the image type set to 8-bit grayscale or 24-bit color, use the lines effect to
create special effects that retain only the horizontal and/or vertical lines of the
objects contained within an image. There are three effects: horizontal, vertical and
both.
Original
Horizontal
Vertical
Both
Procedures
Click the [Effect] menu and select [Lines].
The lines window will display.
Sample Window
Displays the lines samples
Lines Sample Selection Button
Click the [Lines Option Selection] button and and select an effect from
the pull-down menu.
The image will appear with the effect applied in the sample window.
Click the [OK] button to accept the effect.
The lines of the image will be accentuated as shown in the sample in the
Lines window.
92
Editing
● Pixelate
With the image type set to 8-bit grayscale or 24-bit color, use the pixelate effect to
gather groups of pixels into blocks that provide the image with the appearance of
a mosaic. There are four levels of pixel groupings: 2x2, 3x3, 4x4 and 5x5.
Original
2x2
3x3
4x4
5x5
Procedures
Click the [Effect] menu and select [Pixelize].
The pixelate window will display.
Sample Window
Displays the pixelate samples
Pixel Number Selection Button
Click the [Pixel Number Selection] button and select an effect from the
pull-down menu.
The image will appear with the effect applied in the sample window.
Click the [OK] button to accept the effect.
The pixels of the image will be grouped as shown in the sample in the
Pixelate window.
93
Editing
● Posterize
With the image type set to 8-bit grayscale or 24-bit color, use the posterize effect
to reduce the number of colors in an image, creating a simplified color scheme.
There are four levels of posterizing.
Original
Level 1
Level 2
Level 3
Level 4
Procedures
Click the [Effect] menu and select [Posterize].
The posterize window will display.
Sample Window
Displays the posterize samples
Posterize Level Selection Button
Click the [Posterize Level Selection] button and select an effect from
the pull-down menu.
The image will appear with the effect applied in the sample window.
Click the [OK] button to accept the effect.
The image will be posterized as shown in the sample in the Posterize
window.
94
Editing
● Low Relief
With the image type set to 8-bit grayscale or 24-bit color, use the low relief effect
to emboss an image. There are three effects available: emboss, sculpt and metalize.
Original
Emboss
Sculpt
Metalize
Procedures
Click the [Effect] menu and select [Low Relief].
The low relief window will display.
Light Icons
The emboss and sculpt effects
display three light icons in the
sample window to change the
direction in which simulated
shadows are cast.
Sample Window
Displays the low relief effect samples
Low Relief Effect Selection Button
Click the [Low Relief Effect Selection] button and select an effect from
the pull-down menu.
The image will appear with the effect applied in the sample window.
Click the [OK] button to accept the effect.
The image will be processed with a the low relief effect as shown in the Low
Relief window.
95
Editing
● Halftone
When an 8-bit grayscale image is selected, use the halftone effect to rearrange the
halftones of the image into patterns to convert it into a black and white image.
There are six halftone patterns: flat dot, angled line, angled dot, horizontal line,
vertical line and threshold.
Flat Dot
Angled Dot
Vertical Line
Angled Line
Horizontal Line
Threshold
Original
Procedures
Click the [Effect] menu and select [Halftone].
The halftone window will display.
Sample Window
Displays the halftone pattern samples
Halftone Pattern Selection Button
Click the [Halftone Pattern Selection] button and select an effect from
the pull-down menu.
The image will appear with the effect applied in the sample window.
Click the [OK] button to accept the effect.
The image will be converted into a black and white image as shown in the
Halftone window.
96
Editing
Editing a Saved File
In addition to scanning and saving images to a file, CanoCraft FS can open saved
files into the preview window for further processing and saving, or for saving to a
new file.
● Procedures for Loading a Saved File
To load a saved file, follow the procedures below.
Click the [File] menu and select [Open].
The open dialog will display.
Select the desired file and click the [Open] button.
The selected file will display in the preview window.
• You can edit and process images displayed in the preview window with the
adjust menu commands.
97
Editing
● Saving a File After Editing
You can save a file that has been loaded from disk and processed by saving it under
a new name.
Procedures
Click the [File] menu and select [Save As].
The save as dialog will display.
Input a new file name and click the [Save] button.
The image displayed in the preview window will be saved under the new
name. You can also change the save location and file format with this dialog.
Click this arrow to select the drive and folder for the
file
Input a name in the box using letters or numbers
Click this button to create a new folder for the file
Click this button to change how the file data
appears in the window
Click this button to navigate to a folder or drive a
level higher in the disk hierarchy
Click the arrow to display a list of file formats. You
can select formats ending with the extensions: BMP,
DIB, GIF, JPG, PIX, RLE, TIF and FPX
Click here after you select the file location and
format and input a name
98
Editing
● Deleting a File after Editing
Follow the procedures below to clear a file from the preview window.
Click the [File] menu and select [Close].
The image in the preview window will disappear.
• The “Image not saved” message appears if the preview image is deleted
before being saved. Clicking [Yes] to the “Save image?” question causes it
to be written to disk. If you select [No], the file will be cleared from the
preview window without being saved to disk.
99
Copying with
CanoCraft FS Copy
This section explains how to use CanoCraft FS
Copy with your CanoScan 2700F/FS 2710 film
scanner to output scanned images directly to
your printer. Use the following procedures to
operate the program.
• Always turn on the scanner and printer power
before you start Windows and use CanoCraft
FS Copy.
• CanoCraft FS Copy and CanoCraft FS cannot be
run simultaneously.
●
●
●
●
●
●
●
●
●
●
Copying with CanoCraft FS Copy
Displaying the Copy Window
CanoCraft FS Copy can be started from and used on the Windows desktop. Its
control panel will display when it is started.
All of the program’s functions can be accessed from its program window.
Procedures for Opening CanoCraft FS Copy
Turn on the scanner and display and any other peripheral devices
connected to your computer.
Turn the computer on and start Windows.
• Ensure that you turn the scanner power on before you start Windows. You
will not be able to use CanoCraft FS Copy if the scanner power was off
when you started Windows.
Select CanoCraft FS Copy by double-clicking its desktop icon or clicking the [Start] menu on the Windows taskbar and selecting [Programs], [Canon CanoCraft FS] and [CanoCraft FS Copy] in succession.
• CanoCraft FS cannot run at the same time as CanoCraft FS Copy.
101
Copying with CanoCraft FS Copy
Copying
Copying Procedures
Once you have the CanoCraft FS Copy control panel displayed, follow the
procedures below to insert film into the scanner and output (copy) images on the
printer.
Click the arrow (paper size selection) button to the right of the paper
size display and select a paper size for printing.
Click the [Setup] button to the left of the printer display box and set
the image output size and image position settings.
The settings dialog for the selected printer will display when you click the
Setup button.
Printer Setup Dialog
Image Position
Click the box beside the [Center]
or [Top Left] option to select it.
Image Orientation
Click the box beside the
[Portrait] or [Landscape] option
to select it.
Image Output Size
Click the box beside the [Fit to Paper Size] or [Custom Setting] option to select it.
If the custom option is selected, choose an output size from the [Size] category.
You can click the [Add], [Edit] or [Remove] buttons to add to, change or delete
output sizes.
102
Copying with CanoCraft FS Copy
• The image will be expanded or reduced to fit the printable area of the page
if the scale to page option is selected in the image output size box.
• The image will be printed at the selected size if the custom option is
selected.
• The registered sizes in the size list of the custom option can be changed or
deleted. New sizes can also be added.
Insert the film into the scanner.
35 mm Film
Mounted Slides
IX240
Film
103
Copying with CanoCraft FS Copy
Select a film type.
Select the [35 mm] or [IX240] setting to match your film. In addition, specify
whether it is a negative or positive film.
Click an icon to select [Negative] or [Positive].
Click an icon to select the film type.
• The film type can also be set with the pull-down menu summoned by
clicking the scanner’s [Setup] button. The scan resolution, color balance and
ColorGear settings can also be adjusted from the pull-down menu displayed
by clicking the [Settings] button. (p. 74)
• IX240 film refers to film complying with IX240 standards.
Select an image type.
Select the [Color] or [Grayscale] setting to match your film.
Click an icon to select an image type.
• The color option is only available when a color printer is selected in the
printer box.
104
Copying with CanoCraft FS Copy
Adjust the brightness, if required.
Adjust the brightness by dragging the slider or inputting
a value in the box.
Select the number of copies to output, if required.
Click the numbers on the ten-key pad or enter a
number from the computer keyboard to set the number
of copies.
Confirm that the paper is properly inserted in the printer and click the
[Start] button.
The film will be scanned and the image will print.
Stop Button
Click here to stop printing.
105
Copying with CanoCraft FS Copy
• Some printers may print an image even if the paper size is incorrectly set.
• The [Initializing film scanner. Please remove film.] message will display if the
film scanner’s power is turned on with a film already inserted or if a set
period of time passes without the scanner being operated after the power
is turned on. If this happens, remove the film from the scanner and follow
the instructions on the screen.
• There is generally no need to pay attention to the actual resolution at
which the film is scanned because it is automatically calibrated according to
the printer resolution, paper size and image output size.
• The film will automatically eject when the scan is complete if the auto eject
function is on.
To close CanoCraft FS Copy, click the close box.
You can also close CanoCraft FS
Copy by right-clicking the title bar
and selecting [Close].
106
Copying with CanoCraft FS Copy
Adjusting CanoCraft FS Copy Settings
The scanner and printer settings used by CanoCraft FS Copy are automatically set
when you install CanoCraft FS or change configurations. Although there is no need
to adjust the scanner or printer settings for CanoCraft FS Copy under normal
operating conditions, you may wish to change them to accommodate changes in
the printer paper size or orientation, or when using more than one scanner or
printer.
• To change settings, ensure that the scanner and printer are correctly
connected and turned on, then turn on the computer and start Windows.
Changing the Printer Settings
Specify the printer by clicking the printer selection button to the right
in the printer area and selecting a printer from the pull-down menu.
Printers registered with Windows will display
in the pull-down menu.
Click the [Setup] button on the left of the printer area and set the
paper size, orientation and source settings.
Clicking the [Properties] button will display the properties dialog for the
selected printer.
Click this button to adjust the detailed
settings for the printer. Refer to the manual
accompanying your printer for an explanation of the settings.
Click the [OK] button once you are satisfied with the settings.
107
Copying with CanoCraft FS Copy
Changing the Scanner Settings
Click the arrow (scanner selection) button to the right of the scanner
display box and select a scanner from the pull-down menu.
The name of the scanners registered in Windows will display in the pulldown menu. (CanoScan FS2710 will normally display.)
Click the [Settings] button to the left of the scanner display box and
select a setting from the pull-down menu.
• Refer to the next page for instructions regarding the menu categories and
settings procedures.
Adjust the settings as required and click the [OK] button.
108
Copying with CanoCraft FS Copy
Scan Resolution
Select the [Scanning Resolution] option from the setup submenu.
At installation, this setting is set to [Default Resolution].
High Resolution: scans at the printer’s resolution setting.
Default Resolution: scans at half the printer’s resolution setting.
Low Resolution: scans at one-third of the printer’s resolution setting.
Film Type
Sets the type of film being scanned.
• Please refer to the Selecting the Film Type topic for instructions on selecting
the film type. (p. 29)
Exposure
Allows the manual adjustment of the exposure setting (scan speed) for film that
has been intentionally over- or underexposed or that has an extremely bright or
dark background.
• Please refer to the Adjusting the Exposure Settings topic for instructions on
adjusting the exposure setting. (p. 70)
Focus
Switches between the autofocus and manual
focus settings for printing. While the autofocus
setting is sufficient for standard films, warped or
distorted films or those shot slightly out of focus
may require manual adjustment.
• Please refer to the Adjusting the Focus topic for instructions on adjusting
the focus. (p. 72)
• If the image remains blurred even after adjusting the focus manually, check
the film to ascertain that it was shot in focus.
109
Copying with CanoCraft FS Copy
Adjust (Alt + A)
The image coloring is adjusted with the brightness/contrast tab, the gamma value
tab and the tone curve tab. Adjustments can be saved to file and reused, which is
handy if the same image is to be reprinted.
• For details on adjustments to coloring, refer to Adjusting
Images, starting on page 50.
• The keyboard shortcut to open the Adjust dialog is [Alt + A].
Preferences
Sets the auto eject settings, the exposure and focus settings during the final scan,
the ColorGear color matching system settings and other settings that are active
during the final scan and when the program is closed.
• Please refer to the Setting the CanoCraft FS Preference Settings topic in the
Other Functions section for instructions regarding preference settings (p.
74).
• The program cannot be set to save the preview image and automatically
close when the final scan is finished.
Version Information
The About dialog displays such information as the CanoScan FS2710 version
number, the scanner's SCSI ID and the SCSI host adapter ID.
110
Appendices
The appendices include troubleshooting
tips for installing and operating CanoCraft
FS and CanoCraft FS Copy. Instructions on
how to uninstall the software, a glossary
and an index are also included.
Operating Environment
Hardware
CD-ROM equipped IBM PC/AT compatible
Operating System
Windows 95, Windows 98, Windows NT 4.0
Compatible Film Scanners <CanoScan FS2710 Film Scanner>
<CanoScan 2700F Film Scanner>
Performance Specifications
Interface
Auto Detection of SCSI scanners
Image Types
Black and White, 8-bit grayscale, 12-bit grayscale (CanoScan
FS2710), 24-bit color, 36-bit color (CanoScan FS2710)
Film Types
35 mm color negatives and positives, 35 mm monochrome,
IX240 color negatives and positives, IX240 monochrome
Brightness Settings
256 levels
Contrast Settings
256 levels
Density Settings
256 levels (black and white images only)
Gamma Curve
Adjustable
Scan Resolution
120-5440 dpi
Color Adjustment
Brightness, color balance, histogram, brightness/contrast, color
balance, tone curve, gamma value, threshold value
*Specifications are subject to change without notice.
●
●
●
●
●
●
●
●
●
●
Appendices
Troubleshooting
Please read the suggestions below if you have trouble installing or using CanoCraft
FS, or if you think that there is a problem with the software or equipment. If the
remedies suggested below do not solve your problem or your problem isn’t listed,
consult your Canon vendor or the nearest Canon Customer Support Help Desk (p.
133).
• Before you contact us, ensure that you have read the Readme file and Help
files that accompany the software as well as the CanoScan FS2710/2700F
Product Guide.
• When you contact a Customer Support Help Desk, our technicians will need
to know about the computer connected to the scanner. Please take time
now to print out and fill in the System Information page in the CanoScan
FS2710/2700F Getting Started guide.
Problems with Software Installation
Installation is unsuccessful
Cause:
Solution:
Insufficient memory to run the installer program
Close other software programs that are running and reinstall.
Setup initialization error message displays
Cause :
Insufficient free hard disk space on the specified drive
Solution 1: Cancel the setup, delete or transfer unnecessary files from
the hard disk and reinstall.
Insufficient space on install drive message displays
Cause :
Insufficient free hard disk space on the specified drive
Solution 1: Specify another drive in the installer window.
Solution 2: Close the installer and delete unnecessary files on the specified drive to free up disk space.
112
Appendices
Scanner not detected message displays
Cause 1:
Solution:
Scanner power is off
Close Windows. Turn on the scanner power first, then restart
Windows and run auto configuration.
Cause 2:
Solution:
Scanner power was off when Windows was started.
Close Windows. Turn on the scanner power first, then restart
Windows and run auto configuration.
Cause 3:
Solution:
Scanner is incorrectly attached
Turn off the computer and reattach the scanner properly.
Turn on the scanner power first, then restart Windows and
run auto configuration. (p. 120)
(Getting Started Guide)
Problems Starting Software Programs
Specified device not found message displays
Cause 1:
Solution:
Scanner power is off
Close Windows. Turn on the scanner power first, then restart
Windows and run auto configuration.
Cause 2:
Solution:
Scanner power was off when Windows was started.
Close Windows. Turn on the scanner power first, then restart
Windows and run auto configuration.
Cause 3:
Solution:
Scanner is incorrectly attached
Turn off the computer and reattach the scanner properly.
Turn on the scanner power first, then restart Windows and
run auto configuration. (p. 120)
(Getting Started Guide)
Problem with SCSI adapter or its software message displays
Cause:
Solution:
Scanner power is off
Turn on the scanner. (Getting Started Guide)
113
Appendices
Can’t start CanoCraft FS from within another application
Cause:
Solution:
Scanner settings not correctly set in the application program
Correct the scanner settings in the application program. See
the manual for the application program for instructions.
[CanoCraft FS or CanoCraft FS Copy is running. Close it and run this
program] message displays
Cause1:
You attempted to start CanoCraft FS when CanoCraft FS
Copy was already running
Solution1: Close CanoCraft FS Copy before starting CanoCraft FS.
Cause2:
You attempted to start CanoCraft FS Copy when CanoCraft
FS was already running
Solution2: Close CanoCraft FS before starting CanoCraft FS Copy.
Problems with Scanning
[Initializing film scanner. Please remove film] message displays
Cause 1:
Solution:
Scanner power turned on with a film already inserted
Remove the film and follow the instructions on the screen.
Cause 2:
Set period of time passed without scanner being operated
after power turned on
Remove film and follow the instructions on the screen.
Solution:
Image is vertically or horizontally inverted
Cause:
Film is inserted upside down or backwards
Solution 1: Insert the film with the correct orientation. (Getting Started
Guide)
Solution 2: Click the Rotate/Flip button and change the orientation of
the image. (p. 39)
Brightness of preview image and scanned image are different
Cause:
Solution:
Display brightness settings are incorrect
Adjust display brightness settings. (Display manual)
114
Appendices
Preview image coloring is strange
Cause 1:
Solution:
Film is faded
This problem can be corrected to a certain extent by retouching the image with image processing software.
Cause 2:
Film (negative) is of type difficult for automatic film type
selection with the automatic color adjustment feature of
the exposure function.
Turn off the automatic color adjustment feature of the
exposure function and manually specify settings, such as the
film type and scanning speed. (2700F only) (p. 70)
Solution:
Cause 3:
Solution:
Cause 4:
Solution:
Automatic color adjustment feature of the exposure function turned off and incorrect film type selected
Reset film type and rescan. (p. 70)
Color balance and brightness settings are incorrect
Click the [Adjust] button and reset the color balance and
brightness settings. (p. 55)
Colors sometimes appear at the boundaries of highlights and shadows
when negative films are scanned.
Cause 1:
The exposure function is set to auto color adjustment
Solution 1: In the exposure adjustment dialog, click the check box to
remove the check mark beside the auto color adjustment
option and drag the slider to the middle. (p. 70)
Cause 2: The exposure adjustment is set to an under-exposure value
Solution 2: Drag the slider in the exposure adjustment dialog toward
the over-exposure side. (p. 70)
Cannot achieve the desired coloration despite having adjusted the
exposure (negative film)
Cause:
Solution:
The histogram highlight setting is incorrect
Use the white pointer tool in the histogram tab of the adjust
dialog to reset the highlight level on the preview image.
(p. 58)
115
Appendices
Although it is the same negative film, the colors of the preview image
change with each scan.
Cause:
Solution:
The exposure function is set to auto color adjustment
In the exposure adjustment dialog, click the check box to
remove the check mark beside the auto color adjustment
option and drag the slider to the middle. (p. 70)
A scan with the image type set to black and white results in an image
that is whited out or too dark
Cause:
Solution:
Threshold setting is too high or low
Adjust the threshold setting. (p. 69)
Black border around film included in scanned image
Cause:
Solution:
Scan area not set
Set the scan area. (p. 41)
Cannot freely specify the scan area in the preview window
Cause:
Solution:
Fixed aspect ratio selected
Reset aspect ratio to normal setting. (p. 45)
Scanning is taking a long time
Cause:
Solution:
Scan resolution is set too high
Lower the scan resolution to the minimum setting and
rescan.(p. 32)
Image Quality Problems
Scan quality is poor
Cause:
Solution:
Scan resolution is too low
Raise the scan resolution and rescan.(p. 32)
Image is blurred
Cause 1:
Solution:
Focus setting was incorrect in manual focus mode
Refocus in manual focus mode or use the autofocus mode.
(p. 72)
Cause 2:
Film was shot out of focus
116
Appendices
Problems Saving Images
[Low disk space condition] message displays, file cannot be saved
Cause:
Insufficient disk space on specified disk
Solution 1: Specify another disk as the save location.
Solution 2: Resave after removing files from the disk.
Solution 3: Lower the scan resolution and resave. (p. 32)
Cannot open saved file in an application program
Cause 1:
Solution :
Incompatible file format
Resave in a file format recognized by the application. (p. 46)
Cause 2:
File size is too large for the application to handle
Solution : Resave at a lower scan resolution. (p. 32)
Problems with Printing
Printing fails or printing errors
Cause 1:
Solution:
Printer not receiving power
Turn the printer power on. See the printer manual.
Cause 2:
Solution:
Printer is not on-line
Place printer on-line. See the printer manual.
Garbled characters print
Cause :
Solution:
Printer settings set for printer different than the connected
printer
Select the connected printer as the default printer and
adjust its settings to the appropriate values. (p. 77)
117
Appendices
Uninstalling CanoCraft FS
You may wish to uninstall CanoCraft FS to install an upgrade or to remove it from a
particular computer. Delete it with the CanoCraft FS Uninstall program or insert
the CD-ROM and select the Add/Remove Software menu item.
• If you try to delete CanoCraft FS by simply deleting its folder with the
Windows Explorer program, unnecessary items will remain in the system
files. Be sure to use CanoCraft FS Uninstall. However, CanoCraft FS Uninstall
will leave some information behind in the WIN.INI and other files.
• The same procedures can be used to uninstall an old version of CanoCraft
FS, such as 3.1 or 3.5.
Uninstalling with the CanoCraft FS Uninstall Program in the Start Menu
Click the CanoCraft FS Uninstall icon in the CanoCraft FS desktop
folder or click the [Start] menu and select [Programs], [Canon
CanoCraft FS] and [CanoCraft FS Uninstall] in succession.
The confirm file deletion dialog will display.
Click the [Yes] button.
The CanoCraft FS Uninstall dialog will display.
The procedure is complete once all the items
have had a check mark placed alongside.
118
Appendices
Click the [OK] button.
• If you have software for other Canon scanners, such as flatbed or film
scanners, a deletion confirmation message for shared files will display.
Follow the instructions on the message to proceed.
Uninstalling with the Install/Uninstall Software Menu on the CD-ROM
Place the software CD-ROM that came with the CanoScan FS2710/
2700F film scanner into the computer drive.
Select [Install/Uninstall Software]
from the menu.
Click the [Uninstall] tab at the top
and select the Open the Add/Remove
Programs Dialog] button at the bottom.
Select [CanoCraft FS] from the list in the
Add/Remove Programs dialog and click
the [Add/Remove] button.
• Clicking the Add/Remove button displays a dialog similar to the CanoCraft
FS Uninstall dialog summoned through the Start menu (see previous page).
The procedure is complete once all the items have had a check mark placed
alongside.
119
Appendices
Configuring CanoCraft FS
It may be necessary to configure CanoCraft FS if
the scanner was incorrectly attached or the power
was off while CanoCraft FS was being installed or
if the message to the right displays and prevents
CanoCraft FS or CanoCraft FS Copy from scanning.
The configuration process can be conducted with the [Automatic Configuration]
setting or the [Configuration] setting, which allows you to confirm each stage of
the process.
• To run the configuration process, ensure that the scanner is correctly
attached and turned on before Windows is started.
CanoCraft FS Automatic Configuration
This setting allows CanoCraft FS to automatically configure its settings to operate
correctly with the scanners and printers connected to the computer.
Procedures
Double-click the [CanoCraft FS Automatic Configuration] icon.
If this window is not displayed, click the [Start] button on the
Windows taskbar and select [Programs] and [CanoCraft FS].
The configuration complete message will display after a moment.
Read the message and click the [OK] button.
120
Appendices
CanoCraft FS Configuration
This setting allows CanoCraft FS to be configured one device at a time to operate
correctly with each scanner and printer that is connected to the computer.
• Select this setting when you wish to switch between more than one scanner
or printer or when you wish to create a special configuration. Otherwise,
the automatic configuration setting is recommended for most cases. (see
prior page)
Procedures
Double-click the CanoCraft FS Configuration icon.
The current settings will display in the configuration manager.
If this window
does not display,
click the Windows
[Start] button on
the taskbar and
select it from the
submenu.
Click the button to the left of the configuration manager and select a
device.
● Monitor Settings
Set the CanoCraft FS display color balance settings to match your monitor.
Select the monitor option corresponding to
your monitor or select the name of a
monitor that your monitor emulates.
If your monitor type is unknown, choose
the first option, [Canon’s Default Profile for
Monitors].
121
Appendices
● Printer Configuration
Select the printer color balance, paper size and graphics settings that match
your printer.
Select the printer name corresponding to your printer
and click the [Properties] button to set the paper and
graphics settings. Refer to the manual accompanying
the printer for instructions regarding the settings.
BJC-4300 Settings Window
● Copy Configuration
Select the copier color balance, paper size and graphics settings that match
your printer. Use the same procedures as for the printer to adjust these
settings.
The settings window for the attached
(installed) printer will display.
• The printer and fax settings are the same as those set by Windows. There is
no need to change these settings if they were correctly set with Windows.
122
Appendices
● Fax Configuration
Select the paper size and orientation, number of copies and resolution for
sending the scanned image as a facsimile transmission. Please read the
Windows manual for details regarding these settings.
● Configured Devices
Select the settings for the scanner (attached to the computer) used with
CanoCraft FS.
The scanner will not operate properly if these settings are incorrect. Ensure
that you confirm that the displayed scanner name corresponds to the
scanner attached to the computer.
The name and SCSI ID of the
scanner attached to the computer
will display if it is correctly attached
and powered up. If the scanner
name is only displayed on the left,
click the [Add] button to copy it to
the right side and click the [Accept]
button.
Click the [Close] button after you have finished adjusting the settings.
123
Appendices
List of Film Types
Please refer to the following list to select the correct film type, ranging from A to
D, to specify in the Exposure Adjustment dialog when scanning with the CanoScan
2700F.
35 mm Film
Film Manufacturer
Fuji
Kodak
Konica
AGFA
Film
HG100
HG400
REALA
REALA ACE
SUPER G100
SUPER G200
SUPER G400
SUPER ACE G100
SUPER ACE G400
SUPER V 100
EKTAR 25
EXTAR 100
GOLD 100
GOLD 400
SUPER GOLD 100
SUPER GOLD 200
SUPER GOLD 400
DD 100
DD 400
IMPRESA 50
JX 100
LV 100
LV 200
LV 400
XG 400
HDC 100
HDC 400
OPTIMA 100
OPTIMA 400
ULTRA 50
XRG 100
XRG 200
XRG 400
XRS 100
XRS 400
Film
Film Type
A
C
B
B
A
B
B
C
C
C
C
A
B
C
B
B
B
D
D
C
C
C
C
C
C
A
D
A
D
A
D
D
D
C
C
Film Type
124
Appendices
IX240 Film
Film Manufacturer
Fuji
Kodak
Konica
AGFA
nexia F
nexia A
nexia H
ADVANTiX 100
ADVANTiX 200
ADVANTiX 400
JX 400
FUTURA 100
FUTURA 400
B
B
B
A
A
A
B
A
B
125
Appendices
Glossary
8-Bit Grayscale Image
An 8-bit image type utilizing only the brightness data from an image,
which is then expressed in black, white and 256 shades of gray.
12-Bit Grayscale Image
An 12-bit image type utilizing only the brightness data from an image,
which is then expressed in black, white and 4096 shades of gray.
24-Bit Color Image
Images scanned as red, green and blue light and reproduced in gradients of
256 tones per color (8-bit). A color image can be expressed in up to 16.7
million color tones (256 x 256 x 256).
35 MM Film
A widely used standard film format. There are several types of film using
this format, including color and monochrome, which also come as a
negative or positive film. Of these, color negatives are the most commonly
used.
36-Bit Color Image
Images scanned as red, green and blue light and reproduced in gradients of
4096 tones per color (12-bit). A color image can be expressed in up to 68.7
billion color tones (4096 x 4096 x 4096). On a computer display no
difference can be discerned between 24-bit and 36-bit color.
IX240
A new film system and format that is compact and easy to use. This system
permits the automatic imprinting of such information as the shooting date/
time and exposure setting and incorporates functions that make it easy to
display images on computers and TVs.
IX240 Film
IX240 film is a format that is smaller than 35 mm film. The film is 24 mm
wide and images are 17 x 30 mm. IX240 negative films are generally
developed and returned to the photographer in the original film cartridge.
126
Appendices
Black and White
An image type utilizing only the highlight and shadow data from an
image, which is expressed in only two tones using the size of dot groupings
and density of either tone to express the image details. There are many
different standard patterns (dither patterns) that can be used to express an
image.
Brightness
The brightness of data scanned from a film. Raising the brightness value
makes an image brighter, lowering it makes it darker.
Color Balance
The balance of color tones in an image. The color balance of an image is
adjusted by changing the relative ratios of red, green and blue or cyan,
yellow, magenta and black.
Color Image
Images scanned as red, green and blue light and reproduced in gradients of
256 tones per color (8-bit). A color image can be expressed in up to 16.7
million color tones (256 x 256 x 256).
ColorGear
A proprietary Canon color management system that produces consistent
coloring between input and output devices, such as a scanner and
computer display.
Contrast
The difference in highlights and shadows when an image is scanned.
Raising the contrast produces a sharply defined image, lowering it
produces a softer, less focused image.
Dither Pattern
The arrangement of dots used to express data converted from the halftone
values of the original image into only two colors, black and white. Dither
patterns using groups of 8 x 8 dots (64) can be expressed as squares, circles,
triangles or other shapes, expressing the details if the image by varying the
size and density of groupings.
Dithering
One method of using only black and white to express halftones. After each
dot of the image has been converted to black or white using the halftone
threshold, the difference in brightness between the original and postconversion image is averaged and applied to the entire image, expressing it
in shadows and highlights.
127
Appendices
Dot
The fundamental element of a letter, object or image, which is arranged in
vertical and horizontal groups. When scanning a film, the number of dots
per inch (dpi) determines the resolution (or density) of a letter, object or
image.
Film Base Color
Color negative film that has been developed has an overall orange tint.
This is called the film base color. This tint is applied to the film to eliminate
unnecessary light and reproduce colors at their best. Each manufacturer
uses a slightly different film base color for each of their products. As a
result, the scanner must compensate for these differences to reproduce
colors faithfully.
Gamma Correction
A setting to make the brightness of image data consistent between the
original film (input value) and the computer display (output value) or any
further output devices, such as a printer. The relationship between the
input and output is called the gamma value. A value of 1 represents output
that equals the input. A gamma value of less than one, indicates that the
output is brighter than the original and values over one indicate that the
output is darker. The graphical representation of the relationship is called
the gamma curve (or tone curve). (p. 65)
Gamma Curve
See gamma correction.
Grayscale
An (8-bit) image type utilizing only the brightness data from an image,
which is then expressed in black, white and 256 shades of gray.
Halftone
Color tones between the extremes of black and white. In black and white
images, halftones are simulated with dithering or diffusion techniques.
Histogram
A graph that shows the distribution of shadows and highlights in an image.
An image file contains data with varying brightness values. The brightness
values range from shadows to highlights, which are assigned values
ranging from 0 to 255.
128
Appendices
Image File
An image that has been expressed as a collection of dots assigned varying
color and brightness values that has been converted into a data format
that can be read by a computer. The fundamental structure of an image file
is a bitmap, the horizontal and vertical arrangement of the dot
information, which is supplemented by other data in popular image
formats, such as the TIFF, JPEG and BMP formats.
Resolution
The density of the dots that comprise an image expressed as a collection of
dots. The fineness or coarseness of an image is expressed as the number of
dots per inch (dpi).
RGB
An acronym for the “three base tones of light,” red, green and blue, used
in varying combinations to reproduce the full spectrum of colors on
monitors and other output devices. The scanner detects red, green and
blue light reflected from the original film with its sensors. Color printers
use the complementary colors to RGB, namely cyan, magenta, yellow and
black (CYMK) to express colors. Cyan, yellow and magenta are referred to
as the “three base tones of color.”
Scan
The process whereby a scanner is used to read information off an original
document or image. In CanoCraft FS, clicking the [Save] or [Scan] button
causes the scanner to scan a film using various settings, such as resolution,
brightness, color balance and special effects, and to save the resulting
image as a file in the specified location.
Threshold
When an image is expressed using only two colors, black or white, the
threshold is the dividing point at which the original data is assigned either
a black or white value.
Tone Curve
See Gamma Correction.
TWAIN
The standard application programming interface for input devices, such as
image scanners. If both the input device and software comply with this
standard, the two are compatible regardless of the manufacturer or model
type.
129
Appendices
Index
Symbols
10-Key Numeric Keypad 21, 105
12-Bit Grayscale 31
24-Bit Color 31
36-Bit Color 31
8-Bit Grayscale 31
A
About 83
Adjust
40, 55, 57, 58, 61, 63, 65, 67, 69, 110
Adjust Button 20
Adjusting a Histogram 58
Adjusting a Tone Curve 65
Adjusting Brightness 55
Adjusting Brightness and Coloring 40
Adjusting Brightness/Contrast 61
Adjusting the Color Balance 67
Adjusting Threshold 69
Adjustment Mode 54
Aspect Ratio 45
B
Black and White 27, 31
Brightness 61
Brightness Setting 105
Brightness Slide Bar 21
Brightness Tab 55, 57, 61
Brightness/Contrast Tab 61
C
CanoCraft FS Close 19
CanoCraft FS Icon 11, 18
CanoCraft FS Program Window 20
CanoCraft FS Remove 118
CanoCraft FS Start 18
CanoCraft FS Uninstall 15, 118
Clear 85
Clipboard 85
Close 99
Close Box 20
Color 31
Color Balance Tab 67
Coloring Setting 55
Coloring Tab 56
Contrast 61
Copy 85
Copy Number Display 21
Copying to the Clipboard 85
Ctrl+C 85
Ctrl+Y 86
Ctrl+Z 86
Custom Resolution Setting Dialog 33
D
Despeckle 89
Document Size 32, 102, 110
Dragging 42, 44
E
Easy Adjust Mode 54
Edges 91
Edit 23
Effect 24
Expert Adjust Mode 54
Exposure 70, 109
130
Appendices
F
Fax 79
Fax Properties Dialog 80
Fax Setup 80
File 23
File Type 47
Film manufacturers 124
Film Type 109
Film type 124
Find Lines 92
Flip 39
Focus 72, 109
Free Disk Space 15
G
Gamma Value Tab 63
Gamma Values 63, 64
Grayscale 27
H
Halftone 96
Help 24, 25
Help Button 20, 21, 25
Highlights 57
Histogram Tab 58
M
Magnification 22, 32, 36
Menu Bar 20, 23
Menu Commands 23
Mouse Cursor 38, 41
N
Noise 89
Number of copies 105
O
Open 97
Output Magnification 102
Output Magnification Box 33, 35
Output Magnification/Scan Resolution
20, 43, 44
Output Resolution 22, 32, 34, 36, 43
Output Resolution Settings 34, 35
Output Resolution Settings Dialog 34
Output Size 20, 44
Output Size/Units 43
I
Image 24
Image Format 31
Image in the Preview Window 99
Image Type 22, 30
Image Type Button 21
Installing CanoCraft FS 15
Invert 90
L
Lines 92
Lock Button 20, 42, 43
Low Relief 95
131
Appendices
P
Paper size 106
Pixelate 93, 94
Pop-Up Menu 22
Positioning Documents 29
Preferences 74, 110
Auto Eject 74
Color Matching 75
DIalog 74
Save Preview Image 74
Settings 74
Single Scan 74
Preview Button 20
Preview Window 20, 37
Print 77
Print Dialog 77
Printer Selection Button 21
Printer Setup 78, 107
Printer Setup Button 21
Printing 77
Progress Bar 37
Pull-Down Menu 20, 23
R
Redo 86
Reset Button 21
Resetting Default Settings 76
Resolution 33
RGB Values 20
Rotating the Image 39
S
Save 46
Save As 98
Scan 46
Scan Area 41
Scan Resolution 22, 32, 33, 108, 109
Scan Resolution Setting 33
Scanner Settings 108
Scanner Setup Button 21
Scanning Procedures 27
Selecting the Scanner 81
Selection Frame 43, 44
Self-Test 82
Sending a Fax 79
Settings 23, 107
Settings Button 20
Settings Display Area 20, 22
Shadow 57
Sharpen 87
Soften 88
Specifications 111
Start 101
Start Button 21
Starting CanoCraft FS 18
Stop Button 21, 105
T
Text 32
Threshold 69
Threshold Tab 69
Title Bar 20, 21
Tone Curve 65
Tone Curve Tab 65
TWAIN- Compliant Application 19
U
Undo 86
Undo All 86
V
Version Data 83
Version Information 110
W
Windows Desktop 18
Z
Zoom Cancel Button 20
Zoom In Button 20
Zoom Out Button 20
132
Appendices
Customer Support Help Desk
CANON (UK) LTD.
Canon House, Manor Road, Wallington, Surrey SM6 0AJ, United Kingdom
For technical support, please contact Canon Helpdesk.
Helpdesk:
P.O. Box 431, Wallington, Surrey SM6 0XU
TEL: (0990) 143 723 (Calls may be recorded.)
FAX: (0990) 143-340
BBS: (0990) 143-350
For sales equiries: (0121) 666-6262
CANON FRANCE S.A.
17, quai du Président Paul-Doumer
92414 Courbevoie Cedex, France
Tél.01 4199 7777
Fax.
01 4199 7951
Hotline:
Tél.01 4199 7070
CANON DEUTSCHLAND GmbH
Europark Fichtenhain A10, 47807 Krefeld, Postfach 528, 47705 Krefeld, Germany
TEL: 02151/345-0 FAX: 02151/345-102
CANON- Hotline-Service
Customer Support: 02151/349-555
Info-Desk: 02151/349-566
Mailbox: 02151/349-577
Telefax: 02151/349-588
CANON ITALIA S.p.A
Palazzo L, Strada 6, 20089
MilanoFiori-Rozzano (MI), Italy
TEL: 02/8248. 1
FAX: 02/8248. 4604
Pronto Canon 02/8249. 2000
http://www.canon.it
CANON OY AB
Kornetintie, 3, 00380 Helsinki, Finland
Tel: 010 544 20
Help Desk: 0600-0-22606
Fax: 010 544 4382
133
Appendices
CANON SVENSKA AB
S-127 88, Skärholmen, Sweden
BRUHN A.S.
Vasekær 12, DK-2730 Herlev, Denmark
Hotline: 44 88 26 66
http://www.canon.dk
CANON NORGE AS
Hallagerbakken 110, Boks 33, Holmia 1201 Oslo 12, Norway
Tlf: 2262 9321
FAX. 2262 0615
CANON BENELUX NEDERLAND B.V.
Neptunusstraat 1, 2132 JA Hoofddorp
The Netherlands
CANON BENELUX BELGIUM N.V./S.A.
Bessenveldstraat 7, 1831 Diegem, Belgium
CANON GmbH
Zetschegasse 11, 1232 Wien, Austria
CANON (SCHWEIZ) A.G.
Industriestrasse 12, CH-8305 Dietlikon
Switzerland
Tel: 01/83561 61
Fax: 01/835 68 60
Hotline: 157 30 20
CANON ESPAÑA S.A.
C/Joaquin Costa No 41, 28002 Madrid, Spain
Teléfono de attención al cliente: 901-301301
Tel.: 91-5384500
Fax.: 91-4117780
CANON AUSTRALIA PTY. LTD.
1 Thomas Holt Drive, North Ryde, Sydney N.S.W. 2113, Australia
Info-Line: (02)9805 2864
134
Appendices
CANON NEW ZEALAND LTD.
Fred Thomas Drive, Takapuna, P.O. Box 33-336 Auckland, New Zealand
Info-Line: 0900-522666
CANON HONG KONG CO., LTD.
10/F, Lippo Sun Plaza, 28 Canton Road
Tsimshatsui, Kowloon, Hong Kong
CANON SINGAPORE PTE. LTD.
79 Anson Road #09-01/06, Singapore 079906
CANON LATIN AMERICA, INC.
6505 Blue Lagoon Drive Suite 325, Miami Florida 33126, U.S.A.
CANON EUROPA N.V.
Bovenkerkerweg 59-61, P.O. Box 2262
1180 EG Amstelveen, The Netherlands
CANON INC.
30-2 Shimomaruko 3-chome, Ohta-ku
Tokyo 146-8501, Japan
© CANON INC. 1998
CREATED IN JAPAN