1
Canon EOS 620-650
Camera Manual
POSTED 12-5-02
This is the full text and images from the manual. This may take 3 full minutes for all images to appear. If they
do not all appear. Try clicking the browser "refresh" or "reload button".
This camera manual library is for reference and historical purposes, all rights reserved.
This page is copyright© by
, M. Butkus, N.J.
This page may not be sold or distributed without the expressed permission of the producer
I have no connection with any camera company
If you find this manual useful, how about a donation of $4 to:
M. Butkus, 29 Lake Ave., High Bridge, NJ 08829-1701
and send your E-mail address too so I can thank you.
Most other places would charge you $10.50 for a electronic copy
or $20.00 for a hard to read Xerox copy.
This will allow me to continue to buy new manuals and maintain these pages.
It'll make you feel better, won't it?
If you use Pay Pal, use the link below. Use the above address for a check, M.O. or cash.
To main Chinon/Ricoh manual site
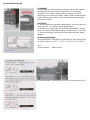
Introduction
Thank you for purchasing the Canon EOS 620/650. Designed with the most advanced and innovative technology
available, this high performance AF/AE SLR camera with a built-in motor drive offers you genuine, creative
freedom and picture-taking ease.
Enjoy Taking Photos More Comfortably
This is EOS' design theme. The EOS 620/650 has brilliantly made it come true thanks to the high speed, precise
auto-focus system and the built-in motor drive capable of winding film up to three frames per second which
maximizes your potential.
Needless to say film speed setting and film transportation have been completely automated. A few of the many
features of the EOS 620/650 are the evaluative metering function (Factor 6 light analysis system) in which the
camera automatically recognizes subject pattern and its size so correct exposure can be obtained in backlit
situations, and the intelligent program AE mode which selects the ideal program line according to the
characteristics of the lens in use.
In addition, your photographic options are further expanded by exclusive accessories such as the Speedlites
420EZ and 300EZ that respond to a wide range of illuminations from dark surroundings to fill-in flash, the
Quartz Date Back E that imprints data, and the Technical Back E that memorizes exposure control data.
For a full understanding of the EOS 620/650, please read this instruction booklet carefully before using the
camera.
While reading these instructions unfold the front and back flaps of this booklet for easy reference to the camera
s parts.
EOS" is derived from "Electro-Optical System" originating from the completely electronic data communication
between the camera and lens. Further, "EOS,' is the Goddess of Dawn in Greek mythology--heralding the new,
genuine AF system generation.
``EF" lens stands for ..Electro-Focus" and adopts the lens-integral auto focus system which uses special motors
to make precise and high-speed auto focusing possible whatever the lens focal length.
Table of Contents
Preliminary Preparations
1. Attaching the Lens 6
2. Loading the Battery 8
3. Checking the Battery 9
4. Loading the Film 10
[Automatic Film Speed Setting] 12
Basic Steps
1. Setting the Main Switch to the "Full Auto" Position 14
2. Holding the Camera 15
3. AF Focusing 16
4. Exposure 17
[Display Panel Illumination] 18
5. Automatic Film Rewind 19
[Rewinding Mid-Roll] 20
Making the Most of Your EOS 620/650
1.
2.
3.
4.
Main Switch Functions 22
Setting the AF Mode 24
Setting the Film Winding Mode 26
Setting the Shooting Mode 27
(1) Program AE 28
(2) Program Shift Function 30
(3) Shutter-Priority AE 32
(4) Aperture-Priority AE 34
[Depth of Field] 36
(5) Depth of Field AE 38
(6) Manual 42
5 Partial Metering 44
6. Exposure Compensation 46
7. Auto Exposure Bracketing 48
8. Multiple Exposures 52
9. Difficult Subjects for Auto-focus 54
10. Manual Focusing 56
Other Shooting
1.
2.
3.
4.
Self-timer Photography 58
Dedicated Flash Photography 60
Bulb [Long Exposure] 63
Shooting with Infrared Film 64
Accessories 65
Caring for Your Camera 72
Other Notes 73
Appendix 74
Specifications 82
Carrying the Camera 87
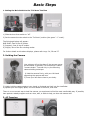
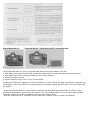
1. Attaching the Lens
1) Turn the rear lens cap in the direction of the arrow until it stops and remove it from the lens.
· To attach the rear lens cap, align its ''O'' mark with the red dot on the lens. Then lightly push it in and turn it
clockwise until it stops.
2) Turn the body cap counterclockwise and remove it.
· To attach the body cap, align its "o" mark with the camera's red dot, then turn the cap clockwise.
3) To mount the lens, align the lens mount positioning point with the camera's red dot.
4) Then turn the lens clockwise until it stops and the lens is locked with a click.
· To remove the lens, turn it counterclockwise while pressing the lens release button.
5) Remove the front lens cap.
CAUTION
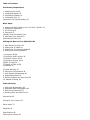
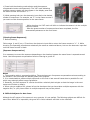
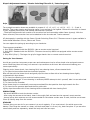
2. Loading the battery
1) Remove the grip with a coin or similar object.
2) As shown in the photo, load the battery so that its terminals face in the direction of the camera. Make sure
the battery is pushed in all the way until it is locked by the orange lever
3) Replace the grip securely.
· When replacing the battery, first push the orange lever upward to remove the dead battery.
· When using a tripod, dismount t the camera before replacing the battery.
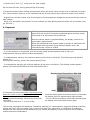
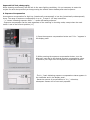
3. Checking the Battery
1 ) Set the main switch to the green "Go", "A" or "(-)"mark. The
display will come on at this time. If the display does not appear,
confirm that the battery is loaded correctly.
2) Open the switch cover on the back of the camera and press the battery check
button(
). Battery power shows in the display panel.
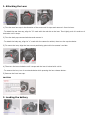
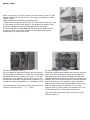
4. Loading the Film
1) To open the back cover, push the back cover latch down while pressing the back cover lock button
2) Insert the upper-flat end of the film cartridge into the film chamber first. The film-load check mark (OIL)
appears in the display panel.
3) Pull the film leader across the shutter curtain until its tip is aligned with the orange index.
CAUTION
* Before loading the first roll of film, remove the plastic insert.
* NEVER touch the shutter curtain. Its high-precision design makes it sensitive to
pressure. Also, when loading the film be careful that the film leader does not touch
the shutter curtain.
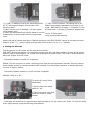
4) Make sure that the film has no slack and that its perforations are properly engaged with the sprocket teeth.
5) Close the back cover. The camera advances the film automatically and stops when "1" appears in the frame
counter in the display panel.
6) During film advance, the film transport bars will appear at the bottom of the display panel moving in
sequence from left to right. However, if the film does not advance correctly, the bars blink after the camera has
stopped and the shutter will. not release. Reload the film.
If the film leader extends past the orange index, take out the film cartridge and manually rewind the excess film
back into the cartridge.
Film becomes soft and tears easily in high humidity. Keep it stored in its canister until loading.
Automatic Film Speed Setting
The camera automatically sets film speed by sensing the DX code marked on the film cartridge. (ISO 25 - 5000
according to DX code standard)
1. The automatically-set film speed will appear in the display panel while the film advances to the first usable
frame.
2.. When using film without a DX code, set the speed manually by following these steps: (ISO6-6400).
1 ) Set the main switch to either "A" or " ((*)) ".
2) Open the switch cover, and press both the blue and yellow buttons at the same time to display the ISO film
speed number.
3) Turn the electronic input dial until your film speed displays.
· Once the buttons are depressed, you can remove your fingers because the ISO display is held on for
approximately eight seconds. To clear this status within eight seconds, press the shooting mode selector.
· The previously set film speed appears and blinks in the display panel to warn you if the film speed has not
been set. Always be sure to set the correct film speed, because the warning stops after film speed setting.
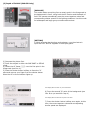
Basic Steps
1. Setting the Main Switch to the "Full Auto" Position
1) Slide the lens focus switch to "AF"
2) Set the camera's main switch to the "Full Auto" position (the green " 0 " mark).
The following displays will appear:
ONE SHOT: One of the AF modes.
P (Program): One of the AE modes.
S (Single): One of the film winding modes.
For further details on the above displays, please refer to pp. 24, 26 and 27.
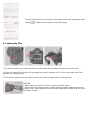
2. Holding the Camera
Your pictures will not be sharp if the camera moves
as the shutter is pressed. This movement is called
"camera-shake." To avoid this, try the following
camera-holding technique:
1) Hold the camera firmly, with your left hand
supporting the camera and lens.
2) Press your left elbow close to your body.
3) Lightly hold the camera against your cheek or forehead and look into the viewfinder.
4) Spread your feet slightly apart, one foot ahead of the other, and relax.
There is no one correct way to hold the camera, so experiment to find the most comfortable way. If possible,
lean against a steady support such as a tree, wall, or table to help you keen the camera still.
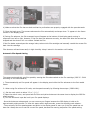
3. AF Focusing
1) Center the AF from ('[ ]" mark) over the main subject.
Do not touch the lens' moving parts during AF focusing.
2) Press the shutter button halfway and automatic focus (AF) starts. When correct focus is obtained, the green
AF in-focus indicator lights up in the viewfinder and the AF focus signal (short electronic beeper tone) sounds.
· Original focus remains locked, even if the subject or focusing distance changes as long as the shutter button is
held halfway.
· When AF is impossible, the green AF in-focus indicator will start blinking and the shutter will not release. (see
pp. 54 to 56.)
4. Exposure
1) Gently press the shutter button halfway to check the exposure.
Exposure will be correct if the shutter speed and aperture values remain
continuously lit at the bottom of the viewfinder.
· Once the shutter button is pressed halfway, the display is held on for
approximately eight seconds.
· When the automatically-set shutter speed is too slow to hand-hold, the
camera-shake warning sounds (long electronic beeper tone). We
recommend using a tripod or a flash.
· If correct exposure is not possible, both the shutter speed and the aperture blink to warn you.
Underexposure warning--Switch to flash photography.
· In underexposure warning, the maximum aperture of the lens in use blinks. (The blinking shutter speed is
always 30".)
Overexposure warning--Use an ND (neutral density) filter.
· In overexposure warning, the minimum aperture of the lens in use blinks. (The blinking shutter speed is
always 2000 with the EOS 650 and 4000 with the EOS 620.)
Display Panel Illumination (EOS 620
Only)
2) Compose the picture and while continuing to hold
down the shutter button gently press the shutter
button completely to take the picture.
· The camera automatically advances the film to the
next frame.
· Set the main switch to "L" to turn off the
Press the display panel illumination button to illuminate
the display panel for approximately eight seconds.
· To turn off the illumination within eight seconds press
the display panel illumination button again.
This camera is equipped with advanced "evaluative metering" so it automatically recognizes lighting conditions,
subject pat" tern, and even subject size in the picture area. Even when there is a difference in brightness
between the main subject and the background (e.g. backlit photography), correct exposure can be obtained
without exposure compensation.
5. Automatic Film Rewind
The film automatically rewinds at the end of the
roll.
1) During rewind the film transport bars move in
2) Film rewind stops automatically when the film has
sequence from right to left to indicate the function in
been completely rewound. Open the back cover when
progress while the frame counter counts in descending the film-load check mark(~) blinks.
order.
3) Remove the film cartridge.
Press the film rewind button (~) to rewind before the
roll ends. The function begins immediately.
Making the Most of Your EOS 620/650
Detailed explanation of other modes to make picture-taking fun.
1. Main Switch Functions
The main switch has four positions.
A (ON): Activates the camera. (The electronic beeper
L (OFF): Turns off the camera. Be sure to set at this
tone does not sound at this position.)
position to prevent accidental shutter release when not
in use.
((*)) (ON): In addition to being the same ON position
as "A", the electronic beeper tone sounds in the
following cases;
1) When correct focus is obtained. - AF focus signal
(short beeper tone)
2) When the automatically-set shutter speed is too slow
to hand-hold.--Camera-shake warning (long beeper
tone)
[ ] (ON): Full auto position. The setting will be as
follows automatically regardless of the mode. 1) AF
mode - ONE SHOT 2) AE mode - P (Program) 3) Film
winding mode - S (Single) 4) Electronic beeper tone
-short; AF focus signal
-long; camera-shake warning
Various AE and AF modes described in "Making the Most of Your EOS 620/650" cannot be set when the main
switch is at the " [ ] " position. Make sure the main switch is set to "A" or" ((*)) " position.
2. Setting the AF mode
This camera has two AF modes and the manual focus mode.
ONE SHOT: Normal set position. The lens stops moving once focus has been obtained. As long as the shutter
button is kept pressed halfway, the original focus and exposure remain locked. This mode is useful when you
want your subject to be off-center.
· The shutter releases only after AF completion.
SERVO: The lens continues to rotate, refocusing every time the focusing distance changes. Use this mode to
freeze subject motion at a certain moment while following a moving subject. Exposure is determined at the
moment of shutter release.
· The shutter releases whether or not AF has been completed.
MANUAL: Refer to p. 56.
To set the AF mode, follow
these steps:
1) Set the lens focus mode
switch to "AF."
2) Open the switch cover and
press the yellow AF mode
selector.
· The display will be held on for approximately eight seconds so you can remove your finger. To clear this status
within eight seconds, press the shooting mode selector.
3) Turn the electronic input dial to select either
"ONE SHOT" or "SERVO"
3. Setting the Film Winding Mode
This camera has two automatic film winding modes.
S: Single exposure. The film automatically advances to the next frame upon shutter release.
C: Continuous exposure. Keep pressing the shutter button and the film winds continuously at the maximum
speed of approximately three frames per second.
**image missing: Self-timer position. (see p. 58)
To set the film winding mode, follow these steps:
1) Open the switch cover and press the blue film winding mode
selector.
· The display will be held on for approximately eight seconds so you
can remove your finger. To clear this status within eight seconds,
press the shooting mode selector.
2) Turn the electronic input dial to set either "S" or "C" in the display panel.
4. Setting the Shooting Mode
To set the shooting mode, press the shooting mode
selector while turning the electronic input dial until the
desired mode appears. (The display moves in the
following cycle.)
· Once the shutter button is pressed halfway, the
display will be held on for approximately eight seconds.
To clear this status within eight seconds, press the
shooting mode selector.
AF can be done with the Canon Circular Polarizing Filter
PL-C. When using a linear polarizing filter, use manual
focusing. (see p.56)
(1 ) Program AE
[Purpose]
The camera automatically sets shutter speed/ aperture
combinations according to subject brightness. This
mode particularly suits first-time SLR users or those
who prefer to concentrate on picture composition or
candid snapshots.
[SETTING]
While pressing the shooting mode selector, turn the
electronic input dial until "P" appears in the display
panel.
When the automatically-set shutter speed is too slow to hand-hold,
the camera will sound a long beeper tone to warn you. We
recommend using a tripod or flash.
The camera selects the ideal program line according to the
characteristics of the lens in use, i.e., the maximum or minimum
aperture and lens focal length. This is referred to as "Intelligent
Program AK." For further information on the program line, please
see pp. 79 and 80.
This program AE mode has the same characteristics as the one
selected when the main switch is set to the green " [ ] " mark (see
p.14). However, the "ONE SHOT" AF and "S" film winding modes are
automatically set so use the setting described on this page when
you want to use the "SERVO" AF mode or "C" film winding mode.
(2) Program Shift Functions (EOS 620 Only)
[PURPOSE]
With the EOS 620, you can change the automatically-set shutter speed/aperture combinations of the program
AE mode. This function is particularly useful when you need a specific shutter speed or aperture while shooting
in the program AE mode.
Be sure to set the main switch to the "A" or "(' ')" position. (At the green " [ ] " position, the program shift
function cannot be used.
[SETTING]
Simply turn the electronic input dial until the desired shutter speed or aperture value appears after pressing the
shutter button halfway to meter the subject. For example, when you need a fast shutter speed suddenly to
freeze a fast-moving subject while shooting in the program AE mode, turn the electronic input dial to set a fast
shutter speed such as 1/500 second.
· Once the shutter button is pressed halfway, you can remove your finger because the display will be held on for
approximately eight seconds.
· After shutter release, the program shift function
automatically clears.
· The program shift function cannot be used in flash
photography.
· For further information on the program shift
characteristics, please see p.81
(3) Shutter-Priority AE
[PURPOSE]
In this mode the shutter speed is manually set and the camera
automatically chooses the correct aperture for the lighting
conditions. This mode is best for taking pictures of moving
subjects by con trolling the shutter speed. Faster shutter speeds
freeze subject motion while slower shutter speeds can produce
artistic blur effects.
[SETTING]
1) While pressing the shooting mode selector, turn the electronic
input dial until "TV" appears in the display panel.
2) Remove your finger from the shooting mode selector. At this
point, the initial shutter speed setting is always 125 (1/125 see).
3) Turn the electronic input dial until the desired shutter speed
appears.
Shutter speed display
4000 3000 2000 1 500 1000 750 500 350 250 180 125 90 60 45
30 20 15 10 8 6 4 3 2 0"7 1" 1"5 2" 3" 4" 6" 8" 10" 15" 20 30"
Note
4000 and 3000 .... EOS 620 only
The "camera-shake" warning does not sound in shutter-priority AE.
(4) Aperture-Priority AE
[Purpose]
In this mode, the aperture is set manually and the camera chooses
correct shutter speed for the blighting conditions (the opposite of
shutter-priority AE). Use this mode for portraits, landscapes and
still-life photography where depth of field is an important factor.
(see p. 36)
[SETTING]
1) While pressing the shooting mode selector, turn the electronic
input dial until "Av" appears in the display panel.
2) Remove your finger from the shooting mode selector. At this
point, the initial aperture setting is always 5.6 (f/5.6).
3) Turn the electronic input dial until the desired aperture value
appears.
When the automatically-set shutter speed is too slow to hand-hold,
the camera-shake warning sounds. We recommend using a tripod.
Depth of Field
When your subject is in focus, there is a certain area in front of it and
behind it which will also be in focus. This range of sharpness is called
"depth of field".
Depth of field has the following characteristics:
1) The smaller the aperture, the wider the depth of field and vice versa.
2) The shorter the lens focal length is, the greater the depth of field,
provided that aperture and shooting distance are the same.
3) The farther the shooting distance, the greater the depth of field..
4) Depth of field is generally greater in the background than the
foreground by a ratio of two to one.
To check the depth of field (1)
Push the depth-of-field check button and the camera
will stop-down the aperture to either the automaticallycalculated value (e.g. shutter-priority AK), or the one
set manually (e.g. aperture priority AK). As you look
through the viewfinder with the button pushed in, you
can see the range of sharpness, i.e. the depth of field.
It is impossible to check depth of field when the main
Twitch is set at the green " " [ ] " " mark
To check the depth of field (2)
Press the shutter button halfway and note the aperture
value. Find the two aperture values on the depth-offield scale on the lens which correspond to that value.
Then draw imaginary lines from those two values to the
distance scale. The effective depth of field lies between
those two distances. For example, using a standard
50mm lens focused at 5m with the aperture set at f/11,
depth of field extends from approx. 2.7m to 10m
(approx. 8.8ft to 32.8ft) away. Any subject from 2.7m
to 10m away will be in reasonably sharp focus.
There are some lenses which have no depth-of-field
scale so follow (1).
(5) Depth of Field AE (EOS 650 Only)
[PURPOSE]
This mode makes everything from a certain point in the foreground to
the background in focus, using both the AF function and the depth of
field. The camera automatically sets the correct aperture value and
corresponding shutter speed for the lighting conditions. Use this mode
for landscapes and large-group commemorative shots.
[SETTING]
1) While pressing the shooting mode selector, turn the electronic
input dial until "DEPTH" appears in the display panel.
2) Compose the picture first.
3) Focus the subject in either the ONE SHOT or SERVO
mode.
4) Center the AF frame ("[ ]") over the first point in the
foreground (see illus. A).
5) Press the shutter button halfway to focus the "A"
point and remove your finger from the shutter button
when the AF in-focus indicator lights up.
The display after the first "A'' point is focused.
6) Focus the second "B" point of the background (see
illus. B as you would for step 4)
The display after the second "B" point is focused.
7) Press the shutter button halfway once again. At this
time, the correct aperture value and corresponding
shutter speed are displayed.
8) Gently press the shutter button completely to take
the picture.
When shooting continuously, it is not necessary to focus the same subject again provided you keep pressing the
shutter button halfway after exposure. (To clear, press the shooting mode selector after you remove your finger
from the shutter button.)
[VIEW FINDER INFORMATION]
Correct exposure- Exposure will be correct if continuously lit values display.
Underexposure - Both the shutter speed of 30" and the lens maximum aperture start blinking.
Overexposure - Both the shutter speed of "2000" and the lens minimum aperture start blinking; use an ND
filter.
If it is impossible to get the distance range in focus, the lens minimum aperture value will start blinking.
Exposure, however, will still be correct and you will get the best results under the existing shooting conditions.
(see helpful hints on p. 41)
[Helpful Hints]
1. Move back from the subject and follow steps 2 through 7 again. If
the minimum aperture stops blinking, the distance range will be in
sharp focus and the exposure will be correct.
2. Use a wide-angle lens (or wide-angle side when using a zoom lens)
and follow steps 2 through 7 again. If the minimum aperture stops
blinking, the distance range will be in sharp focus and the exposure will
be correct.
· When you try to focus extremely near and far points the automatically-set shutter speed will be comparatively
slower and the long beeper tone will sound to warn you of camera-shake. Hold the camera steady or use a
tripod.
· When using a zoom lens, do not change the lens focal length after focusing the first point Always be sure to
compose the picture first.
· It is advisable to use a wide-angle lens to obtain maximum depth-of-field effect. (A lens focal length of more
than 200mm is not recommended when you want maximum depth of field.)
· Depth of field will be shallow if two points are focused at the same shooting distance. When you want to take a
portrait, a telephoto lens is recommended to strengthen the shallow effect.
· In depth of field AE, exposure is determined at the moment of shutter release even if the AF mode is set at
ONE SHOT. (see p:24)
· Depth of field AE cannot be used in flash photography.
· Press the shooting mode selector to clear the depth of field AE while operating.
(5) Manual Override
[PURPOSE]
This creative mode allows you to control exposure by setting both
the shutter speed and aperture.
[SETTING]
1) While pressing the shooting mode selector, turn the electronic
input dial until "M" appears in the display panel.
2) Remove your finger from the shooting mode selector.
· At this point, the initial setting is always 1/125 sec. at f/5.6.
3) Turn the electronic input dial to set the desired shutter speed.
4) Press the manual aperture set button.
· At this point, " OP ", " 00 ", or " CL " lights up instead of the shutter speed. (The aperture value remains
unchanged.) The meaning of each display follows:
5) While pressing the manual aperture set button, turn the
electronic input dial until " 00 " displays. The corresponding
aperture value displays.
6) Remove your finger from the manual aperture set button.
7) Determine the exposure referring to the shutter speed/aperture
combination. You must rely on your own experience for setting the
exposure.
· Set a slower shutter speed if "OP" remains lit when the electronic input dial is turned to the lens maximum
aperture.
· Set a faster shutter speed if "CL" remains lit when the electronic input dial is turned to the lens minimum
aperture.
· The camera-shake warning does not sound in the manual mode.
5. Partial Meeting
This camera has an evaluative metering function which allows you to obtain the correct exposure without
exposure compensation in normal backlit photography (see p. 18). Use the partial metering mode, however, for
stage photography where there is a big difference in brightness between the main subject and the background,
and when you want to control the exposure.
· The partial metering mode can be used regardless of the camera's mode, except when the main switch is set
to the full auto position ( 0 ).
· The partial metering area is approximately 6.5% of the picture area.
· The AE lock mechanism automatically works in the partial metering mode.
AE lock:
The original exposure value remains locked as long as the
shutter button is pressed halfway, so even if you recompose
the picture, correct exposure on the main subject will not be
affected by changes in fighting conditions.
1) Put the main subject in the center and cover with the partial
metering mark.
2) Press the shutter button halfway.
3) While pressing the shutter button halfway, press the partial
metering button. (In the manual override, however, press the
partial metering button while pressing the manual aperture set
button.)
· A green asterisk ("*") indicating that the partial metering
mode and the AE lock are on appears in the viewfinder.
· You can remove your finger from the partial metering button
if you keep pressing the shutter button halfway.
4) Compose the picture while continuing to hold down the
shutter button, then press the shutter button completely to
take the picture.
Sequential AE lock photography
When shooting continuously with AE lock in the same lighting conditions, it is not necessary to meter the
subject for each shot provided you keep pressing the shutter button halfway after each exposure.
6. Exposure Compensation
Use exposure compensation for high-key (intentionally overexposed) or low-key (intentionally underexposed)
shots. The range of exposure compensation is up to _5 steps in 1/2-step increments.
· "+" means increasing exposure while "--" means decreasing exposure.
· Exposure compensation can be used regardless of the metering or shooting mode, except when the main
switch is set to the full auto position ( O )
1) Press the exposure compensation button and "0.0+-" appears in
the display panel.
2) While pressing the exposure compensation button, turn the
electronic input dial to the desired exposure compensation value.
3) Remove your finger from the exposure compensation button.
· The"+/-"mark indicating exposure compensation status appears in
the viewfinder and in the display panel.
· Reset the amount of compensation to "0.0_" otherwise,
subsequent frames will be incorrectly exposed.
7. Auto Exposure Bracketing (EOS 620 Only)
Use auto exposure bracketing when you want to choose the best exposure by changing the amount of exposure
on film intentionally. The range of bracketing is up to +/- 5 steps in 1/2-step increments.
1) Open the switch cover and press both the AF mode selector and battery check button simultaneously to
display the 0.0 and "AEB" indicating auto exposure bracketing.
· Once the buttons are depressed, you can remove your fingers because the 'AEB" display is held on for
approximately eight seconds. To clear this status within eight seconds, press the shooting mode selector.
2) Turn the electronic input dial to the desired bracketing value.
· If you set 1.0 in the display panel, for example, the camera automatically makes three continuous exposures
in sequence of -1.0 step of underexposure, correct exposure according to the camera's meter and +1.0 step of
overexposure. Then the auto exposure bracketing status automatically clears.
Notes
1. Three continuous exposures are automatically made regardless of the film winding mode.
2. The original focus remains locked during three continuous
exposures regardless of the AF mode.
3. To clear auto exposure bracketing before shooting, display the
"AEB" and preset bracket value again by following step 1) above,
then turn the electronic input dial until the bracket value returns to
0.0. (Clearing auto exposure bracketing is impossible while
shooting.)
4. Bulb cannot be used with auto exposure bracketing.
5. Auto exposure bracketing is impossible with a flash.
(Auto Exposure Bracketing Continued)
Helpful Hints
1. Use the exposure compensation function if, for example, you want particular overexposing-bracket exposures
such as +/- 0.5, + 1.5 and + 2.5.
Example:
1) Set auto exposure bracketing value to 1.0--( - 1.0,
+/- 0, + 1.0).
2) Set the exposure compensation value to + 1 .5.
The result will be three continuous exposures in
sequence of + 0.5, + 1.5 and +2.5.
2. With the Technical Back E, auto exposure bracketing can be done up to nine exposures in 1/4-step
increments.
8. Multiple Exposures (EOS 620 Only)
The EOS 620's provision for multiple exposures allows you to take
two or more exposures on the same frame for a creative effect.
Preset multiple exposures up to nine frames with the single
operation of the electronic input dial are possible.
1) Press both the shooting mode selector and the exposure
compensation button simultaneously. The "ME" mark indicating
multiple exposure status will then appear in the display panel and
the frame counter will become " 1".
2) While pressing both turn the electronic input dial to the desired
number of exposures. For example, set "3" on the frame counter if
you want to make three exposures on the same frame.
· While shooting, the "ME" mark will blink to indicate the camera is in the multiple
exposure status.
· After the preset number of exposures have been completed, the film
automatically advances to the next frame.
[Clearing Preset Exposures]
1. Before shooting
Follow steps 1) and 2) on p. 52 and turn the electronic input dial to return the frame counter to "1". 2. While
shooting The operating procedures are basically the same as mentioned above, but turn the electronic input dial
until the frame counter is blank.
[Exposure Compensation]
It is necessary to correct the exposure depending on the situation because the same frame is exposed several
times. Use the exposure compensation function referring to pp.46-47.
Notes
1. The preceding table is a general guideline. The actual amount of exposure compensation varies according to
the situation. Your technique will benefit greatly from practice.
2. It is not advisable to make multiple exposures on the first or last several frames due to possible film curl
which may adversely affect image registration.
3. Generally, the first exposure of a series should be a relatively dark subject so that the image in the next
exposure will show up clearly.
4. When using a negative film, please inform the developer that you have taken multiple exposures with the
negative film, or your picture taken in multiple exposure may not be printed.
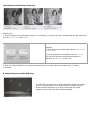
9. Difficult Subjects for Auto focus
Although the AF system of the camera is very accurate, it is not perfect. The following subjects are difficult for
auto focus. When AF is impossible, the green AF in-focus indicator will blink in the viewfinder
(Focus)
Focus these subjects as follows:
1. Auto focus a substitute subject at the same distance from
the camera as your main subject, and then recompose the
picture (A)
2. Hold the camera vertically and focus the subject using
auto-focus then recompose the picture (C)
3. Manually focus the subject following the steps on the next
page.
10. Manual Focusing
1) Slide the lens focus mode switch to "M".
· The panel display automatically changes to "M.
FOCUS" and the AF mode cannot be set.
2) Turn the lens manual focusing ring and focus your
subject using the matte-surface.
· The subject is in focus when the image is not fuzzy.
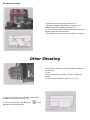
Other Shooting
The self-timer allows you to delay shutter release for
ten seconds.
To set:
1) Put the camera on a table, tripod, or other flat
surface.
2) Set the main switch to either "A" or "((*))"
3) Open the switch cover and press the blue film
winding mode selector (see p. 26).
4) Turn the electronic input dial until "
appears in the display panel.
" mark
5) Focus the subject in either the ONE SHOT or SERVO mode.
6) Make sure the exposure is correct and then press the shutter
button. The self-timer operation indicator will start blinking and the
frame counter displays the countdown.
· The shutter automatically releases ten seconds after being pressed.
Two seconds before shutter release, the indicator starts blinking faster.
· To cancel the self-timer before shutter release, press the battery
check button.
· Do not stand in front of the camera when you press the shutter
button.
If your eye will not be at the viewfinder when you press the shutter
button, cover the viewfinder as shown to prevent stray light from
entering at the rear, using the viewfinder cover attached to the neck
strap shoulder pad.
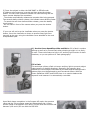
(1) Use the Canon Speedlites 420e and 300 as fill-in flash in outdoor
settings as well as for normal flash when shooting at night or in a dimlylit room. These units feature a built-in AF auxiliary light function for dark
situations, so you can perform AF flash photography.
Fill in flash:
This technique utilizes a flash unit as an auxiliary light to prevent subject
underexposure In backlit situations. Generally, the exposure level
between the main subject illuminated by the flash and the background in
ambient light must be balanced to avoid unnatural effects. With the
Canon Speedlites 420EZ and 300EZ there is no need to balance this
exposure level because it is automatically controlled.
Upon flash charge completion in the Program AE mode, the aperture
value and the X-sync shutter speed are automatically set. X-sync
shutter speed is set between 1/60 and 1/125 sec with the EOS 650 and
between 1/60 and 1/250 sec with the EOS 620.
Please consult the Speedlite's instruction book for further details.
(2) Other Canon Speedlites
Follow the steps below for automatic flash photography:
1) Set the camera's shooting mode to "M".
2) Set the desired X-sync shutter speed between 30 and 1/125 sec with the EOS 650 and between 30 and
1/250 sec with the EOS 620.
· If the shutter speed is faster than 1/125 see (EOS 650) or 1/250 see (EOS 620), it is automatically set to
1/125 sec (EOS 650) or 1/250 sec (EOS 620).
3) Set the aperture on the flash.
4) Set the same flash aperture on the camera.
· When using the 300TL, set the flash mode set button to A-TTL or FEL for TTL automatic flash photography.
· Do not use the 277T and 299T in the "PROGRAM" mode. Be sure to set the flash to "F. NO. SET" mode.
· The 244T and the multiple flash accessories for the T90 cannot be used.
(3) Other Manufacturers' Flashes
The X-sync speed can be set to 1/125 or slower with the EOS 650 and 1/250 sec or slower with the EOS 620.
(1/60 sec or slower with the EOS 650 and 1/125 sec or slower with the EOS 620 with a large, studio-type
flash), but please confirm correct synchronization before use (due to their flash duration).
Use a Canon Speedlite with this camera. Using a flash (usually with more than two contacts) or flash accessory
of another manufacturer may cause the camera to work improperly or even damage the camera itself.
When a large, studio-type flash or general cable connection type flash is used with this camera, the Canon Hot
Shoe Adapter is required to connect the flash with the camera.
3. Bulb (Long Exposure)
Use the bulb mode for exposures longer than 30 seconds like astro
or night photography.
1) Set the shooting mode to "M".
2) Turn the electronic input dial until "bulb" (next to 30") displays.
3) Set the aperture value by turning the electronic input dial while
pressing the manual aperture set button.
· The camera requires relatively little power in the bulb mode
saving battery usage.
· Bulb operation time displays by a series of three bars and
numbers from 1 to 30. Each bar mark indicates 30 seconds.
Maximum exposure time display is 120 seconds. (three bars and
30).
· Use the Technical Back E to control the exposure time within a period of 23 hrs. 59 mins. 59 sees. (available
optionally)
· Use a tripod, Remote Switch 60T3 and Grip GR20 (standard with the EOS 620) when taking long exposures
(available optionally).
· There is no exposure warning in the bulb mode.
4. Shooting with Infrared Film
When using black-and-white infrared film make a slight adjustment
in focus with the red infrared index.
For example, focus the subject first, then if the lens is focused at
5m on the distance scale, turn the manual focusing ring to align the
5m mark with the red dot and release the shutter.
· When using infrared film, use a deep red filter as specified by the
manufacturer.
· The infrared index mark position has been computed for infrared
film usage with peak sensitivity at 800nm.
· Read the manufacturer's instructions when using color infrared
film.
Accessories
Speedlites 420EZ/300EZ
These are high-performance, electronic flash units featuring A
(Advanced)-TTL automatic flash output control, which respond to a wide
range of illumination from dark surroundings to bright (fill-in flash). They
have a built-in auto internal zoom mechanism in the flash head which
automatically adjusts the flash coverage angle to use flash energy more
effectively. In addition, the rapid-fire flash system enables you to take a
flash picture in no less than 1 second with the 300EZ or 1.5 seconds with
the 420EZ. The guide numbers are 35 (ISO 100.m) or 116 (ISO 100-ft.)
with the 420EZ, and 28 (ISO 100.m) or 93 (ISO 100.ft.) with the 300EZ.
· The above figures show the guide numbers when the flash head is set
at the 50mm position at full charge.
EF Lenses
The greatest feature of SLR cameras is that they accept a variety of
interchangeable lenses ranging from fish-eye to telephoto. Canon provides the
following 13 different interchangeable lenses plus an extender exclusively for
the EF 300mm f/2.8L for just as many applications. Canon EF lenses succeed
the ED lens' established reputation for high resolution, superb color balance
and easy handling.
Helpful Hint:
The most important point in lens selection is identifying a clear idea of the kind
of subjects you want to photograph. For example, a short telephoto is
indispensable for a portrait, while a wide-angle and a telephoto are necessary
for landscape photography. Most people, however, want enough flexibility to
take shots of the family, travel scenery, sports events, and other subjects.
That's why Canon's lens system offers various types of zoom lenses.
Interchangeable Focusing Screens The Overall New Laser-Matte/AF Frame screen comes with your camera.
You can change the focusing screen according to specific focusing needs with six different focusing screens
available optionally.
Quartz Date Back E
Technical Back E / Interface Unit TB / Keyboard Unit
E
The Quartz Date Back E is a fully automatic data back which imprints data on the film.
1. Auto date up through the year 2029. (automatic compensation for leap years and long/short months)
2. Auto digital clock mode (Day/Hour/Minutes) with 24 hour display.
3. Arbitrary 6-digit numbers
4. Frame counter number from Fc 0001 through 9999.
As the name "Technical" suggests, the Technical Back E not only imprints the data and arbitrary comments (up
to 30 digits) on film but memorizes shooting data such as shutter speed, aperture value, lens focal length and
film speed.
· When the Technical Back E is connected to a personal computer through the Interface Unit TB, it is also
possible to command the camera from a computer, etc. (The Interface Unit TB is sold in both MSX and IBM
computer models, but product availability may vary from area to area.)
· With the Keyboard Unit E, comments can be imprinted in English, French, German and Spanish.
Dioptric Adjustment Lenses / Circular Polarizing Filters PL-C / Interchangeable
Grips
Ten eyesight correction lenses are available in powers of +3, +2, +1.5, +1, +0.5,0, - 0.5, - 2, - 3 and -4
diopters. They make viewing and focusing easier if you are near or far-sighted. Choose the one which is closest
to your eyeglass prescription, and make a practical test if possible.
· The dioptric adjustment lens consists of a correction lens and removable rubber frame (eyecup). With the
frame removed, the correction lens can be attached to the A-series and T series cameras.
AF photography is possible with the Canon Circular Polarizing Filters PL-C. These are screw-in types available in
three thread diameters: 52mm, 58mm and 72mm.
You can replace the palm grip according to your hand size.
Three types are available:
1. Grip GR30: Standard with the EOS 650. Has no remote control terminal.
2. Grip GR20: Standard with the EOS 620. The same size as Grip GR30 but equipped with a remote control
terminal.
3. Grip GR10 (Grip L): The large size grip for bigger hands. Has no remote control terminal.
Caring for Your Camera
As with any precision instrument proper care and maintenance involve a few simple rules and good common
sense. Observing them will keep your camera in top condition at all times. We recommend cleaning your
camera periodically.
Cleaning tools: blower brush, lens cleaning fluid, lens cleaning tissue, silicone treated cloth
1) To clean the lens surface and the viewfinder eyepiece:
Blow off dust with the blower brush and gently wipe the lens surface with a lens cleaning tissue slightly
moistened with lens cleaner.
2) To clean the reflecting mirror and the focusing screen:
Only use a blower brush. If more cleaning is necessary NEVER attempt to do it yourself, take it to an authorized
Canon Service Facility.
3) To clean the film chamber:
Use a blower brush to occasionally remove accumulated film dust particles that might scratch the film.
4) To clean the film pressure plate and the film guide rails:
Lightly wipe the surface with a lens cleaning tissue moistened with lens cleaning fluid.
PRECAUTIONS
· Be careful NEVER to touch the shutter curtain.
· After using the camera at the beach, clean it thoroughly Salt and sand are the camera's worst enemies.
· Aerosol spray dust removers are not recommended for the shutter curtain area. If used, hold the can at least
20cm (8 inches) away from the curtain.
STORAGE
The best thing you can do for your camera is to use it regularly. If you must store it for awhile remove the
battery. Then wrap the camera in a clean, soft cloth and place it in a cool, dry, dust-free place. If you store the
camera body and lens separately, attach the body and rear lens caps.
AVOID STORING YOUR CAMERA IN THE FOLLOWING PLACES:
· "Hot spots" such as a car trunk, rear window shelf or glove compartment.
· Laboratories or other areas where chemicals may cause corrosion.
· In direct sunlight.
Carefully check the operation of each part after prolonged storage before shooting important events.
Other Notes
1. Liquid Crystal Display
The display panel uses a liquid crystal to display exposure information. After about five years, the display may
become hard to read.
The liquid crystal may respond relatively slow in low temperatures about 0°C/32°F and the display may become
dark in high temperatures about 60°C/140°F. Regular functioning resumes in temperatures about 20°C/68°F.
Take your camera to the nearest Canon Service Facility for the replacement of the liquid crystal. (Replacement
will be at owner's expense.)
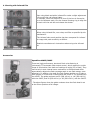
2. Blinking "bc" Display
A "bc" appearing with battery check bar marks may blink in the display panel to warn you of battery
replacement or camera malfunction. Perform the following operations:
1) Check the battery first.
2) If battery voltage is insufficient, replace the battery.
3) If battery voltage is sufficient, remove the battery from the battery chamber and reinstall it.
4) Release the shutter once.
If the blinking "be" disappears, the camera has returned to normal condition and you can keep shooting. If it
does not disappear after repeating these operations several times, there has been a camera malfunction and
the camera needs repair. Take the camera to the nearest Canon Service Facility
3. Lithium Battery Pack (1)
This camera uses one, six-volt lithium battery pack (2CR5). Try to make a habit of checking the battery at the
following times:
· After loading a new battery
· After prolonged storage
· If the shutter will not release
· Shooting in low temperatures
· Before shooting important events
1) Wipe the battery terminals and the camera contacts with a clean, dry cloth before loading to ensure proper
contact.
2) Remove the battery if you do not expect to use the camera for about three weeks or longer.
3) Battery performance deteriorates slightly in temperatures below 0°C/32°F. Keep the camera and a spare
battery pack close to your body or in a pocket to keep them warm until you are ready.
Battery may explode or cause burns if disassembled, recharged, shorted or
exposed to high temperature or disposed in fire.
4. Lithium Battery Pack (2)
Even if one blinking bar mark or no bar mark appears in the display panel during battery check, exposure will
be correct as long as the shutter releases. Automatic wind and rewind, however, may not be possible because
of insufficient battery power.
Also, if the camera stops during wind or rewind all the film transport bars start blinking to warn you. Automatic
rewind re-starts after new battery pack replacement and pressing the film rewind button.
5. X-ray examinations at Airports
Film passing through X-ray examinations at airports may be exposed and ruined even when loaded. To avoid
accidental exposure, tell the inspector to hand-check your camera and film.
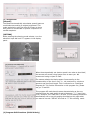
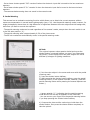
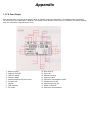
Appendix
1. LCD Panel Display
This camera uses a liquid crystal display panel to indicate shooting information. The diagram below shows all
the information for explanation. However, the display never actually looks like this. Normally, the panel displays
only the information required at the time.
1.
2.
3.
4.
5.
6.
7.
8.
9.
Battery check
Depth of field AE
ISO film speed
Shutter speed
Metered manual exposure level
Program AE
Manual
ISO indicator
AF mode
10. One-shot AF
11. Servo AF
12. Manual focusing
13. Aperture value
14. Exposure compensation value
15. Shutter-priority AE
16. Aperture-priority AE
17. Depth of field AE
18. Exposure compensation
19. Film winding mode
20. Single exposure
21. Continuous exposure
22. Self-timer
23. Film-load check
24. Film rewind completion
25. Film transport (wind/rewind)
26. Film wind completion
27. Battery check
28. Frame counter
29. Sell-timer countdown
30. Bulb exposure time
31. Auto exposure bracketing value
32. Auto exposure bracketing
33. Multiple exposures
34. Number of multiple exposures
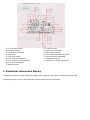
2. Viewfinder Information Display
The bright and easy-to-read viewfinder displays only necessary information outside the field of view.
The diagram here shows all the information at the same time for explanation.
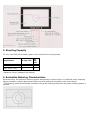
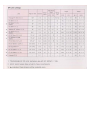
3. Shooting Capacity
For one, new 2CR5 lithium battery pack in the continuous film winding mode.
Temperature
24-exp. rolls
36exp.
rolls
Normal (20°C/ 68°F)
150
100
Low (-20°C/- 4°F)
15
10
(Based on Canon's Standard Test Method)
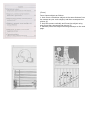
4. Evaluative Metering Characteristics
As shown below, the evaluative metering system automatically measures light in six different zones, analyzing
lighting conditions, subject pattern and subject size while putting an emphasis on the main subject.
· The metering system automatically switches to the partial metering mode when the partial metering button is
pressed.
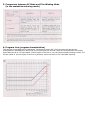
5. Comparison between AF Mode and Film Winding Mode
(in the evaluative metering mode)
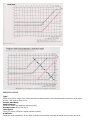
6. Program Line (program characteristics)
This camera is equipped with the advanced "Intelligent Program AK" which chooses the best shutter
speed/aperture combinations, taking the lens focal length into account. When the automatically-set shutter
speed becomes O to 0.5 steps below 1/focal length of the lens in use, the camera-shake warning sounds. The
shutter speed of 1/focal length of the lens is generally said to be the limit for hand-held shooting.
SPECIFICATIONS
Type:
35mm auto-focus, single-lens reflex camera with electronically-controlled automatic exposure, focal plane
shutter, and built-in motor drive.
Format: 24x36mm
Usable Lenses:
Canon EF lenses (full aperture metering only)
Standard Lens: EF 50 mm f/1.8
Lens Mount:
Canon EF Mount (electronic signal transfer system)
Viewfinder:
Fixed eye-level pentaprism. Gives 94% vertical and horizontal coverage of actual picture area, and 0.8X
magnification at infinity with a standard 50mm lens.
Dioptric Adjustment:
Built-in eyepiece is adjusted to standard --1 diopter. (eyepoint: 19.3mm)
Focusing Screen:
Overall new laser-matte/AF frame. Six types of interchangeable screens are available optionally.
Mirror: Quick-return half-mirror with shock and noise absorber.
Viewfinder Information:
Displayed at the bottom of the viewing area. (1) 7-segment LCD digit and character display
1. Shutter speed--flashes at 2Hz to give out-of-metering range warning.
2. Aperture value--flashes at 2Hz to give out-of-metering range warning.
3. Metered manual exposure level--OP, oo, CL
4. Depth of field AE (EOS 650 only) --dEP 1, dEP 2
(2) LCD mask character display
1. *--AE lock indicator in partial metering mode.
2. M--Manual exposure indicator
-flash charge completion indicator
3.
4. +/ - -exposure compensation indicator
5. 0--AF in-focus indicator (flashes at 8Hz when AF is not possible.)
Light Metering System:
TTL full aperture metering using SPC. Two selectable metering patterns: evaluative metering and partial
metering (approx. 6.5% of the picture area). Stopped-down metering is not possible.
Exposure Modes:
1.
2.
3.
4.
5.
6.
7.
Shutter-Priority AE
Aperture-Priority AE
Intelligent Program AE
Program Shift Function (EOS 620 only)
Depth of Field AE (EOS 650 only)
Manual
Flash AE (A-TTL program flash AE and TTL program flash AE with specified Canon Speedlites)
Camera-shake Warning:
Operates for program AE, aperture-priority AE, and the EOS 650's depth of field AE modes. When automatically
set shutter speed falls 0 to 0.5 steps below 1/focal length of the lens in use, the electronic beeper sounds.
Beeper can also be turned on and off.
Metering Coupling Range:
EV 1 - 20 (EV -1 to 20 in normal temperature) with 50mm V1.4 at ISO 100 or equivalent.
Film Speed:
ISO 25 - 5000 is automatically set by 1/3 step according to DX code standard. ISO 6 - 6400 can also be set
manually.
Exposure Compensation:
+5 steps by 1/2-step increment
Auto Exposure Bracketing (EOS 620 Only)
+5 steps in 1/2-step increments. Three continuous exposures are taken in sequence of underexposure, correct
exposure according to camera's meter and overexposure.
Multiple Exposures (EOS 620 Only):
Presetting up to nine exposures is possible. Automatically cleared upon completion.
AF Control System:
TTL-SIR (TTL secondary imaged registration) phase-detection type using BASIS (base- stored image sensor). AF
operation starts when the shutter button is pressed halfway. AF in-focus indicator lights upon ranging
completion. Audible indicator (electronic beeper) can be turned on and off.
Three selectable modes:
1. ONE SHOT: AF operation ends and focus is locked once ranging is completed. Shutter does not release until
ranging is completed.
2. SERVO: Focus continuously adjusts to follow the subject movement. Shutter can be released at any time
regardless of ranging completion.
3. Manual: By rotating the manual focusing ring after focus mode switch is set to "M".
AF Working Range: EV 1 - 18 at ISO 100
AF Auxiliary Light:
The ultra-bright red LED (peak sensitivity: 700 nm) is automatically projected with specified Canon Speedlites.
Shutter:
Vertical-travel focal plane shutter with soft-touch electromagnetic release. All speeds electronically controlled.
Shutter Speed:
EOS650--1/2000--30 sees and bulb. X-sync is 1/125 sec. Can be set in 1/2-step increments.
EOS 620--1/4000--30 sees and bulb. X-sync is 1/250 sec. Can be set in 1/2-step increments.
Self-timer:
Electronically controlled with a delay of approx. 10 sees indicated by blinking LED operation confirmation lamp.
Film Loading:
After film positioning and back cover closure, the film automatically advances to the first usable frame and then
stops (approx. 1.5 sees)
Film Wind:
Automatic using the built-in miniature motor. Confirmation by the film transport bar marks in the display panel.
Film Winding Mode:
Two selectable modes; S (single exposure) and C (continuous exposure at the maximum speed of approx. three
frames per second).
Film Rewind:
Automatic using the built-in miniature motor. Starts when the film end is reached and then stops (with 24-exp.
film, approx. 10 sees with the EOS 650 and approx. 7 sees with the EOS 620). Mid-roll rewind performed by
pressing the film rewind button.
Flash Contact: Coupled directly to the camera by X-sync contact on the accessory shoe.
Automatic Flash (using the Speedlite 420el 300EZ with the camera set to "P"):
A-TTL flash auto--Using the camera's A-TTL program and the flash's near-infrared preflash, the correct aperture
value is automatically set. Xsync speed is also automatically set between 1/60 and 1/125 sec with the EOS 650
and between 1/60 and 1/250 sec with the EOS 620 upon flash charge completion. TTL control system which
meters the light reflected from the film surface. Automatic fill-in flash is possible.
Grip: Interchangeable.
The GR30 (without remote control terminal) is standard with the EOS 650.
The GR20 (with remote control terminal) is standard with the EOS 620.
The large-size, Grip GR10 is available optionally.
Depth of-Field Check:
By pressing the depth-of-field check button.
LCD Display Panel:
Displays only the information required at the time e.g. shooting mode, film winding mode, AF mode shutter
speed, aperture value, film speed, or battery check. Timer function for eight sees is provided; the display is held
on for eight sees after the switch i.e., shutter button is pressed. The EOS 620's display panel can be illuminated
by electrolum-nescence. Power Source: One, six-volt lithium battery pack (2CR5). Battery is replaced by
removing grip.
4www.butkus.org
Battery Check:
By pressing the battery check button. Three energy levels are shown by the battery check bar marks in the
display panel.
Back Cover:
Interchangeable. Opened by sliding the latch with safety lock. Quartz Date Back E and Technical Back E can be
attached.
Dimensions: 148(W) x 108.3(H) x 67.5(D) mm (5-13/16" x 4-1/4 x 2-518 )
Weight: EOS 650--6609 (23-5/16 oz.) body only EOS620--7009 (24-11/16 oz.) body only
(All data are based on Canon's Standard Test Method.)
Subject to change without notice.
This equipment has been tested and found to comply with the limits for a Class B computing device in
accordance with the specifications set forth in Subpart J of Part 15 of the FCC Rules. If this equipment does
cause interference to radio or television reception which can be determined by turning the equipment on and
off, use the equipment in another location. If necessary, the user should consult the dealer or an experienced
radio/television technician for additional suggestions. The user may find the following booklet prepared by the
Federal Communications Commission helpful:
"How to Identify and Resolve Radio-TV interference Problems"
This booklet is available from the US Government Printing Office, Washington, D.C., 20402, Stock No. 004-00000345-4."
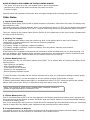
Carrying the Camera
Camera Cases
Canon offers three semi-hard cases.
1. Semi-hard case S stores the camera with the EF 50mm f/1.8
lens.
2. Semi-hard case L stores the camera with the EF 35-70mm
f/3.5-4.5 lens.
3. Semi-hard case LL stores the camera with the EF 35-105mm
f/3.5-4.5 lens.