1
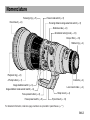
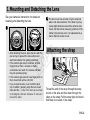
EF800mm f/5.6L IS USM
C
Y
P
O
ENG
Instruction
Thank you for purchasing a Canon product.
Designed for EOS cameras, the EF800mm
f/5.6L IS USM is a high-performance supertelephoto lens equipped with an Image
Stabilizer.
• "IS" stands for Image Stabilizer.
• "USM" stands for Ultrasonic Motor.
Features
1. The Image Stabilizer gives the equivalent
effect of a shutter speed four stops faster*.
The lens also has a second image stabilizer
mode that is optimized for following shots of
moving subjects.
2. The lens features outstanding image quality
through the use of fluorite, super UD, and UD
lens elements.
3. Ultrasonic motor (USM) for quick and quiet
autofocusing.
4. Manual focusing is available after the subject
comes into focus in autofocus mode (ONE
SHOT AF).
C
5. The AF Stop button for stopping the AF
operation at anytime.
6. Focus preset enables you to focus instantly at
a preset distance.
7. A truly round aperture hole results in a nicer
background blur.
8. The lens is compatible with Extender EF1.4X ll
and EF2X ll.
9. Tight seal structure ensures excellent dustproof and drip-proof performance.
10. Designed for lighter weight with major parts
made of magnesium alloy.
Y
P
O
* Based on [1/focal length] second. Generally, it requires
a shutter speed [1/focal length] second or faster to
prevent camera shake.
Conventions used in this instruction
Warning to prevent lens or camera malfunction
or damage.
Supplementary notes on using the lens and
taking pictures.
ENG-1
a Safety Precautions
a Safety Precautions
• Do not look at the sun or a bright light source through the
lens or camera. Doing so could result in loss of vision. Looking
at the sun directly through the lens is especially hazardous.
• Do not point the lens or camera at the sun or photograph
it. This is because the lens concentrates the sun’s rays even
when the sun is outside the image area or when shooting
with backlight, which could cause malfunction or fire.
• Whether it is attached to the camera or not, do not
leave the lens under the sun without the lens cap
attached. This is to prevent the lens from concentrating
the sun’s rays, which could cause a fire.
• Do not stand on the lens case. Falling off the case
could result in injury.
• Do not stack lens cases. A falling lens case could
cause an injury.
C
This device complies with Part 15 of the FCC Rules. Operation is
subject to the following two conditions: (1) This device may not
cause harmful interference, and (2) this device must accept any
interference received, including interference that may cause
undesired operation.
Do not make any changes or modifications to the equipment
unless otherwise specified in the instructions. If such changes or
modifications should be made, you could be required to stop
operation of the equipment.
This equipment has been tested and found to comply with the
limits for a class B digital device, pursuant to part 15 of the FCC
Rules. These limits are designed to provide reasonable protection
against harmful interference in a residential installation. This
equipment generates, uses and can radiate radio frequency
energy and, if not installed and used in accordance with the
instructions, may cause harmful interference to radio
communications.
However, there is no guarantee that interference will not occur in
a particular installation. If this equipment does cause harmful
interference to radio or television reception, which can be
determined by turning the equipment off and on, the user is
encouraged to try to correct the interference by one or more of
the following measures:
• Reorient or relocate the receiving antenna.
• Increase the separation between the equipment and receiver.
• Consult the dealer or an experienced radio/TV technician for
help.
Y
P
O
Handling Cautions
• If the lens is taken from a cold environment into a
warm one, condensation may develop on the lens
surface and internal parts. To prevent condensation in
this case, first put the lens into an airtight plastic bag before
taking it from a cold to warm environment. Then take out
the lens after it has warmed gradually. Do the same when
taking the lens from a warm environment into a cold one.
• Do not leave the lens in excessive heat such as in a
car in direct sunlight. High temperatures can cause
the lens to malfunction.
This Class B digital apparatus complies with Canadian ICES-003.
ENG-2
Nomenclature
Focusing ring (→ 5)
Focus mode switch (→ 5)
Hood mount (→ 6)
Focusing distance range selection switch (→ 5)
Distance scale (→ 6)
Orientation locking knob (→ 14)
Drop-in filter (→ 12)
Rubber ring (→ 4)
C
Playback ring (→ 8)
Y
P
O
AF stop button (→ 7)
Contacts (→ 4)
Image stabilizer switch (→ 9)
Lens mount index (→ 4)
Image stabilizer mode selector switch (→ 9)
Focus preset button (→ 8)
Focus preset switch (→ 8)
Strap mount (→ 4)
Tripod mount (→ 14)
For detailed information, reference page numbers are provided in parentheses (→ **).
ENG-3
1. Mounting and Detaching the Lens
See your camera’s instructions for details on
mounting and detaching the lens.
• After detaching the lens, place the lens with the
rear end up to prevent the lens surface and
electrical contacts from getting scratched.
• If the contacts get soiled, scratched, or have
fingerprints on them, corrosion or faulty
connections can result. The camera and lens
may not operate properly.
• If the contacts get soiled or have fingerprints on
them, clean them with a soft cloth.
• If you remove the lens, cover it with the dust
cap. To attach it properly, align the lens mount
index and the K index of the dust cap as shown
in the diagram, and turn clockwise. To remove it,
reverse the order.
C
The lens mount has a rubber ring for enhanced
water- and dust-resistance. The rubber ring may
cause slight abrasions around the camera's lens
mount, but this will not cause any problems. If the
rubber ring becomes worn, it is replaceable by a
Canon Service Center at cost.
Y
P
O
Attaching the strap
Thread the end of the strap through the strap
mount on the lens and then back through the
clasp on the strap. Pull the strap tight and check
that there is no slack in the clasp.
ENG-4
2. Setting the Focus
Mode
3. Switching the Focusing
Distance Range
To shoot in autofocus (AF) mode, set the focus
mode switch to AF.
To use only manual focusing (MF), set the focus
mode switch to MF, and focus by turning the
focusing ring. The focusing ring always works,
regardless of the focus mode.
C
Y
P
O
You can set the focusing distance range at
6m/19.7ft. to infinity, 6m/19.7ft. - 20m/65.6ft., or
20m/65.6ft. to infinity.
By setting the suitable focusing distance range,
the actual autofocusing time can be shorter.
After autofocusing in ONE SHOT AF mode, focus
manually by pressing the shutter button halfway
and turning the focusing ring. (Full-time manual
focus)
ENG-5
4. Infinity Compensation Mark
5. Hood
Infinity compensation mark
Distance index
To compensate for shifting of the infinity focus
point that results from changes in temperature.
The infinity position at normal temperature is the
point at which the vertical line of the L mark is
aligned with the distance indicator on the
distance scale.
C
For accurate manual focusing on subjects at
infinity distance, look through the viewfinder while
rotating the focusing ring.
The dedicated Lens Hood ET-155 helps to
prevent stray light from entering the lens and
protects the front of the lens from rain, snow or
dust.
Y
P
O
To attach the hood, loosen the hood locking knob
by turning it counterclockwise. Fit the hood onto
the lens hood mount, and tighten the locking
knob to fix it in place. Use the same procedure,
in reverse, to remove the hood.
ENG-6
6. AF Stop Button
• The AF stop function also works in AI Servo AF
mode.
• By setting the camera's Custom Function, you
can change the AF stop button's function. For
details, see the camera's instruction manual.
During autofocus operation, you can press the
AF stop button to temporarily pause autofocus.
Y
P
O
If the shutter button is still pressed halfway when
the AF stop button is released, autofocusing will
continue as before.
C
• With the EOS 630/600, RT, A2/A2E/5, or 10S/10
set to the AI Servo AF mode and continuous
shooting, AF will not resume even after you let
go of the AF stop button. Press the shutter
release button halfway to resume AF.
• With the EOS A2/A2E/5 and 10S/10 set to the
Sports mode, AF will not resume even after you
let go of the AF stop button. Press the shutter
release button halfway to resume AF.
ENG-7
7. Focus Preset
By presetting any focusing distance, you can
instantly focus at that point even while you are
shooting a different subject. This function
operates in both the AF and MF modes.
How to Focus at the Preset Distance
While turning the playback ring to the left or
right, press the shutter button completely.
• The lens will focus at the preset distance.
• If the focus preset switch was set to
, the beeper
will sound twice.
How to Set
Set the focus preset switch to
or
C
.
Press the shutter button halfway to focus the
distance you want to preset.
Press the focus preset button.
• The focused distance will be preset.
• If the focus preset switch was set to
beeper will sound once.
Y
P
O
• When turning the playback ring, keep your finger
away from the shutter button. In One-Shot AF
mode, the exposure will be locked when you
press the shutter button halfway and focus is
achieved. So if you press the shutter button
halfway while turning the playback ring, the
exposure may not be correct.
• When not using the focus preset, set the switch
to OFF.
, the
In the following cases, the focusing distance scale
will move slightly. It will not affect the image.
• When you press the focus preset button.
• When you turn the playback ring.
ENG-8
8. Image Stabilizer Settings
You can use the image stabilizer in AF or MF mode.
Set the STABILIZER switch
to
.
• If you are not going to use the
image stabilizer function, set
the switch to
.
Y
P
O
Select the stabilizer mode.
• MODE 1: Corrects vibrations
in all directions. It is mainly
effective for shooting still
subjects.
• MODE 2: It compensates for
vertical camera shake during
following shots in a horizontal
direction, and compensates for
horizontal camera shake
during following shots in a
vertical direction.
C
When you press the shutter
button halfway, the Image
Stabilizer will start
operating.
• Make sure the image in the
viewfinder is stable, then press
the shutter button the rest of
the way down to take the
picture.
ENG-9
9. Tips on Using the Image Stabilizer
The image stabilizer in this lens is effective for hand-held shots or when using a monopod under the
following conditions.
● MODE 1
● MODE 2
C
Y
P
O
• In moderately dark areas such as evening
scenes.
• In locations where flash photography is
prohibited such as live performances in
theaters.
• In situations where your footing is uncertain.
• In situations where fast shutter settings cannot
be used.
• When panning subjects in motion.
ENG-10
Tips on Using the Image Stabilizer
• The Image Stabilizer cannot compensate for a
blurred shot caused by a subject that moved.
• Set the STABILIZER switch to
when you
are taking pictures using the Bulb setting (long
exposures). If the STABILIZER switch is set to
, the image stabilizer function may introduce
errors.
• The Image Stabilizer might not be fully effective
in the following cases:
• You shoot while riding on a bumpy road.
• You move the camera dramatically for a
panning shot in Mode 1.
• You shoot using techniques other than
following shots in Mode 2.
• The Image Stabilizer consumes more power
than normal shooting, so fewer shots can be
taken if you use the function.
• The image stabilizer operates for about two
seconds even when your finger is off the shutter
button. Do not remove the lens while the
stabilizer is in operation. This will cause a
malfunction.
• With the EOS-1V/HS, 3, ELAN 7E/ELAN
7/30/33, ELAN 7NE/ELAN 7N/30V/33V, ELAN
II/ELAN II E/50/50E, REBEL2000/300, IX, and
D30, the Image Stabilizer will not work during
self-timer operation.
C
• Using a tripod also stabilizes the image.
However, depending on the kind of tripod and
shooting conditions, sometimes it may be better
to turn off the Image Stabilizer function.
• The stabilizer is equally effective for hand-held
photography and photography with a monopod.
• The image stabilizer function also operates when the
lens is used with an Extension Tube EF12 ll or EF25 ll.
• With Extender EF1.4X II/EF2X II attached to the
lens, the Image Stabilizer will work with the
following cameras:
EOS-1Ds Mark III, EOS-1Ds Mark II, EOS-1Ds, EOS-1D Mark
lll, EOS-1D Mark II N, EOS-1D Mark II, EOS-1D, EOS 40D,
30D, 20D, 20Da, 10D, 5D, DIGITAL REBEL XSi/450D, DIGITAL
REBEL XTi/400D DIGITAL, DIGITAL REBEL XT/350D DIGITAL,
DIGITAL REBEL/300D DIGITAL, D60, D30, EOS DCS1, DCS3,
D2000, D6000, EOS-1V/HS, EOS-1N/DP/HS/RS, 3, ELAN
7E/ELAN 7/30/33, ELAN 7NE/ELAN 7N/30V/33V, ELAN
II/ELAN IIE/50/50E, REBEL X/REBEL XS/500, REBEL G/500N,
REBEL 2000/300, REBEL Ti/300V, REBEL T2/300X, REBEL
K2/3000V, IX, IX Lite/IX7, 3000/88, 5000/888
• Pictures may look distorted after being taken depending
on the camera, but this doesn't affect shooting.
• If you set the camera’s Custom Function to
change the assigned button to operate the AF,
the Image Stabilizer will operate when you press
the newly assigned AF button.
Y
P
O
ENG-11
10. Drop-In Filters
The lens comes with the drop-in Gelatin Filter
Holder 52 holding a glass filter. The holder
accepts commercially-available gelatin filters.
Using a Gelatin Filter
14mm
14mm
47mm
Removing and Installing
C
Y
P
O
To remove the drop-in filter, press in the left and
right lock buttons and pull the filter holder straight
up out of the slot.
To install the drop-in filter, push the filter holder
straight down into the slot until it clicks into place.
• The filter holder can be installed facing either forwards
or backwards.
Because the lens optics are designed to include a
glass filter, you must always install the filter
holder, even if no gelatin filter is fitted.
47mm
Lift up the holder’s retaining frame
Trim the gelatin filter as shown in the figure,
and mount it in the holder.
Return the retaining frame to its closed
position.
The Drop-In Screw-Type Filter Holder 52 and
Drop-In Circular Polarizing Filter PL-C52 are also
available (Sold separately).
ENG-12
11. Extenders
(Sold separately)
With Extender EF1.4X ll or EF2X ll attached, the lens specifications will change as follows:
Item
With EF1.4X ll Extender
Focal length (mm)
Aperture
Angle of view
With EF2X ll Extender
1120
1600
f/8 – 45
f/11 – 64
1°30’
Diagonal
2°10’
Vertical
1°10’
50’
Horizontal
1°50’
1°20’
Maximum magnification (×)
0.2
Y
P
O
0.28
• With Extender EF1.4X II attached to the lens, only manual focus is possible. However, with
the EOS-1Ds Mark III, EOS-1Ds Mark ll, EOS-1Ds, EOS-1D Mark lll, EOS-1D Mark ll N,
EOS-1D Mark ll, EOS-1D, EOS-1V/HS, EOS-3 camera, autofocusing with the center focusing
point is possible.
• With Extender EF2X II attached to the lens, only manual focus is possible.
• First attach the Extender to the lens, then attach the lens to the camera. Detach it from the
camera in the reverse order. If you attach the lens to the camera first, misoperation may
occur.
• Only one Extender can be attached to the lens and camera.
• If you use an Extender on the lens mounted on a EOS A2/A2E/5, set the exposure
compensation to -1/2 stop for the EF1.4X II or -1 stop for the EF2X II.
C
When an Extender is attached, the AF speed will become slower by design to retain proper AF
control.
ENG-13
12. Extension Tubes (Sold separately)
14. Case
You can attach Extension Tube EF12 II or EF25
II for magnified shots. The shooting distance and
magnification are shown below.
EF12 II
EF25 II
Camera-to-Subject
Distance (mm)
Near
Far
5466
51418
4982
24356
Lid
Magnification
Near
0.16×
0.19×
Far
0.02×
0.04×
Manual focusing is recommended for accurate
focusing.
C
13. Using the Tripod Mount
Belt
Y
P
O
Adjusting the Revolving Mount
You can loosen the orientation lock-knob on the
tripod mount to allow it to rotate as needed to fit
a particular camera model for switching between
vertical and horizontal positions.
Keyhole
Lever
When putting the lens into its case, follow the
procedure below.
Attach the hood in reverse direction, then attach the lens
cap. Keep the hood locking knob facing the direction
opposite the tripod mount as shown in the left figure.
Position the tripod mount straight upwards and lay
the lens into the case as shown in the right figure.
Secure the lens with the belt.
Press the lever while holding the lid from the
top, and lock it.
ENG-14
Specifications
Focal Length/Aperture
Lens Construction
Minimum Aperture
Angle of View
Min. Focusing Distance
Max. Magnification
Field of View
Filter
Max. Diameter and Length
Weight
Hood
Lens Cap
Case
800 mm f/5.6
14 groups, 18 elements
f/32
Diagonal: 3°5’
Vertical: 1°40’
Horizontal: 2°35’
6 m/19.7 ft.
0.14 ×
approx. 171 × 256 mm/6.7 × 10.1 inch (at 6 m)
Drop-in 52-series
163 × 461 mm/6.4 × 18.1 inch
4500 g/158.7 oz.
ET-155
E-180D
Lens Case 800
C
Y
P
O
• The lens length is measured from the mount surface to the front end of the lens. Add 26.5 mm when including the
lens cap and dust cap.
• The size and weight listed are for the lens only, except as indicated.
• Closeup Lenses 250D/500D cannot be attached.
• Aperture settings are specified on the camera.
• All data listed is measured according to Canon standards.
• Product specifications and appearance are subject to change without notice.
ENG-15
C
CT1-8556-003
0812Ni
Y
P
O
© CANON INC. 2008