1
Print Services Client
Version 1.0
User's Guide
Pub No. SE-IE-1360-V1
ENG
How This Manual Is Organized
This manual describes the procedures for using Print Services Client.
Chapter 1
Print Services Client (p. 1-1)
Chapter 2
Installation and Setup (p. 2-1)
Chapter 3
Job Management (p. 3-1)
Chapter 4
Change Settings Function (p. 4-1)
Chapter 5
Appendix (p. 5-1)
• The information in this manual is subject to change without notice.
• Considerable effort has been made to ensure that this manual is free of inaccuracies and
omissions. However, as we are constantly improving our products, if you need an exact
specification, please contact Canon.
• The contents of this manual shall not be reproduced without the prior consent of Canon.
ii
Contents
How This Manual Is Organized...................................................................................... ii
Preface............................................................................................................................ v
How To Use This Manual................................................................................................ v
Notations Used in This Manual............................................................................................................v
Keys Used in This Manual......................................................................................................................v
Displays Used in This Manual..............................................................................................................vi
Abbreviations Used in This Manual...................................................................................................vi
Trademarks................................................................................................................... vii
Chapter 1 Print Services Client
Overview of Print Services Client...............................................................................1-2
System Requirements........................................................................................................................ 1-3
System Configuration........................................................................................................................ 1-4
Chapter 2 Installation and Setup
Login Services..............................................................................................................2-2
Authentication Services of MEAP-compatible Canon Devices................................................. 2-2
Types of Authentication Services.................................................................................................... 2-3
Flow of Login Service Settings......................................................................................................... 2-4
Installation and Setup Flow........................................................................................2-5
Starting and Closing SMS............................................................................................2-6
Starting and Logging In to SMS....................................................................................................... 2-6
Logging Out from SMS....................................................................................................................2-10
Installing and Uninstalling Print Services Client.....................................................2-11
Installation..........................................................................................................................................2-12
Uninstallation....................................................................................................................................2-13
Starting and Stopping an Application.....................................................................2-15
Starting an Application....................................................................................................................2-15
Stopping an Application.................................................................................................................2-16
Confirming Application Details................................................................................2-17
Confirming Print Services Client Settings................................................................2-18
iii
Chapter 3 Job Management
Logging In and Logging Out.......................................................................................3-2
Logging In............................................................................................................................................ 3-2
Logging Out......................................................................................................................................... 3-3
How the Main Menu Screen Is Organized...................................................................................... 3-4
Stored Job Management.............................................................................................3-8
Displaying a List of Stored Jobs....................................................................................................... 3-8
Displaying Stored Job Details........................................................................................................3-10
Displaying Stored Job Status..........................................................................................................3-12
Printing a Stored Job........................................................................................................................3-13
Changing Print Settings and Printing...........................................................................................3-15
Canceling Printing............................................................................................................................3-18
Deleting a Stored Job.......................................................................................................................3-19
Chapter 4 Change Settings Function
Changing the Settings................................................................................................4-2
Logging In to the Management Console....................................................................................... 4-2
Downloading the Settings File......................................................................................................... 4-4
Uploading the Settings File.............................................................................................................. 4-5
Changing the Settings....................................................................................................................... 4-6
Logging Out from the Management Console.............................................................................4-10
Changing the Management Console Password.........................................................................4-11
Changing the Display Language for Management Console....................................................4-12
Chapter 5 Appendix
List of Error Messages.................................................................................................5-2
Print Services Client Operations...................................................................................................... 5-2
Management Console Error Messages........................................................................................... 5-4
PullPrint Service Provider Error Messages..................................................................................... 5-7
Limitations...................................................................................................................5-8
Login...................................................................................................................................................... 5-8
Event Notification when Operating the Touch Panel Display................................................... 5-8
Canon Business Imaging Online Access Time-Out...................................................................... 5-8
Displayed Characters......................................................................................................................... 5-8
Displays................................................................................................................................................. 5-8
AMS (Access Management System) Compatibility...................................................................... 5-9
MEAP Resource Use...................................................................................................5-10
iv
Preface
Thank you for purchasing Print Services Client. Please read this manual thoroughly before operating
the application to familiarize yourself with its capabilities, and to make the most of its many functions.
After reading this manual, store it in a safe place for future reference.
How To Use This Manual
Notations Used in This Manual
The following notations are used in this manual to explain procedures and restrictions.
IMPORTANT
Indicates operational requirements and restrictions. Be sure to read these items carefully to operate
the machine correctly, and avoid damage to the machine.
NOTE
Indicates a clarification of an operation, or contains additional explanations for a procedure. Reading
these notes is highly recommended.
Keys Used in This Manual
The following button names are a few examples of how buttons to be clicked are expressed in this
manual:
• Buttons on Computer Operation Screens: [Button Name]
- Example:
[Setup]
[OK]
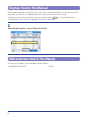
Displays Used in This Manual
The computer operation screenshots and Canon device touch panel display screenshots may differ
from those you actually see, depending on the system environment you are using.
The buttons which you should click or press are marked with a
multiple buttons are used for an operation, all buttons are marked.
----
2
Select the job to print → press [Chng Set. & Prnt].
----
Abbreviations Used in This Manual
In this manual, product names are abbreviated as follows:
imageRUNNER ADVANCE:
vi
iR-ADV
, as shown below. When
Trademarks
MEAP and the MEAP logo are trademarks of Canon Inc.
Windows and the Windows logo are trademarks or registered trademarks of Microsoft Corporation in
the U.S. and/or other countries.
Other product and company names herein may be the registered trademarks or trademarks of their
respective owners.
vii
viii
Print Services Client
1
$)"15&3
Print Services Client enables you to use PullPrint Service Provider to manage jobs stored in Canon
Business Imaging Online from the touch panel display of a MEAP-compatible Canon device.
This chapter provides an overview of Print Services Client.
----
Overview of Print Services Client.................................................................................................1-2
System Requirements.............................................................................................................................................. 1-3
System Configuration.............................................................................................................................................. 1-4
1-1
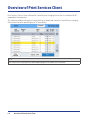
Overview of Print Services Client
Print Services Client is client software for Canon Business Imaging Online that is installed in MEAPcompatible Canon devices.
This software enables you to print, cancel printing, or delete jobs stored in Canon Business Imaging
Online from the touch panel display of a Canon device.
NOTE
The screen that is displayed may differ depending on the model of the machine.
1-2
Overview of Print Services Client
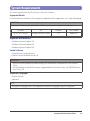
System Requirements
The system requirements for Print Services Client are as follows.
Supported Models
For information on the devices that support the operation of this application, see "Canon Homepage."
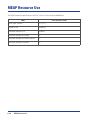
IMPORTANT
Print Services Client uses the port below. Confirm that the port is enabled on the device.
Function
Use
Protocol
Port Number
HTTP/HTTPS Receive
Change Settings Function
TCP
8000/8443
Supported Web Browsers
• Windows Internet Explorer 7.0
• Windows Internet Explorer 8.0
• Windows Internet Explorer 9.0
Linked Software
• Canon Business Imaging Online
• PullPrint Service Provider Version 1.0
IMPORTANT
• PullPrint Service Provider must be running in the same MEAP environment as Print Services
Client.
• For information on the MEAP resources supported by Print Services Client, see "MEAP Resource
Use," on p. 5-10
Supported Languages
• English (Default)
• Japanese
NOTE
If you specify a language that is not supported, the default language (English) is displayed.
Overview of Print Services Client
1-3
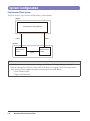
System Configuration
Print Services Client System
The Print Services Client system configuration is shown below.
SERVER
Canon Business Imaging Online
HTTPS
HTTPS
PRINTER
Print Services
Client
HTTPS
PullPrint Service
Provider
NOTE
• For information on the connection settings, see Chapter 4, "Change Settings Function"
• You can connect Print Services Client and Canon Business Imaging Online via a proxy server.
Print Services Client supports the proxy authentication methods below.
- Basic Authentication
- Digest Authentication
1-4
Overview of Print Services Client
Installation and Setup
2
$)"15&3
You can install Print Services Client using SMS (Service Management Service) from a Web browser on
a networked computer.
This chapter provides instructions on installing and setting up Print Services Client.
----
Login Services...............................................................................................................................2-2
Authentication Services of MEAP-compatible Canon Devices....................................................................... 2-2
Types of Authentication Services.......................................................................................................................... 2-3
Flow of Login Service Settings............................................................................................................................... 2-4
Installation and Setup Flow.........................................................................................................2-5
Starting and Closing SMS.............................................................................................................2-6
Starting and Logging In to SMS............................................................................................................................. 2-6
Logging Out from SMS..........................................................................................................................................2-10
Installing and Uninstalling Print Services Client......................................................................2-11
Installation...............................................................................................................................................................2-12
Uninstallation..........................................................................................................................................................2-13
Starting and Stopping an Application......................................................................................2-15
Starting an Application.........................................................................................................................................2-15
Stopping an Application.......................................................................................................................................2-16
Confirming Application Details.................................................................................................2-17
Confirming Print Services Client Settings.................................................................................2-18
2-1
Login Services
Login services are authentication services that manage the user information of MEAP-compatible
Canon devices. This section provides information on these authentication services.
IMPORTANT
The authentication services available for use differ depending on the device you are using. For more
information, see the manual accompanying your device.
Authentication Services of MEAP-compatible
Canon Devices
User authentication for MEAP-compatible Canon devices is performed based on MEAP authentication.
MEAP authentication prompts entry of a user name and password when the power of a Canon device
is turned ON or when the user is switched by pressing
(ID).
The appearance of the screen differs depending on the selected MEAP authentication service. The
following screen is the Login screen when the SSO-H authentication service is selected.
NOTE
The appearance of the Login screen may differ depending on the model of the machine.
2-2
Login Services
Types of Authentication Services
The three authentication services described below are provided as login services for MEAPcompatible Canon devices.
Department ID Management (Default Authentication)
Provides the No Authentication function (no login screen displayed) and the Department ID
Management function.
Select Default Authentication for the login service if you do not want to perform authentication or if
you want to select Department ID Management.
SDL (Simple Device Login)
Performs user authentication (login) based on user information (user name and password) registered
in advance by the administrator in the Canon device's hard disk.
Unlike Department ID Management, both alphabetical characters and numbers can be used in
registered information. SDL user registration is performed from the SDL User Register/Edit screen.
SSO (Single Sign-On)/SSO-H (Single Sign-On H)
The following three user authentication methods are available for SSO or SSO-H:
• Domain Authentication
• Local Device Authentication
• Domain + Local Device Authentication
This method performs login by connecting to the domain controller on the network and using the
information (user name and password) managed by Active Directory. By using this method, you can
log in to the network from a Canon device using the same user name and password for computers
and other network devices.
NOTE
• For more information on the supported authentication devices, see the manual accompanying
your device.
• To use SSO, you must set install an application module called SA (Security Agent) on a networked
computer. If you are using SSO-H, it is not necessary to install SA.
Login Services
2-3
Flow of Login Service Settings
The flow of login service settings is described below. For more information, see the manual
accompanying your device.
1.
Deciding the login service
Firstly, decide which authentication service
to use.
2.
Setting the login service
Set the authentication service from the
[System Management] page of SMS.
3.
Registering user information in the login
service
Register user information for the set
authentication service.
2-4
Login Services
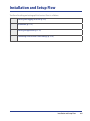
Installation and Setup Flow
The flow of installing and setting up Print Services Client is as follows.
1.
Starting and Logging In to SMS (p. 2-6)
2.
Installation (p. 2-12)
3.
Starting an Application (p. 2-15)
4.
Confirming Print Services Client Settings (p. 2-18)
Installation and Setup Flow
2-5
Starting and Closing SMS
You must log in to SMS (Service Management Service) to install Print Services Client.
SMS is software that can access the printer via the network from your Web browser, enabling you to
install and manage Print Services Client.
NOTE
• The default password is 'MeapSmsLogin' (case sensitive).
• This password helps prevent unauthorized printer operations.
• In order to prevent erroneous usage, the administrator should change the password when
usage begins. For information on changing the password, see the manual accompanying your
device.
• Make sure that you do not forget your password. Otherwise, you will not be able to access SMS.
• If you forget your password, contact your local authorized Canon dealer.
• The appearance of the SMS screen differs depending on the model of the machine. For more
information on SMS, see the manual accompanying your device.
Starting and Logging In to SMS
Log in to SMS to install Print Services Client. The login procedure is as follows.
IMPORTANT
• Before starting SMS, set the IP address of the printer.
• Multiple users cannot log in to SMS at the same time.
• The default login method is set to using the shared password for SMS. To log in using the user
name and password for the SDL, SSO, or SSO-H login service, the login method must be started.
For more information on starting a login method, see the manual accompanying your device.
2-6
Starting and Closing SMS
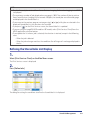
Logging In Using the Shared Password for SMS
You can access SMS by logging in from the SMS login page using the password set in SMS.
----
1.
Enter the URL below in the address bar of the Web browser.
http://<IP address of the printer>:<HTTP port number>/sms
IMPORTANT
• If you do not know the IP address of the printer, consult your administrator.
• You cannot connect via a proxy server. If your system environment has a proxy server, perform
the following setting. (As settings vary according to the system environment, consult your
network administrator.)
- Enter the IP address of the printer into [Exceptions] in the Web browser proxy server
settings.
• Set your Web browser to enable all cookies and use JavaScript.
NOTE
• The default HTTP port number is 8000. If the HTTP port number has been changed in the
printer's protocol settings, enter the new HTTP port number. If you do not know the HTTP port
number, consult your administrator.
• The device's eight digit serial number is displayed on the top left of the SMS Login screen. This
serial number is necessary when obtaining a license file from the License Management System.
• A drop-down list for switching the displayed language is displayed on the top right of the
screen. Select the display language as necessary.
Starting and Closing SMS
2-7
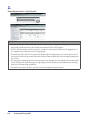
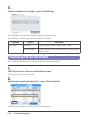
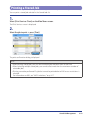
2.
Enter the password → click [Log In].
IMPORTANT
• If you cannot log in because the password is incorrect, a message prompting you to re-enter the
password is displayed. Enter the correct password and click [Log In] again.
• If SMS is idle for longer than five minutes, it times out and you are automatically logged out. If
this happens, log in again from the [Login] page.
• If you do not log in within five minutes of displaying the Login page, you cannot log in even if
you enter the correct password. Re-enter the password according to the message displayed on
the screen.
• If a message is displayed and you cannot log in even though you entered the correct password
within five minutes of displaying the Login page, confirm whether your Web browser settings
meet the SMS operating conditions.
• For more information on SMS, see the manual accompanying your device.
2-8
Starting and Closing SMS
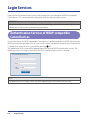
Logging In Using a User Name and Password for Canon Device
Login
You can access SMS by logging in using a user name and password used for the SDL, SSO, or SSO-H
login service.
Only users registered as administrators can log in.
----
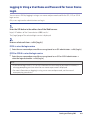
1.
Enter the URL below in the address bar of the Web browser.
http://<IP address of the Canon device>:8000/sms/rls/
The [Login] page of the selected login service is displayed.
2.
Enter or select each item → click [Log In].
If SDL is set as the login service
☐ Enter the user name and password for a user registered as an SDL administrator → click [Log In].
If SSO or SSO-H is set as the login service
☐ Enter the user name and password for a user registered as an SSO or SSO-H administrator →
select the login destination → click [Log In].
NOTE
• If you cannot log in to SDL, SSO, or SSO-H because the user name or password is incorrect, a
message prompting you to re-enter the user name or password is displayed.
• For more information on logging in using a user name and password, see the manual
accompanying your device.
Starting and Closing SMS
2-9
Logging Out from SMS
Log out to finish the operation.
----
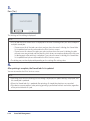
1.
Click [Log Out from SMS].
The [Login] page is displayed.
IMPORTANT
When you finish using SMS, make sure you log out. If you close the Web browser without logging
out, SMS becomes temporarily inaccessible.
2-10
Starting and Closing SMS
Installing and Uninstalling Print Services
Client
Install Print Services Client and the license file.
IMPORTANT
• A valid license file is required to install a MEAP application.
- If your application comes with a License Access Number, you must access the License
Management System at the following URL to obtain your license file:
http://www.canon.com/meap/
After accessing the License Management System, follow the directions displayed on the
screen to obtain your license file. You must have your License Access Number and Device
Serial Number available in order to complete the license generation process.
- If your application does not come with a License Access Number, your license file will be
provided by your MEAP Application provider.
• The maximum number of MEAP applications that can be installed is 19 (one of these is the
portal service that is installed by default).
• If you update an existing version, you can retain the previous settings for Print Services Client.
Installing and Uninstalling Print Services Client
2-11
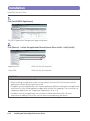
Installation
Install Print Services Client.
----
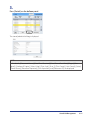
1.
Click [Install MEAP Application].
The [MEAP Application Management] page is displayed.
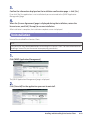
2.
Click [Browse] → select the application file and license file to install → click [Install].
Application file:
A file with the 'jar' extension.
License file:
A file with the 'lic' extension.
IMPORTANT
• You cannot install only a license file.
• When installing an application, make sure you specify the license file. You cannot install the
application without specifying the license file.
• To update an existing application, first stop the application before installing the new application
and license file. You cannot update the application without first stopping it. For instructions on
stopping an application, see "Stopping an Application," on p. 2-16
• To add a license for an application that is already installed, add a license file. For more
information on adding a license file, see the manual accompanying your device.
2-12
Installing and Uninstalling Print Services Client
3.
Confirm the information displayed on the installation confirmation page → click [Yes].
If you click [No], the application is not installed and you are returned to the [MEAP Application
Management] page.
4.
When the [License Agreement] page is displayed during the installation, review the
license terms, and click [I Accept] to resume installation.
After installation is complete, the installation complete screen is displayed.
Uninstallation
Uninstall the installed Print Services Client.
NOTE
The license files must be disabled before uninstalling Print Services Client. For more information on
disabling a license file, see the manual accompanying your device.
----
1.
Click [MEAP Application Management].
The [MEAP Application Management] page is displayed.
2.
Click [Uninstall] for the application you want to uninstall.
Installing and Uninstalling Print Services Client
2-13
3.
Click [Yes] on the displayed screen.
If you click [No], the application is not uninstalled and you are returned to the [MEAP Application
Management] page.
IMPORTANT
• If the application to uninstall is linked with another application, the confirmation message <A
package exported from this application cannot be used.> may be displayed. If you uninstall
such applications, you may not be able to use other applications.
• You can only uninstall applications for which a license is not installed. To uninstall an application
with a different license status, disable the license file on the [License File Management] page
before uninstalling the application. For more information on disabling a license file, see the
manual accompanying your device.
• To disable a license file, the application must be stopped. For instructions on stopping an
application, see "Stopping an Application," on p. 2-16
• Modified settings are retained after uninstallation of Print Services Client if you are using a
device with Configuration service.
If the device you are using does not support Configuration service and you uninstall Print
Services Client, the modified settings are discarded. Even if you reinstall Print Services Client, the
default settings are applied.
• If you update an existing version without uninstalling, you can retain the previous settings for
Print Services Client.
2-14
Installing and Uninstalling Print Services Client
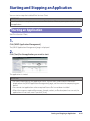
Starting and Stopping an Application
You can start or stop the installed Print Services Client.
IMPORTANT
Even if installation is complete, you cannot use Print Services Client on your system until you start
the application.
Starting an Application
Start Print Services Client.
----
1.
Click [MEAP Application Management].
The [MEAP Application Management] page is displayed.
2.
Click [Start] for the application you want to start.
The application is started.
IMPORTANT
• For more information on the application status, license status, and resource information
displayed on the [MEAP Application Management] page, see the manual accompanying your
device.
• You cannot start applications whose required license file has not been installed.
• When the resources required for memory, threads, sockets, or file descriptors has run out, the
application will not start, even if you click [Start].
Starting and Stopping an Application
2-15
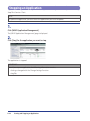
Stopping an Application
Stop Print Services Client.
NOTE
To update an application, you must close the application you want to update.
----
1.
Click [MEAP Application Management].
The [MEAP Application Management] page is displayed.
2.
Click [Stop] for the application you want to stop.
The application is stopped.
IMPORTANT
Even if you stop an application, the following information remains:
• Settings changed with the Change Settings function
• Log files
2-16
Starting and Stopping an Application
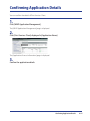
Confirming Application Details
You can confirm the details of Print Services Client.
----
1.
Click [MEAP Application Management].
The [MEAP Application Management] page is displayed.
2.
Click [Print Services Client] displayed in [Application Name].
The [Application/License Information] page is displayed.
3.
Confirm the application details.
Confirming Application Details
2-17
Confirming Print Services Client Settings
To use Print Services Client after installing it in a MEAP-compatible Canon device, you must correctly
specify Print Services Client settings.
You can use the Management Console to confirm Print Services Client settings.
IMPORTANT
Even if Print Services Client has been started, the settings must be correctly set to use it on your
system.
----
1.
Log in to the Management Console of Print Services Client.
The Change Settings screen is displayed.
NOTE
For instructions on logging in to the Management Console, see "Logging In to the Management
Console," on p. 4-2
2.
Confirm that the settings are correct.
NOTE
• For more information on the settings, see "Setting Items," on p. 4-7
• If the settings are not correct, they must be changed. For more information on changing the
settings, see "Changing the Settings," on p. 4-6
2-18
Confirming Print Services Client Settings
Job Management
3
$)"15&3
Print Services Client enables you to manage jobs stored in Canon Business Imaging Online from the
touch panel display of a Canon device.
This chapter provides instructions on managing jobs with Print Services Client.
----
Logging In and Logging Out........................................................................................................3-2
Logging In.................................................................................................................................................................. 3-2
Logging Out............................................................................................................................................................... 3-3
How the Main Menu Screen Is Organized........................................................................................................... 3-4
Stored Job Management..............................................................................................................3-8
Displaying a List of Stored Jobs............................................................................................................................. 3-8
Displaying Stored Job Details..............................................................................................................................3-10
Displaying Stored Job Status...............................................................................................................................3-12
Printing a Stored Job.............................................................................................................................................3-13
Changing Print Settings and Printing................................................................................................................3-15
Canceling Printing..................................................................................................................................................3-18
Deleting a Stored Job............................................................................................................................................3-19
3-1
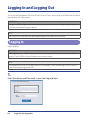
Logging In and Logging Out
To use the job management function of Print Services Client, you must log in to MEAP from the touch
panel display of a Canon device.
IMPORTANT
To log in to MEAP, a login service must be set. For more information on setting a login service, see
the manual accompanying your device.
NOTE
The screen that is displayed may differ depending on the model of the machine.
Logging In
Log in to MEAP.
IMPORTANT
After logging in, you must be using Canon Business Imaging Online to use the functions of Print
Services Client. PullPrint Service Provider must also be started.
NOTE
The procedure uses the SSO-H login service as an example. To use another login service, see the
manual accompanying your device.
----
1.
Enter [User Name] and [Password] → press the [Log In] button.
3-2
Logging In and Logging Out
NOTE
• If you specify the domain for the login destination when logging in to the device, the domain
name is also sent to Canon Business Imaging Online, and the domain name is used for logging
in to Canon Business Imaging Online.
• If you select 'This Device' for the login destination when logging in to the device, the domain
name is not sent to Canon Business Imaging Online, and Canon Business Imaging Online
authentication is performed without a specified domain.
• If you are using Print Services Client on the Cloud, the tenant ID is also sent to Canon Business
Imaging Online, and the tenant ID is used for authentication.
For information on the tenant ID, see "Setting Items," on p. 4-7
Logging Out
Log out of MEAP.
----
1.
Click the [Log Out] button.
NOTE
• You can log out at any time while logged in.
• Print Services Client logs out from MEAP when Auto Reset is performed or the device enters the
Energy Saver mode.
Logging In and Logging Out
3-3
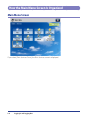
How the Main Menu Screen Is Organized
Main Menu Screen
If you select [Print Services Client], the Print Services screen is displayed.
3-4
Logging In and Logging Out
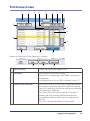
Print Services Screen
①
④
⑧
⑤
②
⑥
⑦
⑥
③
⑪
⑨
⑩
⑫
⑬
⑭
⑮
Bottom of screen when [Other Operation] is selected:
⑯
⑰
⑱
1
Login user name
Displays the name of the logged in user.
2
[Limitations]
Press to display the limitations dialog.
If the device is not operating in AMS mode, [Limitations] is
not displayed.
For information on AMS, see "AMS Limitations," on p. 3-17
3
[Select All/Clear Selection]
Either [Select All] or [Clear Selection] is displayed according
to whether or not jobs are selected. If no jobs are selected,
[Select All] is displayed, and if one or more jobs are selected,
[Clear Selection] is displayed.
Press [Select All] to select the first 20 jobs in the job list.
However, jobs that cannot be displayed and jobs that
cannot be printed due to AMS access restrictions are not
selected.
Press [Clear Selection] to deselect all selected jobs.
Logging In and Logging Out
3-5
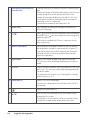
4
Selected/Maximum Number of
Selectable Jobs
"Selected" displays the number of currently selected stored
jobs.
"Maximum Number of Selected Jobs" displays the maximum
number of jobs that can be selected. However, if the
number of stored jobs displayed in the job list is less than
the maximum number of selectable jobs, the number of
stored jobs in the list is displayed.
The maximum number of selectable jobs is 20.
5
[Refine Jobs]
Press to display the dialog for setting the conditions to
refine the stored jobs.
6
[
Press [ ] to retrieve data for the previous page and update
the job list. Press [ ] to retrieve data for the next page and
update the job list.
][
]
Each button is enabled only if there is a previous or next
page, respectively.
7
Job No./Total Job No.
Job No. displays the ordinal numbers for the first and last
jobs displayed in the job list, connected with a hyphen ("-").
Total Job No. displays the total number of jobs that were
retrieved with the set refining conditions from the jobs
stored in the database.
8
Pages/Copies
Displays the number of pages and copies for each job.
This item may not be displayed, depending on the device
model.
9
Print Set.
Displays the print attributes (Print Style and N on 1) for each
job as icons. This item may not be displayed, depending on
the device model.
For information on the icons, see "Changing Print Settings
and Printing," on p. 3-15
10 Stored Jobs list
Displays a list of the stored jobs.
A check mark is displayed in the check box to the left of a
selected job.
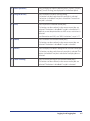
11 [
12 [
Updates the Stored Jobs list.
]
][
]
Press to scroll the Stored Jobs list by the number of jobs
displayed on the screen.
These buttons can be used only when the number of jobs
exceeds the number of jobs displayed on the screen.
3-6
Logging In and Logging Out
13 [Other Operation]
Press to display or hide the balloon panel. [Delete], [Details],
and [Cancel Printing] are displayed in the balloon panel.
14 [Chng Set. & Prnt]
Press to display the print settings dialog.
This button can be used when only one job is selected.
The button is disabled if no job is selected or if more than
one job is selected.
15 [Print]
Press to print the selected stored job(s).
This button can be used only when one or more jobs are
selected. The button is disabled if no job is selected or if a
job that cannot be printed due to AMS access restrictions is
selected.
For information on AMS, see "AMS Limitations," on p. 3-17
16 [Delete]
Press to delete the selected stored job(s).
This button can be used only when one or more jobs are
selected. The button is disabled if no job is selected.
17 [Details]
Press to display the details dialog for the selected stored job.
This button can be used when only one job is selected. The
button is disabled if no job is selected or multiple jobs are
selected.
18 [Cancel Printing]
Press to cancel printing of the selected stored job(s).
This button can be used only when one or more jobs are
selected. The button is disabled if no job is selected.
Logging In and Logging Out
3-7
Stored Job Management
You can display a list of, print, and delete jobs stored in Canon Business Imaging Online from the
touch panel display of a Canon device.
NOTE
• To use the stored job management function, you must log in to MEAP from the touch panel
display of a Canon device. For instructions on logging in, see "Logging In," on p. 3-2
• The screen that is displayed may differ depending on the model of the machine.
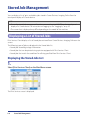
Displaying a List of Stored Jobs
Print Services Client displays a list of stored jobs retrieved from Canon Business Imaging Online on the
screen.
The following types of jobs are displayed in the Stored Jobs list:
• Stored jobs according to login information
• Stored jobs that can be printed using a printer equipped with Print Services Client
• Stored jobs that match the conditions for refining specified from Print Services Client
Displaying the Stored Jobs List
1.
Select [Print Services Client] on the Main Menu screen.
The Print Services screen is displayed.
3-8
Stored Job Management
NOTE
• The list of stored jobs retrieved from Canon Business Imaging Online when logging in to MEAP
is displayed.
• The maximum number of jobs displayed on one page is 100. If the number of jobs to retrieve
from Canon Business Imaging Online exceeds 100 jobs, the stored jobs are retrieved by page
and displayed in the Stored Jobs list.
• If you move to the previous page or next page using [
displayed Stored Jobs list, the selections are canceled.
] or [
] while jobs are selected in the
• If you press [
] on the Print Services screen, the Stored Jobs list is updated.
• If you are using an imageRUNNER model or LBP model, select [Print Services Client] from the
MEAP application selection button.
• If you update the list when a job is selected, the selection is retained, except in the following
cases:
- When the job is deleted
- When the job no longer matches the conditions for refining and is no longer displayed in
the list
Refining the Stored Jobs List Display
1.
Select [Print Services Client] on the Main Menu screen.
The Print Services screen is displayed.
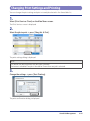
2.
Press [Refine Jobs].
The dialog for setting the conditions to refine the Stored Jobs list is displayed.
Stored Job Management
3-9
3.
Select the conditions for refining → press [Start Refining].
The stored jobs that match the conditions for refining are displayed.
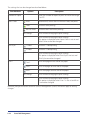
The conditions for refining that can be selected are as follows.
Condition
Print Count
Options
Description
Unprinted
Displays jobs for which the print count is zero.
No Specification
Displays jobs for which the print count has not reached
the limit count.
Displaying Stored Job Details
You can confirm the details of stored jobs displayed in the Stored Jobs list.
----
1.
Select [Print Services Client] on the Main Menu screen.
The Print Services screen is displayed.
2.
Select the job to confirm the details of → press [Other Operation].
A balloon panel is displayed to the right of [Other Operation].
3-10
Stored Job Management
3.
Press [Details] on the balloon panel.
The stored job details dialog is displayed.
NOTE
In the details, [Document Name], [Date/Time Received], [Date/Time of Last Print], [Pages], [Size
(byte)], [Number of Copies], [Select Color], [Print Style], [N on 1], [Print Count], [Limit Count], [Status],
[Owner Name], [Retention Expiration], [Print Expiration], and [Document ID] are displayed.
Stored Job Management
3-11
Displaying Stored Job Status
The status of stored jobs retrieved from Canon Business Imaging Online is displayed in the stored job
details dialog of the Print Services screen.
The types of status that are displayed are described below.
Status
Description
Receiving
Receiving stored job with Canon Business Imaging Online
Waiting
Successfully received stored job with Canon Business Imaging Online
Printing
Completed receipt of stored job with Canon Business Imaging Online and printing
in process
Printed
Completed printing
Deleting
Processing deletion
RX Error
Could not complete receipt of stored job with Canon Business Imaging Online
Ended in Err.
Printing failed
Waiting to Print Canon Business Imaging Online received print request but printing not yet in
process
Canceled
Canceled printing before completion
Processing
Canon Business Imaging Online is exporting a stored job for an output option
Deleted
Completed deletion
NOTE
If Deleting, RX Error, Ended in Err., Canceled, or Deleted is displayed for the status, the print result for
that job is error.
3-12
Stored Job Management
Printing a Stored Job
You can print a stored job selected in the Stored Jobs list.
----
1.
Select [Print Services Client] on the Main Menu screen.
The Print Services screen is displayed.
2.
Select the job to print → press [Print].
The print confirmation dialog is displayed.
NOTE
• When printing stored jobs, you can select multiple jobs and print them at one time.
• When selecting multiple stored jobs, you cannot select more than the maximum number of
selectable jobs.
• Printing cannot be performed if a job that cannot be printed due to AMS access restrictions is
selected.
For information on AMS, see "AMS Limitations," on p. 3-17
Stored Job Management
3-13
3.
Press [Yes].
The Waiting to Print dialog is displayed.
NOTE
• A list of jobs for which errors occur is displayed in the error list dialog when you select and print
multiple stored jobs.
- If errors occur for all the jobs you select and you close the error list dialog, the Stored Jobs
list is updated and you are returned to the Print Services screen.
- If errors occur for some of the jobs you select and you close the error list dialog, the jobs
without errors are printed, and the jobs for which errors occurred are displayed in the error
list dialog again after printing is complete. If you close the error list dialog, the Stored Jobs
list is updated and you are returned to the Print Services screen.
• The dialog may not be displayed depending on the settings file setting value.
4.
After printing is complete, the Stored Jobs list is updated.
You are returned to the Print Services screen.
NOTE
• If printing starts after the Waiting to Print dialog is displayed, an update dialog is displayed, and
the stored job is updated.
• When the Stored Jobs list is updated after printing, all stored job selections are canceled.
• If the device cannot perform color printing, printing is performed in black-and-white, regardless
of the print attributes of a job.
3-14
Stored Job Management
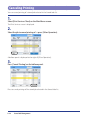
Changing Print Settings and Printing
You can change the print settings and print a stored job selected in the Stored Jobs list.
1.
Select [Print Services Client] on the Main Menu screen.
The Print Services screen is displayed.
2.
Select the job to print → press [Chng Set. & Prnt].
The print settings dialog is displayed.
NOTE
This button can be used when only one job is selected.
The button is disabled if no job is selected or if more than one job is selected.
3.
Change the settings → press [Start Printing].
The print confirmation dialog is displayed.
Stored Job Management
3-15
The settings that can be changed are described below.
Print Attribute
Number of Copies
Select Color
Print Style
Options
-
Enter the number of copies to print. Set within the range
1 to 255.
Auto
Automatically selects Black & White or Color, and prints.
Color
Performs color printing.
Black & White
Performs black-and-white printing.
No Change
Prints without changing the print settings.
-----
Prints without changing the print settings.
This option is displayed when Select Color is not set and
Select Color cannot be changed.
1-Sided
Performs 1-sided printing.
2-Sided
Performs 2-sided printing.
-----
N on 1
Description
Prints without changing the print settings.
This option is displayed when Print Style is not set and
Print Style cannot be changed.
1 on 1
Prints one page on one side of the paper.
2 on 1
Prints two pages on one side of the paper.
4 on 1
Prints four pages on one side of the paper.
No Change
Prints without changing the print settings.
-----
Prints without changing the print settings.
This option is displayed when N on 1 is not set and N on
1 cannot be changed.
However, job type limitations and AMS (Access Management System) limitations apply to setting
changes.
3-16
Stored Job Management
AMS Limitations
The print attributes that can be changed are limited according to AMS access limitations and some
device information.
Print Attribute
Condition
Limitations
Print Style
When Deny is set for the AMS limitation,
Simplex
Only 2-Sided can be selected.
N on 1
When 2 is set for the AMS limitation, Nup
Only 2 on 1 or 4 on 1 can be selected.
When 4 is set for the AMS limitation, Nup
Only 4 on 1 can be selected.
When Bw is set for the AMS limitation,
ColorPrint
Only Black & White can be selected.
Select Color
NOTE
• If the device is operating in AMS mode, Print Services Client applies limitations according to the
access limitations for the login user.
If the device is operating in Regular mode, limitations are not applied.
• AMS mode is available only for iR-ADV models.
• By pressing the Limitations button on the Print Services screen, you can display the Limitations
dialog and confirm the AMS limitations set for the login user.
The Limitations button is displayed only when the device is operating in AMS mode.
4.
Press [Yes].
The Waiting to Print dialog is displayed.
Stored Job Management
3-17
Canceling Printing
You can cancel printing of a stored job selected in the Stored Jobs list.
1.
Select [Print Services Client] on the Main Menu screen.
The Print Services screen is displayed.
2.
Select the job to cancel printing of → press [Other Operation].
A balloon panel is displayed to the right of [Other Operation].
3.
Press [Cancel Printing] on the balloon panel.
Press to cancel printing of the stored job selected in the Stored Jobs list.
3-18
Stored Job Management
NOTE
• You can select multiple jobs and cancel them at one time.
• When selecting multiple stored jobs, you cannot select more than the maximum number of
selectable jobs.
• When the Stored Jobs list is updated after canceling, all stored job selections are canceled.
• If errors occur for some or all of the stored jobs when canceling printing, the jobs for which
errors occurred are displayed in the error list dialog. Close the error dialog to update the Stored
Jobs list.
Deleting a Stored Job
You can delete a stored job selected in the Stored Jobs list.
----
1.
Select [Print Services Client] on the Main Menu screen.
The Print Services screen is displayed.
2.
Select the job to delete → press [Other Operation].
A balloon panel is displayed to the right of [Other Operation].
Stored Job Management
3-19
3.
Press [Delete] on the balloon panel.
The delete confirmation dialog is displayed.
NOTE
• When deleting stored jobs, you can select multiple jobs and delete them at one time.
• When selecting multiple stored jobs, you cannot select more than the maximum number of
selectable jobs.
• The dialog may not be displayed depending on the settings file setting value.
4.
Press [Yes].
The waiting to delete dialog is displayed.
NOTE
If errors occur during deleting, a list of the jobs for which the errors occurred is displayed in the
error list dialog. If you close the error list dialog, the Stored Jobs list is updated and you are returned
to the Print Services screen.
3-20
Stored Job Management
5.
After deleting is complete, the Stored Jobs list is updated.
You are returned to the Print Services screen.
NOTE
When the Stored Jobs list is updated after deletion, all stored job selections are canceled.
Stored Job Management
3-21
3-22
Stored Job Management
Change Settings Function
4
$)"15&3
This chapter provides instructions on changing the settings of Print Services Client.
----
Changing the Settings..................................................................................................................4-2
Logging In to the Management Console............................................................................................................. 4-2
Downloading the Settings File.............................................................................................................................. 4-4
Uploading the Settings File.................................................................................................................................... 4-5
Changing the Settings............................................................................................................................................. 4-6
Logging Out from the Management Console..................................................................................................4-10
Changing the Management Console Password...............................................................................................4-11
Changing the Display Language for Management Console.........................................................................4-12
4-1
Changing the Settings
You can change the settings of Print Services Client.
IMPORTANT
The use of Web browser navigation functions such as [Back] or [Forward] are not supported when
using the Change Settings function.
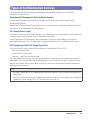
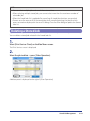
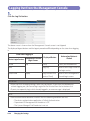
Logging In to the Management Console
1.
Enter the URL below in the address bar of the Web browser. (The URL entry is case
sensitive.)
http://<IP address of device>:8000/PrintServicesClient/Console
The Login screen of the login service is displayed.
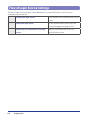
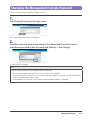
2.
Enter [User Name] and [Password] → select the login destination → click [Log In].
Enter or select the necessary items according to the set login service.
Set Login Service
Department ID Management
Operation
1. Enter a Department ID and PIN.
2. Click [Log In].
SDL
1. Enter a user name and password.
Single Domain SSO
2. Click [Log In].
Multi Domain SSO
1. Enter a user name and password.
SSO-H
2. Select the login destination.
3. Click [Log In].
The Login screen for Print Services Client is displayed.
NOTE
If no operation is performed for a specified period of time after logging in to the login service, the
login becomes invalid and you must log in again.
4-2
Changing the Settings
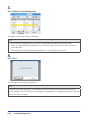
3.
Enter [User Name] and [Password] → click [Log In].
The Change Settings screen is displayed.
IMPORTANT
• To log out of the login service, click [Log Out] in the upper right part of the Management
Console Login screen.
• If no operation is performed for five or more minutes after logging in, only the logout operation
can be performed.
• If you close the Web browser without logging out, you cannot log in again for five minutes from
the last button click.
• If you try to separately log in while already logged in, an error message is displayed.
• The Login screen is skipped if one of the following conditions is met:
- "LoginSkip" is set to '1'
- The setting for "ConsoleLogin" includes the login user name for the remote login service
NOTE
• The default user name and password are as follows:
- User name: printservicesclient
- Password: printservicesclient
• You can change the password. For instructions on changing the password, see "Changing the
Management Console Password," on p. 4-11
• You can change the display language. For instructions on changing the display language, see
"Changing the Display Language for Management Console," on p. 4-12
Changing the Settings
4-3
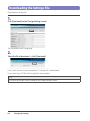
Downloading the Settings File
Download the settings file.
1.
Click [Download] on the Change Settings screen.
The Download screen is displayed.
2.
Select the file to download → click [Download].
If you select “printservicesclient.properties,” a settings file is downloaded.
If you select 'log', a ZIP file of all the log files is downloaded.
NOTE
Click [Back to Settings Screen] to display the Change Settings screen.
4-4
Changing the Settings
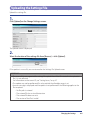
Uploading the Settings File
Upload the settings file.
1.
Click [Upload] on the Change Settings screen.
The Upload screen is displayed.
2.
Select the location of the settings file from [Browse] → click [Upload].
If the update is successful, you are returned to the Settings File Upload screen.
IMPORTANT
• The tenant ID is not supported for settings file upload. Even if the ID is stated in the uploaded
file, it is not reflected.
For information on the tenant ID, see "Setting Items," on p. 4-7
• The update may not be performed if a value outside the allowable range is set.
• An error message is displayed and the update is not performed if the following applies to the
file to upload:
- No file path is entered
- The entered file has an invalid extension
- The entered file does not exist
- The version of the file is invalid
Changing the Settings
4-5
NOTE
• The uploaded settings file is checked and invalid settings are replaced with the value at the time
for the same setting in the settings file.
• Restart Print Services Client to reflect the setting changes.
• If you are using Internet Explorer 7, you can directly enter text in the various entry fields.
• Click [Back to Settings Screen] to display the Change Settings screen.
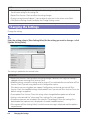
Changing the Settings
Change the settings.
----
1.
Enter the setting value in [New Setting Value] for the setting you want to change → click
[Update Setting Value].
The setting is updated to the entered value.
IMPORTANT
• Restart Print Services Client to reflect the setting changes. However, the "Log.Level"setting is
updated without restarting Print Services Client.
• Modified settings, except the setting value for tenant ID, are retained after uninstallation of Print
Services Client if you are using a device with Configuration service.
If the device you are using does not support Configuration service and you uninstall Print
Services Client, the modified settings are discarded. Even if you reinstall Print Services Client, the
default settings are applied.
• If you update Print Services Client, the setting values changed before update are reflected.
• Setting a value outside the "value range" for a settings file is not supported.
• If Japanese characters are included in the value for "ConsoleLogin" when the settings file is
downloaded, the Japanese text is displayed in Unicode (\udddd notation).
• If the content of [New Setting Value] is invalid, an error message is displayed and the update is
not performed.
4-6
Changing the Settings
NOTE
• You can click
to update the current display.
• The values displayed in the entry fields of [New Setting Value] column are as follows:
1. When the setting is in the settings file
- The settings file value is displayed.
2. When the setting is not in the settings file
- If entry is required, the default value is displayed.
- If entry is not required, it is left blank.
• If you press [Auto Set], a value appropriate for Canon Business Imaging Online is automatically
entered for [New Setting Value].
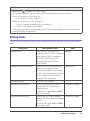
Setting Items
The settings and setting values that can be changed with the Management Console are described
below.
Setting Item
WebMonitor.Url
Setting Value Details
Notes
Set the URL for Canon Business
Required
Imaging Online. The URL is as follows:
https://prnwm.a01.c-aas.com/wm/
If you click [Auto Set], the URL is
automatically entered in [New
Setting Value].
WebMonitor.Device.ProxyInfo
0: Select when not using the device
The default is '1'.
proxy server settings for Canon
Business Imaging Online connection.
1: Select when using the device proxy
server settings for Canon Business
Imaging Online connection.
OMPrintServer.Port
This item is not available.
WebMonitor.HttpTimeout
Set the time-out time for the HTTP
connection with Canon Business
Imaging Online.
Set within the range 1000 to 30000
(unit: milliseconds).
WebMonitor.ReadTimeout
Set the time-out time for response
The default is '60000'.
reading with Canon Business Imaging
Online.
Set within the range 1000 to 180000
(unit: milliseconds).
The default is '30000'.
Changing the Settings
4-7
Setting Item
Setting Value Details
Notes
StoredJobList.MaxSelectJobNum
Set the maximum number of jobs
that can be selected.
Set within the range 1 to 20.
The default is '20'.
StoredJobList.MaxJobNum
Set the maximum number of jobs
retrieved for one request.
Set within the range 1 to 100.
The default is '100'.
StoredJobList.PrintJob.Confirm
0: Select to hide the stored job print
confirmation dialog.
1: Select to display the stored job
print confirmation dialog.
The default is '1'.
StoredJobList.DeleteJob.Confirm
0: Select to hide the stored job delete The default is '1'.
confirmation dialog.
1: Select to display the stored job
delete confirmation dialog.
StoredJobList.AutomaticSelectJob
0: Deselects the maximum number
of jobs that can be selected from the
top when logging in.
1: Selects the maximum number of
jobs that can be selected from the
top when logging in.
The default is '0'.
Log.Level
Select the log level from the
following:
The default is 'High'.
• StartException
• Exception
• High
• Public
LoginSkip
0: Select to display the Login screen.
1: Select to skip the Login screen.
The default is '0'.
TenantID
Required to log in to Canon Business
Imaging Online.
You must acquire a
tenant ID when using
Print Services Client on
the Cloud.
To acquire the tenant ID, enter the
user ID and password of a user with
a print service management role for
the target tenant, and click [Acquire
Tenant ID].
After acquiring the tenant ID, click the
button to update the Print Services
Client settings.
4-8
Changing the Settings
Setting Item
ConsoleLogin
Setting Value Details
Notes
Register the user names that skip the
Login screen.
Separate each user with a comma (",")
when specifying multiple users.
If you enter a Department ID,
enter a seven digit number. If the
Department ID is less than seven
digits, enter leading zeros to make a
seven digit number. E.g. Department
ID is '1': enter '0000001'
You can register up to five users or
five departments.
IMPORTANT
• If you want to connect to Canon Business Imaging Online via a proxy server, specify the device
proxy server settings, and set the WebMonitor.Device.ProxyInfo setting to '1'.
Also, use the following methods for proxy authentication:
- Basic Authentication
- Digest Authentication
• If WebMonitor.Url is changed, the tenant ID setting is cleared. To use a tenant ID after changing
WebMonitor.Url, you must acquire a tenant ID from the new connection destination and specify
the setting again.
Changing the Settings
4-9
Logging Out from the Management Console
1.
Click the Log Out button.
The above screen is shown when the Management Console screen is not skipped.
The displayed logout button and the logout procedure differ depending on the state when logging
in.
State when Logging In
Management Console
Device Login Service
Login Screen
Invalid
Skip
Valid
Valid/Invalid
Display
Action when Button is
Clicked
Displayed Button
[Close]
Closes your Web browser.
[Log Out]
Returns to the login screen of
the login service.
[Log Out from Print
Services Client]
Returns to the Management
Console login screen.
IMPORTANT
• When you finish changing settings, make sure you log out. If you close the Web browser
without logging out, you cannot log in again for five minutes from the last button click.
• If you try to separately log in while already logged in, an error message is displayed.
NOTE
• Device authentication becomes invalid if all of the following conditions are met:
- The device authentication application is Default Authentication
- Department ID Management of the device is OFF
- The System Manager ID of the device is not set
4-10
Changing the Settings
Changing the Management Console Password
You can change the password for a login account.
----
1.
Click [Change Password] on the Login screen.
The Change Password screen is displayed.
2.
Enter the current user name and password in [User Name] and [Current Password] →
enter the new password in [New Password] and [Confirm] → click [Change].
The password is changed.
NOTE
• Enter the password in 8 to 32 alphanumeric characters.
• The new password is valid until Print Services Client is uninstalled.
If you uninstall Print Services Client, the password is discarded. Even if you reinstall Print Services
Client, the default password is used.
• If you update Print Services Client, the password set before update is retained.
Changing the Settings
4-11
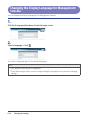
Changing the Display Language for Management
Console
You can change the display language for the Management Console.
1.
Click the [Language] drop-down list on the Login screen.
2.
Select a language → click
.
The screen is displayed again in the selected language.
NOTE
• Only Japanese and English are supported.
• If you skip the login screen, you can change the display language on the screen for changing
settings.
4-12
Changing the Settings
Appendix
5
$)"15&3
This chapter describes the error messages, limitations, and MEAP resource use for Print Services Client.
----
List of Error Messages...................................................................................................................5-2
Print Services Client Operations............................................................................................................................ 5-2
Management Console Error Messages................................................................................................................. 5-4
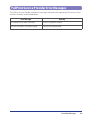
PullPrint Service Provider Error Messages.......................................................................................................... 5-7
Limitations....................................................................................................................................5-8
Login............................................................................................................................................................................ 5-8
Event Notification when Operating the Touch Panel Display......................................................................... 5-8
Canon Business Imaging Online Access Time-Out............................................................................................ 5-8
Displayed Characters............................................................................................................................................... 5-8
Displays....................................................................................................................................................................... 5-8
AMS (Access Management System) Compatibility........................................................................................... 5-9
MEAP Resource Use....................................................................................................................5-10
5-1
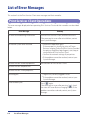
List of Error Messages
This section lists the Print Services Client error messages and their remedies.
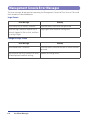
Print Services Client Operations
The error messages displayed when operating Print Services Client and their remedies are described
below.
Error Message
An error occurred during initialization.
Remedy
Uninstall Print Services Client, and then reinstall it.
If the error persists even after reinstallation, contact
your System Manager.
An internal system error occurred.
• Perform the operation again.
If the error persists, check the status of Canon
Business Imaging Online/PullPrint Service Provider/
the printer, or perform login/logout, start/stop, or
reinstallation of Print Services Client.
• Confirm the network settings of your printer.
• If the problem cannot be resolved, contact your
System Manager.
Incorrect version: resource.properties.
Reinstallation of Print Services Client.
Incorrect version: template.xml.
Incorrect version : mafw.properties..
Please log out.
• Log out any currently logged in users.
• If the problem cannot be resolved, contact your
System Manager.
Failed to obtain job.
Press [
] again.
If the error persists even after pressing [
], check
the status of Canon Business Imaging Online. If the
problem cannot be resolved, contact your System
Manager.
5-2
List of Error Messages
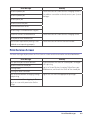
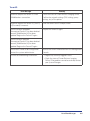
Error Message
Failed to update job.
Failed to update job.
Remedy
Check the status of Canon Business Imaging Online. If
the problem cannot be resolved, contact your System
Manager.
Failed to print job.
Failed to cancel the jobs.
Disconnected from server.
Failed to log in to WebMonitor. Log out.
Could not connect to WebMonitor.
Check the status of Canon Business Imaging Online.
No response from WebMonitor.
The function required for printing is not
enabled or not operating properly.
Check the status of PullPrint Service Provider.
Print Services Screen
The error messages displayed on the Print Services screen and their remedies are described below.
Error Message
The specified job has been deleted.
Failed to send the stored job.
Printing failed.
Printing has been canceled.
You are restricted from changing settings
and printing.
Remedy
Displayed when the status of a stored job is changed
while printing.
Log in to Canon Business Imaging Online from your
Web browser, and check the status of the stored job.
Log in as a user with the appropriate privileges.
You are restricted from logging in. Please
log in as a user with permission for the
usage.
List of Error Messages
5-3
Management Console Error Messages
The error messages displayed when operating the Management Console of Print Services Client and
their remedies are described below.
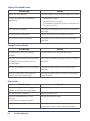
Login Screen
Error Message
Remedy
[User Name] or [Password] is incorrect.
Enter the correct user name and password.
Could not log in because another user is
currently logged in. Wait a while, and then
try to log in again.
Log in again after the other user logs out.
Change Settings Screen
Error Message
Remedy
The entered value is incorrect.
Enter the correct value for the item in which the error
occurred.
The version of the file is incorrect. All items
will be displayed in default settings.
Update the setting values.
5-4
List of Error Messages
TenantID
Error Message
Remedy
Could not acquire the Tenant ID. Check
<WebMonitor> connection.
Check the status of Canon Business Imaging Online.
Confirm the network settings (DNS settings, proxy
settings, etc.) of the printer.
Could not acquire the Tenant ID. [User ID]
or [Password] is incorrect.
Enter the correct user ID and password.
The file has been uploaded.
The acquired Tenant ID has been deleted
because [WebMonitor.Url] has been
updated. Register the Tenant ID again.
Acquire the Tenant ID again.
The file has been updated.
The acquired Tenant ID has been deleted
because [WebMonitor.Url] has been
updated. Register the Tenant ID again.
The tenant ID needs to be re-registered.
Contact the system administrator.
An error occurred during initialization.
Retrieve the tenant information from the Management
Console.
• Log out any currently logged in users.
• Check the status of Canon Business Imaging
Online. If the problem cannot be resolved, contact
your System Manager.
List of Error Messages
5-5
Settings File Upload Screen
Error Message
Specify the file to upload.
An error occurred while uploading the
specified file.
Remedy
Enter the file path in one or more file path entry fields.
• Upload the file again.
• Restart Print Services Client.
If the problem cannot be resolved, reinstallation of
Print Services Client.
The extension is incorrect.
Enter a file with the correct extension in the file path
entry field.
The specified file is not found.
Enter an existing file in the file path entry field.
The version of the file is incorrect.
Enter a file with the correct version in the file path
entry field.
Change Password Screen
Error Message
Remedy
[User Name] or [Current Password] is
incorrect.
Enter the correct user name and password.
Characters that cannot be used have been
entered for [New Password]. Enter the
password again.
Enter a new password using only characters valid for a
password.
Set [New Password] with 8 to 32 characters. Enter the new password in 8 to 32 alphanumeric
characters.
[New Password] and [Confirm] do not
match. Enter the password again.
Enter the same password in [Confirm] as entered for
[New Password].
Error Screen
Error Message
Remedy
You are not logged in or were logged out
due to a session time-out. Log in again.
Log in again.
The specified URL is incorrect.
Specify the correct URL.
Could not upload because an error
occurred.
Try to perform the operation again.
Perform the operation again.
A system error occurred.
Restart Print Services Client. If the error persists,
uninstall Print Services Client, and then reinstall it.
5-6
List of Error Messages
PullPrint Service Provider Error Messages
The PullPrint Service Provider-related error messages displayed when operating Print Services Client
and their remedies are described below.
Error Message
Remedy
This operation has been cancelled.
There is no specific remedy.
An error occurred in the following job.
Confirm the displayed job.
List of Error Messages
5-7
Limitations
The precautions and limitations for the use of Print Services Client are described below.
Login
When a login event occurs, the login user name must be set in the login information and be
acquirable.
Event Notification when Operating the Touch
Panel Display
If an operation is performed from the touch panel display, Print Services Client processes it in
accordance with the event notification from MEAP. When an operation is performed from the touch
panel display, it is MEAP that monitors and determines the event to notify, not Print Services Client.
Canon Business Imaging Online Access Time-Out
A time-out time is set for HTTP communication with WebMonitor. If HTTP communication with
WebMonitor times out, communication is suspended. There are two types of time-out: HTTP
connection time-out that occurs between an HTTP request being sent to WebMonitor and
connection being confirmed, and HTTP response reading time-out that occurs between the HTTP
connection with WebMonitor being confirmed and the response being returned.
The system error dialog is displayed on the Print Services screen when a time-out occurs.
Displayed Characters
The characters that Print Services Client can display are limited to the Shift JIS characters that can be
displayed on the touch panel display of the device. Characters that cannot be displayed on the touch
panel display of the device are shown as <?>.
Displays
The appearance of screens and terminology used in Print Services Client differ depending on the
model of the device you are using.
5-8
Limitations
AMS (Access Management System) Compatibility
• Guest users cannot use Print Services Client.
In the application limits, set Print Services Client to be inaccessible for Guest users.
• If the device you are using is an iR model other than an iR-ADV or an LBP model, you cannot use
the AMS mode.
Limitations
5-9
MEAP Resource Use
The MEAP hardware specifications for Print Services Client are described below.
Item
Print Services Client
MEAP Spec. Version
13, 15, 18
Hard disk size
32,000 KB
Maximum memory use
6,500 KB
Maximum number of threads
25
Maximum number of file descriptions
15
Maximum number of sockets
12
5-10
MEAP Resource Use
© CANON INC.