1
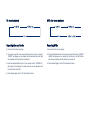
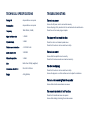
CD5
Compact disc player
User’s manual
INTRODUCTION
Thank you for purchasing this Cambridge Audio CD player. This model
is part of our commitment to the on-ggoing development of the
Cambridge Audio range. We hope that you will appreciate the results
and enjoy many years of listening pleasure from them.
As with previous Cambridge Audio CD players, the CD5 makes use of a
custom Cambridge Audio servo solution and transport, at the heart of
which is a VLSI (Very Large Scale Integration) circuit which dynamically
adjusts in real time the focusing, tracking and output level of the laser
for the maximum retrieval of digital information. To ensure the very best
performance there are also multiple separate power supplies for the
D/A converter circuitry, audio filters, clocks and other stages, as well as
extensive use of low impedance film capacitors.
The CD5 CD player also now features MP3 playback and allows navigation of MP3 folders on the disc directly from the remote control and front
panel.
Your CD player can only be as good as the system it is connected to.
Please do not compromise on your amplifier, speakers or cabling.
Naturally we particularly recommend amplification from the Cambridge
Audio range, which have been designed to the same exacting standards
as our CD players. Your dealer can also supply excellent quality
Cambridge Audio interconnects to ensure your system realises its full
potential.
Thanks for taking the time to read this manual; we do recommend you
keep it for future reference.
Matthew Bramble
Technical Director
SAFETY PRECAUTIONS
Checking the Power Supply Rating
For your own safety please read the following instructions carefully before attempting
to connect this unit to the mains.
Check that the rear of your unit indicates the correct supply voltage. If your mains
supply voltage is different, consult your dealer.
This unit is designed to operate only on the supply voltage and type that is indicated on the rear panel of the unit. Connecting to other power sources may damage
the unit.
This equipment must be switched off when not in use and must not be used unless
correctly earthed. To reduce the risk of electric shock, do not remove the unit's
cover (or back). There are no user serviceable parts inside. Refer servicing to qualified service personnel. If the power cord is fitted with a moulded mains plug the
unit must not be used if the plastic fuse carrier is not in place. Should you lose the
fuse carrier the correct part must be reordered from your Cambridge Audio dealer.
The lightning flash with the arrowhead symbol within an equilateral triangle is
intended to alert the user to the presence of un-insulated ‘dangerous
voltage’ within the product’s enclosure that may be of sufficient magnitude to constitute a risk of electric shock to persons.
The exclamation point within an equilateral triangle is intended
to alert the user to the presence of important operating and maintenance instructions in the service literature relevant to this appliance.
This product complies with European Low Voltage (73/23/EEC)
and Electromagnetic Compatibility (89/336/EEC) Directives
when used and installed according to this
instruction manual. For continued compliance only Cambridge
Audio accessories should be used with this product and servicing
must be referred to qualified service personnel.
The crossed-out wheeled bin is the European Union symbol for indicating separate collection for electrical and electronic equipment.
This product contains electrical and electronic equipment which
should be reused, recycled or recovered and should not be disposed of with unsorted regular waste. Please return the unit or contact the authorised dealer from whom you purchased this product
for more information.
Plug Fitting Instructions (UK Only)
The cord supplied with this appliance is factory fitted with a 13 amp mains plug fitted with a 3 amp fuse inside. If it is necessary to change the fuse, it is important
that a 3 amp one is used. If the plug needs to be changed because it is not suitable
for your socket, or becomes damaged, it should be cut off and an appropriate plug
fitted following the wiring instructions below. The plug must then be disposed of
safely, as insertion into a 13 amp socket is likely to cause an electrical hazard.
Should it be necessary to fit a 3-pin BS mains plug to the power cord the wires
should be fitted as shown in this diagram. The colours of the wires in the mains
lead of this appliance may not correspond with the coloured markings identifying
the terminals in your plug. Connect them as follows:
The wire which is coloured BLUE must be
connected to the terminal which is marked
with the letter ‘N’ or coloured BLACK.
The wire which is coloured BROWN must be
connected to the terminal which is marked
with the letter ‘L’ or coloured RED.
The wire which is coloured GREEN/YELLOW
must be connected to the terminal which is
marked with the letter ‘E’ or coloured GREEN.
If your model does not have an earth wire,
then disregard this instruction.
If a 13amp (BS 1363) plug is used, a 3amp fuse must be fitted, or if any other type
of plug is used a 3amp or 5amp fuse must be fitted, either in the plug or adaptor,
or on the distribution board.
IMPORTANT SAFETY INSTRUCTIONS
Please take a moment to read these notes before installing your CD player,
they will enable you to get the best performance and prolong the life of the
product. We advise you follow all instructions, heed all warnings and keep the
instructions for future reference.
The unit is of Class 1 construction and must be connected to a Mains socket outlet with a protective earthing connection.
Only use the specified attachments/accessories with this unit.
Do not defeat the safety purpose of the polarized or grounding-type plug. A
polarized plug has two blades with one wider than the other. A grounding type
plug has two blades and a third grounding prong. The wide blade or the third
prong are provided for your safety. If the provided plug does not fit into your
outlet, consult an electrician for replacement of the obsolete outlet.
The unit must be installed in a manner that makes disconnection of the
mains plug from the mains socket outlet (or appliance connector from the
rear of the unit) possible. Where the mains plug is used as the disconnect
device, the disconnect device shall remain readily operable. Protect the
power cord from being walked on or pinched particularly at plugs, convenience receptacles, and the point where they exit from the unit.
This unit must be installed on a sturdy, level surface. Do not place
in a sealed area such as a bookcase or in a cabinet. Any space open
at the back (such as a dedicated equipment rack) is fine however.
When a cart is used, use caution when moving the cart to avoid
injury from tip-over.
The unit requires ventilation. Do not situate it on a rug or other soft surface
and do not obstruct any air inlets or outlet grilles.
Do not install near any heat sources such as radiators, heat registers, stoves,
or other apparatus (including amplifiers) that produce heat.
WARNING - To reduce the risk of fire or electric shock, do not expose this unit
to rain or moisture. This unit must not be used near or exposed to dripping or
splashing water or other liquids. No objects filled with liquid, such as vases,
shall be placed on the unit. In the event, switch off immediately, disconnect
from the mains supply and contact your dealer for advice.
Ensure that small objects do not fall through any ventilation grille. If this happens, switch off immediately, disconnect from the mains supply and contact
your dealer for advice.
To turn the unit off completely switch off on the rear panel. If you do not
intend to use this unit for a long period of time, unplug it from the mains socket. Unplug this unit during lightning storms.
To clean the unit, wipe its case with a dry, lint-free cloth. Do not use any
cleaning fluids containing alcohol, ammonia or abrasives. Do not spray an
aerosol at or near your CD player.
This unit is not user serviceable, never attempt to repair, disassemble or
reconstruct the unit if there seems to be a problem. Servicing is required
when the unit has been damaged in any way, such as power-supply cord or
plug is damaged, liquid has been spilled or objects have fallen into it, the unit
has been exposed to rain or moisture, does not operate normally or has been
dropped. A serious electric shock could result if this precautionary measure
is ignored.
Important Note
This unit has been designed to play compact discs, recordable CDs (CD-R) and re-writable CDs (CD-RW) bearing the
identification logo shown here. No other discs can be
used. The CD-R/CD-RW discs should contain properly
recorded TOC (Table of Contents) information so that they
can be played back. This unit can play only the discs recorded in the CD-DA
format designed for music reproduction. Do not attempt to play a disc on this
unit containing other data, such as a CD-ROM for PCs.
REAR PANEL CONNECTIONS
Compact Disc Player
Designed in London, England
Class 1 Laser Product
Luokan 1 Laserplaite
Klass 1 Laserapparat
LINE
OUTPUT
OPTICAL OUT
LEFT
3
CAUTION: RISK OF ELECTRIC SHOCK.
DO NOT OPEN.
1
2
RIGHT
LINE
OUTPUT
Model: CD5 v3.0
Power Rating: 230V AC 50Hz
Max Power Consumption: 40W
OPTICAL OUT
1 Line output
Use good quality interconnect cables from these sockets to any line level
input on your amplifier.
2 AC power socket
Once you have completed all connections to the amplifier, plug the AC
power cable into an appropriate mains socket. Your compact disc player
is now ready for use.
AVIS:
RISQUE DE CHOC ELECTRIQUE.
NE PAS OUVRIR.
ACHTUNG: VORM ÖFFNEN DES GERÄTES.
NETZSTSCKER ZIEHEN.
www.cambridge-audio.com
Manufactured in an
ISO9002
approved facility
3 Toslink optical digital output
Use to connect to the input of a separate DAC or digital recording
machine. Use a high quality TOSLINK fibre optic interconnect cable
designed specifically for audio use.
Note: MP3 playback is not supported through the digital output. Please
connect using the Line output.
FRONT PANEL CONTROLS
Compact Disc Player
CD5
POWER
OPEN / CLOSE
1
2
1 Power
Switches the unit between On and Off.
2 Open/Close
Allows you to open and close the disc tray thus making it possible to load
a disc. Pressing Play will also close the tray and start the CD.
3 Play/Pause
Plays the disc and pauses play.
4 Stop
Stops the CD playing.
FOLDER
/
3
4
5
6
5 Skip/Scan
Allows for skipping between tracks and also searching within tracks.
Press once to skip a track, press and hold to search within a track.
6 Folder
Press to skip forward or backward to locate a desired MP3 folder on the
CD.
REMOTE CONTROL
Insert the supplied AA batteries to activate.
Play/Pause
Press to play or pause the CD.
Stop
Press to stop the CD.
Skip/Scan
Right - press once to skip forward by one track on the CD. Press and hold
to scan forwards through tracks.
Left - press once to skip backward by one track on the CD. Press and
hold to scan backwards through tracks.
Folder
Press to skip forward or backward to locate a desired MP3 folder on the
CD.
Program, Repeat, Random, Intro
Refer to the ‘Operating instructions’ section of this manual for more information.
Numerical track select
Press the number of the desired track. The track will then be played
from the start of the track. To select a track number greater than ten,
press the first number followed by the second number.
OPERATING INSTRUCTIONS
Loading and unloading discs
Note:
1. Press the Power button.
- Do not put anything except a Compact Disc into the tray, foreign objects
may damage the mechanism.
2. Press the Open/Close button. “OPEN” will appear on the display.
- Do not force the tray by hand during the opening and closing operations.
Compact Disc Player CD5
- To avoid dirt and dust entering the mechanism, keep the disc tray
closed.
POWER
OPEN / CLOSE
- If the Compact Disc is seriously scratched or too dirty the player may
not be able to read it or play it.
FOLDER
- Never load more than one disc into the disc tray at one time.
3. When the disc tray has opened fully, place a disc carefully in the tray
with the label side facing up.
4. To close the disc tray, press the Open/Close button again. When the
tray, with a correctly loaded disc, is fully closed the disc will start turning automatically. “CD READ” will appear on the display. After the CD
player has read the disc it will be ready to play. Pressing Play/Pause
will also close the tray and start playing the disc.
5. The disc tray can be opened at any time by pressing the Open/Close
button. Only remove the disc after the tray has fully opened.
Normal disc play
MP3 disc play
1. Switch on your amplifier and set its input selector to the correct position. Adjust the volume control to a minimum.
1. Insert an MP3 disc as normal.
2. Press the Power button.
3. Press the Open/Close button to open the disc tray, and load a disc.
4. Press the Open/Close button again to close the tray. The CD player
will read the disc and enter Standby mode. Alternatively pressing
Play/Pause will close the tray and start playing the disc.
5. Press the Play/Pause button. The disc will start playing from the
beginning of the first track. When the last track has finished playing,
the CD playerPOWER
will return to Standby mode.
OPEN / CLOSE
/
FOLDER
6. To stop the disc at any point press the Stop button. Pressing the
Play/Pause button while the disc is playing will pause the disc. When
the disc is paused the display will flash, play can be resumed by
pressing the Play/Pause button again.
2. The display will show the total number of tracks and folders respectively when a MP3 disc is loaded.
3. Press the Folder buttons to skip forward or backward to locate a
desired MP3 folder on the CD.
Compact Dis
Compact Disc
Player
OPEN
/ CLOSE CD5
/
FOLDER
4. Press Play/Pause to play the CD. The display will show the track number and the elapsed time of the track being played.
Locating a specific track
Using numerical keys
1. Ensure that a disc is loaded.
You can use the numerical keys on your supplied remote handset to
choose tracks.
2. Pressing the right Skip/Scan button once will forward the CD by one
track. Repeat as necessary.
3. Press Play/Pause. The disc will play to the end of the disc and then
return to Standby mode.
4. Pressing the left Skip/Scan button will access the previous track.
1. Ensure that a disc is loaded. The player can be in standby mode or
playing.
2. Simply press the number of the desired track and the player will play
the disc from the start of that track.
3. If the track number required is greater than ten, press the first number followed by the second number.
Locating a particular point in a track
1. Ensure that the disc is playing the desired track.
2. Press and hold the right Skip/Scan button, the CD will then fast forward within the track.
3. Release the button when the desired time has been reached. Play
will resume.
4. Press and hold the left Skip/Scan button, the CD will then rewind
within the track.
CD repeat playback
MP3 disc repeat playback
Repeating discs and tracks
Repeating MP3s
1. Ensure that the disc is playing.
1. Ensure that the disc is playing.
2. To repeat a specific track press Repeat while the track is playing.
“REPEAT” will appear on the display and the selected track will now
be repeated until the function is turned off.
2. Press the Repeat button on the remote control three times. “REPEAT
ALBUM” will appear on the display. All the tracks in the MP3 folder
will now be repeated until the function is turned off.
3. Press the Repeat button twice on the remote control. “REPEAT ALL”
will appear on the display. The whole disc will now be repeated until
the function is turned off.
3. Press Repeat again to turn off the Repeat function.
4. Press Repeat again to turn off the Repeat function.
Playing tracks in a random order
1. Ensure that a disc is loaded.
2. Press the Random button on the remote control. “RANDOM” will
appear on the display.
3. Press Play/Pause. The CD Player will now play the entire disc in a random order.
4. Press Random to exit Random function. The disc will continue playing to the end in the correct order.
5. Press the Stop button at any time to stop the disc.
Using the Intro function
1. Ensure that a disc is loaded.
2. Press Intro on the remote control. “INTRO” will appear on the display.
If the disc is not playing the CD player will automatically play the first
ten seconds of each track. If a disc is being played when Intro is
pressed the player will progress to the next track and play the first ten
seconds of any remaining tracks.
3. Press Intro again at any time to enter normal play mode.
Programming disc play
1. Ensure that a disc is loaded and the player is in Standby mode.
2. Press Program on the remote control. The Program set-up will appear
in the display.
3. Using the Skip/Scan buttons, skip to the track number that you want
to program as your first track (or press the actual track number on
the remote).
4. Press Program. The desired track is now entered and the program
number increases by one.
5. Repeat steps three and four until all your desired tracks are entered.
6. Press Play/Pause. The programmed tracks will play.
7. You can use the Skip/Scan functions on your remote control to move
through your programmed selection in the same way as normal playback.
8. Pressing Stop once will stop play and pressing Stop twice at any time
will wipe the program and return the player to stopped mode.
TECHNICAL SPECIFICATIONS
TROUBLESHOOTING
Voltage AC
As specified on rear panel
There is no power
Consumption
As specified on rear panel
Frequency
10Hz-20kHz (-0.5dB)
Ensure the AC power cord is connected securely.
Ensure the plug is fully inserted into the wall socket and is switched on.
Check fuse in the mains plug or adaptor.
Signal to Noise ratio
> 110dB
The player will not read the disc
Dynamic range
> 94dB
Total harmonic distortion
< 0.03% @ 1kHz
Check the disc is not loaded upside down.
Check that the disc is not too scratched or dirty.
Audio output level
1.1V RMS
There is no sound
Channel separation
> 95dB
Ensure that the amplifier is set correctly.
Check that the interconnects are inserted correctly.
Jitter
Better than 250pS (weighted)
Dimensions - H x W x D
80 x 430 x 300mm
Weight
4.0kg (8.8lbs)
The disc is skipping
Check that the disc is not too scratched or dirty.
Ensure the player is on a firm surface and not subject to vibrations.
There is a hum coming from the speaker
Ensure that all cable connections are secure.
The remote handset will not function
Check that the batteries have not expired.
Ensure that nothing is blocking the remote sensor.
LIMITED WARRANTY
Cambridge Audio warrants this product to be free from defects in materials and workmanship (subject to the terms set forth below). Cambridge
Audio will repair or replace (at Cambridge Audio's option) this product or
any defective parts in this product. Warranty periods may vary from
country to country. If in doubt consult your dealer and ensure that you
retain proof of purchase.
To obtain warranty service, please contact the Cambridge Audio authorised
dealer from which you purchased this product. If your dealer is not
equipped to perform the repair of your Cambridge Audio product, it can be
returned by your dealer to Cambridge Audio or an authorised Cambridge
Audio service agent. You will need to ship this product in either its original
packaging or packaging affording an equal degree of protection.
Proof of purchase in the form of a bill of sale or receipted invoice, which
is evidence that this product is within the warranty period, must be presented to obtain warranty service.
This Warranty is invalid if (a) the factory-applied serial number has been
altered or removed from this product or (b) this product was not purchased from a Cambridge Audio authorised dealer. You may call
Cambridge Audio or your local country Cambridge Audio distributor to
confirm that you have an unaltered serial number and/or you purchased
from a Cambridge Audio authorised dealer.
This Warranty does not cover cosmetic damage or damage due to acts of
God, accident, misuse, abuse, negligence, commercial use, or modification
of, or to any part of, the product. This Warranty does not cover damage due
to improper operation, maintenance or installation, or attempted repair by
anyone other than Cambridge Audio or a Cambridge Audio dealer, or authorised service agent which is authorised to do Cambridge Audio warranty
work. Any unauthorised repairs will void this Warranty. This Warranty does
not cover products sold AS IS or WITH ALL FAULTS.
REPAIRS OR REPLACEMENTS AS PROVIDED UNDER THIS WARRANTY
ARE THE EXCLUSIVE REMEDY OF THE CONSUMER. CAMBRIDGE AUDIO
SHALL NOT BE LIABLE FOR ANY INCIDENTAL OR CONSEQUENTIAL DAMAGES FOR BREACH OF ANY EXPRESS OR IMPLIED WARRANTY IN THIS
PRODUCT. EXCEPT TO THE EXTENT PROHIBITED BY LAW, THIS WARRANTY IS EXCLUSIVE AND IN LIEU OF ALL OTHER EXPRESS AND IMPLIED
WARRANTIES WHATSOEVER INCLUDING, BUT NOT LIMITED TO, THE
WARRANTY OF MERCHANTABILITY AND FITNESS FOR A PRACTICAL PURPOSE.
Some countries and US states do not allow the exclusion or limitation of
incidental or consequential damages or implied warranties so the above
exclusions may not apply to you. This Warranty gives you specific legal
rights, and you may have other statutory rights, which vary from state to
state or country to country.
This guide is designed to make installing and using this product as easy as possible. Information in this document has been carefully checked for accuracy at the
time of printing; however, Cambridge Audio's policy is one of continuous improvement, therefore design and specifications are subject to change without prior
notice. If you notice any errors please feel free to email us at: [email protected]
This document contains proprietary information protected by copyright. All rights
are reserved. No part of this manual may be reproduced by any mechanical, electronic or other means, in any form, without prior written permission of the manufacturer. All trademarks and registered trademarks are the property of their
respective owners.
© Copyright Cambridge Audio Ltd 2007
CD5 v3.0
www.cambridge-audio.com
Part No. AP20206/3