1
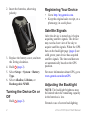
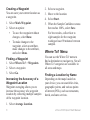
eTrex®
quick start manual
for use with models 20 and 30
Getting Started
Device Overview
‹ warning
See the Important Safety and Product
Information guide in the product
box for product warnings and other
important information.
➋
➊
➌
➍
➎
When using your device the first time,
you should complete these tasks to set
up the device and get to know the basic
features.
1.
2.
3.
4.
5.
6.
7.
8.
9.
2
Install the batteries (page 3).
Turn on the device (page 4).
Register the device (page 4).
Acquire satellites (page 4).
Calibrate the compass (page 5).
Mark a waypoint (page 6).
Create a route (page 7).
Record a track (page 7).
Navigate to a destination (page 8).
➊ Zoom keys
➋ Back key
➌ Thumb Stick™
➍ Menu key
➎
Power and backlight key
eTrex 20/30 Quick Start Manual
Battery Information
➐
➑
➏
➒
➏ Mini-USB port (under weather cap)
➐ Battery cover
➑ Battery cover locking ring
➒ Mounting spine
‹ warning
The temperature rating for the device
(-4°F to 158°F, or -20°C to 70°C)
may exceed the usable range of some
batteries. Alkaline batteries can rupture
at high temperatures.
notice
Alkaline batteries lose a significant
amount of their capacity as temperature
decreases. Therefore, use lithium
batteries when operating the device in
below-freezing conditions.
The device operates on two AA
batteries.
Installing AA Batteries
You can use alkaline, NiMH, or
lithium batteries. Use NiMH or lithium
batteries for best results.
1. Turn the D-ring counter-clockwise,
and pull up to remove the cover.
eTrex 20/30 Quick Start Manual
3
2. Insert the batteries, observing
polarity.
Registering Your Device
• Go to http://my.garmin.com.
• Keep the original sales receipt, or a
photocopy, in a safe place.
Satellite Signals
3. Replace the battery cover, and turn
the D-ring clockwise.
4. Hold (page 2).
5. Select Setup > System > Battery
Type.
6. Select Alkaline, Lithium, or
Rechargeable NiMH.
Turning the Device On or
Off
Hold
4
(page 2).
After the device is turned on, it begins
acquiring satellite signals. The device
may need a clear view of the sky to
acquire satellite signals. When the GPS
bars on the backlight page (page 4) are
solid green, your device has acquired
satellite signals. The time and date are
set automatically based on the GPS
position.
For more information about GPS, go to
www.garmin.com/aboutGPS.
Adjusting the Backlight
Note: The backlight brightness may
be limited when the remaining capacity
in the batteries is low.
Extensive use of screen backlighting
eTrex 20/30 Quick Start Manual
can significantly reduce battery life.
4. Follow the on-screen instructions.
1. While the device is on, press .
2. Move the Thumb Stick left and
right to adjust the brightness level.
Selecting a Profile
Calibrating the Compass
Notice
Calibrate the electronic compass
outdoors. To improve heading
accuracy, do not stand near objects that
influence magnetic fields, such as cars,
buildings, or overhead power lines.
The eTrex 30 has a 3-axis, electronic
compass.
You should calibrate the compass after
moving long distances, experiencing
temperature changes, or changing the
batteries.
Profiles are a collection of settings that
optimize your device based on how
you are using it. For example, your
settings and views can be different
when you are using the device for
geocaching and for navigating on
water.
1. Select Profile Change.
2. Select a profile.
Waypoints
Waypoints are locations you record and
store in the device.
1. Select Compass.
2. Select menu.
3. Select Calibrate Compass > Start.
eTrex 20/30 Quick Start Manual
5
Creating a Waypoint
You can save your current location as
a waypoint.
1. Select Mark Waypoint.
2. Select an option:
• To save the waypoint without
changes, select Done.
• To make changes to the
waypoint, select an attribute,
make changes to the attribute,
and select Done.
Finding a Waypoint
1. Select Where To? > Waypoints.
2. Select a waypoint.
3. Select Go.
Increasing the Accuracy of a
Waypoint Location
Waypoint averaging allows you to
increase the accuracy of a waypoint
location by collecting multiple samples
of the waypoint location.
2.
3.
4.
5.
Select a waypoint.
Move to the location.
Select Start.
When the Sample Confidence status
bar reaches 100%, select Save.
For best results, collect four to
eight samples for the waypoint,
waiting at least 90 minutes between
samples.
Where To? Menu
You can use the Where To? menu to
find a destination to navigate to. Not all
Where To? categories are available in
all areas and maps.
Finding a Location by Name
Depending on the maps loaded on
your device, you can search for cities,
geographic points, and various points
of interest (POIs), such as restaurants,
hotels, and auto services.
1. Select Average Location.
6
eTrex 20/30 Quick Start Manual
1.
2.
3.
4.
Select Where To?.
Select All POIs.
Enter the name or part of the name.
Select Done.
Creating a Route
A route is a sequence of waypoints that
leads you to your final destination.
1. Select Route Planner > Create
Route > Select First Point.
2. Select a category.
3. Select the first point in the route.
4. Select Use.
5. Repeat steps 2–4 until the route is
complete.
6. Select back to save the route.
Tracks
A track is a recording of your path.
The track log contains information
about points along the recorded path,
including time, location, and elevation
eTrex 20/30 Quick Start Manual
for each point.
Recording Track Logs
1. Select Setup > Tracks > Track
Log.
2. Select Record, Do Not Show or
Record, Show On Map.
If you select Record, Show On
Map, a line on the map indicates
your track.
3. Select Record Method.
4. Select an option:
• To record tracks at a variable
rate that creates an optimum
representation of your tracks,
select Auto.
• To record tracks at a specified
distance, select Distance.
• To record tracks at a specified
time, select Time.
5. Select Recording Interval.
7
6. Complete an action:
• Select an option to record tracks
more or less often.
NOTE: Using the Most Often
interval provides the most track
detail, but fills up the device
memory quicker.
• Enter a time or distance, and
select Done.
As you move with the device turned
on, a track log is created.
Navigating to a
Destination
You can navigate to a destination using
the map or compass.
1.
2.
3.
4.
8
Select Where To?.
Select a category.
Select a destination.
Select Go.
The map page opens with your
route marked with a magenta line.
5. Navigate using the map (page 8) or
compass (page 8).
Using the Map
1. Select Map.
The position icon represents your
location on the map. As you travel,
the position icon moves.
2. Complete one or more actions:
• Use the Thumb Stick to move
the map to different areas.
• Select ▲ and ▼ to zoom in and
out of the map.
Tip: To customize the map view, select
menu > Setup Map, and adjust the
settings.
Navigating with the Bearing
Pointer
The eTrex 30 has a 3-axis, electronic
compass.
eTrex 20/30 Quick Start Manual
When navigating to a destination,
the bearing pointer points to your
destination, regardless of the direction
you are moving.
computers and as mounted volumes on
Mac computers.
1. Begin navigation to a destination
(page 8).
2. Select Compass.
3. Turn until points toward the
top of the compass, and continue
moving in that direction to the
destination.
1. Connect your device to a computer
(page 9).
2. Go to www.opencaching.com.
3. If necessary, create an account.
4. Sign in.
5. Follow the on-screen instructions
to find and download geocaches to
your device.
Connecting to a
Computer
1. Connect the USB cable to a USB
port on your computer.
2. Pull up the weather cap from the
mini-USB port.
3. Plug the small end of the USB
cable into the mini-USB port.
Your device and memory card
(optional) appear as removable
drives in My Computer on Windows
eTrex 20/30 Quick Start Manual
Downloading Geocaches
Troubleshooting
Resetting the Device
If the device stops responding, you can
reset the device.
1. Remove the batteries.
2. Reinstall the batteries (page 3).
note: This does not erase any of your
data or settings.
9
Getting the Manuals from the
Device
1. Connect your device to a computer
(page 9).
2. Pull up the weather cap from the
mini-USB port.
3. Plug the small end of the USB
cable into the mini-USB port.
4. Open the “Garmin” drive or
volume.
5. Open the Garmin\Documents
folder or volume.
6. Double-click START HERE.html.
Contacting Garmin Product
Support
• Go to www.garmin.com/support
and click Contact Support for
in-country support information.
• In the USA, call (913) 397.8200 or
(800) 800.1020.
• In the UK, call 0808 2380000.
• In Europe, call +44 (0)
870.8501241.
Optional Accessories
Optional accessories, such as mounts,
maps, fitness accessories, and
replacement parts, are available at
http://buy.garmin.com or from your
Garmin dealer.
10
eTrex 20/30 Quick Start Manual
Garmin®, the Garmin logo, and eTrex® are trademarks of Garmin Ltd. or its subsidiaries, registered in the
USA and other countries. Thumb Stick™is a trademark of Garmin Ltd. or its subsidiaries. These trademarks
may not be used without the express permission of Garmin. Other trademarks and trade names are those of
their respective owners.
© 2011 Garmin Ltd. or its subsidiaries
Garmin International, Inc.,1200 East 151st Street, Olathe, Kansas 66062, USA
Garmin (Europe) Ltd.
Liberty House, Hounsdown Business Park, Southampton, Hampshire, SO40 9LR UK
Garmin Corporation
No. 68, Zhangshu 2nd Road, Xizhi Dist., New Taipei City, 221, Taiwan (R.O.C.)
www.garmin.com
July 2011
190-01198-02 Rev. B
Printed in Taiwan