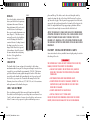
1
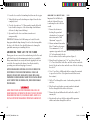
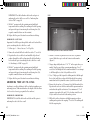
07-137-BSF_Safe OM.indd 1
PROSTEEL SAFES
Safe
owner’s manual
7/21/08 11:13:07 AM
Important Operating Instructions for:
C o n t e n t s Browning prosteel safes
Thank You for Purchasing a Browning ProSteel Safe.............................2
Inspecting Your Safe.................................................................................3
UL Tool Attack Listing..............................................................................3
Fire Protection Rating..............................................................................3
Water and Fire Damage............................................................................4
Rust Danger to Guns................................................................................4
Safe Serial Number...................................................................................4
Placement of Your Safe.............................................................................4
Moving the Safe........................................................................................6
Removing the Safe Door..........................................................................6
Anchoring Your Safe to the Floor............................................................8
Anchoring Your Safe to a Wall...............................................................10
Operating the (Dial) Combination Lock..............................................13
Electronic Locks......................................................................................14
Lost Combination...................................................................................15
Lock Maintenance...................................................................................15
Changing the Combination...................................................................16
Keylock....................................................................................................16
Paint.........................................................................................................16
Door Closure Adjustment......................................................................17
Fire Seal...................................................................................................17
Hinges......................................................................................................18
Shear Pin.................................................................................................18
Shelf Adjustment.....................................................................................18
Factory Installed Interior Lights............................................................19
Care..........................................................................................................20
Warranty Service.....................................................................................22
Limited Materials and Workmanship Warranty...................................22
ProSteel Fire and Break-in Limited Warranty.......................................24
If you have any questions about your new safe, this
owner’s manual or other Browning products, contact:
Browning Consumer Information
One Browning Place
Morgan, UT 84050-9326
Phone: (801) 876-2711
www.browning.com
Please use the space below to record information about
your new safe.
Model ___________________________________________________
Serial Number_____________________________________________
Purchased From_ __________________________________________
Date of Purchase___________________________________________
Page
1
07-137-BSF_Safe OM.indd 2-1
7/21/08 11:13:07 AM
Thank you for purchasing a
Browning Prosteel safe.
A Browning ProSteel safe is the finest home security safe available. With
proper care and installation it will provide you many years of peace of
mind, security and fire protection (fire-resistant models only).
Your Browning ProSteel safe is a security safe designed to protect your
valuable personal property from theft by increasing the time it takes for
a thief to access your valuables. Most successful burglaries occur within
minutes of a criminal entering a home or business. A security safe slows
down a criminal and makes it more difficult to access your valuables
quickly. Your Browning ProSteel safe is the most cost-effective deterrent
to theft available on the market today. DO NOT However, ASSUME
that ANY SAFE IS IMPENETRABLE — IT IS NOT! A
KNOWLEDGEABLE THIEF CAN GET INTO ANY SAFE IF GIVEN
THE APPROPRIATE TOOLS AND ENOUGH TIME. Your safe is a
deterrent and a delaying device. You can make it even more effective by
placing it in the right location and anchoring it to the floor and wall.
Browning ProSteel fire safes offer similar protection against fire. They
are fire-resistant, not fireproof. DO NOT ASSUME A FIRE-RESISTANT
SAFE WILL WITHSTAND ANY AND ALL FIRES — IT WILL NOT.
Browning ProSteel fire-resistant safes are evaluated in a controlled
test environment to assure that the safe’s interior temperature does
not exceed 350° F for the amount of time and temperature exposure
as stated on the door label placed on each safe. Different models of
Browning ProSteel safes have different fire ratings, and a longer time
rating indicates more fire resistance compared to a safe with a shorter
rating. You can improve your fire-resistant safe’s ability to protect your
valuables from fire by placing it in an appropriate location in your
home. Follow the instructions under “Placement of Your Safe” on
page 4. A safe is just one part of protecting your valuables. Adequate
homeowner’s insurance coverage should also be maintained.
2
07-137-BSF_Safe OM.indd 2-3
Inspecting your safe
Upon receipt of your safe, you should immediately inspect it for any
damage that may have occurred during shipping. If your safe was
commercially delivered and you detect any damage, call the shipping
company that delivered your safe and report the damage.
important: Any damage, concealed or otherwise, not noted on the
delivery receipt must be reported to the shipping company within 15
days of delivery.
Your safe comes bolted to its shipping pallet. You will need to remove
the black plastic covers in the safe floor to access the bolts. Use a ½"
socket wrench to remove the bolts.
The safe door is heavy. Do not open the safe while located on
an uneven or unstable floor or on plush carpet. The weight of
the open door could cause the safe to tip forward. See
instructions on page 8 for “anchoring your safe.” Failure to
follow this warning could result in serious injury or death.
UL t o o l a t t a c k l i s t i n g
Browning ProSteel safes carry the UL tool attack label certifying
the design and construction have been tested by Underwriters
Laboratories® and passed the Residential Security Container
test specifications.
F i r e P r o t e c t i o n R at i n g
Browning ProSteel fire safes carry a fire rating to help you compare the
different levels of fire resistance offered. To develop the fire ratings,
safes are subjected to a rigorous fire test. Sample safes are placed in a
gas furnace and heated for the amount of time stated to the peak
temperature in the rating. Temperatures are monitored in several
locations throughout the safe. In order to pass the test, the safe interior
temperature must not exceed 350° F in any sensor location.
3
7/21/08 11:13:08 AM
Wat e r a n d f i r e d a m a g e
Should your safe be exposed to fire or water, the fire-resistant
properties of the insulation will be compromised. Do not continue
to store valuable items in such a safe. Check with your insurance
agent to determine if your policy will replace the safe, in addition
to other household items.
Rust danger to guns
If your safe is in a fire, remove your guns as soon as possible
to clean and lubricate them.
Safe serial number
Your safe’s serial number is located on a label in the upper right-hand
corner of the rear exterior of the safe. Do not remove it. You will need
the serial number should warranty concerns arise. Since the safe will
probably be placed against a wall, you should record the serial number
on the first page of this owner’s manual, or in another secure location,
prior to installation. Do not lock the recorded serial number inside
the safe. You will need this serial number in case you lose your
combination or if the safe fails to open.
P LA C EMENT OF YOUR SAFE
For maximum protection against theft, fire and weather exposure,
placement of your safe within your home is crucial. Place your safe
where it is not visible from windows or normal traffic areas. The best
way to protect your valuables is to keep them from being targeted in
the first place.
Placing your safe away from exterior doors and windows also makes
it more difficult and more time consuming for thieves to get your
valuables out of your home. Time is the crucial element. Thieves want
to get in and out of your home quickly. A time-consuming job is a
strong deterrent. The best location for your safe is in a basement, away
from windows, behind a locked door.
4
07-137-BSF_Safe OM.indd 4-5
Special fire considerations: Browning ProSteel fire-resistant safes are
rated to withstand the time and temperature stated on the rating label.
However, when a home burns some portions of that fire may burn at
more than 2000° F. Placement of your safe away from potential hot
spots of the fire will improve the chances of your safe and contents
surviving a home fire. While there is no guarantee
temperatures anywhere will remain below a specific
temperature, we strongly recommend you avoid
placing your safe in, above or below these areas:
• Kitchen — Most home fires begin in the kitchen area because
of open flames from cooking and flammable materials like grease,
cooking oils, wood cabinets, etc.
• Garage — Keep your safe as far away from the garage as
possible. Flammable liquids, automobiles and small engines can
start fires and flammable liquids and other chemicals stored in the
garage can fuel the fire.
• Furnace or water heater — Open flames in these areas
may cause fires to start, and gas lines provide additional fuel.
• Storage areas for fuel sources — Avoid areas with
firewood, black powder, smokeless powder, gasoline, propane,
paint and thinners or any other flammable material.
• Upper floors of the home — Heat rises and the upper
floors burn the hottest. The safe may fall through the floor if the
fire damages the joist structure. A fall from the upper floor may
damage the safe and break the fire seal around the door.
• Basement center — In a catastrophic home fire, burning
timbers, etc. from upper floors will cave in toward the center of
the basement floor and burn at an extremely high temperature.
The best positioning for fire protection is in your basement, against an
outside wall, away from areas where a fire is likely to start or burn
exceptionally hot.
5
7/21/08 11:13:08 AM
Notice! Your Browning ProSteel Safe is not designed for
exterior use. Exposing your safe to rain, moisture or high
humidity can cause rust and damage to the lock and other
parts of the safe. The painted exterior finish is designed for
interior use only and will not withstand direct contact with
water or moisture without damage. The safe bottom is lightly
finished metal. It will rust if exposed to a wet floor. High
humidity can cause the safe bottom to rust if the carpet below
it absorbs moisture. If you place your safe on carpet, you
should protect your carpet from rust stains by placing a
sheet of clear plastic between the safe and carpet. Damage
to your safe from exposure to moisture and high humidity is
not warranted.
MO V ING t h e SAFE
which allow the door to open 180° and be removed for easier home
installation. The external hinge system in no way compromises security
because there are locking bolts around the perimeter of the door, and
even with the hinges removed the door is secured by the locking bolts.
The safe door is heavy and can be as much as 1 ⁄ 3 of the total
weight of the safe. Should you choose to remove it, be sure to
have enough people help support the weight of the door and
care should be taken to avoid dropping it, which could cause
damage or personal injury to yourself or others. Failure to
follow this warning could result in serious injury or death.
The door may be removed by opening it enough to clear the door frame
(approximately 110°) and lifting straight up. Re-installing the door is
simplified if the lower hinge is adjusted prior to removing the door.
REMO V ING THE SAFE DOOR
Your Browning ProSteel safe is very heavy. Extreme care
should be used when moving this or any other large, heavy
item to avoid injury to yourself or others. We strongly
recommend using a professional mover to move your safe.
Failure to follow this warning could result in serious injury
or death.
1 With the door closed, use a 5/32" Allen wrench and turn the bolt
located in the bottom piece of the bottom hinge four half-turns
counterclockwise (looking down Figure 1
at the hinge).
• Tile or other floors that could be damaged.
2 With the door open (clear of the
frame) have two or more people
support the door and lift it
straight up and off the hinges.
Care should be taken to lift
straight up to avoid damaging
the hinge pins (Figure 1).
• Doorways or furniture that could be damaged.
RE - INSTALLING THE SAFE DOOR
• Stairs or corners you will need to navigate.
1 With two or more people
supporting the door, position
the door hinges above the pins
on the bottom hinge pieces on
the safe.
Some considerations that need to be addressed when moving your
safe into your home are:
• The load your floors and stairs will bear.
REMO V ING THE S a f e DOOR
Most Browning ProSteel safes have external hinges (except Compact
Series safes which feature a non-removable, internal hinge design),
6
07-137-BSF_Safe OM.indd 6-7
Door must be clear of frame to remove. Lift
straight up to avoid damaging bolts.
7
7/21/08 11:13:08 AM
2 Lower the door onto the bottom hinge first, then onto the top pin.
AN C HORING t o a C ON C RETE FLOOR
3 When both the top and bottom hinges are aligned lower the door
completely down.
Important: Pre-drill the holes
in the safe back and floor prior
to anchoring the safe to the floor
or wall.
4 Close the door and use a 5/32" Allen wrench to turn the Allen bolt
located in the bottom piece of the bottom hinge four half-turns
clockwise (looking down at the hinge).
5 Open and close the door several times to make sure it
swings smoothly.
Important: Hardened steel ball bearings are located below the
hinge pins within the hinge housing. Do not lose these bearings while
the door is off of the safe. Care should be taken not to damage the
paint while removing or re-installing the door.
AN C HORING YOUR SAFE TO THE FLOOR
Placing your safe on a concrete floor and anchoring it to the floor and
wall behind it provides the maximum protection for your valuables.
Many common attacks on security safes involve tipping the safe over
on its back. You can reduce the chances of an effective attack by
preventing your safe from being tipped or moved.
Notice! Drilling holes in the wall of a fire safe reduces the
effectiveness of the fire-Resistant material. If holes are
drilled in the safe body, holes must be sealed with a hightemperature silicone caulking. Failure to do so may allow hot
gases to enter your safe during a fire, which could damage
your valuables.
always WEAR EYE and ear PROTECTION WHEN using a drill or
other power tools TO PREVENT THE POSSIBILITY of dust or debris
from CONTACTING YOUR EYES, resulting in injury. Always use a
dust mask to prevent inhalation of potentially harmful dust.
8
07-137-BSF_Safe OM.indd 8-9
Figure 2
1 Remove the safe interior
shelving, floor panel and
elevation brace. See removal
instructions under “Shelf
Adjustment" on page 18.
2 Measure and mark four anchor
holes 2" from the safe corners.
Use a minimum of 3/8" x 4"
expansion-type anchor bolts and Anchor holes should be placed in the corners.
1¾" steel washers inside the safe
floor to reinforce it at the anchor positions (Figure 2).
3 Elevate the safe by placing it on 2" x 4" wood braces. Place the
2" x 4" wood braces flat on the floor and slide one brace under the
front of the safe and one brace under the rear of the safe, elevating
the safe 1½".
4 Use a 2" wood bit to drill through the fire-resistant floor material
to expose the steel floor. (Not required on models that are not
fire-resistant.)
5 Drill a ½" hole through the center of each anchor point in the
safe floor.
6 Place the safe exactly where you want to anchor it and mark
the floor through the holes in the safe bottom.
7 Remove the safe and drill anchor holes in the floor with a 3/8"
masonry bit.
8 Reposition the safe over the holes and install the expansion
anchors and washers through the safe floor.
9
7/21/08 11:13:08 AM
Important: Pre-drill wall anchor holes in the safe prior to
anchoring the safe to the floor or wall. See “Anchoring Your
Safe to a Wall” on page 10.
9 Fill the 2" openings in the fire-resistant material with high
temperature silicone caulking. The caulking will seal the opening
and prevent hot gases from entering the safe during a fire. (Not
required on models that are not fire-resistant.)
10 Replace the floor panel, elevation brace and interior shelving.
Figure 3
2"
2"
2"
2"
AN C HORING t o a J OIST FLOOR
Important: Pre-drill the pass-through holes in the safe back and floor
prior to anchoring the safe to the floor or wall.
1 Follow steps 1 – 5 above, but use 3/8" x 4" lag bolts.
2 Remove the safe and drill holes in the floor with a 5/16" wood bit.
3 Reposition the safe over the holes and install the lag bolts and
washers through the safe floor. Important: Pre-drill wall anchor
holes in the safe prior to anchoring the safe to the floor or wall.
See “Anchoring to a Wall” on page 10.
4 Fill the 2" openings in the fire-resistant material with high
temperature silicone caulking. The caulking will seal the opening
and prevent hot gases from entering the safe during a fire. (Not
required on models that are not fire-resistant.)
5 Replace the floor panel, elevation brace and interior shelving.
AN C HORING y o u r s a f e t o a w a l l
Anchoring to a wall, in addition to the floor, further strengthens your
anchoring system. (Without wall anchors, the height of the safe allows
it to be used as a lever to pry against the floor anchors.)
AN C HORING t o a MASONRY WALL
important: Pre-drill the holes in the safe back and floor prior to
anchoring the safe to the floor or wall.
10
07-137-BSF_Safe OM.indd 10-11
Mark 2" from the top and each side of the safe wall to locate anchor holes.
1 Measure 2" from the top and each side of the safe’s top interior
corners. Mark these spots on the safe’s interior with a marker
(Figure 3).
2 Using a sharp utility knife cut a 2" x 2" “X” in the carpet where you
marked. Tape the carpet flaps open using masking tape. Use a 2"
wood bit to drill though the fire-resistant insulation. Do not attempt
to drill through the steel safe body with the wood bit.
3 Use a ½" high-speed bit designed for drilling metal to drill through
the steel safe wall. Once you have drilled though the fire-resistant
material and safe body, mark the center of your holes on the wall.
4 Remove the safe and use a 3/8" masonry bit to drill the anchor holes.
Reposition the safe over the holes and install the expansion anchors
and washers through the safe interior. Use a minimum of 3/8" x 4"
expansion-type anchor bolts and 1¾" steel washers inside the safe
body to reinforce the safe wall at the anchor position.
5 Fill the holes in the safe interior with high-temperature silicone
caulking and reposition the carpeting “X” cut out. The caulking will
hold the carpet in place.
11
7/21/08 11:13:08 AM
AN C HORING t o a FRAMED WALL
important: Pre-drill the holes in the safe back and floor prior to
anchoring the safe to the floor or wall.
Anchoring to a framed wall requires the location of your anchor holes
align with the center of your wall studs, which are normally spaced
16" on-center. However, you must check to verify the actual position
of the studs before drilling your safe.
1 To align your safe and mounting holes with the studs, place a piece
of masking tape across the top-rear edge of your safe. Measure and
mark the center of your safe on the tape.
4 Drill down 2" from the top of the safe on each of these stud
centers (Figure 4). Mark these spots on the safe’s interior with a
marker. Using a sharp utility knife, cut a 2" x 2" “X” in the carpet
on your marks.
5 Move the safe away from the wall and, using a high-speed bit
designed for drilling metal, drill through the steel safe wall.
6 Use a 2" wood bit to drill though the fire-resistant insulation. Do
not attempt to drill through the steel safe body with the wood bit.
7 Reposition the safe on your centerline marks against the wall and
mark the hole centers on the wall of the house.
2 Find the centers of the studs and mark them on the wall where
they can be seen above the safe. Find the midpoint between the
stud centers and mark it as well. The centerline of the safe and the
centerline of the studs should align with the safe in place.
8 Use a 5/16" wood bit to drill the pilot holes through the sheet rock
and stud. Next install 3/8" x 3½" lag bolts through a 1¾" diameter
steel washer through the safe body and into the stud. Tighten all
anchor bolts.
3 Mark the centerline of the safe interior. Measure the distance from
the stud centerline to each stud center (approximately 8"). Measure
out from the centerline in your safe interior this same distance to
locate the two stud center lines within your safe (Figure 4).
9 Fill the 2" holes in the safe interior with high-temperature silicone
caulking and reposition the carpeting “X” cut out. The caulking
will hold the carpet in place.
Figure 4
O P ERATING THE ( d i a l ) C OM B INATION LO C K
O P ENING THE SAFE
Safe Centerline
Stud Center
Stud Center
1 Turn the dial counterclockwise (left) four times, passing the first
number in your combination three times and stopping on it the
fourth time.
2 Turn the dial clockwise (right) three times, passing the second
number in your combination two times and stopping on it the
third time.
3 Turn the dial counterclockwise (left) two times, passing the
third number in your combination once and stopping on it
the second time.
Carefully measure the distance between stud centers in your home.
12
07-137-BSF_Safe OM.indd 12-13
4 Turn the dial clockwise (right) until it stops, which is normally
around 95.
13
7/21/08 11:13:09 AM
5 Turn your safe handle clockwise to open the safe door.
important: If you miss any combination number by more than 1
dial mark your safe will not open. Make sure you are looking straight
down at the index marks. Make sure to align the numbers with the
center index line located at the 12 o’clock position. If the safe does
not open, try turning the safe handle firmly counterclockwise before
re-dialing the combination.
LO C KING THE SAFE
1 Close the door with the locking bolts retracted.
2 Turn the safe handle counterclockwise (left) to extend the bolts
into the door frame after the door is closed.
3 Turn the combination dial counterclockwise (left) at least three
times to lock the bolts in place.
important: You must first close the door and then turn your safe
handle counterclockwise to extend the bolts before turning the dial to
properly lock the door in place. If the dial is turned while the door is
open and the bolts are extended (handle turned clockwise) the door
will be “locked open.” This is easily fixed by following the unlocking
procedure previously mentioned, immediately followed by the locking
procedure listed above.
To prevent Someone from inadvertently becoming locked inside
your safe, Always keep your safe in a locked condition, even if
your valuables are not inside. Failure to do so could result in
serious injury or death.
ELE C TRONI C LO C KS
If your safe is equipped with a factory installed electronic lock,
instructions for the lock are inside the safe. No maintenance is
required for the electronic lock, other than changing the battery
by following the directions in the lock instructions.
14
07-137-BSF_Safe OM.indd 14-15
You should immediately change the combination of the electronic
lock from the factory default code. The lock instructions outline the
process to program a new electronic lock combination.
Important: Record the combination you select, as the factory will
not have any record of the combination you choose. If you forget the
combination on your electronic lock there is no easy way to open the
safe, so please record the new combination in one or more secure
locations outside the safe.
You still must record the serial number of the safe with an electronic
lock as it will be required for any warranty or service needs.
L o s t C o m b i n at i o n
You are strongly encouraged to keep a backup copy of your
combination in a hidden and secure location. To protect the safety of
your combination, we will not release combinations without a security
check. We do not maintain any ownership information on gun safes,
and combinations are tracked only by serial number. If you lose your
combination, we will only release it upon completion of a security
check process that requires your safe’s serial number and several other
steps. Your safe’s serial number is located on the upper right-hand
corner of the rear of the safe. There is a place to record this serial
number on the first page of this owner’s manual.
LO C K MAINTENAN C E
Your combination lock should not require any maintenance.
Do not spray or apply any lubrication to any lock parts. If your
dial is difficult to turn, there is a problem with the lock mechanism.
Lubrication will not solve the problem. Contact our warranty service
number for assistance (page 22).
Should your keylock stick or be difficult to turn, you can put a small
drop of light oil on the key before inserting it into the keyway.
15
7/21/08 11:13:09 AM
C HANGING THE C OM B INATION
Your combination of the S & G® Mechanical Lock is pre-set at the
factory. Changing the combination will void your lock warranty.
If you must change the combination for some reason, contact a
certified locksmith to do this for you.
KEYLO C K
The keylock in your combination dial is used to lock the dial only. This
is a convenience feature that allows you to lock your dial so that it will
not accidentally rotate and lock while you are moving items into or out
of your safe. The keylock also allows you to lock the dial while the safe
is in the locked position. This prevents the dial from being turned
while the safe is locked.
To lock your dial with the key, turn the dial until the “0” is resting in
the 12 o’clock position, where the black line is located on the top of
your dial ring and turn the key clockwise in the key lock.
Should you lose your keys, replacement keys may be ordered with
the serial number printed on the upper right-hand corner of the
combination tag. Contact the Browning Consumer Department
(page 22) to order additional keys. (Approximately $8 per key as
of this owner’s manual printing.)
P AINT
Painted exteriors should be cleaned with a damp soft cotton cloth only.
Do not use solvents or any other chemicals to clean your safe’s painted
surfaces. If you should scratch or chip the paint on your safe, a touch
up bottle with brush is included inside your safe (not all models).
This bottle should be adequate for most scratches incurred during
installation. Touch up paint is also available by contacting Browning.
However, due to increased regulations restricting the sending of paint
through the mail, Browning has also provided the Delstar® paint
numbers for the paint colors available on our standard safes.
16
07-137-BSF_Safe OM.indd 16-17
Gloss Black
Hunter Green Metallic
Burgundy
Sand Metallic
Black Cherry
DAR 9000
DAR 4108
DAR 74004
F1929
Sherwin-Williams® 82128
If touch up paint is needed other than that supplied by Browning, you
can get it at an automotive paint supplier.
important: The textured-finished safe paints are special formulas
created by the manufacturer for Browning ProSteel safes and cannot
be duplicated by an automotive paint store. These can be ordered by
calling our consumer department at (800) 333-3288.
DOOR C LOSURE AD J USTMENT
Browning ProSteel safes are shipped with molded door corner
protectors installed between the door corner and the door frame.
After removing the packaging from your safe, make sure to remove
the protective corners and adjust the two door tension adjustment
screws located inside of the door frame. The tension adjustment
screws apply pressure against the locking bolts when the door is in
the closed position. The tension adjustment screws should be adjusted
until the door closes without play between the door and frame. Do
not over-adjust the tension screws or your safe will not close. The
locking bolts will hit the adjustment screws. A #3 Phillips screwdriver
is required to adjust the tension screws.
FIRE SEAL
The black plastic strip attached to the edge of your safe door or frame
is a fire seal that expands to seal the door when heated by a fire. If you
live in an area with high humidity, you will not want your door to
close tightly against this seal. Air must circulate through your safe or
condensation will form on your firearms causing rust. Loosen the
door just enough to allow some exchange of air. An electric
dehumidifier is highly recommended if your average daily relative
humidity is above 20 percent.
17
7/21/08 11:13:09 AM
HINGES
Your door height is adjusted at the
factory and should not require any
adjustment when new. However,
hinge adjustment bolts are located
on the bottom of each hinge to
allow you to make adjustments over
time (Figure 5). This allows you to
raise and lower the door slightly as
needed. Rotating the Allen bolt
counterclockwise (looking down at
the hinge) raises the door on its
hinges. Both Allen bolts (top and
bottom hinges) should be turned
the same amount when adjusting
the door. (Not applicable on
Compact Series safes.)
Figure 5
Notice! The gun rack is fragile and can easily be broken when
attempting to remove it or install it in a new location. Do not
attempt to remove the gun rack by forcing it out of the
retainer clips. Remove all top clips before attempting to move
the gun rack. Support the entire width of the gun rack before
removing it.
Adjusting the hinges.
SHEAR P IN
The handle shaft of some safe models is attached to the locking
mechanism with a shear pin. The shear pin will snap if excessive force
is applied to your safe handle (approximately 175 ft/lb.). This feature
provides additional security against attempted break in. If the shear
pin is broken, the handle will spin within the safe door and you will
not be able to open your safe. Contact the Browning ProSteel Safe
Warranty Service line toll free at (877) 501-7233, ext. 14 for assistance
with replacement of the handle shear pin.
SHELF AD J USTMENT
Prior to adjusting any shelf, first remove all items from that shelf.
Your shelves are held in place by several clips that secure them to four
“tracks” on the safe interior. Some are above the shelves and some are
below. To remove a clip, squeeze it together with hand pressure or
18
07-137-BSF_Safe OM.indd 18-19
pliers and lift up. The shelves can be relocated along this track by
simply relocating the clips to the desired shelf location. To replace a
clip, insert the top lip of the clip into the appropriate slot in the track,
squeeze the clip together and insert the bottom lip of the clip into the
track. It is important that all clips supporting a particular shelf are
located at the same height to ensure that the shelf sits level.
FA C TORY INSTALLED INTERIOR LIGHT s
Some safes include a factory-installed interior light package located in
the ceiling of the safe.
The interior light bulbs are hot. To reduce the risk of fire,
damage, or injury please note the following:
• Bulb gets hot quickly. Do not touch lens, guard or
enclosure. Touch only the power switch/plug when
turning on.
• Keep combustibles away from interior lights.
• Do not operate the lights if damaged, without the
complete bulb (lamp) enclosure in place or if bulb
enclosure is damaged.
• Do not look directly at lighted bulb.
• Keep all items at least 3" from lights.
Failure to follow these warnings could result in serious
injury, death or cause damage to the safe or belongings.
19
7/21/08 11:13:09 AM
Bulb Replacement
Carpet
1 Prior to replacing a bulb, turn the light switch off and
unplug the light. Allow the bulb to cool before replacing.
The key to removing stains from your carpeted interior is to clean
them as soon as they occur. Do not soak the carpeting with water to
remove stains. Small amounts of water can permanently damage the
fire-resistant materials within your safe if the water is allowed to soak
into the carpeted areas. Use any household carpet spot remover to
clean up stains. Follow the directions on the product itself.
2 Twist lens cover counterclockwise.
3 Use only Type JCDGY8 20 watt 120 volt halogen bi-pin
replacement light bulbs.
Notice! Do not touch the bulb at any time. Use a dry soft clean
cloth to touch bulb while replacing.
4 Make sure the replacement bulb is installed correctly. (If you have
questions contact customer service.)
6 Remove soft cloth from new replacement bulb before putting lens
cover back on.
7 Replace lens cover with a clockwise motion.
C ARE
Safe Body
All Browning ProSteel safe paint finishes are designed for indoor
use only. Use a damp rag to wipe down the surface of the safe. If
something other than water is needed, a very mild soap solution may
be used. However, only water should be used around the detailing
areas. Care should be taken around the art scene, pinstripe, corners or
logo to avoid catching and peeling any edges with the cleaning cloth.
A r t Sc e n e
If your safe was manufactured with our exclusive art scene transfer
process you must take particular care not to clean your safe with any
ammonia-based cleaners. Glass cleaners like Windex® can permanently
damage the art scene and other portions of the safe detailing package.
Do not attach anything to the body or detailing materials with tape.
Tape may remove the art scene, paint and other portions of the
detailing package.
20
07-137-BSF_Safe OM.indd 20-21
D P X AND D P H SYSTEM INTERIOR MATERIALS
Several other materials are used in the construction of the patented
DPX Storage System and the DPH Storage System. No specific
maintenance is required for these systems, and they can be spot
cleaned using mild detergent and water on a clean cloth. Care should
be taken to avoid excessive pulling on sewn seams as items are added
to or removed from the pockets, pouches and loops of the DPX and
DPH systems.
The safe interior should always be loaded before storing any firearms
on the DPX door rack to prevent tipping or weight imbalance.
Handle
Some chemicals or abrasive cleaners can damage gold, brass or
chrome handle finishes. The spokes, handle and hub on your safe
should be cleaned only with a soft, damp cloth. No abrasives or
chemicals of any kind should be used.
L o c k i n g B o lt s
The tolerances between your locking bolts and the safe body and door
are very tight. Because they fit so tightly, it may be necessary from
time to time to place a small amount of Teflon® lubricant on the
bottom of each bolt with the bolts in the extended position.
Mirror Interior
If your safe is equipped with an interior mirror on the back panel,
use only rubbing alcohol or distilled water and a soft cloth to clean
the mirror.
21
7/21/08 11:13:09 AM
Notice! Follow only the recommended CLEANING procedures and
use only the recommended cleaning materials. Failure
to follow this information COULD CAUSE YOUR MIRROR TO
become CLOUDY.
Wa r r a n t y S e rv i c e
If you experience any problems with your Browning ProSteel safe,
please contact our warranty service hotline. We want you
to be completely satisfied with your safe. Your dealer cannot provide
warranty service for this product.
All warranty service must be pre-authorized by ProSteel.
Have your safe serial number and your proof of purchase in
hand prior to calling the warranty service number. No assistance
can be provided without your serial number. Please call toll free
at (877) 501-7233, ext. 14.
LIMITED m a t e r i a l s a n d
w o r k m a n s h i p wa r r a n t y
ProSteel warrants your safe to be free from defective materials and
workmanship for five years from the date of original purchase with
the exception of the combination lock (which carries a five-year
warranty from the lock manufacturer) and any electrical or lighting
accessories (which carry a 90-day warranty). This warranty does not
apply to damage or loss resulting from accident, alteration, misuse,
unauthorized entry or improper installation, damage resulting from
exposure to moisture and/or condensation, nor does it cover wear or
scratching of paint or plating.
If the product should become defective within the warranty period,
ProSteel will repair or replace it (at ProSteel’s discretion) free of
charge. A replacement safe or part will be shipped curbside delivery
22
07-137-BSF_Safe OM.indd 22-23
(for destinations in the continental United States). Should any defect
be noted, the purchaser agrees to inform ProSteel in writing before
any work is performed. For consumers in Canada, please contact
Browning Canada. For consumers in Europe or the United Kingdom,
please contact Browning International S.A.
important: All repair work claimed under this warranty must be
approved by the manufacturer prior to repair. Any unauthorized
repair, dismantling, or tampering with the locking mechanism shall
nullify this warranty.
Neither ProSteel Security Products nor Browning will be liable for
consequential or incidental damages or expenses. This warranty is in
lieu of any other warranty from ProSteel Security Products or
Browning, whether expressed or implied, including but not limited to,
any warranty of merchantability or fitness for any particular purpose.
This warranty gives you legal rights. You may also have other rights,
which vary from state to state.
For more information regarding your warranty, please contact:
ProSteel Security Products
Customer Service Dept.
1400 South State
PO Box 977
Provo, UT 84603
(877) 501-7233, ext.14
For customers in Canada, please contact:
Browning Canada Sports Ltd./Ltée
5583 Chemin St Francois
St Laurent, Quebec
Canada H4S1W6
(514) 333-7261
23
7/21/08 11:13:09 AM
browning.com
BROWNING US: Morgan, Utah 84050-9326
BROWNING CANADA: Browning Canada Sports Ltd/Lteé, St-Laurent, Quebec H4S 1W6
BROWNING INTL: Parc Industriel des Hauts-Sarts, B-4040 Herstal, Belgium
NEU080610/07137
26
07-137-BSF_Safe OM.indd 26
7/21/08 11:13:10 AM
For customers in Europe or the United Kingdom, please contact:
NOTES
Browning International S.A.
Parc Industriel des Hauts-Sarts
3eme Avenue #25
4040 Herstal, Belgium
00 32 4 240 52 11
For non-warranty questions, contact Browning at:
Browning Consumer Department
One Browning Place
Morgan, UT 84050
(800) 333-3288
P ROSTEEL FIRE AND B REAK - IN
LIMITED WARRANTY
ProSteel will repair or replace (at ProSteel’s option) free of charge any
ProSteel manufactured safe produced after January 1, 2006 that is
damaged during an attempted break-in, a successful break-in or by a
fire during the lifetime of the original consumer purchaser provided
the purchaser’s homeowners insurance does not cover the claim. The
safe must be returned to the factory along with a report by the
investigating police or fire department, documentation from the
purchaser/policyholder’s insurance company stating that the claim is
not covered, and proof of purchase. For safes in the continental
United States, ProSteel will arrange for and cover the shipping costs
both to and from the factory and any locksmith costs necessary to
open the safe. A comparable new safe or the repaired safe will be
returned to the owner (curbside delivery).
IMPORTANT: This offer specifically excludes the contents of the safe.
It also excludes damage to the safe due to acts of God, terrorism and
war, and applies only to home/residential, non-commercial use of the
safe. This offer does not apply to Vault and Security Doors.
24
07-137-BSF_Safe OM.indd 24-25
25
7/21/08 11:13:09 AM