1
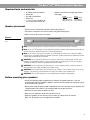
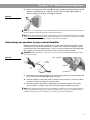
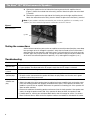
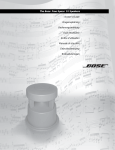
The Bose® 151® SE Environmental Speakers
Owner’s Guide
The Bose® 151® SE Environmental Speakers
Before you begin
English
Thank you for purchasing Bose 151® SE speakers. Their advanced design and quality construction are intended to provide long-term listening enjoyment in or outside your home. Your
151 SE speakers are engineered to provide quality Stereo Everywhere® speaker performance
from a simple, elegant weatherproof design.
Unpacking
Carefully unpack your speakers and save all packing materials for future use. If you discover
that the product was damaged in transit, notify Bose Corporation or your authorized Bose
dealer immediately. Verify that the carton contains the parts shown in Figure 1.
Figure 1
A
Carton contents
B
151® SE speakers
Mounting bracket (2)
Bracket locking
screw (2)
C
D
E
#8 lock washer (2)
¼ inch x 9/16 inch
bracket-to-speaker
mounting screw (4)
F
¼ inch lock washer (4)
G
#12 x 1¾ inch
wood screw (4)
H
#12 x 1 inch wall anchor (4)
(for concrete mounting only)
WARNING: To avoid danger of suffocation, keep the plastic bags out of the reach of children.
For your records
Serial numbers are located on the back of each speaker. Write the numbers here and on the product registration card.
Serial numbers: ___________________________________ and ____________________________________
Dealer name: _____________________________________________________________________________
Dealer phone: _______________________________________Purchase date: ________________________
Please read this owner’s guide
Please read this owner’s guide completely before beginning this installation. Failure to follow the instructions in this
owner’s guide voids all warranties on your speakers. If you are unsure of your ability to complete this installation, consult a
professional installer.
Hereby Bose B.V. declares that this equipment is compliant with the essential requirements of the EMC Directive 89/336/EEC. This
equipment is intended for use (amongst others) in all EC/EFTA countries. The complete declaration of conformity can be found on
<http://www.bose.com/guides>.
©2004 Bose Corporation. No part of this work may be reproduced, modified, distributed or otherwise used without prior written permission.
2
The Bose® 151® SE Environmental Speakers
Required tools and materials
#2 Phillips-head screwdriver
Power drill
Eye and ear protection
Dust mask
3
/32 inch (2,5 mm) wood bit, or
¼ inch (6,0 mm) masonry bit
• Speaker cord: Measure length and choose
wire gauge:
Length
20 ft (6 m), max.
30 ft (9 m), max.
50 ft (15 m), max.
English
•
•
•
•
•
Gauge
18 (0.82 mm2)
16 (1.30 mm2)
14 (2.10 mm2)
Speaker placement
• For best results, mount both speakers horizontally (Figure 2).
• Place them a minimum of seven feet apart, facing the listening area.
• Make sure they do not face each other.
Figure 2
7 ft (2 m), minimum
Speakers mounted on a
wall
Note: For Stereo Everywhere® speaker performance, horizontal mounting is required.
Note: Your 151® SE speakers can be mounted vertically. However, when mounted vertically you
will not experience Stereo Everywhere® speaker performance.
Note: If you choose to place the speakers on a flat horizontal surface, put a layer of suitable
material (such as rubber) under the speaker to prevent speaker movement or damage to the flat
surface due to vibration of the speaker.
CAUTION: Do not mount the brackets on surfaces that are not sturdy enough, or that have
hazards concealed behind them, such as electrical wire or plumbing. If you are unsure about
installing the bracket, contact a qualified professional installer.
CAUTION: Do not install near any heat sources, such as halogen lamps, registers, stoves or
other apparatus (including amplifiers) that produce heat.
CAUTION: Do not hang items from the brackets or speakers. Do not place items on top of the
speakers. The brackets were designed to support the weight of the speakers only.
CAUTION: The 151 SE speakers are not intended to be installed in automobiles.
Before mounting your speakers
• Check local building codes regarding the installation of outdoor speakers. If you are
uncomfortable about installing this product, contact your Bose dealer to arrange for a qualified serviceman to help you.
• Measure the length of speaker cord needed to connect each speaker to your amplifier. See
“Required tools and materials” for recommended wire lengths and sizes.
• Determine the best route to protect the wire.
• Make sure the speakers cannot fall and cause injuries.
• Keep the speakers at least 9 inches (23 cm) from any video screen or monitor.
Bose 151 SE speakers are not magnetically shielded.
3
The Bose® 151® SE Environmental Speakers
English
Mounting procedure
1. Remove screw C and lock washer D from the mounting bracket assembly, and remove
part B from part A (Figure 3).
Figure 3
Speaker cord
A
Exploded view of speaker
and mounting bracket
D
C
E
F
B
2. Hold bracket part A in position against the wall and mark the left and right round holes for
the mounting hardware (Figure 4). If you plan to feed speaker cord through the wall, mark
the oval speaker cord feed-through hole also.
Figure 4
A
Mounting the brackets
Mount bracket B with
flat end next to terminals.
H
E
G
Mount bracket A with
locking screw on the left.
F
B
Speaker cord
3. Drill holes using the appropriate drill bits for the wall material. Refer to “Required tools
and materials” on page 3.
Note: If you plan to feed the speaker cord through the bracket, feed the cord through the wall
before mounting the bracket.
4. Mount bracket part A to the wall using the appropriate hardware for wood (G) or concrete
(H and G). Make sure the hole for the bracket locking screw is on your left (Figure 4).
5. Mount bracket part B to the rear of the speaker using two machine screws E and two
lock washers F (Figure 4).
4
The Bose® 151® SE Environmental Speakers
Figure 5
Adjusting speaker angle
C
Note: Your 151® SE speakers can be mounted vertically. However, when mounted vertically you
will not experience Stereo Everywhere® speaker performance.
Note: For vertical mounting, mount bracket part A so that the hole for bracket locking screw C is
at the lower end of the bracket. When mounted vertically, you can rotate the logo to be read horizontally. Gently pull out on the logo, rotate it into position and release.
Connecting your speakers to your receiver/amplifier
Speaker cord consists of two insulated wires. The wire marked with a stripe or rib is used
for the positive (+) red terminal connection. The plain wire is used for the negative (–) black
terminal connection. Strip approximately ½ inch (1.3 cm) of insulation from the ends of both
wires (Figure 6). Then, twist the ends of each wire so there are no loose strands.
CAUTION: Before making any connections, turn off your receiver/amplifier and unplug it from
the AC power outlet.
Figure 6
Rear of speaker
Speaker wiring
½ inch
(1.3 cm)
(+) Wire
(+) Terminal
1. At the back of your speaker (Figure 6), unscrew the hex knobs on the terminal posts until
you can see the small hole going through each post.
2. Insert the marked (+) wire into the red (+) terminal. Insert the plain (–) wire into the black
(–) terminal. Tighten the knobs to secure the wires.
3. Check the speaker connections carefully. Make sure no loose strands of wire touch
across terminals creating a short circuit that can damage an amplifier or receiver.
Note: After making the connections, any bare lengths of speaker wire can be affected by exposure to the outdoor environment. To protect the speaker wires, apply a thin coating of silicone
caulking material, such as RTV adhesive, to any bare sections of speaker wire.
5
English
6. Secure the speaker with bracket part B to bracket part A using bracket locking screw C
and lock washer D (Figure 3). To adjust the angle, loosen screw C slightly (Figure 5),
move the speaker up or down, and retighten screw C.
The Bose® 151® SE Environmental Speakers
English
4. Connect the speaker on the left side of the listening area to the left amplifier channel
(Figure 7). Attach the marked wire to the red (+) terminal. Attach the plain wire to the black
(–) terminal.
5. Connect the speaker on the right side of the listening area to the right amplifier channel.
Attach the marked wire to the red (+) terminal. Attach the plain wire to the black (–) terminal.
Note: If your speakers are being connected to your receiver or amplifier as a secondary set of
speakers, be sure to make the appropriate connections to the “B” channel.
Figure 7
Example of amplifier rear
panel connections
(–) wire
(+) wire
Testing the connections
Set the balance control on your receiver or amplifier to normal (centered) and play some deep
bass passages of music through the speakers. Verify that the sound seems to come from a
point between the two speakers, and that the bass is full and natural. If not, check your connections again; they may be reversed, causing the speakers to play out of phase. Make sure
all the wires are connected positive to positive (+ to +) and negative to negative (– to –).
Troubleshooting
Problem
What to do
Neither
speaker plays
1. Check the settings on your receiver/amplifier. Refer to its owner’s guide for instructions.
Bass or treble
is weak
Check the tonal balance setting on your receiver or amplifier.
Only one
speaker plays
1. Make sure the balance control is centered on your receiver/amplifier.
One speaker
still does not
play
2. If your speakers are connected to the “B” output, check that the “B” output is selected.
2. Check the wires connected to the speaker that does not play. Make sure the wires are in good
condition and are firmly connected.
1. Disconnect the working speaker from the receiver or amplifier.
2. Switch the cord of the faulty speaker from its original receiver or amplifier jacks to the other set of
jacks (the working speaker was originally attached to those jacks). If the speaker now works, the
problem is your receiver or amplifier. Reconnect the speakers to a working unit. If the speaker still
does not work, continue.
3. Remove the cord from the working speaker and connect it to the faulty speaker. If the speaker now
works, the original speaker cord is bad. If the speaker still does not work, the speaker is bad.
4. If trouble persists, contact your authorized Bose dealer, who will arrange for service. Or, contact
Bose Customer Service. Refer to the list of phone numbers and addresses included in the carton.
6
The Bose® 151® SE Environmental Speakers
Cleaning your speakers
Customer service
If you need help with your new product, contact Bose Customer Service. Refer to the list of
phone numbers and addresses included in the carton.
Limited warranty
Bose 151 SE environmental speakers are covered by a limited five-year transferable warranty.
Details of coverage are on the product registration card that came with your speakers.
Technical information
Driver complement
Three (3) 2½ inch full-range environmental drivers per speaker
Dimensions
4½ in H x 6 in D x 12½ in W (11.4 cm x 15.2 cm x 31.8 cm)
Compatibility
• Compatible with amplifiers or receivers rated 10 to 100 watts per channel at 4 to 8 ohms
• 50W IEC continuous power handling at 6 ohms
Environmental capabilities
• Salt fog, sun, high humidity (100% relative humidity)
• Temperature extremes: -40°F to 158°F (-40°C to 70°C)
7
English
Use a cloth dampened in mild detergent and water to remove dust or dirt from the outside of
your 151® SE speakers. Or, use a hose to rinse them thoroughly with fresh water. Do not use
enough pressure to force water behind the grille and into the driver or the acoustic port.
©2004 Bose Corporation
The Mountain, Framingham, MA 01701-9168 USA
273809-ENGvo AM Rev.00