1
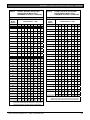
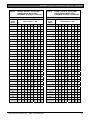
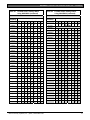
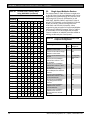
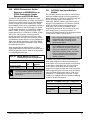
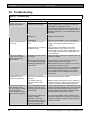
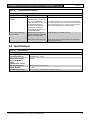
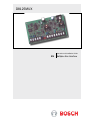
D8125MUX
Operation and Installation Guide
EN
Multiplex Bus Interface
EN | 2
Contents
Contents...........................................................................2
1.0
Introduction ......................................................3
1.1
Description..........................................................3
1.2
Programming......................................................3
1.3
Listings ................................................................3
2.0
Operation...........................................................4
3.0
Installation.........................................................4
3.1
Connecting the D5060 Programmer...............5
3.2
Programming......................................................6
3.2.1 Powering the D5060..........................................6
3.2.2 Programming Points..........................................6
3.2.3 Removing a Point from the D8125MUX.........6
3.2.4 Interrogation Mode ............................................7
3.3
Installing and Wiring the D8125MUX to the
Control Panel .....................................................7
3.4
Wiring the D8125MUX to Multiplex Points.....8
3.5
Using Power B and MUX BUS B (Optional) ..9
3.6
Wiring Multiplex Devices to the Multiplex Bus
..............................................................................9
3.7
Installing a Multiplex Device...........................10
3.7.1 Adding Multiplex Devices to the Control Panel
............................................................................10
3.7.2 Removing Multiplex Devices from the Control
Panel .................................................................10
3.8
Point Matrix Tables..........................................11
3.9
Single Input Multiplex Devices.......................18
3.10
MX250 Photoelectric Smoke Detectors and
MXB2W Base or D7050 Photoelectric Smoke
Detector and D7050-B6 Base........................19
3.11
DS7460(i) Dual Input Multiplex Module........19
3.12
DS7432 Eight Input Remote Module ............20
3.13
DS7465(i) Input/Output Module.....................20
4.0
Testing the System .......................................21
4.1
Local Walk Test (Command 44)....................21
4.2
Missing Multiplex Points .................................21
4.3
Extra Multiplex Points .....................................21
4.4
Ground Fault Notification on Multiplex
Devices .............................................................21
5.0
Troubleshooting ............................................22
6.0
Specifications.................................................23
2
D8125MUX | Operation and Installation Guide | Contents
Figures
Figure 1:
Figure 2:
Figure 3:
Figure 4:
Figure 5:
Figure 6:
Figure 7:
Figure 8:
Figure 9:
D8125MUX Multiplex Bus Interface
Module......................................................... 4
D5060 Multiplex Point Programmer ........ 4
Installing Multiplex Points without DIP
Switches Wiring Diagram ......................... 5
Installing Multiplex Points with DIP
Switches Wiring Diagram ......................... 5
Programmer Cables (included)................ 5
D8125MUX Mounting Locations.............. 8
D8125MUX Wiring Diagram ..................... 8
Wiring the D8125MUX to Detection
Systems Multiplex Points.......................... 9
Wiring Multiplex Devices to MUX Bus .... 9
Tables
Table 1:
Table 2:
Table 3:
Table 4:
Table 5:
Table 6:
Table 7:
Table 8:
Table 9:
Table 10:
Table 11:
Table 12:
Table 13:
Table 14:
Table 15:
Table 16:
Table 17:
Table 18:
Operation LED Descriptions..................... 4
D5060 LED Definitions.............................. 4
Point Type Entry Code .............................. 6
D8125MUX Line Length ........................... 9
Control Panel to D8125MUX Distance ... 9
Multiplex Devices ..................................... 10
Point Conversion Table........................... 11
DS7457i, DS7461i, and DS7465i Switch
Settings When Using D8125MUX on
Zonex 1...................................................... 12
DS7457i, DS7461i, and DS7465i Switch
Settings When Using D8125MUX on
Zonex 2...................................................... 14
DS7460i Switch Settings When Using
D8125MUX ............................................... 16
Single Input Multiplex Device Point
Response Configuration ......................... 18
MX250, MX250TH, D7050, and D7050TH
Point Type Configuration ........................ 19
DS7460(i) Point Type Configuration ..... 19
DIP Switch Settings ................................. 20
DS7432 Point Type Configuration......... 20
DS7465(i) Point Type Configuration ..... 20
Troubleshooting ....................................... 22
Specifications ........................................... 23
Bosch Security Systems, Inc. | 10/09 | F01U034973-02
D8125MUX | Operation and Installation Guide | 1.0
Introduction
.
1.0 Introduction
1.1
Description
Use the D8125MUX Multiplex Bus Interface Module
to connect multiplex points to the zonex bus on the
following Bosch Security Systems control panels:
D9412GV2, D7412GV2, D7212GV2, D9412G,
D7412G, D7212G, D9412, D7412, D7212, D9112,
and D9124 with version 5.22 or greater firmware.
Install the D8125MUX on Zonex 1 and Zonex 2
(D9412GV2, D9412G, D9412, and D9112 only). The
multiplex bus interface supports two independent
multiplex buses; therefore, a fault on one multiplex
bus does not prevent the other from operating
normally.
The D8125MUX scans the multiplex points connected
to it and reports the points’ status to the control panel.
Point index programming then determines if the
control panel initiates an action (for example, alarm
response, trouble response, and so on).
1.3
Listings
The D8125MUX is UL Listed as a subassembly in the
following categories:
• UL 864
Control Units, System (UOJZ)
• UL1023
Household Burglar Alarm Systems
(NBSX)
• UL1610
Central Station Alarm Units (AMCX)
• UL609
Local Alarm Units (AOTX)
• UL365
Police Station Connect Alarm Units
(APAW)
• UL1076
Proprietary Alarm Units (APOU)
The D7212GV2 and D7212G are not UL
Listed for UL 864 commercial fire
applications.
Do not mix fire and non-fire products on
the same communication bus.
Also available on the D8125MUX are auxiliary power
terminals labeled Power A (+,-), Power B (+,-) that
support remote devices requiring an uninterrupted
source of power.
D8125MUX is a Class B (Style 4) signaling line
circuit.
For additional D8125MUX installation information,
refer to the D9412GV2/D7412GV2 Approved
Applications Compliance Guide (P/N: F01U003639).
1.2
Programming
The D8125MUX is programmed using the D5060
Multiplex Point Programmer. The D5060 connects to
the D8125MUX PROG PORT located next to the
POWER A+ terminal. Individual point addresses and
point types are then programmed into the D8125MUX
EEPROM. In addition, the programmer must also
program each multiplex point that is connected to the
system, unless the point is equipped with
programming DIP switches. Reset pins are provided
(located above Zonex Bus Out terminal) to clear the
D8125MUX of all programmed points.
Refer to Section 3.2 Programming on page 6 for
programming information.
Bosch Security Systems, Inc. | 9/08 | F01U034973-02
3
D8125MUX | Operation and Installation Guide | 2.0
Operation
2.0 Operation
3.0 Installation
The D8125MUX continuously monitors itself for
proper operation and indicates its condition using the
green Operation LED (Figure 1). Refer to Table 1 for
a description of the Operation LED.
Use the D5060 Programmer (Figure 2 and Table 2) to
program multiplex bus points for the D9412GV2,
D7412GV2, D7212GV2, D9412G, D7412G, D7212G,
D9412, D7412, D7212, and D9112 Control Panels. In
addition to programming points, the D5060 can also
be used to program and read information from a
D8125MUX.
Figure 1:
D8125MUX Multiplex Bus Interface
Module
Figure 2:
1
D5060 Multiplex Point Programmer
EXT.
POWER
SERIAL PORT
MUX
POINTS
INTERROGATION MODE
RESET
ON
(HOLD)
12V
IN
OUT
GND
ZONEX BUS
FIRE MANUAL PROG
PORT
WALK TEST
+
-
POWER A
+
-
MUX BUS A
+
POWER B
+
YES
-
MUX BUS B
1 - Operation LED
Table 1:
Operation LED Descriptions
LED Status
Meaning
Flashing 1/2
second on, 1/2
second off
Off
The D8125MUX scans its
programmed multiplex points and
operates normally.
A module fault is indicated. Refer
to Section 5.0 Troubleshooting on
page 22.
The Multiplex Point Programmer
is connected to the D8125MUX.
Reset the D8125MUX EEPROM
with the reset pin by plugging in
the D5060 Programmer and
placing the shorting bar over the
reset pin. The LED rapidly flashes
twice followed by a pause.
On
Double flash
4
DOWN
1
2
3
4
5
6
7
8
9
*
0
#
CLEAR
NO
UP
ENTER
OFF
(HOLD)
INTERROGATE
(HOLD)
MULTIPLEX POINT PROGRAMMER
Table 2:
D5060 LED Definitions
Display
Definition
Adr
Enter address.
A.dr
Enter address for Interrogation Mode.
bAd
Battery voltage is below 15 V.
Err
Point was not programmed correctly.
Lob
Battery voltage is below 16 V.
noP
No response from point.
PnL
Communications with the D8125 failed.
rSP
Point responds to address.
tYP
Enter point type.
t.YP
Enter point type for Interrogation Mode
Bosch Security Systems, Inc. | 10/09 | F01U034973-02
D8125MUX | Operation and Installation Guide | 3.0
Installation
.
3.1
Connecting the D5060 Programmer
Figure 4:
1. When using external power, attach the flying
leads of the included power cable to the output
terminals of a 16.5 VAC transformer. Insert the
plug end into the jack labeled EXT. POWER on
the programmer. Refer to Figure 3, Figure 4, and
Figure 5.
2. Use the serial cable provided to connect the
D8125MUX to the jack labeled SERIAL PORT on
the programmer.
3. For multiplex devices without DIP switches, use
the multiplex programmer cable provided to
connect the point to be programmed to the port
labeled MUX POINTS as shown in Figure 3. Use
the appropriate connector, either the alligator
clips or the probes, to connect the programmer to
a point.
For multiplex points with programmable DIP
switches, program the point using the DIP
switches. Connect the programmer to the
D8125MUX as shown in Figure 4.
Figure 3:
1
1
2
2
RESET
12V
IN
OUT
ZONEX BUS
EXT.
POWER
GND
FIRE MANUAL PROG
PORT
WALK TEST
+
-
POWER A
SERIAL PORT
+
-
MUX BUS A
+
-
POWER B
+
-
MUX BUS B
MUX
POINTS
INTERROGATION MODE
Installing Multiplex Points without
DIP Switches Wiring Diagram
3
Installing Multiplex Points with DIP
Switches Wiring Diagram
3
1 - External power
2 - D8125MUX
3 - D5060 Multiplex Point Programmer
Figure 5:
Programmer Cables (included)
RE SET
1 2V
IN
O UT
Z ONEX BUS
G ND
FI RE M ANUAL P ROG
P ORT
WA LK TEST
+
-
PO WER A
+
-
MUX BUS A
+
PO WE R B
+
-
MU X B US B
1
EXT.
POWER
SERIAL PORT
MUX
POINTS
2
INTERROGATION MODE
4
1 - External power
2 - D8125MUX
3 - Multiplex point without DIP switches
(non-i models)
4 - D5060 Multiplex Point Programmer
3
1 - C310 Serial Cable
2 - C319 External Power Supply Cable
3 - C320 Multiplex Programmer Cable
Bosch Security Systems, Inc. | 9/08 | F01U034973-02
5
D8125MUX | Operation and Installation Guide | 3.0
3.2
Programming
3.2.1
Powering the D5060
Turn on the D5060 by pressing and holding the [1]
key until the unit beeps. To turn the unit off, press and
hold the [#] and [*] keys simultaneously until the unit
beeps.
After 5 minutes of inactivity, the
programmer powers down automatically
to conserve power.
3.2.2 Programming Points
1. The D5060 shows the prompt Adr after it is
powered. This indicates that it is ready to begin
programming.
2. If the multiplex device has no DIP switches,
connect the D5060 to the point to be programmed
as shown in Figure 3 on page 5. If the mutiplex
device has DIP switches, program the device
using its DIP switches.
If the mutiplex device has no DIP
switches, connect the D8125MUX and
the mutiplex device to be programmed to
the D5060 for simultaneous programming
(Figure 3). If the mutiplex device has DIP
switches, program the device using its
DIP switches, and program the
D8125MUX using the D5060 (Figure 4 on
page 5).
3. Enter the point’s three-digit address. The address
must be between 1 and 255. Press [#].
The programmer shows tyP.
4. Enter the number corresponding to the point type
you are programming as shown in Table 3 and
press [#]. The programmer alternately shows the
address and the point type.
When you program for a mutiplex smoke
device by entering decimal value 4 or 5
Table 3, an 18-second timer starts
counting. Do not disconnect the mutiplex
smoke device until after the timer counts
down to zero.
6
Installation
Table 3:
Point Type Entry Code
Decimal
Value
0
Point Type
1
Contact
2
Sensor (or single point module)
Remove point from D8125MUX
3
I/O module
4
Multiplex smoke without low temperature
5
Multiplex smoke with low temperature (0°C)
6
Dual point
5. Press [#] to program a point connected to the
D5060 and the D8125MUX (if connected), or
press [1] to program the D8125MUX only. If the
mutiplex device has DIP switches, program the
device using its DIP switches.
Press [*] at any time to return to a
previous step in the procedure.
6. If the point is programmed correctly, the unit
beeps once and shows Adr, indicating it is ready
to program the next point. If the point was not
programmed correctly, the unit sounds a threebeep error tone and one of the following
messages appears:
Err: The point was not programmed correctly.
PnL: Communications with the D8125MUX
failed.
7. Press [*] to clear the entry, or press [#] to
reprogram.
If programming the D8125MUX and multiplex
device simultaneously and only one receives the
program, the D5060 shows Adr. If having
troubles with the point after installation, try
programming the D8125MUX and multiplex
devices separately.
3.2.3 Removing a Point from the D8125MUX
1. Apply power to the D5060 and connect the
programmer to the D8125MUX only.
2. Enter the address of the point you want to
remove.
3. When prompted for a point type, press [0]. Refer
to Table 3. Then press [#].
4. Press [1] to remove the point.
5. If the point is programmed correctly, the D5060
beeps once and Adr appears.
Bosch Security Systems, Inc. | 10/09 | F01U034973-02
D8125MUX | Operation and Installation Guide | 3.0
.
3.2.4
Interrogation Mode
You can also use the programmer to read information
from the D8125MUX and multiplex points. Refer to
Section 3.1 Connecting the D5060 Programmer on
page 5 to install the D5060.
Reading Information from the D8125MUX
1. To enter Interrogation Mode, press and hold [7]
and [9] simultaneously until the unit beeps.
2. The LED marked INTERROGATION MODE
lights.
A.dr appears prompting you to enter a starting
address.
3. Enter an address followed by [#].
The Interrogation LED flashes.
4. Press [#] to read point information from the
D8125MUX at that address.
5. Press [4] to read the previous address
information from the D8125MUX.
6. Press [6] to read the next address information
from the D8125MUX.
If communication between the unit and
the D8125MUX fails, the unit sounds a
three-beep error tone and shows PnL.
7. Exit Interrogation Mode by pressing and holding
[*] until the unit beeps.
Reading Information from MUX Points
Disconnect all multiplex points from the
D8125MUX and the multiplex bus before
reading multiplex point information.
1. To enter Interrogation Mode, press and hold [7]
and [9] simultaneously until the unit beeps. The
LED marked INTERROGATION MODE lights.
2. The display reads A.dr prompting you to enter a
starting address. Enter an address and press [#].
3. Press [1].
4. When t.YP appears at the keypad, enter the point
type of the multiplex point as shown in Table 3 on
page 6 and press [#].
5. If a point responds to the address, the
programmer beeps once and rSP appears. If the
point does not respond, the unit beeps three
times and the display reads noP.
6. Exit Interrogation Mode by pressing and holding
[*] until the unit beeps.
3.3
Installation
1. Align the D8125MUX with any of the three
mounting locations shown in Figure 6 on page 8.
Then fasten the module with the three mounting
screws provided.
2. Remove AC and DC power from the control
panel.
3. Connect 12 V from the D8125MUX to Zonex
Power +, Terminal 24, on the D9412GV2,
D7412GV2, D7212GV2, D9412G, D9412, and
D9112 (Terminal 3 on the 7412G, D7212G,
D7412, and D7212) as shown in Figure 7 on
page 8.
4. Connect IN on the D8125MUX to Zonex Out 1,
Terminal 28 (or Zonex Out 2 Terminal 26) on the
control panel.
5. Connect OUT on the D8125MUX to Zonex In 1,
Terminal 27 (or Zonex In 2 Terminal 25) on the
control panel.
6. Connect GND on the D8125MUX to Zonex
Common, Terminal 23, on the D9412GV2,
D7412GV2, D7212GV2, D9412G, D9412, and
D9112 (Terminal 9 on the D7412G, D7212G,
D7412, and D7212).
7. Connect Power A + and Power A - on the
D8125MUX to multiplex devices that require
auxiliary power. Up to 200 mA are available at
these terminals.
8. Connect MUX BUS A + and A - on the
D8125MUX to the positive and negative bus wires
of the multiplex points.
9. When using Loop B, connect Power B (if
applicable) and MUX BUS B on the D8125MUX
to the power and bus wires of the multiplex
points. Power B+ and B- also have up to a 200
mA capacity. Observe correct polarity.
Ensure the D8125MUX is not powered
before connecting or disconnecting
multiplex devices. Connecting or
disconnecting a multiplex device while the
D8125MUX is powered causes the
multiplex device address setting to
reprogram or scramble.
Installing and Wiring the
D8125MUX to the Control Panel
The D8125MUX is installed in the control panel
enclosure and is connected to either Zonex 1 or
Zonex 2 on the control panel.
Bosch Security Systems, Inc. | 9/08 | F01U034973-02
7
D8125MUX | Operation and Installation Guide | 3.0
Figure 6:
Installation
D8125MUX Mounting Locations
1
1
1 - Module mounting location
Figure 7:
D8125MUX Wiring Diagram
1
Operation Monitor
Pulses When Normal
Flickers When Ringing
GRN
Reset Pin
Disable All Except Battery
Charging And Programming
PERIPHERAL DEVICE WIRING
POWER +
32
YELLOW
DATA BUS A
31
GREEN
DATA BUS B
30
BLACK
COMMON
29
ZONEX OUT 1
28
ZONEX IN 1
27
ZONEX OUT 2
26
RED
RESET
12V
N.F.P.A.
Style 3.5
Signaling
Line
Circuits
IN
OUT
ZONEX BUS
ZONEX IN 2
25
ZONEX POWER +
24
ZONEX COMMON
23
PROG
CONN
RESET
GND
FIRE MANUAL PROG
PORT
WALK TEST
+
-
POWER A
+
-
MUX BUS A
-
+
POWER B
-
MUX BUS B
12V
IN
OUT
ZONEX BUS
GND
FIRE MANUAL PROG
PORT
WALK TEST
+
-
POWER A
+
-
MUX BUS A
+
POWER B
+
-
MUX BUS B
2
3
4
1 - D9412GV2, D7412GV2, D7212GV2, D9412G,
D9412, or D9112 only.
2 - The Fire Walk Test terminal does not operate on
this model.
3.4
+
3-
When connecting the D8125MUX to a
D7412G, D7212G, D7412, or D7212, use
Terminals 3 and 9 in place of Terminals 24
and 23 respectively.
4 - Supervised, Power Limited.
Wiring the D8125MUX to Multiplex Points
Do not use shielded or twisted pair cable.
1. Connect Power A+ and Power A- on the D8125MUX to multiplex devices that require uninterrupted
auxiliary power. Refer to Figure 8 on page 10. Up to 200 mA is available at these terminals.
2. Connect MUX BUS A+ and A- on the D8125MUX to the positive and negative bus wires of the multiplex
points. The maximum allowable current on MUX BUS A is 75 mA.
8
Bosch Security Systems, Inc. | 10/09 | F01U034973-02
D8125MUX | Operation and Installation Guide | 3.0
Installation
.
Figure 8:
Wiring the D8125MUX to Detection
Systems Multiplex Points
Table 4:
D8125MUX Line Length
MUX BUS A
Maximum Wire Impedance: 33 Ω
AWG (mm)
Length in Ft (m)
D8125MUX
POWER A
MUX BUS A
22 (0.8 mm)
18 (1.2 mm)
MUX BUS B
POWER B MUX BUS B
+ - + - + - + -
Maximum Wire Impedance: 33 Ω
AWG (mm)
Length in Ft (m)
2
1
22 (0.8 mm)
2000 (610)*
18 (1.2 mm)
5000 (1524)*
*
3
5
1234-
3.5
6
To Loop B BUS –
To Loop B BUS +
To Loop B Power –
To Loop B Power +
4
5678-
To Loop A BUS –
To Loop A BUS +
To Loop A Power –
To Loop A Power +
Using Power B and MUX BUS B
(Optional)
It might be necessary to use the Power B (+, -) and
MUX BUS B (+, -) terminals for isolation purposes.
For example, an Authority Having Jurisdiction (AHJ)
might require that fire points and burglar points be on
independent buses.
1. Connect Power B+ and Power B- on the
D8125MUX to multiplex devices that require
uninterrupted auxiliary power. Up to 200 mA is
available at these terminals.
2. Connect MUX BUS B + and B - on the
D8125MUX to the positive and negative bus wires
of the multiplex points. The maximum allowable
current on MUX BUS B is 75 mA.
3.6
Current requirements for multiplex points vary. The maximum
allowable distance you can locate remote points might be
reduced. Do not exceed 75 mA maximum on each MUX bus
output.
Table 5:
8
7
2000 (610)*
5000 (1524)*
Wiring Multiplex Devices to the
Multiplex Bus
Use one two-wire data expansion loop using MUX
BUS A, or distribute the devices on both MUX BUS A
and B. Table 4 shows the maximum distance per
MUX bus output - each D8125MUX has two multiplex
bus outputs. Table 5 shows the maximum distance
between the control panel and the D8125MUX.
Determine the required wire gauge for each multiplex
bus expansion loop (Table 4). Programming the
individual multiplex points with the D5060 assigns
them to point numbers. Daisy chain and T-tapping
configurations are acceptable. Refer to Figure 9.
Bosch Security Systems, Inc. | 9/08 | F01U034973-02
Control Panel to D8125MUX
Distance
Maximum Impedance: 4.05 Ω at +68°F (+20°C)
nominal
Maximum Distance
Size
250 ft
600 ft
76 m
193 m
22 AWG
18 AWG
0.65 mm
1.02 mm
Fire applications require 18 AWG.
Figure 9:
Wiring Multiplex Devices to MUX
Bus
D8125MUX
D8125MUX
1
1
1 - Multiplex device
9
D8125MUX | Operation and Installation Guide | 3.0
3.7
Installing a Multiplex Device
As shown in Table 6, several types of multiplex
devices are available. Each multiplex accessory
device is packaged with instructions connecting to the
multiplex bus output.
Table 6:
Multiplex Devices
Product
Point Type
DS7432 Eight Input Remote Module
DS7450 Flush Mount Single Multiplex
Contact Point
DS7452 Surface Mount Single Multiplex
Contact Point
DS7457 Single Multiplex Input Module
DS7460 Dual Zone Input Module
DS7465 Input/Output Module
MX775 (DS7470) Multiplex PIR Intrusion
Detector – 50 ft (15 m) Mirror
MX934 (DS7471) Multiplex PIR Intrusion
Detector – 35 ft (11 m) Mirror
MX938 (DS7472) Ceiling Mount Multiplex
PIR Intrusion Detector
MX540 (DS7473) Multiplex PIR Intrusion
Detector – 40 ft (12 m) Fresnel Lens
MX794 (DS7474) Multiplex Long Range
PIR Intrusion Detector
MX950 (DS7476) Multiplex
PIR/Microwave TriTech Intrusion Detector
MX835 (DS7477) Multiplex
PIR/Microwave TriTech Intrusion Detector
with Pet Immunity
MX250 Photoelectric Smoke or Photo with
Heat Detector and MXB2W Base
D7050/D7050TH Photoelectric or Photo
with Heat Detector and D7050-B6 Base
Lot #249 and greater
6
1
10
Installation
3.7.1
Off board points for the D9412GV2, D9412G, D9124,
D9412, and D9112 are numbered 9 through 127 and
129 through 247 (D7412GV2, D7412G, D7412, and
D7212 use off board Points 9 through 75 only;
D7212GV2 and D7212G use off board Points 9
through 40 only). The D9412GV2, D9412G, D9412,
and D9112 reserves Points 128 and 248 for internal
use. The D8125MUX connected to Zonex 1 monitors
Points 9 through 127, whereas the D8125MUX
connected to Zonex 2 monitors Points 129 through
247.
1
2
6
3
2
2
2
2
2
2
2
4
4
Adding Multiplex Devices to the Control
Panel
The D8125MUX and multiplex points
connected to Zonex 2 must be
programmed in the D8125MUX with DIP
switches as Points 9 through 127. Refer
to Table 7 on page 11.
3.7.2
Removing Multiplex Devices from the
Control Panel
To remove a multiplex device from the system:
1. Connect the device to the D5060.
2. Enter the address.
3. Enter 0 for the point type.
Ensure that the D8125MUX is not
powered before connecting or
disconnecting multiplex devices.
Connecting or disconnecting a multiplex
device while the D8125MUX is powered
causes the multiplex device address
setting to reprogram or scramble.
After any programming or hardware
change, do a functional test of the system
as required by local codes.
Bosch Security Systems, Inc. | 10/09 | F01U034973-02
D8125MUX | Operation and Installation Guide | 3.0
Installation
.
Table 7:
Point Conversion Table
If Zonex
2 Pt. # is
Program
as
If Zonex
2 Pt. # is
Program
as
If Zonex
2 Pt. # is
Program
as
If Zonex
2 Pt. # is
Program
as
If Zonex
2 Pt. # is
Program
as
129
130
131
132
133
134
135
136
137
138
139
140
141
142
143
144
145
146
147
148
149
150
151
152
9
10
11
12
13
14
15
16
17
18
19
20
21
22
23
24
25
26
27
28
29
30
31
32
153
154
155
156
157
158
159
160
161
162
163
164
165
166
167
168
169
170
171
172
173
174
175
176
33
34
35
36
37
38
39
40
41
42
43
44
45
46
47
48
49
50
51
52
53
54
55
56
177
178
179
180
181
182
183
184
185
186
187
188
189
190
191
192
193
194
195
196
197
198
199
200
57
58
59
60
61
62
63
64
65
66
67
68
69
70
71
72
73
74
75
76
77
78
79
80
201
202
203
204
205
206
207
208
209
210
211
212
213
214
215
216
217
218
219
220
221
222
223
224
81
82
83
84
85
86
87
88
89
90
91
92
93
94
95
96
97
98
99
100
101
102
103
104
225
226
227
228
229
230
231
232
233
234
235
236
237
238
239
240
241
242
243
244
245
246
247
105
106
107
108
109
110
111
112
113
114
115
116
117
118
119
120
121
122
123
124
125
126
127
3.8
Point Matrix Tables
Only use one D8125MUX per zonex output. Refer to Table 8 beginning on page 12 for Zonex 1. Refer to Table
9 beginning on page 14 for Zonex 2
If configuring the system with DS7457i, DS7461i, or DS7465i MUX devices. Refer to Table 10 on page 16 if
configuring the system with the DS7460iMUX device.
The type of multiplex device used determines the quantity of devices you can connect to the D8125MUX. Do
not program two multiplex points to the same point number. After programming all the points, perform a
Service Walk Test. Refer to the control panel’s operation and installation guide for information on the Service
Walk Test. If a multiplex point is not functioning, check for duplicate addresses.
Two sheets of peel-off labels are supplied with the D8125MUX. Each label has two parts. Place the smaller
part (with the point number) on the multiplex point. Throw away the larger part. Use the sheet marked Bank 1
for Points 9 through 127 and the sheet marked Bank 2 for Points 129 through 247. The D7412GV2,
D7212GV2, D7412G, D7212G, D7412, and D7212 Control Panels use the sheet marked Bank 1.
Bosch Security Systems, Inc. | 9/08 | F01U034973-02
11
D8125MUX | Operation and Installation Guide | 3.0
Table 8:
DS7457i, DS7461i, and DS7465i
Switch Settings When Using
D8125MUX on Zonex 1
Point
(Relay)
Address
2
3
4
009
011
012
013
014
015
016
•
•
•
•
•
•
•
•
•
•
•
•
•
•
•
•
017
018
019
020
021
022
023
024
025
026
027
028
029
030
031
033
034
035
036
5
•
•
•
•
•
•
•
010
032
Table 8:
•
•
•
•
•
6
7
•
•
•
•
•
•
•
•
•
•
•
•
2
037
•
•
•
•
•
•
•
•
•
044
•
046
•
048
•
050
•
•
•
•
•
•
•
•
•
•
•
•
•
•
•
•
•
•
•
•
•
•
•
043
045
047
049
051
052
053
054
055
•
056
•
058
057
059
•
060
•
062
•
4
5
6
•
•
•
7
8
•
•
•
•
•
Maximum Number of Points (D7212G)
041
•
•
3
•
•
•
•
039
042
Note: When using the DS7465i Input/Output Module, only
Addresses 009 through 064 support the relay option
(009 through 024 on the D7212GV2 and D7212G).
12
1
038
•
•
•
•
•
Switch Number (• = ON)
040
•
•
•
•
•
•
•
•
•
•
8
•
•
•
DS7457i, DS7461i, and DS7465i
Switch Settings When Using
D8125MUX on Zonex 1 (continued)
Point
(Relay)
Address
Switch Number (• = ON)
1
Installation
61
063
064
•
•
•
•
•
•
•
•
•
•
•
•
•
•
•
•
•
•
•
•
•
•
•
•
•
•
•
•
•
•
•
•
•
•
•
•
•
•
•
•
•
•
•
•
•
•
•
•
•
•
•
•
•
•
•
•
•
•
•
•
•
•
•
•
•
•
•
•
Note: When using the DS7465i Input/Output Module, only
Addresses 009 through 064 support the relay option
(009 through 024 on the D7212GV2 and D7212G).
Bosch Security Systems, Inc. | 10/09 | F01U034973-02
D8125MUX | Operation and Installation Guide | 3.0
Installation
.
Table 8:
DS7457i, DS7461i, and DS7465i
Switch Settings When Using
D8125MUX on Zonex 1 (continued)
Point
(Relay)
Address
2
3
4
5
6
7
066
067
068
069
070
071
072
073
074
075
•
•
•
•
•
•
•
•
•
•
•
083
•
•
•
•
•
•
•
•
•
•
•
077
078
079
080
081
082
083
084
085
086
087
088
089
090
091
092
•
•
•
•
•
•
•
•
•
•
•
•
•
•
•
•
•
086
087
•
•
•
088
089
•
090
091
•
•
•
•
•
•
•
•
094
095
096
•
•
•
092
093
Maximum for D7412G, D7412, and D7212
076
•
•
•
•
•
•
•
•
•
•
•
•
•
•
•
•
•
084
085
•
097
098
•
099
100
•
•
•
•
•
•
•
•
•
•
•
•
101
102
•
103
104
•
•
•
105
106
•
107
108
•
•
•
109
110
•
•
Note: When using the DS7465i Input/Output Module, only
Addresses 009 through 064 support the relay option
(009 through 024 on the D7212GV2 and D7212G).
Bosch Security Systems, Inc. | 9/08 | F01U034973-02
Switch Number (• = ON)
1
8
Maximum for DS7465i
065
DS7457i, DS7461i, and DS7465i
Switch Settings When Using
D8125MUX on Zonex 1 (continued)
Point
(Relay)
Address
Switch Number (• = ON)
1
Table 8:
2
•
•
•
•
•
•
•
•
•
•
•
•
•
•
•
•
•
•
•
•
•
•
•
•
•
•
•
•
3
4
•
•
•
•
•
•
•
•
•
•
•
•
•
•
•
•
•
•
•
•
•
•
•
•
•
•
•
•
5
6
•
•
•
•
•
•
•
•
•
•
•
•
7
8
•
•
•
•
•
•
•
•
•
•
•
•
•
•
•
•
•
•
•
•
•
•
•
•
•
•
•
•
•
•
•
•
•
•
•
•
•
•
•
•
•
•
•
•
•
•
Note: When using the DS7465i Input/Output Module, only
Addresses 009 through 064 support the relay option
(009 through 024 on the D7212GV2 and D7212G).
13
D8125MUX | Operation and Installation Guide | 3.0
Table 8:
DS7457i, DS7461i, and DS7465i
Switch Settings When Using
D8125MUX on Zonex 1 (continued)
Point
(Relay)
Address
112
113
114
115
116
117
118
119
120
121
122
123
124
125
126
127
128
2
•
•
•
•
•
•
•
•
•
•
•
•
•
•
•
•
•
3
•
•
•
•
•
•
•
•
•
•
•
•
•
•
•
•
•
4
5
•
•
•
•
•
•
•
•
•
•
•
•
•
•
•
•
•
6
•
Table 9:
DS7457i, DS7461i, and DS7465i
Switch Settings When Using
D8125MUX on Zonex 2
Zone
(Point)
Address
Switch Number (• = ON)
1
111
Installation
7
•
8
•
Switch Number (• = ON)
1
2
3
•
•
•
•
•
•
•
•
•
•
•
•
•
•
•
131
132
•
133
134
•
•
•
135
136
•
•
•
•
•
•
•
•
•
•
•
•
•
•
•
•
•
137
138
•
•
•
•
•
•
•
139
140
•
141
142
•
•
•
143
144
•
NOT USED
145
146
147
148
149
150
151
152
153
154
155
156
157
158
5
•
•
•
•
•
•
•
130
Note: When using the DS7465i Input/Output Module, only
Addresses 009 through 064 support the relay option
(009 through 024 on the D7212GV2 and D7212G).
14
4
129
•
•
•
•
•
•
•
6
7
8
•
•
•
•
•
•
•
•
•
•
•
•
•
•
•
•
•
•
•
•
•
•
•
•
•
•
•
•
•
•
•
•
•
•
•
•
•
•
•
•
•
•
•
•
•
•
•
•
•
•
•
•
•
Bosch Security Systems, Inc. | 10/09 | F01U034973-02
D8125MUX | Operation and Installation Guide | 3.0
Installation
.
Table 9:
DS7457i, DS7461i, and DS7465i
Switch Settings When Using
D8125MUX on Zonex 2 (continued)
Zone
(Point)
Address
1
2
•
•
•
•
•
•
•
•
•
•
•
•
•
•
•
•
•
•
•
•
•
•
•
•
•
160
161
162
163
164
165
166
167
168
169
170
171
172
173
174
175
176
177
178
179
180
181
182
183
184
185
186
187
188
3
•
•
•
•
•
4
5
6
•
•
•
•
•
•
•
•
•
•
•
•
•
•
•
•
•
•
•
•
•
•
•
•
•
7
•
8
•
•
•
•
191
192
•
197
198
•
•
•
199
200
•
201
202
•
•
•
•
•
•
•
•
•
•
•
•
•
•
•
203
204
•
205
206
•
•
•
207
208
•
209
210
•
•
•
•
•
•
•
211
212
•
213
214
•
•
•
215
216
•
217
218
•
•
•
219
220
•
•
Bosch Security Systems, Inc. | 9/08 | F01U034973-02
Switch Number (• = ON)
1
189
190
•
•
•
•
DS7457i, DS7461i, and DS7465i
Switch Settings When Using
D8125MUX on Zonex 2 (continued)
Zone
(Point)
Address
Switch Number (• = ON)
159
Table 9:
221
222
2
•
•
•
•
•
•
•
•
•
•
•
•
•
•
•
•
•
•
•
•
•
•
•
•
•
•
•
•
•
•
3
4
5
6
•
•
•
•
•
•
•
•
•
•
•
•
•
•
•
•
•
•
•
•
•
•
•
•
•
•
•
•
•
•
•
•
•
7
8
•
•
•
•
•
•
•
•
•
•
•
•
•
•
•
•
•
•
•
•
•
•
•
•
•
•
•
•
•
•
•
•
•
•
•
•
•
•
•
•
•
•
•
•
•
•
•
•
•
15
D8125MUX | Operation and Installation Guide | 3.0
Table 9:
DS7457i, DS7461i, and DS7465i
Switch Settings When Using
D8125MUX on Zonex 2 (continued)
Zone
(Point)
Address
223
224
225
226
227
228
229
230
231
232
233
234
235
236
237
238
239
240
241
242
243
244
245
246
247
248
16
2
•
•
•
•
•
•
•
•
•
•
•
•
•
•
•
•
•
•
•
•
•
•
•
•
•
3
•
•
•
•
•
•
•
•
•
•
•
•
•
•
•
•
•
•
•
•
•
•
•
•
•
4
5
6
•
•
•
•
•
•
•
•
•
•
•
•
•
•
•
•
•
•
•
•
•
•
•
•
•
7
•
•
•
•
•
•
•
•
•
•
•
•
•
•
•
•
•
•
•
•
•
•
•
•
•
DS7460i Switch Settings When
Using D8125MUX
Switch Number (• = ON)
1
•
•
•
•
•
•
Table 10:
Address
Zone/Relay
Switch Number (• = ON)
1
Installation
•
•
8
2
3
4
009/010
•
011/012
•
015/016
•
019/020
•
023/024
•
027/028
•
031/032
•
035/036
•
039/040
•
043/044
•
047/048
•
051/052
•
055/056
•
059/060
•
•
•
•
013/014
017/018
•
•
•
•
•
•
•
•
021/022
025/026
029/030
033/034
037/038
041/042
045/046
049/050
053/054
057/058
5
•
•
•
•
•
•
•
•
•
•
•
•
•
•
6
7
•
•
•
•
•
•
•
•
•
•
•
•
•
•
•
•
•
•
•
•
•
•
•
•
•
•
•
•
•
•
•
•
•
•
•
•
•
•
•
•
•
8
•
•
•
•
•
•
•
•
•
•
•
•
•
•
•
•
•
•
•
•
•
•
•
•
•
•
NOT USED
Bosch Security Systems, Inc. | 10/09 | F01U034973-02
D8125MUX | Operation and Installation Guide | 3.0
Installation
.
Table 10:
DS7460i Switch Settings When
Using D8125MUX (continued)
Address
Zone/Relay
2
061/062
063/064
067/068
069/070
071/072
073/074
075/076
077/078
079/080
081/082
083/084
085/086
087/088
089/090
091/092
093/094
095/096
097/098
099/100
101/102
103/104
105/106
107/108
109/110
111/112
113/114
115/116
117/118
119/120
121/122
123/124
•
•
•
•
•
•
•
•
•
•
•
•
•
•
•
•
•
•
•
•
•
•
•
•
•
•
•
•
•
•
3
4
5
6
•
•
•
•
•
•
•
•
7
•
•
•
•
•
•
•
•
•
•
•
•
•
•
•
•
•
•
•
•
•
•
•
•
•
•
•
•
•
•
•
•
•
•
•
•
•
•
•
•
•
•
•
•
•
•
•
•
•
•
•
•
•
•
•
•
•
•
•
•
•
•
•
•
•
•
•
•
•
•
DS7460i Switch Settings When
Using D8125MUX (continued)
Address
Zone/Relay
Switch Number (• = ON)
1
065/066
Table 10:
•
•
8
•
•
•
•
•
•
•
•
•
•
•
•
•
•
•
•
•
•
•
•
•
•
•
•
•
•
•
•
•
•
•
•
Bosch Security Systems, Inc. | 9/08 | F01U034973-02
Switch Number (• = ON)
1
125/126
2
3
•
•
127/128
4
5
6
•
•
•
•
•
•
•
131/132
133/134
135/136
137/138
•
•
•
•
•
•
•
•
139/140
141/142
143/144
145/146
147/148
149/150
151/152
153/154
•
•
•
•
•
•
•
•
•
•
•
•
•
•
•
•
155/156
157/158
159/160
161/162
163/164
165/166
167/168
169/170
171/172
173/174
175/176
177/178
179/180
181/182
183/184
187/188
8
•
NOT USED
129/130
185/186
7
•
•
•
•
•
•
•
•
•
•
•
•
•
•
•
•
•
•
•
•
•
•
•
•
•
•
•
•
•
•
•
•
•
•
•
•
•
•
•
•
•
•
•
•
•
•
•
•
•
•
•
•
•
•
•
•
•
•
•
•
•
•
•
•
•
•
•
•
•
•
•
•
•
•
•
•
•
•
•
•
•
17
D8125MUX | Operation and Installation Guide | 3.0
Table 10:
Switch Number (• = ON)
1
189/190
191/192
193/194
195/196
197/198
199/200
201/202
203/204
205/206
207/208
209/210
211/212
213/214
215/216
217/218
219/220
221/222
223/224
225/226
227/228
229/230
231/232
233/234
235/236
237/238
239/240
241/242
243/244
245/246
247/248
18
3.9
DS7460i Switch Settings When
Using D8125MUX (continued)
Address
Zone/Relay
2
•
•
•
•
•
•
•
•
•
•
•
•
•
•
•
•
•
•
•
•
•
•
•
•
•
•
•
•
•
3
4
5
6
•
•
•
•
•
•
•
•
•
•
•
•
•
•
•
•
•
•
•
•
•
•
•
•
•
•
•
•
•
7
•
•
•
•
•
•
•
•
•
•
•
•
•
•
•
•
•
•
•
•
•
•
•
•
•
•
•
•
•
•
•
•
•
•
•
•
•
•
•
•
•
•
•
•
•
Installation
8
•
•
•
•
•
•
•
•
•
•
•
•
•
•
•
•
•
•
•
•
•
•
•
•
•
•
•
•
•
Single Input Multiplex Devices
The devices listed in Table 10 reserve a single point
on the MUX bus. Single Input Multiplex points can be
programmed as Points 9 through 127 (Zonex 1) and
129 through 247 (Zonex 2) (238 devices) on the
D9412GV2, D9412G, D9412, and D9112; Points 9
through 75 (67 devices) on the D7412GV2, D7412G,
D7412, and D7212; Points 9 through 40 on the
D7212GV2 and D7212G (32 devices). When
programming the point type for Single Input Multiplex
points using a D5060 Programmer, refer to Table 11
for information on how to configure the point type.
Tamper conditions on multiplex points are treated as
Missing conditions by the control panel.
Table 11:
Single Input Multiplex Device Point
Response Configuration
Device Type
DS7450 Flush Mount Single
Multiplex Contact Point
DS7452 Surface Mount Single
Multiplex Contact Point
DS7457 Single Multiplex Input
Module
MX775 (DS7470) Multiplex
PIR Intrusion Detector - 50 ft
(15 m) Mirror
MX934 (DS7471) Multiplex
PIR Intrusion Detector - 35 ft
(11 m) Mirror
MX938 (DS7472) Ceiling
Mount Multiplex PIR Intrusion
Detector
MX540 (DS7473) Multiplex
PIR Intrusion Detector - 40 ft.
(12 m) Fresnel Lens
MX794 (DS7474) Multiplex
Long Range PIR Intrusion
Detector
MX950 (DS7476) Multiplex
PIR/Microwave TriTech
Intrusion Detector
MX835 (DS7477) Multiplex
PIR/Microwave TriTech
Intrusion Detector with Pet
Immunity
Point
Type
1
Point
Response
NO
1
NO
2
2
Configurable
(NO or NC)
NO
2
NO
2
NO
2
NO
2
NO
2
NO
2
NO
NOT USED
Bosch Security Systems, Inc. | 10/09 | F01U034973-02
D8125MUX | Operation and Installation Guide | 3.0
Installation
.
3.10
MX250 Photoelectric Smoke
Detectors and MXB2W Base or
D7050 Photoelectric Smoke
Detector and D7050-B6 Base
The MX250 and MX250TH Photoelectric Smoke
Detectors with MXB2W Base or D7050 and D7050TH
Photoelectric Smoke Detectors and D7050-B6 Base
reserve a single point on the multiplex bus. Single
input Multiplex points can be programmed as points 9
through 127 (Zonex 1) and 129 through 247 (Zonex
2) (238 smoke detectors) on a D9412GV2, D9412G,
D9124, D9412, or D9112; points 9 through 75 (67
smoke detectors) on a D7412GV2, D7412G, D7412,
and D7212; and (32 smoke detectors) points 9
through 40 on the D7212GV2 and D7212G. Other
wiring restrictions can reduce the maximum number
of photoelectric smoke detectors on the multiplex bus.
Refer to the MX250 Installation Guide (P/N: 45253)
and the D7050 Installation Instructions (P/N: 47458)
for additional information.
When programming an MX250 Series or D7050
Series Photoelectric Smoke Detector and base with a
D5060 Programmer, refer to Table 12 for information
on configuring the point type.
Table 12:
MX250, MX250TH, D7050, and
D7050TH Point Type Configuration
Device Type
Photoelectric Smoke
Detector and Base
Point
Type
4
Point
Response
NO
The rotary address switches must be set
to the “B” range address to work with the
D8125MUX.
3.11
DS7460(i) Dual Input Multiplex
Module
The DS7460(i) reserves two points on the MUX bus.
Dual input multiplex points can be programmed as
Points 9 through 127 (Zonex 1) and 129 through 247
(Zonex 2) (59 per zonex, 118 modules) on
D9412GV2, D9412G, D9412, and D9112: Points 9
through 75 (33 modules) on a D7412GV2, D7412G,
D7412, and D7212; Points 9 through 40 on the
D7212GV2 and D7212G (16 modules). When
programming dual points, they occupy first an odd
point number, then an even point number. For
example, DS7460(i) Modules must be programmed to
occupy Points 9 and 10, not 10 and 11.
When using the D5060 programmer, only
program the odd or first point on the
module. The even or second point is
automatically added.
The DS7460i cannot be used for Point 75
on the D7412GV2, D7412G, D7412, and
D7212 or for Points 127 or 247 on the
D9412GV2, D9412G, D9412, and D9112.
Failure to observe these programming
requirements will result in intermittent
missing conditions.
In addition, both points on the DS7460i must have a
Point Index assigned to it when programming the
control panel. If one of the two points is not required
on the device, simply place the 47 kΩ end-of-line
(EOL) resistor on the point input terminals and
program the unused point with the same Point Index.
When programming the point type for the DS7460(i),
using the D5060 Programmer refer to Table 13 for
information on configuring the point type. Tamper
conditions on multiplex points are treated as Missing
conditions by the control panel.
Table 13:
Bosch Security Systems, Inc. | 9/08 | F01U034973-02
DS7460(i) Point Type Configuration
Device Type
Point Type
Point Response
DS7460i Dual
Input Multiplex
Module
6
Configurable
(N/O or N/C)
19
D8125MUX | Operation and Installation Guide | 3.0
3.12
DS7432 Eight Input Remote Module
This device type reserves eight points on the
multiplex bus. Each D8125MUX supports fifteen
DS7432s on the D9412GV2, D9412G, D9412, and
D9112 Control Panels, up to eight on the D7412GV2,
D7412G, D7412, and D7212 Control Panels, and up
to four on the D7212GV2 and D7212G Control
Panels. The DS7432s occupy groups of eight points;
however, when programming the DS7432 with the
multiplex point programmer, program them as four
sets of dual points. For example, if using a DS7432
on the system for Points 9 through 16, program
Points 9, 11, 13, and 15 as dual points with the even
points being added automatically. Program starting
point locations for the DS7432 on the D9412GV2,
D9412G, D9412, and D9112 Control Panels as
follows: 9, 17, 25, 33, 41, 49, 57, 65, 73, 81, 89, 97,
105, 113, 121. Refer to Table 14.
Table 14:
DIP Switch Settings
Installation
on the device, place the 47 kΩ EOL resistor on the
point input terminals. Refer to Table 15 for
information on configuring the point type. Tamper
conditions on multiplex points are treated as Missing
conditions by the control panel. Removing the cover
and activating the tamper results in a missing
condition for all eight points.
Table 15:
DS7432 Point Type Configuration
Device Type
Point Type
Point Response
DS7432 Eight Input
Remote Module
6
Configurable
(NO or NC)
3.13
DS7465(i) Input/Output Module
This device type reserves a single point on the MUX
bus and provides a Form C (NO, C, NC) relay output.
The relay output number assigned to this module is
the same as the point number assigned to it. For
example, if this device was programmed as Point 27,
the relay number is also 27.
DIP Switch
Zonex 1/
Zonex 2
9/129
1
2
3
4
5
Open
Open
Open
Open
Closed
17/137
Open
Open
Open
Closed
Open
25/145
Open
Open
Open
Closed
Closed
33/153
Open
Open
Closed
Open
Open
41/161
Open
Open
Closed
Open
Closed
49/169
Open
Open
Closed
Closed
Open
57/177
Open
Open
Closed
Closed
Closed
65/185
Open
Closed
Open
Open
Open
73/193
Open
Closed
Open
Open
Closed
81/201
Open
Closed
Open
Closed
Open
89/209
Open
Closed
Open
Closed
Closed
97/217
Open
Closed
Closed
Open
Open
105/225
Open
Closed
Closed
Open
Closed
113/233
Open
Closed
Closed
Closed
Open
121/241
Open
Closed
Closed
Closed
Closed
Points 127/128 and 247/248 cannot be
programmed when using DS7432s
(D9412GV2, D9412G, D9412, or D9112).
Program starting point locations for the DS7432 on
the D7412GV2, D7412G, D7412, D7212 as follows:
9, 17, 25, 33, 41, 49, 57, and 65. Program starting
point locations for the DS7432 on the D7212GV2 and
D7212G as follows: 9, 17, 25, and 33. Failure to
observe this programming requirement will result in
intermittent missing conditions. All eight points on the
DS7432 must also have a Point Index assigned to
them. If any of the eight point inputs are not required
20
The relay output on this module is a fully
programmable relay and follows the relay
programming of the control panel.
The maximum number of DS7465i Modules that can
be placed on the control panels is 56 as points 9
through 64 for the D9412GV2, D7412GV2, D9412G,
D7412G, D9412, D7412, D7212, and D9112; and 16
as points 9 through 24 for the D7212GV2 and
D7212G. Place the DS7465(i) on the D8125MUX
connected to Zonex 1.
If only the relay is required for the installation, assign
a Point Index for the programmed point location, and
place a 47 kΩ EOL resistor on the point input
terminals. Refer to Table 16 for point type
configuration.
Table 16:
DS7465(i) Point Type Configuration
Device Type
Point Type
Point Response
DS7465(i) Input/Output
Module
3
Configurable
(NO or NC)
Tamper conditions on multiplex points are treated as
Missing conditions by the control panel. Using
DS7465i Input and Output Modules on the system
does not interfere with the use of D8129 OctoRelay
Modules.
Bosch Security Systems, Inc. | 10/09 | F01U034973-02
D8125MUX | Operation and Installation Guide | 4.0
.
Control the relay output on each DS7465 using any of
the following control panel options:
• Relay follows Point for Points 9 through 64
(Points 9 through 34 for D7212GV2/D7212G)
(refer to the Relay Response Type section in the
control panel’s program entry guide).
When the DS7465i is programmed to
follow a point, the relay can have a
delayed response of 2 to 5 sec.
•
•
•
•
•
•
Area or Panel Wide Relay functions
Schedules (skeds)
[Command] [5] [4]
Remote Programming Software control
Enter Key Relay Number (refer to Command
Center Assignments in the control panel’s
program entry guide)
BFSK Relay (D7412GV2, D7212GV2, D7412G,
D7212G, D7412, and D7212 only)
4.0 Testing the System
4.1
Local Walk Test (Command 44)
While disarmed, check the security system’s status
by entering [COMMAND] [4] [4] at the D1255 or
D1260 Keypad. This command initiates a System
Walk Test. Each point of protection is scanned by the
control panel, and points are displayed on the D1255
as they are activated. An accompanying tone is heard
from the keypad to alert the user of an activated point.
When all the burg points are tested, 0 POINTS TO
TEST appears and the system returns to normal
operation. Points failing to report during the Walk Test
can be viewed by pressing [NEXT] until the display
reads VIEW UNTESTED ? Press [NEXT] to view the
faulty points.
Refer to the Security System Owner’s Manual
(P/N: 71-06633-000) for more details on the Local
Walk Test features.
4.2
Missing Multiplex Points
4.3
Testing the System
Extra Multiplex Points
Extra Points occur when the D8125MUX sends point
transitions back to the control panel and the control
panel does not have a Point Index programmed for it.
Extra multiplex points are reported to the control
panel as a trouble event at the keypad or central
station. The keypad shows the default custom text for
the point number as programmed in the RADXPNTS
(handler).
When an extra point is activated during the Service
Walk Test, it appears as an extra point in the control
panel’s event log and at the local printer (if installed).
Use VIEW LOG to view the control panel’s event log.
Once an extra point is identified, check the
programming to see if it has a Point Index
programmed. Determine if the point belongs in the
system.
Refer to Section 5.0 Troubleshooting on page 22 for
more information.
4.4
Ground Fault Notification on
Multiplex Devices
When the Loop Input (+) is in a normal condition, a
ground fault on the Loop Input (+) terminal is initially
signaled as a point trouble. A ground fault condition is
signaled by the system after the normal 30 second
ground fault detect time. To witness the ground fault
indication on the keypad, the point trouble must be
cleared from the display by pressing [Command] [4]
on a D1255 and D1260 or [Trouble Silence] on a
D1256. The control panel History Log, shown on a
keypad or sent to the central station, also indicates
the ground fault detection. An Alarm condition is still
indicated even during the occurrence of a ground
fault condition.
When the loop is in an open position, a ground fault
on the Loop Input (+) terminal disrupts supervision.
An open on the loop does not indicate a new fault,
because the ground fault is interpreted as an open. A
short might indicate an Alarm condition depending on
the control panel’s programming.
Multiplex points appearing as missing on the display
are usually not connected properly to the multiplex
bus, not programmed correctly, nor have incorrect
DIP switch settings.
Check the multiplex bus wiring to the missing point
and its programming.
Bosch Security Systems, Inc. | 9/08 | F01U034973-02
21
D8125MUX | Operation and Installation Guide | 5.0
Troubleshooting
5.0 Troubleshooting
Table 17:
Troubleshooting
Symptom
Diagnosis
Remedy
Multiplex point appears as
missing at the keypads.
Multiplex point is not connected
to MUX bus. Check wiring.
Points intermittently appear
as missing.
Multiplex point not
programmed.
MUX bus wires not connected
to D8125MUX.
Noise problem on MUX bus
loop.
Verify that a multiplex point programmed for the
missing multiplex point is connected to the MUX bus
wiring. Make sure its polarity is correct.
Check the Green Operation LED on the D8125MUX. It
should be flashing. An LED OFF indicates no power, a
D8125MUX PCB failure, or an EEPROM failure on the
D8125MUX.
Verify the missing point’s programming with the
Multiplex Point Programmer.
Verify the MUX bus wires are connected to the correct
terminals on the D8125MUX. Verify correct polarity.
Make sure MUX bus wires do not run over fluorescent
lighting or near large AC power transformers or
conduits.
Verify the wiring to the multiplex points and the
D8125MUX does not have nicks or cuts in the
insulation that can short to nearby conduit. Make sure
wires are tight under terminals of multiplex points and
on the D8125MUX.
Remove the sensor wiring from the multiplex point and
meter it for continuity.
There should be no more than 100 of resistance, plus
the EOL resistance. If you read less than the EOL
resistance look for shorts in the wiring.
With the wires for the sensor removed, use a meter to
check them for continuity to ground.
A ground before the EOL resistor on a multiplex points’
sensor loop is interpreted as a short. If the multiplex
point is programmed for trouble on short, a ground
before the EOL causes the multiplex point to send a
trouble report.
The control panel ignores events generated while the
programming or reset switch is down.
Intermittent shorts or opens on
the MUX bus wires.
One or more multiplex
points remain in trouble or
alarm when all devices
appear normal.
The MUX bus is open, shorted
or grounded.
Opens, shorts, or grounds at
various points in the MUX bus
can cause alarms and troubles
depending on multiplex point
programming.
Faulted multiplex points do
not generate alarms or
troubles as programmed.
Control panel’s reset hook
switch is down when event was
generated.
Two multiplex points are
programmed for the same
address.
Short on D8125MUX, MUX bus
terminals, or short on control
panel Zonex data terminals (25
& 26, 27 & 28).
Control panel transmits PT
BUS TROUBLE reports.
Erroneous alarm or trouble
reports might follow.
Erroneous alarm or trouble
reports appear at keypads.
22
A multiplex point is
programmed for address 128
or 248 or a D8128D
OctoPOPIT on the same
system has address switches
set for Points 121 through 128
or Points 241 through 248.
Multiplex points programmed for the same address do
not function correctly. Check the programming of each
multiplex point with the multiplex point programmer.
A short on either MUX BUS A or MUX BUS B terminals
generates a PT BUS TROUBLE report. A short on BUS
A or BUS B does not prevent the other from normal
operation. Determine what series of points is wired to
BUS A and BUS B. Check wiring for shorts.
Confirm that a multiplex point is not programmed as
Point 128 or 248. Multiplex points cannot be used as
Points 128 or 248 (these are reserved for control panel
functions). OctoPOPITs cannot be used for Points 121
to 128 or 241 to 248.
Bosch Security Systems, Inc. | 10/09 | F01U034973-02
D8125MUX | Operation and Installation Guide | 5.0 Troubleshooting
Table 17:
EN | 23
Troubleshooting (continued)
Symptom
Diagnosis
Remedy
All off-board points report as
MISSING.
Short on Aux power, Terminal
3 or Zonex power, Terminal 24.
If only one D8125MUX is
connected to the control panel,
the D8125MUX might be
incorrectly connected to the
control panel, or MUX bus
wiring might be disconnected
from the D8125MUX.
Multiplex power terminals or
MUX bus terminals on DS7432
might be incorrectly wired.
Address switches on DS7432
set for Points 121 through 128.
Terminals 3 and 24 share a common circuit breaker.
Points on the DS7432 all
appear missing.
Check wiring and devices connected to these terminals
for shorts or grounds. Check connections to D8125MUX
and control panel for errors. Check the green Operation
LED on the D8125MUX to see if it is flashing.
Verify the wiring on DS7432 is correct.
Ensure address switches on DS7432 are not set for
Points 121 through 128. These points are reserved for
control panel functions.
6.0 Specifications
Table 18:
Specifications
Operating Voltage
Current Requirements
Maximum Current Draw
(using both MUX bus
outputs
and both power outputs)
Operating Temperature
Relative Humidity
Dimensions (H x W x D)
Nominal 12 VDC
D8125MUX only: 140 mA
678 mA
+32°F to +120°F (0°C to +49°C)
0 to 93%
1.0 in. x 3.25 in. x 5.5 in. (25 mm x 8.3 cm x 14.0 cm)
Bosch Security Systems, Inc. | 9/08 | F01U034973-02
23
Bosch Security Systems, Inc.
130 Perinton Parkway
Fairport, NY 14450-9199
(800) 289-0096
© 2008 Bosch Security Systems, Inc.
F01U034973-02