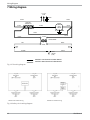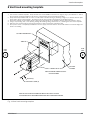
1
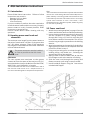
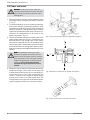
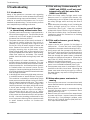
Installation manual
AQ4 Horizontal Vent Kit
For Bosch AquaStar Models: GWH 1600 P, GWH 1600 H
For Bosch Pro Tankless Models: GWH 425 PN, GWH 425 HN*
WARNING : If the information in this manual is not
followed exactly, a fire or explosion may result causing
property damage, personal injury or death. Do not store
or use gasoline or other flammable vapor and liquids in
the vicinity of this or any other appliance.
Improper installation, adjus tment, alteration, ser vice or
maintenance can cause injury or property damage. Refer
to this manual. For assistance or additional information
consult a qualified installer, ser vice agency or the gas
supplier.
In the Commonwealth or Massachusetts this product
mus t be installed by a licensed plumber or gas fit ter.
Upon completion of the installation, these instructions
should be handed to the user of the appliance for future
reference.
* The GWH 425 HN has been redesigned. This vent kit is
not compatible with the older version (identified by a
white cover). Use the AQ1 horizontal vent kit with the
older version.
Table of Contents
Table of Contents
1 Introduction
........................................................................ 3
1.1
1.2
1.3
1.4
............................................................................... 3
............................................................................... 3
............................................................................... 3
Parts included
Warnings
Preparation
Requirements for installation in
Massachusetts
............................................................................... 4
2 AQ4 Installation instructions
........................................................................ 5
2.1 Introduction
2.2 Locating power vent hood and
clearances
2.3 Power vent hood
2.4 Power vent motor
2.5 Vent piping
2.6 Linear safety spillage switch
2.7 Flow switch
............................................................................... 5
............................................................................... 5
............................................................................... 5
............................................................................... 6
............................................................................... 7
............................................................................... 7
............................................................................... 8
3 Operation
........................................................................ 9
3.1 First time start up
............................................................................... 9
4 Maintenance
........................................................................ 9
5 Troubleshooting
...................................................................... 10
5.1 Introduction
5.2 Power vent motor runs all the time or
intermittenly without water flow
5.3 Pilot will not hold when lit or spark
automatically with hot water flow
5.4 Pilot goes out during hot water use
5.5 Noise when power vent motor is
running
............................................................................. 10
............................................................................. 10
............................................................................. 10
............................................................................. 10
............................................................................. 10
6 One Year Limited Warranty
...................................................................... 11
7 Wiring diagram
...................................................................... 12
8 Vent hood template
...................................................................... 13
2
AQ4 Manual
Introduction
1 Introduction
1.1 Parts included
Vent Hood Kit
• 1 - 4" vent hood: VH1-4
• 4 - Exterior screws
• 1 - 5" to 4" vent reducer pipe
• 1 - AQ4FLAPPER back draft accessory
Vibration Mount Packet
• 2 - Vibration mounts with nuts and washers
• 2 - Brackets with nuts and washers
Flow Switch Packet
• 1 - Flow switch
• 3 - Replacement pipes (See chapter 2.7)
• 2 - Pipe clips
• 1 - Molex connector cable
• 1 - Heat exchanger bushing
Power vent motor
• 1 - Power vent motor (HSUL-1 Series containing
integrated 24v control circuit) including 25 foot
control cable with wire nuts and an HPN 6-foot
power cord
• 5 - Nylon ties
War
ning: Failure to install AQ4FLAPPER
arning:
properly may allow freezing air to come in
contact with the water heater’s heat
exchanger and cause the heat exchanger
to burst. Such damage is not covered
under the water heater’s warranty.
1.3 Preparation
1. Follow installation and operating instructions
manual supplied with the water heater.
2. Before mounting water heater to wall, check its
minimum clearance requirements.
3. When using an AQ4 the maximum vent length from
the water heater to the point of termination is 25
feet. Subtract 5 feet for each additional 90° elbow
(up to two additional elbows allowed.)
4. Install power vent motor as close to the vent hood
as possible.
1.2 Warnings
1. Failure to install, maintain and/or operate the
power vent in accordance with manufacturer’s
instructions may result in conditions which can
produce bodily injury and property damage.
2. The power vent must be installed by a qualified
installer in accordance with all local codes or, in
their absence, in accordance with the National
Fuel Gas Code (ANSI Z223.1 NFPA #54), the
National Electric Code, the Canadian Electrical
Code (C22.1), Canadian Gas Code (CSA B149.1)
and The Occupational Health and Safety Act
(OSHA) as applicable.
3. The power vent motor shaft must be mounted
horizontally to prevent motor bearing wear.
4. Disconnect power supply when making wiring
connections or when working around the fan blade
and motor. Failure to do so may result in severe
personal injur y and equipment damage.
5. Make certain the power source is adequate for
the fan motor requirements. Do not add the power
vent to a circuit where the total load is unknown.
AQ4 Motor is 200 watts- 1.66 amps @ 120vac.
6. Locate the outlet receptacle as close to the vent
motor as possible. Do not use an extension cord.
AQ4 Manual
3
Introduction
1.4 Requirements for installation in
Massachusetts
Attention residents of the Commonwealth of
Massachusetts:
In the Commonwealth of Massachuset t s the
following regulation went into effect on 12/30/2005:
(a) For all side wall horizontally vented gas fueled
equipment installed in every dwelling, building or
structure used in whole or in part for residential
purposes, including those owned or operated by the
Commonwealth and where the side wall exhaust vent
termination is less than seven (7) feet above finished
grade in the area of the venting, including but not
limited to decks and porches, the following
requirements shall be satisfied:
1. INSTALLATION OF CARBON MONOXIDE
DETECTORS. At the time of installation of the side
wall horizontal vented gas fueled equipment, the
installing plumber or gasfitter shall observe that
a hard wired carbon monoxide detector with an
alarm and battery back-up is installed on the floor
level where the gas equipment is to be installed.
In addition, the installing plumber or gasfitter
shall observe that a bat tery operated or hard wired
carbon monoxide detector with an alarm is
installed on each additional level of the dwelling,
building or str ucture served by the side wall
horizontal vented gas fueled equipment. It shall
be the responsibility of the property owner to
secure the services of qualified licensed
professionals for the installation of hard wired
carbon monoxide detectors.
a. In the event that the side wall horizontally
vented gas fueled equipment is installed in a
crawl space or an attic, the hard wired
carbon monoxide detector with alarm and
battery back-up may be installed on the next
adjacent floor level.
b. In the event that the requirements of this
subdivision can not be met at the time of
completion of installation, the owner shall
have a period of thirty (30) days to comply
with the above requirements; provided,
however, that during said thirty (30) day
period, a battery operated carbon monoxide
detector with an alarm shall be installed.
2. APPROVED CARBON MONOXIDE DETECTORS.
Each carbon monoxide detector as required in
accordance with the above provisions shall comply
with NFPA 720 and be ANSI/UL 2034 listed and
IAS certified.
3. SIGNAGE. A metal or plastic identification plate
shall be permanently mounted to the exterior of
the building at a minimum height of eight (8) feet
above grade directly in line with the exhaust vent
4
terminal for the horizontally vented gas fueled
heating appliance or equipment. The sign shall
read, in print size no less than one-half (1/2) inch
in size, “GAS VENT DIRECTLY BELOW. KEEP CLEAR
OF ALL OBSTRUCTIONS”.
4. INSPECTION. The state or local gas inspector of
the side wall horizontally vented gas fueled
equipment shall not approve the installation
unless, upon inspection, the inspector obser ves
carbon monoxide detectors and signage installed
in accordance with the provisions of 248 CMR
5.08(2)(a)1 through 4.
(b) EXEMPTIONS: The following equipment is
exempt from 248 CMR 5.08(2)(a)1 through 4:
1. The equipment listed in Chapter 10 entitled
“Equipment Not Required To Be Vented” in the
most current edition of NFPA 54 as adopted by
the Board; and
2. Product approved side wall horizontally vented gas
fueled equipment installed in a room or structure
separate from the dwelling, building or structure
used in whole or in part for residential purposes.
(c) MANUFACTURERS REQUIREMENTS – GAS
EQUIPMENT VENTING SYSTEM REQUIRED. When
the manufacturer of Product Approved side wall
horizontally mounted gas equipment provides a
venting system design or venting system components
with the equipment, the instructions provided by the
manufacturer for the installation of the equipment
and the venting shall include:
1. Detailed instructions for the installation of the
venting system or the venting system components:
and
2. A complete parts list for the venting system design
or venting system.
(d)MANUFACTURER REQUIREMENTS – GAS
EQUIPMENT VENTING SYSTEM NOT PROVIDED.
When the manufacturer of a product approved side
wall horizontally vented gas fueled equipment does
not provide the parts for the venting of flue gases,
but identifies “special venting systems,” the following
requirements shall be satisfied by the manufacturer:
1. The referenced “special venting system”
instructions shall be included with the appliance
or equipment installation instructions; and
2. The “special venting systems” shall be product
approved by the Board, and the instructions for
that system shall include a parts list and detailed
installation instructions.
(e) A copy of all installation instructions for all
products approved side wall horizontally vented gas
fueled equipment, all venting instructions, all parts
lists for venting instructions, and/or all venting
design instructions shall remain with the appliance
or equipment at the completion of the installation.
AQ4 Manual
AQ4 Installation instructions
2 AQ4 Installation instructions
Also:
2.1 Introduction
Please follow these instructions. Failure to follow
instructions may result in:
· Damage, injury or death
· Improper operation
· Loss of warranty
If you are unable to perform the tasks required to
install the water heater and this accessory properly,
please contact a locally licensed plumber, HVAC
contractor or gas technician.
Please contact Bosch Water Heating with any
questions.
2.2 Locating power vent hood and
clearances
The maximum vent length from the water heater to
the point of termination is 25 feet. If using more than
one 90° elbow, subtract 5 feet off the maximum
vent length for each additional elbow used. Maximum
of three elbows allowed.
The power vent motor must be installed
as close as possible to the VH1-4 vent
hood.
Clearances
The vent system must terminate so that proper
clearances from the center of the vent hood (Fig. 1)
are maintained as cited in the National Fuel Gas Code,
ANSI Z223.1 and CSA B149.1 in Canada:
“The exit terminals of mechanical vent system shall be located
not less than 7 feet above grade when located adjacent to a
public walkway. The venting system shall terminate at least
3 feet above any forced air inlet within 10 feet. The venting
system shall terminate at least 4 feet below, 4 feet
horizontally from or 1 foot above any door, window or gravity
air inlet into any building.”
2.3 Power vent hood
1. Attach the mounting template (on page 13) to the
interior wall that the vent hood will be penetrating.
2. Insure the proposed vent termination clearances
are met (Chapter 2.2) before cutting opening
through wall. Using a 1/2" drill bit, drill two pilot
holes where noted on the template. The drill bit
must be long enough to penetrate to the building
exterior.
3. Attach the template to the outside of the building
aligning the pilot holes on the template with the
pilot holes drilled in step 2.
4. Using a reciprocating saw, cut a hole through the
building siding, wall board, etc., following the
appropriate lines of the template.
5. Apply a bead of exterior-rated caulk to the vent
hood flange to seal at the exterior of building.
6. Slide the vent hood through the opening and
fasten to exterior wall using screws provided.
7. Install backdraft flapper using the instructions
included with flapper.
“The vent terminal shall also not be installed closer than 3
feet fr om the inside corner of an L-shaped structur e, or
less than 1 foot above grade or anticipated snow pack level.”
Fig. 1 External vent hood clearances
AQ4 Manual
5
AQ4 Installation instructions
2.4 Power vent motor
Caution: Power vent motor must be
mounted with vibration mounts and with
motor shaft horizontal to prevent motor
bearing wear.
6"
V
6"
V
V
V
V
4. Route the control cable from the power vent motor
along the ceiling or joists down to the right side
of water heater, taking care not to come within 6"
of the vent pipe or any other potentially hot
surface. In many cases, the gas or water supply
piping can be used as a routing path from the
ceiling down to the right side of the water heater.
Use the supplied nylon ties to secure the cable.
6"
V
Note: Any additional vent pipe used
between the power vent motor and the
vent hood will be under positive pressure
during operation. This vent pipe must be
single wall galvanized or stainless steel
vent pipe. The connections must be
sealed with high temperature silicone
sealant.
Fig. 2 Vibration mounts and recommended support
V
1. Remove vibration mounts, nuts and washers from
parts bag. Install on power vent motor as shown
in Fig. 2.
2. To prevent vibration, securely support power vent
motor from ceiling or joist using a plumber’s strap
fastened to the vibration mounts. As an alternative
means of support, a wall bracket may be used to
support the underside of the motor. Observe a 6"
clearance to combustibles on all sides of the
power vent motor. (Fig. 3)
3. Connect the power vent motor outlet to the inner
sleeve of the vent hood (Fig. 4). Use the four prepunched holes in the outlet collar of the power
vent motor as a guide to drill 1/8" diameter holes
into the vent pipe. Fasten power vent motor outlet
to the vent hood inlet using sheet metal screws.
Seal the connection with high temperature silicone
sealant.
6"
V
Fig. 3 Minimum clearances to power vent motor
Fig. 4 Vent connection to power vent motor
6
AQ4 Manual
AQ4 Installation instructions
2.5 Vent piping
1. Install 5" to 4" reducer pipe on top of the water
heater and then connect a 4" 90º elbow to begin
the horizontal run. Use 4" vent pipe to connect
from this elbow to the power vent motor inlet,
avoiding elbows wherever possible. The maximum
vent length from the water heater to the point of
termination is 25 feet. (Fig. 5) If using more than
one 90° elbow, subtract 5 feet off the maximum
vent length for each additional elbow used. A
maximum of three elbows is allowed. The
minimum vent length is 2 ft.
2. Support the vent pipe in accordance with vent pipe
manufacturer’s instructions. Vent pipe is not
supplied in the power vent kit, with the exception
of the 5" to 4" reducer in the AQ4 kit. Observe the
clearances associated with the class of vent pipe
used. 4” single wall galvanized, 4” stainless steel
or 4” B-vent pipe is required.
Fig. 5 Venting setup
2.6 Linear safety spillage switch
The linear safety spillage switch provides a means
for safety shut down of the water heater in the event
of flue blockage or power vent failure. If hot flue
gases spill from the draft hood diverter, the draft
spillage sensing switch will open the pilot safety
circuit and shut off all gas to the water heater. The
switch is normally closed and opens at temperatures
greater than 185º F. It has a manual reset button.
Mounting the linear safety spillage switch
1. At tach the spillage switch to the top left of the
heater’s draft diverter using the existing hole and
the included mounting screw. (Fig. 6)
2. Lay copper capillary sensing tube across top of
the draft diverter. Allow excess tube to hang down
right side of hea ter. Do no t cut or cr im p
capillar y tube.
3. Route the two wires from the spillage switch down
the left side of heater to the ECO keeping the cables
out of contact with hot surfaces. (Fig. 6)
Connecting linear safety spillage switch to pilot
safety circuit
The ECO/temperature limiter is mounted on the
lower left outlet water pipe. (Fig. 7)
1. Remove one wire lead connected to ECO terminal
(it does not matter which one is disconnected).
2. At tach 1/4" q uick connect terminal end of linear
spill switch cable to now exposed terminal of the
ECO.
3. Connect the male spade connector to the removed
lead wire from step 1. See the wiring diagram in
Fig. 13 to confirm proper set up.
Fig. 6 Linear safety spillage switch mounting
ECO terminals
Fig. 7 ECO location
AQ4 Manual
7
AQ4 Installation instructions
2.7 Flow switch
Replacement piping and flow switch is included for
1600P/425PN and 1600H/425HN water heaters.
Check your model number on the right side of the
water heater cover to confirm which procedure to
follow.
Models 1600P/425PN
1. Shut off cold water supply isolation valve. If none
installed, install before proceeding. Open hot
water tap to relieve water pressure if water is
already connected.
2. Remove and save clip on lower right side of heat
exchanger.
3. Using a flat head screw driver remove and save
pin from front, right side of water valve. (Fig. 8)
4. Remove copper pipe and set aside.
5. Find and connect the black flow switch to the
bushing and pipes shown in Fig. 9A. Secure
together with supplied clips.
6. Position flow switch and connecting pipe and
bushing in place of the copper pipe that was
removed.
7. Reinstall pin in water valve and clip on heat
exchanger connection.
8. Connnect the three prong Molex connector cable
to the flow switch.
9. Connect control cable from vent motor to Molex
connector cable with wire nuts as seen in Fig.
10.
Models 1600H/425HN
1. Shut off cold water supply isolation valve. If none
installed, install before proceeding. Open hot
water tap to relieve water pressure if water is
already connected.
2. Remove and save clip on lower right side of
hydrogenerator.
3. Remove and save pin from front, right side of
water valve using a flat head screwdriver. (Fig. 8)
4. Remove copper pipe and set aside.
5. Find and connect the black flow switch to the
pipes shown in Fig. 9B.
6. Position flow switch and connecting pipes in place
of the copper pipe that was removed. Secure
together with supplied clips.
7. Reinstall pin in water valve and clip on heat
exchanger.
8. Connnect the three prong Molex connector cable
to the flow switch.
9. Connect control cable to Molex connector cable
with wire nuts as seen in Fig. 10.
Water valve pin
Pipe to heat
exchanger
Fig. 8 Water valve pin
Connection to
water valve
Brass heat
exchanger
bushing
Flow switch
molex connector
Replacement
pipe for pilot
models
Fig. 9A 1600P/425PN flow switch connections
Connection to
hydro generator
Replacement
pipes for
hydro models
Connection to
water valve
Flow switch
molex connector
Fig. 9B 1600H/425HN flow switch connections
Connections from
Molex connector
cable (white and
yellow)
Connection from
vent motor (black
and red)
Fig. 10 Flow switch electrical connections
8
AQ4 Manual
Operation
3 Operation
3.1 First time start up
It is important to verify proper operation of the power
vent motor before commissioning the system:
1. Slowly turn on cold water supply and check for
any leaks at newly installed flow switch and piping.
2. Plug power vent motor into 120VAC outlet.
3. With the gas supply to the water heater turned off
(see water heater manual) turn on a hot water
tap. The power vent motor should come on. Verify
the back-draft flapper is open and air is being
blown out of the power vent hood. If not, see the
troubleshooting tips in Chapter 5.
4. Turn off hot water tap.
Note: The AQ4 power vent fan motor is equipped
with a 45 second post purge cycle. The fan motor
should continue to run for this length of time after
the hot water flow has been shut off.
5. Open gas supply to the water heater and follow
the lighting instructions in water heater
installation manual.
3.1.1 Draft test
1. Check for proper combustion and ensure there is
no spillage by holding an recently extinguished
match or other visible smoke source in front of
the draft divertor. The smoke from the extinguished
match should be quickly sucked into the opening
and up the exhaust venting. If the smoke is blown
back, there is a blockage in the vent or the vent
motor is not operating properly.
3.1.2 Safety interlock test
1. Open the gas supply to the water heater.
2. Block the back draft flapper from opening from
the outside.
4 Maintenance
The vent system must be inspected at regular 3-month
intervals. Points of inspection are as follows:
1. Screened opening of the vent hood should be free
from foreign material and cleaned as necessar y.
2. Check all vent system connections for leakage and
reseal where needed with high temperature
silicone sealant. If any vent pipe component shows
signs of deterioration, replace immediately.
3. Inspect proper closure of the back draft flapper
accessory. If the flapper does not properly close,
there is a risk of freezing air crossing the heat
exchanger that may cause the pipes to freeze and
burst. This condition is not covered by the water
heater warranty. See Fig. 11A for a properly closed
back-draft flapper.
4. Conduct safety interlock test and operation of
backdraft flapper once a year (Chapter 3.1.2).
F ig. 11A Properly closed backdraft flapper
CAUTION: The metal of the back draft
flapper will be hot when conducting this
test.
3. Turn on the hot water supply to allow the burner
to activate. Hot flue gasses will spill from the
draft diverter momentarily. In less than three (3)
minutes, the linear spillage switch should trip,
opening the the heater safety circuit and halting
the flow of gas to the heater.
NOTE: If spillage switch does not shut off the
gas, check that you have made the proper safety
circuit connections. If the switch still does not
trip, contact Bosch Water Heating.
4. After the burners shut off, turn off hot water
supply and wait 2-3 minutes...then push the reset
button on the linear spillage switch.
5. Depending on model, light the pilot or run hot
water and repeat Safety Interlock Test, (Step 1-4)
closes
6. Ensure back draft flapper moves freely andcloses
properly before operating once test is complete.
AQ4 Manual
F ig. 11B Improperly closed backdraft flapper
9
Troubleshooting
5 Troubleshooting
5.1 Introduction
Many of the questions customers ask regarding
operation of this unit can be answered by following
the troubleshooting steps outlined below. Visit our
website at www.boschho twater.com for more
detailed troubleshooting. For best results, perform
each step before proceeding to the next.
5.2 Power vent motor runs all the time
or intermittenly without water flow
1. The AQ4 power vent fan motor is equipped with a
45 second post purge cycle. The fan motor should
continue to run for this length of time after the
hot water flow has been shut off.
2. The power vent motor is flow switch activated. If
the internal paddle inside the flow switch is
jammed, it may constantly send a signal to turn
on the fan. Shut off water supply to heater and
drain. Remove flow switch from water heater
piping by removing clips on both ends. Flush
water through both ends of flow switch to free
up internal paddle and clear debris. After flushing,
shake flow switch up and down. The internal
paddle should be heard moving freely back and
forth.
3. Large amounts of water demand can create
pressure drops throughout plumbing. This may
allow for movement of the power vent flow switch
and activate the fan. Activated sprinkler systems
or flushed toilets are common causes for this
symptom. Consult a plumbing professional for the
use of check valves to prevent unintentional water
flow through the heater.
4. In buildings with excessively high water pressure,
a condition known as “water hammer” may exist.
This condition is caused by a combination of high
water pressure and the abrupt closing of a faucet
valve or internal washer/toilet valve. This instant
change in flow results in an instant change in the
internal pressures in the pipe, which then sends
a shock wave through the pipe. This physical
shock will shake, rattle or cause a loud bang in
the plumbing which we refer to as “water
hammer.” Such a shock wave may cause movement
of the power vent flow switch which will activate
the fan. Consult a plumbing professional for the
use of a pressure reducing valve, expansion tank
or water hammer arrestor to combat this
condition.
10
5.3 Pilot will stay lit when manually lit
(1600P and 425PN) or will not spark
automatically with hot water flow
(1600H and 425HN)
1. Check the linear safety spillage switch reset
button to see if it is tripped (See Section 2.6).
Overheating or loss of power to the unit will trip
the safety spillage switch and stop the flow of
gas.
2. Check the entire pilot safety circuit (including the
safety spillage switch) for loose or dirty
connections (See Fig 8). Clean any corrosion
evident with a pencil eraser or light sandpaper.
3. Pilot flame is weak or dirty. Consult water heater
installation manual for instructions on cleaning
the pilot assembly.
5.4 Pilot and/or burners go out during
hot water use
1. Inspect entire vent system for blockage or
obstruction. Ensure the back draft flapper
installed on the power vent hood swings fr eely.
2. Verify power vent fan operates with water flow.
If not, verify wire connection from flow switch to
fan motor. Clean cold water inlet filter and verify
flow rate through the water heater is adequate
enough to activate the flow switch. If flow rate is
more than 0.5 GPM, then flow switch may be
defective and should be replaced.
3. If heater is newly installed, verify power vent fan
motor is not installed backwards (See Fig 4).
4. Ensure power vent motor is mounted as close as
possible to the VH1-4 vent hood. Mounting the
power vent motor directly on top of or close to
the water heater, may result in lifting flames and
pilot outages.
5.5 Noise when power vent motor is
running
1. Ensure power vent motor is mounted level with
motor shaft horizontal or premature motor bearing
wear may occur.
2. Ensure power vent motor is mounted using the
supplied vibration mounts or premature motor
bearing wear may occur.
3. Remove vent pipe connection from water heater
to power vent motor. Inspect internal fan wheel
for broken fins. If any damage is evident, order
online or call Technical Support (800) 642-3111
for a replacement wheel kit.
AQ4 Manual
One Year Limited Warranty
6 One Year Limited Warranty
General
The vent kit is warranted by the Manufacturer
(TJERNLUND) through BBT North America. BBT North
America (BBTNA) will furnish a replacement part
which fails in normal use and service within the
applicable periods specified below, in accordance
with the terms of this war ranty. The BBTNA
replacement will be warranted for the unexpired
portion of the original warranty. This warranty will
be valid only for vent kits in possession of the original
purchaser.
The Warranty Terms
If any vent kit component fails within one (1) year
after the original installation and operation, BBTNA
will furnish a replacement component. However, if
the vent kit is installed in other than a single family
dwelling, the warranty is limited to thirty (30) days
from date of original installation and operation.
Exceptions
This warranty will not apply:
1. to defects or malfunctions resulting from failure
to properly install, operate or maintain the unit in
accordance with the printed instructions provided;
2. to damage or abuse, accident, neglect or other
acts of nature;
3. to failure of the vent motor resulting from the
operation of the vent kit in a corrosive atmosphere;
4. to defects or damage caused by any at tachment
or modification, including any energy-saving device.
Shipping costs:
In addition to supplying the replacement part(s),
BBTNA will provide ground ser vice delivery for these
parts. Expedited or upgraded shipping will be charged
to the customer.
Service Labor Costs
This warranty does not cover any labor costs
associated with ser vice, removal or re-installation of
part(s). All such costs must be borne by the
Purchaser. Additionally, this warranty does not cover
any labor costs associated with service, removal or
re-installation of the original vent kit or a replaced
vent kit.
Any claim for warranty parts should be made to your
local dealer, distributor or to BBTNA. If BBTNA, please
cont act the Technical Support Department:
BBT NORTH AMERICA CORPORATION
Bosch Group
Bosch Water Heating
340 Mad River Park
Waitsfield, VT 05673
Phone: 800-642-3111
www.boschhotwater.com
In most cases, the dealer or distributor will be able
to promptly honor your claim and subsequently notify
BBTNA. However, all replacements are made subject
to validation by BBTNA of in-warranty coverage. The
damaged or defective item must be made available
in exchange for the replacement.
Miscellaneous
No one is authorized to make any other warranties
on behalf of BBTNA. It is expressly understood that
the replacement warranty of BBTNA shall be in lieu
of any and all other warranties, express or implied,
including warranties of merchantability or fitness for
a particular use or purpose, and further that BBTNA
shall not be liable for any loss or damage directly or
indirectly arising from the use of the vent kit, or for
any consequential damages arising from such use.
BBTNA sole liability with respect to any defect shall
be for the replacement of the defective part(s). Some
states do not allow such limitations and exclusions,
so the above may not apply to you.
This warranty gives specific legal rights. You may also
have other rights which vary from state to state.
How to Make a Claim
AQ4 Manual
11
Wiring Diagram
7 Wiring diagram
115/1/60
PLUG
GREEN
WHITE
BLACK
TJERLUND
TIMER RELAY
POWER
VENT
MOTOR
BLACK
BLACK
WHITE
GREEN
WHITE
BLACK
WHITE
115VAC
TRANSFORMER
RED
BLACK
24VDC
WIRE
NUT
WIRE
NUT
YELLOW
WHITE
FLOW
SWITCH
(N/O)
DENOTES LINE VOLTAGE FACTORY WIRING
DENOTES LOW VOLTAGE FACTORY WIRING
Fig. 12 Fan wiring diagram
-
425HN and 1600H wiring
425PN and 1600P wiring
Fig. 13 Safety circuit wiring diagram
12
AQ4 Manual
Vent hood template
8 Vent hood mounting template
1. Use scis sors to detach template. Verify external vent hood inst allation clearances on page 5 (Fig. 1) are adhered to. At tach
the vent hood mounting template to the interior of the wall the vent hood will be penetrating.
2. Verify that wall penetration will not come in contact with concealed wiring or plumbing. Using a 1/2” drill bit, drill two pilot
holes where noted on the template. The drill bit must be long enough to pene trate to the building exterior.
3. A ttach the template to the building exterior aligning the pilot holes on t he template with the pilot holes drilled in step 2.
4. Using a reciprocating saw, cut an opening through the building siding, wall board, etc., following the lines of the template.
5. Slide the vent hood through the opening and fasten to exterior wall using provided screws.
6. Once power venter is completely installed and secured, apply a bead of exterior rated caulk between vent hood flange and
exterior of building.
CUT HOLE THROUGH WALL
TEMPLATE
PILOT
HOLE
PILOT
HOLE
BUILDING
EXTERIOR
NOTE: HARDWARE SHOWN INCLUDED
WITH VENT HOOD
WASHER (4)
SHEET METAL SCREW (4)
WHEN INSTALLING THE VENT HOOD FOLLOW THE BACK DRAFT FLAPPER
INSTRUCTION SHEET IF OUTDOOR TEMPERATURES MAY DROP BELOW FREEZING
Fig. 14 Vent hood mounting template
AQ4 Manual
13
Notes
14
AQ4 Manual
Notes
AQ4 Manual
15
BBT NORTH AMERICA CORPORATION
Bosch Group
Bosch Water Heating
340 Mad River Park
Waitsfield, V T 05673
Phone 800-642-3111
Fax (802) 496-6924
www.boschhotw ater.com
[email protected]
AQ4 manual 11-20 (11.06) TSE