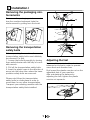
1
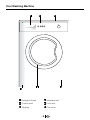
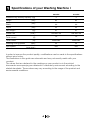
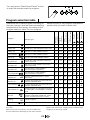
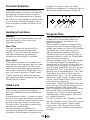
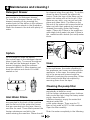
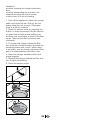
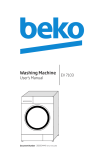
Washing Machine
2012 CX
2112 CX
Contents
Specifications of your
Washing Machine |
Warnings |
5
Things to do Before Calling the Authorized Service
Removing the packaging reinforcements 7
Removing the transportation safety bolts 7
Installation |
Adjusting the feet
Water connections
Electrical Connection
6
7
7
8
9
Preparation |
Control Panel10
Turning On/Off
4
9
10
Program Selection
and Operating Your
Machine |10
Program selection table
Function Selection
Auxiliary Functions
Child Lock 12
Program Flow
Changing the Program
Cancelling a program
Laundry Addition Function
End of the Program
Unloading the Laundries
Detergent Drawer
Siphon
14
Inlet Water Filters
11
12
12
12
13
13
13
13
13
14
14
Maintenance and
cleaning |14
Hose 14
Cleaning the pump filter
14
2
EN
Your Washing Machine
Detergent Drawer
Adjustable feet
Control panel
Front door
Tabletop
Filter cover
3
EN
Specifications of your Washing Machine |
2012 CX
2112 CX
Maximum dry laundry capacity (kg)
5
5
Height
(cm)
85
85
Width
(cm)
60
60
Depth
(cm)
54
54
Net Weight
(kg)
Power inlet
(VHz.)
61
61
220-240 / 50
220-240 / 50
Total current
(A)
10
10
Total Power
(W)
2200-2350
2200-2350
(rpm)
52
52
(rpm max.)
600
600
Washing-rinsing speed
Spin speed
In order to improve the product quality, modifications can be made in the specifications
without prior notice.
The illustrations in this guide are schematic and may not exactly match with your
product.
The values that are declared in the markings on your product or in the printed
documents accompanying are obtained in a laboratory environment according to the
related standards. These values may vary according to the usage of the product and
environmental conditions.
4
EN
Warnings |
• This product is designed for household
usage.
• Your washing machine is adjusted to
230 volts. Your machine may not
operate with low voltage.
• If the current value of the fuse at your
home is less then 16 amperes, consult
a qualified electrician and have a fuse of
16 amperes installed.
• When using with or without a
transformer, make sure that the
grounding installation is made by a qualified electrician. When used without
grounding, our company shall not be
responsible for the possible damages.
• In order to make your machine ready to
use, call Authorized Service and if your
clean water installation and water drains
are not proper, call a qualified plumber.
• Your machine should not be placed on
a rug covered floor. Otherwise, electrical
parts may overheat since your machine
will not be able to take air from the
bottom. This may lead to the machine
malfunction.
• While installing the machine, make sure
that the hot and cold water taps are
connected correctly. Otherwise, your
laundries may come out hot in the end
of washing process and worn out.
• When the supply cord/plug of the
machine is damaged, you must call the
authorized service.
• Make sure that the water inlet hoses are
new. Do not use worn out/used water
inlet hoses again. It may cause stains to
remain on your laundries.
• Before washing the clothes that are pretreated with cleaning agents (gasoline
ether, liquid stain remover and etc.) rinse
thoroughly with clean water.
• Never wash the device with a water
hose! There is a risk of electric shock!
Before cleaning, always disconnect the
electricity connection by unplugging.
• Never touch the plug with wet hands.
Never grab from the cable but from the
plug when unplugging.
5
• If the power cable or the plug is
damaged, or the appliance shows any
other errors, do not operate the
appliance!
• For the failures that can not be solved by
applying the information given in these
operating instructions:
Turn off the machine, unplug it, close
the water tap and contact with the customer service center. Never try to repair
the machine by yourself.
• When you operate your washing machine for the first time, use Cotton 90o
program with detergent without loading
the machine with laundry in order to
make it ready for washing your laundry.
After washing the very dirty clothes such
as the working clothes of a car technician, it is recommended to repeat the
machine cleaning process.
• The performance of your washing
machine depends on the compound
effect of the machine, water and the
cleaning agent that is used. If poor
and unqualified cleaning agents are
used, stains on your laundries will be
stabilized. Before washing the stained
laundries, pay attention to clean them as
described in the following pages.
• Your machine is designed to resume
its operation when the power restores
after a power failure. You can not cancel
the program by pressing On/Off button.
When the power restores, the machine
will resume from the point it stopped.
• During the production, some water may
have remained in your machine because
of the quality control processes. It does
not cause any damage to your machine.
• Plug must be accessible after
installation.
• The repair or change of main plug
should be carried out by authorized
technicians or specialists.
• Main water pressure should be between
1 - 10 bars.
EN
Things to do Before Calling the Authorized Service
If the light of the 1st auxiliary function
on the left hand side is flashing
It is in the child-lock mode. (See. Child-lock)
If the cover and washing light on the
program follow-up indicator is
flashing and the end light is
constantly on
The program selection knob may be in-between
position.
Readjust the program by turning the program
selection knob. If the warning continues, contact the
authorized service.
The door may not be properly closed. Open and
close the door again and restart the washing program.
The water may be cut or the taps may be closed.
Check the taps. Turn off your machine and restart.
If the fault persists, unplug your machine, close the
taps and contact the authorized service.
Machine may be in the self-protection mode due to the
substructure problems (grid voltage, water pressure and
etc.)
Therefore, you can not start or select a program. Press
Start/Pause/Cancel button for 3 seconds and return
the machine to the factory settings. (See.Cancelling a
Program)
If the light of Start/Pause/Cancel
button starts to flashing after a short
time you start your machine
If the “Washing” light on the program
follow-up indicator is flashing
If the program can not be started or
selected
If the water is cut while your machine
is operating, the current program does
not proceed. To continue the program
Your machine may stop due to the low
voltage
During the production, some water
may have remained in your machine
because of the quality control
processes.
You have selected the program in your
machine and pressed the “Start/
Pause/Cancel” button but the machine
did not start
Press “Start/Pause/Cancel” button, program will
proceed.
Wait for a while. When the voltage reaches to a normal level your machine will start to operate.
This does not cause any damage to your machine.
The plug of your machine may not be plugged in a
grounded outlet, front cover may not be closed or
the fuse may be blown.
Is the water drained directly?
Check the water inlet and drainage hoses. Are they
well mounted? Gaskets of the water inlet hoses may
not be well seated. If the problem is none of them,
the pump filter may not be well closed.
Check if the drainage hose is connected as
described in the user guide.
During the water drainage, you may
hear water sound from the pump
This sound is normal.
Is water coming from under your
machine
Check if your detergent is suitable for automatic
machine. Use the recommended amount of
detergent in your next washing.
If sometimes you are not satisfied with Make sure that you have selected the correct
the rinsing and spinning
program, you have adjusted the speed adjusting/
efficiency (laundries have
decrease button correctly and you have loaded the
detergent remnants or they are not dry right laundries for the program you have chosen, try
enough)?
again when the voltage is normal.
Is foam running over the detergent
drawer?
6
EN
Installation |
Removing the packaging reinforcements
To remove the packaging reinforcement
lean the machine backward, take the
reinforcement by pulling from the braid.
Removing the transportation
safety bolts
Before operating the machine, the
transportation safety bolts must definitely
be removed. For this,
1. Loosen the bolts thoroughly by turning
them anticlockwise with the help of a suitable wrench.
2. Pull off the transportation safety bolts.
3. Insert the plastic caps in the direction of
arrow into the holes from where the transportation safety bolts are removed.
Please note! Keep the transportation
safety bolts in a safe place in order to
reuse them for any other transportation.
Transport your washing machine with the
transportation safety blots installed.
7
Adjusting the feet
Your machine must stand level and
balanced on its feet in order to operate
more silent and vibration-free.
First loosed the plastic counter nut on the
adjustable feet of your machine.
After maintaining the balance by
adjusting the feet, tighten the plastic
counter nut upwards.
EN
If you want to use both water inlets of the
product, you can connect the hot water
hose after removing the stopper and gasket group from the hot water valve.
* Applies for the products supplied with a
blind stopper group. "
Since the connection points are under
water pressure, turn on the taps to the
maximum after the connection. Check if
there is any water leakage at the connection points. In order to prevent the water
leakages and the damages they may
cause, keep the taps closed when you are
not using the machine.
Minimum 1 bar and maximum 10 bars of
water flow from the tap is enough for your
machine to operate efficiently. (In practice,
1 bar means that more than 8 liters of water per minute flows from a full open tap.)
Do not connect the product with single
water inlet to the hot water tap. The product may switch to the protection mode if
the temperature of the water connected to
a product with double water inlet through
a Y part and single water inlet is above
40°C.
a) Water drainage hose
Water drainage hose can be attached to
the side wall of a sink or bathtub. Hose
should not be bend. When the drainage
hose is hanged on a sink or bathtub, it can
be secured with a hose bracket so that it
will not fall.
The end of drainage hose can be
connected directly to the waste water
drainage hole or to the specific end that is
installed to the outlet elbow of the sink.
The hose should be installed to a height
of 40 cm minimum and 100 cm maximum.
110
"If you are going to use your double waterinlet machine as a single (cold) water-inlet
unit, you must install the stopper*, supplied with your machine to the hot water
valve.
100
a) Water inlet hose
The specific hoses that come with the
machine are connected to the water inlet
valves on the machine. Red labeled hose
is for hot water inlet and blue labeled hose
is for cold water inlet.
Models with double water inlets can be
used as a model with a single water inlet
by using a plug. Plug should be installed
to the hot water valve. A rubber gasket
should be used in order to prevent water
leakage from the connection point.
90
Water connections
0
10
20
30
40
50
60
70
80
Install the elbowed end of the hose to your
machine. Hand-tighten the nuts of the
hose, do not use a spanner
8
EN
Electrical Connection
Plug in the grounded plug at the end of the
power cable of the washing machine to a
grounded wall outlet which is fed with
suitable voltage and current.
Preparation |
• Please note the followings before start ing to wash your laundry:
- Have you plugged the machine?
- Have you connected the drainage hose as necessary?
- Have you closed the front door?
- Have you opened the tap?
• If you are installing your machine by yourself, please read the “Installation” section
first.
• Separation of the laundries to be washed:
Please separate the laundries according to
their types (cotton, linen, synthetic, woolen,
etc.), dirtiness levels and washing temperature. Do not wash the white clothes along
with the colored ones.
Remove solid objects such as belts, cuff
links and curtain rods from the laundries or
put them into a washing bag.
Empty the pockets. Zip and button up. It
is recommended to place the very small
laundries such as baby clothes into the big
laundries such as pillowcases or put into a
special
washing filet in order to prevent them from
sticking between the bellows or slipping into
the cauldron, pump filter, hose and etc.
For stained laundries, see the Practical and
useful information section. Your machine can
wash the woolen clothes with a “Machine
Washable” or “Unfeltable” label in the special
woolen program without damaging them.
Sensitive clothes with a “Do not wash in the
machine” or “Hand-wash” (silk, pure wool,
cashmere and etc.) label can be washed in
the hand-wash program which is designed
specifically.
9
• To open the front door, grab the handle
and pull it. For your safety, the front door of
your machine can only be opened when the
machine is not operating. If the “ready” LED
is on, the door can be opened.
• Loading the laundry into the machine:Place
the laundries by spreading and
without compaction. Place your hand woven
clothes into the machine by turning inside
out. When closing the door, make sure that
no laundry is in between the door and the
rubber bellows.
Push the front door to close it. If the front
door is not closed correctly, washing does
not start.
• The selection of detergent and softener:
The detergent amount depends on the hardness of water, the amount of laundry and the
dirtiness level of the laundry. Recommended
amounts are written on the detergent package. If your laundries are not very dirty and/or
your water has a low
hardness, use less detergent as
recommended in the detergent packages.
Otherwise you may encounter excessive
foam.
You should use detergents that are
developed especially for automatic
washing machines. Avoid using bleachers
that contain chlorine or sulfur.
Put the powder detergent and softener
into the appropriate compartments in the
detergent drawer and close the detergent
drawer.
Pour the softener as recommended in the
package (generally <100ml; i.e. 1 tea cup)
Never exceed the “MAX” marking. If you
put more, it will mix into the washing water
EN
via siphon (III) and it will be wasted. In
this case, it may be necessary to refill the
softener. If the softener is condensed over
time, it may be necessary to dilute with
some water. Otherwise, condensed softener clog the siphon and block the flow.
I. Compartment I, the powder detergent compartment for prewash.
II. Compartment II, the powder detergent compartment for main washing.
III.Siphon
The softener compartment.
Program Selection and Operating Your Machine |
Control Panel
2
4
5
6
1
3
Program selection knob
On / Off button
Auxiliary function buttons
Start/Pause/Cancel button
Program follow-up indicator
6 Spin speed selection knob
Turning On/Off
You can make the machine ready for
program selection by pressing the “On
/off” button. When “On/Off” button is
pressed, “Door” LED is on meaning that
“door can be opened”. To turn off the
machine, press the “On/Off” button again.
Pressing the “On/Off” button never means
that the program is started.
10
EN
You must press “Start/Pause/Cancel” button
in order the machine starts its program.
Program selection table
155
45
1.70
Cotton 60*
Normal dirty, heat resistant cotton, linen
5
145
49
1.14
Cotton 40
Less dirty or heat resistant cotton
5
150
45
0.65
Cold (Cotton)
Less dirty or heat resistant cotton
3.5
113
39
0.14
Super 40
Very dirty and heat resistant cotton
5
180
45
0.65
Synthetic 60
2.5
120
55
0.90
• •
•
2.5
125
55
0.55
• •
•
2.5
92
50
0.28
• •
•
2.5
85
50
0.10
• •
•
2
85
60
0.40
•
•
1.5
70
60
0.40
•
•
1.5
51
55
0.02
•
•
1
55
50
0.21
2.5
30
40
0.16
Rinsing
Normal dirty, heat resistant cotton/synthetic compound
Less dirty or heat resistant cotton/synthetic compound
Very little dirty or heat resistant
cotton/synthetic compound
Very little dirty or heat resistant
cotton/synthetic compound
Sensitive, Delicate synthetic, cotton
compound
Woolens and sensitive compounds with
machine washable label
Woolens and sensitive compounds with
machine washable label
Special program for laundries that have
silk, cashmere, un-washable in machine
labels.
Special program for very little dirty or small
amounts of laundries (sweat suit, towel
and etc. that are used only for once)
Rinsing Program
3.5
-
20
0.03
Spin+Pump
Spin + Pump Program
3.5
-
11
0.03
Synthetic 40
Synthetic 30
Cold (Synthetic)
Delicate 30
Woolen 40
Cold (Woolen)
Hand Wash 30
Mini 30
*Energy Label Program EN 60456:1999 and IEC 60456
Ed.4 2001
Water and power consumption may show differences
from the table above depending on the water pressure,
11
Rinse Hold
5
•
•
•
•
•
•
•
•
•
Power
consumption (kWh)
Very dirty, heat resistant cotton, linen
Laundry type
Rinse Plus
Water
consumption (lt)
Cotton 90
Program
Prewash
Program
Time (min)
selection knob to the program-temperature
position that you want to wash with.
Maximum
Load (kg)
Determine the suitable program according to
the type, amount, dirtiness level and washing
temperature of the laundry by looking at the
program selection table.Turn the program
•
•
•
hardness and temperature, environmental temperature,
laundry type and amount, auxiliary function selection and
changes in the electricity voltage.
EN
Function Selection
Depending on the selected program, the
selectable auxiliary functions are selected
by pressing the each function’s button.
The light of the selected function comes
on. Since it is not possible to select some
of the auxiliary functions together, one of
them becomes off when the other one is
selected.
Auxiliary Functions
Prewash
To wash the very dirty laundries, you can
use this function in the cotton and
synthetic programs.
Rinse Plus
You can increase the number of the
current rinsing cycles by using this
function. Thus, the risk of the sensitive
skins get effected by the detergent
remaining on the laundry is reduced.
Rinse Hold
If you desire to leave your synthetic and
wool fabrics in the machine after the wash
program you may select the Rinse hold
option to prevent them getting wrinkled. If
you want to cancel the “Rinse Hold” function, you have to press on “Start/Pause/
Cancel” button first, select the desired
spin speed and then repress on the “Start/
Pause/Cancel” button.
Child Lock
“This machine is equipped with a child
lock in order to prevent the program
flow to be affected when the buttons are
pressed
during washing cycles. In order to enable
the child lock, press and keep pressed the
1st and 2nd auxiliary function buttons from
the left at the same time for 3 seconds.
The light of the 1st auxiliary function button will flash continuously.
After the program completes, it is
necessary to disable the child lock in order
to initiate a new program or interfere the
12
program. Therefore, when the same
buttons are pressed for 3 seconds, light of
the second auxiliary function will go off.
Program Flow
After the machine starts to operate, the
related light in the program follow-up
indicator comes on according to the
selected program.
When a step is complete, the light of the
previous step goes off and the light of the
related step comes on. When On/Off button
is pressed, the “Door” light comes on.
After the washing program is selected,
“Washing” light on the program follow-up
indicator comes on when the “Start/Pause/
Cancel” button is pressed.
When the program ends “End” light comes
on. After the program is complete, the
machine will not allow you to open the door
for a while for your safety. If you want to
open the door meanwhile, the door will not
open and the “Door” light will flash. After
the door lock is deactivated the “Door” and
“End” lights will come on. Now you can
open the front door. You can switch your
machine in to the “Pause” mode by pressing the “Start/Pause/Cancel” button while
your machine is operating.
In this case, “Start/Pause/Cancel” light will
flash. You can make some changes in the
program settings in the Pause mode
(See. Changing the Program) and you may
also benefit from the laundry addition
function if the “Pause” mode is selected at
a suitable step of the program (See. Laundry addition function).
In order to return to the “Washing” mode
from the “Pause” mode, you need to press
the “Start/Pause/Cancel” button again.
In this case, “Start/Pause/Cancel” light
will flash and your machine will resume its
program.
EN
Changing the Program
Even if a new program is selected by
changing the position of program selection
knob while your machine is operating, the
first selected program continues to run.
In order to change the washing program,
the ongoing program should be cancelled.
(See. Cancelling a program)
In order to change the auxiliary functions
while your machine is operating, you can
make any desired changes after pressing
the “Start/Pause/Cancel” button.
If you want to change the spin speed
while your machine is operating, press the
“Start/Pause/Cancel” button, select the
spin speed and press the “Start/Pause/
Cancel” button again.
Laundry Addition Function
If you want to add laundry to your machine
after the washing program starts, switch
the machine to pause mode by pressing
“Start/Pause/Cancel” button. If the water
level in the machine is suitable, the “Door”
light on the program follow-up indicator
comes on approximately 2 minutes later
and you can open the door and add
laundry. If the “Door” light is not
continuously on at the end of this period,
the water level in the machine is not
suitable and you can not add laundry.
You can resume the program by pressing
“Start/Pause/Cancel” button again.
knob is changed while your machine is
operating. In order to change the washing
program, a new program can be selected
and started after “Cancelling a program”
by pressing the “Start/Pause/Cancel”
button for 3 seconds as described above.
End of the Program
When the program ends “End” light on the
program follow-up indicator comes on.
“End” and “Door” lights come on within
two minutes after the door is opened,
the machine becomes ready for the next
washing. If any of the buttons is pressed
or the position of the selection knob is
changed when the machine is at the end
of a program, “End” light goes off and only
the “Door” light remains on. Meanwhile,
if the door is still locked, the “Door” light
flashes until the door is opened. To turn
the machine off, press the “On/Off” button.
Unloading the Laundries
Your machine stops automatically when
the program ends. Turn off the taps. Grab
and pull the handle to open the door.
Press “On/Off” button to turn off your
machine. After you take the laundries out,
leave the front door open and ventilate the
inside of the machine. Check the inside of
the bellows and wipe it.
Cancelling a program
In order to cancel the selected program,
“Start/Pause/Cancel” button is pressed for
3 seconds and machine starts to drain at
the end of this time. Meanwhile, “Washing”
and “End” lights are on. After the drainage
process completes “Start/Pause/Cancel”
and “Washing” lights are off. “Door” light
starts to flash. When the “Door” light is
on continuously, the door can be opened
and a new program can be selected. You
can start a program by selecting a new
program.
The selected program continues to run
even if the position of program selection
13
EN
Maintenance and cleaning |
Detergent Drawer
The powder detergent remnants may
accumulate in the detergent drawer.
To clean the detergent drawer, pull the
drawer towards you by pressing the
marked point of the siphon in the softener
compartment as shown in the illustration.
Wash the drawer in the sink with plenty of
water.
be cleaned when they get dirty. To do this,
close the taps. Remove the water inlet
hoses. Clean the tops of the filters on the
water inlet valves with a thin brush. If the
filters are very dirty, you can pull out with
pliers and clean them. The filters on the
flat end of the water inlet hoses should be
taken out with their gaskets by hand and
cleaned thoroughly under the flowing
water. (There are 2 filters in the machines
with single (cold) water inlet and 4 filters in
the machines with double (hot-cold) water
inlets.
Siphon
Do not forget to clean the siphon
(the colored part in the detergent drawer)
when it gets dirty. To remove the siphon,
first take out the detergent drawer. To
prevent clogging, clean the softener
remnants inside of it. After cleaning, put
back the siphon and check if it is well
seated or not.
Hose
Since there is a risk of freezing especially
in the cold areas, the water remaining in
the appliance can frozen and damage the
appliance. In this case, the water remaining in the pump and hoses should be
drained by removing the pump filter. Water
inlet hoses should also be emptied by
removing them from the taps.
Cleaning the pump filter
Inlet Water Filters
At the end of the water inlet valves which
are mounted to the back of the machine
and the flat end of the water inlet hoses
that are mounted onto the taps, there is
one filter for each. These filters prevent the
foreign substances and dirt in the
water entering the machine. Filters should
14
• Clean the foreign substance filter
periodically at least for once!
• If the foreign substances (coins, buttons,
baby socks and etc.) clog the foamy water
pump, clean the filter.
• Before cleaning, empty the water that
remains inside first.
• Hot water danger: There may be 15
liters of hot water at 90°C in the machine.
Open the filter carefully.
Drain the water completely in the following
EN
situations...
• before cleaning the foreign substance
filter;
• before transporting the machine ( for
example moving into a new house);
• when there is a risk of freezing.
1. Turn off the appliance, unplug the power
cable and close the tap. Wait for the hot
soapy water to cool enough. Otherwise,
there is a risk of scalding.
2. Open the service cover by pressing the
button. In order to prevent the little amount
of water that is inside pump spilling over
the floor, put a container in front of the filter
cover. Take out the filter by turning anticlockwise.
3. To loosen the foreign substance filter,
turn it half turn (anticlockwise) and take the
remaining water with a cloth. When there
is no water, turn the foreign substance filter
until it is totally released and take it out.
4. Clean the foreign substance filter and
pump opening.
5. Reinstall the foreign substance filter and
turn it tightly (clockwise).
6. Close the service cover.
15
EN