1
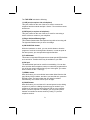
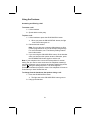
7HOHSKRQH
,QVWUXFWLRQ0DQXDO
,VVXH
&RPFRGH
)HEUXDU\
Disclaimer
Intellectual property related to this product (including trademarks) and
registered to Lucent Technologies Inc. has been transferred or
licensed to Avaya Inc.
Any reference within the text to Lucent Technologies Inc. or Lucent
should be interpreted as references to Avaya Inc. The exception is
cross references to books published prior to April 1, 2001, which may
retain their original Lucent titles.
Avaya Inc. formed as a result of Lucent’s planned restructuring,
designs builds and delivers voice, converged voice and data,
customer relationship management, messaging, multi-service
networking and structured cabling products and services. Avaya Labs
is the research and development arm for the company.
Copyright© 1996 Lucent Technologies
All Rights Reserved
Notice
While reasonable efforts were made to ensure that the information in
this document was complete and accurate at the time of printing.
Lucent Technologies can assume no responsibility for any errors.
Changes or corrections to the information contained in this document
may be incorporated into future issues.
Federal Communications Commission (FCC) Notice
This equipment has been tested and found to comply with the limits for
a Class A digital device, pursuant to Part 15 of the FCC Rules. These
limits are designed to provide reasonable protection against harmful
interference when the equipment is operated in a commercial
environment. This equipment generates, uses, and can radiate radiofrequency energy and, if not installed and used in accordance with the
instruction manual, may cause harmful interference to radio
communications. Operation of this equipment in a residential area is
likely to cause harmful interference, in which case the user will be
required to correct the interference at his or her own expense.
Trademark Information
DEFINITY is a registered trademark of Lucent Technologies.
DIMENSION is a registered trademark of Lucent Technologies.
MERLIN is a registered trademark of Lucent Technologies.
Ordering Information
For more copies of this manual, call your local authorized Lucent
Technologies distributor.
Contents
Your 9103 Voice Terminal . . . . . . . . . . . . . . . . . . . . . . . . . . . . 1
Installation . . . . . . . . . . . . . . . . . . . . . . . . . . . . . . . . . . . . . . . . 6
Contents of the 9103 Package. . . . . . . . . . . . . . . . . . . . . . . 6
Installing the Batteries. . . . . . . . . . . . . . . . . . . . . . . . . . . . . 6
Desk/Table Installation . . . . . . . . . . . . . . . . . . . . . . . . . . . . . 7
Using the Features . . . . . . . . . . . . . . . . . . . . . . . . . . . . . . . . . 8
Answering and Placing a Call . . . . . . . . . . . . . . . . . . . . . . . 8
The Memory-Dialing Feature . . . . . . . . . . . . . . . . . . . . . . . . 9
Redialing a Number (with the SAVE Button
or the REDIAL Button) . . . . . . . . . . . . . . . . . . . . . . . . . . . 11
Hold . . . . . . . . . . . . . . . . . . . . . . . . . . . . . . . . . . . . . . . . . . 12
Conference . . . . . . . . . . . . . . . . . . . . . . . . . . . . . . . . . . . . 12
Transfer . . . . . . . . . . . . . . . . . . . . . . . . . . . . . . . . . . . . . . . 12
General Care and Maintenance . . . . . . . . . . . . . . . . . . . . . . 13
Cleaning . . . . . . . . . . . . . . . . . . . . . . . . . . . . . . . . . . . . . . . 13
Failure to Operate and Service Difficulties. . . . . . . . . . . . . 13
FCC Regulations
Pertaining to this equipment
Interference Information (Part 15) Some telephone equipment
generates and uses radio frequency energy, and if not installed and
used properly, may cause interference to radio and television
reception.
Your Lucent Technologies product has been tested and found to meet
the standards for a Class B computing device, as specified in Subpart
J of Part 15 of the FCC Rules. These specifications are designed to
provide protection against such interference in a residential
installation. However, there is no guarantee that interference will not
occur in a particular installation.
If your Lucent Technologies product causes interference to radio or
television reception when in use, you might correct the interference
with any one or all of these measures:
1
Where it can be done safely, reorient the receiving television
or radio antenna.
2
To the extent possible, relocate the television, radio, or
other receiver with respect to the telephone equipment.
3
If your telephone product runs on AC power, plug your
product into an AC outlet that’s not on the same circuit as
one used by your radio or television.
Registration Information (Part 68) The following information is
applicable only to equipment connected directly to the telephone
network and not to connection of stations behind terminal systems.
In compliance with the FCC Rules, you should be aware of the
following:
1
Connection of this equipment to the telephone network must
be through one of the standard network interface jacks.
These jacks may be ordered from the local telephone
company or through Lucent Technologies as your
authorized agent.
2
Registered equipment may not be used with coin telephone
lines or party lines.
3
Customers connecting equipment to the telephone network
will, upon request of the local telephone company, provide
the following information:
•
•
The telephone number assigned to the line used with
this telephone.
The Registration Number and the Ringer Equivalence
Number (REN) from the Registration label on the
bottom of the telephone. The REN is useful to
determine how many devices you can connect to your
telephone line and still have them ring when your
telephone line is called. In most, but not all areas, the
sum of all the RENs should be five or less. You may
want to contact your local telephone company.
4
If trouble is experienced, the telephone set should be
unplugged from the network interface to determine if the
telephone set or the telephone line is the trouble source. If
your telephone set is determined to be malfunctioning, it
should not be reconnected until repairs are made.
5
Repairs to this equipment, other than routine repairs, can be
made only by Lucent Technologies or its authorized agents.
6
If a telephone set causes harm to the telephone network,
the local telephone company may temporarily discontinue
your service and, if possible, notify you in advance. If
advance notice is not practical, you will be notified as soon
as possible. You will be given the opportunity to correct the
problem and be informed of your right to file a complaint
with the FCC.
The local telephone company may make changes in its
facilities, equipment, operation, or procedures that could
affect the proper functioning of your equipment. If they do,
you will be given adequate notice in writing to allow you an
opportunity to maintain uninterrupted telephone service.
IMPORTANT SAFETY WARNINGS
Only the most careful attention has been devoted to quality standards
in the manufacture of your new telephone. Safety is a major factor in
the design of every set. But, safety is YOUR responsibility, too.
Please read carefully the helpful tips listed below and on the next
page. These suggestions will enable you to take full advantage of your
new telephone. Then, retain these tips for later use.
Use
When using your telephone equipment, the following safety
precautions should always be followed to reduce the risk of fire,
electric shock, and injury to persons.
•
•
•
•
•
•
•
Read and understand all instructions.
Follow all warnings and instructions marked on the
telephone.
This telephone can be hazardous if immersed in water. To
avoid the possibility of electric shock, do not use it while you
are wet. If you accidentally drop the telephone into water, do
not retrieve it until you have first unplugged the line cord
from the modular jack. Do not plug the telephone back in
until it has dried thoroughly.
Avoid using the telephone during electrical storms in your
immediate area. There is a risk of electric shock from
lightning. Urgent calls should be brief. Even though
protective measures may have been installed to limit
electrical surges from entering your business, absolute
protection from lightning is impossible.
If you suspect a natural gas leak, report it immediately, but
use a telephone away from the area in question. The
telephone’s electrical contacts could generate a tiny spark.
While unlikely, it is possible that this spark could ignite
heavy concentrations of gas.
Never push objects of any kind into the equipment through
housing slots since they may touch hazardous voltage
points or short out parts that could result in a risk of electric
shock. Never spill liquid of any kind on the telephone. If
liquid is spilled, however, refer servicing to proper service
personnel.
To reduce the risk of electric shock, do not disassemble this
telephone. There are no user serviceable parts. Opening or
removing covers may expose you to hazardous voltages.
Incorrect reassembly can cause electric shock when the
telephone is subsequently used. If your telephone does not
work properly, refer to the information below which
describes how to get service for your telephone.
Service
1
Before cleaning, unplug the telephone from the modular wall
jack. Do not use liquid cleaners or aerosol cleaners. Use a damp
cloth for cleaning. (See General Care and Maintenance later in
this manual.)
2
Unplug the telephone from the modular wall jack. Be sure to refer
servicing to qualified service personnel when these conditions
exist:
—
If liquid has been spilled into the telephone.
—
If the telephone has been exposed to rain or water.
—
If the telephone does not operate normally by following the
operating instructions, adjust only those controls described
in these instructions. Do not attempt to adjust any other
controls since doing so may result in damage to the
telephone and will require extensive work by a qualified
technician to restore the telephone to normal operation.
—
If the telephone has been dropped or the housing has been
damaged.
—
If you note a distinct change in the performance of the
telephone.
WARNING: When this product is located in a separate building from
the telephone communications system, a line current protector MUST
be installed at the entry/exit points of ALL buildings through which the
line passes.
The following are the ONLY acceptable devices for use in this
application:
•
Lucent Technologies 4-type protectors, except the 4C3S-75
“Enhanced” Protector
SAVE THESE INSTRUCTIONS
!
When you see this warning symbol on the product,
refer to the instructions booklet packed with the
product for more information before proceeding.
Your 9103 Telephone
The Lucent Technologies 9103 telephone can be used at your place
of business with any of the following communications systems:
System 25, System 75, System 85, DEFINITY® Generic 1 or Generic
2, MERLIN®, or Dimension® Communications Systems. The Lucent
Technologies 9103 has the following features:
•
•
•
•
•
•
•
•
•
•
•
•
•
•
Convenient Pulse or pushbutton Tone dialing
Fully modular connection which provides maximum ease of
installation
Battery backup in case of power interruption
Easily installed on desk or table
User-selectable ringer volume and pitch control
Flashing ringer light which indicates an incoming call
Flashing Message light
Three memory-dialing buttons
Ten memory-dialing numbers can be programmed on the
numeric dial pad keys (0 and 1 through 9)
On-hook dialing with the 1-way speaker
FLASH button, for accessing such system features as Hold
and Transfer
Last Number Redial feature
Save feature, which allows you to save a number in memory
for a temporary period of time
Full PBX system compatible
Figure 1 shows you the top and bottom view of the Lucent
Technologies 9103 telephone and its many features. Explanations of
these features follow the figures.
1
1
2
3
14
4
ON HOOK
DIAL
FLASH
5
1
GHI
ABC
DEF
2
JKL
4
13
PQRS
3
MNO
5
TUV
6
6
WXYZ
7
8
*
O
9
#
9103
PROGRAM
AUTO
SAVE
MEM 1
MEM 2
MEM 3
PAUSE
REDIAL
7
8
9
10
12
11
TOP VIEW
18
RINGER
PITCH
2
1
16
PULSE TONE
17
15
BOTTOM VIEW
Figure 1: Lucent Technologies 9103 Telephone,
Top and Bottom Views
2
The TOP VIEW includes the following:
1) LINE jack (on top/rear side of telephone)
This jack, located on the rear of the set, is used to connect the
telephone and the modular wall jack. Use the 7-foot cord that comes
with the set.
2) DATA jack (on top/rear of telephone)
This jack, located on the rear of the set, is used for connecting a
device such as a modem to your telephone.
3) Ringer indicator/Message light
This indicator flashes when the telephone rings with an incoming call.
The light also flashes when you have a message.
4) ON HOOK DIAL button
While the handset is on-hook, you can use this button to hear the
progress of a call as it is being dialed. However, in order to speak to
the other person, you must speak through the handset.
5) FLASH button
This button is used with PBX systems to activate special PBX facilities
such as Hold or Transfer which may be available in your PBX.
6) Dial pad
The standard dial pad can be used for normal dialing. You can also
store and then dial a telephone number or extension programmed on
any of the ten numeric dial pad keys (0 and 1 through 9; you cannot
store numbers on the * or # keys).
7) REDIAL button
With this feature, you can redial the last number dialed from the dial
pad. Merely, lift the handset, and when you hear dial tone, press the
REDIAL button. The last number that you dialed is redialed
automatically. This number can be up to 32 digits.
8) PAUSE button
With this feature, you can insert a 3.6-second pause into the dialing
sequence. A pause in a dialing sequence may be needed if your
telephone is connected to certain types of PBX or to any network
where a pause is required. For example, you may need a pause
between an outside line access number (usually, “9”) and the
telephone number.
3
9) SAVE button
On this button you can save one number in the redial memory for
future use.
10) Memory-Dialing buttons
These buttons, located below the dial pad and labeled MEM 1,
MEM 2, and MEM 3, provide easy dialing of frequently-dialed or
emergency numbers. Each memory button can store up to 16 digits. A
pause counts as one digit.
11) AUTO button
This button is used to dial the numbers stored on the ten numeric dial
pad keys (0 and 1 through 9).
12) PROGRAM button
This button is used to enter numbers or extensions onto any of the
three one-touch memory buttons (MEM 1, MEM 2, or MEM 3) or on
any of the ten numeric dial pad keys (0 and 1 through 9; you cannot
store numbers on the * or # keys).
13) Handset cord jack
This jack, located on the left side of the set, is used for connecting the
handset with the telephone.
14) Handset
The handset is used for placing and receiving calls.
4
The BOTTOM VIEW includes the following:
15) Battery compartment
You may place two 1.5-Volt AA batteries in this compartment in case
of power outage.
16) Tone/Pulse switch
This switch us used to select the dialing mode, either TONE (DTMF)
or PULSE (Decadic). The correct mode depends on the telephone
network.
17) Ringer volume switch
The settings on this switch affects the ringer volume during an
incoming call. There are three available ringer volume positions: Low,
Medium, and High.
18) Ringer pitch control
The pitch of the ringing sound can be changed by rotating this control
on the bottom of the telephone.
5
Installation
Use the following procedures for installing your 9103 telephone.
Contents of the 9103 Package
The following items come in the box with the 9103 telephone:
•
•
A 7-foot line cord
A 9-foot handset cord
Installing the Batteries
This telephone requires two 1.5-Volt AA batteries (provided with the
set) to retain the numbers stored in memory in the event the telephone
is disconnected from the line.
1
If the telephone is already connected, disconnect the
telephone from the modular jack before you install the
batteries.
2
Locate the battery compartment on the right side on the
bottom of the telephone. See Figure 1 for its location.
3
Insert a small pointed tool or a small screwdriver in the
“D”-shaped hole to the left of the compartment.
4
Press down and slide the cover to the right to open it.
5
Insert two AA batteries in the battery compartment. The “–”
(negative) end of the battery should be placed against the
springs.
6
Replace the battery compartment cover and, if applicable,
plug the line cord into the modular jack again. If you have
not installed the telephone yet, go on to Desk/Table
Installation on the next page.
Note: After you replace the batteries, it will be necessary to
re-program your memory-dialing buttons.
6
Desk/Table Installation
For desk or table installation, use the 7-foot straight line cord that
came with your telephone to connect the telephone to a modular jack.
WARNING: Do not plug the handset cord into the line jack on the
bottom of your telephone since it could damage your handset and the
telephone.
1
Plug one end of the line cord into the line jack on the
top/rear of the telephone. See Figure 1 for the location of
the line jack.
2
Plug one end of the coiled handset cord into the handset
jack on the side of the telephone. See Figure 1.
3
Plug the other end of the handset cord into the handset.
4
Hang up the handset.
5
Plug the free end of the line cord into a modular jack.
6
Lift the handset and listen for dial tone.
Note: When you have installed the telephone, you can set
the ringer volume and ringer pitch as desired. (See Figure 1
for the location of the Ringer volume switch and the Ringer
pitch control.)
7
Using the Features
Answering and Placing a Call
To answer a call
1
Lift the handset.
2
Speak with the other party.
To place a call
1
Lift the handset or press the ON HOOK DIAL button.
•
2
When you press the ON HOOK DIAL button, the light
next to the button goes on.
Dial the desired number.
Note: You can also use a memory-dialing button or dial a
number programmed on one of the numeric dial pad keys.
For more information, see “The Memory-Dialing Feature”
later in this section.
3
If you are using the ON HOOK DIAL button, lift the handset
when you hear the other person answer. Otherwise, press
the ON HOOK DIAL button again to end the call.
Note: If your telephone line is set to the Pulse position for normal
dialing, but you need to enter touch-tones for telephone answering/
messaging systems or such services as electronic banking-by-phone,
press
during the dialing sequence. This will change the
subsequent numbers from pulse to tones. Your telephone will revert to
Pulse when you have finished the call.
To change from the handset to the speaker during a call
1
Press the ON HOOK DIAL button.
•
2
The light next to the ON HOOK DIAL button goes on.
Hang up the handset.
8
The Memory-Dialing Feature
You may store any combination of numeric entries, including a pause,
a *, and a #, in Tone mode. Use the following procedures.
To store a number on any of the three Memory-Dialing buttons
1
Lift the handset or press the ON HOOK DIAL button.
•
When you press the ON HOOK DIAL button, the light
next to the button goes on.
2
Press the PROGRAM button.
3
Dial the telephone number you want to store.
Note: You can use the PAUSE button to program a
3.6-second pause between a dialing access number
(usually “9”) and the telephone number and for certain
banking and long-distance services.
4
Press the memory-dialing button on which the number is to
be stored (MEM 1, MEM 2, or MEM 3).
5
Hang up the handset or press the ON HOOK DIAL button.
•
The light next to the ON HOOK DIAL button goes off.
To dial a telephone number stored on a Memory-Dialing button
1
Lift the handset or press the ON HOOK DIAL button.
•
2
When you press the ON HOOK DIAL button, the light
next to the button goes on.
Press the memory-dialing button (MEM 1, MEM 2, or
MEM 3) on which the telephone number is stored.
•
The telephone number is dialed automatically.
9
To store a telephone number on any of the 10 numeric dial pad
keys
You can store a telephone number or extension on any of the
10 numeric dial pad keys (0 and 1 through 9, but NOT * or #).
1
Lift the handset or press the ON HOOK DIAL button.
•
When you press the ON HOOK DIAL button, the light
next to the button goes on.
2
Press the PROGRAM button.
3
Dial the telephone number you want to store on the dial pad
key (maximum of 16 digits).
Note: You can use the PAUSE button to program a
3.6-second pause between a dialing access number
(usually “9”) and the telephone number and for certain
banking and long-distance services.
4
Press the PROGRAM button again.
5
Press any numeric dial pad key (0 and 1 through 9; you
cannot use * and #) on which you want to store the
telephone number.
6
Hang up the handset or press the ON HOOK DIAL button
again.
•
The light next to the ON HOOK DIAL button goes off.
To dial a number stored on a dial pad key
1
Lift the handset or press the ON HOOK DIAL button.
•
2
When you press the ON HOOK DIAL button, the light
next to the button goes on.
Press the AUTO button and then press the dial pad key on
which the number is stored.
•
The telephone number is dialed automatically.
Note: If you are using the ON HOOK DIAL button, you must
lift the handset in order to speak to the other person.
10
Redialing a Number (with the SAVE Button or the REDIAL Button)
Note: You can use the REDIAL button or the SAVE button to redial
numbers. Your telephone redials up to 32 digits.
•
•
The REDIAL button redials the last number you dialed.
The SAVE button redials a specific number you have dialed
before and that you have stored on the SAVE button for
future use.
To store a number on the SAVE button
1
When you want to save a number you have just dialed,
press the PROGRAM button and then the SAVE button.
•
The number is stored on the SAVE button.
To call a number stored on the SAVE button
1
Lift the handset or press the ON HOOK DIAL button.
•
2
When you press the ON HOOK DIAL button, the light
next to the button goes on.
When you hear dial tone, press the SAVE button (to redial a
specific number you have saved).
•
The number is automatically dialed.
Note: If you are using the ON HOOK DIAL button, you must
lift the handset in order to speak to the other person.
To use the REDIAL button to redial a number you just dialed
1
Lift the handset or press the ON HOOK DIAL button.
•
2
When you press the ON HOOK DIAL button, the light
next to the button goes on.
When you hear dial tone, press the REDIAL button (to redial
the last number that you dialed).
•
The number is automatically dialed.
Note: If you are using the ON HOOK DIAL button, you must
lift the handset in order to speak to the other person.
11
Hold
To put a call on hold
1
While on a call, press the FLASH button.
To return to the held call
1
Press the FLASH button twice.
•
You are connected to the held call.
Conference
To add a third party to a call
1
While on a call, press the FLASH button.
•
2
The present call is put on hold.
Dial the number of the third party.
Note: You can privately discuss the call with the third party
at this time; if there is no answer or busy, press the FLASH
button twice to return to the original party.
3
Press the FLASH button.
•
All parties are now connected.
Transfer
To send a present call to another extension or to an outside
number
1
Press the FLASH button.
•
2
Dial the number that the call is to be transferred to.
•
3
The present call is put on hold.
Remain on the line and announce the call; if the dialed
number is busy or not answered, press the FLASH
button twice to return to the held call.
Hang up.
•
Transfer is completed.
12
General Care and Maintenance
This telephone is a precision electronic instrument. While in use or
storage, care should be taken to avoid rough handling, extreme
temperatures, and damp or dirty environments.
Cleaning
NEVER use aerosol sprays or other chemical agents or substances
which leave a residue (furniture polish, for example).
Use a mild detergent and a damp clean cloth when cleaning. Do not
allow moisture to enter the telephone’s interior. Damage may result.
Failure to Operate and Service Difficulties
If telephone service problems occur at any time, it is recommended
that the installation procedure described in this manual be re-checked.
•
•
If a fault occurs, try to determine if the fault is with the
telephone, or with the network or system to which the
telephone is connected:
Disconnect the faulty telephone, and test the line with a
substitute telephone. If the substitute telephone operates
satisfactorily, the problem is in the faulty telephone.
Test the faulty telephone on a good line. If the problem still
occurs, the fault is in the telephone.
If necessary, consult your Lucent Technologies distributor for further
advice.
13
14