1
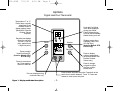
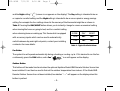
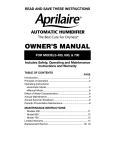
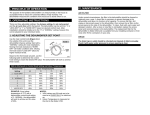
110-964B
7/12/01
9:14 AM
Page 1
®
ELECTRONIC THERMOSTAT
Owner’s Manual
MODELS
8533, 8534 & 8538
Digital Heat/Cool Thermostats
110-964B
7/12/01
9:14 AM
Page 2
OWNER’S MANUAL – TABLE OF CONTENTS
Introduction . . . . . . . . . . . . . . . . . . . . . . . . . . . . . . . . . . . . . . . . . . . . . . . . . . . . . . . . . . . . . . . . . . . . . . . 1
Getting Familiar With The Aprilaire® Thermostat. . . . . . . . . . . . . . . . . . . . . . . . . . . . . . . . . . . . . . . . 3
• Temperature Display . . . . . . . . . . . . . . . . . . . . . . . . . . . . . . . . . . . . . . . . . . . . . . . . . . . . . . . . . . . 3
• Mode Button . . . . . . . . . . . . . . . . . . . . . . . . . . . . . . . . . . . . . . . . . . . . . . . . . . . . . . . . . . . . . . . . . . 3
• Temperature Settings – Day/Night Button . . . . . . . . . . . . . . . . . . . . . . . . . . . . . . . . . . . . . . . . . 3
• Fan Button. . . . . . . . . . . . . . . . . . . . . . . . . . . . . . . . . . . . . . . . . . . . . . . . . . . . . . . . . . . . . . . . . . . . . 4
• Outdoor Button . . . . . . . . . . . . . . . . . . . . . . . . . . . . . . . . . . . . . . . . . . . . . . . . . . . . . . . . . . . . . . . . 4
Setting Up The Aprilaire Thermostat . . . . . . . . . . . . . . . . . . . . . . . . . . . . . . . . . . . . . . . . . . . . . . . . . . 5
Operating The Aprilaire Thermostat . . . . . . . . . . . . . . . . . . . . . . . . . . . . . . . . . . . . . . . . . . . . . . . . . . 7
Changing The Current Temperature Setting. . . . . . . . . . . . . . . . . . . . . . . . . . . . . . . . . . . . . . . . . . . . 9
Optional Feature – Locking The Keypad . . . . . . . . . . . . . . . . . . . . . . . . . . . . . . . . . . . . . . . . . . . . . . 10
In Case Of Power Failure . . . . . . . . . . . . . . . . . . . . . . . . . . . . . . . . . . . . . . . . . . . . . . . . . . . . . . . . . . . 11
Cleaning . . . . . . . . . . . . . . . . . . . . . . . . . . . . . . . . . . . . . . . . . . . . . . . . . . . . . . . . . . . . . . . . . . . . . . . . . 11
Limited Warranty. . . . . . . . . . . . . . . . . . . . . . . . . . . . . . . . . . . . . . . . . . . . . . . . . . . . . . . . . . . . . . . . . . 12
© Research Products Corporation 2001
110-964B
7/12/01
9:14 AM
Page 3
IMPORTANT: READ ALL INSTRUCTIONS THOROUGHLY
Introduction
Thank you for your recent Aprilaire Electronic Thermostat purchase. We sincerely
appreciate your business and are pleased to add your name to our growing list of customers.
With this purchase, you have invested in the highest quality equipment currently available.
®
Please be assured that in addition to product quality, we are committed to total product
performance and complete customer satisfaction.
Now, please take a few minutes to familiarize yourself with your new Aprilaire Thermostat. In
order to take advantage of all the benefits of your new thermostat, it is important that you
understand how to operate it.
–1–
110-964B
7/12/01
9:14 AM
Page 4
Aprilaire
Digital Heat/Cool Thermostat
Temperature ˚F or ˚C.
Room temp. normally
displayed. Press
Outdoor button to
display outdoor temp.
(Model 8041 Remote
Outdoor Sensor
required).
Set-point icon displays
the active set point
(full sun = Day set
point, partial moon
= Night set point).
Heat and Cool Mode
icons. Both displayed
during Auto Mode.
Flame flickers during
heat call and Snowflake
flashes during cool call.
Mode
Outdoor
Fan
Day/Night
Press to select
Heat/Cool/Auto/Off.
(Auto for Models 8534
& 8538 only)
Press to display
outdoor temperature
(w/optional Model 8041
Remote Outdoor
Sensor only).
Press for continuous
fan. Press again to
resume to auto fan.
Press to change
set point to either
the Day or Night
preset value.
Press to raise and lower set point. Press both at the
same time to switch between ˚F and ˚C. Press and
release to view current set point.
Fan icon displays during
continuous fan only.
Figure 1 - Display and Button Description
Displays mode when
changing (Heat, Cool,
Off, and Auto).
(Auto for Models 8534
& 8538 only)
–2–
110-964B
7/12/01
9:14 AM
Page 5
Getting Familiar with the Aprilaire Thermostat
(refer to Figure 1)
The LCD (Liquid Crystal Display) normally shows: the room temperature, the current mode of operation, if
the Day or Night temperature setting is being used, and if the system fan is set for continuous operation.
Temperature Display
Room temperature can be displayed in either degrees Fahrenheit or degrees Celsius. If the displayed
temperature seems abnormally high or low (example: 70˚F is equal to 21˚C), press the DECREASE
button and INCREASE
button simultaneously to switch between ˚F and ˚C.
Mode Button
Three modes of operation are available for all the Heat/Cool thermostat models: Heat, Cool, and Off.
Additionally, with the Models 8534 and 8538, “AUtO” mode is available. The mode of operation indicates
how you want your heating and cooling equipment to operate. Press the MODE button until the desired
mode of operation shows on the display.
Temperature Settings - Day/Night Button
The thermostat stores four temperature settings in its memory, two for heating and two for cooling. The
two temperatures for each mode are called the Day setting ”
–3–
“ (a sun icon appears on the display)
110-964B
7/12/01
and the Night setting “
9:14 AM
Page 6
“ (a moon icon appears on the display). The Day setting is intended to be an
occupied or comfort setting and the Night setting is intended to be an unoccupied or energy savings
setting. For example the four settings stored in the memory of the thermostat might be as shown in
Table 1. Pressing the DAY/NIGHT button allows you to instantly change to a more economical setting
when leaving the house or going to bed, and to a comfort setting
MODE
DAY
NIGHT
with accessory inputs which can be used to automatically
Heat
68˚F
60˚F
switch between day and night set points; contact your installing
Cool
78˚F
85˚F
when returning home or waking up. This thermostat is equipped
contractor for more details.
Table 1 – Typical Set Point Values
Fan Button
The system fan will operate automatically during a heating or cooling cycle. If it is desired to run the fan
continuously, press the FAN button, and a Fan “
“ icon will appear on the display.
Outdoor Button
This button will be made functional when the optional Aprilaire Model 8041 Remote Outdoor Sensor has
been installed. It can then be used to find out the outdoor temperature from indoors. If the Model 8041
Remote Outdoor Sensor has not been installed, two dashes “– –” will appear on the display when this
button is pushed.
–4–
110-964B
7/12/01
9:14 AM
Page 7
Setting Up The Aprilaire Thermostat
To ensure accurate temperature control, observe the following simple guidelines:
• When the thermostat is operating, close the cover to allow proper air circulation over the
temperature sensor.
• Do not place anything which can give off warm or cool air, such as candles or portable humidifiers,
near the thermostat.
1. Adjusting the Heat Temperature Settings. There are
two settings, the Day setting “
“ (a sun icon
appears on the display) and the Night setting “
“
(a partial moon icon appears on the display).
See Figure 2.
a.
Press the MODE button repeatedly until HEAt
appears on the display.
b.
Press the DAY/NIGHT button until the “
“ icon
(Day setting) appears on the display.
c.
Use the DECREASE
button and INCREASE
button to adjust the setting.
–5–
DAY
DAY
NIGHT
NIGHT
Figure 2 - Adjust Heat Settings
110-964B
7/12/01
9:14 AM
Page 8
d.
Press the DAY/NIGHT button until the “
e.
Use the DECREASE
“ icon (Night setting) appears on the display.
button and INCREASE
button to adjust the setting.
2. Adjusting the Cool Temperature Settings. There are two
settings, the Day setting “
“ (a sun icon appears on
the display when this setting is being used) and the Night
setting “
“ (a partial moon icon appears on the display
when this setting is being used). See Figure 3.
a. Press the MODE button repeatedly until COOL
appears on the display.
b. Press the DAY/NIGHT button until the “
“ icon
(Day setting) appears on the display.
c. Use the DECREASE
button and INCREASE
button to adjust the setting.
d. Press the DAY/NIGHT button until the “
e. Use the DECREASE
DAY
DAY
NIGHT
NIGHT
Figure 3 - Adjust Cool Settings
“ icon (Night setting) appears on the display.
button and INCREASE
–6–
button to adjust the setting.
110-964B
7/12/01
9:14 AM
Page 9
Operating The Aprilaire Thermostat
1. Select the mode of operation by repeatedly pressing the MODE button until the desired mode
appears on the display. The heating and cooling system may be turned off by selecting the “OFF”
mode. Do not set to the “OFF” mode during periods when freezing temperatures may occur.
• COOL: In the “COOL” mode a Snowflake “
“ icon appears on the display, which flashes
when the air conditioning is running.
• HEAT: In the “HEAt” mode a Flame “
“ icon appears on the display, which flickers when the
furnace is running.
• AUTO (Models 8534 and 8538 only): In the “AUtO” mode, the heating and cooling system will
operate in either the “HEAt” or “COOL” mode depending on which current setting the room
temperature is closest to. Note that both the Snowflake “
appear on the display.
–7–
“ and Flame “
“ icons
110-964B
7/12/01
9:14 AM
Page 10
2. Select the temperature setting to be used by pressing the DAY/NIGHT button until the
desired previously stored temperature setting (Day or Night) appears on the display. Use the
DECREASE
button and INCREASE
button to change the temperature if desired (NOTE
that if changed, the new set point will be permanently stored in memory - see CHANGING THE
CURRENT TEMPERATURE SETTING).
3. After approximately 5 seconds the thermostat will return to the normal display.
Note: This thermostat utilizes time delays to protect the heating and cooling equipment. If the
equipment does not shut off or turn on immediately when the temperature setting has been
changed, it may be due to the built-in time delays (4 minutes max.).
4. Press the Fan button, if it is desired, to run the fan continuously. A Fan “
on the display when the fan is set to operate continuously.
–8–
“ icon will appear
110-964B
7/12/01
9:14 AM
Page 11
Changing The Current Temperature Setting
1. Press and release either the DECREASE
button or INCREASE
button to see the current
temperature setting. The setting, a Thermometer icon and a Double Arrowhead icon will appear
(see Figures 2 and 3 on pages 5 and 6).
2. Change the temperature setting:
OPTION 1 – Use the DECREASE
DECREASE
button or INCREASE
button or INCREASE
button. Press and hold the
button to change the current temperature setting.
The thermostat remembers the most recent temperature settings. For example, if the Day, Cool
temperature shown in Figure 3 were changed from 78˚F to 76˚F, the 76˚F setting would remain in
memory as the Day, Cool setting.
Note: The Cool temperature setting must be a minimum of 2˚F higher than the Heat temperature
setting for both the Day and Night sets. The thermostat will automatically update the setting not
being changed. In the example above, if the Day, Heat setting was 75˚F, the thermostat would
have automatically changed the setting to 74˚F when the Cool setting was changed to 76˚F.
OPTION 2 – Use the DAY/NIGHT button. Press the DAY/NIGHT button to instantly change the
temperature setting to one of the two settings stored in memory.
–9–
110-964B
7/12/01
9:14 AM
Page 12
Optional Feature – Locking The Keypad
If tampering with the thermostat is expected and unwanted, the keypad can be locked by changing the
position of the Keypad Lock DIP switch (switch no. 2) from the factory set OFF position to ON.
The DIP switches are located inside the thermostat on the circuit board. To access the DIP switches,
refer to the Installation Instructions that came with the thermostat, or consult your contractor.
In the locked position, only the following functions can be done:
•
The outdoor temperature button will display the outdoor temperature.
•
The thermostat will default to the Day setting.
•
The DECREASE
button and INCREASE
button will temporarily change the Day setting
a maximum of ±6°F (±3° for Model 8533) for a period of 3 hours before the thermostat
automatically returns to the Day setting.
If the thermostat does not respond when a button is pushed, it may be because the keypad has been
locked. A Lock “
“ icon will appear when a button other than Outdoor is pushed if the keypad has
been locked.
– 10 –
110-964B
7/12/01
9:14 AM
Page 13
In Case Of Power Failure
This thermostat does not require a battery. If the power goes out, the display is blank. During the
period that the power is off, the heating/cooling system will not operate. When the power is restored,
the thermostat will default to the Day setting and the current mode of operation at the time of the
power outage.
This thermostat is equipped with a continuous memory feature which does not require any battery.
The thermostat will never lose the four programmed temperature settings regardless of the length of
the power outage.
Cleaning
If the surface of the thermostat becomes dirty it can be cleaned with plain water or many non-abrasive
household cleaners, such as glass cleaner. When using any cleaner be careful not to get any into the
interior of the thermostat. Do not spray any cleaner directly onto the thermostat. Spray the cleaner onto
a soft cloth and wipe the surface of the thermostat.
– 11 –
110-964B
7/12/01
9:14 AM
Page 14
Limited Warranty
Your Research Products Corporation Aprilaire® Thermostat unit is expressly warranted for two (2) years from date of
installation to be free from defects in materials and workmanship.
Research Products Corporation’s exclusive obligation under this warranty shall be to supply, without charge, a
replacement for any thermostat which is found to be defective within a two (2) year period and which is returned, together
with the date of installation, no later than thirty (30) days after said two (2) year period by you to either your original
supplier or to Research Products Corporation, Madison, Wisconsin 53701.
THIS WARRANTY SHALL NOT OBLIGATE RESEARCH PRODUCTS CORPORATION FOR ANY LABOR COSTS AND SHALL
NOT APPLY TO DEFECTS IN WORKMANSHIP OR MATERIALS FURNISHED BY YOUR INSTALLER AS CONTRASTED TO
DEFECTS IN THE THERMOSTAT ITSELF.
IMPLIED WARRANTIES OF MERCHANTABILITY OR FITNESS FOR A PARTICULAR PURPOSE SHALL
BE LIMITED IN DURATION TO THE AFORESAID TWO YEAR PERIOD. RESEARCH PRODUCTS CORPORATION’S
LIABILITY FOR INCIDENTAL OR CONSEQUENTIAL DAMAGES, OTHER THAN DAMAGES FOR PERSONAL INJURIES,
RESULTING FROM ANY BREACH OF THE AFORESAID IMPLIED WARRANTIES OR THE ABOVE LIMITED WARRANTY IS
EXPRESSLY EXCLUDED. THIS LIMITED WARRANTY IS VOID IF DEFECT(S) RESULT FROM FAILURE TO HAVE THIS
THERMOSTAT INSTALLED BY A QUALIFIED HEATING AND AIR CONDITIONING CONTRACTOR. IF THE LIMITED
WARRANTY IS VOID DUE TO FAILURE TO USE A QUALIFIED CONTRACTOR, ALL DISCLAIMERS OF IMPLIED
WARRANTIES SHALL BE EFFECTIVE UPON INSTALLATION.
Some states do not allow limitations on how long an implied warranty lasts or the exclusion or limitation of incidental or
consequential damages, so the above exclusion or limitations may not apply to you.
This warranty gives you specific legal rights and you may also have other rights which vary from state
to state.
– 12 –
110-964B
7/12/01
9:14 AM
Page 15
Notes
– 13 –
110-964B
7/12/01
9:14 AM
Page 16
The Aprilaire® Total Indoor Air Comfort System is an integrated group of air quality enhancement
products designed to work with your heating and cooling system to make your home more comfortable.
For the best in indoor air quality, ask your heating and cooling contractor about these fine
Aprilaire products, or visit us at www.aprilaire.com for your Indoor Air Solutions.
Automatic Humidifier
High Efficiency Air Cleaner
Fresh Air Exchanger
The Best Cure For Dryness®
Nobody Makes Clean Air Easier ®
Only The Freshest Homes Have April Air™
The world’s first computer-equipped,
completely automatic humidifier.
The economical, trouble-free, high
efficiency air cleaner for your home.
Your best value for a constant, controlled
supply of fresh air with energy-recovery.
Zone Control System
Electronic Thermostat
Custom Comfort Throughout Your Home®
Energy Efficiency Never Looked So Good™
The most reliable way to achieve temperature
control in every area of your home.
Ultra-thin, easy-to-use programmable or digital
controls featuring pinpoint accuracy.
P.O. BOX 1467 • MADISON, WI 53701-1467
Products For Better Indoor Air Quality ™
B2202212
REV. 04/01
110-964B