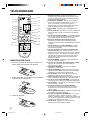
1
¨
For model:
AV-14F703
COLOR TELEVISION
USER'S GUIDE
TV CATV VCR DVD
POWER
STANDARD
INPUT
1
2
BBE
4
5
DISPLAY
7
8
9
0
RETURN
SLEEP TIMER
C.C.
3
6
LIGHT
AUDIO SELECT
RM-C309G
ENTER
MUTING
CH
VOL
VOL
CH
MENU
EXIT
Ð VCR CHANNEL +
PREV NEXT
REW
REC
VCR/DVD
POWER TV/VCR
PLAY
FF
STOP
OPEN/CLOSE
PAUSE
STILL/PAUSE
TV
IMPORTANT NOTE TO THE CUSTOMER:
In the space below, enter the serial number for your
television (located on the rear of the television cabinet).
Staple your sales receipt or invoice to the inside cover of this guide.
Keep this user's guide in a convenient place for future reference.
Keep the carton and original packaging for future use.
Serial Number
3L00501A E Cover
1
27/3/2002, 17:07
The lightning flash with arrowhead symbol, within an equilateral triangle
is intended to alert the user to the presence of uninsulated dangerous
voltage within the product's enclosure that may be of sufficient magnitude to constitute a risk of electric shock.
CAUTION: TO REDUCE THE RISK OF
ELECTRIC SHOCK, DO NOT REMOVE
COVER (OR BACK). NO USER-SERVICEABLE
PARTS INSIDE. REFER SERVICING TO
QUALIFIED SERVICE PERSONNEL.
The exclamation point within an equilateral triangle is intended to
alert the user to the presence of important operating and maintenance (servicing) instructions in the literature accompanying the
appliance.
CAUTION: Changes or modifications not expressly approved by the party responsible for compliance with the FCC
Rules could void the user's authority to operate this equipment.
WARNING:
CAUTION:
TO PREVENT FIRE OR SHOCK HAZARD, DO NOT EXPOSE THIS APPLIANCE TO RAIN OR MOISTURE.
TO PREVENT ELECTRIC SHOCK DO NOT USE THIS POLARIZED PLUG WITH AN EXTENSION CORD,
RECEPTACLE OR OTHER OUTLET UNLESS THE BLADES CAN BE FULLY INSERTED TO PREVENT
BLADE EXPOSURE.
IMPORTANT SAFEGUARDS
1. READ INSTRUCTIONS
All the safety and operating instructions should be read before the unit is operated.
2. RETAIN INSTRUCTIONS
The safety and operating instructions should be retained for future reference.
3. HEED WARNINGS
All warnings on the unit and in the operating instructions should be adhered to.
4. FOLLOW INSTRUCTIONS
All operating and use instructions should be followed.
5. CLEANING
Unplug this unit from the wall outlet before cleaning. Do not use liquid cleaners or aerosol cleaners. Use a damp cloth for cleaning
the exterior cabinet only.
6. ATTACHMENTS
The manufacturer of this unit does not make any recommendations for attachments, as they may cause hazards.
7. WATER AND MOISTURE
Do not use this unit near water. For example, near a bathtub, washbowl, kitchen sink, laundry tub, in a wet basement, or near a
swimming pool.
PORTABLE CART WARNING
(symbol provided by RETAC)
8. ACCESSORIES
Do not place this unit on an unstable cart, stand, tripod, bracket, or table.
The unit may fall, causing serious injury, and serious damage to the unit.
8A. An appliance and cart combination should be moved with care. Quick stops, excessive
force, and uneven surfaces may cause the appliance and cart combination to overturn.
S3126A
9. VENTILATION
Slots and openings in the cabinet back or bottom are provided for ventilation, and to ensure reliable operation of the unit, and to
protect it from overheating. These openings must not be blocked or covered. The openings should never be blocked by placing
the unit on a bed, sofa, rug, or other similar surface. This unit should never be placed near or over a radiator or heat source.
This unit should not be placed in a built-in installations such as a bookcase or rack unless proper ventilation is provided or the
manufacturer's instructions have been adhered to.
10. POWER SOURCE
This unit should be operated only from the type of power source indicated on the rating plate. If you are not sure of the type of
power supply to your home, consult your appliance dealer or local power company. For units intended to operate from battery
power, or other sources, refer to the operating instructions.
11. GROUNDING OR POLARIZATION
This unit is equipped with a polarized alternating-current line plug (a plug having one blade wider than the other). This plug will fit
into the power outlet only one way. This is a safety feature. If you are unable to insert the plug fully into the outlet, try reversing
the plug. If the plug should still fail to fit, contact your electrician to replace your obsolete outlet. Do not defeat the safety purpose
of the polarized plug, if your unit is equipped with a 3-wire grounding-type plug, a plug having a third (grounding) pin. This plug
will only fit into a grounding-type power outlet. This too, is a safety feature. If you are unable to insert the plug into the outlet,
contacts your electrician to replace your obsolete outlet. Do not defeat the safety purpose of the grounding-type plug.
12. POWER-CORD PROTECTION
Power-supply cords should be routed so that they are not likely to be walked on or pinched by items placed upon or against
them, paying particular attention to cords at plugs, convenience receptacles, and the point where they exit from the appliance.
2
3L00501A E/01-13
2
27/3/2002, 17:07
13. LIGHTNING
To protect your unit during a lightning storm, or when it is left unattended and unused for long periods of time, unplug it from the
wall outlet and disconnect the antenna or cable system. This will prevent damage to the unit due to lightning and power line
surges.
14. POWER LINES
An outside antenna system should not be located in the vicinity of overhead power lines or other electric light or power circuits,
or where it can fall into such power lines or circuits. When installing an outside antenna system, extreme care should be taken
to keep from touching such power lines or circuits, as contact with them might be fatal.
15. OVERLOADING
Do not overload wall outlets and extension cords as this can result in a risk of fire or electric shock.
16. OBJECT AND LIQUID ENTRY
Do not push objects through any openings in this unit, as they may touch dangerous voltage points or short out parts that could
result in fire or electric shock. Never spill or spray any type of liquid into the unit.
17. OUTDOOR ANTENNA GROUNDING
If an outside antenna or cable system is connected to the unit, be sure the antenna or cable system is grounded to provide
some protection against voltage surges and built-up static charges, Section 810 of the National Electrical Code, ANSI/NFPA
70, provides information with respect to proper grounding of the mast and supporting structure, grounding of the lead-in wire to
an antenna discharge unit, size of grounding conductors, location of antenna discharge unit, connection to grounding electrodes, and requirements for the grounding electrode.
18. SERVICING
Do not attempt to service this unit yourself as opening or removing covers may expose you to dangerous voltage or other
hazards. Refer all servicing to qualified service personnel.
19. DAMAGE REQUIRING SERVICE
Unplug this unit from the wall outlet and refer servicing to qualified service personnel under the following conditions:
a. When the power-supply cord or plug is damaged.
b. If liquid has been spilled, or objects have fallen into the unit.
c . If the unit has been exposed to rain or water.
d. If the unit does not operate normally by following the operating instructions. Adjust only those controls that are covered by
the operating instructions, as an improper adjustment of other controls may result in damage and will often require
extensive work by a qualified technician to restore the unit to its normal operation.
e. If the unit has been dropped or the cabinet has been damaged.
f . When the unit exhibits a distinct change in performance, this indicates a need for service.
20. REPLACEMENT PARTS
When replacement parts are required, be sure the service technician uses replacement parts specified by the manufacturer or
those that have the same characteristics as the original part.
Unauthorized substitutions may result in fire, electric shock or other hazards.
21. SAFETY CHECK
Upon completion of any service or repairs to this unit, ask the service technician to perform safety checks to determine that the
unit is in proper operating condition.
22. HEAT
The product should be situated away from heat sources such as radiators, heat registers, stoves, or other products (including
amplifiers) that produce heat.
23. NOTE TO CATV SYSTEM INSTALLER
This reminder is provided to call the CATV system installer's attention to Article 820-40 of the NEC that provides guidelines for
proper grounding and, in particular, specifies that the cable ground shall be connected to the grounding system of the building,
as close to the point of cable entry as practical.
EXAMPLE OF ANTENNA GROUNDING AS PER THE NATIONAL ELECTRICAL CODE
ANTENNA LEAD IN WIRE
GROUND CLAMP
ANTENNA DISCHARGE UNIT (NEC
SECTION 810-20)
ELECTRIC
SERVICE
EQUIPMENT
GROUNDING CONDUCTORS (NEC SECTION
810-21)
GROUND CLAMPS
NEC-NATIONAL ELECTRICAL CODE
S2898A
POWER SERVICE GROUNDING ELECTRODE
SYSTEM (NEC ART 250, PART H)
3
3L00501A E/01-13
3
27/3/2002, 17:07
IMPORTANT RECYCLING INFORMATION
This product utilizes both a Cathode Ray Tube (CRT) and other components that contain lead. Disposal of these materials may be regulated in your community due to environmental considerations. For
disposal or recycling information, please contact your local athorities, or the Electronic Industries Alliance: http://www.eiae.org
TABLE OF CONTENTS
FEATURES ......................................................... 4
LOCATION OF CONTROLS ............................... 5
REMOTE CONTROL .......................................... 6
ANTENNA/CATV CONNECTIONS ................... 11
CONNECTION TO OTHER EQUIPMENT ........ 12
SETTING LANGUAGE ...................................... 13
SETTING CLOCK ............................................. 13
TO MEMORIZE CHANNES .............................. 14
SETTING V-CHIP ............................................. 15
TV BASIC OPERATION .................................... 17
INPUT button .................................................... 18
STEREO AND SEPARATE AUDIO
PROGRAM (SAP) ............................. 18
DISPLAY button ................................................ 18
PICTURE ADJUSTMENTS ............................... 19
SOUND ADJUSTMENTS .................................. 19
CLOSED CAPTION .......................................... 20
ON/OFF TIMER ................................................ 21
BBE ................................................................... 22
SLEEP TIMER button ....................................... 22
VCR buttons ...................................................... 22
DVD buttons ...................................................... 22
TV/CATV swich ................................................. 22
VCR/DVD swich ................................................ 22
TROUBLESHOOTING GUIDE .......................... 23
SPECIFICATIONS .............................. Back Cover
FEATURES
• Flat Picture Tube - It reduces the influence of surrounding light resulting in outstanding image detail and clarity.
• 181 Channel Tuner - The tuning system is capable of receiving all 68 VHF/UHF standard broadcast channels that are available in
your area. When operating on a cable system, it can tune to the standard VHF channel frequencies plus up to 113 cable channel
frequencies. The actual number of channels received depends upon channel reception in your area or your cable system.
• On-Screen 3 Language Display - Consists of channel, sleep timer, volume level, muting, text/caption indicators and picture
control adjustments. These can be displayed in English, Spanish or French.
• ON/OFF Timer - Allows you to automatically turn on or off your TV at a set time.
• Sleep Timer - Operable from the remote control, this TV can be programmed up to 120 minutes to turn off automatically.
• V-Chip - The V-Chip function can read the rating of a TV program or movie content if the program is encoded with this
information. The V-Chip will allow you to set a restriction level.
• Picture Control Adjustments - The On-Screen display allows precise remote control adjustment of BRIGHTNESS, COLOR,
CONTRAST, SHARPNESS, TINT and COMPONENT.
• Closed Captioned Decoder - Displays text captions or 1/2 of full screen text on the screen for hearing impaired viewers.
• Stereo/SAP Reception - This TV is designed to receive stereo and separate audio program (SAP) broadcasts where available.
• BBE- BBE gives you the vivid sound with so much presence.
• Video Input Jacks - This unit is equipped 3 types of video input jacks. The component video in jacks and S-video in jack enable
you to watch the DVD player or the video devices with high quality picture.
• Remote Control - You can operate your VCR, Cable Box, Satellite Dish and DVD after you have registered the 3-digit codes for
their brand name.
4
3L00501A E/01-13
4
27/3/2002, 17:07
LOCATION OF CONTROLS
FRONT
BACK
IN
OUT
Y
ANT(75)
VIDEO
VIDEO
PB
L/MONO
S-VIDEO AUDIO
PR
R
VIDEO 1
VIDEO 2
L/MONO
AUDIO
R
8 9 10 11
12
VIDEO 3 IN
ON TIMER
POWER
CHANNEL
VOLUME
VIDEO L/MONO
1
2 3
4
5
6
AUDIO
R
7
1. POWER Button - Press to turn the TV on or off.
2. Remote Sensor - Signals from the Remote
Control unit are received here.
3. ON TIMER Indicator - This indicator lights up
when the powered up. It also lights up when ON
TIMER program is turned ON while power is OFF.
4. CHANNEL +/– Buttons - Press to select a higher
or lower numbered channel set into memory.
5. VOLUME +/– Buttons - Press to raise or lower the
volume of the sound.
6. VIDEO 3 IN Jacks (Front) - Audio and video signal
cables from an external source can be connected
here.
7. HEADPHONES JACK - Plug an earphone or headphones with an 1/8 miniplug into this jack for listening.
8. VHF/UHF IN (ANT) Jack - Connect a VHF/UHF
antenna or CATV cable to this jack.
9. VIDEO 1 IN Jacks (Rear) - Audio and video signal
cables from an external source (ex. VCR) can be
connected here. If your video device has S-video out
jack, connect to S-video in jack.
10. VIDEO 2 IN Jacks - Audio and video signal cables
from an external source (ex. DVD) can be connected
here.
If you have a DVD with component video out jacks,
connect to the component video in jacks. If you have
a video device without the component video out,
connect to video in jack.
11. REAR AUDIO (L / R) /VIDEO OUT Jacks - Used to
output audio and video signals to a TV, amplifier or
VCR.
NOTE: This video out jack does not output the signal
from component video in jacks.
12. AC Power Cord - Connect to a 120V, 60Hz outlet.
5
3L00501A E/01-13
5
27/3/2002, 17:07
REMOTE CONTROL
TV CATV VCR DVD
POWER
11
1
STANDARD
2
3
4
5
INPUT
1
2
3
BBE
4
5
6
DISPLAY
7
8
9
0
RETURN
SLEEP TIMER
C.C. AUDIO SELECT
6
7
8
LIGHT
12
13
14
15
16
RM-C309G
MUTING
ENTER
+
CH
VOL
+
VOL
17
18
CH
9
10
MENU
EXIT
VCR CHANNEL
PREV NEXT
REW
REC
VCR /DVD
POWER TV/VCR
PLAY
19
20
FF
STOP PAUSE
STILL/PAUSE
OPEN/CLOSE
TV
BATTERY INSTALLATION
1. Slide the battery compartment cover in the direction
of the arrow.
2. Install two “AA” (penlight size) batteries, paying
attention to the polarity diagram in the battery
compartment.
3. Replace the compartment cover.
1. TV/CATV Switch - Used to select the TV or Cable
Box to be operated. (You can operate your cable box
after you have programed the remote control.)
2. VCR/DVD switch - Used to select the VCR or DVD
to be operated. (You can operate your VCR or DVD
after you have programed the remote control.)
3. BBE Button - Press to turn BBE On or Off.
4. DISPLAY Button - Displays the current status time,
channel (or Input), the present settings on the TV
screen.
5. SLEEP TIMER Button - Sets the TV to turn off
automatically after up to 120 minutes.
6. C.C. (Closed Caption) Button - Switches between
Caption, Text and TV modes for Closed-Captioned
programs.
7. MUTING Button - Press to turn off the sound. Press
again to turn the sound back on.
8. CH +/– Buttons - Press the + button to change to a
higher numbered channel set into memory. Press the
– button to change to a lower numbered channel set
into memory. Press to select the desired item during
On-Screen operations.
9. MENU Button - Press to display the On-Screen
menu function.
10. VCR or DVD Operation Buttons - Press to operate
your VCR or DVD.
11. POWER Button - Press to turn the TV on or off.
12. STANDARD Button - Press to reset the On-Screen
picture adjustments or Audio adjustment to their
factory preset positions.
13. INPUT Button - Switches between the TV and
external input sources.
14. 10-key pad - Allows direct access to any channel of
the TV, VCR or Cable box.
15. RETURN Button - Switches between the present
channel and the last channel selected.
16. LIGHT Button - Press to turn the illumination on for
CH +/– and VOL +/– buttons.
17. AUDIO SELECT Button - Switches sound between
mono and stereo, and SAP when receiving broadcasts in stereo or SAP.
18. ENTER Button - Press to enter selected setup.
19. VOL +/– Buttons - Press the + button to increase, or
the – button to decrease the volume level. Press to
select the desired setting or arrangement during OnScreen operations.
20. EXIT Button - Press to exit the On-Screen menu
function.
6
3L00501A E/01-13
6
27/3/2002, 17:07
REMOTE CONTROL BASICS
BATTERY PRECAUTIONS
• Before you can operate the remote control, you must
first install the batteries (included). See “Changing the
Batteries” on this page above for instructions. (For an
illustration, please see page 6.)
• Press the POWER button to turn the television on or
off.
• Make sure the TV/CATV switch is set to TV. Move the
switch to
CATV only if you need to operate a cable box.
• Slide the VCR/DVD selector switch to VCR to control
a VCR, slide to DVD to control a DVD player. Please
see pages 8 to 10 for instructions on programming
your remote control to operate a Cable box, VCR or
DVD player.
• Press the CH + and CH – buttons to scan through the
channels. Tap the CH + or CH – button to move
through the channels one channel at a time.
• Press VOL + or VOL – to raise or lower the volume.
An indicator bar will appear onscreen to show you the
television volume level.
• The CH +/– and VOL +/– buttons are also used to
navigate JVC’s onscreen menu system.
• You can directly access specific channels using the
10-key pad.
• This remote includes illuminated buttons for key
features like CH +/– buttons, and VOL +/– buttons.
Press the LIGHT button to turn the illumination on.
The precautions below should be followed when using
batteries in this device:
1. Use only the size and type of batteries specified.
2. Be sure to follow the correct polarity when installing
the batteries as indicated in the battery compartment.
Reversed batteries may cause damage to the device.
To avoid a potential short circuit, insert the “–” end
first.
3. Do not mix different types of batteries together (e.g.
Alkaline and Carbon-zinc) or old batteries with fresh
ones.
4. If the device is not to be used for a long period of time,
remove the batteries to prevent damage or injury from
possible battery leakage.
5. Do not try to recharge batteries not intended to be
recharged; they can overheat and rupture. (Follow
battery manufacturer’s directions.)
6. When you change the batteries, try to complete the
task within three minutes. If you take longer than three
minutes, the remote control codes for your Cable Box
may have to be reset (see page 8).
EFFECTIVE DISTANCE OF THE REMOTE
CONTROL TRANSMITTER
CHANGING THE BATTERIES
Push down on the remote’s back cover and slide
towards the bottom to remove it.
Insert two AA batteries (supplied), carefully noting the
“+” and “–” markings on the batteries and on the remote
control. To avoid a potential short circuit, insert the “–”
end first.
Be sure to use only size AA batteries.
When batteries are installed, slide the cover back into
place (until it clicks into position).
• If the remote control acts erratically, replace the
batteries. Typical battery life is six months to one year.
We recommend using alkaline batteries for longer
battery life.
When you change the batteries, try to complete the
task within three minutes. If you take longer than three
minutes, the remote control codes for your VCR, DVD,
and/or Cable Box may have to be reset (pages 8-10).
15 FEET
30˚
30˚
NOTES: • When there is an obstacle between the TV
and the transmitter, the transmitter may not
operate.
• When direct sunlight, an incandescent lamp,
fluorescent lamp or any other strong light
shines on the Remote sensor of the TV, the
remote operation may be unstable.
7
3L00501A E/01-13
7
1/4/2002, 8:17
REMOTE CONTROL
(CONTINUED)
REMOTE PROGRAMMING
Setting the CATV, VCR and DVD Codes
You can program your remote to operate your cable box, satellite receiver, VCR or DVD player by using the
instructions and codes listed below. If the equipment does not respond to any of the codes listed below or to the
code search function, use the remote control supplied by the manufacturer.
Cable Box or Satellite setup
The remote control is programmed with CATV and/or Satellite codes for power on, power off, channel up, channel
down, and 10 key operation.
1) Find the CATV/Satellite brand from the list of codes shown below.
2) Slide the 2-way selector switch to “CATV ”.
3) Press and hold down the DISPLAY button.
4) With the DISPLAY button held down, enter the first code number listed using the 10 key pad.
5) Release the DISPLAY button.
6) Confirm the operation of the Cable Box/Satellite receiver.
• If your CATV or Satellite box does not respond to the first code, try the others listed. If it does not respond to any
code, try the Search Codes Function as shown below.
Cable Box
CODES
Cable Box
CODES
ABC
Archer
Cableview
Citizen
Curtis
Diamond
Eagle
Eastern
GC Brand
Gemini
General Instrument
Hamlin
Hitachi
Jerrold
Macom
Magnavox
Memorex
Movietime
Oak
Panasonic
Paragon
Philips
Pioneer
024
032, 025
051, 032
022, 051
058, 059
024, 032, 025
029
034
032, 051
022, 043
065, 024, 025, 026, 027, 020, 021, 022, 057, 023
040, 041, 042, 045, 058, 064
049, 024
065, 024, 025, 026, 027, 020,021, 022, 057, 023
049, 050, 051, 054
033
030
032, 051
039, 037, 048
055, 056, 060, 071
063
028, 029, 030, 052, 053, 031, 069
047, 062
Pulsar
Puser
RCA
Realistic
Regal
Regency
Rembrandt
Samsung
Scientific Atlanta
SLMark
Sprucer
Stargate
Telecaption
Teleview
Texscan
Tocom
Toshiba
Unika
Universal
Videoway
Viewstar
Zenith
Zenith/Drake Satellite
051, 032
032
061, 070
032
058, 064, 040, 041, 042, 045, 068
034
037, 032, 051, 038
051
057, 058, 059
051, 047
051, 056
032, 051
067
047, 051
044
035, 036, 066
050
032, 025
022, 032
052
029, 030
063, 046
046
Digital Satellite
Systems
CODES
Digital Satellite
Systems
CODES
Echostar
Express VU
G.E.
G.I.
Gradiente
Hitachi
HNS (Hughes)
Pranasonic
100, 113, 114
100, 113
106
108
112
104, 111
104
105
Philips
Primestar
Proscan
RCA
Sony
Star Choice
Toshiba
Uniden
102, 103
108
106, 109, 110
106, 109, 110
107
104, 108
101
102, 103
Cable/Satellite Search Codes Function:
1)
2)
3)
4)
Slide the 2-Way Mode Selector switch to CATV.
Press the TV POWER and RETURN buttons. Hold for at least three seconds and release.
Press TV POWER, see if the CATV or Satellite box responds.
If there was a response, press RETURN. The operating codes are now set. If there was no response, repeat Step 3.
If you repeat Step 3 a total of 52 times without a response, use the remote control which came with the equipment.
5) Press RETURN to exit.
8
3L00501A E/01-13
8
27/3/2002, 17:07
VCR setup
The remote control is programmed with VCR codes for power on, power off, play, stop, fast-forward, rewind, pause,
record, channel up, and channel down operation.
1) Find the VCR brand from the list of codes shown below.
2) Slide the first 2-way selector switch to “TV ”and the other 2-way selector switch to “VCR ”.
3) Press and hold down the DISPLAY button.
4) With the DISPLAY button held down, enter the first code number listed with the 10 key pad.
5) Release the DISPLAY button.
6) Confirm the operation of the VCR.
• If your VCR does not respond to the first code, try the others listed. If it does not respond to any code, try the
Search Codes Function as shown below.
• Some manufacturer’s VCR’s may not respond to the TV/VCR button, even if other buttons work properly.
• To record, hold down the REC button on the remote and press PLAY.
VCRs
CODES
VCRs
CODES
Admiral
Aiwa
Akai
Audio Dynamic
Bell & Howell
Broksonic
Canon
CCE
Citizen
Craig
Curtis Mathes
Daewoo
DBX
Dimensia
Emerson
Fisher
Funai
G.E.
Go Video
Goldstar
Gradiente
Hitachi
Instant Replay
Jensen
JVC
Kenwood
LXI
Magnavox
Marantz
Marta
Memorex
MGA
Minolta
Mitsubishi
Multitech
NEC
Olympic
035
027, 032, 095
029, 072, 073, 074
003, 005
063, 071
020, 026, 094
023, 025
043
064
063, 029, 064
045, 024, 027, 093
043, 059, 024, 092
003, 004, 005
045, 093
043, 026, 077, 061, 025, 042, 020, 076
063, 066, 067, 065, 071, 091
027, 026, 020, 000
033, 045, 024
037, 051, 049, 050, 089
064
083, 084, 081, 000, 001
023, 045, 058, 027, 081, 093
024, 023
003
000, 001, 002, 003, 004, 005
003, 004, 064, 005
027, 064, 058, 065, 066, 063, 067
031, 023, 024, 086
003, 004, 005
064
024, 067
038, 040, 047, 048, 041, 042
058, 045, 093
038, 040, 047, 048, 041, 042, 078, 090
047, 027, 062
003, 004, 005, 000
024, 023
Optimus
Orion
Panasonic
Penney
Pentax
Philco
Philips
Pioneer
Proscan
Quasar
Radio Shack
RCA
Realistic
Samsung
Samtron
Sansui
Sanyo
Scott
Sears
Shintom
Sharp
Signature 2000
Singer
Sony
SV 2000
Sylvania
Symphonic
Tashiro
Tatung
Teac
Technics
Teknika
Toshiba
Vector Research
Wards
Yamaha
Zenith
028, 021, 035, 064
026, 020
023, 024, 021, 022
024, 058, 045, 063, 003, 004, 005, 093
058, 005, 045, 093
031, 024, 027, 023, 026, 020, 043
031, 023, 024, 086
023
045, 058, 023, 024, 031, 046, 059, 060, 033, 087, 093
021, 022, 023, 024
033, 024, 063, 036, 067, 040, 027
033,045,058,023,024,031,046,059,060,083,084,085,087,093
024, 063, 036, 067, 040, 027
037, 060, 062,033, 089
089
003, 026, 020, 052
063, 067, 091, 071
059, 060, 062, 067, 038, 040, 047, 048, 026, 020
063, 064, 065, 066, 058, 000, 001
075
035, 036, 080,088
027, 035
075
028, 029, 030, 053, 054, 055
027
031, 023, 024, 027
027, 081
064
003, 004, 005
003, 004, 027, 005
021, 022, 023, 024
024, 027, 070
059, 046, 079
005
035, 036, 067, 044, 064
063, 003, 004, 005
044, 082, 064, 094
VCR Search Codes Function:
1) Slide the first 2-way selector switch to “TV ” and the other 2-way selector switch to “VCR ”.
2) Press the VCR POWER and RETURN buttons. Hold for at least three seconds and release.
3) Press VCR POWER, see if the VCR responds.
4) If there was a response, press RETURN. The operating codes are now set. If there was no response, repeat Step 3.
If you repeat Step 3 a total of 80 times without a response, use the manufacturers remote control which came
with the VCR.
5) Press RETURN to exit.
9
3L00501A E/01-13
9
27/3/2002, 17:07
REMOTE CONTROL
(CONTINUED)
DVD setup
The remote control is programmed with DVD codes for power on, power off, play, stop, fast-forward, rewind, previous
chapter, next chapter, tray open/close, and still/pause operation.
1) Find the DVD player brand from the list of codes shown below.
2) Slide the first 2-way selector switch to “TV ” and the other 2-way selector switch to “DVD ”.
3) Press and hold down the DISPLAY button.
4) With the DISPLAY button held down, enter the first code number listed with the 10 key pad.
5) Release the DISPLAY button.
6) Confirm the operation of the DVD player.
• If your DVD player does not respond to the first code, try the others listed. If it does not respond to any code, try
the Search Codes Function as shown below.
• After you program your remote, some DVD buttons may not work properly. If some buttons do not work
properly, use the remote control which came with your DVD player.
DVD Player
CODES
DVD Player
CODES
Aiwa
Apex
Denon
Hitachi
JVC
Kenwood
Konka
Mitsubishi
Onkyo
Oritron
Panasonic
Philips
Pioneer
043
040
020, 037
030, 031
000
035
039
025
041
044
020
023, 036
022
Raite
RCA
Sampo
Samsung
Sharp
Silvania
Sony
Technics
Toshiba
Wave
Yamaha
Zenith
033
021, 026
034
030
028
038
024, 045, 046, 047
020
023
042
020
027, 032
DVD Player Search Codes Function:
1) Slide the first 2-way selector switch to “TV ” and the other 2-way selector switch to “DVD ”.
2) Press the DVD POWER and RETURN buttons. Hold for at least three seconds and release.
3) Press DVD POWER, see if the DVD player responds.
4) If there was a response, press RETURN. The operating codes are now set. If there was no response, repeat Step 3.
If you repeat Step 3 a total of 30 times without a response, use the manufacturers remote control which came with
the DVD player.
5) Press RETURN to exit.
10
3L00501A E/01-13
10
27/3/2002, 17:07
ANTENNA/CATV CONNECTIONS
Combination VHF/UHF Antenna
This television has an
extended tuning range and
can tune most cable channels
without using a cable
company supplied converter
box. Some cable companies
offer "premium pay channels"
in which the signal is
scrambled. Descrambling
these signals for normal
viewing requires the use of a
descrambler device which is
generally provided by the
cable company.
Single 75 ohm Cable
300 ohm Twin-lead Wire
Take off the Splitter
Splitter
UHF Antenna
300-75 ohm
Matching Transformer
(not supplied)
300 ohm Twin-lead Wire
IN
OUT
Y
ANT(75)
VIDEO
VIDEO
L/MONO
S-VIDEO AUDIO
PB
PR
R
VIDEO 1
VIDEO 2
L/MONO
AUDIO
R
VHF Antenna
Single 75 ohm Cable
Separate VHF/UHF Antennas
300 ohm Twin-lead Wire
Combiner
(not supplied)
300-75 ohm
Matching Transformer
(not supplied)
Incoming CATV
Connect the 75 ohm Cable from the VHF antenna and the UHF
antenna Twin-lead to a combiner (not supplied). Attach the
Combiner to the Antenna Jack.
NOTE:If your VHF antenna has a Twin-lead Wire, use the 30075 ohm Matching Transformer (not supplied), then connect the
Transformer to the Combiner.
For Subscribers to Basic Cable TV Service
For basic cable service not requiring a Converter/Descrambler
box, connect the CATV 75 ohm Coaxial Cable directly to the
Antenna Jack on the back of the television.
Converter/Descrambler
Converter/Descrambler
Splitter
A/B Switch
A B
Combination VHF/UHF Antenna (Single 75 ohm
Cable or 300 ohm Twin-lead Wire)
Connect the 75 ohm cable from a combination VHF/UHF
antenna to the Antenna Jack. If your combination antenna has
a 300 ohm Twin-lead Wire, use the 300-75 ohm Matching
Transformer (not supplied).
Combination VHF/UHF Antenna (Separate VHF and
UHF 300 ohm Twin-leads)
Connect the UHF Twin-lead Wire to a Combiner (not supplied).
Connect the VHF Twin-lead to the 300-75 ohm Matching
Transformer (not supplied). Attach the Transformer to the
Combiner. Attach the Combiner to the Antenna Jack.
For Subscribers to Scrambled Cable TV Service
If you subscribe to a cable service which requires the use of a
Converter/Descrambler box, connect the incoming cable to the
Converter/Descrambler box and connect the output of the box
to the Antenna Jack on the back of the television. Follow the
connections shown left. Set the television to the output of the
Converter/Descrambler box (usually channel 3 or 4) and use
the Converter/Descrambler box to select channels.
For Subscribers to Unscrambled Basic Cable with
Scrambled Premium Channels
If you subscribe to a cable service in which basic cable
channels are unscrambled and premium channels require the
use of a Converter/Descrambler box, you may wish to use a
two-set signal splitter (sometimes called a "two-set coupler")
and an A/B Switch box from the cable installer or an electronics
supply store. Follow the connections shown left. With the switch
in the "B" position, you can directly tune any nonscrambled
channels on your TV. With the switch in the "A" position, tune
your TV to the output of the Converter/Descrambler box (usually
channel 3 or 4) and use the box to tune scrambled channels.
11
3L00501A E/01-13
11
27/3/2002, 17:07
CONNECTION TO OTHER EQUIPMENT
The exact arrangement you use to interconnect various video and audio components to the TV is dependent on the model
and features of each component. Check the User’s Guide provided with each component for the location of video and audio
inputs and outputs.
The connection diagrams in the following are offered as suggestions. You may need to modify them to accommodate your
particular assortment of components. The diagrams are intended to show component video and audio interconnections only.
Press the INPUT button to select the AV mode to use the TV as a monitor.
Operate your VCR as usual.
TV/AV SELECTION
If you connect the TV to VCR, camcorder, TV game or DVD you can select by pressing the INPUT button.
Press the INPUT button repeatedly to select the desired
mode.
TV
VIDEO 1
COMPONENT
VIDEO 2
VIDEO 1
VIDEO 3
An indication of input source will display
on the screen for 4 seconds.
3. To connect the TV to a camcorder
To playback from the camcorder, connect the camcorder
to the TV as shown.
1. To connect the TV to a VCR
(ex. Use VIDEO 1 IN jacks to connect it.)
Rear of TV
VIDEO
VCR
IN
Front of TV
OUT
Y
AUDIO (L)
VIDEO
VIDEO
PB
L/MONO
AUDIO
R
To Audio(L/R)/
Video OUT
PR
VIDEO 1
VIDEO 2
VIDEO 3 IN
L/MONO
AUDIO
VIDEO
R
VIDEO
To Audio(L/R)/
Video OUT
AUDIO (R)
R
AUDIO (R)
• Select “VIDEO 1” by pressing the INPUT button to
display the VCR picture.
2. To connect the TV to a VCR with an S-VIDEO jack
If you connect a VCR with an S-video jack to the SVIDEO jack on the rear of TV, you must also connect the
audio cables to the AUDIO IN (VIDEO 1) jacks on the
rear of the TV. The S-video cable only carries the video
signal. Audio signal is separate.
AUDIO (L)
• Select “VIDEO 3” by pressing the INPUT button to
display the camcorder picture.
4. To connect the TV to a DVD with COMPONENT
VIDEO OUT Jacks.
If you connect a DVD with the COMPONENT VIDEO
OUT jacks to the COMPONENT VIDEO IN (Y, PB, PR)
jacks on the rear of TV, you must also connect the audio
cables to the AUDIO IN (VIDEO 2 IN) jacks on the rear of
the TV.
Rear of TV
IN
Rear of TV
OUT
Y
ANT(75Ω)
VIDEO
VIDEO
L/MONO
L/MONO
S-VIDEO AUDIO
R
VIDEO 1
VIDEO 2
DVD
PB
AUDIO
R
R
NOTE: When the S-video cable and the video cable are
connected to each jack at the same time, the S-video
cable takes precedence over the video cable.
VIDEO 1
PR
VIDEO 2
AUDIO (R)
AUDIO (R)
(Not supplied)
OUT
Y
VIDEO
L/MONO
AUDIO
(Not supplied)
(Not supplied)
(Not supplied)
• Select “COMPONENT” by pressing the INPUT button
to display the DVD picture.
• If you have a DVD without COMPONENT VIDEO OUT
jacks, connect the video cable to VIDEO IN (VIDEO 2
IN) jack. In this case, select “VIDEO 2” by pressing the
INPUT button to display the DVD picture.
12
12
IN
AUDIO (L)
S-VIDEO
3L00501A E/01-13
AUDIO
(not supplied)
(not supplied)
VCR
L/MONO
AUDIO (L)
27/3/2002, 17:07
SETTING LANGUAGE
This TV can display the channel number, on-screen displays and picture adjustments on the screen in English, Spanish or
French.
On-screen language selection (step 3) will automatically appear on the screen when you press the MENU button initially.
Select the language you prefer first, then proceed with the other menu options.
1
Press the MENU button.
2
Press the CH + (▲) or – (▼)
button to select the LANGUAGE
mode, then press the ENTER
button.
MENU
CLOCK SET
ON/OFF TIMER
CH SET-UP
PICTURE
AUDIO
LANGUAGE / IDIOMA / LANGUE
V-CHIP SET
▲ / ▼ / ENTER / MENU / EXIT
3
Press the CH + (▲) or – (▼)
button until the " " indicator
points to the desired language:
English (ENGLISH), Spanish
(ESPAÑOL) or French
(FRANCAIS), then press the
ENTER button.
LANGUAGE / IDIOMA / LANGUE
▲ / ▼ / ENTER / MENU / EXIT
4 Press the EXIT button.
NOTE:
If Spanish or French is chosen, the Closed Caption indicators will be in the selected language, but the Closed Caption text
will not be affected by the language selection.
SETTING CLOCK
You must set the time manually for DISPLAY and ON/OFF TIMER.
1
Press the MENU button.
4
2
Press the CH + (▲) or CH –
(▼) button until the indicator
next to "CLOCK SET" begins
to flash, then Press the
ENTER button.
CLOCK SET
10 : 00 AM
MENU
CLOCK SET
ON/OFF TIMER
CH SET-UP
PICTURE
AUDIO
LANGUAGE / IDIOMA / LANGUE
V-CHIP SET
▲ / ▼ / ENTER / MENU / EXIT
▲/▼/
5
3
Press the CH + (▲) or CH – (▼) button to set
the minute.
Press the CH + (▲) or CH –
(▼) button to set the hour,
then press the VOL + ( )
button.
CLOCK SET
12 : 00 AM
▲/▼/
/
/ ENTER / MENU/ EXIT
/
/ ENTER / MENU/ EXIT
Press the EXIT button.
NOTES:
• After a power failure or disconnection of the
power plug, the time display will be lost. In this
case, set present time again.
• When you set the minute, you can change in 10minutes by holding down the CH + (▲) or CH –
(▼) button.
13
3L00501A E/01-13
13
27/3/2002, 17:07
TO MEMORIZE CHANNELS
This TV is equipped with a channel memory feature which
allows channels to skip up or down to the next channel set
into memory, skipping over unwanted channels.
Before selecting channels, they must be programmed into
the TV's memory. In addition to normal VHF and UHF
channels, this TV can receive up to 113 Cable TV channels.
To use this TV with an antenna, set the TV/CATV menu
option to the TV setting. When shipped from the factory, this
menu option is in the CATV setting.
AUTOMATIC CHANNEL MEMORY
TV/CATV SELECTION
1
2
3
4
5
1
Press the MENU button.
2
Press the CH + (▲) or – (▼) button
until the indicator next to "CH SETUP" begins to flash, then press the
ENTER button.
3
Press the CH + (▲) or – (▼) button
until the indicator next to "AUTO CH
MEMORY" begins to flash, then press
the ENTER button. The TV will begin
memorizing all the channels available
in your area.
Press the MENU button.
Press the CH + (▲) or – (▼) button
until the indicator next to "CH SETUP" begins to flash, then press the
ENTER button.
MENU
CLOCK SET
ON/OFF TIMER
CH SET-UP
PICTURE
AUDIO
LANGUAGE / IDIOMA / LANGUE
V-CHIP SET
▲ / ▼ / ENTER / MENU / EXIT
Press the CH + (▲) or – (▼) button
until the indicator next to "TV/CATV"
begins to flash.
Press the VOL + ( ) or – ( ) button
to select the TV or CATV mode. The
arrow indicates the selected mode.
4
▲ / ▼ / ENTER / MENU / EXIT
Press the EXIT button.
CH SET-UP
TV CATV
AUTO CH MEMORY
ADD / DELETE
CH LABEL
▲/▼/
/
1
Press the MENU button.
2
Press the CH + (▲) or – (▼) button
until the indicator next to "CH SETUP" begins to flash, then press the
ENTER button.
3
Press the CH + (▲) or – (▼) button
until the indicator next to "ADD/
DELETE" begins to flash, then press
the ENTER button.
/ MENU / EXIT
NOTE: Contact your cable company to determine the
type of cable system used in your area.
MENU
CLOCK SET
ON/OFF TIMER
CH SET-UP
PICTURE
AUDIO
LANGUAGE / IDIOMA / LANGUE
V-CHIP SET
▲ / ▼ / ENTER / MENU / EXIT
CH SET-UP
TV CATV
AUTO CH MEMORY
ADD / DELETE
CH LABEL
▲ / ▼ / ENTER / MENU / EXIT
4
Select the desired channels to be
added or deleted using the 10-key
pad (0-9) or the CH + or – button.
5
Press the VOL + ( ) or – ( ) button to select ADD or
DELETE.
If an unmemorized channel was selected (step 4), the
channel indication will be red. Press the VOL + ( ) or –
( ) button if you wish to ADD the unmemorized
channel. The channel indicator will change from red to
green when a channel is added and the channel will be
memorized. If a memorized channel was selected (step
4), the channel indication will be green.
Press the VOL + ( ) or – ( ) button if
you wish to DELETE the channel from
memory. The channel indicator will
change from green to red when a
channel is deleted.
Repeat Steps 4 and 5 for each
channel to be added or deleted.
6
ADD
0-9 ▲ / ▼ /
CH 012
/
/ MENU / EXIT
Press the EXIT button after adding or deleting all of the
desired channels, to return to normal TV viewing.
14
14
CH SET-UP
TV CATV
AUTO CH MEMORY
ADD / DELETE
CH LABEL
TO ADD/DELETE CHANNELS
Press the EXIT button.
3L00501A E/14-BACK
MENU
CLOCK SET
ON/OFF TIMER
CH SET-UP
PICTURE
AUDIO
LANGUAGE / IDIOMA / LANGUE
V-CHIP SET
▲ / ▼ / ENTER / MENU / EXIT
27/3/2002, 17:08
TO MEMORIZE CHANNELS
(CONTINUED)
CH LABEL
You can labal every channel up to 4 characters.
Channel labels will appear over the channel number display each time you select a channel.
Press the MENU button.
3
Press the CH + (▲) or – (▼) button until the indicator
next to "CH SET-UP" begins to
MENU
CLOCK SET
flash, then press the ENTER
ON/OFF TIMER
CH SET-UP
button.
PICTURE
Go to step 7 when you select the "SET".
Go to step 9 when you select the "CLEAR".
7
Now the bar for the first space is flashing. Press the
VOL + ( ) or – ( ) button to
CH LABEL : CH 012
enter a character in the first
SET/CLEAR
SET
space. Press the button
LABEL - - - repeatedly until the character
you want appears on the
▲ / ▼ / / /ENTER / MENU / EXIT
screen. Then press the ENTER
button.
▼
2
6
AUDIO
LANGUAGE / IDIOMA / LANGUE
V-CHIP SET
▲ / ▼ / ENTER / MENU / EXIT
4
NOTE:
Press the CH + (▲) or – (▼) button until the indicator
next to "CH LABEL" begins to
flash, then press the ENTER
CH SET-UP
TV CATV
button.
AUTO CH MEMORY
The character will change as below.
–
ADD / DELETE
CH LABEL
Press the VOL + ( ) or – ( ) button to select "SET"
or "CLEAR". Select "SET" in case
CH LABEL : CH 012
you have a channel to label or
SET/CLEAR
SET CLEAR
change. Select "CLEAR" in case
LABEL - - - you have a channel to delete.
Then press the ENTER button.
▼
▲/▼/
•••
SPACE
9
•••
A
+
–
8
Repeat step 7 to enter the rest of the characters
from second to fourth.
9
Press the ENTER button to register.
10 Press the EXIT button.
▼
▼
5
0
Z
▲ / ▼ / ENTER / MENU / EXIT
▼
Select a channel you want to label by pressing
the 10-key pad or CH + or - button.
▼
1
/ /ENTER / MENU / EXIT
SETTING V-CHIP
This TV is fitted with a V-CHIP controller which provides you with channel viewing access controls and restrictions. This
function is to prevent your children from watching violence or sexual scenes that may be harmful.
1
Press the MENU button and
press the CH + (▲) or – (▼)
button to select the V-CHIP SET
option, then press the ENTER
button.
MENU
CLOCK SET
ON/OFF TIMER
CH SET-UP
PICTURE
AUDIO
LANGUAGE / IDIOMA / LANGUE
V-CHIP SET
▲ / ▼ / ENTER / MENU / EXIT
4
Press the CH + (▲) or – (▼)
button to select the V-CHIP
option.
Press the VOL + ( ) or – ( )
button to select the ON.
V-CHIP SET
V-CHIP
US TV RATING
MOVIE RATING
CAN ENG RATING
CAN FRE RATING
CHANGE PASSWORD
▲/▼/
/
: OFF
: OFF
: OFF
: OFF
: OFF
/ MENU / EXIT
Enter your password (4 digits)
V-CHIP SET
using the 10-key pad (0-9). In
NEW
PASSWORD
:
the event of entering incorrect
password press the VOL – ( )
button. Then press the ENTER
0-9/ / ENTER / MENU / EXIT
button.
• After registration of password, step 3 will not
appear.
5
For U.S.
V-CHIP SET
V-CHIP
: ON
Press the CH + (▲) or – (▼)
US TV RATING
: OFF
MOVIE
RATING
: OFF
button to select the US TV RATING
CAN ENG RATING
: OFF
CAN FRE RATING
: OFF
or MOVIE RATING option.
CHANGE PASSWORD
For Canadian
▲ / ▼ / / / MENU / EXIT
Press the CH + (▲) or – (▼)
button to select the CAN ENG RATING or CAN FRE
RATING option.
3
Enter the same password for
confirmation, then press the
ENTER button.
6
Press the VOL + ( ) or – ( )
button to select the desired
rating for the applicable video
or TV channel.
7
Press the EXIT button.
▼
2
V-CHIP SET
CONFIRM
PASSWORD
▼
0-9/
:----
/ ENTER / MENU / EXIT
V-CHIP SET
V-CHIP
: ON
US TV RATING
: TV-14
MOVIE RATING
: OFF
CAN ENG RATING
: OFF
CAN FRE RATING
: OFF
CHANGE PASSWORD
DISPLAY TO SET CONTENTS
▲ / ▼ / / / MENU / EXIT
15
3L00501A E/14-BACK
15
27/3/2002, 17:08
SETTING V-CHIP
(CONTINUED)
for U.S.
TV RATING
MOVIE RATING
VOL – ( )
OFF
TV–Y
VOL + ( )
TV-Y7
TV-PG
TV-G
VOL – ( )
TV-14
TV-MA
TV-Y : all children
TV-PG : parental guidance
TV-Y7 : 7 years old and above TV-14 : 14 years old and above
TV-G : childrens program
TV-MA : 17 years old and above
When you select TV-Y7, TV-PG, TV-14 or TV-MA, press the DISPLAY
button to explain the rating.
Press the CH + (▲) or – (▼) button to select the desired rating you
want. Press the VOL + ( ) or – ( ) button to select the setting ON
or OFF. If you want to back to V-CHIP SET menu, press the MENU
button.
for Canadian
CAN ENG RATING
E
C
C8+
G
PG
14+
18+
E
C
PG-13
G
: all ages
PG
: parental guidance
PG-13 : parental guidance
less than 13 years old
VOL + ( )
C8+
VOL + ( )
PG
R
NC-17
X
: under 17 years old
parental guidance
suggested
NC-17 : 17 years old and above
: adult only
X
R
CAN FRE RATING
VOL – ( )
OFF
G
OFF
G
PG
VOL
14+
: Exempt
: Programming Intended for Children
: Programming Intended for Children 8 and Over
: General Audience
: Parental Guidance
: 14 Years and Older
: Adult
18+
OFF
E
G
+( )
8ans+
VOL
13ans+
–( )
16ans+
18ans+
E
: Exemptées.
G
: Général.
8ans+ : Général-Déconseillé aux jeunes enfants.
13ans+ : Cette émission peut ne pas convenir aux enfants de
moins de 13 ans.
16ans+ : Cette émission ne convient pas aux moins de 16 ans.
18ans+ : Cette émission est réservée aux adultes.
NOTES:
• If you want to change password, follow steps 1 and 2 and select "CHANGE PASSWORD" option then enter your
new password.
• The V-Chip function is activated only on programs and tapes that have the rating signal.
• Once you block a program using the V-Chip function, the blocked program cannot be watched based on the content
of the show. When the program starts, the "IF YOU CANCEL PROTECT, INPUT PASSWORD" will appear on the
screen. When you want to release the V-Chip temporarily, enter the password.
If you change the channel or turn off and on the TV while releasing the V-Chip temporarily, the V-Chip setting will be
resumed.
• When you watch the TV from the cable box or the VCR with the RF Modulator, then you release the V-Chip
temporarily, the V-Chip setting will not be resumed until you turn off the TV. The TV channel is not used in this case.
• When changing the channel with the cable box or the VCR, approximately 10 seconds will pass until the program
appears.
• When you dislocated or lost the password, you can cancel the existing password by the following procedure:
- Press VOLUME – button of main unit.
- Keep pressing VOLUME – button of main unit and press "0" key of remote control simultaneously for a few
seconds.
16
3L00501A E/14-BACK
16
27/3/2002, 17:08
TV BASIC OPERATION
Before operate your TV select TV position of the TV/CATV
switch on the remote to control the TV with the remote.
1
2
To turn on the TV, press the POWER button.
CH 012
32
The sound level will be indicated on the TV screen by
green bars and a number. As the sound level increases, so do the number of bars and the number on
the screen. The same is true for decreasing the level.
Set the TV/CATV menu option to the appropriate
position. When shipped from the factory, this menu
option is in the CATV setting. See "TO MEMORIZE
CHANNELS".
TV
CATV
4
CH 007
The VOLUME can be adjusted to a desired level by
pressing the VOL (VOLUME) + or – button.
Adjust the volume level by
pressing the VOLUME + or –
button. The volume level will
be indicated on the screen by
VOLUME
green bar. As the volume level
increases, so do the number of
bar. If the volume decreases,
the number of green bar also decreases.
3
RETURN button
Returns to the channel viewed just before the channel
currently onscreen.
- VHF/UHF channels
- CABLE TV channels
CH (CHANNEL) + and – buttons
Press and release the CH
(CHANNEL) + or – button. The
channel automatically stops at the
next channel set into memory.
For proper operation, before selecting channels,
they should be set into the TV's memory.
See "TO MEMORIZE CHANNELS".
MUTING button
MUTING
The MUTING button instantly turns the
volume down completely when you
press it.
Press MUTING button and the volume
level will instantly go to zero. To restore
the volume to its previous level, press MUTING button again.
10-key pad (0-9)
Press these buttons to select a channel. The channel
number will appear on the upper right corner of the TV
screen. If an invalid channel number is selected, the display
will revert to the original channel.
TV Mode Direct Channel Selection
When the TV/CATV menu option is in the TV position, all
channels can be instantly selected by using two buttons.
(For example, to select channel 2, press "0", then "2". If you
press only "2", channel selection will be delayed for a few
seconds). For channels 10 and above, press the 2 digits in
order.
CH 012
CATV Mode Direct Channel Selection
When the TV/CATV menu option is in the CATV position,
channels can be selected as follows:
CH. 1-9
CH. 10-12
CH. 13-99
CH. 100-125
Press "0" twice, then 1-9 as needed.
Example, to select channel 2, press
"002".
Press "0", then remaining 2 digits.
Example, to select channel 12, press
"012".
Press the 2 digits in order.
Example, to select channel 36, press
"36".
Press the 3 digits in order.
Example, to select channel 120, press
"120".
NOTE: If the station being viewed stops broadcasting, the
TV will automatically shut off after 15 minutes.
17
3L00501A E/14-BACK
17
27/3/2002, 17:08
INPUT button
Selects the signal input source for the
television or Video1,2,3 or Component
for video devices like VCR's, DVD
players, or camcorders.
The input source changes as below.
VIDEO 1
VIDEO1
TV
VIDEO3
VIDEO2
COMPONENT
STEREO AND SEPARATE AUDIO PROGRAM (SAP)
The TV is equipped with a feature known as Multi-channel
TV Sound or MTS. MTS broadcasts greatly enhance TV
viewing by bringing you programs with high fidelity stereo
sound. MTS also provides an extra channel called the
Separate Audio Program or SAP which broadcasters
can use to transmit a second language for bilingual
transmission or for other purposes.
LISTENING TO STEREO SOUND
When the TV is turned on or a channel selection is
made, make certain the STEREO appears on the
screen. This means that "Stereo" broadcasting is available. You can enjoy stereo sound from the left and right
speakers.
LISTENING TO SAP (SEPARATE AUDIO PROGRAM)
When the TV is turned on or a channel selection is
made, make certain the SAP appears on the screen. This
means that the "Separate Audio Program" broadcasting is
available.
TO SELECT DESIRED SOUND
Press the AUDIO SELECT button to select the desired
sound.
MONO+SAP BROADCASTING
MAIN SOUND
(MONO)
• When "Mono" broadcasting is received, no indication is
displayed.
• If the broadcast signal is not strong enough or clear
stereo sound is not available, press the AUDIO
SELECT button to change to mono sound. The noise
should be eliminated. Press it again to return to the
stereo sound.
MAIN + SAP SOUND
(MONO)
SAP SOUND
STEREO+SAP BROADCASTING
MAIN SOUND
(STEREO)
SAP SOUND
MAIN SOUND
(MONO)
MAIN + SAP SOUND
(MONO)
DISPLAY button
Press the DISPLAY button to display the current informations on the screen.
Press Once
Press Twice
STEREO and
Separate Audio
Program (SAP)
8 : 30 AM
CLOCK
Audio output
STEREO SAP
CAPTION CH1
SEL. STEREO
CH 012
ABCD
Press 3 times
Channel No.
Channel label
(if preset)
Closed Caption
Clear the current
informations
18
3L00501A E/14-BACK
18
27/3/2002, 17:08
PICTURE ADJUSTMENTS
You can adjust the settings for color, sharpness, contrast, brightness, tint and component.
1
2
3
4
Press the VOL + ( ) or – ( ) button to adjust the
setting.
Press the MENU button.
Press the CH + (▲) or – (▼)
button until the indicator next to
"PICTURE" begins to flash,
then press the ENTER button.
MENU
CLOCK SET
ON/OFF TIMER
CH SET-UP
PICTURE
AUDIO
LANGUAGE / IDIOMA / LANGUE
V-CHIP SET
▲ / ▼ / ENTER / MENU / EXIT
Press the CH + (▲) or – (▼)
button repeatedly to select the
item you want to adjust.
▼
COMPONENT
/
▼
BRIGHTNESS
CONTRAST
COMPONET
+
–
increase brightness
increase contrast
brilliant color
greenish color
makes picture clearer
be best picture for
DVD
decrease brightness
decrease contrast
pale color
reddish color
makes picture softer
indicate video device
except DVD
TO RETURN TO INITIAL SETTING
▲/▼/
BRIGHTNESS
BRIGHTNESS
CONTRAST
COLOR
TINT
SHARPNESS
0
/ MENU / EXIT
NOTE: The on-screen display will disappear 6 seconds
after finishing an adjustment. The settings can
only be adjusted when they are displayed on
the TV screen.
COLOR
SHARPNESS
Press the STANDARD button while the picture adjusting
mode appears on the screen (except the adjusting component).
TINT
SOUND ADJUSTMENTS
You can adjust the setting for bass, treble, balance and
stable sound.
1
Press the MENU button.
2
Press the CH + (▲) or – (▼)
button until the indicator next to
"AUDIO" begins to flash, then
press the ENTER button.
4
Press the VOL + ( ) or – ( ) button to adjust the
setting.
BASS
3
MENU
CLOCK SET
ON/OFF TIMER
CH SET-UP
PICTURE
AUDIO
LANGUAGE / IDIOMA / LANGUE
V-CHIP SET
▲ / ▼ / ENTER / MENU / EXIT
Press the CH + (▲) or – (▼)
button repeatedly to select the
item you want to adjust.
▼
BALANCE
STABLE
SOUND
STABLE SOUND “ON”
STABLE SOUND “OFF”
0
/
▼
BASS
TREBLE
BALANCE
–
makes the bass sound
weaker
makes the treble sound
weaker
makes the output level
of left speaker stronger
TO RETURN TO INITIAL SETTING
Press the STANDARD button while the sound adjusting
mode appears on the screen.
▲/▼/
BASS
TREBLE
+
makes the bass sound
stronger
makes the treble
sound stronger
makes the output level
of right speaker stronger
/ MENU / EXIT
STABLE SOUND FEATURE
When the loud sound is made, the stable sound feature
automatically lower the sound.
STABLE SOUND
NOTE: The on-screen display will disappear 6 seconds
after finishing an adjustment. The settings can
only be adjusted when they are displayed on
the TV screen.
19
3L00501A E/14-BACK
19
27/3/2002, 17:08
CLOSED CAPTION
WHAT IS CLOSED CAPTIONING?
This television has the capability to decode and display
Closed Captioned television programs. Closed
Captioning will display text on the screen for hearing
impaired viewers or it will translate and display text in
another language.
Most other shows provide two or three lined Captions
placed near the character who is speaking so the viewer
can follow the dialogue. Words in italics or underlined
describe titles, words in foreign languages or words
requiring emphasis. Words that are sung usually appear
enclosed by musical notes.
TO VIEW CLOSED CAPTIONS
Press the C.C. button on the remote control to switch
between normal TV and the two Closed Caption Modes
(Captions and 1/2 of Full Screen Text).
Captions: This Closed Caption Mode will display text on
the screen in English or another language. Generally,
Closed Captions in English are transmitted on Captions
Channel 1 and Closed Captions in other languages are
transmitted on Captions Channel 2.
The Captions will appear in places on the screen where
they will least interfere with the picture, usually on the
bottom of the screen. News programs will usually show
three-line Closed Captions which scroll onto the screen.
Text: The Text Closed Caption Mode will usually fill 1/2 of
full screen with a programming schedule or other
information. After selecting a Closed Caption Mode, it will
stay in effect until it is changed, even if the channel is
changed. If the Captions signal is lost due to a
commercial or a break in the signal, the Captions will
reappear when the signal is received again. If the
channels are changed, the Captions will be delayed
approximately 10 seconds.
For television programs broadcasting with Closed
Captions, look in your TV guide for the Closed Captions
symbol (CC).
• When activating the Closed Captioned Decoder, there will be a short delay before the Closed Captioned text appears
on the screen.
• Closed Captioned text is only displayed in locations where it is available.
• If no caption signal is received, no captions will appear, but the television will remain in the Caption Mode.
• Misspellings or unusual characters may occasionally appear during Closed Captioning. This is normal with Closed
Captioning, especially with live programs. This is because during live programs, captions are also entered live.
These transmissions do not allow time for editing.
• When Captions are being displayed, on-screen displays, such as volume and MUTING may not be seen or may
interfere with Closed Captions.
• Some cable systems and copy protection systems may interfere with the Closed Captioned signal.
• If using an indoor antenna or if TV reception is very poor, the Closed Caption Decoder may not appear or may
appear with strange characters or misspelled words. In this case, adjust the antenna for better reception or use an
outdoor antenna.
20
3L00501A E/14-BACK
20
27/3/2002, 17:08
ON/OFF TIMER
ON TIMER SETTING
This feature allows you to have the TV automatically turn "ON" at predetermined time.
If you program the "ON" timer once the timer will turn "ON" the TV daily at the same time and to the same channel.
If the power has been turned on at programmed time, the channel is changed to a programmed one.
1
Press the MENU button.
2
Press the CH + (▲) or CH – (▼)
button until the indicator next to
"ON/OFF TIMER" begins to flash,
then press the ENTER button.
3
Press the CH + (▲) or CH – (▼)
button until the indicator next to
"ON TIMER" begins to flash, then
press the ENTER button.
5
Press the CH + (▲) or CH –
ON/OFF TIMER
ON TIMER
(▼) button to set the
7:00AM CH012
CANCEL
minute, then press the VOL +
OFF TIMER
( ) button.
12:00AM
CANCEL
• You can change in 10▲ / ▼ / / / ENTER / MENU / EXIT
minutes step by holding
down the CH + (▲) or CH –
(▼) button.
6
Press the CH+ (▲) or CH –
(▼) button to set the channel,
then press the VOL+ ( )
button.
• You can set the channel
which is added in the
CH SET-UP option.
MENU
CLOCK SET
ON/OFF TIMER
CH SET-UP
PICTURE
AUDIO
LANGUAGE / IDIOMA / LANGUE
V-CHIP SET
▲ / ▼ / ENTER / MENU / EXIT
ON/OFF TIMER
ON TIMER
12:00AM CH012
OFF TIMER
12:00AM
CANCEL
CANCEL
▲ / ▼ / ENTER / MENU / EXIT
4
Press the CH + (▲) or CH – (▼)
button to set the hour, then press
the VOL + ( ) button.
ON/OFF TIMER
ON TIMER
12:00AM CH012
OFF TIMER
12:00AM
CANCEL
7
CANCEL
ON/OFF TIMER
ON TIMER
7:30AM CH012
OFF TIMER
12:00AM
CANCEL
CANCEL
▲ / ▼ / / / ENTER / MENU / EXIT
Press the CH + (▲) or CH –
(▼) button to select the
SET mode.
ON/OFF TIMER
ON TIMER
7:30AM CH007
▲ / ▼ / / / ENTER / MENU / EXIT
OFF TIMER
12:00AM
CANCEL
CANCEL
▲ / ▼ / / / ENTER / MENU / EXIT
8 Press the EXIT button.
NOTES:
• You cannot set the ON/OFF TIMER when the clock is not set.
• This TV will automatically turn off approximately 1 hour later after the ON TIMER turns on the TV unless any
buttons are pressed.
• To cancel the ON TIMER function:
To cancel ON TIMER in step 7 above press the CH + (▲) or CH – (▼) button to select the CANCEL mode.
OFF TIMER SETTING
This feature allows you to have the TV turn "OFF" automatically at a predetermined time.
If you program the OFF TIMER once, The TV will be automatically turned off at the same time daily.
4
1
Press the MENU button.
2
Press the CH + (▲) or CH – (▼)
button until the indicator next to
"ON/OFF TIMER" begins to flash,
then press the ENTER button.
3
Press the CH + (▲) or CH – (▼)
button until the indicator next to
"OFF TIMER" begins to flash,
then press the ENTER button.
MENU
CLOCK SET
ON/OFF TIMER
CH SET-UP
PICTURE
AUDIO
LANGUAGE / IDIOMA / LANGUE
V-CHIP SET
▲ / ▼ / ENTER / MENU / EXIT
ON/OFF TIMER
ON TIMER
7:00AM CH012
OFF TIMER
12:00AM
Press the CH + (▲) or
CH – (▼) button to set
the hour, then press the
VOL + ( ) button.
ON/OFF TIMER
ON TIMER
12:00AM CH012
OFF TIMER
12:00AM
CANCEL
CANCEL
▲ / ▼ / / / ENTER / MENU / EXIT
5
Press the CH + (▲) or CH –
ON/OFF TIMER
ON TIMER
(▼) button to set the minute
12:00AM CH012
CANCEL
then press the VOL + ( )
OFF
TIMER
button.
11:00PM
CANCEL
• You can change in 10minutes step by holding ▲ / ▼ / / / ENTER / MENU / EXIT
down the CH + (▲) or CH –
(▼) button.
6
Press the CH + (▲) or CH –
(▼) button to select the SET
mode.
CANCEL
CANCEL
▲ / ▼ / ENTER / MENU / EXIT
ON/OFF TIMER
ON TIMER
12:00AM CH012
OFF TIMER
11:30PM
CANCEL
CANCEL
▲ / ▼ / / / ENTER / MENU / EXIT
7 Press the EXIT button.
NOTES:
• If station being viewed stops broadcasting, the TV will automatically shut itself off after 15 minutes.
• To cancel the OFF TIMER function:
To cancel OFF TIMER, in step 7 above press the CH + (▲) or CH – (▼) button to select the CANCEL mode.
21
3L00501A E/14-BACK
21
27/3/2002, 17:08
BBE
By correcting the phase delay and distortion naturally generated by speaker systems, BBE ensures that the sound
that reaches your ears is as natural as the original
SONUD. Human voices are clearer and music is natural
and well-defined.
• BBE is a registered trademark of BBE Sound, Inc. For
U.S., licensed from BBE Sound, Inc. under USP
4638258, 4482866 and 5510572. For Canada, licensed
from BBE Sound, Inc. BBE is a registered trademark of
BBE Sound, Inc.
TO SET BBE
Press the BBE button to select
ON or OFF.
ON
OFF
▼
BBE AUDIO
SLEEP TIMER button
The Sleep Timer can turn the TV off for you after you fall
asleep. Program it to work in intervals of 10 minutes, for
a total time of up to 120 minutes.
SLEEP
120
• To change the sleep timer setting:
Press the SLEEP TIMER button repeatedly until the
display turns to desired time.
• To cancel the sleep time:
Press the SLEEP TIMER button repeatedly until the
display turns to 0.
VCR buttons
You can use this remote control to operate the basic
functions of your VCR. These functions include: play,
record, rewind, fast-forward, stop, pause, channel scan,
TV /VCR, power on, and power off.
Move the selector switch to VCR to operate.
• The remote is preset with the code 000 to control
JVC-brand VCR's. For any other manufacturer's brand
VCR, please see the code chart and instructions on
page 9.
DVD buttons
You can also use this remote control to operate the basic
functions of your DVD player. These functions include
play, rewind, fast-forward, stop, still/pause, previous/
next, tray open/close, power on, and power off.
Move the selector switch to DVD to operate.
• The remote is preset with the code 000 to control
JVC-brand DVD players. For any other manufacturer's
brand DVD player, please see the code chart and
instructions on page 10.
TV/CATV switch
Use either the television's own tuner or a cable box to
select channels. Set this switch to TV to operate the
television's built-in tuner.
Move the switch to CATV to operate a cable box.
• See page 8 for information on programming your
remote for cable box operation.
VCR/DVD switch
You can control a VCR or DVD player with the buttons
on the lower part of the remote control.
Use the VCR/DVD selector switch to choose either VCR
or DVD operation.
• See pages 9 and 10 for information on programming
your remote with VCR and DVD operating codes.
22
3L00501A E/14-BACK
22
27/3/2002, 17:08
TROUBLESHOOTING GUIDE
Before requesting service, please refer to the following chart for the symptom and possible solution.
SYMPTOMS
POSSIBLE SOLUTIONS
TV does not operate
• Make sure the power cord is plugged in.
• Try another AC outlet.
• Power is off, check fuse or circuit breaker.
• Unplug unit for an hour, then plug it back in.
• Set the 2 way selector switch on the remote control correctly (See page 6).
Poor sound or No sound
• Station or CATV experiencing problems, tune to another station.
• Check sound adjustments (Volume and Muting).
• Check for sources of possible interference.
Poor picture or No picture
• Station or CATV experiencing problems, tune to another station.
• Make sure channels are set into memory.
• Check antenna or CATV connections, reorient antenna.
• Check for sources of possible interference.
• Check picture control adjustments.
Poor reception on some channels
• Station or CATV experiencing problems, tune to another station.
• Make sure channels are set into memory.
• Station signal is weak, reorient antenna to receive desired station.
• Check for sources of possible interference.
Poor color or no color
• Station or CATV experiencing problems, tune to another station.
• Make sure channels are set into memory.
• Check picture control adjustments.
• Check antenna or CATV connections, reorient antenna.
• Check for sources of possible interference.
Picture wobbles or drifts
• Station or CATV experiencing problems, tune to another station.
• Make sure channels are set into memory.
• CATV company is scrambling signal.
• Check antenna orientation.
No CATV reception
• Check all CATV connections.
• Set TV/CATV menu option to the CATV mode.
• Station or CATV system problems, try another station.
Horizontal or diagonal bars on screen
• Check antenna connections, reorient antenna.
• Check for sources of possible interference.
No reception above channel 13
• Make sure TV/CATV menu option is in the appropriate mode.
• If using antenna, check UHF antenna connections.
No Remote operation
• Batteries are weak, dead or inserted incorrectly.
• Remote is out of range, move closer to TV within (15 feet).
• Make sure Remote is aimed at sensor.
• Confirm there are no obstructions between the Remote and the TV.
• Make sure the power cord is plugged in.
• Set the 2 way selector switch on the remote control correctly (See page 6).
• No broadcast on station tuned.
• Sleep Timer is set.
• ON/OFF TIMER is set.
• Power interrupted.
• Approximately 1 hour has passed after the ON TIMER turns on and no button was
pressed (See page 21).
TV shuts off
Closed - Caption is not activated.
• TV station experiencing problems or program tuned is not closed captioned.
Try another channel.
• Check CATV connection or VHF/UHF antenna, reposition or rotate antenna.
• Press C.C. button to turn on the closed caption decoder.
Display is not shown in your language.
• Select proper language in the menu options.
The remote control does not operate
other product.
• Set the 2 way selector switch on the remote control correctly (See page 6).
• Program remote with a different code.
• The remote control may not be compatible with your product.
• Install new batteries.
The remote control does not operate
some features of other product.
• Program remote with a different code.
• The remote control may not be able to operate all features of your product.
23
3L00501A E/14-BACK
23
27/3/2002, 17:09
SPECIFICATIONS
AC Power Input:
AC Power Consumption:
Picture Tube:
Audio Power Output Rating:
Speaker:
Audio/Video Input:
Tuner Type:
Receiving Channels:
VHF
UHF
CATV
Antenna Input Impedance:
Dimensions:
Weight:
120 V, 60 Hz
80W
14" (measured diagonally)
2.5 W + 2.5 W
1-5/8" (4 cm) x 2-13/16" (7 cm), 8 ohm x 2
COMPONENT Input:
Y-Input: 1.0Vp-p, 75 ohm
PB, PR-input: 0.7Vp-p, 75 ohm
S-Video Input
Y-Input: 1.0Vp-p, 75 ohm
C-Input: 0.3Vp-p, 75 ohm
Video Input: 1.0Vp-p, 75 ohm
Audio Input: –8dB, 47k ohm
181 Channel, Quartz PLL Frequency Synthesized
2-13
14-69
01-97 (5A)-(A-3)
98-99 (A-2)-(A-1)
14-22 (A)-(I)
23-36 (J)-(W)
37-65 (AA)-(FFF)
66-125 (GGG)-(125)
75 ohm (VHF/UHF/CATV) Coaxial Input
17-1/8" (432 mm) (W) x 15-1/2" (393.5 mm) (D) x 13-5/8" (344.5mm) (H)
26.4 lbs (12.0 kg)
ACCESSORIES:
Remote Control
Batteries (2 x AA)
Specifications are subject to change without notice.
JVC COMPANY OF AMERICA
Division of U.S. JVC CORP.
1700 Valley Road
Wayne, New Jersey 07470
JVC CANADA, INC.
21 Finchdene Square
Scarborough, Ontario
Canada M1X 1A7
3L00501A K
02/04
PRINTED IN THAILAND
24
3L00501A E/14-BACK
24
1/4/2002, 16:24
Pour le modèle:
AV-14F703
MANUEL
D'INSTRUCTIONS
TÉLÉCOULEUR
TV CATV VCR DVD
POWER
STANDARD
INPUT
1
2
BBE
4
5
DISPLAY
7
8
9
0
RETURN
SLEEP TIMER
C.C.
3
6
LIGHT
AUDIO SELECT
RM-C309G
ENTER
MUTING
CH
VOL
VOL
CH
MENU
EXIT
Ð VCR CHANNEL +
PREV NEXT
REW
REC
VCR/DVD
POWER TV/VCR
PLAY
FF
STOP
OPEN/CLOSE
PAUSE
STILL/PAUSE
TV
REMARQUE:
Veuillez inscrire dans les espaces ci-dessous le n˚ de série de
votre téléviseur (sités à l'arrière du téléviseur).
Agrafez votre reçu ou votre facture à la page intérieure de ce guide. Rangez ce
manuel dans un lieu où vous le retrouverez rapidement pour vous y référer.
Gardez le carton et l'emballage d'origine pour une utilisation ultéríeure.
Numéro de série
3L00501A F Cover
1
27/3/2002, 17:09
ATTENTION
RISQUE DE CHOC ELECTRIQUE
NE PAS OUVRIR
Le signe représentant un éclair dans un triangle équilatéral a pour
but d'avertir l'utilisateur du danger présenté par des pièces non isolées
à l'intérieur de l'appareil et dont la tension est suffisante pour provoquer
des décharges électriques dangereuses.
CAUTION:
AFIN DE REDUIRE LES
RISQUES DE CHOC ELECTRIQUE, NE PAS
RETIRER LE COUVERCLE (OU LE PANNEAU
ARRIERE). AUCUNE PIECE NE PEUT ETRE
REPAREE PAR L'UTILISATEUR. CONFIEZ
L'APPAREIL A UN TECHNICIEN QUALIFIE.
Le point d'exclamation dans un triangle équilatéral a pour but d'avertir
l'utilisateur que des instructions importantes relatives à l'utilisation et
à l'entretien se trouvent dans le manuel accompagnant l'appareil.
ATTENTION: Tout changement ou toute modification n'étant pas autorisée de façon explicite par l'organisme responsable
de la conformité aux règles de la FCC peut entraîner l'interdiction à l'utilisateur d'utiliser cet appareil.
AVERTISSEMENT: AFIN D'EVITER TOUT RISQUE D'INCENDIE OU D'ELECTROCUTION, N'EXPOSEZ PAS CET
APPAREIL A LA PLUIE NI A L'HUMIDITE.
ATTENTION:
POUR PREVENIR LES CHOCS ELECTRIQUES, N'UTILISEZ PAS CETTE FICHE POLARISEE AVEC UNE
RALLONGE, UNE PRISE DE COURANT OU UNE AUTRE SORTIE DE COURANT, SAUF SI LES LAMES
PEUVENT ETRE INSEREES A FOND SANS EN LAISSER AUCUNE PARTIE A DECOUVERT.
IMPORTANTES MESURES DE SECURITE
1.
2.
3.
4.
5.
6.
7.
8.
8A.
9.
10.
11.
12.
Lisez les instructions
Lisez attentivement toutes les instructions sur le fonctionnement et la sécurité avant de mettre l'appareil en marche.
Conservez les instructions
Gardez les instructions, pour vous y référer plus tard, au besoin.
Tenez compte de ces mises en garde
Toutes les mises en garde imprimées sur l'appareil ou contenues dans le manuel d'instructions doivent être observées.
Observez les instructions
Toutes les instructions sur le fonctionnement et l'utilisation doivent être suivies.
Nettoyage
Débranchez l'appareil de la prise électrique avant de le nettoyer. N'utilisez pas de produits de nettoyage liquides ni en aérosol,
mais essuyez l'appareil avec un linge humide.
Accessoires
Le fabricant de cet appareil ne conseille aucun accessoire car leur emploi peut être dangereux.
Eau et humidité
N'utilisez pas l'appareil dans des endroits humides ou près de l'eau, comme par exemple à proximité d'une baignoire, d'un
évier de cuisine ou de salle de bain, dans un sous-sol humide ou autour d'une piscine.
MISE EN GARDE EN CAS
Emplacement de l'appareil
D'UTILISATION D'UN CHARIOT
Ne placez pas cet appareil vidéo sur un chariot, support, trépied ou table instable,
(Symbole foumi par la RETAC)
car il pourrait en tomber, se casser et blesser sérieusement quelqu'un se trouvant à proximité.
Si vous voulez déplacer l'appareil avec le chariot sur lequel il est placé, procédez avec
prudence, car des arrêts brusques, une force excessive ou des surfaces inégales peuvent
causer le renversement de l'appareil avec le chariot.
S3126A
Ventilation
Les fentes et les orifices se trouvant à l’endos et sous le boîtier de l’appareil sont destinées à assurer sa ventilation
de manière à ce qu’il fonctionne sans anomalie et qu’il ne soit pas exposé à une surchauffe. N'obstruez pas ces orifices
d'aération en plaçant l'appareil sur une surface molle, comme un lit, un divan ou un tapis. Ne le placez pas non plus près ou
au-dessus d'un radiateur ou d'une bouche de chauffage ni sur une étagère ou dans un meuble fermé, dont les parois
pourraient bloquer la circulation d'air autour de l'appareil. Suivez les instructions du fabricant.
Source d'alimentation
Cet appareil ne peut être raccordé qu'à la source d'alimentation indiquée sur sa plaque signalétique. Si vous ne connaissez
pas la tension de votre source de courant, questionnez votre marchand ou votre compagnie d'électricité locale. Pour les
appareils destinés à être alimentés par des piles ou autres sources de courant, consultez le manuel d'instructions.
Mise à la terre ou polarisation
Cet appareil est doté d'une fiche polarisée de courant alternatif (une lame plus large que l'autre) qui ne peut se brancher sur la
prise que d'une seule façon. S'il vous est impossible de la brancher sur la prise, essayez de l'inverser. Si c'est toujours
impossible, demandez à un électricien de vous remplacer la prise désuète. N'essayez pas de neutraliser l'objectif sécuritaire
de la fiche polarisée si votre appareil est doté d'une fiche à 3 broches à mise à la terre. Cette fiche peut se brancher
seulement sur une prise électrique à mise à la terre. Ceci est aussi un dispositif de sécurité.
Protection du cordon d'alimentation
Le cordon d'alimentation doit être acheminé de façon à ne pas être écrasé ni coincé. Il faut aussi faire attention aux fiches,
prises et points de sortie de l'appareil.
2
3L00501A F/01-13
2
27/3/2002, 17:09
13. Orage électrique
Pour éviter les dommages causés par la foudre ou les soudaines hausses de tension, débranchez l'appareil de la prise
électrique et déconnectez l'antenne ou le système de câblodistribution si l'appareil doit rester sans surveillance et inutilisé
pendant une longue période.
14. Lignes de haute tension
L'antenne extérieure ne doit pas être placée à proximité de lignes d'alimentation aériennes ni de circuits de courant, ni de telle
façon qu'elle puisse toucher ces lignes ou circuits en tombant. Pendant l'installation de l'antenne extérieure, il faut être très
prudent de ne pas toucher ces lignes ou circuits car leur contact peut être fatal.
15. Surcharge
Ne surchargez pas les prises électriques murales ni les cordons de rallonge, car cela risque de causer un incendie ou des
chocs électriques.
16. Pénétration de liquide ou corps étranger
Faites attention de ne pas laisser tomber un corps étranger ni de laisser pénétrer un liquide dans les orifices de l'appareil, car
cela peut toucher des points de tension dangereux, causer un court-circuit, un incendie ou des chocs électriques. Ne versez
jamais de liquide sur l'appareil.
17. Mise à la terre de l'antenne extérieure
Si une antenne extérieure ou un système de transmission par câble est relié à l'appareil, vous devez vous assurer que
l’antenne ou le système de transmission par câble est convenablement mis à la terre de manière à être protégé, dans toute la
mesure du possible, contre les surtensions et les charges d’électricité statique. La section 810 du code national de l'électricité
(ANSI/NFPA 70) vous renseigne sur les moyens appropriés de mettre le mât et la structure de support à la terre, de la mise à
la terre du fil de descente vers un élément de décharge de l'antenne, et du raccordement des électrodes de mise à la terre.
18. Service ou réparation
Le consommateur ne doit pas essayer de réparer l'appareil lui-même, mais doit se limiter aux réglages décrits dans le manuel
d'instructions. En cas de besoin, confiez l'appareil à un centre de service autorisé.
19. Dommages exigeant des réparations
L'appareil doit être débranché de la prise électrique et confié à un réparateur qualifié si:
a. La fiche ou le cordon d'alimentation a été endommagé;
b. Un objet est tombé ou un liquide a pénétré à l'intérieur de l'appareil;
c. L'appareil a été exposé à la pluie;
d. L'appareil ne fonctionne pas convenablement quand vous suivez les instructions. Effectuez seulement les réglages
expliqués dans le manuel d'instructions, car des réglages inadéquats peuvent endommager sérieusement l'appareil,
qui exigera alors des réparations coûteuses par un technicien qualifié pour retrouver son bon état de fonctionnement;
e. L'appareil est tombé ou son boîtier a été endommagé;
f . Le fonctionnement de l'appareil a changé de façon marquante.
20. Pièces de rechange
Quand il est nécessaire de remplacer certaines pièces de l'appareil, assurez-vous que le réparateur utilise les pièces
recommandées par le fabricant ou ayant les mêmes caractéristiques que les pièces originales. Le remplacement par des
pièces non autorisées peut causer un incendie, des chocs électriques ou d'autres accidents.
21. Vérification de sécurité
Après service ou réparation, demandez au technicien d'effectuer des vérifications de sécurité pour s'assurer
que l'appareil est en bon état de fonctionnement.
22. Chaleur
N'exposez pas cet appareil à des sources de chaleur, comme des radiateurs, bouches de chauffage, cuisinières
ou autres appareils dégageant ou produisant de la chaleur, y compris un amplificateur.
23. Remarque à la personne qui effectuera le raccordement au réseau de câblodistribution
Cet avis est destiné à lui rappeler l'article 820-40 du Code national de l'électricité (NEC) qui donne les lignes de
conduite sur la mise à la terre correcte et qui stipule que "la mise à la terre du câble doit être raccordée à un
système de mise à la terre de l'édifice, aussi près que possible de son point d'entrée".
EXEMPLE DE LA MISE A LA TERRE DE L'ANTENNE SELON
LES INSTRUCTIONS DU CODE DE L'ELECTRICITE
Câble de descente d'antenne
Bride de mise à
la terre
Elément de décharge de l'antenne
(Article 810-20 du NEC)
Equipement du
service électrique
NEC - Code national de l'électricité
S2898A
Conducteurs de mise à la terre
(Article 810-21 du NEC)
Brides de mise à la terre
Système d'électrodes de mise à la terre du courant
(Art. 250, section H, du NEC)
3
3L00501A F/01-13
3
27/3/2002, 17:10
IMPORTANTES INFORMATIONS DE RECYCLAGE
Ce produit utilise à la fois un tube cathodique et d’autres composants qui contiennent du plomb. Il se peut que l’évacuation de
ces matériaux soit réglementée dans votre communauté afin de protéger l’environnement. Pour de plus amples renseignements sur l’évacuation ou le recyclage, veuillez contacter vos autorités locales
ou l’association Electronic Industries Alliance à http://www.eiae.org
TABLE DES MATIERES
CARACTÉRISTIQUES ........................................ 4
EMPLACEMENT DES COMMANDES ................ 5
TÉLÉCOMMANDE .............................................. 6
RACCORDEMENT DES ANTENNES .............. 11
CONNEXION À UN AUTRE APPAREIL ........... 12
CHOIX DE LA LANGUE .................................... 13
MISE À L’HEURE DE L’HORLOGE .................. 13
MISE EN MÉMOIRE DES CANAUX ................. 14
UTILISATION DE LA PUCE V .......................... 15
FONCTIONNEMENT DU TÉLÉCOULEUR ...... 17
Touche INPUT .................................................. 18
STÉRÉOPHONIE ET CANAL SON
SÉPARÉ (SAP) ...... 18
Touche DISPLAY .............................................. 18
RÉGLAGE DE L'IMAGE ................................... 19
RÉGLAGES SONORES ................................... 19
SOUS-TITRAGE ............................................... 20
MINU MAR/ARR ............................................... 21
BBE ................................................................... 22
Sleep Timer (Minuterie Sommeil) ...................... 22
Boutons Magnétoscope .................................... 22
Boutons DVD .................................................... 22
Interrupteur TV/CATV ....................................... 22
Interrupteur VCR/DVD ...................................... 22
GUIDE DE DÉPISTAGE DES PANNES ........... 23
FICHE TECHNIQUE ....................... derniere page
CARACTÉRISTIQUES
• Écran plat - réduit l'influence de l'éclairage ambiant. L'image est extrêmement détaillée et très nette.
• Possibilité de syntonisation 181 canaux - Le syntonisateur peut capter tous les 68 canaux VHF/UHF de
télévision disponibles dans votre région. Si vous souscrivez à un service de câblodistribution, il peut capter les
fréquences des canaux VHF standard plus jusqu'à 113 canaux câblodistribués. Le nombre réel de canaux captés
dépend de la réception des canaux dans votre région ou de votre système de câblodistribution.
• Affichage à l'écran en 3 langues - Les données (numéro du canal, durée avant l'arrêt différé, niveau sonore,
coupure du son, texte/sous-titres, réglages de l'image/sonores), peuvent être affichées en un choix de 3 langues:
français, anglais ou espagnol.
• Minuterie de mise sous/hors tension - Vous permet de mettre automatiquement votre télécouleur à une heure réglée.
• Minuterie d'arrêt différé automatique - Le télécouleur peut être programmé, par télécommande, pour s'éteindre
automatiquement après une période pouvant aller jusqu'à 120 minutes.
• Puce V - La puce V permet de classer une émission télévisée ou le contenu d’un film. Grâce à cette information, il est possible
de définir un niveau de restriction.
• Réglage de l'image par télécommande - L'affichage à l'écran permet de régler avec précision, au moyen de la
télécommande, la luminosité, la couleur, le contraste, la netteté, la teinte et la component de l'image.
• Décodeur de sous-titrage - Fait apparaître les sous-titres ou un texte sur le demi de l'écran, pour aider les
téléspectateurs malentendants.
• Réception stéréo ou d’un canal son séparé (SAP) - Ce téléviseur a été conçu pour la réception des émissions en stéréophonie
et de celles avec un canal son séparé.
• BBE - BBE vous offre un son éclatant avec beaucoup de présence.
• Prises d'entrée vidéo - Cet appareil est doté de 3 types de prises d'entrée vidéo. Les prises d'entrée pour composantes vidéo et
la prise d'entrée S-vidéo vous permettent de regarder les images fournies par un lecteur de DVD, ou tout autre appareil vidéo
produisant des images de haute qualité.
• Télécommande - Vous pouvez agir sur le magnétoscope, la boîte du câble, la parabole pour satellite et le lecteur de DVD
lorsque les codes à 3 chiffres correspondant aux fabricants ont été enregistrés.
4
3L00501A F/01-13
4
27/3/2002, 17:10
EMPLACEMENT DES COMMANDES
VUE AVANT
Illustration of AV-24F703
VUE ARRIERE
IN
OUT
Y
ANT(75)
VIDEO
VIDEO
PB
L/MONO
S-VIDEO AUDIO
PR
R
VIDEO 1
VIDEO 2
L/MONO
AUDIO
R
8 9 10 11
12
VIDEO 3 IN
ON TIMER
POWER
CHANNEL
VOLUME
VIDEO L/MONO
1
2 3
4
5
6
AUDIO
R
7
1. Interrupteur - Pour mettre l'appareil en/hors circuit.
2. Capteur de la télécommande - Les signaux de la
télécommande sont captés ici.
3. Voyant d’enregistrement (ON TIMER) - Cet
indicateur s’allume quand l’appareil est sous
tension. It s’allume aussi quand l’enregistrement
par minuterie est en service alors que l’appareil est
hors tension.
4. Sélecteurs de canaux (+/–) - Pressez pour passer
à un canal à numéro supérieur ou inférieur mis en
mémoire.
5. Touches de réglage du volume (+/–) - Pressez
pour augmenter ou réduire le volume.
6. Prises VIDEO 3 IN (Avant) - Pour raccorder les
câbles d’entrée des signaux audio/video d’une
source extérieure.
7. Prise d’écouteur - Pour l’écoute en privé,
aranchez un écounteur ou un casque d’écoute
monophonique à mini fiche de 1/8” sur cette prise.
8. Prise d’entrée d’antenne VHF/UHF (ANT.) Raccordez à cette prise une antenne VHF/UHF ou
le câble provenant du réseau de câblodistribution.
9. Prises VIDEO 1 IN (Arrière) - Les câbles audio et
vidéo provenant d'une source extérieure (par
exemple, un magnétoscope) peuvent être reliés à
ces prises. Si l'appareil vidéo possède une prise de
sortie S-vidéo, reliez-la à la prise d'entrée S-vidéo.
10. Prises VIDEO 2 IN - Les câbles audio et vidéo
provenant d'une source extérieure (par exemple, un
lecteur de DVD) peuvent être reliés à ces prises. Si
le lecteur de DVD possède des prises de sortie pour
les composantes vidéo, reliez-les aux prises d'entrée
vidéo. Si vous possédez un appareil vidéo qui n'est
pas pourvu de sortie pour les composantes vidéo,
reliez-le à la prise d'entrée vidéo.
11. Prises de sortie VIDEO/AUDIO (VIDEO/AUDIO L/R
OUT) - Pour la sortie des signaux audio et vidéo vers
un téléviseur, un amplificateur ou un magnétoscope.
REMARQUE: Les signaux appliqués sur les prises
d'entrée pour composantes vidéo, ne sont pas
présent sur cette prise de sortie.
12. Cordon d’alimentation du CA - Pour brancher
l’appareil sur une prise de 120 volts, 60 hertz.
5
3L00501A F/01-13
5
27/3/2002, 17:10
TÉLÉCOMMANDE
TV CATV VCR DVD
POWER
11
1
STANDARD
2
3
4
5
INPUT
1
2
3
BBE
4
5
6
DISPLAY
7
8
9
0
RETURN
SLEEP TIMER
C.C. AUDIO SELECT
6
7
8
LIGHT
12
13
14
15
16
RM-C309G
MUTING
ENTER
+
CH
VOL
+
VOL
17
18
CH
9
10
MENU
EXIT
VCR CHANNEL
PREV NEXT
REW
REC
VCR /DVD
POWER TV/VCR
PLAY
19
20
FF
STOP PAUSE
STILL/PAUSE
OPEN/CLOSE
TV
INSERTION DES PILES
1. Ouvrez le couvercle du compartiment à piles en le
faisant glisser dans la direction de la flèche.
2. Insérez deux piles "AA" en observant leurs polarités,
tel qu'indiqué sur le diagramme.
3. Fermez le couvercle.
1. Sélecteur TV/CATV - Permet de sélectionner le
télécouleur ou décodeur câble à commander. (Vous
pouvez commander votre décodeur câble après avoir
programmé la télécommande.)
2. Commutateur VCR/DVD - Utilisez ce commutateur
pour choisir l'appareil, magnétoscope ou lecteur de
DVD, à commander. (Vous pouvez agir sur le
magnétoscope ou sur le lecteur de DVD après que le
boîtier de télécommande a été programmé.)
3. Touche BBE - Pressez le pour mettre BBE sous ou
hors.
4. Touche DISPLAY - Elle affiche sur l'écran du téléviseur
l'heure actuelle, le canal (ou l'entrée) ou les réglages
actuels.
5. Touche d'arrât différé (SLEEP) - Pour régler l'appareil
pour qu'il se mette automatiquement hors circuit après
une période pouvant aller jusqu'à 120 minutes.
6. Sélecteur de télévision/sous-titre/texte (C.C.) Pressez pour passer entre le visionnement de la
télévision ou les deux modes de sous-titrage (sous-titres
ou texte).
7. Touche de mise en sourdine (MUTING) - Pressez
pour couper temporairement le son. Pressez-la de
nouveau pour le rétablir.
8. Touches de réglage des canaux (croissant/ordre
décroissant) (CH + / –) - Pressez la touche + pour
passer à un canal à numéro plus élevé mis en mémoire.
Pressez la touche – pour passer à un canal à numéro
plus bas mis en mémoire. Appuyez sur cette touche
pour choisir le poste désiré lors des réglages avec
affichage sur l'écran.
9. Touche de MENU - Pressez pour faire apparaître le
menu des fonctions à l’écran.
10. Touches de commende du magnétoscope ou DVD Appuyez sur ces touches pour commander le
magnétoscope ou DVD.
11. Interrupteur (POWER) - Pressez le pour mettre
l'appareil en et hors circuit.
12. Touche STANDARD - Appuyez sur cette touche pour
rétablir les valeurs définies en usine pour les réglages
d'affichage sur l'écran ou les réglages audio.
13. Touche INPUT - Cette touche permet de choisir le
téléviseur ou une des sources extérieures.
14. Clavier numérique (0 à 9) - Permet l'accès direct à tout
canal de télévision, magnétoscpe et décodeur câble.
15. Touche de revue rapide (RETERN) - Pour passer du
canal syntonisé à celui que vous regardiez auparavant.
16. Touche LIGHT - Appuyez sur cette touche pour éclairer
les touches CH +/– et VOL +/–.
17. Touche de sélection audio (AUDIO SELECT) Commute le son entre les modes mono et stéréo, et
SAP lorsque l’on reçoit des programmes en mode
stéréo ou SAP.
18. Touche ENTER (validation) - Appuyez sur cette touche
pour valider les réglages effectués.
19. Touches de réglage du VOLUME (VOL + / –) - Pour
augmenter le volume, pressez la touche +; pour le
diminuer, pressez la touche –. Appuyez sur cette touche
pour choisir le réglage ou le paramètre désirés lors des
réglages avec affichage sur l'écran.
20. Touche EXIT - Appuyez sur cette touche pour
abandonner le menu affiché sur l'écran.
6
3L00501A F/01-13
6
27/3/2002, 17:10
Fonctiones de base de la télécommande
• Avant de pouvoir utiliser la télécommande,vous devez
d’abord poser les piles (fournies). Reportez-vous à la
section “Changement des piles” au bas de cette page
pour instructions. (Vous trouverez une illustration à la
page 6.)
• Appuyez sur le bouton POWER pour mettre la
télévision en marche ou à l’arrêt.
• Assurez-vous que le commutateur TV/CATV se trouve
sur la position TV. Mettez le commutateur sur la
position CATV seulement si vous devez utiliser une
boîte de câble.
• Faites glisser le sélecteur VCR/DVD à la position
VCR pour commander un magnétoscope, faites
glisser à la position DVD pour commander un lecteur
de DVD. Veuillez vous reporter aux pages 8 à 10 pour
instructions sur la programmation de votre
télécommande en vue de l’utilisation d’une boîte de
câble, d’un magnétoscope ou d’un lecteur de DVD.
• Appuyez sur les boutons CH + et CH – pour balayer à
travers les canaux. Tapez sur le bouton CH+ou CH –
pour passer à travers les canaux un à la fois.
• Appuyez sur VOL + ou VOL – pour augmenter ou
baisser le volume. Une barre indicatrice apparaîtra à
l’écran pour vous montrer le niveau du volume de la
télévision.
• Les boutons CH +/– et VOL +/– servent également à la
navigation dans le système JVC de menus à l’écran.
• Vous pouvez accéder directement à des canaux
particuliers à l’aide du pavé à clavier numérique.
• Certaines touches de ce boîtier de télécommande
peuvent être éclairées, par exemple les touches CH
+/– ou VOL +/–. Appuyez sur la touche LIGHT pour
que ces touches s'éclairent.
PRECAUTIONS A PRENDRE AVEC
LES PILES
Quand cet appareil est alimenté par des piles, vous devez
observer les précautions suivantes:
1. Utilisez seulement des piles de format et de genre
spécifiés.
2. Quand vous insérez les piles, assurez-vous d'observer
leur polarité, tel qu'indiqué à l'intérieur du
compartiment. Si vous inversez les piles, vous pouvez
endommager l'appareil. Pour éviter tout risque de
court-circuit, introduisez d'abord le pôle "–".
3. Ne mélangez pas des piles de genres différents (par
exemple des piles alcalines avec des piles au
carbonezinc) ou d'anciennes piles avec de nouvelles
piles.
4. Si l'appareil ne doit pas être utilisé pendant un certain
temps, retirez les piles du compartiment pour éviter
qu'elles coulent et endommagent l'appareil.
5. N'essayez pas de recharger des piles non
rechargeables, car elles peuvent surchauffer et éclater.
Suivez les instructions du fabricant des piles.
6. Lorsque vous remplacez les piles, essayez de le faire
en moins de trois minutes. Si vous dépassez les trois
minutes, les codes de télécommande relatifs au
décodeur câble risquent d'être réinitialisés (voir page 8).
DISTANCE EFFICACE DE
FONCTIONNEMENT DE LA TELECOMMANDE
Changement des Piles
Appuyez sur le couvercle arrière de la télécommande et
faites-le glisser vers le bas pour le retirer.
Installez avec précaution les deux piles AA fournies en
repérant les marques “+” et “–” despiles et de la
télécommande. Pour éviter un court-circuit, insérez le “–”
en premier.
Veillez à n'utiliser que des piles AA.
Une fois les piles posées, enclenchez le couvercle en
place.
• Si la télécommande se comporte de façon anormale,
remplacez les piles. Les piles durent de six mois à un
an. Nous vous recommandons d’utiliser des piles
alcalines qui durent plus longtemps.
Lorsque vous remplacez les piles, tâchez de le faire
en moins de trois inutes. Si l’opération de
changement des piles dure plus de trois inutes, vous
devrez peut-être réintroduire les codes de la
télécommande pour votre magnétoscope, lecteur de
DVD et/ou votre boîte de câble (pages 8-10).
15 FEET
30˚
30˚
REMARQUES: • La télécommande peut ne pas
fonctionner s'il y a un obstacle entre cette
dernière et l'appareil.
• Si les rayons du soleil, la lueur d'une
lampe incandescente ou fluorescente
ou une autre lumière puissante
tombent sur le capteur de la
télécommande, le fonctionnement de
l'appareil peut être irrégulier.
7
3L00501A F/01-13
7
1/4/2002, 8:16
TÉLÉCOMMANDE
(SUITE)
PROGRAMMATION AVEC LA TÉLÉCOMMANDE
Réglage du récepteur CATV, magnétoscope ou DVD
Vous pouvez programmer votre télécommande pour qu'elle puisse commander votre récepteur câble ou satellite
en utilisant les instructions et les codes indiqués ci-dessous. Si l'équipement ne répond à aucun de ces codes ou
à la fonction de recherche, utilisez la télécommande fournie par le fabricant.
Configuration du décodeur câble box ou Satellite
La télécommande est programmée avec des codes CATV et/ou Satellite pour la mise sous tension, la mise hors
tension, le canal précédent ou suivant et un fonctionnement sur clavier numérique.
1) Repérez la marque CATV/Satellite dans la liste de codes ci-dessous.
2) Placez le sélecteur 2 positions (TV/CATV) sur "CATV".
3) Maintenez la touche DISPLAY enfoncée.
4) Avec la touche DISPLAY enfoncée, tapez le premier code indiqué en utilisant le pavé clavier numérique.
5) Relâchez la touche DISPLAY.
6) Vérifiez le bon fonctionnement du récepteur câble/Satellite.
• Si le décodeur câble ou satellite ne répond pas au premier code, essayez les autres. S'il ne répond à aucun code,
essayez la fonction de recherche de codes décrite au bas de la page.
Décodeur câble
CODES
Décodeur câble
CODES
ABC
Archer
Cableview
Citizen
Curtis
Diamond
Eagle
Eastern
GC Brand
Gemini
General Instrument
Hamlin
Hitachi
Jerrold
Macom
Magnavox
Memorex
Movietime
Oak
Panasonic
Paragon
Philips
Pioneer
024
032, 025
051, 032
022, 051
058, 059
024, 032, 025
029
034
032, 051
022, 043
065, 024, 025, 026, 027, 020, 021, 022, 057, 023
040, 041, 042, 045, 058, 064
049, 024
065, 024, 025, 026, 027, 020,021, 022, 057, 023
049, 050, 051, 054
033
030
032, 051
039, 037, 048
055, 056, 060, 071
063
028, 029, 030, 052, 053, 031, 069
047, 062
Pulsar
Puser
RCA
Realistic
Regal
Regency
Rembrandt
Samsung
Scientific Atlanta
SLMark
Sprucer
Stargate
Telecaption
Teleview
Texscan
Tocom
Toshiba
Unika
Universal
Videoway
Viewstar
Zenith
Zenith/Drake Satellite
051, 032
032
061, 070
032
058, 064, 040, 041, 042, 045, 068
034
037, 032, 051, 038
051
057, 058, 059
051, 047
051, 056
032, 051
067
047, 051
044
035, 036, 066
050
032, 025
022, 032
052
029, 030
063, 046
046
Système Satellite
numérique
CODES
Système Satellite
numérique
CODES
Echostar
Express VU
G.E.
G.I.
Gradiente
Hitachi
HNS (Hughes)
Pranasonic
100, 113, 114
100, 113
106
108
112
104, 111
104
105
Philips
Primestar
Proscan
RCA
Sony
Star Choice
Toshiba
Uniden
102, 103
108
106, 109, 110
106, 109, 110
107
104, 108
101
102, 103
Fonction de recherche de codes:
1.
2.
3.
4.
Positionnez le sélecteur de mode (sélecteur TV/CATV) sur CATV.
Appuyez sur les touches TV POWER et RETURN. Maintenez la pression environ trois secondes puis relâchez.
Appuyez sur TV POWER et voyez si le récepteur CATV ou Satellite répond.
Si vous obtenez une réponse, appuyez sur RETURN. Les codes de fonctionnement sont maintenant définis.
Si vous n'obtenez pas de réponse, répétez l'étape 3. Si vous répétez l'étape 3 52 fois sans obtenir de réponse,
utilisez la télécommande qui a été fournie avec l'équipement.
5. Appuyez sur RETURN pour quitter.
8
3L00501A F/01-13
8
27/3/2002, 17:10
Configuration du magnétoscope
Le boîtier de télécommande est programmé à l'aide de codes pour la mise en service, ou la mise hors service du
magnétoscope, la lecture, l'arrêt, le bobinage rapide vers la fin de la bande, le bobinage rapide vers le début de la
bande, la pause, l'enregistrement, le choix du canal suivant ou du canal précédent.
1. Repérez la marque VCR dans la liste de codes ci-dessous.
2. Placez le sélecteur 2 positions sur "VCR".
3. Maintenez la touche DISPLAY enfoncée.
4. Avec la touche DISPLAY enfoncée, tapez le premier code indiqué en utilisant le pavé clavier numérique.
5. Relâchez la touche DISPLAY.
6. Vérifiez le bon fonctionnement du récepteur VCR.
• Si le décodeur VCR ne répond pas au premier code, essayez les autres. S'il ne répond à aucun code, essayez
la fonction de recherche de codes ci-dessous.
• Les magnétoscopes de certains fabricants ne répondent pas aux ordres de la touche TV/VCR bien que les
autres touches agissent normalement.
• Pour effectuer un enregistrement, maintenez la pression d'un doigt sur la touche REC du boîtier de
télécommande puis appuyez sur la touche PLAY.
Magnétoscope
CODES
Magnétoscope
CODES
Admiral
Aiwa
Akai
Audio Dynamic
Bell & Howell
Broksonic
Canon
CCE
Citizen
Craig
Curtis Mathes
Daewoo
DBX
Dimensia
Emerson
Fisher
Funai
G.E.
Go Video
Goldstar
Gradiente
Hitachi
Instant Replay
Jensen
JVC
Kenwood
LXI
Magnavox
Marantz
Marta
Memorex
MGA
Minolta
Mitsubishi
Multitech
NEC
Olympic
035
027, 032, 095
029, 072, 073, 074
003, 005
063, 071
020, 026, 094
023, 025
043
064
063, 029, 064
045, 024, 027, 093
043, 059, 024, 092
003, 004, 005
045, 093
043, 026, 077, 061, 025, 042, 020, 076
063, 066, 067, 065, 071, 091
027, 026, 020, 000
033, 045, 024
037, 051, 049, 050, 089
064
083, 084, 081, 000, 001
023, 045, 058, 027, 081, 093
024, 023
003
000, 001, 002, 003, 004, 005
003, 004, 064, 005
027, 064, 058, 065, 066, 063, 067
031, 023, 024, 086
003, 004, 005
064
024, 067
038, 040, 047, 048, 041, 042
058, 045, 093
038, 040, 047, 048, 041, 042, 078, 090
047, 027, 062
003, 004, 005, 000
024, 023
Optimus
Orion
Panasonic
Penney
Pentax
Philco
Philips
Pioneer
Proscan
Quasar
Radio Shack
RCA
Realistic
Samsung
Samtron
Sansui
Sanyo
Scott
Sears
Shintom
Sharp
Signature 2000
Singer
Sony
SV 2000
Sylvania
Symphonic
Tashiro
Tatung
Teac
Technics
Teknika
Toshiba
Vector Research
Wards
Yamaha
Zenith
028, 021, 035, 064
026, 020
023, 024, 021, 022
024, 058, 045, 063, 003, 004, 005, 093
058, 005, 045, 093
031, 024, 027, 023, 026, 020, 043
031, 023, 024, 086
023
045, 058, 023, 024, 031, 046, 059, 060, 033, 087, 093
021, 022, 023, 024
033, 024, 063, 036, 067, 040, 027
033,045,058,023,024,031,046,059,060,083,084,085,087,093
024, 063, 036, 067, 040, 027
037, 060, 062,033, 089
089
003, 026, 020, 052
063, 067, 091, 071
059, 060, 062, 067, 038, 040, 047, 048, 026, 020
063, 064, 065, 066, 058, 000, 001
075
035, 036, 080,088
027, 035
075
028, 029, 030, 053, 054, 055
027
031, 023, 024, 027
027, 081
064
003, 004, 005
003, 004, 027, 005
021, 022, 023, 024
024, 027, 070
059, 046, 079
005
035, 036, 067, 044, 064
063, 003, 004, 005
044, 082, 064, 094
Fonction de recherche de codes:
1. Positionnez le sélecteur de mode sur VCR.
2. Appuyez sur les touches VCR POWER et RETURN. Maintenez la pression environ trois secondes puis relâchez.
3. Appuyez sur VCR POWER et voyez si le récepteur VCR répond.
4. Si vous obtenez une réponse, appuyez sur RETURN. Les codes de fonctionnement sont maintenant définis.
Si vous n'obtenez pas de réponse, répétez l'étape 3. Si vous répétez l'étape 3 80 fois sans obtenir de réponse,
utilisez la télécommande qui a été fournie avec l'équipement.
5. Appuyez sur RETURN pour quitter.
9
3L00501A F/01-13
9
27/3/2002, 17:10
TELECOMMANDE
(SUITE)
Configuration du (DVD)
La télécommande est programmée avec des codes DVD pour la mise sous tension, la mise hors tension, le canal
précédent ou suivant et un fonctionnement sur 10 touches.
1. Repérez la marque dans la liste de codes ci-dessous.
2. Placez le sélecteur 2 positions sur "DVD".
3. Maintenez la touche DISPLAY enfoncée.
4. Avec la touche DISPLAY enfoncée, tapez le premier code indiqué en utilisant le pavé clavier numérique.
5. Relâchez la touche DISPLAY.
6. Vérifiez le bon fonctionnement du DVD.
• Si le DVD ne répond pas au premier code, essayez les autres. S'il ne répond à aucun
code, essayez la fonction de recherche de codes ci-dessous.
• Après la programmation du boîtier de télécommande, il se peut que vous constatiez que certaines touches
concernant le lecteur de DVD n'agissent pas convenablement. Si vous constatez que certaines touches
n'agissent pas convenablement, utilisez le boîtier de télécommande qui accompagne le lecteur de DVD.
DVD
CODES
DVD
CODES
Aiwa
Apex
Denon
Hitachi
JVC
Kenwood
Konka
Mitsubishi
Onkyo
Oritron
Panasonic
Philips
Pioneer
043
040
020, 037
030, 031
000
035
039
025
041
044
020
023, 036
022
Raite
RCA
Sampo
Samsung
Sharp
Silvania
Sony
Technics
Toshiba
Wave
Yamaha
Zenith
033
021, 026
034
030
028
038
024, 045, 046, 047
020
023
042
020
027, 032
Fonction de recherche de codes:
1. Positionnez le sélecteur de mode sur DVD.
2. Appuyez sur les touches DVD POWER et RETURN. Maintenez la pression environ trois secondes puis relâchez.
3. Appuyez sur DVD POWER et voyez si le DVD répond.
4. Si vous obtenez une réponse, appuyez sur RETURN. Les codes de fonctionnement sont maintenant définis.
Si vous n'obtenez pas de réponse, répétez l'étape 3. Si vous répétez l'étape 3 30 fois sans obtenir de réponse,
utilisez la télécommande qui a été fournie avec l'équipement.
5. Appuyez sur RETURN pour quitter.
10
3L00501A F/01-13
10
27/3/2002, 17:10
RACCORDEMENT DES ANTENNES
Antenne combinée VHF/UHF
Ce télécouleur a une
gamme de syntonisation
étendue et peut capter la
plupart des canaux sans
utiliser un convertisseur.
Certaines compagnies de
câblodistribution permettent
le visionnement de "canaux
payants" dont le signal est
brouillé. Pour regarder ces
signaux, un débrouilleur, en
général fourni par la
compagnie, est nécessaire.
Câble unique de 75 ohms
Fil jumelé de 300 ohms
Séparateur Supprimer le séparateur
Transformateur
adapté 300/75 ohms
(non fourni)
Antenne UHF
Fil jumelé de 300 ohms
IN
OUT
Y
ANT(75)
VIDEO
VIDEO
L/MONO
S-VIDEO AUDIO
PB
PR
R
VIDEO 1
VIDEO 2
L/MONO
AUDIO
R
Antenne VHF
Câble unique de 75 ohms
Fil jumelé de 300 ohms
Incoming CATV
Multiplexeur
(non fourni)
Transformateur adapté
300/75 ohms (non fourni)
Converter/Descrambler
Convertisseur/débrouilleur
Converter/Descrambler
Convertisseur/débrouilleur
Séparateur
Commutateur
Splitter
A/B Switch
A/B
A B
Antenne combinée VHF/UHF (câble unique de 75
ohms ou fil jumelé de 300 ohms)
Raccordez le câble de 75 ohms de l'antenne combinée
VHF/UHF à la prise d'antenne.
Si votre antenne VHF/UHF combinée est dotée d'un fil
jumelé de 300 ohms, il est peut-être nécessaire d'utiliser
un transformateur adapté 300/75 ohms.
Antenne VHF/UHF combinée (fils jumelés séparés
VHF et UHF de 300 ohms)
Raccordez le fil jumelé UHF de 300 ohms à un
multiplexeur (non fourni). Raccordez le fil jumelé VHF de
300 ohms au transformateur adapté 300/75 ohms.
Raccordez le transformateur au multiplexeur puis
branchez le multiplexeur sur la prise d'antenne.
Antennes séparées VHF/UHF (câble de 75 ohms de
l'antenne VHF et fil jumelé UHF 300 ohms)
Raccordez le câble de 75 ohms de l'antenne VHF et le fil
jumelé de l'antenne UHF de 300 ohms au multiplexeur
(non fourni) et branchez ce dernier sur la prise
d'antenne.
REMARQUE: Si votre antenne VHF est dotée d'un fil
jumelé, utilisez un adaptateur adapté 300/75 ohms puis
raccordez le transformateur au multiplexeur.
Pour les abonnés aux services de base de
câblodistribution
Pour les services de base du câble sans convertisseur/
débrouilleur, raccordez directement le câble coaxial 75
ohms de la câblodistribution à la prise d'antenne, à l’endos
de l'appareil.
Pour les abonnés aux services de câblodistribution
à canaux brouillés
Si vous souscrivez aux services de câblodistribution
exigeant l'utilisation d'un convertisseur/débrouilleur,
raccordez le câble coaxial d'entrée de 75 ohms au
convertisseur/débrouilleur. Au moyen d'un autre câble
coaxial de 75 ohms, raccordez la prise de sortie du
convertisseur/débrouilleur à la prise d'antenne du
télécouleur. Suivez les instructions ci-dessous. Réglez le
télécouleur sur le canal de sortie du convertisseur/
débrouilleur (en général 3 ou 4) et utilisez le
convertisseur/débrouilleur pour choisir les canaux.
Pour les abonnés aux canaux câblodistribués non
brouillés et aux canaux payants brouillés
Si vous êtes abonné à un service de câblodistribution
offrant des canaux de base non brouillés et des canaux
payants exigeant l'utilisation d'un convertisseur/
débrouilleur, vous pouvez utiliser un séparateur de signal
jumelé (parfois appelé coupleur jumelé) et une boîte de
commutation A/B, qu'on peut se procurer chez
l'installateur du câble ou dans tout magasin spécialisé.
Suivez le schéma de raccordement ci-contre. Quand le
commutateur A/B est réglé à la position "B", il est possible
de syntoniser tous les canaux non brouillés en utilisant le
système de syntonisation du téléviseur. Quand il est réglé
à la position "A", il est possible de syntoniser le téléviseur
sur le canal de sortie du décodeur (en général 3 ou 4) et
d'utiliser le convertisseur pour syntoniser les canaux
brouillés.
11
3L00501A F/01-13
11
27/3/2002, 17:10
CONNEXION À UN AUTRE APPAREIL
La configuration exacte des liaisons entre les divers appareils audio et vidéo et le téléviseur, dépend du modèle et des
particularités de chacun. Pour connaître l'emplacement des entrées et des sorties audio et vidéo, reportez-vous au mode
d'emploi qui est fourni avec chaque appareil.
Les schémas de raccordement qui suivent sont proposés à titre indicatif. Vous pouvez être tenu de les modifier pour les
adapter aux appareils de votre installation. Les schémas n'ont pour objet que de montrer les interconnexions entre les
appareils.
Appuyez sur la touche INPUT pour choisir le mode AV et utiliser le téléviseur comme un moniteur.
Faites fonctionner le magnétoscope comme à l’accoutumée.
SÉLECTION TV/AV
Si vous reliez le téléviseur au magnétoscope, au caméscope,au à un jeu vidéo ou DVD, vous pouvez choisir l’appareil au
moyen de la touche INPUT.
L'indication de la source s'affiche sur l'écran pendant 4
secondes.
1. Pour relier le téléviseur à un magnétoscope
(utilisez, par exemple, les prises VIDEO 1 IN pour
effectuer la connexion.)
VCR
Entrée
vidéo
Entrée
audio (G)
VIDEO 1
COMPONENT
VIDEO 2
VIDEO 3
Arrière du téléviseur
IN
OUT
Y
VIDEO
VIDEO
PB
L/MONO
AUDIO
R
Vers la sortie
audio (G/D)/vidéo
VIDEO 1
TV
L/MONO
AUDIO
PR
VIDEO 1
3. Pour relier le téléviseur à un caméscope
Pour la lecture de la cassette du caméscope, reliez le
caméscope au téléviseur de la manière illustrée.
R
VIDEO 2
Entrée
audio (D)
Arant du téléviseur
(non fourni)
Entrée
vidéo
• Choisissez "VIDEO 1" en appuyant sur la touche
INPUT de manière à afficher l'image du
magnétoscope.
VIDEO 3 IN
VIDEO
Vers la sortie auto
(G/D)/vidéo
L/MONO
AUDIO
R
Entrée
audio (G)
Entrée
audio (D)
(non fourni)
2. Pour connecter le téléviseur à un magnétoscope
muni d’une prise S-vidéo
Si vous connectez un magnétoscope muni d’une prise
S-vidéo à la prise S-VIDEO à l’arrière du téléviseur, vous
devez aussi connecter les câbles aux prises AUDIO IN
(VIDEO 1) à l’arrière du téléviseur. Le câble S-vidéo ne
transporte que le signal vidéo. Le signal audio est séparé.
Arrière du téléviseur
VCR
Entrée audio (G)
IN
OUT
Y
ANT(75Ω)
VIDEO
VIDEO
L/MONO
L/MONO
S-VIDEO AUDIO
R
VIDEO 1
AUDIO
VIDEO 2
R
S-VIDEO
(non fourni)
Entrée
audio (D)
• Choisissez "VIDEO 3" en appuyant sur la touche
INPUT de manière à afficher l'image du caméscope.
4. Pour relier le téléviseur à un lecteur de DVD
possédant des prises COMPONENT VIDEO OUT.
Si vous reliez les prises COMPONENT VIDEO IN (Y, PB,
PR), à l'arrière du téléviseur, à un lecteur de DVD
possédant des prises COMPONENT VIDEO OUT, vous
devez également relier les câbles audio aux prises
AUDIO IN (VIDEO 2 IN) qui se trouve à l'arrière du
téléviseur.
DVD
Entrée
audio (G)
Arrière du téléviseur
IN
PB
AUDIO
(non fourni)
REMARQUES: Quand le câble S-vidéo et le câble vidéo
sont connectés en même temps, le câble
S-vidéo a la priorité sur le câble vidéo.
R
(non fourni)
OUT
Y
VIDEO
L/MONO
VIDEO 1
PR
VIDEO 2
Entrée
audio (D)
(non fourni)
• Choisissez "COMPONENT" en appuyant sur la touche
INPUT de manière à afficher l'image du lecteur de DVD.
• Si le lecteur de DVD ne possède pas de prises
COMPONENT VIDEO OUT, reliez le câble vidéo à la
prise VIDEO IN (VIDEO 2 IN). En ce cas, choisissez
"VIDEO 2" en appuyant sur la touche INPUT de
manière à afficher l'image du lecteur de DVD.
12
3L00501A F/01-13
12
27/3/2002, 17:10
CHOIX DE LA LANGUE
Ce télécouleur peut afficher à l'écran le numéro du canal et les réglages d'image/sonores en français, en espagnol ou en
anglais.
En pressant la touche MENU au début, le choix de la langue d'affichage (étape 3) apparaît à l'écran automatiquement.
Choisissez la langue pour se servir des autres options du menu.
1
Pressez la touche MENU.
2
Pressez la touche CH + (▲) ou –
(▼) pour choisir le mode de
réglage de la langue d'affichage
(LANGUE), puis pressez la touche
ENTER.
MENU
REGLAGE HORLOGE
MINU MAR/ARR
PROG. CNL
IMAGE
AUDIO
LANGUAGE / IDIOMA / LANGUE
REGLAGE PUCE V
▲ / ▼ / ENTER / MENU / EXIT
3
4
Pressez la touche CH + (▲) ou
– (▼) pour choisir la langue
désirée: le français
(FRANCAIS), l'anglais (ENGLISH) ou l'espagnol
(ESPAÑOL), puis pressez la
touche ENTER.
LANGUAGE / IDIOMA / LANGUE
▲ / ▼ / ENTER / MENU / EXIT
Pressez de nouveau la touche
EXIT.
REMARQUE:
Si le français ou l'espagnol est choisi, les indicateurs de sous-titres seront dans la langue choisie, mais le texte de soustitres ne sera pas affecté par le choix de la langue.
MISE À L’HEURE DE L’HORLOGE
Il est nécessaire de régler la date et l’heure pour la minuterie de mise sous/hors tension
1
Pressez la touche MENU.
2
Pressez la touche CH + (▲)
ou – (▼) pour choisir l’option
“REGLAGE HORLOGE” puis
appuyez sur la touche
ENTER.
4
REGLAGE HORLOGE
10 : 00 AM
MENU
REGLAGE HORLOGE
MINU MAR/ARR
PROG. CNL
IMAGE
AUDIO
LANGUAGE / IDIOMA / LANGUE
REGLAGE PUCE V
▲ / ▼ / ENTER / MENU / EXIT
▲/▼/
5
3
Pressez la touche CH + (▲) ou CH – (▼) pour
régler le minute.
Pressez la touche CH + (▲)
ou CH – (▼) pour régler le
heure, puis pressez la
touche VOL + ( ).
REGLAGE HORLOGE
12 : 00 AM
▲/▼/
/
/ ENTER / MENU/ EXIT
/
/ ENTER / MENU/ EXIT
Pressez la touche EXIT.
REMARQUES:
• Après une panne ou une interruption de courant,
le réglage de l'heure est annulé. Dans ce cas,
l'horloge doit être remise à l'heure si.
• Lorsque vous réglez les minutes, vous pouvez
procéder par pas de 10 minutes en maintenant
la touche CH + (▲) ou CH – (▼) enfoncée.
13
3L00501A F/01-13
13
27/3/2002, 17:10
MISE EN MÉMOIRE DES CANAUX
Les canaux disponibles dans votre région peuvent être
emmagasinés dans la mémoire de ce télécouleur. Ce qui
permet de balayer tous les canaux mémorisés, en ordre
croissant/décroissant, ou de sauter les canaux non désirés.
Avant de choisir les canaux, ils doivent avoir été mis en
mémoire, En plus de recevoir les canaux VHF et UHF, ce
téléviseur peut aussi capter jusqu'à 113 canaux
câblodistribués. Pour utiliser cet appareil avec une antenne,
réglez l'option du menu TV/CATV sur le mode "TV".
Lorsque l'appareil est expédié de l'usine, l'option du menu
TV/CATV est en le mode "CATV".
SYNTONISATION AUTOMATIQUE DES CANAUX
1
2
Pressez la touche MENU.
3
Pressez la touche CH + (▲) ou – (▼)
pour choisir le mode de AUTO CNL
MEMO, puis pressez la touche
ENTER. Le télécouleur commence à
mettre en mémoire tous les canaux
disponibles dans votre région.
SÉLECTION TV/CATV
1
Pressez la touche MENU.
2
Pressez la touche CH + (▲) ou – (▼)
pour choisir le mode de PROG.
CNL, puis pressez la touche
ENTER.
3
4
5
Pressez la touche CH + (▲) ou – (▼)
pour choisir le mode de TV
(télévision) ou CATV
(câblodistribution).
Pressez la touche VOL + ( ) ou –
(▼) pour choisir le mode TV ou
CATV. La flèche indique le mode
choisi.
4
MENU
REGLAGE HORLOGE
MINU MAR/ARR
PROG. CNL
IMAGE
AUDIO
LANGUAGE / IDIOMA / LANGUE
REGLAGE PUCE V
▲ / ▼ / ENTER / MENU / EXIT
PROG. CNL
TV CATV
AUTO CNL MENO
AJOUTER / ANNULATION
S-TIT CANAL
▲/▼/
/
PROG. CNL
TV CATV
AUTO CNL MENO
AJOUTER / ANNULATION
S-TIT CANAL
▲ / ▼ / ENTER / MENU / EXIT
Pressez la touche EXIT.
POUR AJOUTER/EFFACER DES CANAUX DE
LA MÉMOIRE
1
Pressez la touche MENU.
2
Pressez la touche CH + (▲) ou – (▼)
pour choisir le mode de PROG. CNL,
puis pressez la touche ENTER.
3
Pressez la touche CH + (▲) ou – (▼)
pour choisir le mode AJOUTER/
ANNULATION, puis pressez la touche
ENTER.
/ MENU / EXIT
MENU
REGLAGE HORLOGE
MINU MAR/ARR
PROG. CNL
IMAGE
AUDIO
LANGUAGE / IDIOMA / LANGUE
REGLAGE PUCE V
▲ / ▼ / ENTER / MENU / EXIT
PROG. CNL
TV CATV
AUTO CNL MENO
AJOUTER / ANNULATION
S-TIT CANAL
▲ / ▼ / ENTER / MENU / EXIT
4
Choisissez le canal à ajouter ou à
effacer en pressant les clavier
numérique (0 à 9) ou les touches CH
+ ou –.
5
Pressez la touche ENTER pour choisir AJOUTER ou
ANN.
Pressez la touche MENU EXIT.
REMARQUE: Contactez votre compagnie de
câblodistribution pour déterminer le
genre de câblodistribution utilisée dans
votre région.
Pressez la touche CH + (▲) ou – (▼)
pour choisir le mode de PROG. CNL,
puis pressez la touche ENTER.
MENU
REGLAGE HORLOGE
MINU MAR/ARR
PROG. CNL
IMAGE
AUDIO
LANGUAGE / IDIOMA / LANGUE
REGLAGE PUCE V
▲ / ▼ / ENTER / MENU / EXIT
Si vous avez choisi un canal non mémorisé (étape 4),
le numéro du canal apparaît en rouge. Pressez la
touche VOL + ( ) ou – ( ) si vous souhaitez ajouter un
canal non mémorisé. Le numéro de canal passe du
rouge au vert pour confirmer que le canal est mémorisé.
Si vous avez choisi un canal mémorisé (étape 4), le
numéro de canal est affiché en vert.
Pressez la touche VOL + ( ) ou – ( ) si vous
souhaitez effacer le canal de la mémoire. Le numéro de
canal passe du vert au rouge pour
AJOUTER
CNL 012
confirmer que le canal a été effacé de
la mémoire. Répétez les étapes 4 et 5
pour chaque canal à ajouter ou
effacer.
0-9 ▲ / ▼ / / / MENU / EXIT
6
Pressez la touche EXIT pour retourner au mode de
visionnement de la télévision.
14
3L30301A F/14-BACK
14
27/3/2002, 17:10
MISE EN MÉMOIRE DES CANAUX
(SUITE)
S-TIT CANAL
Vous pouvez donner un nom comportant 4 caractères à chaque canal.
Les noms des canaux apparaissent au-dessus de l’affichage du numéro de canal chaque fois qu’un canal est choisi.
2
Pressez la touche MENU.
3
Pressez la touche CH + (▲) ou – (▼) pour choisir
l’option "PROG. CNL" puis
MENU
REGLAGE HORLOGE
appuyez sur la touche ENTER.
6
Passez à l'opération 7 si vous avez choisi
"REGLAGE".
Passez à l'opération 9 si vous avez choisi "EFFACE".
7
Le curseur est sur la première position et clignote.
Utilisez les touches VOL + ( )
S-TIT CANAL : CNL 012
et VOL – ( ) pour taper le
REGLAGE/EFFACE
REGLAGE
premier caractère. Appuyez
LABEL - - - sur l'une ou l'autre de ces
touches jusqu'à ce que le
▲ / ▼ / / /ENTER / MENU / EXIT
caractère désiré soit affiché.
Cela fait, appuyez sur la
touche ENTER.
▼
Au moyen du pavé clavier numérique ou de la
touche CH + ou –, choisissez le canal que vous
désirez nommer.
4
▼
MINU MAR/ARR
PROG. CNL
IMAGE
AUDIO
LANGUAGE / IDIOMA / LANGUE
REGLAGE PUCE V
▲ / ▼ / ENTER / MENU / EXIT
Pressez la touche CH + (▲) ou – (▼) pour choisir
l’option "S-TIT CANAL" puis
PROG. CNL
appuyez sur la touche ENTER.
TV CATV
Remarque:
Le caractère change comme suit.
AUTO CNL MENO
AJOUTER / ANNULATION
S-TIT CANAL
–
▼
▼
▼
Appuyez sur la touche VOL + ( ), ou VOL – ( ),
pour choisir "REGLAGE" ou
S-TIT CANAL : CNL 012
"EFFACE". Choisissez
REGLAGE/EFFACE
REGLAGE EFFACE
"REGLAGE" si vous désirez
LABEL - - - nommer ou renommer un canal.
Choisissez "EFFACE" si vous
désirez effacer le nom. Cela fait, ▲ / ▼ / / /ENTER / MENU / EXIT
appuyez sur la touche ENTER.
0
•••
+
▲ / ▼ / ENTER / MENU / EXIT
5
▼
1
9
A
•••
Z
ESPACE
8
Répétez l'opération 7 pour taper les caractères
devant occuper les positions deux à quatre.
9
Appuyez sur la touche ENTER pour valider.
10
Pressez la touche EXIT.
UTILISATION DE LA PUCE V
Ce téléviseur est pourvu d’un contrôleur à puce V qui vous offre le moyen de définir l’accès aux canaux. Cette puce a
pour objet d'empêcher que les enfants ne puissent regarder des scènes violentes ou des scènes de sexe qui
pourraient les blesser.
1
2
Appuyez sur la touche MENU et
appuyez sur la touche CH + (▲)
or – (▼) pour choisir l’option
REGLAGE PUCE V, puis
appuyez sur la touche ENTER.
MENU
REGLAGE HORLOGE
MINU MAR/ARR
PROG. CNL
IMAGE
AUDIO
LANGUAGE / IDIOMA / LANGUE
REGLAGE PUCE V
▲ / ▼ / ENTER / MENU / EXIT
REGLAGE PUCE V
3
Tapez à nouveau le mot de
passe pour confirmation, puis
appuyez sur la touche ENTER.
CONFIRMER
MOT DE PASSE
3L30301A F/14-BACK
15
▼
0-9/
REGLAGE PUCE V
V-CHIP
: OFF
CLASS. PROG. TV
: OFF
CLASS. FILM
: OFF
CLASS. CAN ANG
: OFF
CLASS. CAN FRA
: OFF
CHANGE. MOT DE PASSE
▲/▼/
/
/ MENU / EXIT
Pour les Etats-Unis
REGLAGE PUCE V
V-CHIP
: ON
Appuyez sur la touche CH + (▲)
CLASS. PROG. TV
: OFF
CLASS. FILM
: OFF
ou CH – (▼) pour choisir l’option
CLASS. CAN ANG
: OFF
CLASS. CAN FRA
: OFF
CLASS. PROG. TV ou CLASS.
CHANGE. MOT DE PASSE
FILM.
▲ / ▼ / / / MENU / EXIT
Pour Canadien
Appuyez sur la touche CH + (▲) ou CH – (▼) pour choisir
l’option CLASS. CAN ANG ou CLASS. CAN FRA.
6
Appuyez sur la touche VOL + ( )
ou VOL – ( ) pour préciser le
niveau qui doit être utilisé pour la
vidéo ou le canal de télévision.
:----
/ ENTER / MENU / EXIT
Appuyez sur la touche CH + (▲)
ou – (▼) pour choisir l’option
V-CHIP.
Appuyez sur la touche VOL + ( )
ou – ( ) pour choisir ON.
5
▼
Tapez le mot de passe (4
REGLAGE PUCE V
chiffres) au moyen des clavier
NOUVEAU
MOT DE PASSE :
numérique (0 à 9) permettant la
sélection directe des canaux.
En cas d’erreur, appuyez sur la
0-9/ / ENTER / MENU / EXIT
touche VOL – ( ). Cela fait,
appuyez sur la touche ENTER.
• Après enregistrement du mot de passe,
l'opération 3 n'apparaît plus.
4
7
Pressez la touche EXIT.
27/3/2002, 17:10
REGLAGE PUCE V
V-CHIP
: ON
CLASS. PROG. TV
: TV-14
CLASS. FILM
CLASS. CAN ANG
: OFF
: OFF
CLASS. CAN FRA
: OFF
CHANGE. MOT DE PASSE
DISPLAY-CHANGE. CONTENU
▲ / ▼ / / / MENU / EXIT
15
UTILISATION DE LA PUCE V
(SUITE)
pour les Etats-Unis
NIVEAU DE TÉLÉVISION
NIVEAU D'UN FILM
VOL + ( )
OFF
TV–Y
TV-Y7
VOL – ( )
TV-G
TV-PG
TV-14
VOL – ( )
TV-MA OFF
TV-PG : assistance des parents
TV-Y : tous les enfants
TV-Y7 : enfants de plus de 7 ans TV-14 : adolescents de plus de 14 ans
TV-G : programme pour enfants TV-MA : adolescents de plus de 17 ans
Dans le cas de TV-Y7, TV-PG, TV-14 et TV-MA, appuyez
sur la touche DISPLAY pour connaître le niveau. Appuyez
sur la touche CH + (▲) or – (▼) pour choisir le niveau de
classification désiré. Appuyez sur la touche VOL + ( ) or –
( ) pour obtenir alternativement la mise en service (ON) ou
hors service (OFF).
pour Canadien
CLASS. CAN FRA
E
G
PG
PG-13
R
NC-17
X
G
: tous les âges
PG
: assistance parentale
PG-13 : assistance parentale, moins de 13 ans
R
: moins de 17 ans, assistance parentale conseillée
NC-17 : plus de 17 ans
X
: adultes uniquement
CLASS. CAN ANG
VOL + ( )
OFF
G
VOL + ( )
8ans+
VOL – ( )
13ans+
16ans+
VOL – ( )
18ans+
E
: Exemptées.
G
: Général.
8ans+ : Général-Déconseillé aux jeunes enfants.
13ans+ : Cette émission peut ne pas convenir aux enfants de
moins de 13 ans.
16ans+ : Cette émission ne convient pas aux moins de 16 ans.
18ans+ : Cette émission est réservée aux adultes.
OFF
E
C
C8+
G
PG
14+
18+
E
C
VOL + ( )
C8+
G
PG
14+
18+
: Exempt
: Programming Intended for Children
: Programming Intended for Children 8 and Over
: General Audience
: Parental Guidance
: 14 Years and Older
: Adult
REMARQUES:
• Si vous souhaitez changer le mot de passe, suivez les étapes 1 et 2 et choisissez l'option "CHANGE. MOT DE
PASSE", puis entrez un nouveau mot de passe.
• La puce V ne joue son rôle que vis-à-vis des émissions et des enregistrements sur cassette qui portent le codage
approprié définissant le niveau.
• Après avoir interdit une émission grâce à la puce V, cette émission ne peut pas être regardée. Au moment où elle
commence, la mention “SI VOUS ANNULER LA PROTECTION ENTRER MOT DE PASSE” s’affiche sur l’écran.
Pour regarder l’émission, tapez le mot de passe.
Si vous changez le canal ou mettez le téléviseur hors tension alors que la fonction V-Chip est hors service
temporairement, le réglage original est rappelé. Si vous retournez au canal que vous regardiez précédemment,
vous devez entrer de nouveau votre mot de passe pour remettre la fonction V-Chip temporairement hors service.
• Si vous regardez une émission de télévision diffusée sur le câble, ou bien un enregistrement sur cassette vidéo
introduite dans le magnétoscope relié au téléviseur par la sortie du modulateur radiofréquence, les restrictions liées
au réglage de niveau ne sont pas rétablies, si vous les avez momentanément supprimées, aussi longtemps que
vous ne mettez pas le téléviseur hors service. En effet, dans cette situation, le canal du téléviseur n’est pas utilisé.
• Lorsque vous changez de canal sur le câble ou le magnétoscope, environ 10 secondes sont nécessaires avant que
l’émission ne redevienne visible.
• Si vous avez égaré ou oublié le mot de passe, annulez-le en procédant de la manière suivante:
- Appuyez sur la touche VOLUME – de l'appareil.
- Maintenez la pression d'un doigt sur la touche VOLUME – et appuyez, pendant quelques secondes, sur la touche "0"
du boîtier de télécommande.
16
3L30301A F/14-BACK
16
27/3/2002, 17:11
FONCTIONNEMENT DU TÉLÉCOULEUR
Pour agir sur le téléviseur au moyen du boîtier de
télécommande, choisissez la position TV du sélecteur TV/
CATV de ce boîtier de télécommande.
1
2
Touche RETURN
Cette touche permet d'afficher l'image diffusée sur le canal
choisi immédiatement avant le canal actuellement utilisé.
Pressez l'interrupteur (POWER) pour mettre l'appareil
en circuit.
CNL 012
Réglez le volume au niveau désiré en pressant les
touches de réglage du VOL (VOLUME) + ou –.
Réglez le volume au niveau
désiré en pressant les touches de
Touche MUTING
réglage du volume + ou –.
Le signal sonore est
Le niveau du son sera indiqué à
automatiquement coupé quand vous
VOLUME
32
l'écran par des barres vertes. Au
appuyez sur la touche MUTING.
fur et à mesure que le volume
augmente, le nombre de barres augmente aussi à Appuyez sur la touche MUTING; le
signal sonore est immédiatement
l'écran, et vice versa.
Le niveau du son sera indiqué à l'écran par des barres
vertes. Au fur et à mesure que le volume augmente, le
nombre de barres augmente aussi à l'écran, et vice
versa.
3
Choisissez l’option du menu TV/CATV qui convient. Au
moment de quitter l’usine, le réglage CATV est adopté.
Reportez-vous à "MISE EN MÉMOIRE DES CANAUX".
TV
CATV
4
CNL 007
- Canaux VHF/UHF
- Canaux câblodistribués
Touches de sélection de canaux (CH)+/–
Pressez et relâchez la touche de
sélection des canaux (CH) + ou –.
L'appareil passe
automatiquement au prochain
canal mis en mémoire. Pressez
et gardez la touche enfoncée
pour changer plus rapidement de
canal.
CNL 012
Pour obtenir de bons résultats, avant de choisir les
canaux, ils doivent être mis dans la mémoire du
télécouleur. Voyez la section sur la "MISE EN
MÉMOIRE DES CANAUX".
SOURDINE
coupé. Pour rétablir le signal sonore à sa valeur d'origine,
appuyez une nouvelle fois sur la touche MUTING.
Clavier numérique (0 à 9)
Utilisez ces touches pour choisir directement un canal. Le
numéro du canal choisi apparaît dans le coin supérieur droit
de l'écran. Si vous avez choisi le numéro d'un canal inactif,
l'affichage indique de nouveau le canal initial.
Sélection directe des canaux de télévision
Quand l'option du menu TV/CATV est réglé sur le mode
"TV", tous les canaux peuvent être captés en pressant deux
touches. (Par exemple, pour choisir le canal 2, pressez
d'abord "0" puis "2". Si seulement la touche "2" est pressée,
la sélection sera retardée de quelques secondes.) Pour
choisir un canal supérieur à 10, pressez les deux touches,
dans l'ordre.
Sélection directe des canaux câblodistribués
Quand le sélecteur de mode TV/CATV est réglé au “CATV”
las canaux peuvent être syntonisés de la façon suivante.
CH 1-9
Pressez deux fois la touche 0, puis 1 à 9,
selon le cas. Par exemple, pour le canal 2,
pressez "002".
CH 10-12
Pressez d'abord la touche 0 puis les deux
autres touches. Par exemple, pour le canal
12, pressez "012".
CH 13-99
Pressez les deux touches, dans l'ordre.
Par exemple, pour le canal 36, pressez "36".
CH 100-125 Pressez les trois chiffres, dans l'ordre.
Par exemple, pour le canal 120, pressez "120".
REMARQUE: Le téléviseur passe automatiquement en
veille 15 minutes après l’arrêt des émissions de la station de
télévision syntonisée.
17
3L30301A F/14-BACK
17
27/3/2002, 17:11
Touche INPUT
Cette touche permet de choisir la
source appliquée au téléviseur, ou les
entrées Vidéo 1, 2, 3 ou Component
pour les appareils vidéo tels que
magnétoscopes, lecteurs de DVD ou
caméscopes.
La source change comme suit.
VIDEO 1
VIDEO1
TV
VIDEO3
VIDEO2
COMPONENT
STÉRÉOPHONIE ET CANAL SON SÉPARÉ (SAP)
Ce téléviseur est doté des circuits MTS (Multi-channel TV
Sound). Les circuits MTS augmentent le plaisir de la
télévision puisque la stéréophonie devient possible. La
spécification MTS prévoit également la présence d’un canal
son supplémentaire (canal son séparé) qui peut être utilisé
par la station pour diffuser en même temps les mêmes
informations sonores dans une autre langue, soit parce que
la station désire offrir des émissions bilingues, soit parce
qu’elle souhaite offrir un service supplémentaire.
ÉCOUTE D’UNE ÉMISSION EN STÉRÉOPHONIE
ÉCOUTE D’UNE ÉMISSION AVEC CANAL SON
SÉPARÉ (SAP)
Après la mise en service du téléviseur, ou l’accord sur une
station, la mention SAP apparaisse à l’écran si l’émission
reçue est accompagnée d’un canal son séparé.
Pour choisir les sons désirés
Appuyez sur la touche AUDIO SELECT.
ÉMISSION MONOPHONIQUE + CANAL SON SÉPARÉ
Après la mise en circuit du téléviseur, ou l’accord sur une
station, la mention STEREO apparaît à l’écran si l’émission
reçue est en stéréophonie. Vous pouvez alors profiter de la
stéréophonie grâce aux haut-parleurs gauche et droit de
l’appareil.
• Si l’émission reçue est en monophonie, aucune mention
n’apparaît à l’écran.
• Si la qualité de la réception est médiocre, ou encore si
la réception en stéréophonie n’est pas suffisamment
claire, appuyez sur la touche AUDIO SELECT pour
passer en monophonie. Dans ce cas, les parasites dans
de la reproduction sonore seront éliminés. Appuyez une
nouvelle fois sur cette touche pour revenir au mode
stéréophonique.
Son principal
(monophonie)
canal son séparé
Son principal(monophonie)
+ canal son séparé
ÉMISSION STÉRÉOPHONIQUE + CANAL SON SÉPARÉ
Son principal
(stéréophonie)
Son principal
(monophonie) + canal
son séparé
canal son séparé
Son principal
(monophonie)
Touche DISPLAY
Appuyez sur la touche DISPLAY pour afficher, comme suit, les informations sur l'écran.
Pressez une fois
Pressez deux fois
Programmes
audio séparés
(SAP)
8 : 30 AM
Heure
actuelle
Soritie audio
STEREO SAP
SS-TITRE CNL 1
SEL. STEREO
CNL 012
ABCD
Pressez trois fois
Numéro de
canaux
S-TIT CANAL
(si préréglé)
Sous-titres
Clear the current
informations
18
3L30301A F/14-BACK
18
27/3/2002, 17:11
RÉGLAGE DE L'IMAGE
Vous pouvez régler différents paramètres concernant
l’image, à savoir les couleurs, la netteté, le contraste, la
luminosité et la teinte.
Appuyez sur la touche MENU.
2
Appuyez sur la touche CH +
(▲) ou – (▼) jusqu’à ce que le
témoin voisin de “IMAGE”
commence à clignoter; cela
fait, appuyez sur la touche
ENTER.
3
LUMINOSITE
COMPONENT
CONTRASTE
TEINTE
Augmentation de la
luminosité
Augmentation du
contraste
Augmentation de la
brillancedes couleurs
Augmentation de
dominante verte
Augmentation de la
netteté de l’image
COMPONENT
Meilleure image DVD
LUMINOSITE
MENU
REGLAGE HORLOGE
MINU MAR/ARR
PROG. CNL
IMAGE
AUDIO
LANGUAGE / IDIOMA / LANGUE
REGLAGE PUCE V
▲ / ▼ / ENTER / MENU / EXIT
LUMINOSITE
▲/▼/
▼
Appuyez sur la touche CH +
(▲) ou – (▼) autant de fois
qu’il est nécessaire pour
choisir le paramètre que vous
désirez régler.
Appuyez sur la touche VOL + ( ) ou – ( ) pour faire
varier le réglage.
+
▼
1
4
/
0
/ MENU / EXIT
COULEUR
NETTETE
TEINTE
CONTRASTE
COULEUR
NETTETE
–
Diminution de la
luminosité
Diminution du
contraste
Diminution de la
brillance des couleurs
Augmentation de la
dominante rouge
Diminution de la
netteté de l’image
Indique l'appareil vidéo
sauf le lecteur de DVD
POUR REVENIR AUX RÉGLAGES INITIAUX
Appuyez sur la touche STANDARD alors que l’appareil
est en mode de réglage de l’image.
REMARQUE: L'affichage disparaît de l'écran six
secondes après la fin du réglage.
Il est possible de régler l'image
seulement quand le réglage est affiché à
l'écran.
RÉGLAGES SONORES
Vous pouvez regler différente paramètres concernant le
audio, à savoir les graves, le aigues, le equilible et la
stable sound.
Appuyez sur la touche MENU.
2
Appuyez sur la touche CH +
(▲) ou – (▼) jusqu’à ce que le
témoin voisin de “AUDIO”
commence à clignoter; cela
fait, appuyez sur la touche
ENTER.
3
GRAVES
AIGUES
EQUILIBRE
MENU
REGLAGE HORLOGE
MINU MAR/ARR
PROG. CNL
IMAGE
AUDIO
LANGUAGE / IDIOMA / LANGUE
REGLAGE PUCE V
▲ / ▼ / ENTER / MENU / EXIT
GRAVES
▲/▼/
▼
Appuyez sur la touche CH +
(▲) ou – (▼) autant de fois
qu’il est nécessaire pour
choisir le paramètre que vous
désirez régler.
Appuyez sur la touche VOL + ( ) ou – ( ) pour faire
varier le réglage.
+
/
▼
1
4
0
/ MENU / EXIT
STABLE SOUND
–
GRAVES
renforce les graves
atténue les graves
AIGUES
renforce les aiguës
atténue les aiguës
renforce le niveau de renforce le niveau de
EQUILIBRE sortie du haut-parleur sortie du haut-parleur
droit
gauche
SONS
STABLES
SONS STABLES "ON" SONS STABLES "OFF"
(STABLE
SOUND)
POUR REVENIR AUX RÉGLAGES INITIAUX
Appuyez sur la touche STANDARD alors que l’appareil
est en mode de réglage de l’image.
FONCTION SONS STABLES (STABLE SOUND)
Lorsque les sons deviennent puissants, cette fonction
les atténue automatiquement.
REMARQUE: L'affichage disparaît de l'écran six
secondes après la fin du réglage.
Il est possible de régler l'image seulement
quand le réglage est affiché à l'écran.
19
3L30301A F/14-BACK
19
27/3/2002, 17:11
SOUS-TITRAGE
QUE SIGNIFIE SOUS-TITRAGE?
Ce télécouleur a la capacité de décoder et d’afficher les
émissions télévisées avec sous-titres. Ce genre
d’émissions affichent un texte sur l’écran pour les
téléspectateurs sourds ou malentendants, ou traduisent
et affichent le texte en une autre langue.
POUR VOIR LES SOUS-TITRES
Appuyez sur la touche C.C. sur la télécommande pour
commuter entre le mode de télévision normale et les
deux modes de sous-titrage: sous-titre (Caption) et texte
pleine écran (Full Screen Text).
Sous-titres (CAPTION): Ce mode fait apparaître le texte
à l’écran en anglais ou en une autre langue. En général,
les émissions à sous-titres anglais sont transmises au
canal 1 et les émissions à sous-titres en une autre
langue sont transmises au canal 2.
Les sous-titres apparaissent en général au bas de
l’écran, pour avoir le moins d’interférence possible avec
l’image. Lorsqu’il s'agit du journal télévisé, trois lignes du
texte de nouvelles apparaissent normalement à l’écran.
La plupart des autres émissions offrent deux ou trois
lignes de sous-titres près de la personne qui parle afin
que le téléspectateur puisse suivre facilement le
dialogue.Les mots soulignés ou en italique indiquent des
titres, des mots en langue étrangère ou des mots qui
doivent être accentués. Les mots chantés sont en
général entourés de notes musicales.
Texte (TEXT): En général, ce mode fait apparaître un
texte sur le demi de l’écran, affichant un horaire ou
d’autres informations. Quand vous choisissez le mode à
sous-titrage, il demeurera activé jusqu’à ce que vous le
changiez, même si vous changez de canal. Si le signal
de sous-titrage est perdu, à cause d’une annonce
télévisée ou une interruption de transmission, les soustitres apparaîtront de nouveau quand le signal est reçu
de nouveau. Quand vous changez de canal, les soustitres apparaissent environ 10 secondes plus tard.
Dans les guides d’émissions télévisées, celles à soustitrage sont en général suivies du symbole "CC"
(CLOSED CAPTIONED).
• Quand vous choisissez le mode à sous-titrage, les sous-titres apparaissent à l’écran environ 10 secondes plus tard.
• Le texte du sous-titrage ne s’affiche que s’il est disponible.
• Si aucun signal de sous-titrage n’est reçu, les sous-titres n’apparaissent pas mais le télécouleur reste en mode de
sous-titrage.
• Des fautes d’orthographe ou des caractères insolites apparaissent parfois pendant le sous-titrage. C’est tout-à-fait
normal, surtout si l’émission est en direct, car alors les sous-titres sont créés en direct et il n’y a pas assez de
temps pour les vérifier.
• En mode de sous-titrage, l’affichage du volume ou de la coupure du son peut ne pas être visible ou peut interférer
avec les sous-titres.
• Certains systèmes de câblodistribution ou de protection anticopie peuvent interférer avec le sous-titrage.
• Si vous utilisez une antenne intérieure ou si la réception est mauvaise, le texte ou soustitre peut ne pas apparaître
ou apparaître avec des fautes ou des caractères insolites. Dans ce cas, changez la position de l’antenne ou
utilisez une antenne extérieure.
20
3L30301A F/14-BACK
20
27/3/2002, 17:11
MINU MAR/ARR
POUR RÉGLER L’HEURE DE MISE SOUS TENSION
Cette fonction vous permet de mettre le téléviseur sous tension à une heure donnée. Si vous programmez une fois la
minuterie de mise sous tension, le téléviseur se mettra sous tension tous les jours à la même heure et sur le même canal.
Si l'appareil a été mis en service à l'heure voulue, le canal programmé est sélectionné.
1
Pressez la touche MENU.
2
Pressez la touche CH + (▲) ou –
(▼) pour choisir le mode MINU
MAR/ARR, puis pressez la
touche ENTER.
3
Pressez la touche CH + (▲) ou –
(▼) pour choisir le mode MINU.
MARCHE, puis pressez la touche
ENTER.
5
MENU
REGLAGE HORLOGE
MINU MAR/ARR
PROG. CNL
IMAGE
AUDIO
LANGUAGE / IDIOMA / LANGUE
REGLAGE PUCE V
▲ / ▼ / ENTER / MENU / EXIT
MINU MAR/ARR
MINU. MARCHE
12:00AM CNL012
ANNULER
MINU. ARRET
12:00AM
6
ANNULER
▲ / ▼ / ENTER / MENU / EXIT
4
Pressez la touche CH + (▲) ou –
(▼) pour régler l’heure souhaitée,
puis pressez la touche VOL + ( ).
MINU MAR/ARR
MINU. MARCHE
12:00AM CNL012
ANNULER
MINU. ARRET
12:00AM
ANNULER
▲ / ▼ / / / ENTER / MENU / EXIT
7
8
Pressez la touche CH +
(▲) ou – (▼) pour régler
les minutes souhaitée,
puis pressez la touche
VOL + ( ).
• Vous pouvez régler par
pas de 10 minutes en
maintenant la pression d'un
doigt sur la touche CH +
(▲) ou CH – (▼).
Pressez la touche CH +
(▲) ou – (▼) pour régler le
canal souhaitée, puis
pressez la touche VOL +
( ).
• Vous pouvez définir le
canal qui est ajouté à
l'option PROG. CNL.
Pressez la touche CH +
(▲) ou – (▼) pour choisir
le mode MARCHE.
Pressez la touche EXIT.
MINU MAR/ARR
MINU. MARCHE
7:00AM CNL012
ANNULER
MINU. ARRET
12:00AM
ANNULER
▲ / ▼ / / / ENTER / MENU / EXIT
MINU MAR/ARR
MINU. MARCHE
7:30AM CNL012
ANNULER
MINU. ARRET
12:00AM
ANNULER
▲ / ▼ / / / ENTER / MENU / EXIT
MINU MAR/ARR
MINU. MARCHE
7:30AM CNL007
ANNULER
MINU. ARRET
12:00AM
ANNULER
▲ / ▼ / / / ENTER / MENU / EXIT
REMARQUES:
• Vous ne pouvez pas régler la minuterie (MINU MAR/ARR) si l'horloge n'est pas réglée.
• Le téléviseur se met automatiquement hors tension environ une heure après l’heure de mise sous tension.
• Pour désactiver la fonction de mise sous tension automatique (MINU. MARCHE): Pour annuler la minuterie de
mise sous tension automatique, à l’étape 7 puis pressez la touche CH + (▲) ou – (▼) pour choisir la position
CANCEL.
POUR RÉGLER L’HEURE DE MISE HORS TENSION
Cette fonction vous permet de mettre le téléviseur hors tension automatiquement à une heure réglée. Si vous programmez
une fois la minuterie de mise hors tension, le téléviseur se mettra hors tension tous les jours à la même heure.
1
Pressez la touche MENU.
2
Pressez la touche CH + (▲) ou –
(▼) pour choisir le mode MINU
MAR/ARR, puis pressez la
touche ENTER.
3
Pressez la touche CH + (▲) ou
– (▼) pour choisir le mode
MINU. ARRET, puis pressez la
touche ENTER.
4
MENU
REGLAGE HORLOGE
MINU MAR/ARR
PROG. CNL
IMAGE
AUDIO
LANGUAGE / IDIOMA / LANGUE
REGLAGE PUCE V
▲ / ▼ / ENTER / MENU / EXIT
MINU MAR/ARR
MINU. MARCHE
12:00AM CNL012
ANNULER
MINU. ARRET
12:00AM
ANNULER
▲ / ▼ / / / ENTER / MENU / EXIT
5
MINU MAR/ARR
MINU. MARCHE
7:00AM CNL012
ANNULER
MINU. ARRET
12:00AM
Pressez la touche CH +
(▲) ou – (▼) pour régler
l’heure souhaitée, puis
pressez la touche VOL +
( ).
ANNULER
▲ / ▼ / ENTER / MENU / EXIT
6
7
Pressez la touche CH +
(▲) ou – (▼) pour régler
les minutes, puis pressez
sur la touche VOL + ( ).
• Vous pouvez régler par
pas de 10 minutes en
maintenant la pression
d'un doigt sur la touche
CH + (▲) ou CH – (▼).
Pressez la touche CH +
(▲) ou – (▼) pour choisir
le mode ARRET.
Pressez la touche EXIT.
MINU MAR/ARR
MINU. MARCHE
12:00AM CNL012
ANNULER
MINU. ARRET
11:00PM
ANNULER
▲ / ▼ / / / ENTER / MENU / EXIT
MINU MAR/ARR
MINU. MARCHE
12:00AM CNL012
ANNULER
MINU. ARRET
11:30PM
REMARQUES:
• Si une station reçue cesse de diffuser, le téléviseur se met automatiquement hors tension après 15 minutes.
• Pour annuler la fonction de mise hors tension automatique (MINU. ARRET):
Pour annuler la minuterie de mise hors tension automatique, à l’étape 6 ci-dessus, puis pressez
CH + (▲) ou – (▼)pour choisir la position ANNULER.
3L30301A F/14-BACK
21
27/3/2002, 17:11
ANNULER
▲ / ▼ / / / ENTER / MENU / EXIT
21
BBE
En corrigeant le retard de phase et la distorsion
produites naturellement par les systèmes d’enceintes,
BBE assure que le son qui atteint vos oreilles est aussi
naturel que le son d’origine. Les voix humaines sont
claires et la musique est naturelle et bien définie.
BBE est une marque déposée de BBE Sound, Inc. Pour
les États-Unis, sous licence de BBE Sound, Inc., en
vertu des brevets américains 4638258, 4482866 et
5510572. Pour le Canada, sous licence de BBE Sound,
Inc BBE est une marque déposée de BBE Sound, Inc.
Pour régler le BBE
Appuyez sur la touche BBE pour
choisir soit ON, soit OFF.
ON
OFF
▼
BBE AUDIO
Sleep Timer (Minuterie Sommeil)
Cette inuterie met le téléviseur hors tension à votre place
en cas d’assoupissement. Vous pouvez programmer
cette fonction avec des intervalles de 10 minutes à 120
minutes.
ARRET DIF.
120
• Pour modifier le réglage de la minuterie Sommeil:
Appuyez de manière répétée sur la touche SLEEP
TIMER de façon à afficher l'heure désirée.
• Pour arrêter la minuterie Sommeil:
Appuyez de manière répétée sur la touche SLEEP
TIMER de façon à afficher 0.
Boutons Magnétoscope
Vous pouvez utiliser cette télécommande pour activer les
fonctions de base de votre magnétoscope. Ces fonctions
comprennent : lecture, enregistrement, rembobinage,
avance rapide, arrêt, pause, balayage des canaux, TV/
magnétoscope, mise en marche et à l’arrêt.
Boutons DVD
Vous pouvez également utiliser cette télécommande
pour activer les fonctions de base de votre lecteur
DVD. Ces fonctions comprennent : lecture,
rembobinage, avance rapide, arrêt, image fixe/pause,
image précédente/suivante, ouverture/fermeture du
plateau, mise en marche et mise à l’arrêt
Mettez l ’interrupteur sélecteur à la position VCR pour
activer.
• La télécommande est préréglée avec le code 000
pour commander les magnétoscopes de marque JVC.
Pour un magnétoscope de toute autre marque,
reportez-vous à la liste de codes et aux instructions
figurant à la page 9.
Mettez l’interrupteur sélecteur à la position DVD pour
activer.
• La télécommande est préréglée avec le code 000
pour commander les lecteurs DVD de marque JVC.
Pour un lecteur DVD de toute autre marque, reportezvous à la liste de codes et aux instructions figurant à
la page 10.
Interrupteur TV/CATV
Utilisez le syntonisateur du téléviseur ou une boîte de
câble pour sélectionner les canaux. Mettez cet
interrupteur à la position TV pour utiliser le syntonisateur
incorporé au téléviseur.
Mettez l’interrupteur à la position CATV pour utiliser une
boîte de câble.
• Reportez-vous à la page 8 pour obtenir des informations sur la programmation de votre télécommande
pour l’utilisation de la boîte de câble.
Interrupteur VCR/DVD
Vous pouvez commander un magnétoscope ou un
lecteur de DVD en utilisant les boutons situés sur la
partie inférieure de la télécommande.
Utilisez l’interrupteur sélecteur VCR/DVD pour choisir
l’utilisation du magnétoscope ou du DVD.
• Reportez-vous aux pages 9 et 10 pour plus de
renseignements sur la programmation de votre
télécommanmde à l’aide des codes d’utilisation
magnétoscope et DVD.
22
3L30301A F/14-BACK
22
27/3/2002, 17:11
GUIDE DE DÉPISTAGE DES PANNES
Vérifiez d'abord les points suivants avant de faire appel à un service de réparation.
SYMPTÔME
SOLUTION POSSIBLE
• Assurez-vous que le cordon d'alimentation soit branché.
• Essayez une autre prise.
L'appareil ne fonctionne pas.
• Il n'y a pas de courant. Vérifiez le fusible ou le disjoncteur.
• Débranchez l'appareil pendant une heure puis branchez-le de nouveau.
• Réglez comme il convient le commutateur à 2 positions que porte le boîtier de télécommande
(reportez-vous à la page 6).
Mauvais son ou son
inexistant.
Mauvaise image ou image
inexistante.
Mauvaise réception de
certains canaux.
• Problème à la station ou au réseau de câblodistribution. Essayez une autre station.
• Vérifiez le réglage du son (VOL ou MUTING).
• Recherchez des sources d'interférences possibles.
• Problème à la station ou au réseau de câblodistribution. Essayez une autre station.
• Assurez-vous que les canaux soient mis en mémoire.
• Vérifiez le raccordement de la CATV ou de l'antenne. Ou changez la position de l'antenne.
• Recherchez des sources d'interférences possibles.
• Vérifiez les réglages de l'image.
• Problème à la station ou au réseau de câblodistribution. Essayez une autre station.
• Assurez-vous que les canaux soient mis en mémoire.
• Le signal de la station est faible. Changez la position de l'antenne.
• Recherchez des sources d'interférences possibles.
Mauvaise couleur ou
couleur inexistante.
• Problème à la station ou au réseau de câblodistribution. Essayez une autre station.
• Assurez-vous que les canaux soient mis en mémoire.
• Vérifiez les réglages de l'image.
• Vérifiez le raccordement de la CATV ou de l'antenne. Ou changez la position de l'antenne.
• Recherchez des sources d'interférences possibles.
L'image tremble ou dérive.
• Problème à la station ou au réseau de câblodistribution. Essayez une autre station.
• Assurez-vous que les canaux soient mis en mémoire.
• La compagnie de câblodistribution brouille les signaux.
• Vérifiez la position de l'antenne.
Pas de réception de la
câblodistribution.
• Vérifiez le raccordement au réseau de câblodistribution.
• Réglez l'option du menu de TV/CATV sur le mode CATV.
• Problème à la station ou au réseau de câblodistribution. Essayez une autre station.
Barres horizontales ou
diagonales à l'écran.
Pas de réception
au-delà du canal 13.
• Assurez-vous que le menu du mode TV/CATV soit réglé au mode approprié.
• Recherchez des sources d'interférences possibles.
• Assurez-vous que l'option du menu du mode TV/CATV soit réglé sur um mode approprié.
• Si vous utilisez une antenne UHF, vérifiez son raccordement.
• Les piles sont faibles, épuisées ou mal insérées.
• La télécommande est hors de portée; placez-vous à moins de 15 pieds du téléviseur.
• Assurez-vous que la télécommande soit pointée vers le télécouleur.
• Assurez-vous qu'il n'y ait pas d'obstruction entre la télécommande et le télécouleur.
• Assurez-vous que l'appareil soit branché.
• Réglez comme il convient le commutateur à 2 positions que porte le boîtier de télécommande
(reportez-vous à la page 6).
La télécommande ne
fonctionne pas.
Le télécouleur s'éteint.
Le décodeur de sous-titres
ne fonctionne pas.
• La station cesse d'émettre.
• L'arrêt différé est réglé.
• MINU MAR/ARR est réglé.
• Il n'y a pas de courant.
• Environ une heure après la mise en service de la minuterie, l'arrêt survient si la minuterie est
réglée (reportez-vous à la page 21).
• La station a des problèmes ou cette émission n'est pas sous-titrée. Essayez un autre canal.
• Vérifiez le raccordement de la CATV ou de l'antenne VHF/UHF, ou changez la position de
l'antenne.
• Pressez la touche C.C. pour mettre le décodeur en circuit.
L'affichage n'est pas montré • Choisissez la langue voulue parmi les options du menu.
dans la langue sélectionnée
La télécommande ne
commande pas votre
appareil.
La télécommande ne
commande pas certaines
fonctions de votre appareil.
• Réglez comme il convient le commutateur à 2 positions que porte le boîtier de télécommande
(reportez-vous à la page 6).
• Programmez la télécommande avec un code différent.
• La télécommande n’est peut-être pas compatible avec votre appareil.
• Installez de nouvelles piles.
• Programmez la télécommande avec un code différent.
• La télécommande ne peut peut-être pas commander toutes les fonctions de votre appareil.
23
3L30301A F/14-BACK
23
27/3/2002, 17:11
FICHE TECHNIQUE
Entrée du CA:
Consommation de courant:
Tube image:
Sortie nominale audio:
Haut-parleurs:
Entrées audio/vidéo:
120V, 60Hz
80 W
14" (mesuré à la diagonale)
2,5 + 2,5 W
1-5/8" (4 cm) x 2-13/16" (7 cm), 8 ohm x 2
Entrée COMPONENT:
Y-Entrée:
1,0V c-à-c 75 ohm
PB, PR-Entrée: 0,7V c-à-c 75 ohm
Entrée S-Vidéo:
Y-Entrée:
1,0V c-à-c 75 ohm
C-Entrée:
0,3V c-à-c 75 ohm
Vidéo Entrée:
1,0V c-à-c 75 ohm
Audio Entrée:
–8dB, 47K ohm
181 canaux, à synthétiseur de fréquences à quartz (PLL)
Syntonisateur:
Canaux captés:
VHF
UHF
CATV
Impédance d'entrée d'antenne:
Dimensions (L x P x H):
Poids:
2-13
14-69
01-97 (5A)-(A-3)
98-99 (A-2)-(A-1)
14-22 (A)-(I)
23-36 (J)-(W)
37-65 (AA)-(FFF)
66-125 (GGG)-(125)
Câble coaxial 75 ohms (VHF/UHF)
17-1/8" (432 mm) (L) x 15-1/2" (393,5mm) (P) x 13-5/8" (344,5mm) (H)
26,4 Ib (12,0 kg)
ACCESSOIRE:
Télécommande
2 piles “AA”
Les spécitications peuvent changer sans préavis.
JVC COMPANY OF AMERICA
Division of U.S. JVC CORP.
1700 Valley Road
Wayne, New Jersey 07470
JVC CANADA, INC.
21 Finchdene Square
Scarborough, Ontario
Canada M1X 1A7
3L00501A K
02/04
IMPRIMÉ EN THAÏLANDE
24
3L00501A F/14-BACK
24
1/4/2002, 16:23