1
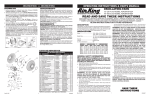
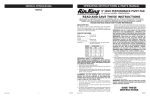
OPERATING INSTRUCTIONS & PARTS MANUAL
MODEL/MODELO 2EKZ7/9046
WALL MOUNTED
OSCILLATING FAN
9
8
11
16" (40,6 cm) MODEL 2EKZ7/9046
READ AND SAVE THESE INSTRUCTIONS
4
READ CAREFULLY BEFORE ATTEMPTING TO ASSEMBLE, INSTALL, OPERATE OR MAINTAIN THE PRODUCT DESCRIBED. PROTECT YOURSELF AND OTHERS BY OBSERVING ALL SAFETY INFORMATION. FAILURE TO COMPLY
WITH INSTRUCTIONS COULD RESULT IN PERSONAL INJURY AND/OR PROPERTY DAMAGE!
10
RETAIN INSTRUCTIONS FOR FUTURE REFERENCE.
DESCRIPTION
7
6
3
2
5
SPECIFICATIONS
1
12
MAINTENANCE
Key
1
2
3
4
5
6
7
8
9
10
11
12
Description
Front Grill w/Ornament
Spinner
Fan Blade
Guard Nut
Ring Screw
Grill Ring
Rear Grill
Motor Assembly
Wall Mount Plate Safety Screw
Wall Mounting Plate Screws
Wall Mounting Plate
Remote Control
Llave Descripción
1
Rejilla delantera con adorno
2
Eje de pivote
3
Aspa del ventilador
4
Tuerca de protección
5
Tornillo de anillo
6
Anillo de rejilla
7
Rejilla trasera
8
Conjunto del motor
9
Tornillo de seguridad para
10
11
12
placa de montaje de pared
Tornillos para placa de montaje de pared
Placa de montaje de pared
Control remoto
Rev. A 5/08
Part No.
9046001
9046002
9046003
9046004
9046012
9046011
9046006
9046007
9046010
9046009
9046008B
9046005
Qty.
1
1
1
1
1
1
1
1
1
3
1
1
No. De Parte
9046001
9046002
9046003
9046004
9046012
9046011
9046006
9046007
Qty.
1
1
1
1
1
1
1
1
9046010
9046009
9046008B
9046005
WARNING: ALWAYS UNPLUG THE CORD BEFORE MOVING OR SERVICING THE FAN.
WARNING: DO NOT IMMERSE FAN IN WATER!
CLEANING: Use a soft cloth moistened with a mild soap solution,
such as liquid dish washing detergent. Dry ALL PARTS COMPLETELY
before reassembling. After any maintenance or servicing, COMPLETELY REASSEMBLE unit as described in this instruction manual
before reconnecting to the power supply.
CAUTION: Do not use gasoline, benzine, thinner, harsh cleaners, etc. as
they will damage the Fan. NEVER use ALCOHOL OR SOLVENTS.
LUBRICATION: Precision bearings are sealed at the factory for life
and will not require any further lubrication.
STORAGE: Store the Fan, with these instructions, in a cool, dry
place.
MANTENIMIENTO
ADVERTENCIA: SIEMPRE DESENCHUFE EL CABLE ANTES DE MOVER
O DAR SERVICIO AL VENTILADOR.
ADVERTENCIA: ¡NO SUMERJA EL VENTILADOR EN AGUA!
LIMPIEZA: Utilice un paño suave humedecido con una solución jabonosa
liviana, tal como un detergente líquido para lavar platos. Seque TODAS
LAS PARTES POR COMPLETO antes de rearmar. Después de dar
mantenimiento o servicio, REARME POR COMPLETO la unidad en la forma
descrita en este manual de instrucciones, antes de volver a conectarla
a la fuente de poder.
PRECAUCIÓN: No utilice gasolina, bencina, acetona, limpiadores
abrasivos, etc. puesto que dañarán el Ventilador. NUNCA use ALCOHOL
O SOLVENTES.
LUBRICACIÓN: Los cojinetes de precisión vienen sellados de por vida en
la fábrica y no precisarán ninguna lubricación adicional.
ALMACENAMIENTO: Guarde el Ventilador con estas instrucciones en un
lugar fresco y seco.
1
3
1
1
4
WARNING: USE OF A THREE-PRONG TO TWO-PRONG ADAPTER
IS NOT RECOMMENDED. IMPROPER CONNECTION MAY CREATE THE RISK OF ELECTRIC SHOCK. USE OF SUCH ADAPTERS
IS NOT PERMITTED IN CANADA.
WARNING: This plug is a safety feature. To reduce
the risk of fire, electric shock and personal injury,
do not remove, replace, repair or tamper with
the originally supplied plug. If the Fan does not
function properly, it may be due to the safety device
incorporated in this plug.
The Air King 16” (40,6 cm) Remote Controlled - Wall Mounted
Oscillating Fan features manual push button and remote control
operation and also features a Timer function. It has a permanently
lubricated motor and a 6' (1.82 m) 18/3 cord set. It also features
an integrated safety plug.
9046ES
Motor .................................120V, 60 Hz
Blade diameter ...................16" (40,6 cm)
Speeds.................................3
Control................................Push Button/Remote Control
Air flow distribution............45°
Approvals............................ETL Listed. Close mesh Fan Guard
meets OSHA requirements.
MODEL
SPEED
CFM
M3/s
RPM
Amps
Watts
dBA
HIGH
1480
0.70
1275
0.40
50
44
8. Where possible, avoid the use of extension cords. If they must
be used, minimize the risk of overheating by ensuring that they
are UL listed. Never use a single extension cord to operate more
than one Fan.
9. Do not operate any Fan with a damaged cord or plug or after the
Fan malfunctions, has been dropped or damaged in any manner.
Return Fan to authorized service facility for examination,
electrical or mechanical adjustment or repair.
10.Do not insert or allow fingers or foreign objects to enter any
ventilation or exhaust opening as it may cause an electric shock
or fire, or damage the Fan. Do not block or tamper with the Fan
in any manner while it is in operation.
11.This Fan is not intended for use in wet or damp locations. Never
locate a Fan where it may fall into a bathtub or other water
container.
12.Do not use Fan outdoors.
13.This Fan is not suitable for use in agricultural facilities including
areas where livestock, poultry or other animals are confined.
Please refer to National Electric Code (NEC) Article 547-7
(2008), or applicable state or local codes or standards relating
to electrical requirements for Agricultural Buildings. THIS FAN
DOES NOT MEET THE REQUIREMENTS OF NEC ARTICLE
547-7 (2008).
14.This Fan is not suitable for use in hazardous locations. Please
refer to National Electric Code (NEC) Article 500 or applicable
state or local codes or standards relating to electrical
requirements for Hazardous locations. THIS FAN DOES NOT
MEET THE REQUIREMENTS OF NEC ARTICLE 500 (2008).
2EKZ7/9046
MED
LOW
1340
0.63
1180
0.36
43
39
1140
0.54
1040
0.32
37
34
* Tested in accordance with AMCA standard 230-99
GENERAL SAFETY INFORMATION
When using electrical appliances, basic precautions should
always be followed to reduce the risk of fire, electric shock
and injury to person, including the following:
1. Read all instructions before using Fan. 2. Make certain that the power source conforms to the electrical
requirements of the Fan.
3. Use this Fan only as described in this manual. Any other use
not recommended by the manufacturer may cause fire, electrical
shock, or injury to persons.
4. Unplug power cord before installing, servicing, or moving the Fan.
WARNING: DO NOT DEPEND UPON THE ON-OFF SWITCH
AS THE SOLE MEANS OF DISCONNECTING POWER WHEN
INSTALLING OR SERVICING THE FAN. ALWAYS UNPLUG THE
POWER CORD.
5. This Fan must NOT be used in potentially dangerous
locations such as flammable, explosive, chemical-laden
or wet atmospheres.
6. DO NOT use Fan in or near a window. Rain may create an
electrical hazard.
7. The power cord is equipped with a three-prong grounded
plug that must be inserted into a matching receptacle. Under
no circumstances should the grounding prong be cut off the
plug. Where a two-prong wall receptacle is encountered, it
must be replaced with a properly grounded three-prong receptacle installed in accordance with the National Electrical
Code (NEC) and all applicable local codes and ordinances.
This work must be done only by a qualified electrician, using
copper wire only.
Rev. A 5/08
WARNING: REDUCE THE RISK OF FIRE OR ELECTRIC
SHOCK – DO NOT USE THIS FAN WITH ANY SOLID STATE
SPEED CONTROL DEVICES.
SAVE THESE
INSTRUCTIONS
1
9046ES
MANUAL DE INSTRUCCIONES DE OPERACIÓN Y PARTES
MODEL/MODELO 2EKZ7/9046
VENTILADORES OSCILANTES DE MONTAJE EN PARED
16" (40,6 cm) MODELO 2EKZ7/9046
LEA Y GUARDE ESTAS INSTRUCCIONES
LÉALAS CUIDADOSAMENTE ANTES DE INTENTAR ARMAR, INSTALAR, OPERAR O DAR MANTENIMIENTO AL PRODUCTO
DESCRITO. PROTÉJASE A SÍ MISMO Y A LOS DEMÁS OBSERVANDO TODA LA INFORMACIÓN SOBRE SEGURIDAD. ¡NO
SEGUIR LAS INSTRUCCIONES PODRÍA RESULTAR EN LESIONES PERSONALES Y/O DAÑOS A LA PROPIEDAD!
GUARDE LAS INSTRUCCIONES PARA REFERENCIAS FUTURAS.
DESCRIPCIÓN
El ventilador oscilante Air King® 16” (40,6 cm) con control remoto para pared tiene un botón manual y operación con control
remoto, además de una función de temporizador. Tiene un
motor lubricado permanentemente y un cable (18/3) de 1,82 m.
También tiene un enchufe de seguridad integrado.
Código Nacional de Electricidad y todos los códigos y ordenanzas
locales aplicables. El trabajo deberá hacerlo un electricista
calificado, utilizando exclusivamente alambre de cobre.
ADVERTENCIA: NO SE RECOMIENDA EL USO DE UN ADAPTADOR
DE TRES A DOS ESPIGAS. LA CONEXIÓN INDEBIDA PODRÍA
CREAR EL RIESGO DE SER ELECTROCUTADO. EL USO DE TALES
ADAPTADORES NO ESTÁ PERMITIDO EN CANADÁ.
ADVERTENCIA: Este enchufe es una medida de seguridad.
Para reducir el riesgo de incendio, choque eléctrico y
lesiones personales, no quite, ni reemplace, ni repare
o altere el enchufe que se provee originalmente. Si
el VENTILADOR no funciona correctamente, puede
deberse al dispositivo de seguridad incorporado en
este enchufe.
8. De ser posible, evite el uso de cables de extensión. Si debieran
usarse, minimice el riesgo de sobrecalentamiento procurando que
estén aprobados por UL. Nunca use un solo cable de extensión
para hacer funcionar más de un Ventilador.
9. No haga funcionar ningún Ventilador con un cable o enchufe
dañado o después de que el ventilador presente algún desperfecto
o haya sido dejado caer o sufriera cualquier tipo de daño.
Regrese el Ventilador a un servicio de reparación autorizado para
examinar el Ventilador, efectuarle ajustes eléctricos o mecánicos
o repararlo.
10.No introduzca ni permita que se introduzcan dedos u objetos
extraños en ninguna abertura de ventilación o escape, puesto
que podría provocar un golpe de electricidad, incendio, o daños
al ventilador. No bloquee ni manipule el Ventilador de ninguna
manera mientras esté en funcionamiento.
11.Este Ventilador no ha sido diseñado para usarse en lugares mojados
o húmedos. Nunca coloque un Ventilador donde quepa la posibilidad
de que caiga en una bañera u otro recipiente con agua.
12.No use el Ventilador en exteriores.
13.Este Ventilador no es adecuado para usar en instalaciones
de agricultura incluyendo áreas donde se almacene ganado,
aves de corral u otros animales. Por favor consulte el Articulo
547-7 (2008) del Código Eléctrico Nacional (NEC), o los códigos
o normas estatales o locales aplicables con relación a los
requisitos eléctricos para edificios destinados a las agricultura.
ESTE VENTILADOR NO CUMPLE CON LOS REQUISITOS DEL
ARTICULO 547-7 DEL NEC (2008).
14.Este Ventilador no es adecuado para usar en lugares peligrosos.
Por favor consulte el Artículo 500 del Código Eléctrico Nacional
(NEC), o los códigos o normas estatales o locales aplicables
con relación a los requisitos eléctricos para lugares peligrosos.
ESTE VENTILADOR NO CUMPLE CON LOS REQUISITOS DEL
ARTICULO 500 (2008).
Especificaciones
Motor....................................... 120V, 60Hz
Tamaño de paletas................... 16" (40,6 cm)
Velocidades............................ 3
Control.................................... Control remoto/botón de presionar
Distribución del lujo de aire... 45°
Aprobaciones...........................Catalogación ETL. El protector de malla cerrada del Ventilador satisface las normas OSHA.
MODELO
VELOC.
CFM
M3/s
RPM
Amps
Watts
dBA
ALTA
1480
0.70
1275
0.40
50
44
2EKZ7/9046
MEDIA
1340
0.63
1180
0.36
43
39
BAJA
1140
0.54
1040
0.32
37
34
* Probó de acuerdo con el estándar de AMCA 230-99
INFORMACIÓN GENERAL DE SEGURIDAD
Al usar aparatos eléctricos, las precauciones básicas
de seguridad deberan siempre de seguirse para reducir
el riesgo de incendio, choque eléctrico, y daño a
personas, incluyenda las siguientes.
1. Lea todas las instrucciones antes de utilizar el Ventilador.
2. Cerciórese de que la fuente de poder sea compatible con las
demandas eléctricas del Ventilador.
3. Use este Ventilador sólo en la forma que se describe en el
manual. Cualquier otro uso no recomendado por el fabricante
podría ocasionar un incendio, golpes de electricidad o lesiones a
personas.
4. Desenchufe el cable eléctrico antes de instalar, proporcionar
servicio o mover el Ventilador.
ADVERTENCIA: NO DEPENDA DEL INTERRUPTOR DE
ENCENDIDO-APAGADO COMO EL ÚNICO MEDIO PARA
DESCONECTAR LA POTENCIA AL INSTALAR O PROPORCIONARLE
SERVICIO AL VENTILADOR. DESENCHUFE SIEMPRE EL CABLE
ELÉCTRICO.
5. Este Ventilador NO debe usarse en ubicaciones potencialmente
peligrosas, tales como en ambientes inflamables, explosivos,
cargados de sustancias químicas o húmedos.
6. NO use el Ventilador en o cerca de una ventana. La lluvia puede
generar riesgos eléctricos.
7. El cordón eléctrico está equipado con una clavija a tierra de
tres espigas que tiene que ser enchufada a un receptáculo del
mismo diseño. Bajo ninguna circunstancia deberá cortarse la
espiga a tierra de la clavija. De existir un receptáculo de pared
de dos espigas, deberá reemplazarse por uno de tres espigas
debidamente puesto a tierra e instalado de conformidad con el
Rev. A 5/08
ADVERTENCIA: DISMINUYA EL RIESGO DE INCENDIO O GOLPES
DE ELECTRICIDAD – NO USE ESTE VENTILADOR CON ARTEFACTOS
DE CONTROL DE VELOCIDAD EN ESTADO SÓLIDO.
CONSERVE ESTAS
INSTRUCCIONES
2
9046ES
ASSEMBLY
5. OSCILLATION: Press the Oscillation Button ( ) to start and stop the
oscillation function.
6. TIMER: The timer function allows the unit to be set to operate for a length
of time from 1/2 hour to 7 1/2 hours. Press the Timer Button ( ) on the
Remote Control to set the length of time desired. After reaching 7 1/2
hours, pressing the timer button once more will reset the Fan to continuous
running. The lights on the front of the unit will light up appropriately with
the length of time that the Fan is set for.
7. To turn the Fan OFF, press the Power Button ( ).
8. After turning the Fan off, unplug the unit from the electrical
outlet.
1. Remove the white safety screw from front of Fan. (Figure 1)
2.Install wall mount plate by following Installation procedures.
3.Place Fan on mounting plate and tighten white safety screw in front of
Fan.
4.Put Rear Grill on Motor by aligning the tab on the Rear Grill with the 3 tabs on
the Motor.
5.Fully seat Rear Grill on Motor and secure with Plastic Nut turning
Clockwise.
6.Slide Blade onto Motor Shaft. (Align groove on blade hub with
pin on motor shaft.)
7.To secure Blade, screw Spinner onto Shaft Counter Clockwise
until tight on Blade hub.
8.Place plastic groove ring over Rear Grill. Tighten half way.
9.Snap Front Grill into plastic groove and tighten screw.
OPERACION
Puede operar este ventilador con los controles manuales ubicados en la parte
superior de la unidad o con el control remoto (mostrado en la Figura 2).
1. Remueva el ventilador de la caja y ensamble según las instrucciones.
2. Conecte el cable eléctrico a un tomacorriente de 120 voltios.
Asegúrese que el enchufe encaje firmemente en el tomacorriente.
De no encajar firmemente en el tomacorriente, podrían deslizarse parcial
o completamente fuera del tomacorriente apenas con un ligero movimiento del cable conectado. Los tomacorrientes en este estado podrían
sobrecalentarse y representar un grave peligro de incendio; si estuvieren
cubiertos por una cortina o tela, el riesgo de incendio es aún mayor.
3. Encienda el ventilador al presionar el botón de Encender ( ).
4. VELOCIDAD: Presione el botón de Velocidad del ventilador ( ) hasta
la configuración de velocidad deseada. Cada vez que se presiona el
botón de Velocidad del ventilador, cambiará la velocidad de alta, media
y baja.
5. OSCILACION: Presione el botón de Oscilación ( ) para iniciar y detener
ENSAMBLADO
1.Remueva el tornillo blanco de seguridad de la parte frontal del ventilador
(Figura 1)
2.Instale la placa de montaje de pared al seguir los procedimientos de
instalación.
3.Coloque el ventilador en la placa de montaje y apriete el tornillo blanco
de segu ridad en la parte frontal del ventilador.
4.Coloque la rejilla trasera en el motor al alinear la pestaña en la rejilla
trasera con las tres pestañas en el motor.
5.Fije completamente la rejilla trasera en el motor y asegure con la tuerca de
plástico al darle vuelta en el sentido de las agujas del reloj.
6.Deslice el aspa en el eje del motor. (Alinee la ranura en el
cubo del aspa con pasador en el eje del motor).
7.Para fijar el aspa, atornille la pieza giratoria en el eje en el
sentido contrario a las agujas del reloj hasta que quede fija
en el cubo del aspa.
8.Coloque el anillo de la ranura de plástico sobre la rejilla trasera. Apriete
hasta la mitad.
9.Quite la rejilla delantera en la ranura de plástico y apriete el tornillo.
Remove White
Safety Screw
REMOTE CONTROL (Figure 2)
1. Install batteries (supplied) as shown in Figure 2. The battery is type
“AAA”.
2. The Remote Control Power Button is labeled as ( ).
3. All the functions performed with the Remote Control work identically to the Manual Controls.
4. Do not mix old and new batteries. Do not mix alkaline, standard
(carbon-zinc) or rechargeable (nickel-cadmium) batteries.
5.DO NOT DISPOSE OF BATTERIES IN FIRE. BATTERIES MAY EXPLODE
OR LEAK.
Remueva el tornillo
blanco de seguridad
CONTROL REMOTO (Figura 2)
Figure 1
1. Instale las baterías (incluidas) según se muestra en la Figura 2. El tipo de batería
es “AAA”.
2. El botón de Encender del control remoto está indicado con ( ).
3. Todas las funciones realizadas con el control remoto operan de manera
idéntica a los controles manuales.
4. No mezcle las baterías viejas con las nuevas. No mezcle las baterías
alcalinas con las estándares (carbono-zinc) o las recargables (níquelcadmio).
5. NO DESECHE LAS BATERÍAS EN FUEGO. LAS BATERÍAS PUEDEN
EXPLOTAR O TENER FUGAS.
Figura 1
INSTALLATION
1. Locate a stud behind wall. If stud cannot be found, special types of
mounting anchors are available at your hardware store.
2. Secure Mounting Plate to wall with Screws supplied (#8 X 1 1/4" Wood
Screws).
3. Fan is now ready to hang on Mounting Plate.
Front View of Remote
Vista de frente del
Control Remoto
INSTALACIÓN
1. Ubique un montante detrás de la pared. Si no puede encontrarlo, hay
disponibl tipos especiales de anclas de montaje en la ferretería.
2. Fije la placa de montaje en la pared con los tornillos suministrados
(tornillos paraadera No. 8 de 3,2 cm).
3. Ahora el ventilador está listo para ser colgado en la placa de montaje.
Back View of Remote
Vista posterior del
Control Remoto
Speed Button
Botón de Velocidad
Oscillation Button
Botón de Oscilación
Timer Button
Botón de
Temporizador
Power Button
Botón de Encendido
OPERATION
This Fan may be operated by the manual controls located on top of
the unit or by the Remote Control (shown in Figure 2 ).
1. Remove the Fan from the carton and assemble as instructed.
2. Plug the cord set into a 120 volt outlet.
Be sure that the plug fits tightly into outlet.
When plugs fit loosely into receptacles, they may slip partially or completely
out of the receptacle with only the slight movement of the attached cord.
Receptacles in this condition may overheat and pose a serious fire hazard;
if covered by a curtain or drape, the fire hazard is even greater.
3. Turn the Fan on by pressing the Power Button ( ).
4. SPEEDS: Press the Fan Speed Button ( ) to desired speed setting.
Each time the Fan Speed Button is pressed, the speed will change
from High, Medium and Low.
Rev. A 5/08
Figure 2
3
Figura 2
9046ES