1
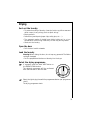
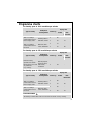
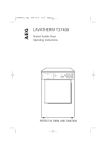
LAVATHERM T3
Ablufttrockner
Exhaust air dryer
Gebrauchsanweisung
Operating instructions
TROCKENZEIT
AUS ERFAHRUNG GUT
LAVATHERM T3
SCHON LÜFTEN
Dear customer,
Please read these operating instructions carefully and pay particular
attention to the safety notes indicated in the first pages. We recommend that you keep this instruction booklet for future reference and
pass it on to any future owners.
The warning triangle and/or the key words (Warning!, Caution!) emphasize information that is particularly important for your safety or correct
functioning of the appliance.
This symbol guides you, step by step, in the operation of the appliance.
The information marked with this symbol provides additional instructions and practical tips on the use of the appliance.
Tips and information about economical and ecological use of the
machine are marked with the clover symbol.
Should any problems arise, this booklet provides instructions on how to
solve them by yourself; see section “Something not working?”.
If this information is not sufficient, please contact our nearest Service
centre (address and telephone numbers are indicated on the enclosed
leaflet).
Printed on recycled paper.
People who think ecologically, act accordingly....
23
Contents
Safety instructions . . . . . . . . . . . . . . . . . . . . . . . . . . . . . . . . . . . . . . . . . . . . 25
General instructions. . . . . . . . . . . . . . . . . . . . . . . . . . . . . . . . . . . . . . . . . . . 27
Discarding . . . . . . . . . . . . . . . . . . . . . . . . . . . . . . . . . . . . . . . . . . . . . . . . . . . 28
Tips for environmental protection . . . . . . . . . . . . . . . . . . . . . . . . . . . . . . . 29
The most important features of your appliance . . . . . . . . . . . . . . . . . . . 30
Structure of the appliance . . . . . . . . . . . . . . . . . . . . . . . . . . . . . . . . . . . . . 31
Front view. . . . . . . . . . . . . . . . . . . . . . . . . . . . . . . . . . . . . . . . . . . . . . . . . . . . 31
Rear view . . . . . . . . . . . . . . . . . . . . . . . . . . . . . . . . . . . . . . . . . . . . . . . . . . . . 31
Control panel . . . . . . . . . . . . . . . . . . . . . . . . . . . . . . . . . . . . . . . . . . . . . . . . . 32
Programme selector . . . . . . . . . . . . . . . . . . . . . . . . . . . . . . . . . . . . . . . . . . . . 33
Programme selector as phase indicator . . . . . . . . . . . . . . . . . . . . . . . . . . 33
Before the first drying cycle. . . . . . . . . . . . . . . . . . . . . . . . . . . . . . . . . . . . 33
Brief operating instructions . . . . . . . . . . . . . . . . . . . . . . . . . . . . . . . . . . . . 34
Drying . . . . . . . . . . . . . . . . . . . . . . . . . . . . . . . . . . . . . . . . . . . . . . . . . . . . . . 35
Sort out the laundry . . . . . . . . . . . . . . . . . . . . . . . . . . . . . . . . . . . . . . . . . . . 35
Open the door . . . . . . . . . . . . . . . . . . . . . . . . . . . . . . . . . . . . . . . . . . . . . . . . 35
Load the laundry . . . . . . . . . . . . . . . . . . . . . . . . . . . . . . . . . . . . . . . . . . . . . . 35
Select the drying programme . . . . . . . . . . . . . . . . . . . . . . . . . . . . . . . . . . . . 35
Remove or add laundry . . . . . . . . . . . . . . . . . . . . . . . . . . . . . . . . . . . . . . . . . 36
End of drying cycle . . . . . . . . . . . . . . . . . . . . . . . . . . . . . . . . . . . . . . . . . . . . 36
Switch the tumble dryer off . . . . . . . . . . . . . . . . . . . . . . . . . . . . . . . . . . . . . 36
Clean the filter . . . . . . . . . . . . . . . . . . . . . . . . . . . . . . . . . . . . . . . . . . . . . . . . 36
Programme charts . . . . . . . . . . . . . . . . . . . . . . . . . . . . . . . . . . . . . . . . . . . . 37
Brief summary of fabric information . . . . . . . . . . . . . . . . . . . . . . . . . . . . 38
Care symbols . . . . . . . . . . . . . . . . . . . . . . . . . . . . . . . . . . . . . . . . . . . . . . . 38
Cleaning and care . . . . . . . . . . . . . . . . . . . . . . . . . . . . . . . . . . . . . . . . . . . . 39
Cleaning the door . . . . . . . . . . . . . . . . . . . . . . . . . . . . . . . . . . . . . . . . . . . . . 39
Cleaning the drum . . . . . . . . . . . . . . . . . . . . . . . . . . . . . . . . . . . . . . . . . . . . . 39
Cleaning the panel and the controls . . . . . . . . . . . . . . . . . . . . . . . . . . . . . . . 39
Something not working? . . . . . . . . . . . . . . . . . . . . . . . . . . . . . . . . . . . . . . . 40
Technical specifications . . . . . . . . . . . . . . . . . . . . . . . . . . . . . . . . . . . . . . . . 41
Electrical connection . . . . . . . . . . . . . . . . . . . . . . . . . . . . . . . . . . . . . . . . . . 41
Special accessory . . . . . . . . . . . . . . . . . . . . . . . . . . . . . . . . . . . . . . . . . . . . . 41
Kit washing/drying column . . . . . . . . . . . . . . . . . . . . . . . . . . . . . . . . . . . . . . 41
Service . . . . . . . . . . . . . . . . . . . . . . . . . . . . . . . . . . . . . . . . . . . . . . . . . . . . . . 42
24
Safety instructions
The safety of AEG appliances complies with the industry standards and with
legal requirements on the safety of appliances. However, as manufacturers,
we feel it is our duty to provide the following safety notes.
General safety
• Repairs to the dryer must be carried out only by qualified personnel.
Repairs carried out by inexperienced persons could cause serious danger.
Contact our Service Centre or your AEG dealer.
• Before starting the appliance check that the rated voltage and the type of
current indicated on the rating plate correspond to those which exist where
the dryer is installed. The type of fuse is also indicated on the rating plate.
• Never start the appliance if the electrical supply cable is damaged or
the control panel or worktop are so damaged that inner components
can be reached.
• Unplug the appliance before carrying out any cleaning or maintenance
operations.
• Never pull the power supply cable to remove the plug from the socket;
always take hold of the plug itself.
• Do not lean on the open door, the appliance could turn over.
• Never spray the machine with a jet of water. Danger of electric shock!
• If the drying programme is interrupted in order to remove the laundry:
the laundry and the drum could be very hot.
Child safety
• Children are often not aware of how dangerous electrical appliances can
be. When the machine is working, they should be carefully supervised
and not be allowed to play with the appliance - there is a risk that they
could become trapped inside.
• The packaging components (e.g. plastic film, polystyrene) can be dangerous to children - danger of suffocation! Keep them out of children’s
reach.
• Make sure that children or pets do not climb into the drum.
25
Safety instructions
Positioning and connection
• Follow the separate instructions for positioning and connection and,
if necessary, take into consideration the advice of your local chimney
sweep or of local authorities.
• Check that the appliance has not been damaged during transport.
Never connect a damaged appliance! If this is the case, contact your
dealer.
• The dryer must not be installed in a room where the temperature can
fall below zero or higher than + 35°C.
• The dryer must be positioned horizontally.
• The dryer must not be positioned on a thick pile carpet as this would
prevent air from circulating freely through the ventilation slots.
• If the appliance is installed near a gas, coal or electric heater, an insulating
not-inflammable panel must be inserted between the dryer and the heater
(size: 85x57.5 cm).
• The plug of the dryer must always be accessible.
• The dryer’s exhaust must not be fed into a cooker hood, or a chimney or
flue pipe designed to carry the exhaust from a fuel burning appliance.
• For correct ventilation of the room, avoid the formation of low pressure.
• A permanent connection to the mains power supply can only be carried
out by a qualified electrician.
26
Safety instructions
Proper use
• For safety reasons, the appliance must not be modified.
• This appliance is designed for domestic use only. If the dryer is used
for any other purposes or is not used correctly, the manufacturer
accepts no responsibility for any possible damage that might occur.
• Dry only items that have been washed with water. Never dry items that
have been in contact with inflammable solvents (petrol, methylated
spirits, dry cleaning fluid and the like). These are of a volatile nature and
could cause an explosion or a fire.
• Items containing rubber foam or materials similar to rubber foam
must not be dried in the appliance. Fire danger!
General instructions
• Starched fabrics leave traces of starch in the drum, therefore they
should not be dried in the appliance.
• If the load to be dried exceeds the maximum weight indicated, creasing
may occur. For particularly delicate fabrics, the maximum load should
not exceed 1.5 kg.
• For your information: 70 per cent of fabric wear is caused by wearing the
garments, 20 percent by washing and only 10 percent by drying them in
a tumble dryer. In your appliance, fluff accumulates in the filter. Only
0.03g fluff per Kilo will be lost by your laundry when being machine
dried.
27
Discarding
Packaging materials
Dispose of your tumble dryer’s packaging materials correctly. All materials
are environmentally friendly and can be disposed of without any danger,
or can be burnt in the refuse incinerator.
The plastic parts can be reused:
• The external plastic cover and the bags inside are made of polyethylene
(>PE<).
• The padding is made of CFC free polystyrene foam (>PS<=).
Cartons are made of recycled paper and should be disposed of in paper
collection containers.
Appliance
Warning! When the appliance is disposed of, pull the plug out of the
socket, cut off the electrical supply cable and destroy the plug with the
remaining cable. Disable the door catch in order to prevent children
from becoming trapped inside while playing.
To dispose of the appliance correctly, contact the local body responsible
for collection.
28
Tips for environmental protection
• During washing, try not to use fabric softeners!
If the laundry is machine dried, it will remain soft even without using
fabric softeners.
• Shake out your laundry!
Shake out the laundry before putting it into the dryer in order to
reduce the drying time and creasing.
• Spin the laundry properly before drying it!
As a general rule, the more the laundry is spun, the more economically
your dryer works.
In the following table, indications on consumption are provided,
according to the spin speed. The data refers to 5 kg of laundry that have
to be store dried.
Spinning:
Revolutions
per minute
Drying cycle:
Residual
dampness
in litres
in %
Time required
in minutes
Energy requirement
in kWh
800
3.5
70
93
3.5
1000
3.25
65
85
3.2
1200
3.0
60
80
3.0
1400
2.75
55
70
2.8
• Please observe the full load specifications!
The machine works more economically if it is fully loaded, as indicated
in the programme charts.
29
The most important features of your appliance
• Select the correct drying programme!
Select the drying programme suited to the type and quantity of laundry, so
that your dryer will work more economically. Some consumption values:
Type of laundry
Cotton1
Cotton
1
Mixed fabrics
2
Desired degree
of dryness
Load in kg
Duration in
minutes
Energy
consumption in kWh
Store dry
5
93
3.5
Iron dry
5
74
2.7
Store dry
2.0
48
0.9
1) previously spun at 800 rpm
2) previously spun at 650 rpm.
• HALF HEAT button: can only be used for loads up to 2 kg!
• Clean the fluff filter after each drying cycle!
The most important features of your appliance
• Time selection by means of programme selector
• HALF HEAT button for gentle drying of delicate cottons
• FRESH & COOL button for gentle drying of delicate fabrics
30
Structure of the appliance
Front view
Control panel
TROCKENZEIT
LAVATHERM T 3
SCHON LÜFTEN
Rating plate
Fluff filter
Door handle
Door (opening direction
can be changed)
Adjustable feet
Rear view
Power
supply cable
Side vent outlet
Rear vent outlet
Ring nut
Intake grille
31
Structure of the appliance
Control panel
DRYNG TIME
LAVATHERM
T3
HALF FRESH
HEAT & COOL
AB
C
D
A HALF HEAT button: for delicate cottons.
B FRESH & COOL button: for delicate fabrics.
C Control light: comes on when the programme is selected.
D Programme selector: to select the drying time.
32
Structure of the appliance
Programme selector
20
0
0
10
80
60
60
80
0
20
40
• Time setting
80 MIN - 20 MIN: to select
the required drying time, in minutes, for
synthetics.
0
12
40
• Time setting
120 MIN - 20 MIN: to
select the required drying time, in minutes,
for cottons.
• COOLING Position : to smooth out
creased garments with a cold air flow;
slightly moisten the creased areas beforehand; duration: 8 minutes.
• OFF Position O: in this position the dryer is switched off, the control
light is not on.
Programme selector as phase indicator
The programme selector acts as an indicator of the cycle phases, by
turning clockwise until the end of the programme is reached.
Before the first drying cycle
Wipe the drum of the dryer with a damp cloth before performing the
first drying cycle.
33
Brief operating instructions
• Spin the laundry as much as possible.
• Sort out the laundry.
• Put the laundry into the tumble dryer.
• If necessary, press the HALF HEAT or FRESH & COOL button.
• Select the drying time with the programme selector.
When the programme is in progress, the door can be opened in order to
remove laundry or to add other items.
At the end of the programme:
• Switch off the tumble dryer.
• Remove the laundry.
• Clean the fluff filter.
34
Drying
Sort out the laundry
• To prevent bundling of laundry: close zips, button up pillow cases and
duvet covers; tie any strings, such as apron strings.
• Empty pockets.
• Remove any metal parts (paper clips, safety pins, etc. ....).
• Turn garments made of double layer fabrics inside out (e. g. turn
anoraks with cotton lining inside out), so that they will dry better.
• Shake out the laundry.
Open the door
• Pull the door handle outwards.
Load the laundry
Warning! When closing the door, do not trap any garments! The fabrics
could get damaged.
• Put the prepared and shaken out laundry into the dryer.
Select the drying programme
60
80
10
0
0
20
0
40
12
20
0
If necessary, press the HALF HEAT button or
the FRESH & COOL button.
The selected programme will be performed
with reduced heat or without heat.
40
60
80
Select the right drying time with the programme selector (see “programme
chart”).
The drying programme starts.
35
Drying
Remove or add laundry
It is possible to interrupt the drying cycle at any time in order to remove
or add laundry.
Open the door.
Caution! Laundry and drum can be hot.
Remove or add laundry.
Close the door to continue the drying cycle.
End of drying cycle
A cooling phase is performed before the end of the drying cycle: the
heat is cut off during this phase. After the cooling phase, it is possible
to remove the laundry from the dryer.
Open the door and remove the laundry.
Switch the tumble dryer off
Pull out the plug.
Clean the filter
To ensure free circulation of air during the drying cycle, the fluff filter
must be cleaned after each drying cycle, before removing the laundry.
Use a damp cloth to do this.
The fluff filter cannot be removed.
36
Programme charts
For laundry spun at 1000 revolutions per minute
Drying time
Type of laundry
Examples of
laundry/fabrics
Thick or multilayer
cottons which have to
be thoroughly dried.
Towelling fabrics,
bathrobes, towels.
Thick or multilayer
cottons which have to
be ironed.
Bed linen, table
cloths, dishtowels.
Load in kg
normal
HALF
HEAT button
5
85
-
2
50
70
5
70
-
2
35
60
For laundry spun at 650 revolutions per minute
Drying time
Type of laundry
Delicate laundry,
synthetics and mixed
fabrics that do not need
any treatment
(e. g. ironing).
Examples of
laundry/fabrics
Delicate jumpers,
shirts, bed linen,
table cloths,
underwear.
Load in kg
2
normal
48
HALF
HEAT button
-
For laundry spun at 1200 revolutions per minute
Drying time
Type of laundry
Examples of
laundry/fabrics
Thick or multilayer
cottons which have to
be thoroughly dried.
Towelling fabrics,
bathrobes, towels.
Thick or multilayer
cottons which have to
be ironed.
Bed linen, table
cloths, dishtowels.
Load in kg
normal
HALF
HEAT button
5
80
-
2
45
65
5
65
-
2
30
55
COOLING PHASE
The laundry is treated with cold air for 8 minutes to smooth out any creasing.
37
Brief summary of fabric information
Care symbols
Check whether fabrics are suitable for tumble drying. One of the following
symbols should appear on the care label:
Basically, this fabric can be tumble dried; however the manufacturer does
not specify whether it can be dried with normal or low temperature.
Normal drying (normal temperature)
Gentle drying (low temperature)
Do not tumble dry
If none of these symbols is found:
Dry cottons, as well as mixed fabrics, at normal temperature. Press the
HALF HEAT button when delicate cottons have to be dried.
It is advisable to take into consideration the care symbols on garment
labels when buying them.
• Wool, eiderdowns
Do not dry any woollen items in the tumble dryer! They can felt!
Eiderdowns can be tumble dried only if the corresponding care symbol
is present.
• Fabrics sensitive to high temperatures
Dry fabrics sensitive to high temperatures (such as acrylic or viscose)
and items bearing the
care symbol using a drying time setting
between 20 and 80 MIN or pressing the FRESH & COOL button.
• Tricot garments, knitwear
• Tricot garments and knitwear tend to shrink.
Do not overdry these items. High quality products are less likely to
shrink.
• New coloured fabrics
Do not dry new coloured fabrics with light-coloured laundry. This
could lead to discoloration!
38
Cleaning and care
Cleaning the door
Clean the door regularly to
remove any fluff.
Cleaning the drum
Warning! Do not clean the stainless
steel drum with abrasive detergent
or steel wool.
Wipe the inside of the drum and
the drum paddles with a standard
household detergent (e.g. vinegar
solution).
Cleaning the panel and the controls
Warning! Do not use household furniture polish or abrasive detergents.
Wipe the panel and the controls with a damp cloth only. Use only warm
water.
39
Something not working?
If a problem occurs, you can try to solve it yourself following the instructions
below. If you call out an engineer when one of the following problems occurs,
or to repair a fault due to incorrect use, the call-out will be charged even if
requested within the guarantee period.
Problem
Possible cause
The programme selector has not been set correctly.
The dryer does not
work.
The plug is not connected.
The main fuse has blown.
The door is not properly closed.
The programme selected is not correct.
Unsatisfactory
drying results.
Clean the fluff filter.
Follow the load indications.
The laundry was not adequately spun.
The drying cycle is
too long.
Clean the fluff filter.
If you cannot find any useful information in these operating instructions to solve your problem, please contact our nearest service centre.
40
Technical specifications
Height x Width x Depth
85x60x57 cm
Depth with the door open
93 cm
Height adjustment
6 mm
Empty weight
33 kg approx.
Load (according to the programme)
max. 5 kg
(Different load sizes in some countries are due to different measuring
methods)
Use
Domestic
Permissible ambient temperature
+5°C to +35°C
This appliance complies with the following EC directives:
- 73/23/EEC of 19/2/1973 “Low voltage directive”
- 89/336/EEC of 3/5/1989 “EMC directive” including modification
directive 92/31/EEC.
Electrical connection
Specifications concerning the power supply are indicated on the rating
plate. The rated voltage and the type of current stated on the plate
must correspond to those which exist where the dryer is installed. Also
refer to the rating plate for the type of fuse required.
Permanent connection must be carried out only by a qualified
engineer.
Special accessory
You can obtain the following special accessory through the AEG customer
service organisation of from your dealer:
Kit Washing/drying column
With this kit you can combine your dryer with any LAVAMAT automatic
washing machine to a washing and drying column. The appliances are
stacked in space-economising manner in this arrangement, the washing
machine at the bottom and the dryer at the top.
41
Service
In the chapter “Something not working?” some problems that can be
solved by yourself are listed. Read this section in the event of problems.
If you are not able to find a solution, contact the Service centre. It is
close by and, if necessary, an engineer will soon be with you. (Addresses
and telephone numbers are given on the enclosed form).
In all cases, set your speech before calling, in order to facilitate troubleshooting: the engineer will be able to decide whether a service visit
is necessary.
Take note of the serial number (Ser. No.) and the product number (Prod. No.)
indicated on the rating plate.
Ser. No. . . . . . . . . . . . . . . . . . . . . . .
Prod. No. . . . . . . . . . . . . . . . . . . . . .
Mod. LAVATHERM T3 Type P511212
Prod. No. 916770543 00
220-230V~ 50Hz 2600 W
16 A
Ser. No.
Try to specify, as precisely as possible:
• The symptoms of the fault.
• When the fault occurs.
When can a service visit be charged during the guarantee period?
- when it should have been possible to solve the problem by yourself,
with the help of the troubleshooting chart (see section “Something
not working?”)
- when the engineer has to come out several times because he has
not been given all the relevant information he needs and so, for
example, has to fetch spare parts. Repeated trips can be avoided if
you prepare your call to the Service centre as described above.
42
AEG Hausgeräte GmbH
Postfach 1036
D-90327 Nürnberg
http://www.aeg.hausgeraete.de
© Copyright by AEG
H125.995.031-02-0298