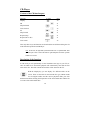
1
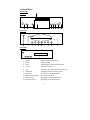
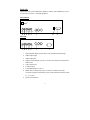
0 Symbol Description Warning! – This symbol alerts you to a potentially hazardous condition, such as the presence of dangerous voltage that could pose a risk of electrical shock. Refer to the accompanying Warning Label or Tag, and exercise extreme caution. Caution! – This symbol alerts you to important operating considerations or a potential operating condition that could damage equipment. Refer to the User’s Manual or Operator’s Manual for precautionary instructions. Copyright This product incorporates copyright protection technology that is protected by method claims of certain U.S. patents and other intellectual property rights owned by Macrovision Corporation and other rights owners. Use of this copyright protection technology must be authorized by Macrovision Corporation, and is intended for home and other limited viewing uses only unless otherwise authorized by Macrovision Corporation. Reverse engineering or disassembly is prohibited. Manufactured under license from Dolby laboratories. “Dolby” and the double-d symbol are trademarks of Dolby laboratories. Manufactured under license from Dolby laboratories. "Dolby" and the double-d symbol are trademarks of Dolby laboratories. Confidential Unpublished Works. 1992-1997 Dolby Laboratories, Inc. All rights reserved. Caution TO REDUCE THE RISK OF ELECTRIC SHOCK, DO NOT REMOVE COVER FRONT OR BACK . NO USER-SERVICEABLE PARTS INSIDE. REFER SERVICING TO QUALIFIED SERVICE PROFESSIONAL. 1 THIS PRODUCT APPLIES U.S. PATENT NOS.4,631,603, 4,577,216, 4,819,098, AND 4,907,093 LICENSED FOR LIMITED VIEWING USES ONLY.. Federal Communications Commission ( FCC ) Statement This device complies with Part 15 of the FCC Rules. Operation is subject to the following two conditions: (1) This device may not cause harmful interference, and (2) This device must accept any interference received; including interference that may cause undesired operation. This Equipment has been tested and found to comply with the limits for a Class B digital device, pursuant to Part 15 of the FCC rules. These limits are designed to provide reasonable protection against harmful interference in a residential installation. This equipment generates, uses and can radiate radio frequency energy and, if not installed and used in accordance with the instructions, may cause harmful interference to radio communications. However, there is no guarantee that interference will not occur in a particular installation. If this equipment does cause harmful interference to radio or television reception, which can be determined by turning the equipment off and on, the user is encouraged to try to correct the interference by one or more of the following measures: Reorient or relocate the receiving antenna. Increase the separation between the equipment and receiver. Connect the equipment into an outlet on a circuit different from that to which the receiver is connected. Consult the dealer or an experienced radio TV technician for help. Warnings Use only shielded cables to connect I O devices to this equipment 2 Content Copyright , FCC statement Unpacking the DVD-Player List of playable media How to handle discs General Part Front side Back side Connecting the DVD-Player Remote Control VFD Display System LEDs Configuration (SETUP) DVD-Player Content of the DVD function part Description of the functions MP3-Player Content of the MP3 function part Description of the functions CD-Player Content of the CD function part Description of the functions VCD-Player Content of the VCD function part Description of the functions Technical Data Warranty and Service Information 3 4 5 5 6 7 9 10 11 11 12 17 18 26 26 30 30 33 33 35 36 3 Unpacking the DVD-Player Please check the contents of your DVD-Player carton User manual 1 pc Remote Control 1 pc Battery 2 pcs for remote control [size “AA” (R6P)] Power Cord 1 pc Video cable Audio cable 1 pc 1 pc (DVD-218/288/298 contain 3 audio cables) S-Video cable 1 pc 4 List of playable media All Yamakawa DVD-Players are compatible to DVD-, CD- and Video-CD Discs. All discs listed here can by played on this product. Usable Discs DVD Video 1 Schicht 2 Schichten Video CD CD-Audio CD-R CD-RW play back time Digital Audio 133min (4,7GB) 242min (8,5GB) 74min maximal 74min maximal 80min maximal 80min maximal Other discs than listed here can not be played on this product and may not be put into the drive in order to prevent damage. Discs than cannot be played on this player: - CD-ROM - CDV - CD-G - Photo CDs How to handle discs • Hold discs always at their edges. • Fingerprints, dirt, scratches may cause distortions. • Do not write on any side of the disc. • Do not use any anti static cleaning liquid. • Do not let the discs fall down and do not bend them. • Do not put more than one disc into the drive of the player. • Do not close the drive if the disc is not positioned correctly. • Keep the disc always in a separate box. Cleaning • Wipe the discs with a soft damp cloth. • Always wipe from the center to the edge of the disc. Do not wipe in circle movements since this may lead to scratches on the disc. Wrong storage You may damage discs if you store them in the wrong place: • Places exposed to direct sun light. • Humid and dusty places. • Places close to a radiator or any other heat emitter. 5 General Part: Front side DVD-268 5 NTSC/PAL DIMM 1 6 DVD-278 1 DVD-208 1 1. 2. 3. 4. 5. 6. 7. 8. 9. 10. 7 5 6 8 3 9 10 2 4 9 10 2 4 8 3 3 2 4 5 On/Off On/off switch of DVD-Player STOP Stops playback PLAY Starts playback; select in menu system Tray key open/close the drive Tray part of the drive where the disc has to be put NTSC/PAL changing TV-System NTSC to PAL Dimm key for 4 levels of display brightness Multi function display shows status of player Skip back key Beginning of current chapter/track Skip forward key Beginning of next chapter/track 6 Back side On the back side you will find all the outputs to connect your DVD-Player to your TV set and your Stereo- / Surround equipment . DVD-268/278 1 Optical Right Left Coax. Video S-Video 2 3 4 5 6 DVD-208 Right Left Coax. Video S-Video 2 3 4 5 6 1. 2. 3. 4. 5. 6. 7. 8. 9. Y Cb Cr 7 Y 8 Cb 9 Cr 7 9 Optical digital output (optical cable is not contained in the packing) Audio Output right Audio Output left Digital Coaxial Output (you can f.e. use the red connectors of the normal audio cable) Video output (AV) S-Video output Component Output (Y Cb Cr) Master Power switch (only if power switch is not in the front side) (to switch on players with master power switch in the back turn the switch to „1“ or „On“) power cord connector 7 Connecting the DVD-Player Note: While your are connecting the DVD-Player to your TV-Set or Stereo-/Surround equipment, switch off all machines and pull their power cords. Video-Connection TV-set If your TV-set does not have component inputs you should at least connect your DVD-Player with the S-Video cable. The video connection via the standard-AV output should be your last choice. To connect your DVD-Players to your TV-set via a Video-recorder is not recommended because it may result in massive picture distortions. These are created by the DVD-Player`s built in Macrovision copy protection system which every DVD-Player must have. TV-set with direct antenna input (f.e. cable TV) If your TV set is directly connected to the antenna (you are not using any receiver or decoder) you should connect the DVD-Player directly to the TV set via component output, S-Video or AV-Video (composite). TV-set with indirect connection to antenna (f.e. Decoder/SAT-Receiver) If your TV-set is connected to the antenna via a Decoder / SAT-Receiver you can either directly connect your DVD-Player to the TV or you can connect the DVDPlayer to the Decoder/Receiver provided there are enough input connectors. The connection through a decoder/receiver may be better if there are no free component or S-Video inputs on your TV-set and you would have to use the AV-(composite) input instead. Decoder/Receivers normally have enough video input connector and can easily handle a connected. DVD-Player Audio Connection Audio playback using your TV-set If you are only using your TV-set for audio playback you only need to connect the analog left and right signal (RCA) to your TV-set. 8 Audio playback using your Stereo-/Surround equipment Parallel to the TV-set the sound can also be output through a connected Stereo/Surround-equipment. Modern Surroundreceivers which have digital input connectors allow to connect the DVD-Player via its digital coaxial output. Only if the DVD-player is connected through a digital audio connection, audio signals can be transmitted as Dolby Digital 5.1 or DTS. If there is no possibility of an digital connection you can use the analog outputs to connect to your stereo equipment. Analog audio connections can output audio signals in Dolby ProLogic or Dolby Surround. 9 Remote Control 1. Standby 1. 2. DVD-Menu 3. tray open/close 2. 3. Resume/Memo 4. Setup DVD Player 5. slow motion 6. Resume (Memo) 4. 5. 6. 7. 8. 9. 10. 11. 12. 13. 14. 15. 16. 17. 15. 18. 19. 20. Display 7. Intro Play (CD/MP3) 8. Chapter- [time search] 9. Display [Info / time] 10. Language setting 11. Angle / Shuffle 12. Mute 13. Subtitle 21. 14. Zoom 15. Volume 16. FR 22. 23. 17. FF 18. Skip back 19. Skip forward 20. Pause 21. Cursor keys 24. 22. PLAY 25. 23. STOP 26. 27. 24. PBC 25. Repeat loop 26. Repeat Scene/Film 27. Program-Mode On some remote controls key no. 6 may be marked as Resume or Memo. The function is identical. 10 VCD Display (only model DVD-268/278) 1 2 4 5 3 6 7 10 8 1. type of disc inserted 2. Playback / Pause 3. Audio output 4. DVD title with parental control 5. Playback (player reads disc) 6. Repeat 7. Number of title 9 13 11 12 8. Number of chapter/track 9. Angle 10. Dolby Digital 11. Zoom 12. PBC playback control (VCD) 13. Time System-LEDs (only model DVD-208) Underneath the power key there are two LED on the front bezel. These LED show the different operational modes: Left Right Status Off Off Player is switched off Blinking Off Player is in standby mode Blinking Blinking Problem with Regional Code On Off Normal playback for all disc types On On Playback of DVDs with Dolby 5.1 Signal Off Blinking Disc is loaded Blinking Off Tray is opening/closing 11 Configuration (SETUP) Once you have connected your DVD-Player you may now switch it on. If the video connection is correct you will see the Yamakawa startup picture. Before you insert a DVD-movie or any other disc into the player you should complete the setup settings which are described on the following pages. The basic settings of the DVD-Player are done in the SETUP. If you press the SETUP key you will see the main menu of the DVD-Player. Normally these settings only have to be made once before the first time you use the player in order to match your player to the TV set and the audio equipment. Later on during using your player changes in the SETUP are rather unlikely. To change in between the items AUDIO, VIDEO and OTHER, where various settings can be made use the cursor keys. When starting the SETUP you already are in the AUDIO menu. If you press SETUP again you will save you setting a leave the SETUP again. AUDIO In the AUDIO menu you may select two items with the cursor keys: • „OUTPUT“ (Audio output) • „DRC” (Dynamic Range Control) 12 Audio output If you use the coaxial or optical digital output of your DVD-Player for the audio output, then choose „DOLBY“. If your DVD-Player is connected to your TV set or stereo equipment with an analog connection choose the setting „PCM“. Also during the setting „DOLBY“ analog signals will be sent out parallel to the digital signals. So therefore the speakers of your conventionally connected TV set will still be working. The factory setting is „DOLBY“. DRC Here you can set the Dynamic Range Control. This function will not allow loud noises in a film (f.e. explosions) to exceed a certain value even if the noise in the film is supposed to be louder. The factory setting is “ON”. VIDEO If you change to the item VIDEO in the setup the following settings can be made: • TV screen • TV system • Subtitle With the vertical cursor keys you can select the items to be changed and with the Play key you can select the value of this item by pressing as often as needed. TV screen: TV System: Subtitle: 4:3 AUTO ON LB NTSC OFF WIDE PAL 13 4:3 TV screen If you have a TV set with widescreen format 16:9 you should select „WIDE“. If you have a TV with 4:3 format you should choose the setting „4:3“, since the black bars during movies will disappear. If you choose the 4:3-setting „LB“ the well known black bars on top and bottom of the screen will appear but the picture is wider to the left and right. Factory setting is „4:3“. TV System If you have an older TV set it may not have multisync technology. In this case you have to choose „NTSC“. If you TV-set has multisync technology you can select „AUTO“ and your TV-Set will automatically match to the playback mode of your DVD-Player. By this you can watch PAL- and NTSC films (check the region code setting of your DVD-Player first) without making any other settings. Factory setting is „NTSC“. Subtitle Depending on the film it is possible to generally determine the subtitle definition. Subtitles will be always switched on after starting a film (then please choose „ON“) or will be always switched off (then please choose „OFF“). There are DVD movies that have their own menu system, whose subtitle definition will be overruling the setup definition of this player. The factory setting is „ON“. During play back of a DVD you can choose the available subtitles by pressing the subtitle key on your remote control. 14 OTHER If you choose “OTHER” in the main menu, you have 4 items to choose from: • PASSWORD • LEVEL • OSD LANGUAGE • Display DIMM PASSWORD By entering a password you can change the level of parental control under the item “LEVEL”. If you entered the right password you may also change the factory set password and replace it with your own. The factory set password is „8888“ LEVEL Some DVD movies have electronic parental control function which will work together with the settings in this menu item. This electronic security code is common on US DVDs. The following levels can be chosen: „ADULT“, „KIDSAFE“, „2“, „3“, „4“, „5“, „THEAT“ or „7“. The factory setting is „ADULT“. 15 OSD LANGUAGE OSD-Language is the language of the menu that you are currently setting. The setting of this language has nothing to do with the playback of a DVD. If you like to keep the english menu, which is factory set, you do not need to change anything. DISPLAY DIMM On the models (DVD-268/278) with VFD-Display on the front side you can control the brightness of the display in 4 levels. 16 DVD-Player Content of the DVD function part Function Symbol Page Displaysystem 21 Chapter search 20 Drive 18 Volume control /Resume 24 Bookmark 19 Menusystem of the DVD 19 Pause 24 Cursor keys 25 FR 24 Skip backward 24 Setup DVD-Player 19 Language of movie 22 Standby Mode 18 Stop 25 Mute 22 Subtitle 23 FF 24 Skip forward 24 PLAY 25 Repeat (loop) 25 Repeat (Chapter or Film) 25 Angle setting 22 Time display 21 Slow motion 19 Time search 20 Zoom 23 17 Description of the functions: Explaining the functions during DVD-Player mode according to the keys on your remote control. Hints for playing discs Some DVD titles require different operation or certain inputs on your remote control are not possible due to limitations that have been made by the maker of the individual disc. In such cases the operational steps may be different or certain functions may not be available. Some discs f.e. offer interactive menu screens during playback. Some keys on your remote control have different functions in MP3, VCD or Audio-CD mode. These special functions will be explained in the sections „MP3Player“, „CD-Player“ and „VCD-Player“. With the Standby key on your remote control you can switch on and off the standby mode. If you want to switch off your player for a longer time, f.e. several hours, you should switch off the player using the power switch (front side DVD-208, backside DVD-268/278). On of the blue LED on the front side of the DVD-208 is blinking during standby mode. The standby mode is only useful to use if you have bookmarked the disc in the player and you want to continue watching the film from this bookmark a little later. The Tray Open key opens and closes the tray of the DVD drive in any operational mode, provided the player is switched on. On the TV screen you will see the words „OPEN“ or „CLOSE“. After closing the tray playback of the inserted disc starts automatically. 18 With the menu key you can open the main menu of the DVD disc during playback, if such a menu is available on the disc. Generally all DVDs have such a menu structure where you can navigate between different features. With the PLAY key you enter the selected item. Depending on the disc`s menu system pressing the menu key for a second time will continue the playback at the point where you first pressed the menu key („Resume“ function). The Setup-key will bring you to the main menu of the DVD-Player. Here you can change all settings of the player and make it match to your TV-set and home stereo equipment. In the SETUP you use the cursor keys for navigation and the PLAY-key for selection. If you press Setup again you confirm the settings you made and playback will continue. The Slow-key activates the slow motion function. By pressing several times you can select between five speed levels which are displayed on the screen: „Slow 1/2" to „Slow 1/6“. /Resume The Resume-key lets you activate two functions: While in STOP Mode this key works as a Resume-function. Pressing this key will continue playback at that point where you pressed STOP to interrupt the playback. If the player is in PLAY mode this key works as a memo key controlling the bookmark function of the player. You can set up to five 19 bookmarks for the inserted disc: First bookmark: Press the Memo-/Resume-key at that scene which you want to find again later on. On the screen it says „Bookmark“ and five empty entry places appear. Choose one field with the cursor keys and press the resume key again. Now the first bookmark is stored. Second bookmark: Press the Memo/Resume-key at the scene that you want to find again later on. Move the cursor to the next empty field and the press the resume key. In order to play a bookmark just press the Memo-/Resume key and choose the bookmark you want to play with the cursor keys. With the Play key you enter the selection and the playback of the disc starting from the selected bookmark begins. NOTE: Opening the tray or switching off the player wih the power switch will automatically delete the bookmark memory. The Search key offers different functions. Pressing the key for the first time will activate the chapter/scene search menu. Pressing the key a second time will activate the time search menu. After pressing the search key during playback of a movie (title) a entry field is displayed on the screen. You have to enter the number of the title in which you wish to search for a certain chapter/scene. Then you need to enter the chapter number into a second entry field. If you have made a valid entry playback will continue where you have defined. If you do not make an entry, the display will disappear shortly after. 20 If you press the search key for the second time you will see the time search menu on the screen. You can directly enter hours, minutes and seconds to jump to a specific point on the disc. By pressing the Info- or Display-key, information about the disc inserted (current playback status and detailed time info) will be shown on the TV-screen. Pressing the key several times these 6 info screens will be shown one after the other. 21 The Audio-key lets you change the language during playback if the movie has more than one audio track on the disc. When pressing the key a display will show the available audio tracks of the movie. By pressing the key several times all of the available audio tracks will be shown on the screen. Press the key as often as needed to select your desired audio track. This setting will be activated shortly after. The angle key lets you choose between different angles of the camera. Films that offer this special function are specially marked. By pressing the angle-key you can see a certain scene from the different view angles provided by the disc. A short info on the screen tells you how many different angles can be selected. The mute key can activate or deactivate the sound during playback. The equivalent info will be displayed on the screen. 22 With the subtitle-key you can display the subtitles available on your DVD-Disc onto the TV-screen. A DVD-disc quite often offers subtitles in different languages, since films are not fully translated for every country or language. An info line on the TV-screen will tell you after pressing the subtitle key which subtitles are available on the disc. Press the key as often as needed to select your choice of available subtitle language. One of the options is always to also deactivate the subtitles. Once you have made your selection the setting will be active shortly after. The Zoom-key lets you enlarge the picture. Pressing the Zoom-key during playback the left upper corner of the screen will be enlarged and playback continues. Two zoom levels are available: x1 and x2 being shown on the upper left corner of the screen. With the cursor keys you can decide which part of the screen should be enlarged. Red markings will tell you which part of the normal screen you are currently enlarging. 23 With the FF and FR keys you can activate the rapid motion function and also define the playback direction (forward or backward) and the playback speed in 5 different levels (x2, x3, x4, x5, x6). You will see equivalent symbols on the TV screen. To continue with normal playback just press the PLAY key. The volume keys control the volume. The factory setting is maximum. Whether you control the volume with the DVD-player`s remote control or by using other remote controls (TV, surround amplifier) depends on your taste. With the skip back and skip forward keys you can jump to the beginning of the previous chapter (scene) or to the beginning of the next chapter (scene). The playback is continued automatically. The number of chapter and title to which you are jumping is shown on the TVscreen. The Pause-key interrupts playback of the disc. Playback continues by pressing the play key. The word PAUSE will be displayed on the screen while the function is active. During Pause mode you can activate the STEP mode by pressing the pause key again. On the screen the word “STEP” will be displayed. Each time you press the pause key, the next still picture (frame) will be displayed. Pressing the Play key will terminate the Step mode and continue normal playback. 24 The cursor keys let you navigate and make selections in all menu systems of the DVD-Player. By pressing the equivalent key you will move forward in a horizontal or vertical menu system by one step. On the screen you will se each step of the cursor keys, so that you know at any time which function you currently have selected. The PLAY key lets you confirm the selections made by the cursor keys in the various menu systems. The Play-key also works as playback key, as you will know from your CD-Player. The word “PLAY” will be displayed on the top right side of the TV screen. The STOP-key will stop the playback of a disc and the DVD-player will automatically switch to the Yamakawa start screen which is also displayed when turning on the player. On the screen you can see “STOP” in the upper right corner. You may now restart the film from the beginning by pressing the play, or continue watching the film where you pressed the stop key by perssing the Resume-/Memo-key. The A-B key lets you define an area of any disc (DVD,CD,MP3 or VCD) as a repeat loop. At the point where the repetition should start you need to press the A-B key once. On the screen you will see “REPEAT A”. At the point where the repetition should end you need to press the A-B key again. Now you will see “REPEAT A-B“ on the screen. Now playback of the selected area of the disc, determined by starting point “A” and ending point “B” will start. If you press the „A-B“ key again the repetition is switched off („REPEAT AB off“). The 1/All key lets you repeat current chapters or the complete film. By pressing several times, the three functions („Repeat Chapter“, „Repeat Title“ and „Repeat off“) can be selected. If you press once the text „Repeat Chapter“ is displayed. Now the current chapter will be repeated until you switch off the function. If you press again “Repeat Title” is displayed and the current Film (Title) will be repeated. If you press again the function is switched off the normal playback will continue. („Repeat Off“). 25 MP3-Player Content of the MP3 function part Function Symbol Page Display 27 Intro Play 28 Shuffle / Random 27 Programming 28 FR 29 Skip backward 29 Search (Title / time) 28 title selection 29 FF 29 Skip forward 29 Description of the functions As for the other disc types (DVD, CD, VCD) there is also an automatic function for playback of MP3 discs. After inserting the disc in to the drive the playback will automatically start with the first track on the disc. If you have also switched on your TV you will see the MP3 Directory Menu, that illustrates the content of the inserted MP3 disc (the directory structure). The playback starts automatically with the first track of the first directory on the disc. Similar to a computer`s hard disc you can define directories on a MP3 CD to better sort different type of music (f.e. Jazz, Rock, etc..). These directories may contain other directories, so called sub directories, (f.e. for different artists). During playback you can browse through the directories of the inserted MP3 disc to search for some certain piece of music. With the cursor keys you select a directory in the brown colored area of the menu and with the Play key you open it. The content of a directory is shown with a green background. You can close a directory by pressing the Menu key and go back to a higher directory level. 26 Note: In MP3 mode, the right LED of model DVD-208 works as a feedback-LED. Each command of the remote control will make the right LED flash. This makes operation without a TV-set easier. MP3 Directory Menu The MP3 files and directories are listed in to columns of 5 entries each. Each entry is max. 8 characters long. Pages with directories have a brown back ground, pages with MP3 files have a green background. Underneath the 2 columns you will see 3 lines where the track is shown which is currently marked with the cursor. You will also find information about the track currently played. (Example shows the directories of the CD (left) and contents of the directory „***-T“ (right). The display key offers four different tables to show on the TV screen. One is the MP3 Directory Menu which you already know, others are the table with the inserted disc type and playback mode (Play, Shuffle or Random) and the time information about the current track. The Angle-key lets you change the playback mode. You can select between „Shuffle“ and „Random“. Shuffle will play the tracks on the disc in a random sequence. Each track will only be played once. Random means that the tracks are played randomly, so one track could randomly be played more than once. 27 The Title-key activated the Intro-Play function of the DVD-player. All music tracks, starting with the first, will be played one after the other for 5sec. Only. On the TV screen the number of each track is shown on the top right corner. The Intro-Play mode is switched off by pressing the title key again. The Search key will help you to find a certain track on the MP3 disc. You have to enter the number of the track. It is easier if your directly enter the number of the track with the numeric keys on your remote control. You can also search for a specific time within a track if you press the search key again. This may be important for longer tracks (sound books etc..). Like on any CD-Player you can define the playback order of a MP3 disc. This individually determined playback order can be stored with the Program key. After pressing the key, the Program Menu appears on the TV screen. The title selection for the program is done by entering the number of the title into the yellow three-digit field at the beginning of the program list. Once you enter a title number you need to confirm with the play key. This will enter the title into the program list. 10 of your selected titles can be seen on one page. During the programming of your list, you may use the cursor keys to mark entries on your program list that you want to remove from the list. Then just press the stop key once you marked the entry to be removed. After that you can return with the cursor to the 3-digit field and continue your programming. Once the list is finished, you can start playback by pressing the Program-key. During playback of a program list you can modify the list at any time. You just need to press the Program-key again and use the cursor keys to mark the track that 28 you want to remove from the list, or you enter the number of the titles that you want to add to your program list. The entire program list can be deleted if you press the STOP key a little longer, while your are in the entry field. With the FF and FR keys you can activate the fast-rewind and fast-forward during playback of a track. Doing so no sound can be heard, since playback mode was interrupted. Pressing the keys several times, will change the speed of rewinding or forwarding in 5 levels: x2, x3, x4, x5,x6. The Skip-back or Skip forward keys can be used to jump to the beginning of the previous track or to the beginning of the next track. Playback will continue automatically. On the TV-screen you will see the number of the track to which you skipped. With the numeric keys you can select any title on the MP3 disc and start playback. You can enter double or triple digit numbers with your numeric key pad. It is not necessary to use the „+10“ key. If a track is listed as „056“ on your screen you do not have to enter a leading „0”. 29 CD-Player Content of the CD function part Function Symbol Page Display 30 FR 31 Skip backward 31 Title selection 32 FF 31 Skip forward 31 Repeat (loop) 31 Repeat (title or disc) 31 Time search 32 Here only those keys and functions are described that are different during the CD mode from the operation as DVD Player. Note: In CD mode, the right LED of model DVD-208 works as a feedback-LED. Each command of the remote control will make the right LED flash. This makes operation without a TV-set easier. Description of the functions In CD mode you will permanently see the Yamakawa start logo on your TV set. Once an audio CD is inserted the playback will automatically start from the first track on the disc. The table with the inserted disc will be shown on the TV. With the Display-key you can display five different tables on the screen. These are the table for the inserted disc type (CDDA stands for CD Digital Audio) and the current playback mode, plus four different time tables showing the elapsed time of the track and the disc and the left over time of the track and the disc. 30 With the Search key you can jump to a certain time within the current track. If you enter a certain time with your remote control you have to make sure it is within the total length of the current track. You can also key in the number of the track you want to listen to, but using the numeric keys for this function is faster. You can use the FF and FR keys to activate the fast forward and fast rewind function during playback. The player will leave the playback mode and you will not hear any sound during the activated function. By pressing the keys several times you can choose between five different speed levels: x2, x3, x4, x5, x6. The Skip-back or Skip forward keys can be used to jump to the beginning of the previous track or to the beginning of the next track. Playback will continue automatically. The A-B key lets you define an area of any disc (DVD,CD,MP3 or VCD) as a repeat loop. At the point where the repetition should start you need to press the A-B key once. On the screen you will see “REPEAT A”. At the point where the repetition should end you need to press the A-B key again. Now you will see “REPEAT A-B“ on the screen. Now playback of the selected area of the disc, determined by starting point “A” and ending point “B” will start. If you press the „A-B“ key again the repetition is switched off („REPEAT AB off“). The 1/All key lets you repeat current tracks the complete CD. By pressing several times, the three functions („Repeat Chapter“, „Repeat Title“ and „Repeat off“) can be selected. If you press once the text „Repeat Chapter“ is displayed. Now the current track be repeated until you switch off the function. If you press again “Repeat Title” is displayed and the total disc will be repeated. If you press again the function is switched off the normal playback will continue. („Repeat Off“). 31 With the numeric keys you can directly select a title on the CD and start the playback. Tracks with double digit numbers can be entered by pressing the „+10“ key once or several times plus the second digit. You can also enter the number directly as a double digit number. 32 VCD-Player Content of the VCD-function part Function Symbol page FR 33 Skip backward 33 Disc view 34 FF 33 Skip forward 33 Slow motion Zoom 34 34 Here only those keys and functions are described that are different during the VCD mode from the operation as DVD Player. Description of the functions With the FF and FR keys you can activate the rapid motion function and also define the playback direction (forward or backward) and the playback speed in 5 different levels (x2, x3, x4, x5, x6). You will see equivalent symbols on the TV screen. To continue with normal playback just press the PLAY key. Video CDs to not have a chapter structure (scenes) like DVD discs. Therefore pressing the skip backward or forward key will not effect a jump to the beginning of the current scene or the beginning of the next scene. If there is only one title on the VCD, pressing these keys will only restart the playback of the title from the beginning. Depending on the settings of the VCD these keys may also be without any function. 33 The Slow-key activates the slow motion function. By pressing several times you can select between five speed levels which are displayed on the screen: „Slow 1/2" to „Slow 1/6“.. The Zoom-key lets you enlarge the picture. Pressing the Zoom-key during playback the left upper corner of the screen will be enlarged and playback continues. There is only one zoom level available for VCD mode. With the cursor keys you can decide which part of the screen should be enlarged. Red markings will tell you which part of the normal screen you are currently enlarging With the Title-key you can activate the discview function. This function will display the content of the disc in small still pictures on the screen. With the cursor keys you can move a cursor onto a certain scene and confirm with the play key. Pressing the title key again will stop the discview mode and you will be in the Stop mode. A resume function is not available at this point. 34 Technical Data DVD Player Specification Modell Pickup Head Disc format: Video compressing Video output Video resolution Video Format Screen format Trickmode Sub-Picture OSD Audio System Digital Ausgang Audio Format Audio DAC Power supply Power consumption Dimension (BTH) cm Weight DVD-208 DVD-268 DVD-278 Dual Focus optical pickup Audio CD DVD Navigation 1.0 Super Video CD (S VCD) Video CD 1.1, 2.0, Interactive VCD 3.0 MPEG-1 & MPEG-2 Composite Video, S-Video, SCART 27MHz 10 bit NTSC / PAL Pan&Scan, Letterbox, 16:9 Widescreen Slow/Rapid Motion; Zoom independant Sub-Picture Decoder 8bit On-Screen Display Dolby Digital (AC-3) 5.1 Digital output 2 channel downmix for all Dolby programs Dts Digital output coaxial, optical (only with DVD-268/278) 96 KHz 24bit 96 KHz 24bit 100VAC-230VAC 34W 30.5x27x6.5 (DVD-208) 43x27x9cm (DVD-268/278) 3.0kg (DVD-208) 4.2kg (DVD-268/278) 35 Service & Warranty Informationen Under www.yamakawa.de you will find warranty, service and support information in the service section. If needed you can also use our enduser helpline. You will also find the telefon number of this helpline in the service section of our homepage www.yamakawa.de. 36