1
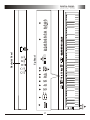
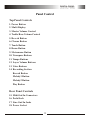
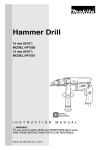
Precaution
Thank you for purchasing this digital instrument.For perfect operation and security,please
read the manual carefully and keep it for future reference.
Safety Precautions
CAUTION
RISK OF ELECTRIC SHOCK
DO NOT OPEN
The lightning flash with arrowhead symbol within an equilateral triangle is in
tended to alert the user to the presence of uninsulated dangerous voltage
within the product s enclosure that may be of sufficient magnitude to constitute a
risk of electric shock to persons.
The exclamation point within an equilateral triangle is intended to alert the user
to the presence of important operating and maintenance(servicing) instructions in
the literature accompanying the product.
Important Safety Instructions
1) Read these instructions.
2) Keep these instructions.
3) Heed all warnings.
4) Follow all instructions.
5) Do not use this apparatus near water.
(Figure 1)
6) Clean only with dry cloth.
7) Do not block any ventilation openings,install in accordance with the manufacturer s instructions.
8) Do not install near any heat sources such as radiators, heat registers,stoves,or other apparatus (including am
plifiers) that produce heat.
9) Do not defeat the safety purpose of the polarized or grounding-type plug.A polarized plug hase two blades
with one wider than the other.A grounding type plug has two blades and a third grounding prong.The wide blade
or the third prong are provided for your safety,if the provided plug does not fit into your outlet.consult an elec
trician for replacement of the obsolete outlet.
10) Protect the power cord from being walked on or pinched particularly at plugs.convenience receptacles,and
the point where they exit from the apparatus.
11) Only use attachments/accessories specified by the manufacturer.
12) Use only with the cart,stand,tripod,bracket,or table specified by the manufacturer,or sold with the
apparatus.When a cart is used,use caution when moving the cart/apparatus combination to avoid injury from
tip-over (Figure 1).
13) Unplug this apparatus during lightning storms or when unused for a long periods fo time.
14) Refer all servicing to qualified service personnel.Servicing is required when the apparatus has been dam
aged in any way,such as power-supply cord or plug is damaged,liquid has been spilled or objects have fallen
into the apparatus,the apparatus has been exposed to rain or moisture,does not operate normally,or has been
dropped.
WARNING:To reduce the risk of fire or electric shock,do not expose this apparatus to rain or
moisture.
CAUTION:Apparatus shall not be exposed to dripping or splashing and no objects filled with
liquids,such as vases,shall be placed on the apparatus.
DIGITAL PIANO
Thanks for using our digital piano
Your digital piano is a high-quality digital piano with 88 standard touch sensitivity
keyboard and combines the most advanced PCM tone generation technology. Your
instrument has 8 demo songs can be selected to playback. The record function real
time to playback the play which you recorded.
In order to obtain maximum performance and enjoyment, please read this manual
thoroughly while trying out the various features described.
DIGITAL PIANO
Contents
Panel Control ................................................................... 2
Play the piano ..................................................................
1.Turn on the Power .....................................................
2.Set the Volume ..........................................................
3.Using Headphone .....................................................
4.Using External Sound System ..................................
5.The Pedals .................................................................
6.Select Voice .............................................................
7.Select dual voice mode ..............................................
8.Reverb Effect ..........................................................
9.Chorus Effect ...........................................................
10.Touch Sensitivity.....................................................
11.Metronome and Tempo ...........................................
12.Transpose ................................................................
13.Layer Volume .........................................................
14.Record and Play back .............................................
15.Demo .......................................................................
4
4
4
4
4
5
5
5
6
6
6
7
7
8
8
9
MIDI Control ................................................................... 10
Specifications ................................................................... 11
1
2
MAX
MASTER VOLUME
19
PHONE1 PHONE2
POWER
1
MIN
3
LOW
4
HIGH
BASS
TREBLE
REVERB
5
MIN
MAX
MASTER VOLUME
CHORUS
6
LOW
HIGH
TOUCH
7
BASS
TREBLE
REVERB
DEMO
8
CHORUS
TOUCH
METRONOME
9
T
R
A
N
S
11
MIDI IN
DEMO
METRONOME
12
LAYER VOLUME
10
15
MIDI OUT
T
R
A
N
S
LAYER VOLUME
T
E
M
P
O
17
LINE OUT
LINE IN
T
E
M
P
O
MULTI DISPLAY
MULTI DISPLAY
2
Up Panel
16
PEDAL
GRAND
PIANO
UPRIGHT
PIANO
Backside Panel
E-PIANO 1
E-PIANO 2
GRAND
PIANO
VIBES
UPRIGHT
PIANO
HARPSI
18
CAUTION
AC 230V~50Hz
STRINGS
ORGAN
E-PIANO 1
RECORD
E-PIANO 2
MELODY2
CLEAR
MELODY1
HARPSI
13
PLAY
VIBES
STRINGS
ORGAN
RECORD
MELODY2
CLEAR
MELODY1
14
PLAY
DIGITAL PIANO
DIGITAL PIANO
Panel Control
Top Panel Controls
1. Power Button
2. Multi Display
3. Master Volume Control
4. Treble/Bass Volume Control
5. Reverb Button
6. Chorus Button
7. Touch Button
8. Demo Button
9. Metronome Button
10. Transpose Buttons
11. Tempo Buttons
12. Layer Volume Buttons
13. Voice Buttons
14. Recording Section
Record Button
Melody1 Button
Melody2 Button
Play Button
Rear Panel Controls
15. Midi Out/In Connectors
16. Pedal Jack
17. Line Out/In Jacks
18. Power Socket
3
DIGITAL PIANO
Play The Piano
1.Turn on the power
Before playing turn the power on by pressing the POWER switch, The pannel LCD will
light.
MULTI DISPLAY
POWER
2.Set the Volume
Initially set the MASTER VOLUME about half way between the "MIN" and "MAX"
settings. You can adjust the volume to accommodate you play.
And you can also set the TREBLE VOLUME or BASS VOLUME by adjusting the
TREBLE/BASS VOLUME switchs.
TREBLE
MIN
MAX
MASTER VOLUME
BASS
LOW
HIGH
3 .Using Headphone
A standard pair of stereo headphone can be plugged into the PHONE jacks for private
practice or late-night playing. The internal speaker system will be automatically shut off
when a pair of headphones is plugged into the PHONE jacks.
PHONE 1 PHONE 2
4. Using External Sound System
The Line Out jack can be used to deliver the output of the piano to a keyboard amplifier,
stereo sound system, mixing console or tape recorder and used the Line In jack you can
also play the piano through an external amplifier/speaker system.
LINE OUT
LINE IN
Stereo
System
Stereo
System
4
DIGITAL PIANO
5.The Pedals
A footswitch can be plugged into the rear-panel SUSTAIN PEDAL jack. It is similar to real
piano function. The Sustain Pedal functions as a damper pedal controlling sustain. Press
the pedal to sustain notes after the keys are released. Press the Sostenuto pedal the keys
which have been pressed effect sustain notes after these are released. The Soft Pedal
controlling the sound volume. Press the pedal to decrease the output sound volume.
SOFT
SOSTENUTO
SUSTAIN
6.Select Voice
There are eight voices embedded in the piano. They are Grand.Piano, Upright.Piano,
E.Piano1, E.Piano2, Harpsichord, Vibes, Strings, Organ. Press voice button, you can
select the desired voice and its indicator lighted.
GRAND
PIANO
UPRIGHT
PIANO
E-PIANO 1
E-PIANO 2
HARPSI
VIBES
STRINGS
ORGAN
7. Select dual voice mode
Press two voice buttons at the same time, their indicators will be lighted. Two voices
will sound simultaneously when you play keyboards.
GRAND
PIANO
UPRIGHT
PIANO
E-PIANO 1
E-PIANO 2
HARPSI
VIBES
STRINGS
ORGAN
8.Reverb Effect
The Reverb effect reproduces the natural ambient wash of sound that occurs when
a instrument is played in a room or concert hall.
You can press [REVERB]button several times to select REVERB type, and you can
press [REVERB] button to OFF the Reverb effect while all the REVERB indicators not
light.
5
DIGITAL PIANO
MULTI DISPLAY
REVERB
9.Chorus Effect
The Chorus effect can be turned on and off by pressing [CHORUS] button.
The effect lets you enhance the sound of a voice.
MULTI DISPLAY
CHORUS
Every voice has a initialized setting, and we can change the Reverb or Chorus effetcs
into the current voice, so that changed the default setting.
10.Touch Sensitivity
Press [TOUCH] button, you can select four type of touch sensitivity style to
accommodate your play and the corresponding indicator will be lighted.
HARD style: require more strength to produce maximal sound.
NORMAL style: require standard strength to produce maximal sound.
SOFT style: require less strength to produce maximal sound.
FIXED style: press the keyboard with more or less strength will produce same
sound volume. Press [TOUCH]botton several times until the indicator not light, and
holding it for more than two seconds, the sound volume will show on the LED,at the
same time use the [TEMPO+/-]buttons to select the sound volume.
T
E
M
P
O
TOUCH
6
DIGITAL PIANO
11.Metronome and Tempo
Press [METRONOME] button, you can turn on or off metronome function. When this
function is on, you can select beat type by holding the [METRONOME] button until the
beat type appear on the LCD, then using the [TEMPO+/-] buttons to set it.
Beat types include :1/4time, 2/4time, 3/4time, 4/4time, 6/4time, 6/8time, 12/8time
T
E
M
P
O
METRONOME
Press [TEMPO+/-] button, you can adjust the speed from 20 to 280b/s. Press these two
buttons at the same time, the speed return to 120b/s.
MULTI DISPLAY
12.Transpose
This TRANSPOSE function makes it possible to shift the pitch of this instrument up or
down in semitone intervals up to a maximum of 12 semitones(one octave). Transposing
the pitch of your instrument keyboard makes it easier to play a difficult key signatures,
and you can easily match the pitch of the keyboard to the range of a singer or other
instrumentlist.
Using [TRANSPOSE+/-] buttons to change the transpose value from G - #F.
T
R
A
N
S
T
E
M
P
O
MULTI DISPLAY
LAYER VOLUME
7
DIGITAL PIANO
13.Layer Volume
After you selected DUAL voice to play the instrument, you can adjust the dual voice
volume by holding [CHORUS] button until the volume appear on the LCD, then using
the [LAYER VOLUME+/-] buttons to set the desired volume.
T
E
M
P
O
T
R
A
N
S
MULTI DISPLAY
CHORUS
LAYER VOLUME
14.Record and Play back
Melody Track Record
Press [RECORD] button and then press[MELODY1] or [MELODY2] button to select
the current track recording.
If the other track has data recorded and the melody track is selected, it will play when
the record is started.
It will start the recording after 4 ticks metronome sound.
Press the corresponding MELODY button, the current recording is end.
RECORD
MELODY1
MELODY2
PLAY
CLEAR
If you want to record MELODY1 track :
Press [RECORD] button, its indicator lighted, then press [MELODY1] button and its
indicator flash, Now you will be recording the MELODY1 track record, and then press
MELODY1 button again will be end the recording.
Play
First to press [MELODY1] or [MELODY2] button to select the melody track you want
to play, and then press [PLAY] button, the song you have recorded will play back. When
in the PLAY mode, press this button will end this mode.
8
DIGITAL PIANO
Clear Recording
Press the [RECORD] and [PLAY] buttons simultaneously to enter clearing record status
and you can also press the two buttons again at the same time to exit the status.
MULTI DISPLAY
RECORD
MELODY1
MELODY2
PLAY
CLEAR
While the indicator M1 is light, then you can press [M1] button to clear the Melody1
track datas, same as to clearing Melody 2 track recording, it will be automatic exit the
clearing record status after ending it.
MULTI DISPLAY
RECORD
MELODY1
MELODY2
PLAY
CLEAR
15.Demo
Press [DEMO] button, the eight voices LED will flash. These eight buttons represent 8
demo songs. Press a button, a corresponding song is selected. If you don't select a song
for 5 seconds, first song will be played automatically.
When in the demo mode, press this button again will terminate the status.
MULTI DISPLAY
DEMO
METRONOME
GRAND
PIANO
UPRIGHT
PIANO
9
E-PIANO 1
E-PIANO 2
HARPSI
VIBES
STRINGS
ORGAN
DIGITAL PIANO
MIDI Control
MIDI, the Musical Instrument Digital Interface, is a world-standard communication
interface that allows MIDI-compatible musical instruments and equipment to share
musical information and control one another. This makes it possible to create "systems"
of MIDI instruments and equipment that offer far greater versatility and control than is
available with isolated instruments.
.This instrument MIDI Connectors
MIDI
IN
MIDI
OUT
Your instrument MIDI IN connector receives MIDI data from an
external MIDI device which can be used to control yours. The MIDI
OUT connector transmits MIDI data generated by your instrument
(e.g. Note and velocity data produced by playing the keyboard ).
.MIDI Control
Most MIDI keyboards(including your instrument, of course)
transmit note and velocity (touch response) information via the
MIDI IN
MIDI OUT connector when ever a note is played on the keyboard.
MIDI OUT If the MIDI OUT connector is connected to the MIDI IN connector
Local instrument
of a second keyboard (synthesizer, etc.) Or a tone generator will
respond precisely to notes played on the original transmitting
keyboard. The result is that you can effectively play two instruments
at once, providing thick multi-instrument sounds. This instrument
also transmit "program change" data when one of its voices is
selected. Depending on how the receiving device is set up, the
MIDI KEYBOARD
corresponding voice will be automatically selected on the receiving
keyboard or tone generator whenever a voice is selected on your
MIDI OUT instrument.
Tone Generator
MIDI IN
Local instrument
Your instrument is capable of receiving the same MIDI data, so a second MIDI keyboard connected
to your instrument MIDI IN connector can be used to remotely play yours and select voices as required.
10
DIGITAL PIANO
Specifications
Keyboard
Polyphony
Voice Selectors
Recorder
Pedal Control
Other Controls
Jacks /Connectors
Main Amplifiers
Speakers
Dimentions(W D
Weight
H)
88 Keys(A-1 ~ C7)
Four types of touch sensitivity
64 notes max.
Grand.Piano, Upright.Piano, E.Piano1, E.Piano2,
Harpsichord, Vibes, Strings, Organ.
Record, Play >3000 notes
Sustain, Soft, Sostenuto
Master volume, Treble/Bass volume, Tempo, Touch, Metronome ,
Demo, Reverb, Chorus, Dual, Midi
Phone, Power, Line Out/In, Pedal, Midi Out/Midi In
40W 2
16.5cm 2, 5cm 2
1575mm 615mm 475mm
75 Kgs/166lbs
10505346-V2.0
11