1
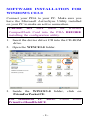
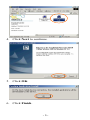
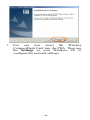
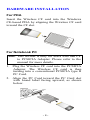
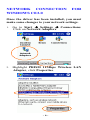
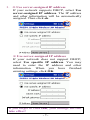
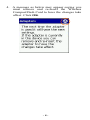
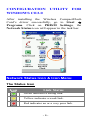
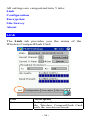
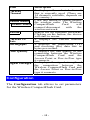
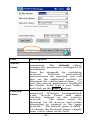
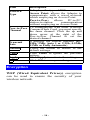
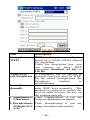
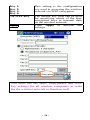
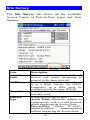
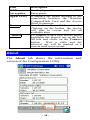
IEEE802.11b
11Mbps
CompactFlash Card
Quick Installation Guide
M73-APO01-560
REGULATORY STATEMENTS
FCC Certification
The United States Federal Communication Commission (FCC)
and the Canadian Department of Communications have
established certain rules governing the use of electronic
equipment.
Part15, Class B
This device complies with Part 15 of FCC rules. Operation is
subject to the following two conditions:
1) This device may not cause harmful interface, and
2) This device must accept any interface received, including
interface that may cause undesired operation. This
equipment has been tested and found to comply with the
limits for a Class B digital device, pursuant to Part 15 of the
FCC Rules. These limits are designed to provide reasonable
protection against harmful interference in a residential
installation. This equipment generates, uses and can radiate
radio frequency energy, and if not installed and used in
accordance with the instructions, may cause harmful
interference to radio communications. However, there is no
guarantee that interference will not occur in a particular
installation. If this equipment does cause harmful
interference to radio
or television reception, which can
be determined by turning off and on, the user is encouraged
to try to correct the interference by one or more of the
following measures:
Reorient or relocate the receiving antenna.
Increase the distance between the equipment and receiver.
Connect the equipment into an outlet on a circuit different
from that to which the receiver is connected.
CAUTION:
1)
2)
To comply with FCC RF exposure compliance
requirements, a separation distance of at least 20 cm must
be maintained between the antenna of this device and all
persons.
This transmitter must not be co-located or operating in
conjunction with any other antenna or transmitter.
SOFTWARE INSTALLATION FOR
WINDOWS CE3.0
Connect your PDA to your PC. Make sure you
have the Microsoft ActiveSync Utility installed
on your PC to make an active connection.
Caution: DO NOT insert the Wireless
CompactFlash Card into the PDA BEFORE
installing the configuration utility.
1. Insert the device driver CD into the CD-ROM
drive.
2. Open the WINCE3.0 folder.
3. Inside the WINCE3.0 folder, click on
PrismForPocketCE.
For Handheld PC users: Please select
PrismForHandHeldCE.
-2-
4. Click Next to continue.
5. Click OK.
6. Click Finish.
-3-
7. You can now insert the Wireless
CompactFlash Card into the PDA. Then use
the Settings on your Windows CE to
configure the network settings.
-4-
HARDWARE INSTALLATION
For PDA
Insert the Wireless CF card into the Windows
CE-based PDA by aligning the Wireless CF card
toward the CF slot.
For Notebook PC
Note: This section is only for users who had CF
to PCMCIA Adapter. Please refer to the
manual for more details.
1. Plug the Wireless CF card into the PCMCIA
Adapter. The Wireless CF card is then
turning into a conventional PCMCIA type II
PC Card.
2. Align the PC Card toward the PC Card slot
with brand label facing upward, as shown
below.
-5-
NETWORK CONNECTION
WINDOWS CE3.0
FOR
Once the driver has been installed, you must
make some changes to your network settings.
1.
Go to Start Æ Settings Æ Connections.
Click on Network Adapters.
2.
Highlight PRISM 11Mbps Wireless LAN
Adapter, click Properties.
-6-
3. ~ Use server-assigned IP address
If your network supports DHCP, select Use
server-assigned IP address. The IP address
and other information will be automatically
assigned. Then click ok.
~ Use server-assigned IP address
If your network does not support DHCP,
select Use specific IP address. You may
need to enter the IP address and other
information. When you have finished
entering settings, click OK.
If you forget to click OK, your settings will not
take effect!
-7-
4. A message as below may appear saying you
must remove and re-insert the Wireless
CompactFlash Card to have the changes take
affect. Click OK.
-8-
CONFIGURATION UTILITY FOR
WINDOWS CE3.0
After installing the Wireless CompactFlash
Card’s driver successfully, go to Start Æ
Programs. Click on PRISM Settings, the
Network Status icon will appear in the task bar.
Network Status Icon & Icon Menu
The Status Icon
Icon
Link Status
Green indicates a strong link.
Yellow indicates a weak link.
Red indicates no or a very poor link.
-9-
Icon Menu
After clicking on the icon, the icon menu as
displayed below will prompt you to configure the
Wireless CompactFlash Card.
Items
Description
These two items allows you
to enable or disable the
wireless radio.
Remove Status Icon… Removes the Utility icon
from the PDA’s system
tray. Each time you power
on your PDA, the icon will
reappear.
Clicking these items will
Wireless Network
Wireless
launch
the
Status
Settings
window,
as
Advanced
described below.
Configuration…
WEP Encryption…
Version
Information…
Wireless Radio On
Wireless Radio Off
- 10 -
All settings are categorized into 5 tabs:
Link
Configuration
Encryption
Site Survey
About
Link
The Link tab provides you the status of the
Wireless CompactFlash Card.
Item
State
Description
It displays the connection state of
the Wireless CompactFlash Card
with the wireless network.
- 11 -
Item
Description
It displays the selected channel
Current
that is currently used. (There are
Channel
14 channels available, depends on
the country.)
Click this button to enable/disable
Enable Radio
the wireless radio. The Wireless
/ Disable Radio CompactFlash
Card
will
connect/disconnect
with
the
wireless network.
Search for all available networks.
Rescan
Clicking on the button, the device
will start to rescan.
Current Tx
It displays the current transfer
Rate
rate.
It displays the transferring (Tx)
Throughput
and receiving (Rx) data rate in
bytes per second.
It displays the link quality of the
Link Quality
connection between the Wireless
CompactFlash Card and the
Access Point or Peer-to-Peer type
it connects.
Signal Strength It displays the signal strength of
the connection between the
Wireless CompactFlash Card and
the Access Point or Peer-to-Peer
type it connects.
Configuration
The Configuration tab allows to set parameters
for the Wireless CompactFlash Card.
- 12 -
Item
Profile
Name
Network
Name
Description
Saves values for all previous setting
parameters. The default values
contain the parameters configured at
installation.
Once the demands for switching
between
different
networking
environments are required, you can
also set the additional profiles to
eliminate the configuration time. To
save the current parameters, highlight
the Profile field, type a new name,
and click on the Apply button.
A specific name shared among
connected Wireless CompactFlash
Card, Access Points and other
wireless stations on the wireless
network.
The name must be
identical for all devices and points
attempting to connect to the same
network. The default name is ANY.
To change the Network Name, simply
enter a new name in the field.
- 13 -
Item
Description
It displays the type of BSS.
Network
Access Point: allows the Adapter to
Type
communicate with a wired network
which employing an Access Point.
Peer-to-Peer: allows PC-to-PC,
station-to-station
communication
without employing an Access Point.
Peer-to-Peer To communicate with other Wireless
CompactFlash Card, you must specify
Channel
the same channel. Click the up and
down arrow at the right of the
Peer-to-Peer Channel to set the
desired channel.
It displays the current transmit rate.
Transmit
1Mb, 2Mb, Auto 1 or 2 Mb, 5.5Mb,
Rate
11Mb or Fully Automatic)
Default
Clicks the button to restore to the
default settings.
Undo
Click Undo to ignore the previous
setting.
Apply
Click Apply to activate the settings.
ok
Click OK to save your changes.
Encryption
WEP (Wired Equivalent Privacy) encryption
can be used to ensure the security of your
wireless network.
- 14 -
Item
Encryption
(WEP)
Description
WEP is a data privacy mechanism
based on a 64-bit/128-bit shared
key algorithm.
Under the drop-down box, you
can choose to have WEP
encryption Disabled, 64 bit, or
128 bit.
Create Keys
A Passphrase can be entered to
with Passphrase generate four keys used for WEP.
For the easiest configuration, the
Passphrase
method
is
recommended.
Create Keys
These four fields can be used to
Manually
enter WEP keys manually. The
method is required to match the
keys of other wireless devices on
the existing network.
~ Alphanumeric: Click Alphanumeric if you are
5 characters
using an alphanumeric phrase.
~ Hexadecimal: Click Hexadecimal if you are
10 digits (0-9, using a hexadecimal number.
A-F)
- 15 -
Key 1:
Key 2:
Key 3:
Key 4:
Use WEP Key
Apply
This setting is the configuration
key used in accessing the wireless
network via WEP encryption.
The default key field can be
for specifying which of the
encryption keys to transmit
on the wireless network.
Click Apply to activate
settings.
used
four
data
the
You must use the same value/phrase and WEP
key settings for all wireless computers in order
for the wireless network to function well.
- 16 -
Site Survey
The Site Survey tab shows all the available
Access Points or Peer-to-Peer types and their
features.
Item
Network
Name
BSSID
Channel
Network
Type
Description
The name must be identical for all
devices and points attempting to
connect to the same network.
A set of wireless stations is referred
to as a Basic Service Set (BSS).
Computers in a BSS must be
configured with the same BSS ID.
It shows the selected channel that is
currently used.
It displays the type of BSS.
Access Point: allows the Adapter to
communicate with a wired network
which employing an Access Point.
Peer-to-Peer: allows PC-to-PC,
station-to-station
communication
without employing an Access Point.
- 17 -
Item
WEP
Encryption
Signal Level
Rescan
Connect
Description
It displays the status of WEP
Encryption.
It displays the signal strength of the
connection between the Wireless
CompactFlash Card and the Access
Point it connects.
Search for all available networks.
Clicking on the button, the device
will start to rescan and list all
available sites.
To connect with a new access point,
highlights the desired one in the left
list box and clicks on the Connect
button.
Wait a while and the
selected one will be marked as a
current used access point.
About
The About tab shows the information and
version of the Configuration Utility.
- 18 -