1
1
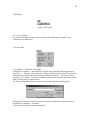
Instruction Manual
Optional PC Playback Software
for Digital Recorder
Model
DX-PC10E (ver.1.0.0)
Please read and accept the
“ End User Software Licence Agreement “
using this software.
(Refer to P.2 of this instruction manual) before
For Windows R 98SE
For Windows R 2000
For Windows R Me
Microsoft, Windows, IntelliMouse are registered trademarks or trademarks of the
Microsoft
Corporation in the US and other regions. (The official name of Windows is Microsoft
Windows Operating System.)
Compact FlashTM is registered trademark of Sandisk.
This software is based in part on the work of the Independent JPEG Group.
All other company and product names appearing herein are the property of their
respective owners.
- Windows 98SE is an abbreviation of Microsoft Windows 98 Second Edition.
- Windows 2000 is an abbreviation of Microsoft Windows 2000 Professional.
- Windows Me is an abbreviation of Microsoft Windows Millennium Edition.
2
End User Software License Agreement
Mitsubishi Electric Corporation and the third party as original development
company reserves all intellectual property rights to this Software for
DX-PC10E("Software") and its associated instruction manual ("Instruction
Manual")
Mitsubishi Electric Corporation grants user("User) a limited non-exclusive
license and right under this Agreement("Agreement") to use this Software.
The User may not reverse engineer, de-compile, or disassemble this Software,
except and only to the extent that such activity is expressly permitted by this
Agreement and applicable law.
Unauthorized total or partial reproductions, copying, sale, import, export, use, or
leasing of either this Software or it's Instruction Manual by User is strictly
prohibited by this agreement and Copyright Law.
Software specifications, software design, and the contents of this Instruction
Manual are subject to change without notice to User.
This Software is designed to playback, display, copy and save digitally recorded
audio and video data. Unauthorized copying by User of copyright protected audio
and video data is not permitted under this Agreement or Copyright Law.
Mitsubishi Electric Corporation assumes no responsibility or liability for privacy
violation or copyright infringement or any intellectual property violation by User
incurred from the Users transfer of audio or video data during the use of this
Software.
Mitsubishi Electric Corporation assumes no responsibility or liability to User for damage, or
demands of any kind, incurred during the use of this Software.
3
Contents
1 Overview
1.1 Product Features
1.2 Operating Environment
1.3 Compatible Digital Recorders
2 Installation
2.1 Installation Method
2.2 Uninstalling DX-PC10E
2.3 Starting/Ending a Session
3 Main Window: Display & Operation
3.1 Main Image Field
3.2 Operation Panel (Top)
3.3 Operation Panel (Bottom)
3.4 Information Panel
3.5 Status Bar
3.6 Shortcuts Menu
3.7 Hint Display
4 File Menu
4.1 Media… Command
4.2 Save As… Command
4.3 Convert… Command
4.4 Print Command
5 Edit Menu
5.1 Copy Command
6 Search Menu
6.1 Comment…/Find Next Command
6.2 Previous Alarm/Next Alarm Commands
6.3 Alarm List... Command
6.4 Time… Command
6.5 Block… Command
7 Operation Menu
7.1 Stop Command
7.2 Playback /Reverse playback Command
7.3 Search / Reverse search command
7.4Field advance / field reverse comand
7.5Top end search
8 Bookmarks Menu
8.1 Save with bookmark Command
8.2 Bookmarks (1 – 0) Command
4
8.3 Bookmarks A, B Command
8.4 Repeat between A and B Command
9 View Menu
9.1 Operation Panel/Status Bar/Information Panel Commands
9.2 Quick Zoom Command
9.3 Zoom Command
9.4 Option Command
9.5 Smoothing Command
9.6 Audio Command
9.7 Camera Command
10 Help Menu
10.1 Help Command
10.2 Version information Command
11 Image Enlargement
11.1 Enlargement rate
11.2 Specify the range
12 Appendix
12.1 Restrictions
5
1 Overview
The DX-PC10E is an application software for playing back media (Compact flash card)
recoded on with a Mitsubishi Digital Recorder. This software works with Microsoft R
Windows R 98SE, Windows 2000, and Windows Me.
1.1 Product Features
- Playing back data in a compact flash card and the same data in other media which
was transferred from the compact flash card.
- Recording date/time/comment display
- Time search, alarm search, alarm index search, block search, alarm list display
- Zoom display of still images
- Printing via Windows-compatible printers
- Zoom/scroll using Microsoft IntelliMouse TM
- Bookmarking and Repeat AB Interval playback
- Audio playback (except some conditions)
- Camera switching capability
- Split-screen display (4-camera or 9-camera display)
Changeable of file format to AVI or JPEG
1.2 Operating Environment
- IBM PC/AT-compatible with Intel Pentium series or Intel Celeron series CPU
(400MHz or faster)
- Microsoft Windows 98SE, Windows 2000, or Windows Me
- RAM: 128MB or more
- Display resolution: 800 pixels x 600 lines (minimum), 1024 pixels x 768 lines or
more (recommended). Use a video card and monitor capable of displaying 32,000 or
more colors.
- Free HD space: 200MB or more
- Sound adapter : Windows-compatible type; SoundBlaster etc.
- Installed browser: MS Internet Explorer 4.01 Service Pack 1 or later
Note:
Operation is not guaranteed for all environments conforming to the above description.
1.3 Compatible Digital Recorders
DX-TL800E Series
6
2 Installation
2.1 Installation Method
To install DX-PC10E, first start up SETUP.EXE on the provided CD. Follow the series
of instructions that appear on-screen, and the software will be installed automatically.
The default directory for the installation is C:¥Program Files¥dxpc10e .
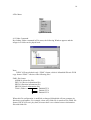
2.2 Uninstalling DX-PC10E
To uninstall DX-PC10E, open the Install/Remove Applications dialog box in the
Operation Panel and select DX-PC10E for removal. Alternatively, select the Uninstall
DX-PC10E command from the Start menu, and follow the series of instructions that
appear on-screen to complete the procedure.
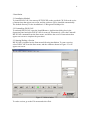
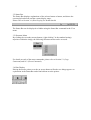
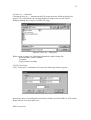
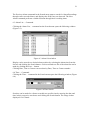
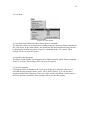
2.3 Starting/Ending a Session
DX-PC10E is included on the Start menu following installation. To start a session,
select DX-PC10E from the Start menu, and the windows shown in Figure 2.3 will
appear on-screen.
Figure 2.3 Main window
To end a session, go to the File menu and select Exit.
7
3 Main Window: Display & Operation
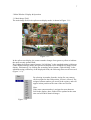
3.1 Main Image Field
The main image field, in its split-screen display mode, is shown in Figure 3.1-1.
Figure 3.1-1
In the split-screen display, the camera number changes from green to yellow to indicate
the most recently updated field.
By clicking the primary mouse button (“left clicking” in the standard setting) within any
of the displayed image fields, the split-screen display can be changed to a single-screen
display. Alternatively, by clicking the secondary mouse button (“right clicking” in the
standard setting) within any of the displayed fields, the following menu can be accessed
(Figure 3.1-2).
By selecting its number from the Assign list, any camera
can be assigned to the field position you have selected. The
assigned camera number gets saved in the registry, and will
appear in that position at the start of the next session.
Note:
If the same camera number is assigned to more than one
field in the display, these fields will be updated at the same
time and will show identical images.
Figure 3.1-2
8
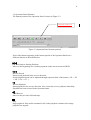
3.2 Operation Panel (Bottom)
The bottom portion of the Operation Panel is shown in Figure 3.2.
Position slider (*1)
Figure 3.2 Operation Panel (bottom portion)
Each of the buttons appearing in the bottom portion of the Operation Panel has a
different function as described below.
Rewind (Jump to Starting Position)
Moves to the beginning of a recording segment on the current connected DVR
Reverse Search
Starts search playback in the reverse direction.
Search playback speed can be adjusted through repeated clicks of this button. (1X -> 2X
-> 4X -> 8X -> 1X…)
Reverse Playback
Starts playback in the reverse direction. Also, starts skip reverse playback when Skip
Playback has been selected in the Operation menu.
Field Reverse
Moves to the previous field and stops.
Stop
Stops playback. If the audio command is ON, audio playback continues after image
playback has stopped.
9
Field Advance
Moves to the next field and stops.
Playback
Begins playback in the normal direction. Also, starts skip playback when Skip Playback
has been selected in the Operation menu. This button is also used to activate the PC
playback software feature.
Forward Search
Starts search playback in the normal direction.
Search playback speed can be adjusted through repeated clicks of this button. (1X -> 2X
-> 4X -> 8X -> 1X…)
Position slider
By dragging the mouse on the slider, the playback image is moved to the designated
position of the medium. This slider is corresponding to the block number of the
medium but not to the time.
1–9
Specifies a camera for single-camera display. For displaying multiple cameras, Press
Ctrl and click on desired camera’s number(s) (1 – 9) at same time. Clicking multiple
buttons will initiate sequential display.
When the non-recorded camera is selected and played back, other camera is displayed
and stops. For displaying single screen, recorded camera shall be selected.
4 split
Shifts display into 4-camera mode. Repeated clicks will cycle display as follows: 4a ->
4b -> 4c -> 4a…
The initial settings for 4a – 4c are, from the top left field to the right: 4a:1 – 4, 4b:5 – 8,
4c: 9・1・2・3.
9 split
Shifts display into 9-camera mode and shows 1-9 cameras from top left to bottom right
(the default setting).
10
Bookmark
Activates the bookmark function saving the image into the PC’s memory. The image
info is lost when PC is turned off.
Playback speed adjustment slider
By dragging the mouse on the slider underneath the buttons, playback speed can be
increased up or decreased down. Using “Fast” (the default setting), images will be
renewed at the device’s maximum speed. “Slow”, on the other hand, adds roughly a
3-second wait to each frame shown at maximum speed. The slider provides 100
adjustment steps between Fast and Slow.
(A playback speed is adjusted by changing the transfer rate in the operation of internal. )
The Operation Panel can be displayed or hidden using the Operation Panel command in
the View menu.
11
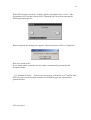
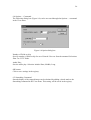
3.3 Information Panel (Right)
The left portion of the Information Panel is shown in Figure 3.3. It shows Media
Information, Image Information, Zoom Rate and Time Search.
Figure 3.3 Information Panel (Right portion)
Media Information:
Shows the range of recording times of the selected folder.
Image information
The date and time of image recording, camera number and comment are displayed .
During split-screen display mode, information on the most recently updated camera
image is displayed. This camera is marked in yellow on the main image field.
When a image was recorded in alarm mode, * mark appears.
Zoom Combo box
12
To activate the zoom function, single screen must be active. Zoom from 25 to 800 % is
possible. For details regarding the Zoom Combo box, please refer to Section 11.(Image
Enlargement).
Time Search
Enter the desired date and time for your search in the text boxes, and click the Search
button. Images will be displayed for the recordings made closest to the specified time. If
no recorded images are available for the date specified, nothing will be displayed.
Note:
Depending on the type of font used, date and time information might not fit fully within
the text box. In this case, go to the Windows Operation Panel, select Region, and set the
format of the date/time display to [DD/mm/yy] and [HH:mm:ss].
The Information Panel can be displayed or hidden using the Information Panel
command in the View menu.
13
3.5 Status Bar
The Status Bar displays explanations of the selected menu or button, and shows the
current playback mode and the current display range.
Please refer to Section 3.6 (Hint Display) for further details
The Status Bar can be displayed or hidden using the Status Bar command in the View
menu.
3.5 Shortcuts Menu
By clicking the secondary mouse button (“right clicking” in the standard setting)
anywhere within the image, the following Shortcuts menu can be accessed .
For details on each of the menu commands, please refer to Section 5.1 (Copy
Command) and 10.3 (Zoom Command).
3.6 Hint Display
Placing the mouse pointer over the on-screen button will make two things appear: an
explanation in the Status Bar and a hint balloon near the pointer.
14
4 File Menu
Figure 4 File menu
4.1 Folder Command
By clicking Folder command in File menu, the following Window appears and the
images in a folder can be played back.
Note:
DX-PC10E can playback only “FSM1” format, which is Mitsubishi Electric DVR
copy format.“FSM1” consists of the following files:
FMS1 file format
ALRM10 (Alarm list file)
DEVC10 (Device information file)
PIRT10 (Partition information file)
SRCH10 (Search information file)
TL001 (Folder)
D00000.TLX
D00001.TLX
D00002.TLX
When this file configuration is modified or changed, Mitsubishi will not guarantee its
function or performance. For example, when only folder file is transferred in FSM1 file
format, DX-PC10E can’t play back, because there is no relation between information
files and folder file.
15
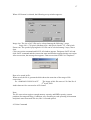
4.2 Save As… Command
Clicking the Save As… command in the File menu opens the following dialog box
(Figure 4.2), which allows the currently displayed image to be saved as either a
Windows bitmap file (.bmp) or an JPEG file (.jpg).
Figure 4.2 Save As… dialog box
When saving an image, the following information is add to image file:
Recording date, camera Number
Comment
Type of alarm recording
4.3 File Conversion
Click “Conversion “ command in file menu, the following window appears.
Specify the range of recording time and camera number and select JPEG or AVI format.
Image data are converted and saved.
JPEG conversion:
16
When JPEG format is selected, a window appears to designate where to save. After
designating SAVE AS and clicking SAVE command, the conversion starts and the
following window appears.
When completed, the message box appears “Data conversion to JPEG is Completed.”.
How to be stored in file:
A new folder which is named conversion date is automatically generated in the
designated folder.
Ex. “09042002123456” This file was converted at 12h34m56s on 9th April in 2002.
JPEG files are created in sequence number from D00000.jpg in the automatically
generated folder.
AVI conversion:
17
When AVI format is selected, the following set up window appears:
Image size: The size of AVI file can be selected among the following 3 steps:
Large: 981 x 720 pixels, Medium: 654 x 480 pixels, Small: 327 x 240 pixels
Frame rate: The speed of playing back AVI file can be selected among 5 steps, fast to
slow.
Click conversion command and SAVE AS window appears. Designate SAVE AS and
click SAVE command and the conversion starts and window appears during conversion.
After conversion, the message box appears “Data conversion to JPEG is Completed.”.
How to be stored in file:
When saved, the file is generated which shows the start time of the range of file
conversion .
Ex. “09042002123456C09.AVI”
The image of this file starts at 12h 34m 56s of
9th April, 2002.
Audio data can’t be converted to AVI format.
Note:
The file conversion requires enough memory capacity and HDD capacity (system
partition) for temporal filing. Conditions vary according to each operating environment
and please start from small file size, like 10 seconds period.
4.3 Print Command
18
Clicking the Print command in the File menu opens the following window (Figure 4.3).
After making desired adjustments to Margin, Printer settings…, and other options, click
the Print button to create a printout of the image.
Figure 4.3 Print window
The Preview column shows what the printout will look like.
Desired margin values (in millimeters) can be entered in each of the Margin text boxes.
19
By adding a check mark to the “Print the displayed area” selection, only the portion of
the image visible in the main window will be printed.
The quantity of printouts to be made can be specified in the Copies box. This function is
not available, however, with printers that do not support printing of multiple copies.
Clicking the Printer Settings button opens the standard Windows Printer Settings dialog
box, which allows selection of the printer, paper type, page orientation, and other items.
Various elements are included in the printout. Date and time are printed in the margin
above the image. Mitsubishi DX-PC10E, the name of the recorder used (e.g.,
DX-TL800 Series), and the printing proportions (in portrait or landscape orientation)
are printed in the margin below the image.
20
5 Edit Menu
Figure 5 Edit menu
5.1 Copy Command
The currently displayed image can be copied to the clipboard by using the Copy
command in the Edit menu.
6. Search Menu
Figure 6. Search menu
6.1 Comment…/Find Next Commands
Clicking the Comment... command in the Search menu opens the following window
(Figure 6.1). Searches can be made for a frame recorded with the specific comment by
entering the text into the box and clicking the Find Next button. The image is then
displayed if it is found. If the Up command of Direction is selected, the search will be
made towards earlier recorded times.
The Down command performs a similar function through later recording times.
Figure 6.1 Find window
Clicking the Find Next in the Search menu starts the search of the comment which is
designated in Comment... command.
6.2 Previous Alarm/Next Alarm Commands
21
The Previous Alarm command in the Search menu starts a search for Alarm Recordings
through earlier recorded times, and displays the field if any are detected. The Next
Alarm command performs a similar function through later recording times.
6.3 Alarm List… Command
Clicking the Alarm List… command on the Search menu opens the following window
(Figure 6.3).
Figure 6.3 Alarm List window
Display can be moved to a desired alarm position by selecting the alarm time from the
list box and clicking the Search button. A tab-sectioned text file of the alarm list can be
made by clicking the Save… button.
Clicking Date, Time or Camera can sort data by Date, Time or Camera number.
6.4 Time… Command
Clicking the Time… command in the Search menu opens the following window (Figure
6.4).
Figure 6.4 Time Search
Searches can be made for a frame recorded at a specific time by entering the date and
time in their respective text boxes and clicking the Search button. The image is then
displayed if it is found.
22
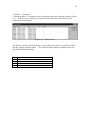
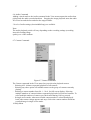
6.5 Block… Command
Clicking the Block... command in the Search menu opens the following window (Figure
6.5). Searches can be made by selecting the desired block from the list box and
clicking the Search button.
Figure 6.5 Block Search
The list box contains the block number, its recording start time, its recording end time,
the flag, and the camera number. The following table indicates symbols used in the
flag field and their meanings.
Flag
A
S
C
Meaning
Contains an alarm-recorded frame
Contains an alarm-recording start frame
Contains a comment-recorded frame
23
7 Operation Menu
Figure 7 Operation menu
7. 1 Stop Command
Clicking the Stop command in the operation menu stops playback or search.
7. 2 Playback / Reverse Playback Command
Clicking the Playback command in the operation menu plays back the images in the
selected folder.
Reverse playback plays back the images to reverse direction.
7. 3 Search / Reverse Search Command
Clicking the Search command in the operation menu plays back with skipping the
numbers of field which is specified in the option dialogue box.
Reverse Search do the same function to the reverse direction.
7. 4 Field Advance / Field Reverse Command
Clicking the Field Advance command in the operation menu displays the next field
image from the present. Field Reverse do the same function to reverse direction.
7. 5 Top End Command
Clicking the Top End command displays the top of the presently selected image folder
Above commands are the same function as the buttons on the Operation Panel.
24
8 Bookmarks Menu
Figure 9 Bookmarks menu
8.1 Marking using bookmark Command
Current playback position can be registered on the bookmarks list by using the save
with bookmark command in the Bookmarks menu. Up to 30 bookmarks can be
registered. When this limit is exceeded, bookmarks will be erased starting with the
oldest bookmark. All bookmarks are erased when the DX-PC10E session is ended. This
command has the same function as the Bookmark button on the Operation Panel.
8.2 Bookmarks quick search Command
Marked bookmarks image can be transferred selecting the Bookmarks list(1-30) in the
Bookmarks menu.
8.3 Bookmarks A, B Command
Using the Bookmarks A, B command in the Bookmarks menu, the current position can
be stored as either the A-point or B-point for the Repeat between A and B function.
8.4 Repeat between A and B Command
By adding a check mark to the Repeat between A and B command in the Bookmarks
menu, repeat playback will be performed from the specified A-point to the specified
B-point when pressing Playback button.
25
9 View Menu
Figure 10 View menu
9.1 Operation Panel/Status Bar/Information Panel Commands
The Operation Panel can be displayed or hidden using the Operation Panel command in
the View menu. In the same manner, the Status Bar and the Information Panel can also
be displayed or hidden using their respective commands in the View menu. These
settings will be saved in the registry.
9.2 Quick Zoom Command
The Quick Zoom window can be displayed or hidden using the Quick Zoom command
in the View menu. This setting will be saved in the registry.
9.3 Zoom Command
Clicking the Zoom command in the View menu brings up a submenu with a list of
selectable display magnifications (100%, 200%, 400%, 800%). You can also have
images automatically adjusted to fit the size of the window by adding a check mark to
the Fit-to-window command. These settings will be saved in the registry.
26
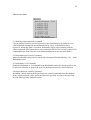
9.4 Options… Command
The following dialog box (Figure 9.4) can be accessed through the Options… command
in the View menu.
Figure 9.4 Option dialog box
Number of Fields to skip
Specify number of field to skip for use of Search / Reverse Search command. Selections
from 2 to 32767 fields.
Audio Play:
Sets the audio play. Selection include Short, Middle, Long.
OK button:
Click to save settings in the registry.
9.5 Smoothing Command
Smooth display of the stopped image can be obtained by adding a check mark to the
Smoothing command in the View menu. This setting will be saved in the registry.
27
9.6 Audio Command
Adding a check mark to the Audio command in the View menu outputs the audio when
plying back the audio-recorded medium. Stopping the image playback starts the audio
for several seconds before and after the stopped frame.
3 levels of audio settings (short/middle/long) are available.
Note:
The audio playback period will vary depending on the recording settings (recording
interval/recording image
quality) etc. of the medium.
9.7 Camera Command
Figure 9.7 Camera commands
The Camera command in the View menu lets you select the playback camera.
- Selecting ALL initiates sequential playback of all cameras.
- Selecting any other option will add that camera to the group of cameras currently
playing.
- Selecting a camera number from No.1 – No.9. for full screen display. Selecting
multiple numbers of camera initiates sequential playback of all selected cameras. To
select multiple numbers of camera, put check mark during Ctrl key pressed.
- In single screen mode, when not recorded camera number is selected and played
back, other camera image appears and stops. Select the camera number which has
recorded image in single screen mode.
10 Help Menu
28
Figure 11 Help menu
10.1 Help Command
Help can be displayed by selecting the Help command in the Help menu.
10.2 About… Command
Information on the version of DX-PC10E being used can be accessed through the
About… command in the Help menu.
11 Zoom function
11.1 Specifying Zoom rate
Enlargement can be specified with any of the listed procedures below.
・ Specify zoom rate 100%, 200%, 400%, 800% or Fit in window using zoom
command in view menu.
・ Specify zoom rate within 25% - 800% in the Zoom combo box in the main window.
・ Specify the desired area by dragging in the Quick Zoom window.
・ Specify zoom rate rotating the wheel on Microsoft IntelliMouse (50% steps) while
holding down the ctrl key.
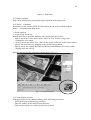
During zoom, the window appears as shown below. (fig. 11.1)
fig. 11.1 Zoom Function
11.2 Zoom display position
Enlarged position can be shifted with any of the following procedures:
・ Scroll the display position using scroll bar.
・ Drag the window to the desired scroll direction.
・ Drag and specify the area in the Quick Zoom window.
29
・ Rotate the wheel of Microsoft IntelliMouse (vertical direction only).
12 Appendices
12.1 Restrictions
- The playback speed of DX-PC10E is determined by the host computer’s processing
speed and the type of playback devices used. For these reasons, there will be cases
where the software’s playback speed does not match the recording intervals of the
digital recorder.
- There are cases, with media which sequence recording times, that Time Search
cannot be correctly executed. The solution to these cases it to use Block Search.