1
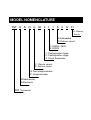
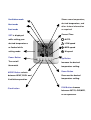
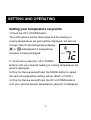
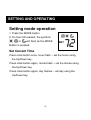
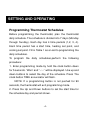
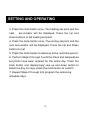
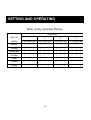
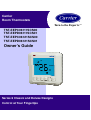
Carrier
Room Thermostats
Turn to the Experts.SM
TST-EEPC06111SCS00
TST-EEPD06111SCS01
TST-EEPC06121SCS00
TST-EEPD06121SCS01
Owner’s Guide
Series 6 Classic and Deluxe Designs
Control at Your Fingertips
CONGRATULATIONS
INTELLIGENT, EASY TO USE
Congratulations on your purchase of a new Carrier
thermostat. Your new thermostat combines computer-like
intelligence with extremely simple operation in an elegant
package. Designed to maximize performance, your Carrier
thermostat provides reliable, accurate temperature control
wile blending in with the surrounding decor. As you read on
you will quickly find how easy it is to set up and operate your
new thermostat and enjoy your climate controlled
environment
COMFORT AT YOUR COMMAND
Carrier has met the needs worldwide with their
programmable thermostats. Controlling your heating and
cooling system at the touch of a button, this powerful device
delivers comfort year round.
MAKING LIFE EASIER
Take a few minutes to review the features and functions
listed in this manual. Carrier gives you control over your
comfort with simple instructions, responsive push buttons
and an easy to read backlit display (on electronic models).
Once set, this thermostat reliably monitors indoor
temperature and responsively meets your comfort demands.
MODEL NOMENCLATURE
TST - E S N C 06 2
1 1 S
C S
01
01: Remote
Sensor
E:Embedded
S:Surface mount
1: AC85V~260V
2: AC24V
1: Cooling water 2 pipe
2: Cooling water 4 pipe
3: Direct Expansion
C: Classic series
D: Deluxe series
N: Non-programmable
P: Programmable
M:Mechanical
E:Electronic
TST: Thermostat
Ventilation mode
Shows room temperature,
desired temperature, and
Heat mode
other feature information
as required.
Cool mode
Current Time.
SET is displayed
while setting your
: AUTO
desired temperatures
: LOW-speed
or flashed while
: MED-speed
setting mode.
Power Button
Turn on/off
thermostat
MODE Button selects
between HEAT,COOL and
Ventilation operation.
Clock button
SET
: HI-speed
Up Button
Increase the desired
temperature setting.
Down Button
Decrease the desired
temperature setting.
FAN Button chooses
between AUTO,LOW,MED,
HI fan operation.
SETTING AND OPERATING
Setting your temperature set points
1.Press the UP or DOWN button.
The LCD readout will be illuminated and the heating or
cooling temperature set point will be displayed, but will not
change. Next to the temperature display,
or
indicateswhich temperature
set point is being displayed.
SET
2. Continue to press the UP or DOWN
buttons until your desired heating or cooling temperature set
point is displayed.
3.(Only for Deluxe series)Press the MODE button to select
the second temperature setting (either HEAT or COOL).
4.(Only for Deluxe series)Press the UP or DOWN buttons
until your second desired temperature set point is displayed.
-1-
SETTING AND OPERATING
NOTE: Your COOL setting must be at least 2℃
℃(4℉
℉)
higher than your HEAT setting. Your thermostat will
automatically change your previously set temperature to
maintain that 2℃
℃(4℉
℉) difference.
Setting fan operation
Press the FAN button to chooses
between AUTO, LOW, MED or HI
fan-speed,When the AUTO mode is
RT
selected, Auto LOW-speed When the
difference between room-temperature
and setting-temperature exceed 1℃(2℉), Auto MED-speed
When exceed 2℃(4℉), Auto HI-speed When exceed 3℃(6
℉).
-2-
SETTING AND OPERATING
Setting mode operation
1. Press the MODE button.
2. On the LCD readout, the symbols
,
, or
will flash as the MODE
SET
Button is pressed.
Set Current Time
Press clock button once, hours flash – set the hours using
the Up/Down key .
Press clock button again, minute flash – set the minute using
the Up/Down key.
Press clock button again, day flashes – set day using the
Up/Down key.
-3-
SETTING AND OPERATING
Programming Thermostat Schedules
Before programming the thermostat, plan the thermostat
daily schedule. The schedule is divided into 7 days (Monday
through Sunday). Each day has 4 time periods (1,2, 3, 4).
Each time period has a start time, heating set point, and
cooling set point. Fill in Table 1 as an aid to programming the
daily schedules.
To program the daily schedules,perform the following
procedure:
1. Enter programming mode by hold the clock button down
for 5 seconds. “Wen” and ”--:--” will be displayed. Use up and
down buttons to select the day of the schedule. Press The
clock button TIME annunciator will flash.
NOTE: If a programming button is not pushed for 90
seconds, the thermostat will exit programming mode.
2. Press the Up and Down buttons to set the start time for
the schedule day and period shown.
-4-
SETTING AND OPERATING
3. Press the clock button once, The heating set point and the
heat
annunciator will be displayed. Press the Up and
Down buttons to set heating set point.
4. Press the clock button once, The cooling set point and the
cool annunciator will be displayed. Press the Up and Down
buttons to set
5. Press the clock button to advance to the next time period.
6. Perform Steps 2 through 5 until the times and temperature
set points have been entered for the entire day. Press the
clock button and display”copy”,use up and down button to
select the day for copy, press the clock button to confirm.
7. Repeat Steps 2 through 6 to program the remaining
schedule days.
-5-
SETTING AND OPERATING
Table 1 Daily Schedule Planner
SCHEDULE
DAY OF
1
2
3
4
WEEK
Tim/Heat/Cool
Tim/Heat/Cool
Tim/Heat/Cool
Tim/Heat/Cool
Monday
/
/
/
/
/
/
/
/
/
/
/
/
Tuesday
/
/
/
/
/
/
/
/
/
/
/
/
Wednesday
/
/
/
/
/
/
/
/
/
/
/
/
Thursday
/
/
/
/
/
/
/
/
/
/
/
/
Friday
/
/
/
/
/
/
/
/
/
/
/
/
Saturday
/
/
/
/
/
/
/
/
/
/
/
/
Sunday
/
/
/
/
/
/
/
/
/
/
/
/
-6-
WHAT IF…
You have a system error message…
The temperature sensor failure indicator sends an E1
reading to the LCD display. This means your thermostat’s
indoor temperature sensor is no longer able to measure
temperatures. You will need to contact your dealer to repair
the problem.
Display E2 indicates the outdoor temperature sensor is
absent or not working properly (and is needed for proper
operation).
-7-
WARRANTY
This thermostat includes a two years limited warranty.
For detailed warranty information, please refer to the All
Product Limited Warranty Card included in your
information packet.
This thermostat is also eligible for manufacture’s extended
system warranties. Ask your dealer for details on extended
warranties for longer-term protection.
Turn to the Experts.SM
www.carrier.com
1-800-CARRIER
A member of the United Technologies Corporation family.
© Carrier Corporation 2005
Manufacturer reserves to discontinue, or change at any time,
specifications or designs without notice or without incurring obligations.