1
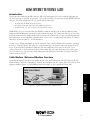
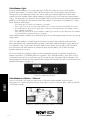
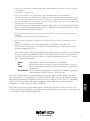
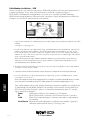
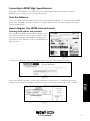
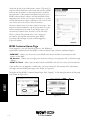
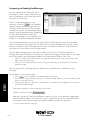
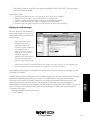
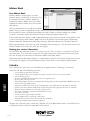
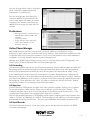
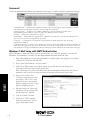
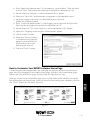
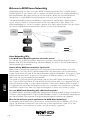
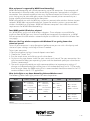
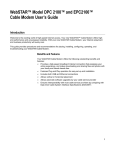
TABLE OF CONTENTS
TABLE OF CONTENTS
WOW! INTERNET REFERENCE GUIDE
Introduction.....................................................................................................................I-1
Cable Modem/Advanced Modem Overview......................................................................I-1
Cable Modem Lights.................................................................................................... I-2
Cable Modem Installation - Ethernet........................................................................... I-2
Cable Modem Installation - USB..................................................................................I-4
Cable Modem Troubleshooting........................................................................................ I-5
Connecting to WOW! High-Speed Internet....................................................................... I-7
Start the Software........................................................................................................... I-7
How to Register Your WOW! Internet Account................................................................. I-7
WOW! Customer Home Page............................................................................................I-8
To Begin Using WOW! Internet.........................................................................................I-9
WOW! Email.....................................................................................................................I-9
Using Multiple Email Accounts.....................................................................................I-9
Help Section................................................................................................................I-9
Composing and Sending Email Messages................................................................... I-10
Replying to Mail Messages.......................................................................................... I-11
Address Book.................................................................................................................I-12
Calendar.........................................................................................................................I-12
Preferences....................................................................................................................I-13
Online Phone Manager...................................................................................................I-13
Call Forwarding...........................................................................................................I-13
Call Rejection..............................................................................................................I-13
Call Detail Records......................................................................................................I-13
Voicemail.......................................................................................................................I-14
Windows 7 Mail Setup with SMTP Authorization..............................................................I-14
How to Customize Your WOW! Customer Home Page.....................................................I-15
Welcome to WOW! Home Networking............................................................................ I-16
ii
WOW! INTERNET REFERENCE GUIDE
Introduction
Thank you for choosing WOW! Internet. We have designed this User Guide to help you get
up and running as quickly as possible. This guide includes an overview of the WOW! Internet
service. The main objectives of this guide are to show you:
• An overview of WOW! Internet service.
• Installing the WOW! Internet cable modem hardware.
• Guidelines for use and summary of information/terms.
WOW! offers a virus scanner from the WOW! Customer Home Page at portal.wowway.com
under the WOW! Network tab on the right side of the page. This utility can be run at any time,
and will automatically update itself with the latest virus definitions. If you are concerned that
your computer may have been infected with a virus, this is a good way to find out. If it does
identify a threat on your PC, it will remove it.
In rare cases, WOW! will block an email account if our servers detect that account sending
out virus-infected email. We take this step proactively, to slow or stop the spread of that
virus. If your account becomes blocked, you will need to install and run an anti-virus
utility, then call us to have the account reinstated. We will need to know what utility you
ran and what virus (or viruses) were detected and removed, so make sure you have that
information on hand.
Cable Modem /Advanced Modem Overview
Generally WOW! will install a new cable outlet near your computer. We will also install the
cable modem (and NIC if required). Should you perform the set-up by yourself, refer to the
diagram below (figure 2.1) and follow the instructions in this section of the guide.
INTERNET
Figure 2.1: Typical Ethernet cable modem setup
I-1
Cable Modem Lights
External cable modems have indicator lights (LED) that show the status of the cable
Internet connection. The exact labels for these lights will vary between manufacturers.
Please refer to the documentation that came with your cable modem for information
specific to your modem. Most cable modems have four lights that indicate its operational
status. For example, the Scientific Atlanta WebSTAR (the most common modem provided by
WOW!) has five lights on the front panel of the modem. These lights are labeled: PC, Cable,
Send, Receiver and Power.
• The Power light is lit when the modem is turned on.
• The PC light is lit when an Ethernet or USB carrier is present between the modem and the PC.
• The Send/Receive lights flashes when data is being transferred between the modem and the
high-speed data network.
• The Cable light will blink when the modem is booting up and will stay on solid when the modem
is synchronized and registered on the network.
Other cable modem models have additional lights that indicate operational errors or testing
information.
NOTE: The cable modem is a sophisticated electronic instrument that should be protected from
power fluctuations. We recommend that you power your cable modem through a surge-protected
110-volt power strip. Furthermore, the cable modem must always be in an open, well-ventilated
area. Do not put the cable modem in a confined space or place books, files or other desktop
paraphernalia on or next to it.
You must check the modem’s lights at the completion of each installation step for the
proper indications. Call WOW! technical support 1-866-4WOW-NOW (1-866-496-9669)
at the conclusion of any installation step if you do not get the proper light indication. Use
the appropriate section for the type of cable modem connection you will use: Ethernet card
below or USB port on page I-4.
Figure 2.2: WebSTAR DPC2100
INTERNET
Cable Modem Installation - Ethernet
These instructions assume that you have an Ethernet cable modem and that your
computer has a working Ethernet port. If you don’t have an Ethernet port, refer to the USB
installation section.
Figure 2.3: Typical Ethernet cable modem installation
I-2
1 Connect the cable coax line dedicated to your cable modem to the Coax Cable Input on the
cable modem
(see figure 2.2 on page I-2).
2 Plug the transformer into a grounded, surge-protected 110VAC household outlet.
Connect the power transformer to the modem’s power connector. Most cable modems are
“on” all the time and do not have a switch. If yours has a power switch, turn on the modem.
Wait for the modem to “sync” with the system. This may take several minutes. A modem light
will indicate when synchronization occurs.
NOTE: Powering up the cable modem could take longer the first time (from 2 to 10 minutes)
than on successive occasions because it must establish its initial connection (block sync or
synchronization) to the WOW! network.
3 Plug one end of the Ethernet cable that came with your kit into the Ethernet port on your
computer.
The Ethernet port looks like a large telephone jack.
4 Insert the other end of the network cable into the Ethernet port on the back of the cable
modem.
NOTE: Your computer needs to be configured for TCP/IP before it will work with
WOW! Internet. In most cases you won’t need to do anything here. Most computers are
already configured for TCP/IP.
Your cable modem will usually display three lights once the modem has established
its connection to the WOW! network. For example, the Scientific-Atlanta Web Star
DPC2100 will display five lights when it is correctly connected to your PC and our
high-speed data network:
Power
Solid green indicates the modem has full power.
PC
When illuminated it indicates the Ethernet carrier is present.
Cable
When illuminated solid green it indicates the modem is registered on
the network.
Send/ReceiveWhen illuminated solid green it indicates the modem is getting a
software update and/or activity. Flashing is ok.
NOTE: When you finish using your cable modem, you do not need to turn it off. Leave it on even
when you turn off your computer. If you power off your cable modem, it may take several minutes to
re-synchronize itself with the WOW! network.
I-3
INTERNET
Please consult your modem’s documentation if your modem lights are labeled differently than
the example above. If the appropriate PC, Cable, and Power lights are correctly illuminated, begin
configuring your computer to connect to the Internet by setting up TCP/IP in the PC’s networking
subsystem. Please contact WOW! technical support if your modem does not have the three
appropriate PC, Cable, and Power lights illuminated.
Cable Modem Installation - USB
These instructions assume that you have a USB cable modem and that your computer has
a working USB port. If not, refer to the Ethernet installation section on page I-1.
NOTE: Because USB hardware incompatibility issues can arise, especially with older hardware,
WOW! Internet cannot guarantee USB connectivity. You may be required to contact your USB device
vendor or use an Ethernet card to connect your modem.
Figure 2.4: Typical USB cable modem installation
1 Connect the cable coax line dedicated to your cable modem to the cable connector on the cable
modem.
(see figure 2.2 on page I-2).
2 Plug the transformer into a grounded, surge-protected 110VAC household outlet. Connect the
power transformer to the modem’s power connector. Most cable modems are “on” all the
time and do not have a switch. If yours has a power switch, turn on the modem. Wait for the
modem to “sync” with the system. This may take several minutes. A modem light will indicate
when synchronization occurs.
NOTE: Powering up the cable modem could take longer the first time (from 2 to 10 minutes)
than on successive occasions because it must establish its initial connection (block sync or
synchronization) to the WOW! network.
3 Plug one end of the USB cable that came with your kit into the USB port on the cable modem.
This port is usually white in color.
4 Connect the other end of the USB cable into your computer’s USB port on the back of your computer.
INTERNET
5 Insert the USB driver CD when prompted by the operating system and follow the on-screen
instructions as the CD runs.
NOTE: Your computer needs to be configured for TCP/IP before it will work with WOW! Internet. In most
cases you won’t need to do anything here. Most computers are already configured for TCP/IP.
Your cable modem will usually display three lights once the modem has established
its connection to the WOW! network. For example, the Scientific-Atlanta Web Star
DPC2100 will display five lights when it is correctly connected to your PC and our
high-speed data network:
Power
Solid green indicates the modem has full power.
PC
When illuminated it indicates the Ethernet carrier is present.
Cable
When illuminated solid green it indicates the modem is registered on
the network.
Send/ReceiveWhen illuminated solid green it indicates the modem is getting a
software update and/or activity. Flashing is ok.
I-4
Please consult your modem’s documentation if your modem lights are labeled
differently than the example above. If the appropriate PC, Cable, and Power lights are
correctly illuminated, begin configuring your computer to connect to the Internet by
setting up TCP/IP in the PC’s networking subsystem.
Please contact WOW! technical support if your modem does not have the three
appropriate PC, Cable, and Power lights illuminated.
NOTE: When you finish using your cable modem, you do not need to turn it off. Leave it on even
when you turn off your computer. If you power off your cable modem, it may take several
minutes to re-synchronize itself with the WOW! network.
Cable Modem Troubleshooting
Use the table below to help with the functions of your cable modem lights. The names and
colors of your lights may vary, but the principles are common to most cable modems.
Lights
Indication
Power
Cable,
Sync or
Block Sync
Steady green means modem is on and is connected to the cable Internet
network. Usually flashes during initial synchronization. Off means no cable
connection (check all cable connections; if problem persists, contact WOW!
technical support). PC or Link Steady green means connection to computer is
working. Off means computer is turned off or not connected. Some modems
do not have this light or an equivalent.
Data or Activity
Flashing green means data is flowing through the modem. Some modems
have a light (RD or RX for example) that indicates when your modem is
receiving data as well as a separate light (TD, TX or SD for example) that
indicates when your modem is transmitting data.
Test or Error
Normally off. May flash during initial self-test or software downloading.
Steady light usually indicates some failure of the modem or the network.
Troubleshooting Tips
If your cable modem does not perform as expected, these following tips may help. If you
need further assistance contact WOW!.
I-5
INTERNET
• Check that your coaxial cable, power, Ethernet/USB, and modem connections are tight. If the
connection becomes loose at one of these places, you will not be able to send or receive data.
Secure the connection.
• Check that your cables are plugged into the correct sockets. One very common error is to
plug the USB cable into the modem’s Ethernet socket. When this is done, your PC light (or
equivalent) will be dark and there will be no connection between the modem and the PC. The
sockets on the back of the modem are labeled; be sure that your USB cable is connected to the
USB socket.
• Check to see if your modem is connected to the WOW! network. Look at your cable modem
and confirm that the cable light is solid green. If the light is green and is not blinking, unplug
the modem’s power cord, wait 30 seconds and then plug it back in.
• Reboot your computer. If your WOW! Internet connection is still not functioning properly
proceed to next step.
• Call 1-866-4WOW-NOW (1-866-496-9669) for automated help. Follow the automated
instructions to hear if there is an outage in your area.
• No outage in your area? If there is not an outage in your area, and you have tried the tips
above, please call WOW! technical support at 1-866-4WOW-NOW (1-866-496-9669).
Advanced Modem Troubleshooting (Phone Modem)
What if my Internet connection is not working?
If your Internet connection is not working and you also have WOW! Cable and/or
WOW! Phone, please check your other services to see if they are working. If they are
also not working then there may be a cable outage in your area. Please contact WOW! at
1-866-4WOW-NOW (1-866-496-9669).
What should I do if my cable TV is working but my Internet is not and I have the WOW!
Advanced Modem for phone?
If your cable television service from WOW! is working and your Internet (and phone) service
is not, you may need to reset your Advanced Modem. See question “How do I reset the
Advanced Modem?” below.
How do I reset the Advanced Modem?
To reset the Advanced Modem, press the recessed reset button with a toothpick, pen tip or
other pointed non-metallic object the back of the Advanced Modem. Once the online light
is on solid, connectivity to the network has been restored.
What is the Standby button on the Advanced Modem?
The Standby button may be used to disconnect your computer from the Internet when not
in use (standby mode enabled). Pressing the button again will reconnect your computer to
the Internet (standby mode disabled).
The Standby button has no effect before the modem has registered on our network.
The current standby mode setting is stored on non-volatile memory. If the Advanced
Modem is reset or loses power, it returns to its previous state. The Standby button will
not affect the telephone service.
INTERNET
For troubleshooting with your Advanced Modem, please turn to page P-13.
I-6
Connecting to WOW! High-Speed Internet
After the cable modem and software are installed in your computer and are working
properly, you’re ready to start using the Internet.
Start the Software
First, you need to locate either the icon for your preferred browser. It may be inside a folder
or on your desktop. Once you’ve found it, simply double-click the icon and you’re on your
way to cyberspace!
How to Register Your WOW! Internet Account
Selecting email address and password
To choose your WOW! Internet email address and
password, as well as register your account from
your home computer, go to portal.wowway.net
and click on the “Register” link in the WOW! Email
box (Figure 1).
Figure 1
Click on the “Register” link and the following screen will be presented (Figure 2).
Figure 2
Enter your WOW! account number and the phone number that is associated with your
account. Your account number is located on your installation work order. Click “submit”.
INTERNET
Figure 3
I-7
Continue to the User Information screen. (Figure 4) In
the User Name field you will create the primary WOW!
Internet email address associated with this account.
For example, if you choose JohnDoe1234, your main
WOW! Internet email address will be JohnDoe1234@
wowway.com. If the user name is already in use, you
will be prompted to select a different user name. Your
user name must be at least four characters.
Your password must be at least eight characters. You
will also need to choose a security question that you
will be prompted to answer if you forget your user
name or password. Your answer is case sensitive.
After a successful creation of a user name and
password, you will be returned to your WOW!
Customer Home Page and you will be logged in.
(Figure 5 below)
WOW! Customer Home Page
Figure 4
Once logged in, you will be able to access the following
applications directly from the WOW! Customer Home Page, without additional logins:
• WOW! Mail - allows you to access your WOW! Internet email from any computer with
access to the Web
• My Account - allows you manage your account settings, manage your bill, and home page
settings
• WOW!-A-Friend - allows you to refer friends to WOW! and track the status of the referrals
If you prefer to stay logged in indefinitely, you can check the “Remember Me” box below
the Login button before you Login (see arrow on Figure 5).
INTERNET
To log out of the WOW! Customer Home Page, click “Logout” in the top right corner of the page
(see arrow on Figure 5.1).
Figure 5
I-8
Figure 5.1
To Begin Using WOW! Internet
Once your Internet connection has been established, you are ready to begin using the
WOW! Internet service—your computer is connected all the time!
1 Double-click the Internet Explorer icon on your desktop, or click the Start button, click
Programs and click Internet Explorer.
2 Internet Explorer will load and display your home page; usually this will be the
WOW! Customer Home Page. See page I-15 for more information on customizing your WOW!
Customer Home Page.
3 To make portal.wowway.net your homepage, select the link at the bottom of the page under
“Help & Tools” called “Make This My Homepage.”
WOW! Email
Using Multiple Email Accounts
With WOW! Internet you can have up to 5 free email addresses (mailboxes) so that
everyone in your house can have their own email address. Each additional mailbox must be
associated with the Primary User Account. The Primary User Account can create additional
mailboxes via the My Account section at portal.wowway.net.
WOW! Mail gives you access to your email from any computer that has an internet
connection. There is no need to use a separate email program to manage your email.
Simply log in to your WOW! Customer Home Page to manage your email, address book,
and calendar.
With WOW! Mail you can see your first three messages right from your WOW! Customer
Home Page. To view the messages simply click on the message and it will open the full
featured email page.
Help Section
More detailed information is available in the help section located in the upper right corner.
INTERNET
I-9
Composing and Sending Email Messages
You can compose and send your email
messages as soon as you write them, or
you can compose a draft and return to it
later to finish and send.
The first step to composing a new
on the toolbar
message is to click
to open a blank compose page. You can
also right-click the name in the Sent By
section of an email and select New Email,
to open a blank compose page. Depending
on your Mail preferences, the blank
compose page opens in the Content pane
or opens as a separate compose window.
In the Compose window, you enter the email address of the person or persons to whom
you are sending the message in the To: field. You can click To to look up a person’s email
address in order to search through your contacts. To add BCC addresses, click Show BCC
next to the Cc: text field in the message header.
You can either compose your message in HTML or in plain text. The default format is
configured in your Preferences, General tab. To quickly change the format for this message
only, click Options on the compose toolbar and select either HTML or Plain Text.
• Format as HTML lets you format your message with different font styles, create tables, add
color, and insert hyper links.
• Format as Plain Text produces text with no style or formatting. Any computer can read this
type of message.
You can attach files, including pictures, documents, spreadsheets, audio files to your
message.
To compose a new mail message:
INTERNET
1. Click
from the toolbar. The compose page is displayed.
2. If you are not using the default identity, in the Account drop-down list, select the identity (also
known as persona) to use.
3. Complete the address, subject line, and body text as needed. Enter the body of the message in
the text box below Subject.
To check the spelling in the message, click Spell Check.
To add an attachment, click
.
Add your signature. If you have different accounts set up, in the Accounts drop down,
select the email address to use for this email. If you have signatures style defined for
the account, click Signature on the Compose toolbar to add that signature.
4. Click Send to send the message.
I-10
If you don’t want to send the message immediately, click Save Draft. The message is
saved in the Drafts folder.
Using Spell Check
1. To check the spelling of your message, click Spell Check, on the toolbar.
Words that are unknown to the spell checker are highlighted.
2. Click on a highlighted word. A pop-up displays suggested corrections.
3. Select the correct word. The word is highlighted in another color.
4. To accept your changes and close the spell checker, click on Resume editing.
Replying to mail messages
You can reply to the sender of
a message or you can reply to
the sender and all recipients of
the message.
• Reply replies only to the
sender of the original
message. It does not
include any other addresses
that might be in the
To: or Cc: fields. Clicking
Reply opens a new mail
compose page and
populates the To: field with
the name of the person
who sent you the message.
• Reply to All includes all recipients from the previous message. You can use this option if you
want everyone who saw the previous message to also see your response.
Using Reply only preserves the body text. Attachments from the original message are not
included in the reply.
I-11
INTERNET
Clicking Reply or Reply to All opens the Compose page, with the text from the old message
preserved. Depending on how you set your user preferences, the text from previous
messages may have a character showing the number of previous exchanges that have
occurred since this text was written. For example if the reply is part of an ongoing
conversation, and you have the option Include original message with this prefix... set to use
the > character, the text from each part of the exchange is shown with angle brackets:
> Previous message
> > Message before previous message
> > > And so forth
Address Book
Your Address Book
Address Book is where you can store
contact details. By default a Contacts and
an Emailed Contacts address book are
created in Address Book. You can create
additional address books and share them
with others.
You can add contacts to any of your address
books. Only a name is required to create a contact, or you can create detailed contact cards
that include full name, multiple email addresses, work, home, and other addresses, phone
numbers, and notes about that contact. You can also create group contact lists.
The Emailed Contacts address book is populated when you send an email to a new address that
is not in one of your other address books. You can disable this feature from your Preferences,
Address Book tab. Remove the check from Settings, Add new contacts to “Emailed Contacts”.
When you compose an email, the auto-complete feature displays a list of names from your
address books that match the text you are typing.
Viewing your contact information
You can view the contact names in a list or as cards. The List view is a vertical list of all of
your contacts. The Cards view shows all the information you entered on the contact form.
You can change the view from the Address Book View drop-down.
Complete contact information displays as a tool tip when you pass the mouse cursor over a name
in an email message or in the email content view, if that name is in one of your address books.
Calendar
The Calendar lets you track and schedule your appointments, meetings, and events.
Calendar includes the following features:
INTERNET
•
•
•
•
•
•
•
•
•
•
•
•
•
•
•
•
Create different personal calendars
Create appointments and schedule meetings and mark them as private or public
Create all-day events
Use the QuickAdd dialog to quickly create an appointment
Display your free/busy status
View other peoples free/busy schedules to facilitate group scheduling with other WOW! email users
Create recurring appointments
View your calendars by various views, including day, 5-day work week, 7-day week, and month
Quickly view your calendar schedule for the day from email messages or from the mini-calendar
Accept/Tentative/Reject an invitation with one click
Share your calendars with other WOW! Webmail users
Print your calendars
Create and manage multiple calendars
Create appointments, meetings, and events
Delegate permission to view or manage your calendars
Import and export other calendar programs
To open the Calendar view, select the Calendar tab. The Work Week view is the default and
is displayed when Calendar is opened the first time.
I-12
You can change which view is displayed
when Calendar is opened from the
Preferences > Calendar tab.
You can change your view from the
Calendar toolbar, to see activities for
a day, work week, full week, or month.
Changing the Calendar view from the
toolbar only changes the view for that
session.
Preferences
• Manage how your mailbox features
work for Mail, Address Book and
Calendar
• Create mail filters
• Assign shortcut keys to quickly
access email folders, saved
searches, and tags
Online Phone Manager
With WOW! Internet you can have up to 5 free email addresses (mailboxes) so that
everyone in your house can have their own email address. Each additional mailbox must be
associated with the Primary User Account. The Primary User Account can create additional
mailboxes via the My Account section at portal.wowway.net.
Manage your WOW! Phone settings online, such as Call Forwarding and Call Rejection, and
access your Call Detail Records from the Phone Manager tab.
Call Forwarding
Call forwarding allows you to set up call forwarding online. Simply select the box to enable call
forwarding and then enter the phone number you would like to have the calls forwarded to.
After you have entered the number you wish to have your calls forwarded to select “Save.”
If you would prefer to only have calls from certain numbers forwarded then selective call
forwarding is for you. To enable selective call forwarding, check the box that reads “forward
calls from the following list of numbers” and then enter the number you would like the calls
forwarded to. Once entered, click “Add,” or select a number on the left and click “Delete”
to remove numbers that no longer need to be forwarded.
Enable Selective Call Rejection to reject calls from specific numbers. Add up to 12 numbers.
To remove numbers from the list, select the number on the left and click “Delete.” The
incoming call does not ring at all, and the person on the other end of the line hears, “The
number you have called is not accepting calls from this number.”
You can also enable Anonymous Call Rejection, which rejects incoming calls from numbers that
show as “Private” or “Blocked” on Caller ID. The incoming call with not ring at all and the person
on the other end of the line will hear, “The party you dialed does not accept anonymous calls.”
Call Detail Records
Call Details Records displays a link that takes you to the My Account tool on the WOW!
Customer Homepage.
I-13
INTERNET
Call Rejection
Voicemail
Listen to, download and delete your voicemail messages, as well as edit your voicemail settings.
• “Get Voicemail” – Updates your Voicemail inbox with new messages. View the phone number,
the length of the message and when the message was received.
• “Reply by Email” – If you have an address book entry with the phone number and a
corresponding email address, you can reply to a voicemail with an email.
• “Delete” – Deletes the selected message(s).
• “Download” – Downloads the voicemail as a WAV file that you can save on your computer so
you can listen to the message offline, anytime.
• “Settings” – Customize the number of rings before calls go to voicemail and reset your
Voicemail Password.
• “Voicemail to Email” – Receive your voicemails via email. When you choose to receive voicemail to
email the message will be sent as an attachment that you can listen to or save as well as a link to
the voicemail message in WOW! Mail. You can add up to 5 email addresses to receive the message.
Windows 7 Mail Setup with SMTP Authorization
NOTE: Windows 7 does not come with an email client as it did with previous versions of
Windows, but Windows Live Mail can be downloaded from Microsoft for free.
1. After downloading and installing Windows Live Mail, open the program and select
“Add email” from the left column.
2. Enter your email address and password.
3. Select the “Remember password” option if you do not want to enter your
password each time you check your email.
Note: You may prefer to leave the Remember password option unchecked if you share a
computer with several users and you want to maintain the privacy of your email.
INTERNET
4. Enter your name in the
“Display name for your sent
messages” field. This is the
display name as you would
like it to appear in the “From”
field in outgoing emails.
5. Do not check the “Manually
configure server settings for
email accounts” option.
6. Click the “Next” button.
7. Select the “POP3” option
from the incoming “Server
type” drop down menu.
I-14
8. Enter “pop3.mail.wowway.com” in the Incoming “server address” field and verify
that the “Port” field next to the incoming server field has defaulted to “110.”
9. Do not select the “Requires a secure connection (SSL)” option.
10. Select the “Clear Text” Authentication using option using drop down menu.
11. Verify the “Logon user name” has defaulted to your username
(before the @wowway.com)
12. Enter “smtp.mail.wowway.com” in the Outgoing server field and verify the Port
field next to the Outgoing server field has defaulted to “25”.
13. Do not select the “This server requires a secure connection (SSL)” option.
14. Select the “Outgoing server requires authentication” option.
15. Click the “Next” button.
16. Select the “Set this account
as the default mail account”
option if you would like this
email account to be your
default email account.
17. Click the “Finish” button.
How to Customize Your WOW! Customer Home Page
Customizing your portal page allows you to display the content you want on your portal
page. You must be logged in to customize your page. To access the customization page,
click on the “Personalize this page” button under the “My Account” tab.
Once you are on the personalization page, you can then select which content you would
like displayed on your portal page. Once you have finished making your selections, click on
the “Finish” button to save them. (Figure 6)
INTERNET
Figure 6
I-15
Welcome to WOW! Home Networking
Home Networking lets you share your WOW! Internet connection with multiple wireless
enabled devices in your home such as laptops and game consoles via a Home Networking
Advanced Modem. No more waiting to use the Internet. When you have WOW! Home
Networking, a single WOW! Internet connection will serve your entire household.
The Home Networking Advanced Modem is connected to a WOW! High-Speed Internet
signal, which is output via Ethernet cable to the main computer in your home. The
Advanced Modem has a built-in wireless receiver that allows other devices that you select
to share the WOW! Internet connection, without a hard wired connection.
Cable
Outlet
Advanced
Modem
Gaming Console
Laptop
Main
Computer
2nd Desktop
Computer
Cable
Printer
Ethernet
For example purposes only.
Configuration of non-WOW! supported devices is not provided.
Wireless
Home Networking FAQs
INTERNET
Is my WOW! Home Networking wireless connection secure?
Yes, we will set up WPA encryption when we install your Home Networking Advanced
Modem. Also, the Home Networking Advanced Modem has built in firewall protection to
further protect your network.
How far will my WOW! Internet wireless signal reach?
Most wireless networking equipment has a range of up to 300 feet indoors and 1500
feet outdoors. For best results, WOW! recommends that equipment you are connecting
wirelessly be within 150 feet of the Home Networking Advanced Modem. The wireless signal
will penetrate most walls, so you can have devices in different rooms and on different
floors and still stay connected to the network.
The wireless signal will typically go through two to three walls before experiencing signal
loss. If you have a large home or a home with thick or dense walls, it is suggested that you
place the wireless router in a high, central location. If you want network access outside, it
is suggested that you place the wireless router near a window. You should also try to keep
the wireless router away from any large metal objects as these may hinder its range.
Can I use WOW! Home Networking with a Macintosh computer?
Yes, WOW! supports connecting a Macintosh computer to the home network as long as it meets the
minimum system requirements. If you have both Windows-based PCs and Macintosh computers on
your home network, file and printer sharing activation between the two are not supported.
What are the minimum system requirements for WOW! Home Networking?
For Windows based computers the minimum system requirement is Windows XP SP2 or
higher. For Macintosh computers the minimum system requirement is Mac OS 10.4 or
higher. Windows 64-bit operating systems are not currently supported.
I-16
What equipment is supported by WOW! Home Networking?
WOW! Home Networking will include connecting up to five computers. One computer will
be connected via Ethernet cable, and the remaining computers connected via a wireless
connection. One network capable printer may also be connected via Ethernet, and file and
print sharing may be activated upon request to allow network printer connectivity to a
printer already wired/connected to the computer.
WOW! will provide you with the WPA key so you can connect other wireless devices to your
network. WOW! does not provide technical support for wireless printers, game consoles,
wireless handhelds or sling boxes. WOW! will connect computers that meet the minimum
requirements for WOW! Home Networking.
Does WOW! provide USB wireless adapters?
Yes, WOW! offers and installs USB wireless adapters. These adapters are available for
purchase from WOW! You must have a free USB port to connect the adapter to, as WOW!
will not connect the USB wireless network adapter to a USB hub. Standard installation fees
may apply.
What can I do if my wireless computers with Windows XP are getting slower than
advertised speeds?
To test if your computer is setup for optimal performance you can visit a third party web
site to test your settings and to adjust them if needed.
To test your computer:
1. Point your browser to http://www.dslreports.com/tools
2. Choose the “Tweak Test”.
3. Run the tweak tester and click on results when done.
4. On the results page choose ‘cable’ for your service and ‘normal’ for your connection. You
will also need to select your operating system and the download speed you subscribe to.
Click on ‘recommend’.
5. The results page will provide you with recommendations to improve your settings. If
changes are recommended you will be given a link to download and run Dr. TCP to make
these changes. Note: the RWIN setting that is recommended should be entered in the TCP
receive window in the Dr. TCP application.
What do the lights on my Home Networking Advanced Modem mean?
The following table shows light patterns for normal operation.
LAN1 – LAN4
WLAN
AC Power
On = Computer
Connected
Off = Computer
not connected
Flash = Computer
Activity
On = Computer
Connected
Off = Computer
not connected
Flash = Computer
Activity
No
AC Power
Off
Off
DMZ
On = DMZ
enabled
Off = DMZ
enabled
Off
Tel. 1 / Tel. 2
On = On-hook
Off = disabled
Flash = Off-hook
INTERNET
Mode
On = On-hook
Off = disabled
Flash = Off-hook
WPA Key ________________________________
(You will need this to connect other wireless devices)
I-17