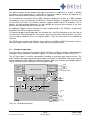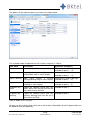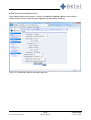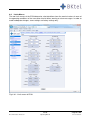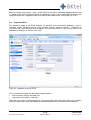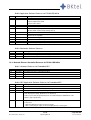
1
ES10L / ES10XL/ Fx-ES10
Optical CATV Transmitter 1550 nm
Operating Manual
Rev. 07
September 2013
Safety instructions
Attention:
Please read the instructions completely and carefully
before putting the transmitter into operation!
All operation steps should be carried out in the
prescribed sequence!
Improper putting into operation can cause serious
danger for persons or can damage the devices.
INVISIBLE LASER RADIATION
DO NOT STARE INTO BEAM OR
VIEW DIRECTLY WITH OPTICAL
INSTRUMENTS
CLASS 1M LASER PRODUCT
MAXIMUM OUTPUT POWER:
20.0 mW
WAVELENGTH: 1550 nm
IEC 60825-1:2007
Document status: Released
ES10
Page 2/100
Operating Manual
rev. 07, 25.09.13
Warranty
All products manufactured by BKtel communications GmbH are guaranteed to be free from defect in
material and workmanship for a period of two (2) years from the date of shipment. During the warranty
period, BKtel communications GmbH will repair, or replace at its option, any product or parts thereof which
have been sold by BKtel communications GmbH or authorized representatives to the Buyer, where such
products or parts thereof, upon inspection by BKtel communications GmbH and in the sole opinion of BKtel
communications GmbH are determined to be defective in workmanship or material. BKtel communications
GmbH reserves the right to issue a credit note for any defective product or parts thereof, as determined by
BKtel communications GmbH, as an alternative to the repair or replacement of such defective product or
parts thereof. This warranty shall extend to all products and parts thereof which have been proved defective
through normal use, but this warranty shall not cover any products or parts thereof that have been
subjected to conditions exceeding the applicable specifications or ratings for such products or parts thereof,
or such products or parts thereof which have been disassembled, modified or otherwise abused.
Buyers must notify BKtel communications GmbH in writing of any warranty claim not later than 30 days
after the expiration of the warranty period. Any claims under this warranty must be made by the Buyer, and
no claim will be accepted from any third party. All claims for shortage of products ordered, or for incorrect
charges, must be presented to BKtel communications GmbH within 10 days after shipment of products by
BKtel communications GmbH.
Limitation
The remedies provided for above are the Buyer’s sole and exclusive remedies. BKtel communications
GmbH shall not be liable to a Buyer, or any other third parties, for installation and removal costs, or for any
other special, consequential or indirect damage, including without limitation the loss of production or profit,
arising from any cause whatever, even if BKtel communications GmbH has been advised to the possibility
of such damage or damages, or even if such damage or damages is alleged to arise from negligent acts,
omissions, or conduct of BKtel communications GmbH or its employees. The liability of BKtel
communications GmbH is expressly limited to the replacement or correction of defective products or parts
thereof, or to the issuance of a credit note for the purchase price of such products or parts thereof. This
warranty is in lieu of all other warranties expressed or implied including, without limitation, any implied
warranties or merchantability or fitness for a particular purpose.
Repair Procedures
Defective products or parts thereof shall be returned to BKtel communications GmbH, transportation prepaid, at the address shown below, using the original packing carton or one that will provide equal
protection. All products or parts thereof which have been returned to BKtel communications GmbH, but
which are found to meet all previously applicable specifications for such products or parts thereof, shall be
subject to an examination charge of not less than US $ 250.00. All products or parts thereof which are
returned to BKtel communications GmbH, and which are not accompanied by an itemised statement of
defects shall be returned to the Buyer at the Buyers expense, and no evaluation of such product or part
shall be carried out.
BKtel communications GmbH shall only accept returns for which an approved Return Material Authorisation
(RMA) has been issued.
Repairs are warranted for the remainder of the original warranty or 90 days, whichever is greater.
Claims for Shipping Damage
When the product is received by the Buyer, it should be immediately inspected for damage to the product or
shortages on the packing list. If the product is damaged, a claim should be filed with the carrier. A quotation
for estimated costs of repair can be obtained from BKtel communications GmbH. Negotiation and
settlement with the carrier must be accomplished by the Buyer.
BKtel communications GmbH, Benzstrasse 4, 41836 Hueckelhoven Baal, Germany
Phone: +49 (2433) 9122 0 Fax: +49 (2433) 9122 99
Email: [email protected]
Document status: Released
ES10
Page 3/100
Operating Manual
rev. 07, 25.09.13
TABLE OF CONTENTS
SAFETY INSTRUCTIONS
8
•
General Safety Instructions
8
•
Laser Safety Classification
9
1
TYPE INFORMATION
12
2
GENERAL DESCRIPTION
13
2.1
Introduction
13
2.2
Principle of Operation
14
2.3
2.3.1
2.3.2
Principle of Element Management
Webbrowser Communication
NMS Communication
17
18
19
3
TECHNICAL SPECIFICATIONS
20
3.1
ES10XL
20
3.2
ES10L
23
3.3
Fx-ES10XL
25
3.4
3.4.1
3.4.2
I/O Ports
ES10La/ES10XLa ((a-versions)
ES10Lb/ES10XLb (b-versions)
26
26
28
3.5
3.5.1
3.5.2
3.5.3
3.5.4
EMS / Service Interfaces
NMS server interface: Ethernet 10/100Mbps (a-versions only)
Local Management Terminal: USB interface (a-versions only)
BK device bus interface: RS485-master (a-versions only)
BK device bus interface: RS485-slave (b-versions only)
30
30
30
30
30
3.6
Front Panel
30
3.7
Rear Panel
31
3.8
3.8.1
3.8.2
3.8.3
Power Supply and Fan Modules
100 – 240 VAC module
±48 VDC module
Fan-only module
31
32
32
33
3.9
Labeling
33
4
OPERATING THE ES10
34
4.1
4.1.1
4.1.2
4.1.3
Handling Optical Components
Handling Optical Fibers
Connecting and Disconnecting Optical Connectors
Cleaning Optical Connectors
34
34
34
34
4.2
Power-Up Sequence
38
Document status: Released
ES10
Page 4/100
Operating Manual
rev. 07, 25.09.13
4.3
4.3.1
4.3.2
4.3.3
4.3.4
4.3.5
4.3.6
4.3.7
Operating Conditions
Optical output signal
Applying an appropriate RF input signal
AGC Modes
Adjusting Regulation Mode
ITU Frequency Adjustments in DWDM Applications (XL only)
Optical Power On /Off
SBS suppression setting (XL only)
38
38
38
40
41
41
41
41
4.4
Push Button / LCD Display
43
4.5
LED Alarm and Warning Messages
45
5
CONTROLLING A NEC
48
5.1
Communicating with the NEC
49
5.2
Devices Update
51
5.3
Configure Slots (optionally)
52
5.4
Server Properties
53
5.5
Event Log
54
5.6
Statistics
55
5.7
5.7.1
General Purpose I/O Ports of NEC Server (Option)
Examples of I/O port status information
56
59
5.8
Server Administration
60
5.9
SNMP Configuration
60
5.10
Server Update
64
5.11
Config Save
65
5.12
Config Restore
67
6
CONTROLLING ES10 VIA A NEC
69
6.1
Status
69
6.2
Alarm and Warning Messages in the Status Page
70
6.3
Parameters
72
6.4
Internal Voltages
73
6.5
6.5.1
6.5.2
6.5.3
6.5.4
6.5.5
6.5.6
6.5.7
6.5.8
6.5.9
6.5.10
Settings Menu
Changing SBS Threshold
Changing SBS Fiber Type and SBS Fiber Length
Changing OMItotrms (AGC on mode only)
Setting Gain (AGC off mode only)
Changing AGC Mode
Setting Slope
Changing ITU Laser Frequency
Changing Optical Output Power Mode
Changing Regulation Mode
Changing Redundancy Mode
74
75
76
77
78
79
80
81
82
83
84
Document status: Released
ES10
Page 5/100
Operating Manual
rev. 07, 25.09.13
6.5.11 Setting Redundancy Mask
6.5.12 Selecting a Redundancy Mask
6.5.13 Setting CATV Signal Channel Spacing
87
88
90
6.6
Limits Menus
91
6.7
Setting an Event Mask for Webserver and SNMP Interface
93
6.8
Properties Menu
94
7
CONTROLLING OTHER DEVICES WITH A NEC
96
8
MAINTENANCE
97
9
TROUBLESHOOTING
97
10
RELEASES
98
10.1
ES10 Hardware Releases
10.1.1 Hardware Releases for ES10La/ES10XLa
10.1.2 Hardware Releases for ES10Lb/ES10XLb
98
98
98
10.2
10.2.1
10.2.2
10.2.3
ES10 Software Releases
Application Software Releases for ES10La/ES10XLa
Application Software Releases for ES10Lb/ES10XLb
Bootloader Software Releases
98
98
99
99
10.3
10.3.1
10.3.2
10.3.3
Network Element Controller Releases for ES10La/ES10XLa
Hardware Releases for Embedded NEC
NEC Application Software Releases for Embedded NEC
NEC Bootloader Software Releases for Embedded NEC
Document status: Released
99
99
99
100
ES10
Page 6/100
Operating Manual
rev. 07, 25.09.13
DOCUMENT STATUS
Document
Operating Manual ES10
Revision
Date
00
31.07.2008 Illies
Document created
01
01.10.2009 Illies
- NEC appl. SW release 3.0.0
- ES10 / ES26 appl. SW release 3.6
- CSO regulation mode revised
- Gain adjustment range revised
- Alarm & Warning Flags revised
02
02.08.2010 Illies
- NEC appl. SW release 3.0.5
- ES10 / ES26 appl. SW release 3.7
- Description of channel controlled mode
updated - LED Display revised
- Event log revised
- New types with 12 dBm & 13 dBm output
added
03
22.06.2011 Illies
- ES10 / ES26 appl. SW release 3.8
- ES10 / ES26 HW release 5.0
- NEC-E appl. SW release 3.1.3
- NEC-E Bootloader SW release 2.1
- Embedded NEC-E HW release 5.0
04
04.11.2012 David
- NEC-E appl. SW release 3.1.4
- ES10 Bootloader SW release 2.1
- Updated block diagrams
05
7.05.2013
- ES10 appl. SW release 3.12
- ES10 HW release 6.0
- NEC-E appl. SW release 3.3.1
- NEC-E Bootloader SW release 2.1
- Embedded NEC-E HW release 5.0
- Exclusion of ES26 (product terminated)
06
19.08.2013 David
General Update
06
19.08.2013 David
New firmware version
Document status: Released
Responsible
David
Remarks
ES10
Page 7/100
Operating Manual
rev. 07, 25.09.13
SAFETY INSTRUCTIONS
NOTICE
•
Read this chapter containing safety instructions before operating the
system for the first time or carrying out any modifications to the
device.
It is also recommended to re–read the chapter at certain intervals in
order to refresh your knowledge about safety.
The device may only be operated by personnel who have received
the necessary training in handling optical and electrical
equipment and have been instructed in laser safety.
General Safety Instructions
DANGER
NOTICE
Please read all instructions completely and carefully before
putting into operation!
All operation steps should be carried out in the prescribed
sequence!
Improper putting into operation can cause death or serious
physical harm of persons or damage the devices.
Operational Personnel
The device may only be operated by personnel who have received
the necessary training in handling optical and electrical equipment
and have been instructed in laser safety.
Installation Locations
The device shall only be operated in locations with restricted or
controlled access.
WARNING
Document status: Released
ES10
Page 8/100
Operating Manual
rev. 07, 25.09.13
•
Laser Safety Classification
Class 1M Product.
WARNING
The device is classified according to the international standard IEC
60825-1:2007; European Version EN 60825-1:2007 and German
Version DIN EN 60825:2008-05). It is assigned to
Class 1M
The laser radiation is emitted in the invisible infra–red spectrum
range. It is potentially hazardous when viewed using an optical
instrument.
Operation and maintenance of the device must only be carried out
by persons who have received adequate training in laser safety. It
must be installed according to BKtel instructions. Use of controls or
adjustments or performance of procedures other than those
specified herein may result in hazardous radiation exposure.
NOTICE
Hazard Level 1M
The device may be integrated in an optical fiber communication
system (OFCS) complying with IEC 60825-2. The standard requires
the assessment of hazard levels at all accessible locations as a
replacement for classifications according to IEC 60825-1. If installed
in an OCFS the device optical output port(s) (fiber connector(s)) are
assigned to the
Hazard Level 1M
This hazard level assignment is based on the laser radiation which
is accessible when the optical fiber connector of the output port(s) is
disconnected. The laser radiation is potentially hazardous when
viewed using an optical instrument.
For subsequent accessible locations within the OFCS the
manufacturer of the OFCS is obliged to assign appropriate hazard
levels and to install applicable laser safety measures according to
IEC 60825-2.
Document status: Released
ES10
Page 9/100
Operating Manual
rev. 07, 25.09.13
•
Location of Laser Apertures
The location of the emitting fiber connector(s) at the front or rear side (optional) of the device can
be seen in chapter 3.6 and 3.7 of this operating manual. Emission is indicated by an LED on the
front panel as shown in chapter 3.6. In case of a not connected fiber connector laser radiation will
be emitted as a divergent optical beam (divergence angle Φ = 0.23 rad) which is 4° off the fiber
axis to the right in direction of beam propagation. The laser radiation has a maximum optical
power of 20.0 mW at a wavelength between 1530 nm and 1565 nm.
•
Laser Safety Instructions
–
–
–
–
–
–
–
–
–
–
–
The device should be shut down, put into a low power state or disconnected before any
work is completed on exposed fiber, connectors, etc.
Check optical power in a fiber using a calibrated optical power meter.
Do not stare directly into the optical beam and do not use any unapproved collimating
device to view the fiber ends or connector facets. This includes magnifying devices such
as eye loupes, magnifiers and microscopes which are used in a distance of less than 100
mm from the connector facet.
If it is necessary to look at fiber ends or connector facets with optical instruments: Ensure
that the fibers do not transmit optical power. Therefore use a calibrated optical power
meter
If the laser safety or hazard level requires the use of eye protection, only use equipment
which has been tested and approved for the wavelengths and optical power involved.
Do not point fiber ends at other people.
Any single or multiple fiber ends or ends found not to be terminated with power levels
exceeding hazard level 1 (acc. IEC 60825-2) should be individually or collectively covered
when not being worked on. Use only covers or covering material with sufficient attenuation
of the optical power at the wavelength concerned. Sharp ends should not be exposed.
When using optical test cords, the optical power source shall be the last to be connected
and the first to be disconnected.
Do not make any unauthorized modifications to any optical fiber system or associated
equipment.
Replace damaged optical safety labels or attach new labels if labels are missing.
Use test equipment of the lowest class necessary and practical for the task. Do not use
test equipment of a higher class than the location hazard level.
Document status: Released
ES10
Page 10/100
Operating Manual
rev. 07, 25.09.13
Parts List
This document contains the description for the following units:
Unit
Transmitter unit
I/O ports
Description
Modular external modulated 1550 nm optical transmitter basic unit for
CATV
ES10L
ES10XL
Fx-ES10XL
Not for ES10L-types
Power supply + fan module 100 VAC ... 240 VAC
Power supply +
fan module
Power supply + fan module ±36 VDC ... ±60 VDC
Fan-only module
SC-APC optical connector, 8° angle
SC-APC optical connector, with shutter
Optical interface
FC/APC optical connector, JDS-standard (default)
FC/APC optical connector, NTT-standard (option)
E2000 – 0.1 dB optical connector
The ES10 is available as an OEM product with customized front panel printing.
Document status: Released
ES10
Page 11/100
Operating Manual
rev. 07, 25.09.13
1 TYPE INFORMATION
Transmitter characteristics
Type
Opt. output
power
SBS
Threshold
Freq.
Plan
NMS
Interface
I/O ports
Wavelength
RF-input
Opt.
connector Opt. Output
OEM
Version
Power
supply
Types
Property
Key
Meaning
Version
ES10
Fx-ES10
XL
L
70
85
100
165
190
PFQ344044
C42
N77
PAL84
xxx
A
B
I
X
15xx.xx
1
2
3
4
5
F
R
0
OEM
230/230
48/48
230
48
230/48
47…1006 MHz
Type
Opt. output power
SBS threshold
Frequency plan
NMS interface
I/O ports
Wavelength
Optical connector
RF-input / opt. output
OEM Version
Power supply
XL
L
+7.0 dBm (ES10L)
+8.5 dBm (ES10XL, Fx-ES10XL)
+10 dBm (ES10XL, Fx-ES10XL)
+16.5 dBm (fix, only L-type)
+13.0 ... +19.0 dBm (adjustable)
PFQ344044
C42
N77
PAL84
Customer specifics
HTTP / SNMP Ethernet
RS485
1548….1560nm
15xx.xxnm ITU Wavelength
E2000
SC/APC
FC/APC-NTT
FC/APC-JDS
SC/APC with shutter
On front side
On rear side
BKtel
OEM Version
2 x (100 … 240 VAC)
2 x (±36 … ±72 VDC)
1x (100 … 240 VAC)
1 x (±36 … ±72 VDC)
mixed 230 VAC/ 48 VDC
Example Transmitter characteristics: ES10XL-85-190-N77-A-I-1558.99-2-F-0-230/230:
Optical transmitter type ES10XL with (2x) 8.5 dBm output power, max. 19 dBm SBS threshold, calibrated for NTSC77
frequency plan, with HTTP/SNMP Ethernet NMS interface, with I/O ports, operating nominally on 1558.99 nm, with
SC/APC connectors, RF input on the front and optical outputs at the rear side, BKtel version with dual 100 … 240 VAC
power supplies.
Document status: Released
ES10
Page 12/100
Operating Manual
rev. 07, 25.09.13
2
GENERAL DESCRIPTION
2.1
Introduction
The optical transmitter ES10 represents a family of externally modulated 1550 nm DFB laser
transmitters. These products have been developed to fulfill the requirements of modern Hybrid
Fiber Coax networks for the transmission of CATV, cable phone and cable data signals. There
are currently 2 different base versions available:
•
ES10L for applications with moderate fiber length of ≤ 65 km.
This version features a SBS threshold of 16.5 dBm, a narrow linewidth laser (0.65 MHz),
output power of 2 x 7 dBm (-70 version), an 10/100 Ethernet Webserver and SNMP
interface for EMS/NMS (element/network management systems) or alternatively an
RS485 interface for EMS only.
•
ES10XL for applications with very long fiber length exceeding 65 km. This version is
designed for highest requirements on transmission performance and features. It offers a
SBS threshold which can be adjusted between 13 and 19 dBm, a very narrow linewidth
laser (0.3 MHz), output powers of > 2 x 8.5 (-85 version) and 2 x 10 dBm (-100 version),
ITU-grid compatible wavelength which can be adjusted by +/- 100 GHz, an 10/100
Ethernet Webserver and SNMP interface for EMS/NMS (element/network management
systems) or alternatively an RS485 interface for EMS only.
Future proof operation is accomplished due to the possibility to download updates of network
controller firmware and transmitter firmware.
The ES10 is offered for 4 different standard frequency plans. Specifications for other frequency
plans are available on request.
The optical transmitter comes in a 1 unit high 19“ housing. Fig. 2.1.1 shows the ES10 with RFIN
socket, RFMonitor socket and optical connectors on the front panel. Optionally these connectors can
be located on the rear panel.
Fig. 2.1.1. ES10
A Liquid Crystal Display (LCD) provides information about actual settings and properties. 6 push
buttons are used to enter data locally. The background light of the LCD is switched on
automatically when a push button is pressed.
The ES10 provides plug in power supply modules. The power supply modules are offered in 2
different input voltage specifications: 100 ... 240 VAC and ±36 ... ±60 VDC. One feature of the
ES10 is the possibility to use two different power supply + fan modules in one transmitter: e.g.
power supply + fan module #1 could be a 100 ... 240 VAC unit, power supply + fan module no. 2
could be a ±36 ... ±60 VDC unit.
Document status: Released
ES10
Page 13/100
Operating Manual
rev. 07, 25.09.13
The optical interface can be ordered with optical connectors as specified in in chapter 1. Without
the need of using special tools it is possible to change the optical interface by replacing the
optical connector interface plate by another one as specified.
For connecting the transmitter with an EMS (element management system) or a NMS (network
management system) an Ethernet 10/100 Base-T Ethernet interface is available at the rear side
of the ES10 (a-version). This Ethernet interface supports SNMP and HTTP protocols. The IP
address for the integrated Webserver can be modified by using the push buttons at the front
panel or the USB local interface at the rear side.
An additional RS485 (master) interface has been implemented at the ES10XLa to poll other
equipment like EDFAs or optical switches.
Five general purpose input/output ports are available via a mini-DIN connector on the rear side of
the transmitter. Port #0 and port #1 are I/O ports, port #1 to port #4 are input-only ports. The ports
can be used for additional alarm or remote functions. They are accessible via the Webserver
interface.
The ES10 b-version offers two RS485 (slave) interfaces for EMS or NMS. Furthermore, there is
one alarm output, which can be used for simple alarm messaging functions.
2.2
Principle of Operation
The transmitter is based on five functional blocks: RF-path, cw-DFB-laserdiode, integrated optical
modulator, control electronics and power supply. The functional diagram is shown in Fig. 2.2.1.
The RF input signal is fed into a preamplifier including an automatic gain control circuitry. The
AGC stabilizes the output signal of the preamplifier to maintain a stable RMS- (root-mean-square)
optical modulation index (OMI) of the optical modulator. Input level variations are compensated as
long as the AGC circuit is working in its nominal gain range.
LEDs
LCD Panel
I/O #0
I/O #1..#5
USB
Ethernet
RS485 (master)
NEC-E
Micro Processor
RS485 (slave)
Push Buttons
OUT #1
SBS
OUT #2
INCATV
RMS
RMS
TPCATV
DC
AC/DC
DC
ES10
Power
In
AC/DC
Fig. 2.2.1. ES10 Block Diagram
Document status: Released
ES10
Page 14/100
Operating Manual
rev. 07, 25.09.13
The AGC can be turned off for a constant gain operation in order to tailor the CNR/CSO/CTB
performance to the used frequency plan and the requirements of the customer. The function is
accessible via the push buttons or the Ethernet interface.
The central core of the transmitter is the electrooptical modulator working as a Mach-Zehnderinterferometer. The light from the laserdiode is coupled into an optical strip waveguide. An
integrated optical splitter divides the light into two identical portions which are phase modulated
by an RF signal applied to the electrodes of the modulator. The concept of the electrodes results
in a push pull phase modulation of both branches. Following the modulating section the signals of
both arms are combined and interfere. The interference of the phase modulated signals results in
an amplitude modulation of the output light signal which is available on both outputs of the
combiner.
The necessary cw input light for the modulator is produced by a DFB laserdiode working with
1550 nm wavelength. There are two control loops for operating the laserdiode at constant optical
output power as well as at constant temperature by means of a thermoelectric cooler. The
ES10XL has been designed for DWDM applications and allows tuning the operation frequency
(wavelength) by +/- 100 GHz in steps of 50 GHz. The laserdiode operating current is controlled in
order to compensate for ageing effects. The temperature of the laserdiode is controlled by
regulating the required drive current for the thermoelectric cooler. At 90% of the available cooler
drive current and/or >130% of the initial laserdiode operating current a warning is generated
which indicates ageing. At 100% cooler drive current the laserdiode operating current is switched
off to protect the laserdiode against irregular temperature conditions and an alarm is generated
indicating severe malfunction. Both types of indications are causing the corresponding LED on
the front plate of the optical transmitter to emit. In case of a warning the LED lights yellow since
the unit is still working properly, however close to its limits. In case of an alarm the LED is emitting
red light. The messages to the network management system are of course more detailed. They
include the actual values of the currents and temperature as well as alarm flags.
To suppress the Stimulated Brillouin Scattering (SBS) the wavelength spectrum of the optical
signal is broadened. Two technologies are used:
•
Broadening the optical spectrum by modulating the laserdiode operating current
•
Broadening the optical spectrum by driving an optical phase modulator
These SBS circuits are mandatory to avoid stimulated Brillouin scattering in optical fibers and
allow operation with optical amplifiers feeding at least +13 dBm of optical power into standard
single mode fibers. For the XL-version of the transmitter all microwave signals can be adjusted in
amplitude via the push-buttons on the front panel to optimize the SBS and SPM (self phase
modulation) performance.
The coupling of light from the laserdiode into the modulator is performed by using polarization
maintaining optical fiber. The optical modulator provides two optical outputs. The signal of one of
these outputs is tapped to an InGaAs photodiode. The electrical signal of this photodiode is
evaluated for two reasons to supervise a proper working of the cw laserdiode. In case of optical
output power out of limit an alarm is generated.
When switching on the ES10, the transmitter starts up adjusting the bias point of the
electrooptical modulator by output power regulation, it’s called “Output power based”. After warm
up sequence the bias point of the electrooptical modulator is evaluated by one of two methods
(the states are shown in the parameter menu):
1. Channel controlled:
A detector circuit measures CSO and (indirectly) CTB distortions to optimize the bias point
of the electrooptical modulator. For a proper operation of the detection circuit at least two
analog modulated TV carriers (no back off) with a frequency spacing of 24 MHz have to be
present. Using this standard software setting of the detection scheme (Channel Distance -
Document status: Released
ES10
Page 15/100
Operating Manual
rev. 07, 25.09.13
> 8 MHz) all known European and Chinese frequency plans are supported: CENELEC
frequency plan, all regular 6 and 8 MHz spacing frequency plans as well as the German
7/8 MHz frequency plan. Additionally it is possible to change the standard software setting
of Channel Distance to 6 MHz (which will be the same as 8 MHz) and to 7 MHz, to work
with regular 7 MHz frequency plans (at least two analog modulated TV carriers with a
frequency spacing of 21 MHz) via push-buttons on the front panel or via the NMS
interface.
The “channel controlled” mode will work also for QAM modulated carriers if one of the
following configurations is given:
a) One pair (=2) QAM carriers with carrier frequency spacing of 24 MHz and OMI
≥14% per QAM carrier
b) Two pairs (=4) QAM carriers with each pair having a carrier frequency spacing of
24 MHz and OMI ≥10% per QAM carrier
c) Four pairs (=8) QAM carriers with each pair having a carrier frequency spacing of
24 MHz and OMI ≥7% per QAM carrier
d) and so on ...
2. Pilot controlled:
An internal pilot tone is used to check for distortion products out-of-band. Service signal
frequency range 47 to 1006 MHz is not targeted by pilot tone control.
The method used for CSO regulation is shown in the parameter page of the webserver (see
‘Regulation state’ in Fig. 6.5.10). It is recommended to set the regulation mode to “Pilot
controlled”. However when the RF input signals contains at least two analog modulated TV
carriers with 24 MHz (or 21 MHz) spacing the CSO regulation mode can be used instead.
The ES10La/ES10XLa is equipped with 4 data interfaces at the rear side:
•
USB interface for local management terminal (LMT),
•
RS485 (master) for polling other BKtel equipment such as EDFAs or optical switches and
translating this information to the Ethernet interface (HTTP and SNMP),
•
Ethernet 10/100 Base-T supporting SNMP and Webserver (HTTP) protocols for interfacing
to an EMS or NMS
•
General purpose I/O interface
The ES10Lb/XLb is equipped with two RS485 (slave) interfaces for interfacing to an EMS or
NMS. Additionally, there are two output ports available for simple alarm or warning messaging.
Plug in power supply/fan modules for different input voltages are available for 100 ... 240 VAC, 36
... 60 VDC. Each module can be simply removed during operation without disturbing the operation
of the transmitter.
Document status: Released
ES10
Page 16/100
Operating Manual
rev. 07, 25.09.13
2.3
Principle of Element Management
The interface configuration for Element Management or Network Management systems is shown
in the next two figures for the ES10La/ES10XLa with embedded NEC (network element controller
= SNMP Proxy Agent) and the ES10L/ES10XLb.
Fig. 2.3.1: EMS/NMS Interface (a) ES10La/ES10XLa
(b) ES10Lb/ES10XLb
The ES10La/ES10XLa versions (ref. to Fig. 2.3.1 a) contain an embedded network element
controller (NEC) which works as a SNMP Proxy Agent. All equipment (EDFAs, optical switches,
receivers and power supplies) which is connected to the RS485 master interface and which
support the BKtel RS485 protocol are polled. The received data is then translated into SNMP and
HTTP and can be accessed via the Ethernet interface or locally via the USB interface. The NEC is
able to poll up to 48 devices on the RS485 bus. On the I/O ports #1 … 5 warnings/alarms
collected from all polled devices can be accessed. The application software of the NEC can be
updated easily in order to support new devices. An overview of software releases is given in
chapter 10. BKtel offers the MIB-files for easy implementation of the SNMP interface into
element/network management systems (EMS/NMS) such as Cablewatch (BKtel), HP Open View
or Rosa (SA former Barco Networks).
The ES10Lb/XLb-versions (ref. to Fig. 2.3.1 b) does not contain an embedded NEC. The RS485
slave interface of the transmitter can be accessed directly, but should be connected to an external
NEC-E (e.g. BKtel’s Ethernet controller NEC-E in BK mechanics).
Document status: Released
ES10
Page 17/100
Operating Manual
rev. 07, 25.09.13
Fig. 2.3.2 shows how the ES10 interface to other devices and a SNMP EMS. The ES10 with
embedded NEC (upper right corner) is connected to other (BKtel) devices via the RS485
interface. In the example there is an optical amplifier OVxxxxb (without embedded NEC) in 19”1RU housing (similar to the ES10) and in total 4 subracks interfacing to the RS485 bus. A variety
of BKtel devices which can be mounted on these subracks like EDFAs, optical switches, optical
transmitters and receivers. For an actual overview please refer to www.bktel.com or contact BKtel
directly. All of these connected devices only provide RS485 slave interfaces, since the NEC of the
ES10 is the dedicated RS485 bus master, polling all other devices. The NEC (SNMP Proxy
Agent) within the ES10 polls all devices and translates this information to Ethernet-HTTP and
Ethernet-SNMP.
Fig. 2.3.2: The ES10XLa interfacing with other equipment and a SNMP EMS.
2.3.1
Webbrowser Communication
Management access on the embedded network element controller NEC-E is established with a
webbrowser using the NEC-E IP address. Besides the webbrowser no other software is
necessary. The access computer is only in need of an Ethernet interface; no dongles are
required.
If the NEC-E is not connected to a LAN/WAN one can directly link the computer with the
embedded NEC-E:
1) by crossed RJ45 cable to the Ethernet 10/100 Base-T interface
Document status: Released
ES10
Page 18/100
Operating Manual
rev. 07, 25.09.13
2) by the USB interface as local management terminal (LMT)
Also USB local interface and Ethernet interface can be used simultaneously.
As soon as the webbrowser establishes the link to the NEC-E, all chassis devices connected to
the RS485 bus are listed on the start page. Clicking on a device listed in the menu “Devices”
leads to further webpages, which allow supervision and adjustment of the selected device.
2.3.2
NMS Communication
The embedded network element controller NEC-E provides an HMS compliant SNMP protocol for
communication with the server of a central (umbrella) network management system (NMS).
SNMP MIBs are available on request.
The NMS can deal with the complete set of device management features by SNMP MIB, because
all management functions are implemented in SNMP. Alarms are indicated by traps. Of course,
decentralized network element controller access by webbrowser is simultaneously available.
Document status: Released
ES10
Page 19/100
Operating Manual
rev. 07, 25.09.13
3
3.1
TECHNICAL SPECIFICATIONS
ES10XL
Application
4 External modulated 1550 nm DFB laser transmitter
4 Electrical to optical conversion of multi-channel CATV video signals (AM-VSB, FM and QAM
signals)
4 Optical downstream transmission in HFC and RF Overlay networks with excellent performance
4 Enables the usage of optical amplifiers (EDFAs) as boosters or repeaters in order to realize
large scale HFC or FTTH networks
Features
4 Two optical outputs with 8.5 or 10.0 dBm optical output power each
4 Low noise, narrow linewidth CW DFB laser with DWDM wavelength according to ITU grid
4 Adjustable wavelength +/- 100 GHz
4 Bandwidth of 47…1006 MHz
4 Improved RF signal performance up to 1006 MHz
4 Enhanced SBS suppression
4 Sophisticated SBS supervision functionality
4 Automatic load control (ALC) for CATV signal input, ready for pure digital RF load
4 Adjustable RF slope
4 Front panel RF test point for CATV input signal
4 High reliability dual, hot-plug-in power supply modules for 100...240 VAC or ±36...±60 VDC
4 HTTP (Webbrowser) and SNMP (a-version)
4 LC display and LED status indication
4 Ethernet, USB and general purpose I/O interface for remote control
4 Very low power consumption
4 Very thin, only 1 U design for mounting into 19”, ETSI or JIS racks
Document status: Released
ES10
Page 20/100
Operating Manual
rev. 07, 25.09.13
General Technical Data
Optical connector
SC/APC, E2000
Optical fiber
Standard single mode 9/125 µm
RF connector
F female, front or rear side mounted
Control interface
a-version: Ethernet 10/100 and USB interface
b-version: RS485 interface
Power supply types
(Dual redundant, hot pluggable)
100 ... 240 VAC, 50/60 Hz
or ±36 ... ±60 VDC
(Real) Power consumption
[W]
< 50 / 56 (1 / 2 power supply unit(s) equipped)
[VA]
< 51 / 57 @ 100V AC (1 / 2 power supply unit(s) equipped)
Enclosure
19” / 1 rack unit [U] (optionally compatible to ETSI or JIS standards)
Weight
[kg]
≈ 9.0 (depend on power supply)
Safety
EN 60950, Laser class 1M according IEC 60 825-1 (eyesafe for
normal viewing)
EMC
EN50083-2
Climatic specification (operation)
Climatic specification (storage)
ETS 300 019, class 3.1
ETS 300 019, class 1.2
Optical Properties
ES10XL-85
ES10XL-100
Wavelength
[nm]
1548…1560 or ITU grid ch 23…37
Side mode suppression
[dB]
> 30
Wavelength adjustment range
[GHz]
Optical power
[dBm]
Relative intensity noise for CATV
(for optical fiber return loss > 40 dB)
[dBc/Hz]
SBS suppression
[dBm]
-100, -50, 0, 50, 100
2x 8.5 min.
2x 10.0 min.
< –158
(typ. < –160)
Threshold adjustable from 13 up to + 19 dBm (65 km standard fiber),
+21.5 dBm (65 km SBS enhanced fiber) 1)
2
Maximum SBS suppression threshold )
10 km
25 km
65 km
Laser linewidth (typical)
[dBm]
+25.5
+23.5
+21.5
[MHz]
0.3
1
) SBS suppression threshold should be adjusted application individually as low as possible. Please see user manual for details.
2
) SBS enhanced fiber, for standard fiber -2.5 dB
Japanese channel allocation with 11 AM video carriers below 230 MHz with OMIPeak= 7.0% measured with noise bandwidth of 4 MHz and 80 256QAM carriers
with OMIQAM= 2.2% measured with noise bandwidth of 5.274 MHz
Document status: Released
ES10
Page 21/100
Operating Manual
rev. 07, 25.09.13
Electrical Properties CATV
RF frequency range
[MHz]
Frequency response flatness
47 ... 862 MHz
47 ... 1006 MHz
[dB]
[dB]
Nom. Input level per TV channel
[dBµV]
80
Input level range (per carrier)
[dBµV]
78 … 96 (for OMI= 5% per CATV carrier)
True RMS input level range
[dBm]
-16 … +2 (for ALC correctly working with OMItot,rms= 18.6%)
Slope range
[dB]
-2 (cable equivalent) … +8 (cable equalization)
RF impedance
[Ω]
75
Return loss
[dB]
> 20 (@ 47 MHz) – 1.5 dB/octave, minimum 15
Test point attenuation
[dB]
-20 (-1.0 … +1.0)
1
47 … 1006
±0.75
±1.2 1)
) PFQ344044 transmitter version: ±1.0
Performance Characteristics
Transmitter version
C42
Channel allocation plan for test
Number of TV, FM, QAM carriers
PFQ344044
D84
N77
CENELEC
42
European Load
PALPAL-D 84
NTSC 77 / Jap 1)
42, 0,0
34, 40, 44
84, 0,0
77,0,0 / 11,0,80
5
5
5
4 / 4
Noise bandwidth
[MHz]
CNR Tx/Rx
[dB]
55.5
52.5
52.5
53.5 / 55
CNR Link 1
[dB]
55
52
52
53 / 54.5
CNR Link 2
[dB]
53
51
50.5
52 / 53.5
CNR Link 3
[dB]
50.5
49
49
50 / 51.5
CSO Tx/Rx and Link 1
[dBc]
65
73
65
65 / 70
CSO Link 2
[dBc]
63
72
65
65 / 70
CSO Link 3 @ output 1
[dBc]
62
67
63
65 / 70
CTB
[dBc]
65
72
65
65 / 66
CNR of QAM carriers Link 1
[dBc]
-
-
-
- / 43
Test Conditions
Booster EDFA
1st Fibre Length
In-Line EDFA
2nd Fibre Length
RX
Tx/Rx
no
no
No
no
0 dBm
Link 1
no
35 km
No
no
0 dBm
Link 2
16 dBm
65 km
No
no
0 dBm
Link 3
13 dBm
52 km
13 dBm
52 km
0 dBm
1
3
) RF input level at 80 dBµV per TV carrier
) Non-dispersion shifted fiber
Document status: Released
2
4
) EDFA with noise figure N= 5 dB
) Receiver Rx with equivalent input noise current density of IEQ= 7 pA/√Hz and efficiency η= 0.95 A/W
ES10
Page 22/100
Operating Manual
rev. 07, 25.09.13
3.2
ES10L
Application
4 External modulated 1550 nm DFB laser transmitter
4 Electrical to optical conversion of multi-channel CATV video signals (AM-VSB, FM and QAM
signals)
4 Optical downstream transmission in HFC and RF Overlay networks
4 Enables the usage of optical amplifiers (EDFAs) as boosters or repeaters in order to realize
HFC or FTTH networks
Features
4 Two optical outputs with 7.0 dBm optical output power each
4 CW DFB laser
4 Bandwidth of 47…862 MHz
4 Automatic load control (ALC) for CATV signal input, ready for pure digital RF load
4 Adjustable RF slope
4 Front panel RF test point for CATV input signal
4 High reliability dual, hot-plug-in power supply modules for 100...240 VAC or ±36...±60 VDC
4 HTTP (Webbrowser) and SNMP (a-version)
4 LC display and LED status indication
4 Ethernet, USB and general purpose I/O interface for remote control
4 Very low power consumption
4 Very thin, only 1 U design for mounting into 19”, ETSI or JIS racks
Document status: Released
ES10
Page 23/100
Operating Manual
rev. 07, 25.09.13
General Technical Data
Optical connector
SC/APC, E2000
Optical fiber
Standard single mode 9/125 µm
RF connector
F female, front or rear side mounted
Control interface
a-version: Ethernet 10/100 and USB interface
b-version: RS485 interface
Power supply types
(Dual redundant, hot pluggable)
100 ... 240 VAC, 50/60 Hz
or ±36 ... ±60 VDC
(Real) Power consumption
[W]
< 50 / 56 (1 / 2 power supply unit(s) equipped)
[VA]
< 51 / 57 @ 100V AC (1 / 2 power supply unit(s) equipped)
Enclosure
19” / 1 rack unit [U] (optionally compatible to ETSI or JIS standards)
Weight
[kg]
≈ 9.0 (depend on power supply)
Safety
EN 60950, Laser class 1M according IEC 60 825-1 (eyesafe for
normal viewing)
EMC
EN50083-2
Climatic specification (operation)
Climatic specification (storage)
ETS 300 019, class 3.1
ETS 300 019, class 1.2
Optical Properties
Wavelength
[nm]
1548…1560
Side mode suppression
[dB]
> 30
Optical power
[dBm]
2x 7.0 min..
Relative intensity noise for CATV
(for optical fiber return loss > 40 dB)
[dBc/Hz]
< –158
(typ. < –160)
SBS suppression
[dBm]
Fixed threshold +16.5 dBm (65 km standard fiber),
+19.0 dBm (65 km SBS enhanced fiber) 1)
Maximum SBS suppression threshold 2)
10 km
25 km
65km
Laser linewidth (typical)
[dBm]
+23.0
+21.0
+19.0
[MHz]
0.65
1
) SBS suppression threshold should be adjusted application individually as low as possible. Please see user manual for details.
2
) SBS enhanced fiber, for standard fiber -2.5 dB
Document status: Released
ES10
Page 24/100
Operating Manual
rev. 07, 25.09.13
Electrical Properties CATV
RF frequency range
[MHz]
47 … 862
Frequency response flatness
47 ... 862 MHz
[dB]
Nom. Input level per TV channel
[dBµV]
80
Input level range (per carrier)
[dBµV]
78 … 96 (for OMI= 5% per CATV carrier)
True RMS input level range
[dBm]
-16 … +2 (for ALC correctly working with OMItot,rms= 18.6%)
Slope range
[dB]
-2 (cable equivalent) … +8 (cable equalization)
RF impedance
[Ω]
75
Return loss
[dB]
> 20 (@ 47 MHz) – 1.5 dB/octave, minimum 15
Test point attenuation
[dB]
-20 (-1.0 … +1.0)
±0.75
Performance Characteristics
Transmitter version
D84
Channel allocation plan for test
PALPAL-D 84
Number of TV, FM, QAM carriers
84, 0,0
Noise bandwidth
[MHz]
5
CNR Tx/Rx
[dB]
52.5
CNR Link 1
[dB]
51.5
CNR Link 2
[dB]
49.0
CNR Link 3
[dB]
46.5
CSO Tx/Rx and Link 1
[dBc]
65
CSO Link 2
[dBc]
65
CSO Link 3 @ output 1
[dBc]
63
CTB
[dBc]
65
Test Conditions
1
3
Booster EDFA
1st Fibre Length
In-Line EDFA
2nd Fibre Length
RX
Tx/Rx
no
no
No
no
0 dBm
Link 1
no
35 km
No
no
0 dBm
Link 2
16 dBm
65 km
No
no
0 dBm
Link 3
13 dBm
52 km
13 dBm
52 km
0 dBm
) RF input level at 80 dBµV per TV carrier
) Non-dispersion shifted fiber
3.3
2
4
) EDFA with noise figure N= 5 dB
) Receiver Rx with equivalent input noise current density of IEQ= 7 pA/√Hz and efficiency η= 0.95 A/W
Fx-ES10XL
For technical specifications please contact BKtel.
Document status: Released
ES10
Page 25/100
Operating Manual
rev. 07, 25.09.13
Dimensions
3.4
I/O Ports
3.4.1
ES10La/ES10XLa ((a-versions)
The ES10La/ES10XLa is equipped with 2 general purpose I/O and 4 input-only binary mode
ports. The ports can be configured via the Webserver (HTTP) interface. The schematics of these
ports are given below.
Fig. 3.4.1: Schematics of I/O port
Document status: Released
ES10
Page 26/100
Operating Manual
rev. 07, 25.09.13
Fig. 3.4.2: Schematics of input-only port
Notes:
• The maximum voltage applied to all ports should be not below GND level and should not
exceed +5 VDC.
• The input level for input high should be >1.6 V; the input level for input low has to be <
0.8 V.
• The input-only port and the open drain output port have a pull-up resistor of about 100 kΩ
towards 3.3 V.
• The active low output resistance to GND of the output port is < 210 Ω.
The ES10 uses an 8 pin Mini-DIN connector for external Input/Output handling. The connector is
located on the backside of the device near to the NMS RS485 Master connector.
Fig. 3.4.3: ES10 rear side connectors
Fig. 3.4.4 shows the view on the 8 port mini-DIN connector
Fig. 3.4.4: 8 pin mini-DIN connector pinout
The mini-DIN connector pins are used as described in the following table.
Document status: Released
ES10
Page 27/100
Operating Manual
rev. 07, 25.09.13
Function in ES10
Pin Number Comments
of mini-DIN
connector
GND
2
Ground
+5.1 VDC (+/- 5%)
(voltage under no-load
condition)
Input / Output #0
1
Max. 80 mA, protected by a serial
Fuse (< 6 Ohms)
5
Used for redundancy switching feature (input port)
or as alarm output port.
Input / Output #1
7
Either Input or Output, configurable by Software;
Input only No.2
3
Input mode configurable by Software
Input only No.3
8
Input mode configurable by Software
Input only No.4
4
Input mode configurable by Software
Input only No.5
6
Input mode configurable by Software
Table 1. Mini-DIN-connector pin assignment of I/O ports
Notes:
• On pin 1, there is a 5.1 VDC (+/-5 %) supply voltage available for feeding an external
interface box, which e.g. could contain optocouplers or relays, external sensors etc.; the
current drawn from this port should not exceed 80 mA.
• I/O #0 is directly related to the transmitter. If the port is used as an output, alarms related
to the transmitter can be accessed on this output. If the port is used as an input it enables
easy redundancy switching between two redundant ES10. For details please refer to 5.7
and 6.5.10.
• I/O #1 to #5 are directly related to the NEC. The output port I/O # 1, can therefore be used
to display a warning or an alarm, if
1.
one of the (up to 48) RS485-polled devices or
2.
the ES10 or
3.
at least one of the input ports (I/O #2..5), which has been set to indicate a warning
or an alarm,
exhibits a warning or an alarm. For details please refer to 5.7.
• All I/O ports can be addressed and configured via the Ethernet Webserver (HTML)
interface or via SNMP.
• In order to not degrade the EMI performance of the ES10, a shielded cable with the shield
connected to pin 2 (GND) of the mini-DIN–connector has to be used.
3.4.2
ES10Lb/ES10XLb (b-versions)
The ES10Lb/XLb is equipped with one I/O port. The schematic is given in Fig. 3.4.5. It uses an 8
pin Mini-DIN connector for external input/output handling. The connector is located on the
backside of the device near to the NMS RS485 Slave connector.
Document status: Released
ES10
Page 28/100
Operating Manual
rev. 07, 25.09.13
Fig. 3.4.5: ES10Lb/XLb rear side connectors
Fig. 3.4.6 shows the view on the 8 port mini-DIN connector
Fig. 3.4.6: 8 pin mini-DIN connector pinout:
The mini-DIN connector pins are used as described in the following table.
Function in ES10L/ES10XL
(b-versions only)
Pin Number Comments
of mini-DIN
connector
GND
2
Ground
+5.1 VDC (+/- 5%)
(voltage under no-load
condition)
Input / Output No.0
1
Max. 80 mA, protected by a serial
Fuse (< 6 Ohms)
5
Input / Output No.1
7
Used for redundancy switching feature (input port)
or as alarm output port.
N/A
Input only No.2
3
N/A
Input only No.3
8
N/A
Input only No.4
4
N/A
Input only No.5
6
N/A
Table 3.4.2.1: Mini-DIN-connector pin assignment of I/O ports
Notes:
• On pin 1, there is a 5.1 VDC supply voltage available for feeding an external interface box,
which e.g. could contain optocouplers or relays etc.; the current sink from this port should
not exceed 80 mA.
Document status: Released
ES10
Page 29/100
Operating Manual
rev. 07, 25.09.13
•
•
3.5
In order to not degrade the EMI performance of the ES10, a shielded cable with the shield
connected to pin 2, (GND) of the mini-DIN–connector has to be used.
I/O #0 is directly related to the transmitter. If the port is used as an output, alarms related
to the transmitter can be accessed on this output. If the port is used as an input it enables
easy redundancy switching between two redundant ES10. For details please refer to
6.5.8.
EMS / Service Interfaces
3.5.1
NMS server interface: Ethernet 10/100Mbps (a-versions only)
The NMS server interface is the main NMS interface of the optical transmitter.
It supports HTTP and SNMP protocols. The NMS server firmware can be downloaded for future
software upgrades.
3.5.2
Local Management Terminal: USB interface (a-versions only)
The USB interface can be used as a user interface for local management of BKtel devices. When
the USB interface of the embedded NEC-E is connected to a PC an additional virtual LAN
interface becomes available. This new PC LAN interface gets automatically configured by the
NEC-E using DHCP. This USB LAN interface is based on the Remote NDIS (RNDIS)
specification from Microsoft. The NEC-E local management is done by using a web browser in the
same way as when communicating over the NEC-E Ethernet interface.
3.5.3
BK device bus interface: RS485-master (a-versions only)
The RS485 bus interface can be used to connect more devices to be managed by the Ethernet
NMS server interface installed in the optical transmitter. The ES10 in this case works as a
network element controller (RS485-master), which polls all equipment that is connected to the
RS485 port.
3.5.4
BK device bus interface: RS485-slave (b-versions only)
The RS485-slave interfaces can be used to manage the ES10L/ES10XLb, which means to read
data and to change settings.
3.6
Front Panel
The following figure shows an example of the front panel vi ew of the ES10. The RF-input and the
optical connectors are optionally available on the rear panel.
Document status: Released
ES10
Page 30/100
Operating Manual
rev. 07, 25.09.13
Item #
Function
1
RF-input (optionally available on rear side)
2
RF-monitor output
3
Status LED’s
4
Liquid Crystal Display
5
Push button field for local set-up of transmitter
6, 7
Optical connectors (optionally available on rear side)
3.7 Rear Panel
The rear panel is described in the following list:
Item #
Function
1
RF-input (optional located on front panel)
2, 3
Optical fiber outputs (optional located on front panel)
4
Not used in ES10, cover
5
I/O ports
6
RS485 interface (RJ-45 female): a-versions: master; b-versions: slave
7
USB interface (a-version only)
8
a-versions: Ethernet interface; b-versions: RS485 slave interface (RJ-45 female)
9
2 green LEDs Ethernet link & data (a-versions only)
10, 11
power supply + fan modules (field replaceable)
3.8
Power Supply and Fan Modules
There are 3 different types of power supply and fan modules available for the ES10. All of them
can be either mounted on the left hand or right hand side.
Document status: Released
ES10
Page 31/100
Operating Manual
rev. 07, 25.09.13
It is possible to replace or exchange all of the modules during operation. This offers a big
flexibility to the end user in order to customize the ES10 exactly to the actual needs.
The necessary outlets for the power supply modules have to be located in the proximity of the
device and have to be easily accessible.
3.8.1
100 – 240 VAC module
Fig. 3.8.1 provides a view on the 100 – 240 VAC power supply and fan module. There is a AC
mains input. There is one LED indicating the status of the power supply module. The power unit
O.K. LED is lightening green when the power supply module is working properly.
The power supply and fan modules might be exchanged during operation (hot plug-in technology)
with neither harm the equipment nor having any impact on the operation of the transmitter in case
of a properly working backup power supply.
SV19
327827
PS004999 Ä06
1HE-230V
CE
AC-LINE INPUT
50-60Hz
100-240VAC
Fig. 3.8.1: 100 ... 240 VAC power supply and fan modules
3.8.2
±48 VDC module
Fig. 3.8.2 shows the ±48 VDC power supply and fan module. There is a ±48 VDC cable terminal
in order to connect the supply voltage. It is important to take care of the correct polarity of the DC
supply voltage, either 0 or +48 VDC connected to the – and + terminals, respectively or 0 and –48
VDC connected to the + and – terminals, respectively.
A fuse and a spare fuse are implemented inside the power supply and fan module and can be
replaced if required. There is one LED informing about the status of the power supply module.
The power unit O.K. LED is lightening green indicating that the power supply module is working
properly.
C€
+ -
DC-Line
Input
36-78V DC
75W max, Fuse T2.0A
SV19" 1HE-48V
PS001551 Ä04
00731
4
The power supply and fan modules can be exchanged during operation (hot plug-in technology)
with neither harming the equipment nor having any impact on the operation of the transmitter in
case of a properly working backup power supply.
Fig. 3.8.2: ±48 VDC power supply and fan modules
Document status: Released
ES10
Page 32/100
Operating Manual
rev. 07, 25.09.13
3.8.3
Fan-only module
For applications, where only one power supply is required, BKtel offers a fan-only module. Fig.
3.8.3 provides the view on the fan-only module.
327616
SV19"
Fan Module
The fan-only module can be exchanged during operation (hot plug-in technology) with having
neither harming to the equipment nor having any impact on the operation of the transmitter in
case of a properly working power supply.
Fig. 3.8.3: Fan-only module
3.9
Labeling
The optical transmitter carries a label specifying hardware model, product number, hardware
release and the ordering number (Fig. 3.9.1). Fig. 4.8.2 reveals the characteristics of the device
with all options (ref. to chapter 1). Fig. 3.9.3 specifies the MAC address if applicable. In case of
questions please specify all these information when communicating with BKtel or sales
representatives.
Fig. 3.9.1. Device label with product number and serial number
Fig. 3.9.2. Label with product number and all characteristics (ref. to chapter 1)
Fig. 3.9.3. MAC Address
Document status: Released
ES10
Page 33/100
Operating Manual
rev. 07, 25.09.13
4
OPERATING THE ES10
4.1
Handling Optical Components
4.1.1
Handling Optical Fibers
The smallest permissible bending radius for fibers used to connect HFC equipment is
currently 30 mm (diameter of 60 mm, G652.D) or 15 mm (diameter of 30 mm, G.657.A). A
smaller radius significantly increases attenuation of the fiber optic cables and even
damages the fibers. Therefore, handle the fibers carefully, especially during installation.
4.1.2
Connecting and Disconnecting Optical Connectors
For connecting optical links:
1. Loosen the dust caps from the transmitter’s optical port
(1) and fiber patch cord.
2. Note the orientation of the device’s optical connector (2)!
Plug the optical male connector of the patch cord in a
sliding matter into the female connector of the device.
3. Save the dust caps.
1
Please proceed in the reverse order for disconnecting optical links.
2
Do not stare into the laser beam or view directly with optical
instruments!
WARNING
4.1.3
In order to prevent uncontrolled emission of laser beams, close the
optical line connector immediately after opening the connection,
using the dust caps designed for this purpose.
Cleaning Optical Connectors
When a connector has been connected and disconnected several times, it may be necessary to
clean the plug pins or adaptor casing.
Only those cleaning agents and materials which have been authorized by the manufacturer may
be used:
• Cleaning cloths made of fluff–free, disposable paper (Kimwipes from Kimberly–Clark)
•
Cleaning fluid: Isopropanol min. 99 %
•
Nylon brush (Curadent Co. Diamond)
•
Brush (Co. Diamond Z–216/32)
•
Rubber bellows (Co. Diamond Z–216/19)
•
Compressed air
Document status: Released
ES10
Page 34/100
Operating Manual
rev. 07, 25.09.13
Laser Radiation
If you inspect the front of the plug when the equipment is switched
on, there is a danger of damage to your eyes.
WARNING
NOTICE
Therefore, always switch the equipment off for this kind of work. Use
a measuring device to ensure that there is no laser beam emission
from the fiber.
Do not touch the surface with your fingers when cleaning.
Plug pins with imprinted grooves on the front must only be daubed
clean using a brush.
Dust or fluff can be blown away using the rubber bellows or dust–
free compressed air.
Document status: Released
ES10
Page 35/100
Operating Manual
rev. 07, 25.09.13
4.1.3.1 Cleaning the Plug Pins
1. Fold the cleaning cloth three times. The cloth
pad now constitutes an eight–layered cloth.
1
2
3
2. Moisten the folded cloth a little using the
cleaning fluid, ensuring that a dry area
remains.
3. Place the front surface of the connector, or the
connector shaft on the moistened part of the
cloth, pressing lightly. Let the cleaning fluid
work into the dirt for a short time.
4. Move the connector to and from on the
moistened part of the cloth, turning slightly and
pressing lightly.
Slide the front surface of the connector, or
connector shaft, from the moist to the dry area,
without breaking the surface contact with the
cloth, so that no cleaning agent residue is left.
NOTICE
If the result of cleaning is not good, repeat the procedure.
5. Reconnect the connector
immediately with a dust cap.
Document status: Released
or
close
it
ES10
Page 36/100
Operating Manual
rev. 07, 25.09.13
4.1.3.2 Cleaning the Connector
NOTICE
Cleaning the device connector(s) requires device opening.
Since device opening may
extinguishes when doing so!
damage
its
function,
warranty
Therefore, cleaning the connector may be only performed by BKtel
manufacturing engineers or BKtel repair engineers. Please send
device to BKtel in case you assume dirty device’s adaptors and/or
connectors.
NOTICE
3
Only clean device’s adaptor and adaptor case when no connector is
connected. Extremely dirty adaptors must be replaced.
1. Disconnect the optical connector or remove the
dust cap from the adaptor.
2. Dissolve both screws of each optical
connector. Caution: Extract the connector very
carefully!
3. Disconnect the internal optical connector
(inside the device) and clean it as described in
the proceeding section. Caution: Do not extend
the connector by more than 1 cm from the
device body.
3
4. If the adaptor is dirt, disconnect the adaptor by
loosening the appropriate screws.
4a. Push the nylon brush through the adaptor
casing several times and then blow clean with
rubber
bellows
or
compressed
air.
Rub the outer casing and fiber adaptor with a
cleaning cloth, if necessary.
4b. Install adaptor in the device again and close
the device.
Document status: Released
ES10
Page 37/100
Operating Manual
rev. 07, 25.09.13
4.2
•
•
•
•
•
•
4.3
Power-Up Sequence
Be sure that the ES10 is put into operation under the specified environmental conditions.
Avoid temperature shocks after transportation and allow sufficient time to accommodate with
the environmental conditions at the operating site.
If not already realized install the appropriate power supply + fan modules, respectively fanonly modules.
Connect the ES10 to one or two (in case of redundant power supplies) appropriate power
supply lines. If only one power supply cable (instead of two) is connected to an ES10
equipped with redundant power supplies, an alarm will be generated and shown with a yellow
illuminated MODULE LED.
After start (with appropriate power line connections), the MODULE LED is illuminated green
and the LCD illumination is on. Then the LCD illumination is switched off and all front side
LED’s are lightening yellow for a short time indicating an ongoing LED test. Afterwards all
LEDs should be lightening green and the microcontroller starts to test the laser and optical
modulator. During this test, which takes about 70 seconds, the optical output power on both
outputs varies between zero power and about twice the nominal power (Poutnom + 3 dB).
With no RF input signal applied and the CSO control loop in “channel controlled” mode the
output power may vary about +/- 1 dB on both outputs. This behavior is due to the control
mode, which adjusts the bias point of the modulator. The output power will be stabilized with
an appropriate RF input signal applied or if the CSO regulation mode is changed to pilot
controlled.
After this procedure the LEDs should monitor the status of the transmitter.
Operating Conditions
4.3.1
Optical output signal
Connect a fiber optic cable with an appropriate, cleaned connector to one of the optical outputs in
order to feed an HFC network. Keep in mind that the ES10 is a laser class 1M product according
to IEC 60825, which requires adequate safety precautions to avoid hazard to people working with
the transmitter.
4.3.2
Applying an appropriate RF input signal
For proper operation, an appropriate RF input signal within the specifications as given in this
section has to be applied to the RF input port (CATV port).
The optical transmitter ES10 has a built-in RF power meter function, which monitors the total rms
(root-mean-square) level at the input of the transmitter. This rms level has to be in a certain
range, so that the transmitter can be properly adjusted. The rms level range depends on the type
of ES10 and is given in Table 2.
ES10XL Version
PFQ344044 (34 PAL,
40 FM, 44 256QAM)
Document status: Released
Total OMI
OMItotrms
RMS Level Range
Prms
PVSB Level Range
(unmodulated)
PVSB Level Range
(modulated)
18.0 %
-16 … +2 dBm
74 … 92 dBµV
76 … 94 dBµV
ES10
Page 38/100
Operating Manual
rev. 07, 25.09.13
N77 (77 PAL)
C42 (42 PAL)
PAL84 (84 PAL)
18.6 %
18.8 %
19.4 %
-16 … +2 dBm
-16 … +2 dBm
-16 … +2 dBm
74 … 92 dBµV
76 … 94 dBµV
74 … 92 dBµV
78 … 96 dBµV
80 … 98 dBµV
78 … 96 dBµV
Table 2. ES10XL RF input leveling
This rms level Prms depends on the number of AM-TV, FM-radio and QAM carriers and their
individual leveling at ES10 RF input port. It can be calculated, when the number of all carriers and
their individual carrier levels are known:
PVSB [ dBµV ] − 108.75 +
Prms [ dBm ] =
+ 10 ⋅ log N VSB ⋅ 10 LVSB / 10 dB + N FM ⋅ 10 LFM / 10 dB + N 64 QAM ⋅ 10 L 64 QAM / 10 dB + N 256 QAM ⋅ 10 L 256 QAM / 10 dB
(
Where:
•
•
•
•
•
•
•
•
•
PVSB is the level of the analogue TV carriers (in dBµV)
NVSB is the number of analogue TV carriers
LVSB is 0 dB for unmodulated carriers (test) and -4 dB for modulated carriers (real video)
NFM is the number of audio-radio carriers
LFM is the audio-radio level referred to the level of the analogue TV carriers
(e.g. LFM= -4 dB)
N64QAM is the number of 64QAM modulated carriers
(digital TV, Fast Internet)
L64QAM is the 64QAM carrier level referred to the level of the analogue TV carriers
(e.g. L64QAM= -10 dB)
N256QAM is the number of 256QAM modulated carriers
(digital TV, Fast Internet)
L256QAM is the 256QAM carrier level referred to the level of the analogue TV carrier
(e.g. L256QAM= -4 dB)
Examples:
1. C42 test signal (unmodulated carriers, common European test scenario):
NVSB= 42, PVSB= 80 dBµV, NVSB= 0 dB:
Prms= -12.5 dBm
2. C42 real video signal (modulated carriers):
NVSB= 42, PVSB= 80 dBµV, NVSB= -4 dB:
Prms= -16.5 dBm
3. N77 test signal (unmodulated carriers, common Japanese/US test scenario):
NVSB= 77, PVSB= 80 dBµV, NVSB= 0 dB:
Prms= -9.9 dBm
4. PFQ344044 real video signal (modulated carriers):
NVSB= 34, PVSB= 80 dBµV, LVSB= -4 dB, N256QAM= 44, L256QAM= -4 dB, NFM= 40, LFM= -4 dB:
Prms= -12.0 dBm
Document status: Released
ES10
Page 39/100
Operating Manual
rev. 07, 25.09.13
)
4.3.3
AGC Modes
The built-in RF power meter controls the rms input level and indicates its status at the INPUT
LED. There are two RF modes, which can be selected.
4.3.3.1 RF Mode “AGC-on”
This mode is the recommended mode for standard operation. As long as the input level is within
the working range of the transmitter (specified in Fehler! Verweisquelle konnte nicht gefunden
werden.), the transmitter will itself adjust the optimum gain. Then, the specified total rms
modulation index OMItotrms, will be automatically obtained by the AGC.
If the input power is lower or higher than required (outside the specified range) the input LED
lights yellow and a warning is generated. If the input power is missing or very high, the input LED
lights red and an alarm is generated.
The AGC always tries to maintain the requested optical modulation index as described. This
index should be high in order to result in good noise behavior. Yet, too high modulation index
causes bit errors, which come up due to overmodulation (clipping) of the transmitter. Therefore,
an optimum optical modulation index has to be used, which is given in Fehler! Verweisquelle
konnte nicht gefunden werden.. The ES10 is factory adjusted to achieve a BER of at least 10-9
with most frequency plans using the built in AGC function.
Note:
The subsequent diagram shows the relationship between OMItotrms and the bit error rate (BER)
measured for 64QAM transmission. Obviously, OMItotrms should be below about 20% in order to
obtain BERs better than 10-6.
1.00E+00
1.00E-02
1.00E-04
1.00E-06
1.00E-08
1.00E-10
15.0
17.5
20.0
22.5
25.0
OMItotrms in %
direct modulated
externally modulated
The BER also depends on the mix of AM, FM and QAM channels. If the QAM load is very small
compared to the AM and FM load the OMItotrms might be chosen about 1 dB higher while still
obtaining the BER as given in the diagram.
Document status: Released
ES10
Page 40/100
Operating Manual
rev. 07, 25.09.13
4.3.3.2 RF Mode “AGC-off”
In this mode, which is for experienced users only, the user has the flexibility to change the gain of
the internal RF amplifier by -12 … +5 dB according to his individual requirements. However, this
adjustment is changing the RF input sensitivity. The OMItotrms is measured for the applied input
signal and the selected gain and can be monitored on the LCD display or via the Ethernet
interface.
This mode should only be used with great care since the automatic protection against
overmodulation as given in the AGC-on mode is lost.
4.3.4
Adjusting Regulation Mode
There are two kinds of bias point regulations: “Channel controlled” and “Pilot controlled”.
Operating the transmitter in “channel controlled” mode requires an input signal in order to adjust
its electrooptical modulator’s bias point. At least 2 RF channels with a channel spacing of 24 MHz
or 21 MHz (software adjustable) are required to obtain a stable performance.
In “pilot controlled” mode, an RF input signal is not required for internal bias point adjustment,
because the transmitter uses an internal pilot control. The pilot frequency is outside the
transmitted RF frequency range in order not to disturb the user’s signals.
4.3.5
ITU Frequency Adjustments in DWDM Applications (XL only)
The ES10 offers the feature to tune the optical frequency (respectively wavelength) of the
transmitter by +/-100 GHz in steps of 50 GHz in order to enable DWDM applications.
The tuning can be performed via the buttons on the front panel or via the Ethernet interface.
4.3.6
Optical Power On /Off
The optical power on/off switching can be performed via the buttons on the front panel or via the
Ethernet interface.
The transmitter can also be configured as a back-up transmitter with optical output power off. This
allows turning on the transmitter within less than 10 seconds in situations when a fast switching to
a redundant transmitter is requested.
4.3.7
SBS suppression setting (XL only)
SBS (Stimulated Brillouin Scattering) is a well-known problem in long distance, high power
transmission on optical fibers destroying the CNR and CSO performance especially in the lower
transmission frequency band.
For extremely coherent optical light, SBS occurs already at optical powers of around +6 dBm (4
mW) in standard single mode fibers. With electronic methods the coherency of the light can be
degraded and in this way achieving an increase of the SBS threshold (meaning the optical power
level at which the perturbing SBS effects start to occur).
If the SBS threshold is increased, another effect, the SPM (self phase modulation) can arise. This
effect degrades the CSO performance in the higher frequency band. SPM depends on the total
dispersion which is present in the transmission system.
Document status: Released
ES10
Page 41/100
Operating Manual
rev. 07, 25.09.13
SBS and SPM are both nonlinear effects in optical fibers and depend on
• the launched optical power
• the fiber properties (especially fiber loss and mode field diameter)
• the link properties (number of splices and total splice loss)
Both effects are getting worse with
• higher optical power
• lower mode field fiber diameter
• higher quality, lower loss fiber
• fewer, lower loss splices
BKtel is testing the SBS and SPM performance of the ES10 with different fiber types and fiber
lengths under worst case conditions: Links containing no splices and providing a fiber loss of only
0.19 dB/km. For this test arrangement the SBS suppression is specified keeping in mind the SPM
problems.
4.3.7.1 SBS Threshold
Depending on fiber type and fiber length the achievable SBS threshold of the ES10 varies as
shown in the following table.
Max. SBS Threshold Level
Fiber Length
Fiber Type
Standard Fiber (G.652D)
SBS Threshold enhanced Fiber*
10km
25km
40km
65km
23
21
20
19
25.5
23.5
22.5
21.5
*e.g. the Corning NexCor® fiber. For more information see: Joint presentation, Corning and BKTel at 2006 SODC Symposium,
NexCor® Technology for Improved HFC and FTTH Access Networks
The ES10 allows inserting values for fiber type and fiber length of the individual application and
link characteristic. The NEC application software then delivers the SBS threshold range which can
be achieved with the BKtel suppression technology in this actual case.
Document status: Released
ES10
Page 42/100
Operating Manual
rev. 07, 25.09.13
4.4
Push Button / LCD Display
Security items
When changing a parameter using the LCD interface in unlocked state, you have to enter a four
digit numeric keycode to login. The LCD login times out after 5 minutes with no key pressed.
The factory default keycode is 1111.
NOTE: Changing the keycode to 0000 disables the code and the parameters can be changed
without entering a code.
Keys default usage
ESC key
The ESC key is used mainly to cancel operations or to switch back a menu level.
ENTER key The ENTER key is used mainly to execute operations or to enter into a new menu
level.
The ▼▲ Cursor keys are used to select a menu entry or to toggle between possible parameters.
The ◄► Cursor keys are used to change letters in a number or a string or to scroll in text
screens.
General Note
In the following, the menu structure of the LCD interface is explained. For more details, please
see also the following chapter 5, in which all the device indications and device configuration
parameters are explained in more detail.
Menu structure
Press ENTER at the Root-Screen to get a menu that contains the NMS server "NEC-E" menu
entry first, followed by the transmitter “ES10” and a list of aliasnames of all detected RS485 bus
BK devices.
Root-Screen
NMS Server “NEC-E”
This menu contains all NMS Server specifics
Transmitter “ES10”
This menu contains all transmitter specifics
If further devices are connected to RS485 bus of ES10 device:
Device menu1 (Device's aliasname is shown)
Device #2 (Device’s aliasname is shown)
…
Document status: Released
ES10
Page 43/100
Operating Manual
rev. 07, 25.09.13
NMS Server menus
NMS Server
Alarms / Warnings / Infos
IP Settings
Keycode
Properties
Date & Time
Reset Server
Rescan RS485
Logout
NMS Server->IP Settings
Save Settings
IP address
Netmask
Default router
Optical transmitter device menus
Alarms / Warnings / Infos
Settings
SBS Suppression
SBS Fiber Length
SBS Fiber Type
Channel Distance
OMI
RF Gain
Laser Frequency
Slope
AGC Mode
Optical Output Power
CSO Regulation Mode
I/O Port Mode
Redundancy Mask
Redundancy Mode
Document status: Released
Server status information
Set the IP parameters of the server
Change the LCD keycode
Show server properties like software- and hardware
releases
Adjust the server's real time clock
Software reset the server
(Re)Search for RS485 devices on the bus
Logout from LCD and return to Root-Screen
NOTE: Don’t forget to Save Settings after a change
Save the changed IP parameters;
the server gets reset after saving the new data
Change or show the IP address
Change or show the netmask
Set or show the default router
Show transmitter's alarm, warning or info messages
Change or show the SBS suppression threshold value
Change or show the SBS fiber length
Change or show the SBS fiber type
Change or show the channel distance
Show OMItotrms, change the OMItotrms for AGC mode
Show RF gain, change RF Gain for manual gain
mode, related to the nominal gain for nominal OMI
and nominal RF-Input power
Change or show the lasers ITU optical frequency
(DWDM only)
Change or show RF slope
Change or show the AGC mode
Change or show optical output power
Change or show the CSO regulation mode
Change or show the I/O port mode
Change or show redundancy mask
Change or show redundancy mode
ES10
Page 44/100
Operating Manual
rev. 07, 25.09.13
Parameters
RF Input
RFtotrms (root-mean-square) input power of CATV input
signal
If the input power is out of range for the selected
OMI- or Gain-settings, an input warning will be
generated and the showed value may be not valid.
OMI
OMItotrms
If the electrical input power or the selected gain is
out of range for a measureable OMI value, an
input warning will be generated and the showed
value may be not valid.
Output power
Optical output power level
TEC Current
Cooler current related to maximum
Laser Current
Laser current related to beginning-of-life value
Module Temperature
Internal temperature
+24V, +3.3V, +5V, +10V, -2.5V
Actual voltage of internal power supplies
Regulation State
Regulation state of electrooptical modulator
For update of values go back to the ES10 menu and enter again
Limits (limit values of above mentioned parameters for warning and for alarming state)
Parameters and order see “Parameters”
Properties (show device properties)
Hardware Rel.
Appl. Sw. Rel.
Bootl. Sw. Rel.
Serial number
Hardware release
Application software release
Bootloader software release
Serial number of manufacturing unit
Miscellaneous
Reset Device
Reset to Default Settings
Generates a reset of the transmitter device
Reset to factory adjustments
Aliasname
Change device's aliasname
4.5
LED Alarm and Warning Messages
Table 3 shows the conditions triggering the LEDs on the front panel. The “Module” LED
summarizes the condition of the transmitter. The “IN” and “Out” LEDs provide detailed information
of the RF input and optical output status of the transmitter. For normal operation all LED’s should
light green. In case of warnings and alarms the responsible LED’s turn into yellow or red and the
LCD shows further explanations.
Module LED
Standard Operation
LED green
non-urgent alarm (warning)
LED yellow
urgent alarm
Document status: Released
LED red
ES10
Page 45/100
Operating Manual
rev. 07, 25.09.13
IN LED
nominal input power
LED green
input power out of nominal operation
LED yellow
loss of input power
OUT LED
LED red
nominal output power
LED green
lack of output power
LED yellow
loss of output power
LED red
standby – operation
LED dark
Table 3. LED display
MODULE status
Normal operation:
MODULE LED green
Non urgent alarms: MODULE LED yellow
• fan 1 or fan 2 failure
• Power supply 1 or power supply 2 failure
• Laser cooler current >90 %. In this case the temperature of the transmitter is too high.
Improve thermal heat flow in order to decrease the operating temperature.
• Laser bias current >130%. The laser has degraded.
In case of a fan or power supply failure the power supply/fan unit has to be replaced. BKtel offers
fans as regular spare parts, too.
Urgent alarms:
MODULE LED red
• Laser cooler current =100 %. In this case the temperature of the transmitter is too high.
Improve thermal heat flow in order to decrease the operating temperature.
• Critical failure of SBS circuitry. In this case the device has to be sent back for repair to
BKtel.
• Internal failure generated by RF amplifier failure, modulator failure. In this case the device
has to be sent back for repair to BKtel.
INPUT status
Normal operation:
INPUT LED green
Non urgent alarm:
INPUT LED yellow
RF-input low or high
• In AGC mode: AGC is out of range
• In Manual Mode: OMI total rms is out of range
Urgent alarm: INPUT LED red
• RF-input is missing.
OUTPUT status
Normal operation:
OUTPUT LED green
Non urgent alarm:
OUTPUT LED yellow
Document status: Released
ES10
Page 46/100
Operating Manual
rev. 07, 25.09.13
The output power deviates by 3 dB from the adjusted value.
The transmitter is still working but with reduced performance. It has to be sent to BKtel for
maintenance.
Urgent alarm: OUTPUT LED red
The output power deviates by 4 dB from the adjusted value. The transmitter is not working
according to specification. It has to be sent to BKtel for maintenance.
•
Document status: Released
ES10
Page 47/100
Operating Manual
rev. 07, 25.09.13
5
CONTROLLING A NEC
Jointly with the optical transmitter a network element controller NEC is embedded in the 19’’
housing of the ES10. The NEC allows supervising and controlling the transmitter and other
equipment which is connected to the RS485 master interface, using the integrated Ethernet
webserver (HTTP) interface. The NEC Ethernet interface has to be connected to a PC either
directly via a crossed Ethernet cable or via a LAN. It is important to choose the IP address of the
NEC to be compatible with the available LAN IP addresses. The IP address can be changed
using the push-buttons and the LCD (please refer to NEC operating manual). In the example
below the IP address has been set to be 172.23.41.196.
Alternatively the NEC-E USB interface can be used as an user interface for local management.
When the NEC-E USB port is connected to a PC an additional virtual LAN interface becomes
available. This new PC LAN interface gets automatically configured by the NEC using DHCP.
This USB LAN interface is based on the Remote NDIS (RNDIS) specification from Microsoft.
The NEC-E local management is done by using a webbrowser in the same way as when
communicating over the NEC Ethernet interface. The NEC USB virtual LAN interface's IP address
is hardcoded to the fixed IP address: 10.10.10.10. Open a web browser and enter 10.10.10.10 in
the address line of the browser.
Please note:
Information regarding the installation of the USB driver and the installation files can be obtained
• from the compact disk delivered with BKtel product
• from BKtel representative (www.bktel.com)
Document status: Released
ES10
Page 48/100
Operating Manual
rev. 07, 25.09.13
5.1
Communicating with the NEC
If a webbrowser gets in touch with the NEC of the transmitter a webpage as shown below will
appear within the webbrowser (e.g. MS Internet Explorer):
Fig. 5.1.1: Display of Webbrowser (Microsoft I.E.)
Selecting the menu button “Devices” all devices are displayed which are connected and
recognized by the NEC. In the example above only one device is connected to the embedded
NEC, the ES10. The NEC itself is displayed with the name NEC-E. The devices overview window
shows general information about the devices. Clicking the name in the devices window selects
the specific device for management purposes. For physical location of a device connected to the
NEC, the flag in front of the devices name can be used. Clicking this flag initiates the module LED
at the device to blink for 10 seconds.
Document status: Released
ES10
Page 49/100
Operating Manual
rev. 07, 25.09.13
Fig. 5.1.2: Log-in to the NEC (server)
In order to change values within the equipment recognized by the NEC, it is necessary to login to
the NEC (= server). Otherwise, it will only be possible to view all the values, however, not to
change them.
Fig. 5.1.3: Display of login menu
If login is selected, it is required to enter the user name and the appropriate password.
Note: The buttons occur in different languages depending on the actual Windows language
setting.
Document status: Released
ES10
Page 50/100
Operating Manual
rev. 07, 25.09.13
After login two additional menu buttons appear in the menu ‘Devices’: Devices update and
Configure Slots. In the main window a button RescanAll allows to research the network for newly
connected devices. Please note that new BK devices should be automatically detected by the
server when inserted into the RS485 bus, but if there are problems then this button might help the
server to find all devices.
5.2
Devices Update
Using this menu button an update of the selected devices firmware is possible as can be seen in
Fig. 5.2.1.
Fig. 5.2.1: Devices Update page
Document status: Released
ES10
Page 51/100
Operating Manual
rev. 07, 25.09.13
5.3 Configure Slots (optionally)
The Configure Slots page provides the possibility to assign a slot number to the specific device.
This functionality is useful if the NEC supervises a larger number of devices especially in the
BKtel modular platforms BK Mega and 2G6.
The number range is from 1 to 48. Number 49 is reserved. In case no numbers are assigned
number 50 and above are automatically used. In case the device is a BKtel product mounted in a
BBT00x subrack, the slot number is detected and assigned automatically. For details see the
operational manuals of the BK Mega and 2G6 product series.
Fig. 5.3.1: Configure Slots page
Document status: Released
ES10
Page 52/100
Operating Manual
rev. 07, 25.09.13
5.4 Server Properties
Selecting the menu button ‘Server’ the properties of the NEC are displayed as shown in the
following figure:
Fig. 5.4.1: Server Properties page
Document status: Released
ES10
Page 53/100
Operating Manual
rev. 07, 25.09.13
5.5
Event Log
Selecting the Event Log menu button all events which occurred during operation of the NEC are
displayed. Depending on the operating conditions the event log looks similar to what is shown in
the figure below:
Fig. 5.5.1: Event log page
There are several marks, filled or unfilled, used to show all events.
• Green exclamation marks show events which occur during normal operation. A solid green
exclamation mark indicates that the event is still present. An exclamation mark filled with white
colour indicates that the event has elapsed. At the same time, the previous shown event with
filled exclamation mark is scratched out.
• Red flags show urgent alarms. Filled or unfilled flags have the same meaning described for
the exclamation mark.
• Orange flags show warnings. Filled or unfilled flags have again the same meaning described
for the exclamation mark.
• All events are shown with time stamps, the equipment causing the event, the serial number of
the equipment and a description of the event.
Up to 512 entries in the event log page are displayed. If this number is reached, the oldest entry
is deleted in order to provide space for a new entry.
Document status: Released
ES10
Page 54/100
Operating Manual
rev. 07, 25.09.13
5.6
Statistics
The statistics page allows getting an insight into the trap handling and the performance of the
NEC as well as the response performance of the RS484 bus.
The statistics of sent, pending and discarded traps is shown in fields and allows to check, whether
the SNMP trap settings are set correctly and/or the communication with the trap receiver works
properly.
• Traps sent: The number of trap packets, which have been sent by the NEC.
Remark: Trap packets are counted, for example: In case of 4 registered trap receivers the
counter is increased by 4 for each trap-event
• Traps pending: The number of trap packets, which the NEC-E has still to send.
• Traps discarded: The number of trap-packets the NEC-E has discarded. The counter is
incremented in case of any “discarded” trap, that means in any case of NEC-E trap
memory-overflow or not in advance via SNMP Get Request verified traps.
The statistics of RS485 bus responses allows to check, whether the RS485 bus communication
works properly. In case of erroneous responses a hardware failure in one of the connected
devices is likely. It is recommend to locate the device by sequentially disconnect all devices until
the erroneous responses disappear. If the malfunction stays after rest and reconnecting of the
device, it is likely to be damaged and has to be sent back to BKtel for repairs.
Fig. 5.6.1. Statistics page
Document status: Released
ES10
Page 55/100
Operating Manual
rev. 07, 25.09.13
5.7
General Purpose I/O Ports of NEC Server (Option)
The NEC-E provides general purpose I/O ports for remote control functions (ref. to 2.3). After
selecting this item in the Server Menu, a window as shown below will appear:
Fig. 5.7.1: Display of I/O ports menu
Document status: Released
ES10
Page 56/100
Operating Manual
rev. 07, 25.09.13
In the I/O mode column, the mode of both the I/O port and all 4 input-only ports (ref. to 3.4) can
be set. The figure below shows the available options for the I/O port:
Fig. 5.7.2: Available modes of operation for the I/O port
Document status: Released
ES10
Page 57/100
Operating Manual
rev. 07, 25.09.13
The options for the input-only ports are shown in the figure below:
Fig. 5.7.3: Available modes of operation for input ports
The available modes of operation for the I/O ports are given in Table 4:
Port mode
Input
Input is notify
Input is warning
Description
Application (examples)
Somebody entered the headend
Input signal (default = factory stetting)
(available on ports 1 … 5)
Input signal creates a notify message Somebody entered the headend
(exclamation mark) in status display
(available on ports 1 … 5)
Input signal creates a warning Temperature in room is too high
message (orange flag) in status display (available on ports 1… 5)
Input is alarm
Input signal creates an alarm message Headend failure
(red flag) in status display
(available on ports 1… 5)
Output on any
alarm
Output will become active with any (available for port 1)
alarm. Alarm limits for the ES10 can be
set in limits menus of ES10
Output on any
warning
Output will become active with any (available for port 1)
warning. Warning limits can be set in
limits menus of ES10
Table 4. Modes of the I/O ports
All ports can be set to be either active low or active high. A description of the I/O port function can
be added to each port optionally
Document status: Released
ES10
Page 58/100
Operating Manual
rev. 07, 25.09.13
5.7.1
Examples of I/O port status information
An ES10 polls also an EDFA (e.g. OVnxxxb) via the RS-485 interface.
Please note, that the I/O port #0 is directly related to the transmitter unit (ES10, refer to 2.3)
whereas all other I/O ports (#1 …5) are related to the NEC.
•
•
We assume that I/O #0 is set to output on any warning (and alarm)
We assume that I/O #1 is set to output on any alarm (no warnings)
The following table lists the state of I/O #0 and #1 for some alarm situations.
Alarm situation
I/O #0
I/O #1
(output on any warning)
(output on any alarm)
RF input of ES10 is low (warning); OVnxxxb
has no warnings or alarms
Active
Inactive
RF input level of ES10 is extremely low
(alarm)
Active
Active
Optical input power level of OVnxxxb is low
(warning); ES10 has no warnings or alarms
Inactive
Inactive
Optical input power level of OVnxxxb is low
(warning); ES10 has no warnings or alarms;
I/O #2 is set to alarm on input; I/O #2 receives
an alarm
Inactive
Active
Optical input power level of OVnxxxb is very
low (alarm); ES10 has no warnings or alarms
Inactive
Active
Document status: Released
ES10
Page 59/100
Operating Manual
rev. 07, 25.09.13
5.8
Server Administration
Fig. 5.8.1: Server administration menu
The server administration menu allows modifying the IP parameters, the user names and
passwords and the interval, how fast the webbrowser pages are updated.
The update interval has to be chosen carefully, especially if the number of devices polled by the
NEC is quite high, in order to avoid too much communication traffic. The new parameters in the
different blocks are executed by clicking on the change button of the individual block.
There are three levels of login priorities defined.
Username
Factory Default
Password
Description
technical
technical
In this level all parameters are allowed to be changed,
except the update and server administration items.
update
update
In this level (additionally to the “technical” level) the
server and device update processes can be executed.
sysadmin
sysadmin
System administrator level, all tasks can be done.
5.9
SNMP Configuration
A SNMP configuration menu is available as shown in the figure below:
Document status: Released
ES10
Page 60/100
Operating Manual
rev. 07, 25.09.13
Fig. 5.9.1: SNMP configuration menu
SNMPv1 Authentication Communities
Separate strings can be allocated to the get community and the set/get community.
Special Settings
HMS Traps Compliance
( see also SCTE-HMS-ALARMS-MIB und SCTE-HMS-COMMON-MIB )
minor compliant
(1)
full compliant
hmsAlarmEvent Trap is sent with
ENTERPRISE OID alarmsIdent
(1.3.6.1.4.1.5591.1.2), instead of OID
scteHmsTree (1.3.6.1.4.1.5591.1) as
demanded by HMS MIB
As demanded by HMS MIB, hmsAlarmEvent
Trap is sent with ENTERPRISE OID
scteHmsTree (1.3.6.1.4.1.5591.1).
hmsColdStart Trap is sent to RFC1215 with
ENTERPRISE OID commonIdent
(1.3.6.1.4.1.5591.1.3), instead of OID
scteHmsTree (1.3.6.1.4.1.5591.1) as
demanded by HMS MIB and with Trap-Type
COLD START.
As demanded by HMS MIB, the
hmsColdStart Trap is sent with the
ENTERPRISE OID scteHmsTree
(1.3.6.1.4.1.5591.1) and with Trap-Type
ENTERPRISE SPECIFIC + Specific-TrapType 0.
Document status: Released
ES10
Page 61/100
Operating Manual
rev. 07, 25.09.13
HMS Notifications
enabled
(1)
disabled
All messages of type “Notification” are sent
as Trap and are inserted in the SNMP SCTE
HMS tables. Since HMS does not recognize
Notifications, “HMS-Severity” minor is
reported
All messages of type “Notification” are not
sent as Trap and are not inserted in the
SNMP SCTE HMS tables.
In the webbrowser the Notifications are still
shown
hfcInventory Format
T-Nova, E531i
(1)
DKS, T12-9
The SNMP variable “hfcInventoryFabricData”
of the T-NOVA-HFC-INVENTORY-MIB is
provided in the format defined by Biedenbach
(T-Nova, E531i)
Document status: Released
The SNMP variable “hfcInventoryFabricData”
of the T-NOVA-HFC-INVENTORY-MIB is
provided in the format defined by Herberg
(DKS, T12-9)
ES10
Page 62/100
Operating Manual
rev. 07, 25.09.13
Trap Verify
If traps are to be transmitted via non-permanent links like dial-up links (e.g. using ISDN or
standard analog modem), it is important to verify that the link to the trap receiver is working before
any SNMP traps are sent. Otherwise the traps could get lost.
Several settings have been introduced to obtain a verification of the link between the trap
transmitter (=NEC) and trap receiver:
•
•
•
•
•
Verify before trap. If enabled, via SNMP Get Request the “sysDescr” OID of the host
having the “Trap Verify Receiver” IP address (see below) is executed before the pending
traps are sent. Only after successful reply all pending traps are sent. For permanent-on
links (e.g. LANs), “disabled” is the recommended setting. For other links “enabled” is the
recommended setting.
Trap verify receiver: Here the IP address of the receiver, verifying the link, can be
entered. In many cases it might be one of the trap receiver addresses as entered.
However, in dial-up links, optionally the IP address of a receiving modem (e.g. ISDN
router) could be used instead of the IP address of a real trap receiver.
Timeout: A timeout time between 30 and 600 seconds might be specified, in order to
detect a link error. The NEC-E is waiting the specified time for replies on the “sysDescr”
SNMP Get Requests. After this time all pending traps are sent, regardless if a reply has
arrived or not. Important: In this case of timeout the ‘traps sent’ and the “traps discarded”
counter (see below) are incremented.
Trap Accumulation Time: It is possible to collect traps during the “Trap accumulation
time”, which can be set between 0 and 60 seconds, until they are transmitted
63ight63ad63e. This feature helps to reduce connection fees in dial up connections. In the
following cases the accumulated traps are in any case released for sending:
The internal trap memory is 3/4 filled.
The SNMP agent of the NEC-E is polled by any kind of manager.
Test “trap verify receiver” response: This function is very useful to set up and test the
communication in modem links. By clicking this link it can be tested, whether the “Trap
Verify Receiver” is answering correctly on the SNMP Get Request. (Timeout after 30
seconds). This link is only visible, when “Verify before Trap” is enabled.
Document status: Released
ES10
Page 63/100
Operating Manual
rev. 07, 25.09.13
5.10 Server Update
It is possible to update the Server (=NEC) firmware by uploading it to the optical transmitter using
the Webserver software upload menu as shown below.
Fig. 5.10.1: Server update menu
A server software update might be required, if new equipment has to be supervised by the NEC,
connected to the RS485 (master) interface, or if the changes to the webbrowser- or SNMPEthernet interfaces have to be implemented.
Note: The buttons occur in different languages depending on the actual Windows language
setting.
Document status: Released
ES10
Page 64/100
Operating Manual
rev. 07, 25.09.13
5.11 Config Save
A configuration menu is optionally available. The menu allows the user to save and/or to restore
the configuration settings of the equipment controlled by the NEC. Pushing the ‘Config Save’
button the following figure appears.
Fig. 5.11.1: Config save menu
A table of the controlled devices with model name, alias name, serial number and slotnumber is
displayed. Devices can be marked for configuration saving using last column of the table.
Document status: Released
ES10
Page 65/100
Operating Manual
rev. 07, 25.09.13
Fig. 5.11.2: Config Save page
Pressing the ‘Generate Config file’ button a file with the settings of the selected devices is
generated and stored in the flash memory of the NEC. To save the file locally, the button ‘Save
generated Config file’ can be used. The default file name is displayed below the button. Also this
link can be used to initiate the file storage.
Document status: Released
ES10
Page 66/100
Operating Manual
rev. 07, 25.09.13
5.12 Config Restore
Pushing the ‘Config Restore’ button the file saved in the NEC memory is available for restoring as
shown in the figure below.
Fig. 5.12.1: Config Restore page
In the column ‘Restore from’ the available configurations can be selected by model name, alias
name, serial number and slot number. The ‘Restore’ button starts the restoration.
In the last column it can be selected if the equipment should also take over the aliasname and
slotnumber. In this way the device can be completely recovered in its settings. In this manner it is
easy to configure a replacement unit or restore the configuration of an entire group of devices e.g.
after a system crash.
Document status: Released
ES10
Page 67/100
Operating Manual
rev. 07, 25.09.13
Fig. 5.12.2: Config restore menu
In case configuration settings of a device should be transferred to another device e.g. in a
different system, the mark has to be deselected. Only the configuration settings are then applied,
the aliasname and slotnumber of the device is not altered.
Using the ‘Upload Config file’ button a local file can be loaded into the NEC memory and further
on be used for restoring configuration settings as described.
Document status: Released
ES10
Page 68/100
Operating Manual
rev. 07, 25.09.13
6
CONTROLLING ES10 VIA A NEC
6.1 Status
The figure below shows the status page of the ES10.
Fig. 6.1.1: Status page
The actual status of the transmitter is shown using a mark and a description.
There are several marks, filled or unfilled, used to show all events.
• A green flag indicates that the transmitter is working properly.
• An orange flag shows a warning. A certain parameter is out of the nominal range. The reason
for that should be checked and solved as soon as possible.
• A red flag shows an urgent alarm. An immediate action is required to fix the failure.
• An exclamation mark provides a message about a certain mode of operation or change
Document status: Released
ES10
Page 69/100
Operating Manual
rev. 07, 25.09.13
6.2
Alarm and Warning Messages in the Status Page
Alarm Flags
Flag
Description
TEC_HIGH_ALARM
Peltier current is higher than the alarm limit (> 100%), (Laser switched off)
OUTPUT_PWR_LOW_ALARM
Optical output power is lower than the alarm limit
RF_INPUT_LOW_ALARM
RF signal is lower than the alarm limit
OUTPUT_PWR_HIGH_ALARM
Optical output power is higher than the alarm limit
RF_INPUT_HIGH_ALARM
RF signal is higher than the alarm limit
OMI_OR_RFGAIN_LOW_ALARM
The calculated rf gain (if AGC on) or the calculated omi (if AGC off) is
lower than the alarm limit
OMI_OR_RFGAIN_HIGH_ALARM
The calculated rf gain (AGC on) or the calculated omi (AGC off) is higher
than the alarm limit
RF_SIGNAL_LOSS
IF RF INPUT LOW ALARM is disabled and RF signal is lower than
typical -17 dBm (guaranteed: -16 dBm)
BOOTLOADER_RUNNING_NO_APPLICA
TION_FIRMWARE
No application firmware loaded, f. ex. After failed firmware update
CONNECTION_LOST_NO_RESPONSE_
FROM_DEVICE
Device connected to the management bus of the NEC (RS485 bus)
doesn’t respond
MODULE_TEMP_LOW_ALARM
Module temperature is lower than the alarm limit (< 0 °C)
MODULE_TEMP_HIGH_ALARM
Module temperature is higher than the alarm limit (> 70°C)
SBS_#1_LEVEL_ALARM
Critical failure of SBS circuitry, device has to be sent back for repair to
BKtel
SBS_#2_LEVEL_ALARM
Critical failure of SBS circuitry, device has to be sent back for repair to
BKtel
SBS_#1_PLL_ALARM
Critical failure of SBS circuitry, device has to be sent back for repair to
BKtel
SBS_#2_PLL_ALARM
Critical failure of SBS circuitry, device has to be sent back for repair to
BKtel
INTERNAL ALARM
Internal failure generated by RF amplifier failure or modulator failure,
device has to be sent back for repair to BKtel.
Table 5. Situations triggering an alarm flag in the ES10; Flags in bold letters can be controlled via
the limits menu (ref. to 6.6)
Document status: Released
ES10
Page 70/100
Operating Manual
rev. 07, 25.09.13
Warning Flags
Flag
Description
OUTPUT_PWR_LOW_WARNING
Optical output power is lower than the warning limit
LASER_HIGH_WARNING
The laser current of one laser is higher than the warning limit (> 130%)
TEC_HIGH_WARNING
The peltier current of one laser is higher than the warning limit (< 90%)
RF_INPUT_LOW_WARNING
RF signal is lower than the warning limit
POWER_SUPPLY_WARNING
One of two power supplies fails (obsolete)
FAN_LEFT_WARNING
The left fan (looking from device’s front side) fails (doesn’t rotate)
FAN_RIGHT_WARNING
The right fan (looking from device’s front side) fails (doesn’t rotate)
OUTPUT_PWR_HIGH_WARNING
Optical output power is higher than the warning limit
RF_INPUT_HIGH_WARNING
RF signal is higher than the warning limit
POWER_SUPPLY_LEFT_WARNING
The left power supplies (looking from device’s front side) fails
POWER_SUPPLY_RIGHT_WARNING
The right power supplies (looking from device’s front side) fails
OMI_OR_RFGAIN_LOW_WARNING
The calculated rf gain (if AGC on) or the calculated omi (if AGC off) is
lower than the warning limit
OMI_OR_RFGAIN_HIGH_WARNING
The calculated rf gain (AGC on) or the calculated omi (AGC off) is higher
than the warning limit
+3.3V_LOW_WARNING
Supply +3.3V is lower than the warning limit
+3.3V_HIGH_WARNING
Supply +3.3V is higher than the warning limit
+5V_LOW_WARNING
Supply +5V is lower than the warning limit
+5V_HIGH_WARNING
Supply +5V is higher than the warning limit
-5V_LOW_WARNING
Supply -5V is lower than the warning limit
-5V_HIGH_WARNING
Supply -5V is higher than the warning limit
+12V_LOW_WARNING
Supply +12V is lower than the warning limit
+12V_HIGH_WARNING
Supply +12V is higher than the warning limit
-12V_LOW_WARNING
Supply -12V is lower than the warning limit
-12V_HIGH_WARNING
Supply -12V is higher than the warning limit
+24V_LOW_WARNING
Supply +24V is lower than the warning limit
+24V_HIGH_WARNING
Supply +24V is higher than the warning limit
LASER_TEMP_DIFF_LOW_WARNING
Laser temperature difference from nominal value is lower than the warning
limit (≥ 1°C below nominal value)
LASER_TEMP_DIFF_HIGH_WARNING
Laser temperature difference from nominal value is higher than the
warning limit (≥ 1°C above nominal value)
MODULE_TEMP_LOW_WARNING
Module temperature is lower than the warning limit (< 5°C)
MODULE_TEMP_HIGH_WARNING
Module temperature is higher than the warning limit (> 65°C)
Table 6. Situations triggering a warning flag in the ES10; Flags in bold letters can be controlled
via the limits menu (ref. to 6.6)
Document status: Released
ES10
Page 71/100
Operating Manual
rev. 07, 25.09.13
6.3 Parameters
The parameters page displays the most important values of the transmitter for operation.
Fig. 6.3.1: Parameters page
For proper operation, the black vertical bars should meet the green fields. Note: The scaling of
the green and yellow fields might be different in order to obtain a good reading, especially of the
green field.
Document status: Released
ES10
Page 72/100
Operating Manual
rev. 07, 25.09.13
6.4 Internal Voltages
The voltages page displays all internal supply voltages like shown below.
Fig. 6.4.1: Internal Voltages page
For proper operation, the black vertical bars should meet the green fields. Note the thresholds for
alarms are not adjustable by the user but are factory settings only.
Document status: Released
ES10
Page 73/100
Operating Manual
rev. 07, 25.09.13
6.5
Settings Menu
This menu allows changing some basic adjustments of the ES10.
Note: Some of the settings require certain hardware and software releases. Please refer to the
manual supplied with the transmitter if some options are different or missing compared to this
figure.
Fig. 6.5.1: Settings menu of ES10
Document status: Released
ES10
Page 74/100
Operating Manual
rev. 07, 25.09.13
6.5.1
Changing SBS Threshold
The figure below shows, how to change the SBS suppression (threshold) between 13.0 and 23.5
dBm It is important to understand, that the SBS setting has a major impact on the transmission
performance, especially for very long fiber transmission (e.g. 100 km) and high frequencies. The
SBS suppression can be adjusted in 0.1 dB steps (calibrated). Please refer to 4.3.7.
Fig. 6.5.2: Changing the SBS threshold of the ES10XL
Document status: Released
ES10
Page 75/100
Operating Manual
rev. 07, 25.09.13
6.5.2
Changing SBS Fiber Type and SBS Fiber Length
Fig. 6.5.3: Changing SBS fiber type and SBS fiber length
The SBS suppression is calibrated for different types of single mode optical fibers and fiber
lengths. In the menu ‘SBS Fiber Type’ a selection is possible between standard fiber and SBS
enhanced fiber. In the menu ‘SBS Fiber Length’ the length of the fiber used can be selected
(more details see 4.3.7).
Document status: Released
ES10
Page 76/100
Operating Manual
rev. 07, 25.09.13
6.5.3
Changing OMItotrms (AGC on mode only)
The figure below shows, how to adjust the RF OMI total rms, in order to optimize the transmission
performance in terms of CNR, CSO, CTB and BER. The RF OMItotrms is shown in %, enabling an
easy comparison e.g. with the graphs as shown in 4.3.
Fig. 6.5.4: Setting RF OMItotrms of ES10
Notes:
1. OMI nominal refers to a factory setting and cannot be changed by the user.
2. RF-OMItotrms setting is only relevant in AGC-on mode.
3. The setting range for RF-OMItotrms might change slightly from device to device due to
production tolerances.
Document status: Released
ES10
Page 77/100
Operating Manual
rev. 07, 25.09.13
6.5.4
Setting Gain (AGC off mode only)
The figure below shows how to adjust the RF gain, in order to optimize the transmission
performance in terms of CNR, CSO, CTB and BER.
Fig. 6.5.5: Setting RF gain of ES10
Notes:
1. The RF gain setting is only relevant in AGC-off mode.
2. The setting range for RF gain might change slightly from device to device due to
production tolerances.
3. Changing the RF gain changes the input sensitivity of the ES10 in AGC off mode; 0 dB is
the nominal RF gain. Setting the RF gain to e.g. 2 dB improves the input sensitivity of the
ES10 from e.g. 80 dBµV to 78 dBµV.
Document status: Released
ES10
Page 78/100
Operating Manual
rev. 07, 25.09.13
6.5.5
Changing AGC Mode
The transmitter can be operated in manual- (AGC off) as well as an automatic- gain controlled
(AGC on) mode. For details please refer to 4.3.2.
Fig. 6.5.6: Selecting the RF AGC mode of the transmitter of ES10
Document status: Released
ES10
Page 79/100
Operating Manual
rev. 07, 25.09.13
6.5.6
Setting Slope
The ES10 enables to change the slope of its internal RF amplifier stages. The slope equalizer
follows a RF cable compensating or RF cable simulating characteristics.
Fig. 6.5.7: Setting the RF gain slope
Document status: Released
ES10
Page 80/100
Operating Manual
rev. 07, 25.09.13
6.5.7
Changing ITU Laser Frequency
The figure below shows, how to change the ITU frequency (optical wavelength) of the transmitter
in steps of 50 GHz up to +/- 100 GHz (not available for ES10L).
Fig. 6.5.8: Changing the ITU frequency of the transmitter ES10XL
Document status: Released
ES10
Page 81/100
Operating Manual
rev. 07, 25.09.13
6.5.8
Changing Optical Output Power Mode
There are 3 different output power modes available for the ES10 as shown in the figure below:
Fig. 6.5.9: Setting the optical output power mode of ES10
1. OFF / Standby. By selecting this mode the ES10 will operate with optical output power
switched off. However, the laser temperature is still kept at the operating temperature by
driving the peltier cooler enabling a fast switching-on time. Additionally the RF input
monitor is operating. Note: In future software releases it is intended not to completely
switch off the optical power but to decrease the optical power below a certain threshold
(e.g. –3 dBm) in order to enable the supervision of the laser in standby mode and in order
to enable the supervision of the fiber link between the ES10 and the subsequent EDFA or
RX.
2. ON. The transmitter output power is always on (default = factory setting).
3. ON / Standby on alarm. The transmitter output power is on, as long as there is no internal
alarm. In case that an alarm condition occurs, the output power is switched into standby
mode. This operating mode has been designed especially for redundant transmitter
operation: If e.g. an RF input alarm occurs, the optical output power is switched to standby
mode. This consequently should also disable the subsequent EDFA. If a pair of two ES10
with subsequent EDFA are intended to be used for redundant operation (master/slave
Document status: Released
ES10
Page 82/100
Operating Manual
rev. 07, 25.09.13
mode, ref. to 6.5.10) this feature will automatically switch from the master TX + EDFA to
the slave TX + EDFA. In this case the I/O No. 0 ports of both ES10 have to be connected
and the master/slave settings according to 6.5.10 have to be chosen. Note: The
requirements for an alarm condition can be set by adjusting the alarms thresholds as
explained in 6.5.11.
6.5.9
Changing Regulation Mode
The figure below shows, how to change the CSO regulation mode of the transmitter. For details
please refer to 4.3.2.
Fig. 6.5.10: Changing the CSO Regulation Mode
Document status: Released
ES10
Page 83/100
Operating Manual
rev. 07, 25.09.13
6.5.10 Changing Redundancy Mode
Fig. 6.5.11: Setting the redundancy port mode
The redundancy mode menu is used to configure redundancy setup between two ES10 (device
redundancy). The I/O port #0 is dedicated for this purpose and the menu Redundancy mode
directly manipulates this port. The I/O port can be set either to be an output port with 4 modes of
operation available:
• active low
• active high (default = factory setting)
• nominal master (irreversible) or
• nominal master (fallback)
or to be an input port, which implies the redundant slave mode.
Document status: Released
ES10
Page 84/100
Operating Manual
rev. 07, 25.09.13
The table below shows the mode of operation and the impact on I/O port No. 0
Mode of operation
Description
I/O port #0
Active low
In case of alarm or warning, which arises Output, active low
in case any of the alarm thresholds has
been reached or due to an internal error
the I/O port becomes low.
Active high
In case of alarm or warning, which arises Output, active high
(Default = factory in case any of the alarm thresholds has
been reached or due to an internal error
setting)
the I/O port becomes high.
Nominal
master In case of alarm or warning, which arises
(irreversible)
in case any of the alarm thresholds has
been reached or due to an internal error
the I/O port becomes high. In case the
alarm
condition
disappears,
the
transmitter will remain in the alarm state
until it is reset manually. This mode is
implemented to prevent a frequent
switching into active/stand-by mode of
two redundant transmitters.
Output, active high
This port should be connected
to the corresponding I/O port
#0 of the redundant transmitter
which is set into redundant
slave mode.
Nominal
(fallback)
Output, active high
This port should be connected
to the corresponding I/O port
#0 of the redundant transmitter
which is set into redundant
slave mode.
master In case of alarm or warning, which arises
in case any of the alarm thresholds has
been reached or due to an internal error
the I/O port becomes high.
In case the alarm condition disappears,
the transmitter will go back into normal
operation, which will set the connected
redundant slave mode into stand-by
operation.
Redundant slave
In case that the input port is low, the
transmitter will go into stand-by operation.
In case that the I/O port #0 (input) will
become high, the transmitter will go into
normal (nominal) mode.
Input, active high
This port should be connected
to the corresponding I/O port
#0 of the redundant transmitter
which is set into redundant
master mode.
Note:
Note: The redundancy mask determines which alarms or warnings trigger the I/O port #0 in
output mode. This is described in the chapter 6.5.11.
Document status: Released
ES10
Page 85/100
Operating Manual
rev. 07, 25.09.13
Application: Automatic redundancy switching of twoES10 located side by side:
• Connect a cable between the master and the slave ES10 connecting both I/O #0 ports and
GND.
• Set the master ES10 in one of the two Nominal master modes
• Set the master ES10 I/O port mask to the desired mode. Set the slave ES10 into the
Redundant Slave mode
Observance:
• As long as the master ES10 does not show any alarm, the slave ES10 should be sleeping (in
stand-by operation), since the I/O port #0 level will be in low state.
• If the master alarm faces an alarm situation, it will set the I/O port #0 level to high state,
therefore awakening the slave transmitter from sleeping (stand-by mode).
• If the cable between the master ES10 and the slave is cut or removed, the slave device will go
from sleeping (stand-by) mode into normal operation due to the internal 100 kΩ pull-up resistor.
• If the power supply from the master ES10 is removed completely, the slave device will go
from sleeping (stand-by) mode into normal operation immediately.
Note:
The slave transmitter might need up to 5 seconds to provide a high performance output signal,
when starting from stand-by. For that reason, the master transmitter will after an alarm situation
create an I/O port high signal to start the slave transmitter and will, however, operate in normal
mode (as far as possible) for five seconds, until it switches into stand-by mode. The purpose of
this method is to make the interruption of the signal as short as possible.
An overview of all alarm and warning flags, which can create an alarm or warning situation, is
given in chapter 6.2.
Document status: Released
ES10
Page 86/100
Operating Manual
rev. 07, 25.09.13
6.5.11 Setting Redundancy Mask
The redundancy mask determines whether only alarms but no warnings (default = factory
setting) or alarms and warnings trigger the I/O port #0 in output mode. The menu is shown in the
figure below.
Fig. 6.5.12: Setting the alarm/warning mask for the output port
With this feature all warnings / alarms of the ES10 can be either enabled or disabled by the user
in relation to the output #0 port. If the output mask is applied a notify message will be shown on
the status page.
When Special alarm/warning mask is chosen an additional webpage appears which allows a
specific choice of alarms and warnings triggering the redundancy switching. It is described in the
next chapter.
Document status: Released
ES10
Page 87/100
Operating Manual
rev. 07, 25.09.13
6.5.12 Selecting a Redundancy Mask
When Special alarm/warning mask is chosen an additional webpage appears which allows a
specific choice of alarms and warnings triggering the redundancy switching.
Fig. 6.5.13: Selecting a special alarm/warning mask
Document status: Released
ES10
Page 88/100
Operating Manual
rev. 07, 25.09.13
Fig. 6.5.14: Redundancy Mask menu
Document status: Released
ES10
Page 89/100
Operating Manual
rev. 07, 25.09.13
6.5.13 Setting CATV Signal Channel Spacing
The Channel controlled AGC mode provides a unique technology to minimize CSO distortions
without requesting pilot tones. By setting the channel spacing to the correct value (ref. to 4.3.4)
the CSO control loop will operate with utmost performance. The figure below shows how to set
the channel spacing.
Fig. 6.5.15: Setting the channel spacing of ES10
NTSC channel plans in general provide a 6 MHz spacing; PAL-D and CENELEC channel plans in
general have an 8 MHz spacing. In Europe also 7 MHz spacing is used in some channel plans.
Document status: Released
ES10
Page 90/100
Operating Manual
rev. 07, 25.09.13
6.6
Limits Menus
The two limits menus of the ES10 determine, what deviations from the nominal values of some of
the operating conditions of the transmitter lead to either warning or alarm messages. In order to
avoid inadequate changes, some settings are factory settings only.
Fig. 6.6.1: Limits menu of ES10
Document status: Released
ES10
Page 91/100
Operating Manual
rev. 07, 25.09.13
After successful log-in, the warning and alarm thresholds for the RFrms input level, OMItotrms, RF
gain and optical output power can be set by the customer.
It is recommended to be very careful in setting the alarm thresholds in order to avoid meaningless
alarms, e.g. due to temperature changes. For the output power warning a range of at least +/- 1
dB is recommended.
Note:
The settings range for the alarm thresholds for RF input, RF gain and OMItotrms might change
slightly from device to device due to production tolerances.
Fig. 6.6.2: Limits-2 menu of ES10
Note: All settings of the limits-2 menu are factory settings only.
Document status: Released
ES10
Page 92/100
Operating Manual
rev. 07, 25.09.13
6.7
Setting an Event Mask for Webserver and SNMP Interface
The ES10 allows setting an event mask, which determines whether a warning or alarm or a
notification is shown or suppressed in the Webserver status screen as well as transmitted via the
SNMP interface. The menu is shown in the following figure.
Fig. 6.7.1: Setting the event mask for the Webserver and SNMP interface
Document status: Released
ES10
Page 93/100
Operating Manual
rev. 07, 25.09.13
With this feature all warnings / alarms of the ES10 can be either enabled or disabled by the user
in relation to the LEDs on the front panel, the Webserver status screen and SNMP interface. If the
alarm/warning mask is applied a notify message will be shown on the status page (ref. to 6.1).
6.8
Properties Menu
The properties page of the ES10 provides an overview of the transmitter properties such as
hardware model, hardware release, serial number and the software releases. Optionally an
aliasname and some user data may be edited. The aliasname occurs in the Devices menu of all
web browser displays as well as in the LCD.
3.13
13. Sept 13
Fig. 6.8.1: Properties menu of ES10
The miscellaneous button can be used to request either a
• reset to factory settings and cold start
• reset of the transmitter (= cold start)
Note: Be very careful in executing these reset commands since they force cold start situation,
where the transmitter might need about 30 seconds to get back to full performance properties.
Document status: Released
ES10
Page 94/100
Operating Manual
rev. 07, 25.09.13
Fig. 6.8.2: Miscellaneous menu
Document status: Released
ES10
Page 95/100
Operating Manual
rev. 07, 25.09.13
7
CONTROLLING OTHER DEVICES WITH A NEC
One of the advanced features of the NEC is, that also additional BKtel equipment can be
managed or monitored through this circuitry either
• via the push-buttons / LCD field of the ES10
• the Webserver (HTTP)
• SNMP interface.
In order to use this function, additional BKtel equipment has to be connected to the RS485
(master) interface of the NEC by using a standard RJ-45 patch cable. All BKtel subracks (BBT001
… 003) provide two RJ-45 sockets located on the interface card on the right hand side of the
subrack. Other BKtel 19”-1RU devices (EDFAs and optical switches) provide two RS485 slave
interfaces on the rear side of the equipment. The two RS 485 interfaces are typically used for
daisy chaining the RS485 interface bus.
There are some limitations to be considered for a proper functioning of the EMS-server:
1. Physical limitations: For the RJ-45 cable a CAT6 or better data cable is recommended.
The length of the cable should be chosen as short as possible. A distance of 10 m should
not be exceeded.
2. General limitations: A maximum of 48 devices can be managed by one NEC.
3. In order to get a correct display of the “rackview” function of the NEC, there are 2 more
limitations required:
• All devices to be managed by one NEC have to be positioned in one rack (and on one
side of the rack if the rack is equipped with equipment from both sides).
• A maximum of four subracks can be used. The address of all subracks have to be set
correctly by adjusting the decimal switches located on the interface panel of the subracks.
Address “1” has to be used for the upper subrack, the next following subrack will obtain
address “2” and so on.
After powering up, the NEC will poll all equipment connected to the RS485 interface
automatically. It might take up to about 2 minutes until all equipment have been identified. This is
also true if equipment is removed or added during normal operation of the NEC.
Document status: Released
ES10
Page 96/100
Operating Manual
rev. 07, 25.09.13
8
MAINTENANCE
• Clean connector ends with a lint free tissue and alcohol before every mating.
• Loose screws fixing the optical connector plate
• Remove the connector from the connector bulkhead.
• Clean the connector ends with a lint-free tissue and alcohol.
• Reinstall the connector into the bulkhead ensuring that the cables/fibers are not stressed.
• Caution: Do not extend the connector by more than 1 cm from the body of the ES10.
9 TROUBLESHOOTING
To avoid problems with the ES10 and 1550 nm transmission there are some general rules which
are important to follow.
• Use only carefully cleaned angled connectors like SC/APC, FC/APC, E2000 and similar ones
for the whole transmission system between optical transmitter and receiver. A mix of angled
and non-angled connectors will result in high insertion loss, and a degradation of the CSO and
CNR performance.
• Avoid bending losses of fiber optic cables. Since optical transmission on 1550 nm is
significantly more sensitive to bending losses it is very important to avoid narrow curvatures
•
•
•
•
Use a proper leveled, flat RF-input signal. The flatness of the input signal (e.g. ± 1 dB) will
directly result in the same variation of CNR, CSO and CTB (in this example: ± 1 dB).
Be careful to understand all nonlinearities in optical fibers with 1550 nm transmission, long
distances and high optical powers. CNR and CSO can easily degrade due to self phase
modulation and Brillouin scattering. In doubts check the performance of the link by using an
optical attenuator instead of using optical fiber to see whether the performance is limited due
to impacts from the fiber.
In case of technical questions please ask our sales representative.
Note: Since the transmitter is working internally with very high optical power and
microwave signals it is not admitted to open the transmitter for personal safety and
EMC reasons. Do not open the transmitter! In case of other than fan/power supply
failures the transmitter has to be sent to BKtel for maintenance!
Document status: Released
ES10
Page 97/100
Operating Manual
rev. 07, 25.09.13
10 RELEASES
10.1 ES10 Hardware Releases
10.1.1 Hardware Releases for ES10La/ES10XLa
Rel.
3.0
4.0
5.0
Date
June 2008
Feb 2010
June 2011
Description
First delivered release of optical transmitter
New SBS Board layout
- EMC optimized
- F-connector type changed
- Redesign of LED label
6.0
May 2013
supports new Flash Memory types
- advanced monitoring of the RF-Signal Path
- SBS Modul: Power consumption reduced, additional monitoring functions integrated
10.1.2 Hardware Releases for ES10Lb/ES10XLb
Rel.
3.0
4.0
5.0
Date
June 2008
Feb 2010
June 2011
Description
First delivered release of optical transmitter
New SBS Board layout
- EMC optimized
- F-connector type changed
- Redesign of LED label
6.0
May 2013
supports new Flash Memory types
- advanced monitoring of the RF-Signal Path
- SBS Modul: Power consumption reduced, additional monitoring functions integrated
10.2 ES10 Software Releases
10.2.1 Application Software Releases for ES10La/ES10XLa
Rel.
3.0
3.1
Date
June 2008
July 2008
3.2
3.3
3.4
Nov 2008
Nov 2008
Nov 2008
3.5
3.6
May 2009
Aug 2009
3.7
3.8
3.12
3.13
Feb 2010
June 2011
May 2013
September 2013
Document status: Released
Description
First delivered release of optical transmitter
- Improved LD temperature control
- Improved pilot CSO control
- Improved fan control
Not public
Not public
- Improved Start-up sequence
- Disabled OMI and RFin Alarm during start-up
Not public
- Protection of the cyclic laser temperature control call
- Enhanced fan regulation
New Firmware to support the new SBS Board
Enhanced OMI variation range
New firmware to support hardware changes
Higher flexibility in supporting SBS supervising IC
ES10
Page 98/100
Operating Manual
rev. 07, 25.09.13
10.2.2 Application Software Releases for ES10Lb/ES10XLb
Rel.
3.0
3.1
Date
June 2008
July 2008
3.2
3.3
3.4
Nov 2008
Nov 2008
Nov 2008
3.5
3.6
May 2009
Aug 2009
3.7
3.8
3.12
3.13
Feb 2010
June 2011
May 2013
September 2013
Description
First delivered release of optical transmitter
- Improved LD temperature control
- Improved pilot CSO control
- Improved fan control
Not public
Not public
- Improved Start-up sequence
- Disabled OMI and RFIN Alarm during start-up
Not public
- Protection of the cyclic laser temperature control call
- Enhanced fan regulation
New Firmware to support the new SBS Board
Enhanced OMI variation range
New firmware to support hardware changes
Higher flexibility in supporting SBS supervising IC
10.2.3 Bootloader Software Releases
Rel.
1.5
1.6
Date
June 2008
May 2013
Description
First delivered release of optical transmitter ES10
New bootloader to support hardware changes
10.3 Network Element Controller Releases for ES10La/ES10XLa
10.3.1 Hardware Releases for Embedded NEC
Rel.
3.0
4.0
5.0
Date
June 2008
Oct 2009
June 2011
Description
First delivered release of optical transmitter
New network element controller processor
Redesign of network element controller board (EMC optimized / RS232 interface omitted)
10.3.2 NEC Application Software Releases for Embedded NEC
Rel.
2.4
2.4.2
3.0.0
3.0.1
Date
June 2008
Sep 2008
Oct 2009
Oct 2009
Description
First delivered release of optical transmitter
With Firefox 3 no file uploads were possible, bug in webserver fixed
New application software version to support the new controller
- Bugfix of alarm bell; BOT devices with faulty and not by the NECE supported alarm
masks displayed a wrong “Alarmmask set” alarm bell,
- LED test procedure integrated which tests the LEDs during first initialization of the
software (only in production)
3.0.2
Oct 2009
- Bugfix for handling of devices, which are disconnected from the RS485 Bus and then are
reconnected.
- Alarm flag did not turn red in unconnected state
- After reconnecting an empty event was displayed in the event log list
Document status: Released
ES10
Page 99/100
Operating Manual
rev. 07, 25.09.13
The manual removal of “unconnected” devices via the “Remove” button is improved.
3.0.3
Nov 2009
- Bugfix DS55 SAT transmitter – the SAT-OMI and SAT-RF gain alarm limits could not be
modified.
- Bugfix for bootloader software update of the old Net+50 processor in the Application
Software Release 3.0.x. Using 3.0.x. an error message occurred after the bootloader
update. Nevertheless the new bootloader was correctly installed. The error message is
removed
- Bugfix SNMP “Trap Verify” Feature”; activation of the “Trap Verify” Feature” was causing a
blocking of the TCP/IP stack and the LAN interface was not responding anymore. After
some minutes the NECE was initiating a watchdog reset.
Support of new devices BFE1000, BOR4085, ECE-FA
- Bugfix BOR4160 / BOR4085 – masking of alarm and SNMP properties modified
- Bugfix DS26 transmitter -- RF input alarm could not be modified by LCD display
- Integration of USB interface
- Extension of the deviation of limit ranges of input power and output power for all the "high
power EDFA" based devices.
3.0.4
Jan 2010
3.0.5
May 2010
3.1.0
3.1.1
3.1.2
3.1.3
3.1.4
Oct 2010
Jan 2011
Feb 2011
June 2011
March 2012
3.2.0
Feb 2013
- support of new BKtel device
- support of optical receiver testpoint management (BOR4160,…)
- support for external modulated transmitter expansions (ES28 support)
3.3.1
May 2013
- support of new BKtel devices
10.3.3 NEC Bootloader Software Releases for Embedded NEC
Rel.
1.7
2.0
2.1
Date
June 2008
Oct 2009
March 2012
Description
First delivered release of optical transmitter ES10
New NEC bootloader to support the new controller
Support of new flash type
ES10
Document status: Released
Operating Manual
Page 100/100
rev. 07, 25.09.13